|
Need more info or you couldn't find what you were looking for, let us know by sending an email to: support@dancik.com.
Navigator Menu
Activating Navigator Applications
Work with Global App Defaults - NAV 1
Adding External Links in Navigator
Work with Authority Classes - NAV 2
Control User File Maintenance - NAV 5
The Navigator menu provides options to secure data and limit user access to the Navigator web-based applications.
|
Note: If changes or updates are made on the Navigator menu, the web browser must be completely closed down and then reopened for the changes to be reflected on the web portions of Navigator.
Activating Navigator Applications
New Navigator enhancements are delivered in an inactive state. Use the Navigator menu to activate them which makes them available for use.
NAV_1 - Work_with_Global_Defaults
NAV 2 - Working_With_Authority_Classes
Using option_"A"_to Grant Access to Individual Features
NAV 1 - Work with Global Defaults
This option allows you to establish global settings for the Navigator applications. Each of the applications has its own options and permissions.
For more information, refer to Work with Global Application Defaults - NAV 1.
NAV 2 Working With Authority Classes (NAV 2)
Authority classes allow you to group users together, they can be created based on system access restrictions or on a user's functional areas such as AP clerk, order clerk, or customer service. They allow you to customize the level of access a group of users has within Navigator and allow you more control than the global settings. A user must be assigned to an authority class before access to the application(s) is granted.
1. Access the Navigator Authority Classes via menu option NAV 2.
2. Use option “W” to a grant or deny access to files.
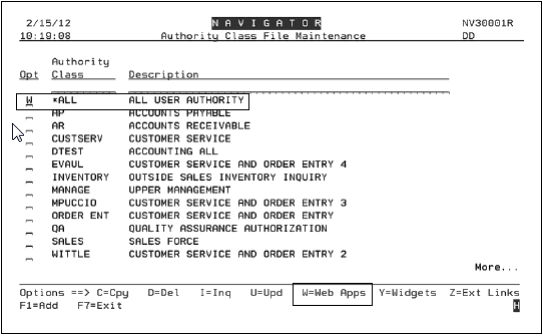
3. On the screen that appears, use option “W” to drill down into the Navigator Applications.
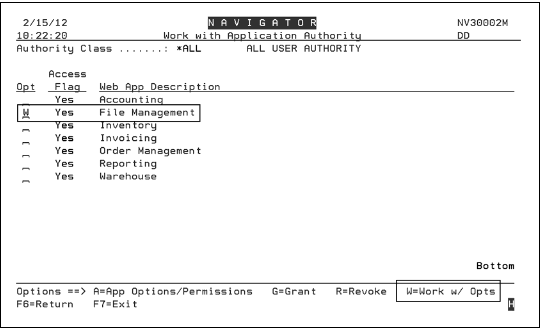
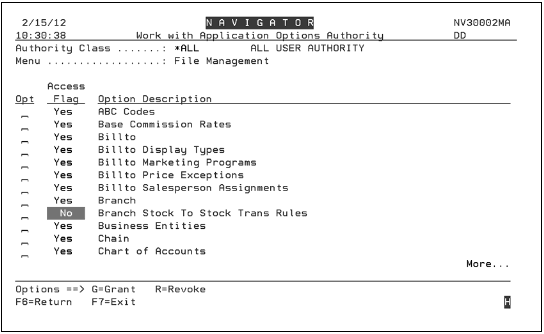
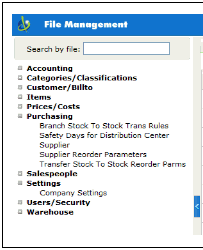
In the example below, if access was not granted by entering a “G” in the Opt field for Branch Stock to Stock Trans Rules that option would not display in the Navigator File Management Application.
5. The access granted options appear in Navigator.
Using option “A” to Grant Access to Individual Features
Using option “A” on the Authority Class menu provides control over who can update the information in the options.
1. Access the Navigator Authority Classes via menu option NAV 2.
2. Use option “W” to access the Navigator Web applications.
3. Enter an “A” for the application you want to work with.
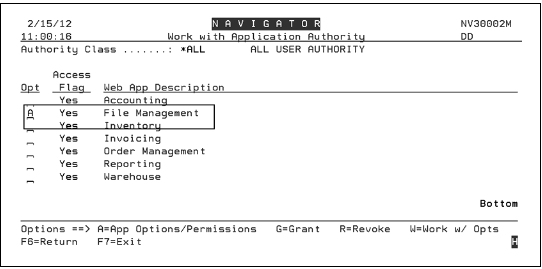
4. Use the security/access levels at the top of the screen to control security/access.
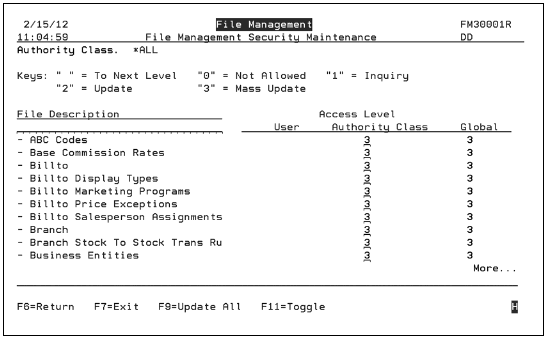
5. The following security/access levels are available:
Blank - Uses the setting from the next level, which for global settings is authority class.
0 - Not allowed. This setting might be used for files that display cost and pricing information. Files assigned a “0” will not display on the application unless the user or authority class overrides the global setting.
1 - Allows an inquire into the file.
2 - Allows for updates and changes to a file.
3 - Gives mass update capability. This feature enables you to update multiple records at one time. This is a very powerful and potentially dangerous option.
Work with Global App Defaults - NAV 1
To watch a video on setting up global defaults, click here.
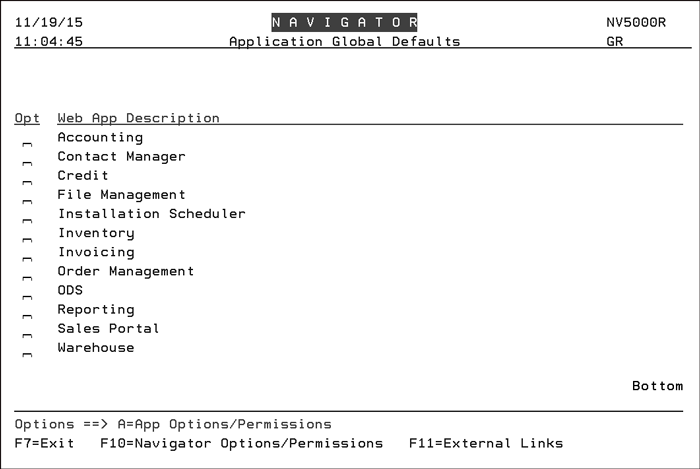
This option allows you to establish global settings for the Navigator applications.
F10_-_Navigator_Options_Permissions
Note: The F11=External Links function allows you to add websites to the Navigator application. For more information, refer to Adding External Links.
Each of the applications has its own options and permissions.
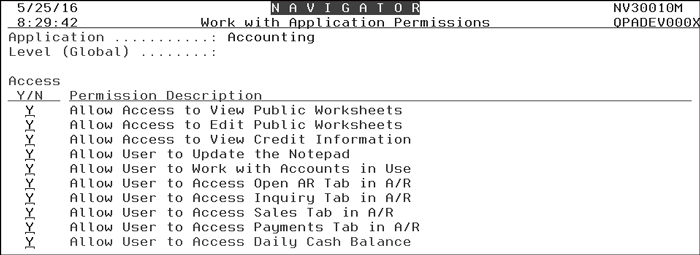
These permissions grant access to the following Navigator functionality:
Entering Invoices in Navigator AP
Making Payments in Navigator AR

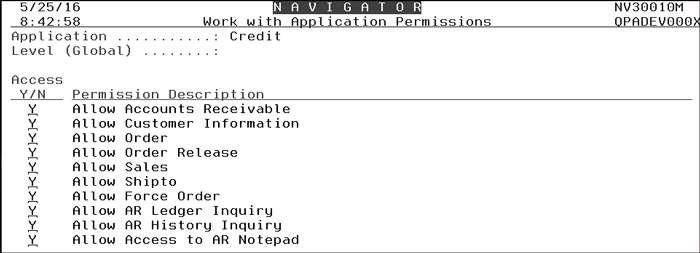
These permissions grant access to the following Navigator Credit Manager functionality: Navigator Credit Manager
This option provides a method to secure features and files on the web based File Management application.
|
Each user has three access levels:
User - Overrides the Authority Class and Global settings. User settings are established via menu option NAV 5 option “W”.
Authority Class - Overrides the Global settings. Authority Class settings are established via menu option NAV 2.
Global - Applies to all users unless overridden.
The following security/access levels are available:
Blank - Uses the setting from the next level, which for global settings is authority class.
0 - Not allowed. This setting might be used for files that display cost and pricing information. Files assigned a “0” will not display on the application unless the user or authority class overrides the global setting.
1 - Allows an inquire into the file.
2 - Allows for updates and changes to a file.
3 - Gives mass update capability. This feature enables you to update multiple records at one time. This is a very powerful and potentially dangerous option.
1. Press F11 to manage the filters available to the user.
Note: The File Management Navigator application uses filters to narrow the search results. For example, you can limit Billto Accounts displayed to your best customers by using the ABC codes.
|
2. The available settings are:
0 - Saved filters - No buttons to save, manage, or reset. User can only work with filters that are available via the dropdown.
1 - Ad Hoc - Ability to create filters on the fly. Cannot save newly created filters. User can work with filters that are available via the dropdown.
2 - Save Private - Save and manage filters for yourself. No public option available - Only private.
3 - All Filter Mgmt - All Public/Private filters available. Can only manage “your” private/public filters.
3. Press F11 to toggle the settings to Download capability.
|
This capability grants or denies the user the ability to download reports as Excel spreadsheets on a file-by-file basis. You can allow a user to run a report of ABC codes, but then deny them the ability to run a report that displays costs.
If downloading ability is granted, the Excel spreadsheet icon displays on the file.
|
The F9=Update All function allows you to make all the settings at one time.
|
This option is a good way to set up new users with a baseline of settings. The settings can then be individually tweaked as needed.
|
Enter the appropriate setting level for each of the three functions. If a field is left blank, the system does not change or update anything (i.e. it does not make all the settings blank).

These permissions grant access to the following Navigator Invoicing functionality:
Invoicing in Navigator by Order or Status Code
Assigning Salespeople to Orders

These permissions grant access to the following Navigator Order Management functionality:
Price Analysis and Discount Calculator

This permission grants access to the ability to send customized emails and schedule tasks: Customized Emails in Navigator
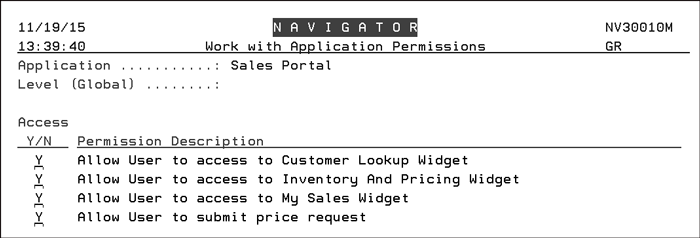
These permissions grant access to the following Sales Portal functionality:
F10 - Navigator Options/Permissions
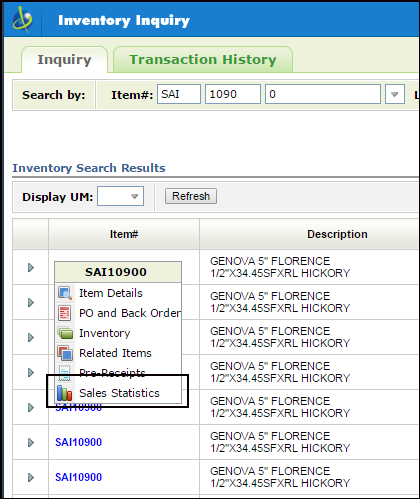
Use this option to limit access to information; such as Sales Statistics.

Sales Statistic information is available from almost all of the Navigator applications when an item is clicked.
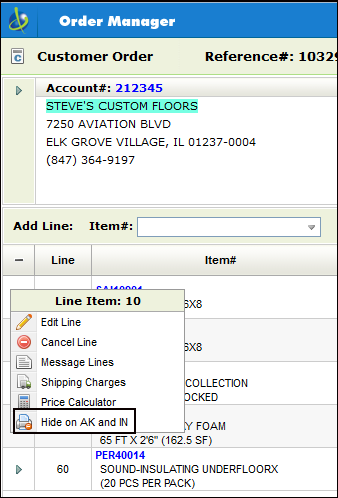
The option Allow Show / Hide on Ak and IN allows you to decide which order lines can be suppressed from printing on order acknowledgements and invoices.
Adding External Links in Navigator
Note: Click here to watch a quick video on how to add links using the NAV menu and then how to access them in Navigator.
Use the F11-External Links function within the Work with Global App Defaults (NAV 1) to add website addresses to the Links tab.
Note: The web links added here are global and will be available to all Navigator users. To limit websites to specific users, use Authority Classes (NAV 2).
|
Press F11 to access the initial screen.
|
Press F1 to create a new link.
|
The entire Link/URL must be used; including the protocol (http for most websites).
Add the following links/URLS to access RADAR and Decor 24.
RADAR - http://YOURDOMAIN.com/dancik/radar
Decor 24 - http://YOURDOMAIN.com/dancik/decor24
The links are accessible under the Navigator Links tab.
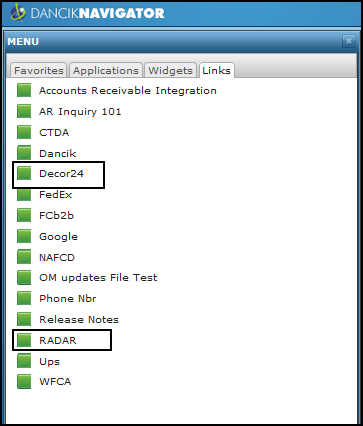
Both Decor 24 and RADAR can be Cross Authentication in Navigator. This allows a user to move between the RADAR, Navigator and Decor 24 applications without having to re-enter a user name and password, multiple times.
For more information, click here.
Work with Navigator Authority Classes - NAV 2
To watch a video on setting up Navigator Authority Classes, click here.
Authority classes allow you to group users together, they can be created based on system access restrictions or on a user's functional areas such as AP clerk, order clerk, or customer service. They allow you to customize the level of access a group of users has within Navigator.
A user must be assigned to an authority class before access to the application(s) is granted. However, a user can still be granted access to a specific application at the user level even if access to an authority class has been revoked.
1. When this option is accessed, the existing authority classes appear.
Note: Use F1 to create new Authority Classes.
|
Options
1. To grant or deny access to an authority class, enter a W (Work w/ Web Apps) in the appropriate Opt field.
|
2. To expand the web application to grant access to individual features, use option A=Application Options.
The functionality for establishing access and security by authority class is the same as when doing it at the global level. Just remember the hierarchy, user settings override, authority class settings, and authority class settings override global settings.
Note: Click here to access some training videos about widgets.
Use these tools to quickly and easily find specific information.
|
The following widgets are available:
Customer Information - Select a Search by parameter and then enter the search criteria. Chose to search through the processed order (orders are considered processed if: they were printed as a pick list, acknowledgement, purchase order, or invoice, in order entry they were processed but not printed, they held by the credit department) or unprocessed orders (examples of unprocessed orders are: quotes, temporary holds, EDI orders that require review and completion, and incomplete orders (user did not fully process)).
Item Information - Discontinued items can be included in the item search. The System Wide Setting - Options to Enable Item Keyword Search controls how discontinued items are displayed. A string search is available. a string search is more powerful than a normal search, but will also take longer. A string search looks for the search string within the item number or its details.
Order Search - Search for processed or unprocessed orders using a variety of parameters such as item number, salesman, or job name. Order details can be viewed on screen by clicking either the order number or reference number.
Here are some ways this widget can be used:
— Search by a complete item or partial number. For example, you can search by manufacturer by only entering the first three characters of the item number.
— View orders for a specific customer. This allows you to quickly and easily track your customer’s buying trends.
— To search for purchase orders, search by customer and account number X00001 (where “X” is the company number). Use the same method to search through stock-to-stock transfer orders except make the account number X00002.
Note: Orders are shown in descending order (newest to oldest). This is different than in some of our other applications such as Order Management where they are in ascending order.
Order Inquiry - This widget provides a “Inquiry” only view into orders. You can update the order as well as access information about the order such as customer information, delivery and pick-up times, and if miscellaneous charges are applied. Both the Order# and Reference# searches are for processed. Since unprocessed orders are not assigned an order number use the Reference# search for unprocessed orders.
Price Check - Item prices can vary by account number and if it is a roll item whether the pricing is by roll or cut. If you do not enter a quantity, a quantity of 1 is assumed. If you do not enter a UM, the native unit of measure, as created in the Item File, is used as the default.
Use this option to add links to external webpages. Links can also be added at the global level. For detailed information, refer to Adding External Links.
Control User File Maintenance - NAV 5
To watch a video on using the Control User File to set-up Navigator users click here.
This user administration program combines all of the user-related settings into one place. It combines all of the user defaults, security fields, and parameters related to any application, including web applications like IWMS, Selection Sheet Manager, and File Management.
User settings are the top level settings. They override the authority class and global settings.
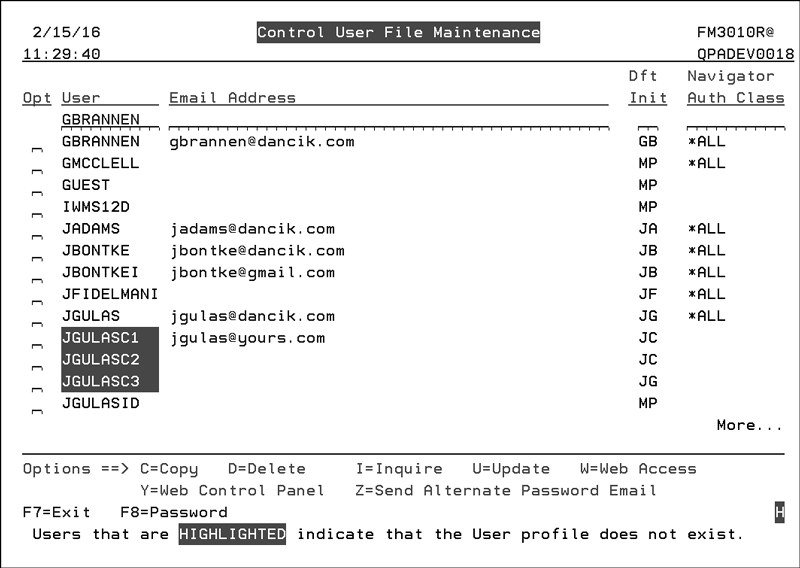
This option, NAV 5, contains the following options:
C - Copy one user's settings to another.
D - Delete a user's settings.
I - Inquire - View a user's settings.
U - Update a user's settings. There are three screens of settings that allow or deny a user access to perform operations such as:
— see costs
— adjust inventory
— enter orders
— access the Order Change and Cancel programs
— access the Update Order Status & Shipping Data program
— Billto/Shipto file updates
Note: The settings listed above are a very small portion of the settings available. For a complete listing, to include detailed descriptions of each setting, refer to Master User ID Control Panel - SET 32.
W - Web Access- Enable or disable a user's access to the Dancik web applications, and enter settings, through the respective function key, applicable to each application.
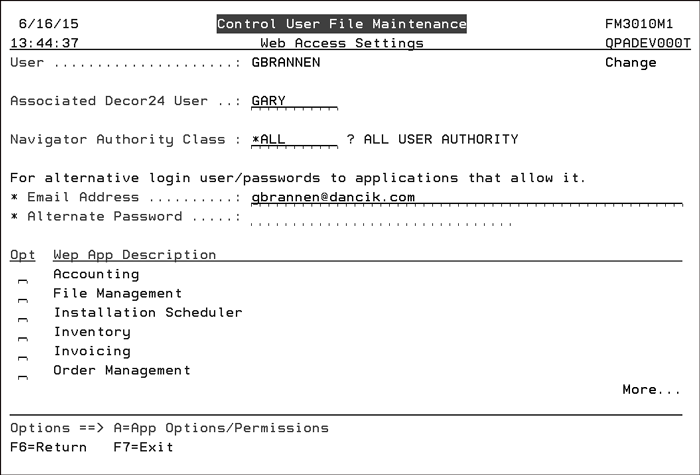
The Associated Decor 24 User setting provides a Cross Authentication between Navigator and Decor 24. This functionality introduces the ability to move between Navigator and Decor 24 without having to re-enter a user name and password, multiple times. Enter a valid and active Decor 24 user name. For more information, click here.
Use the Navigator Authority Class field to assign the user to an established authority class. Authority Classes are created via menu option NAV 2 - Work w/ Authority Classes.
The settings under For alternative login user/passwords to applications that allow it allow your salespeople to log in using their email address as their user name. It provides the same security as the Dancik user name log in. At the current time, June 2015, this option only applies to the Dancik Sales Portal.
Use the A=App Options/Parameters option to specify the access level for the features within a Navigator application. These settings are established in the same manner as the global settings so for more detailed information refer to Work with Global App Defaults.
Y - Web Control Panel - These settings are the same settings that establish operator defaults and restrictions based on the users work station ID. The difference is that these settings relate to a user ID instead of a workstation, and only affect the users use of Dancik's web based applications. Essentially these settings enable user-based web applications to use restrictions and settings normally associated with a work station.
Z - Send Alternate Password Email - allows an administrator to send out a mass email to all the salespeople that have an email entered in the Email Address. This allows the salespeople to create their own password and manage their sign in name/email address.
Note: Option "Z" and the alternative Email settings were developed and implemented for use with the Dancik Sales Portal.
Customized Emails in Navigator
Navigator Accounts Payable
Entering AR Deposits in Navigator
Navigator Financial Statements - Building Workbooks
Receiving Inventory in Navigator