|
Need more info or you couldn't find what you were looking for, let us know by sending an email to: support@dancik.com.
Receiving Inventory in Navigator
Available Options for Receiving Inventory in Navigator
Files Associated with Receipts
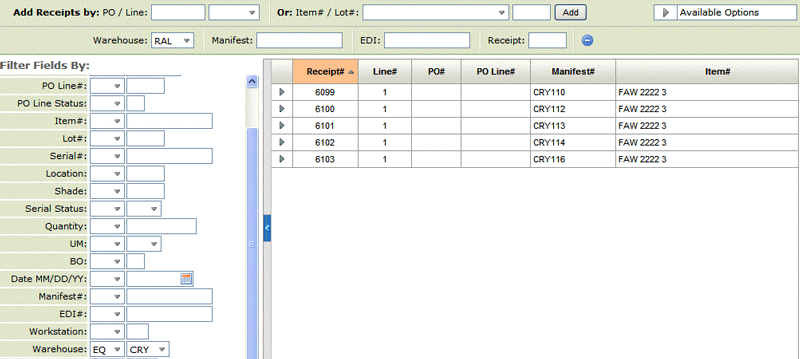
This program lets you enter new receipts and check on your open receipts (pre-receipts).
Use the filters on the left-hand side to limit the table as needed. When you are finished with the filters, click the arrow between the filters and the table to hide them.
The last filter Checked In is for Integrated Warehouse Management System (IWMS) users. Within IWMS, a code of CI is automatically assigned when a receipt is checked in and then putaway with a RF gun. You can use this filter to limit the display to only show receipts that have been check in.
Note: The default Operation Code is “EQ”. This means that if you enter something to filter the receipts listing by (e.g., a receipt number), but do not specify an operator code “EQ” is automatically inserted.
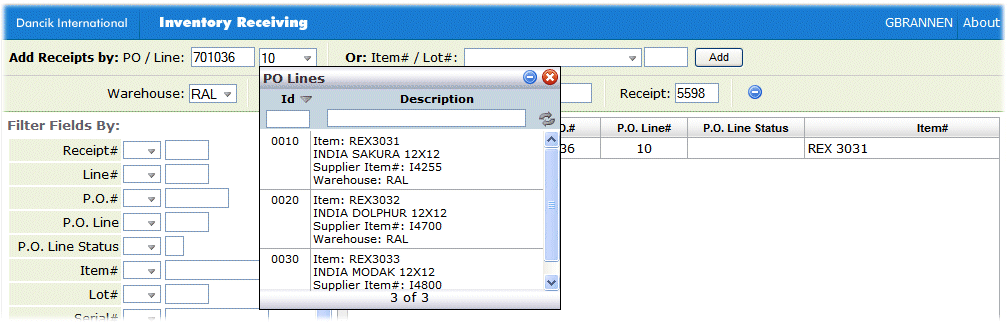
1. Enter either a purchase order and line number or item and lot number. Depending on your Warehouse Settings (SET 14) you might be required to enter a manifest.
2. If you enter a Purchase Order number, you can use the drop down arrow to select the line number.
|
3. Enter the warehouse, manifest number, and receipt as needed.
4. Click Add. The screen expands to allow you to enter more information.
|
Note: The display of the fields Freight, Exchange, Duty, and Rebate is controlled by the option Use Extra Receiving Features on the Warehouse Settings File (SET 14).
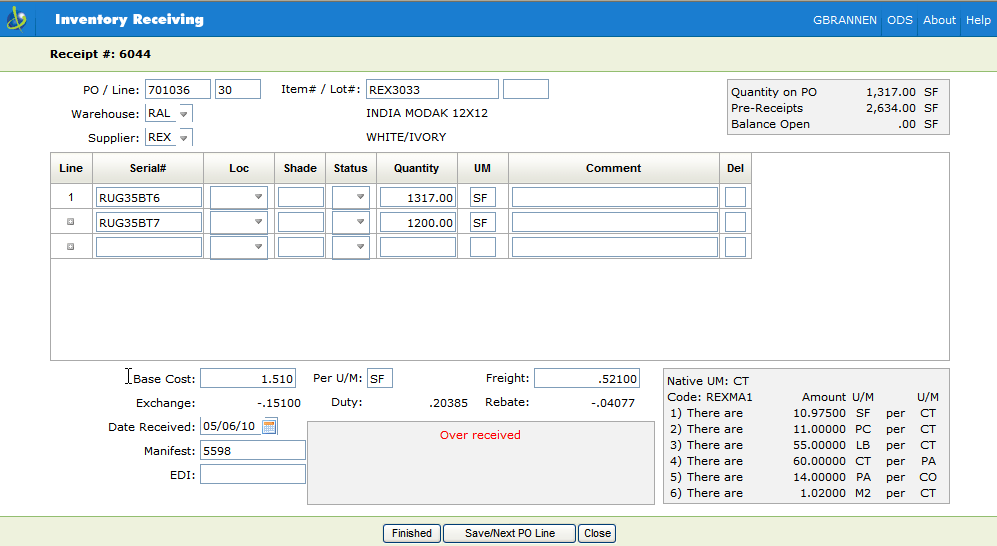
5. Use this screen to enter the serial number, quantity received, and other needed information.
Note: Settings in the Manufacturer File (FIL 4) and/or Product Line (FIL 12) file allow you to automatically assign a prefix and/or suffix to the serial numbers when receiving inventory. Assigning unique serial numbers to inventory can aid in quickly identifying it. Before unique serial numbers can be created by adding a prefix and/or a suffix, the prefix and suffix must be created and activated in the Manufacturer File or the Product Line File.
6. To delete a line, simply enter a “D” in the Del box and click Save or Save and Next.
7. The
![]() icon
allows you to duplicate the information from the previous line and then
make changes as needed.
icon
allows you to duplicate the information from the previous line and then
make changes as needed.
8. Notice the warning message “Over Received”. This means that the quantity received exceeds the quantity open on the purchase order. The warning message does not prevent the receiving entry from being made.
9. The Base cost is the product or material portion of total landed cost (excluding freight), except when goods are purchased on a prepaid freight basis, in which the base cost includes freight. Receipts, when based on purchase orders, use the base cost from the purchase order, and the standard freight cost.
When a purchase order is entered, the most applicable standard base cost is selected from the Cost File (if cost classes are used) or the Item File (if cost classes are not used).
When a receipt is entered, and a purchase order number is specified, the base cost as entered on the purchase order is used, regardless of the current base cost in the Cost or Item file. The receipts entry program also allows the *SC code to be keyed in the EDI# Field, instructing the program to use the standard cost from the Cost or Item Files instead of the cost of the purchase order.
10. Freight costs are the freight and handling portion of total landed cost. Freight cost should be zero only when goods are purchased on a freight prepaid basis.
Methods of applying freight are: 1) manually on each line, 2) standard freight costs from the Cost and/or Item file, 3) freight tables - based upon weight, units, etc.
Freight costs are not determined at the time a purchase order is entered, and are not included on purchase orders.
Freight costs are automatically calculated on receipt.
Freight Costs on receipts are taken from the Standard Freight Cost Field of the Cost File (if cost classes are used), or the Item File (if cost classes are not used), or from the Freight Cost Override Tables. Freight Cost Override Tables are only used if they have been activated via entries in the Warehouse Settings Table, and via entries in the Cost File.
11. The Exchange field displays the conversion difference between two currencies. This difference can either be added to or subtracted from your cost. Currency conversions are set up in the Exchange Rate Table (SET 11). This file enables you to define codes representing each currency, and the respective exchange rates. These exchange rates can be used automatically within the Receiving System for foreign suppliers that are coded for this feature.
12. Duty rates can be automatically applied within the Receiving System. This option is used only for foreign suppliers that are coded for this feature. The Duty table can assign a duty percentage to a manufacturer, supplier and product lines. The Duty Table is only accessed by the receiving program if activated on your system through the Warehouse Settings Table (SET 14).
13. The Rebate field works in conjunction with the Supplier Rebates Table (SET 10) to determine if the inventory should be marked up or down. The Supplier Rebates Table and the Rebate field share the following relationships:
Negative percentage in the Supplier Rebate Table = positive amount in the Rebate field
Positive percentage in the Supplier Rebate Table = negative amount in the Rebate field
A negative rebate percentage adds to the inventory receipt value and a positive percentage reduces the inventory receipt value.
14. The EDI field has two uses.
For reporting - You can enter the shipment number from an advanced shipment notice, or other document, and then you can use that EDI number when printing a Receipts Register (RPO 2) or other report.
Enter *SC to use standard costs - Normally, the Inventory Receipts Program uses the cost that is contained in the purchase order as the default cost of the receipt. However, in certain cases (see examples below), it may be preferable to use standard costs which are established in the Cost and Item File, instead of purchase order costs.
— When importing, you can establish accurate costs using the Build-A-Container Program. The Build-A-Container system can automatically update your standard costs.
— When you are receiving commodity products or products from your own manufacturing plant, you may prefer using standard costs. In this situation, standard costs may be more volatile and timely than those costs captured at the time the purchase order was written.
Note: Dancik can set it up where standard costs are always used in place of purchase order costs. This option should only be considered for importers and manufacturers.
15. The packaging information comes from the Packaging File.
16. Click:
Finish to save the receipt and return to the first screen.
Save/Next PO Line to save the receipt and go to the next PO line.
Close to return to the first window without saving the receipt.
This option is designed to work with items that use PA (pallet) as their UM or items that have a pallet UM in their packaging class within the Packaging File.
Consider receipt 4198 which only has 1 line.

By clicking the arrow to the left of the receipt number and selecting Update, we can see that the receipt line is for 126 CTs (cartons). Notice that the item also has a conversion from cartons to pallets in the package information.
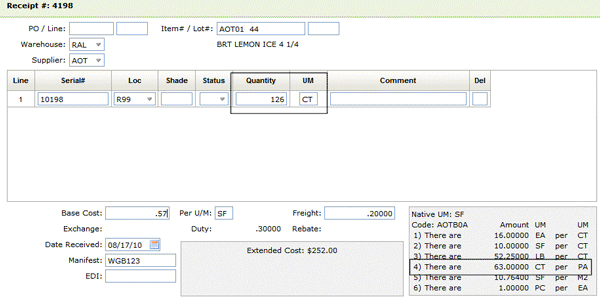
To split this receipt into two lines, click the option arrow to the left of the receipt and select Split. Enter the receipt number and the line you want to split.
Going back to the Inquiry screen and searching for receipt number 4190 now shows that the receipt has two lines.

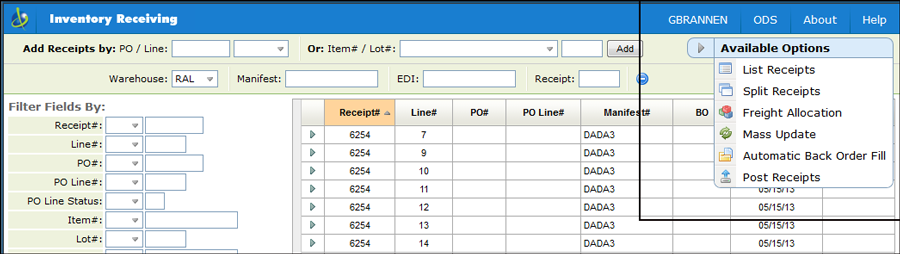
Available Options for Receiving Inventory in Navigator
The Available options are located in the upper right hand corner.
The Receipts List does the following:
Shows the number of serial numbers included within each subtotal.
Shows the supplier number.
Observes warehouse and company number security restrictions, if any, as entered into the Control Panel. Workstations can be restricted to specified warehouses and company numbers in the Control Panel.
Sort options by other reference number and serial number.
Prints Put-A-Way Sheets, for warehouse to assign warehouse bin/locations.
Requests serial number tags from Receipts List option, in card stock or bar coded format.
Decide if you want a summary or detail listing. In the summary version, only sub and grand totals are listed. No details print.
Enter Y in the Do You Want To Page Break After Main Sort option to start a new page for each main sort. For example, if your main sort is by manifest, the listing starts a new page for each manifest.
The following document options are available:
Non Barcoded Paper Documents
Receipts List - A list of all receipts entered. When the receipts are listed, freight charges and any rebate charges are added together and listed as one.
Back Order List - A list of all open back orders that are for items being received.
- It shows the Order Handling Code for each back order.
- It shows the initials of the order entry operator that originally entered the back order.
- Shows the customer purchase order and/or job name if there are no comments entered in the Other Ref#/Comment field on the Back Order Fill Screen.
- It notates back orders that are on “fill/Kill” orders that have been shopped and run through the close-a-truck procedures. These back orders cannot be filled since “fill/kill” means you ship once and cancel what remains. This warning will occur only when you have: Partially shipped a fill/kill order and When prior to updating invoices via the night jobs, one or more of the unshipped items is received through the Pre-Receipts and Back Order Fill System.This method prevents needlessly filling a back order that was effectively cancelled when other parts of the order were shipped even though they are not yet invoiced.
Serial# Tags (On paper/card stock) - Inventory tags for each serial number. Primarily for rolled goods.
Put-Away List - A list of all receipts with space for warehouse personnel to fill in the bin/location.
Barcoded Paper Documents
Serial# Tags (Barcoded on Paper) - This option is a full 8 1/2 by 11 inch tag meant to print on laser paper, and can be inserted into a plastic or laminated slip case. This format takes advantage of the high resolution of the laser printer, and prints bold letters, numbers and a large barcode. In order to use this new label, your printer must be an IPDS printer, and you need printer Services Facility/400 installed.
Note: There are several serial tag formats available. The formats are controlled via option 3 - Label Styles File on the EDI and Bar Code Functions Menu (EB) menu.
Bar Coded Put-Away List - Showing back orders.
Barcoded Labels
Serial # Tags (On bar coded labels) - Bar coded inventory tags for each serial number. Primarily for rolled goods.
Putaway Labels - Includes the serial number, PO number, Item number, receipt and line number, and quantity.
UPC Labels
Slab Labels - This label is generated using a Zebra label printer that can print small bar codes.
The Set Default option allows you to set defaults that apply, unless overridden. One option on the Default Parameter screen, Print Back Ord on PutAway List, gives you the option of printing back orders on the put-away list. If this option is activated, then any back orders for the received items are printed under the items. This facilitates “cross docking” opportunities so that material can be staged to fill the back order instead of being put away.
Use this option to split all the receipts by warehouse, receipt range, or manifest. For example, if four pallets came in on a receipt, this functionality can be used to split one receipt into four to help with moving and storage.
As an example of this functionality, consider the pre-receipts for warehouse CRY.
When Split Receipts is selected and a receipt range is entered the system looks for receipts that meet the criteria:
UM is PA (pallet)
Items on the receipt have a conversion from the received UM to pallet (UM conversions are shown in the lower right-hand corner of the update screen).
The amount received will make more than one pallet.
When the receipts are split, the pre-receipts increase.
This option enables you to apply a fixed total freight amount over an entire pre-receipt, with the program allocating the freight based upon the weight, units, or value of each line in the receipt. This method is especially pertinent for special orders, which are often shipped with a single bill of lading (or packing list) with a single freight charge for that shipment.
Note:Other methods of applying freight are: 1) manually on each line, 2) standard freight costs from the Cost and/or Item file, 3) freight tables - based upon weight, units, etc.
Freight allocations can not be exact, because of rounding and decimal places, and the fact that the freight is allocated as a “per unit” cost. For example, if the freight bill is $50.00, spread across many lines, each with varying weights, quantities, values, etc, then when you re-extend the allocated freight per unit, the result will probably be a few cents different than the original $50.00. However, the result will be as accurate as mathematically possible given the units and dollars received.
In the example below, $100 additional freight by units was added to the manifest.
The Freight Allocation and Mass Updates screen displays all of the pre-receipt lines on the selected manifest or pre-receipt number.
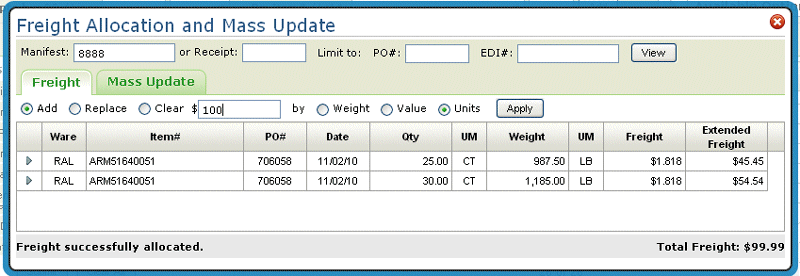
Manifest# or Receipt - If all you enter is a manifest number (i.e. no item number or PO number), the system presents a listing of receipts ny manifest number. You can also change the current manifest or pre-receipt number by entering new values. The screen redisplays with the information for the new manifest or pre-receipt number.
Limit To PO# or EDI#- Use these fields to limit any updates to lines within a particular purchase order or EDI number.
Add, Replace, Clear - Select to add the freight costs to any existing freight charges. The additional freight cost is spread across the lines on the manifest or receipt.
Select to replace the existing freight costs with the additional freight costs.
Use the clear option to eliminate any freight costs.
Weight, Value, Units - Decide if you want to allocate freight costs based on: weight of each item, value of each item, or units received.
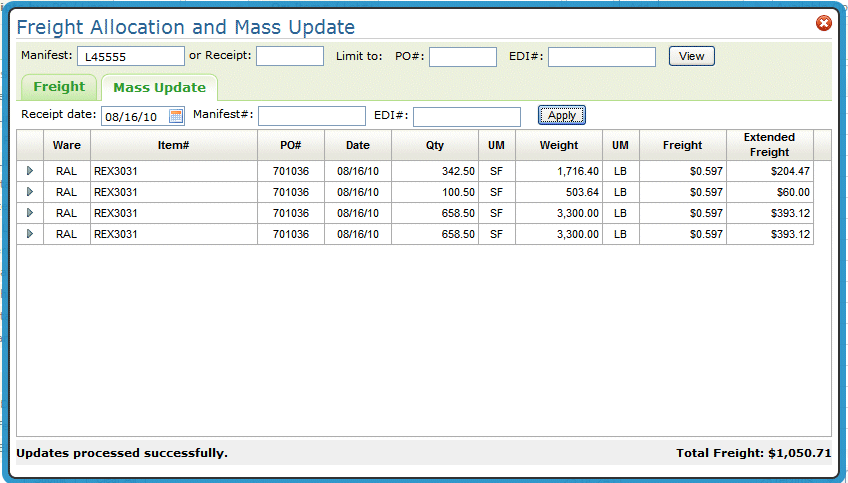
This option allows you to change the Receipt Date, Manifest#, or EDI# on all lines of a receipt or manifest (as a “mass update”). Sometimes, as when a container shipment has been entered into the Pre-Receipts file several days before it arrives and gets posted to inventory, users want to change the date received, manifest#, or EDI# fields on all lines at once.
This option matches receipts to open back orders to best utilize the incoming receipts. After running this option, you can check the Open Order Reports for Customers (ROO 14) for the status of your back orders and make any necessary changes.
It does not actually fill the back orders until the receipts are posted via the Post Receipts option.
Enter the following information:
Field |
Description/Instructions |
Receipt Warehouse |
This mandatory entry is the warehouse whose receipts will be accessed. This process only runs for a single receiving warehouse at a time. |
Receipt # |
This field is optional. If left blank, all unposted receipts are processed. |
Line # |
This field is optional and used only with the Receipt # parameter. If left blank, all lines on the receipts are processed. This option is mainly used for testing. |
Manifest # |
This entry is optional, except when the Warehouse Settings File is set for mandatory manifest numbers. Up to 4 10-character manifest numbers can be specified. If all are left blank, then all unposted manifest numbers are processed. |
EDI # |
This entry is optional. Up to 4 10-character EDI numbers can be specified. If all are left blank, then all unposted EDI numbers are processed. |
Header Warehouses |
This entry is optional. Up to 10 3-character header warehouses can be specified. If all are left blank, then all header warehouses are processed. These are compared to the header warehouses on the open back orders. Only back orders with these header warehouses may be filled. |
Detail Warehouses |
This entry is optional. Up to 10 3-character detail-line warehouses may be specified. If all are left blank, then all detail-line warehouses are processed. Only back orders with these detail-line warehouses may be filled. |
Customer Types |
Enter a groups, such as, architects, contractors, or retail stores. |
Customer ABC Codes |
These codes allow you to fill the back orders of your best customers first. If your top ten percent customer are assigned an “A”, enter that code to ensure their orders move to the top. ABC codes are created using the ABC Code File (FIL 34) and are assigned to customers via the Billto File (FIL 1). |
Ship Days To Process |
This entry is optional. This 3-digit field relates to the ship date and defines the number of days, beyond today, that should be included. For example, if this parameter is set to 10, then only back orders with ship dates equal or less than 10 days from now should be included in the run. You can enter a number between 1-999, or leave blank to include all ship dates. You may wish to use this field in order to run Automatic Back Order Fill in separate iterations. For example, you can run the program first for back orders scheduled to be shipped by tomorrow, and then again for all future shipments, until a reasonable number of days out. |
Prioritize Back Orders by Order Date or by Ship Date |
When processing the back orders, the program can sequence the back orders by the ship date or by the date the order was entered. When prioritized by ship date, customers who require the material sooner are given an advantage in terms of having their orders filled. When prioritized by Order date, customers who placed their orders earlier are given an advantage. |
Associated Files
It is essential that you have carefully established all of the system files and settings that affect how the automatic back order fill process operates:
System Wide Setting for Back Order Fill
Back Order Fill Algorithm Matrix
ISO Tables for all Products
Preferred Serial Number logic if applicable
Automatic Back Order Fill Warehouse Settings (SET 35) - In order for a warehouse to benefit from the automatic back order fill process, it must be configured in this file. This file gives you the ability to establish parameters by warehouse for the automatic back order fill process. These parameters enable the automatic back order fill process to be run in up to four special iterations that are based on customer priority.
This option lets you post receipts and automatically fill any back orders waiting for the inventory contained in the receipts. If you fill back orders with this option no changes can be made except for Allocation Processing.
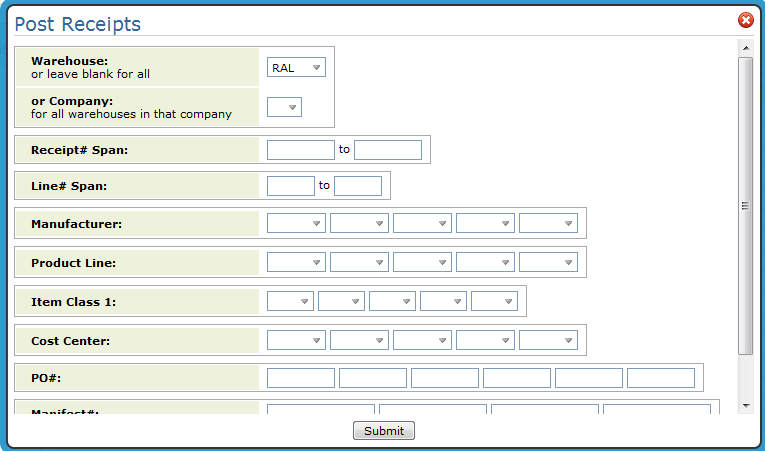
1. Enter a specific warehouse or a whole company to run the posting for.
2. You must enter one the following: manifest number, receipt number, EDI number, manufacturer, or purchase order number.
3. If you choose to post by receipt, you can post a span of line numbers instead of the whole receipt.
Note: When receipts are posted, the freight charge and rebate are totaled and shown as one charge under FRT COST.
4. Click Submit to post the receipts to inventory and automatically fill any back orders.
Files Associated with Receipts
System Wide Settings (SET 4)
Serial Number Assignment - allows you to automatically assign a serial number to inventory during receiving.
Unavailable Serial Number Ranges - Specifies the ranges of serial numbers the system should bypass if the automatic serial number assignment is active.
File Maintenance Files
Stock Keeping Unit File (FIL 13) - warehouse locations entered here appear on the receiving screen.
Manufacturer File (FIL 4) and Product Line (FIL 12) - Contain settings for generating unique serial number prefixes and suffixes and for creating a default serial number to use for items received from this manufacturer or in this Product Line.
Packaging File - Conversion information is pulled from the Packaging File (FIL 11). Use the Packaging Class field in the Item File (FIL 2) to find the packaging class for an item. You can access packing information by pressing F10 while in the Item File.
Cost File (FIL 10) - The cost class (as identified in the Item File for the item) provides the base and freight cost. If a Freight Cost Override Table is specified in the Cost File (via the Frt Tab# field in the lower right-hand corner), that freight table overrides the freight cost entered in the Cost File. Freight Cost Override Tables are accessed via menu option SET 9.
Warehouse Settings File (SET 14) - This program enables you to set warehouse level options. The settings that affect receiving are:
Use Extra Receiving Features - This setting must be active to use of any of the next four table options on this screen. If this option is activated, information from any of the following four tables, if activated, shows up on the Enter Receipts Screen (INB 1).
Use Additional Freight Table
Use Currency Exchange Rate Table
Use Duty Table
Use Expected Supplier Rebate Table
Manifest Number Required during Receiving
Allow receiving system to use Lot# for other than special orders? - This option allows you to prevent the entry (accidental or otherwise) of lot numbers other than those used for special orders. If a user tries to receive or adjust a lot number other than a special order lot number, the system issues the appropriate error message and prevents the entry. It is recommended you enter N here, unless you use the lot # field for orders other than special orders. Do not confuse lot number with serial number when making this decision.
Allow override of freight from freight tables in receiving program - This field, if activated, allows users who are authorized to access costs to override freight table costs. This option applies to freight costs derived from Freight Cost Override Tables. When using standard freight costs, any user authorized to adjust cost can override costs. If this option is set to N, the freight table must be updated in order to change freight costs in the Receiving Program.
Supplier Rebates Table (SET 10)
The Supplier Rebate Table allows you to mark up and mark down your inventory value for margin purposes. This markup is kept separate from the base cost. It is recorded separately and posts to your choice of general ledger accounts.
Marking up inventory value provides a means to equalize big purchasing discounts against what is paid out in salesman commissions. For example, you may purchase a special container of wood at a steep discount, but instead of showing large increases in margin and commissions, you may prefer to move the affect of the discount to another part of your financial statement such as “special purchasing discounts”.
A negative rebate percentage adds to the inventory receipt value and a positive percentage reduces the inventory receipt value. This increase in cost is added during receiving, and reported in the separate rebate column of the receiving reports.
Inventory To G/L Interface File (ACT 103)
This file maps the Suppler Rebate for posting to the correct Chart of Accounts.
Print Inventory Registers (RIV 6)
Rebate costs are separated when running the 198 column detail report for receiving and posting to GL.