Need more info or you couldn't find what you were looking for, let us know by sending an email to: support@dancik.com.
Sales Portal
The Dancik Sales Portal is intended for salespeople and the mobile devices that they use while they are in the field. The application gives salespeople direct access to their accounts. It delivers real-time data on items, pricing and availability of stock, open orders, invoice inquiry marketing and display programs, and general sales statistics.
Mobile/Tablet Browser |
|
Supported |
Safari (iOS only) |
|
Yes |
Chrome App |
|
Yes |
Recommended Devices |
OS Version |
Supported |
iPad (2nd, 3rd, 4th Generation and Air) |
iOS 7.0 or higher |
Yes |
iPhone (4, 4S, 5, 5S, 5C, 6, 6 Plus) |
iOS 7.0 or higher |
Yes |
Samsung - Galaxy 4 and higher |
Google Android 4.0 or higher |
Yes |
Google Nexus 5 and higher |
Google Android 4.0 or higher |
Yes |
Granting Permission to Sales Portal Features
There are a couple of ways to log into the portal:
Using your existing Dancik user name and password - This option does not require any additional set-up.
Use an alternate email based user name - This allows your salespeople to log in using their email address as their user name. It provides the same security as the Dancik user name log in. This option requires a little set-up.
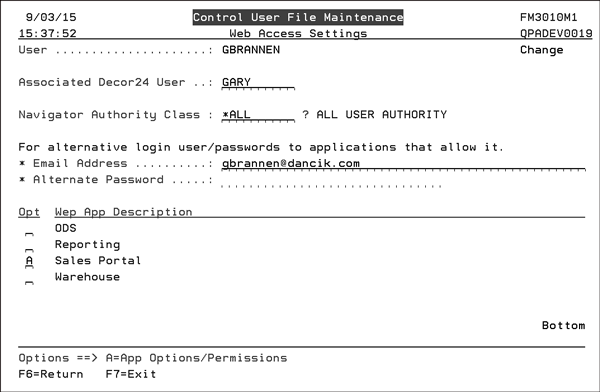
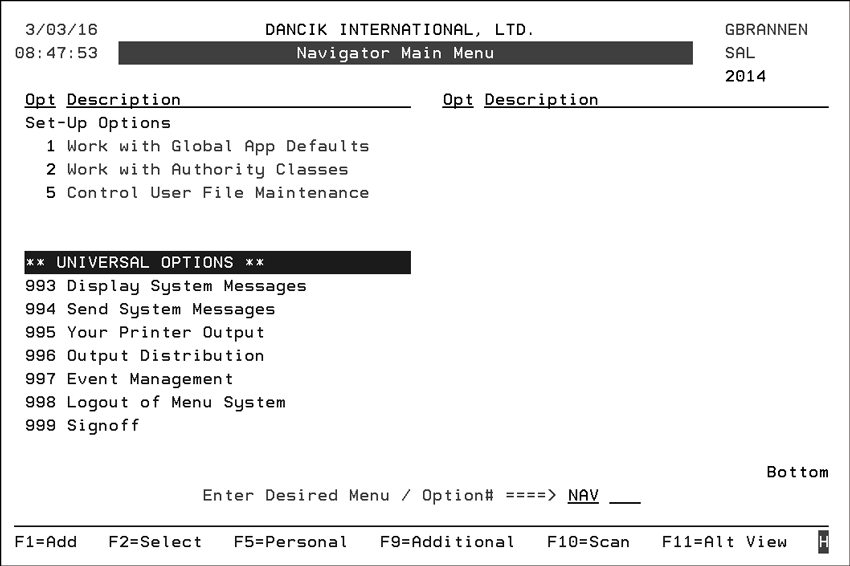
Control User File Maintenance (Menu option NAV 5)
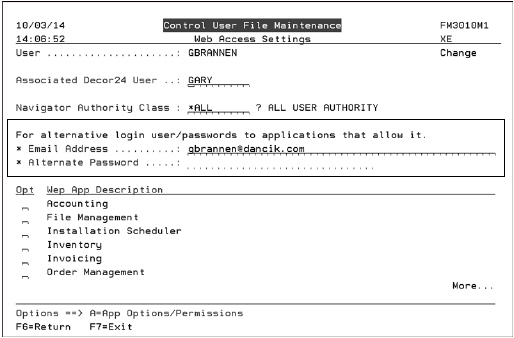
Access this file and enter a “W” in the Opt field of the salesperson you want to provide an alternate address for.
Notice the two settings for adding an alternate Email Address as a user name and the related password.
|
Note: If an email address and password are entered, the Sales Portal automatically uses those entries when the salesperson tries to log in.
Notes:
The Email address is defaulted in from the User Default options application (function F21 on the Work w/ Spooled Files program menu option ODS 21). If an email address has been entered into that file it is displayed as the Email Address to be used as the alternate user name.
If an email is not provided then the Sales Portal continues to use the Dancik user name and password.
Option to Send out an Email for Setting up an Alternate Password
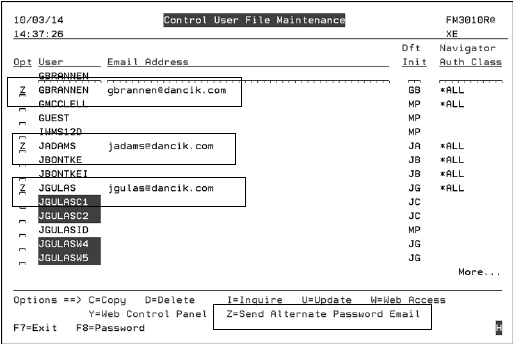
Option “Z”on the Control User File Maintenance (NAV 5) that allows an administrator to send out a mass email to all the salespeople that have an email entered in the Email Address. This allows the salespeople to create their own password and manage their sign in name/email address.
Enter a “Z” into the Opt field of the salespeople that have an email address assigned.
|
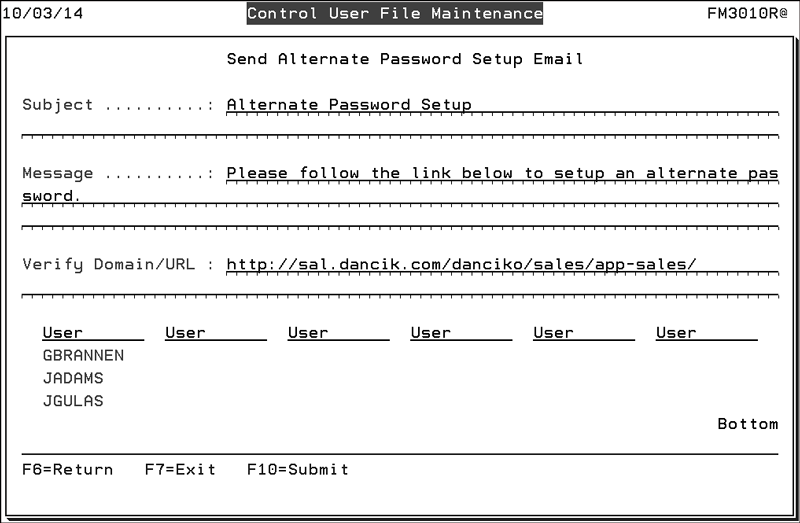
Press Enter to access the following screen.
|
Make changes to the Subject and Message as needed.
The Verify Domain/URL is imported in from the Work with Web Application URLs (menu option WEB 100).
Granting Permission to Sales Portal Features
Access can be granted at the:
Global level (menu option NAV 1) - Follow this path: NAV 1, "A" in Opt field for Sales Portal, "Y" to grant access to options.
Authority Class level (NAV 2) - Follow this path: NAV 2, select an Authority Class,"W" to work with Web apps, "A" in Opt field for Sales Portal, "Y" to grant access to options.
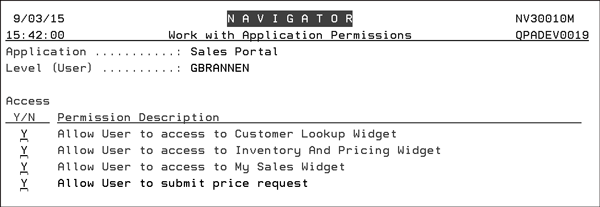
User Level (NAV 5) - Follow these steps:
- Menu option NAV 5
- Enter option "W" for a user
- Enter an "A" for the Sales Portal
- Grant or deny access to the different parts/functionality of the Sales Portal.
The Customer account portion of the Sales Portal lets you quickly and easily check and perform the following:
|
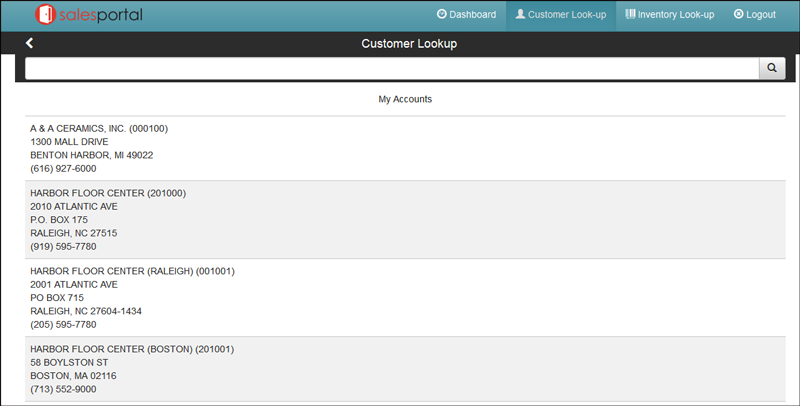
When first accessing the Customer Look-Up window, you are presented with the accounts that are assigned to you.
|
Note: Accounts are assigned to Salespeople via the Billto File.
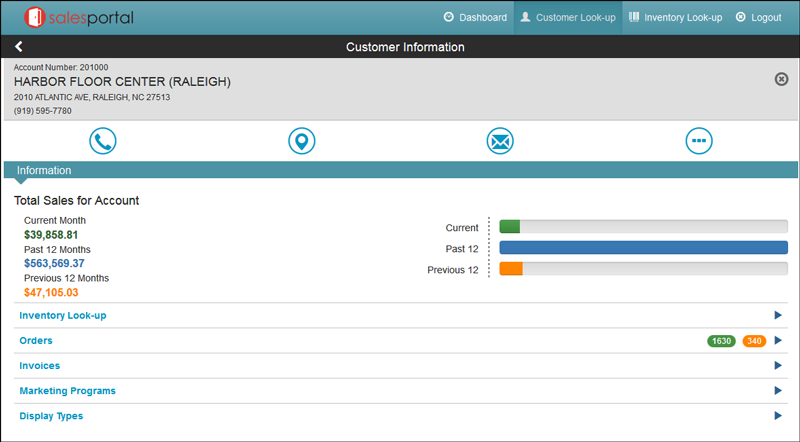
Select one of the accounts in the My Accounts listing or search for an account and select it. The Customer Information window appears.
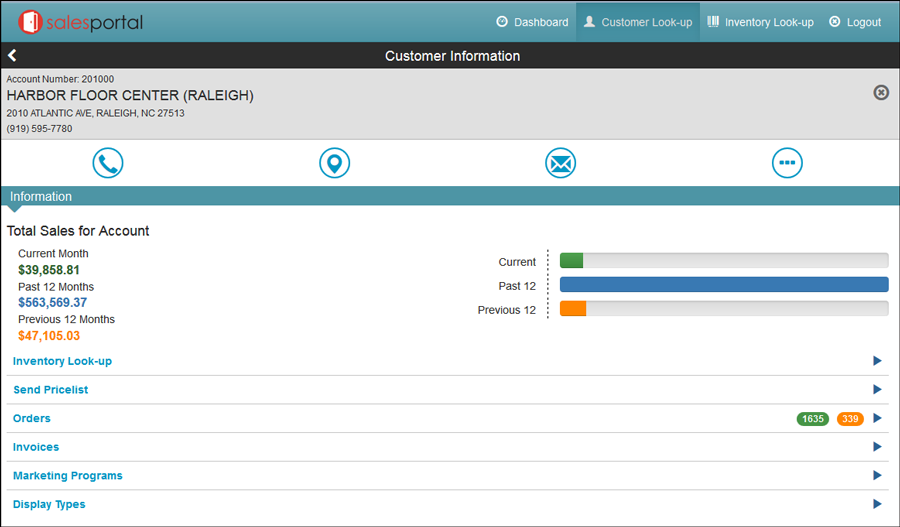
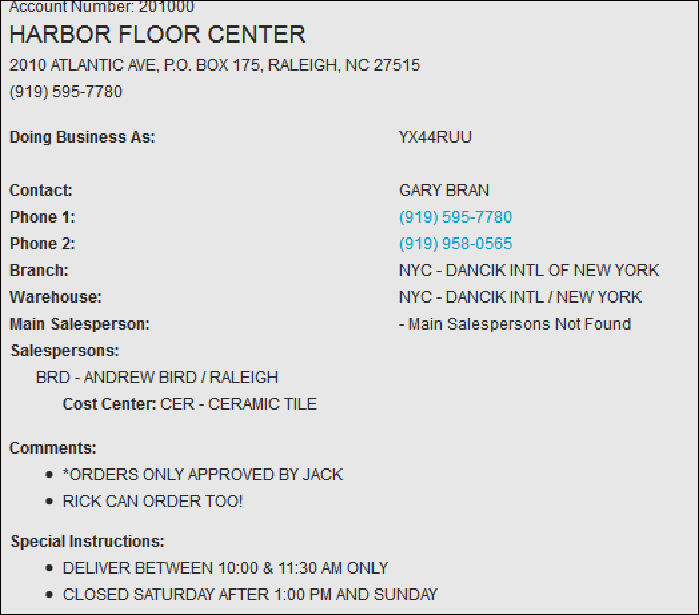
Use the icons at the top of the window to perform the following functions.
Icon |
Function |
|
Presents a list of account contact phone numbers pulled from the Phone Number screen of the Billto File. |
|
Opens up Google Maps at the account’s location. |
|
Opens up your default email application. If there are multiple email contacts assigned to the account they are all listed. If there is only one it is automatically used in the email. |
|
Displays additional details about the account. |
At a glance you can see a sales history for the account:
CURR - Orders that are currently open and have not been invoiced.
PAST 12 - These sales are based off of today's date for the past complete 12 months.
PRV 12 - Based off of today's date for the previous complete 12 months - using invoice date as its field of calculation. These sales are from 24 months ago.
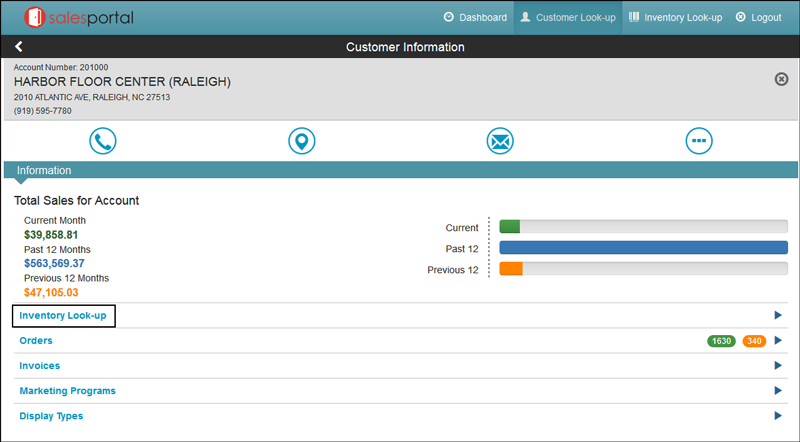
Accessing the Inventory Search from within the Customer Information window directs the Sales Portal to display inventory viewed by the active account.
Note: For more information on Inventory Look-up, refer to See “Account Specific Inquiry”.
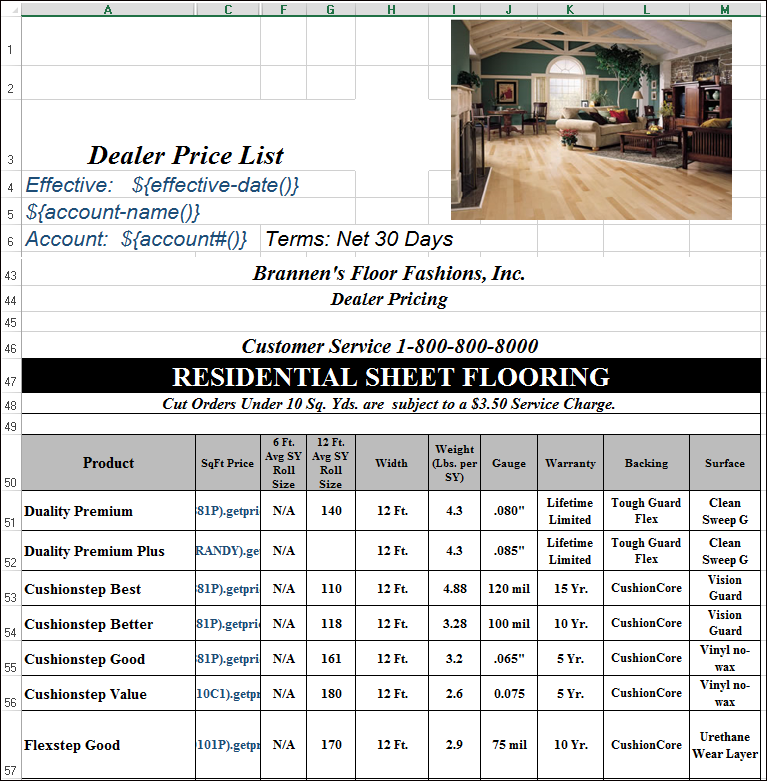
This option creates a new price list option(s) based off user built templates. These templates are manufacturer/item specific and use Dancik supplied keyword code that correspond to price list data values.
Creating the Price List Template
Using Navigator to Create and Update the Links to the Dynamic Price List Templates
Creating the Price List Template
The Price List templates are built using specific keyword values supplied by Dancik. These specific keywords correspond to a database value or conversion process, e.g. SF per Carton pricing, quantity break pricing and carton and pallet pricing variance for the same item.
After the template(s) are built, save them to the IFS where they are accessible to the Sales Portal.
List of Sample Template Codes
Note: Click here to access the template codes in an Excel spreadsheet.
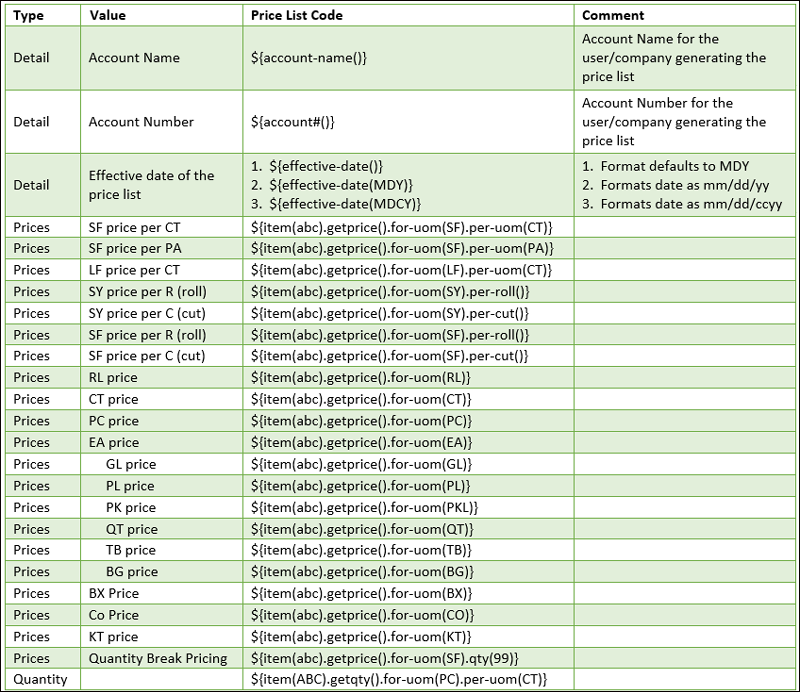
Instructions for Code Usage
The code format shown in the sample values must be followed, meaning that they must begin with ${ and end in } with the specific code words in-between.
Account Name and Number codes do not require any additional data to be entered into the code as they are set to return the associated value.
${account-name()}
${account#()}
There are three date stamp codes that can be used:
${effective-date()} - Format defaults to MDY
${effective-date(MDY)} - Formats date as mm/dd/yy
${effective-date(MDCY)} - Formats date as mm/dd/ccyy
The get price codes require specific data values to be entered:
Any valid item number or unit of measure can be used.
The getprice, per-roll, and per-cut fields do not require anything to be entered in the associated parenthesis.
The get quantity codes require specific data values to be entered:
Any valid unit of measure can be used.
The getqtyavail field does not require anything to be entered in the associated parenthesis.
The text noted in italics below are the fields to be entered by your personnel.
${item(enter item number).getqtyavail().for-uom(enter uom)}
The Pricelist data values (the specific keyword codes being converted) are to be based on Item values.
Example Template
Using Navigator to Create and Update the Links to the Dynamic Price List Templates
After the template(s) are built, save them to the IFS where they are accessible to the Sales Portal. The option, Dynamic Price List Template, in the Navigator File Management provides access to the user created templates.
The Price List Templates stored here are the ones that will be displayed in the Sales Portal.
Creating Links to the Dynamic Price List Templates
1. Access the File Management application within Navigator.
2 Select the Dynamic Price List Template option.
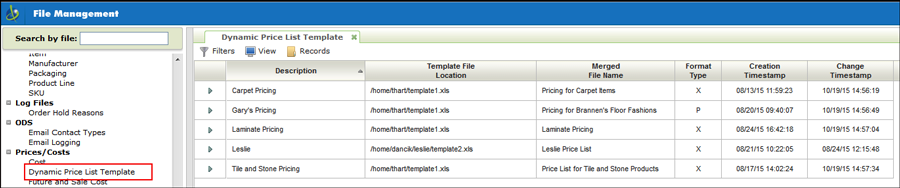
3. Under Records click Create.
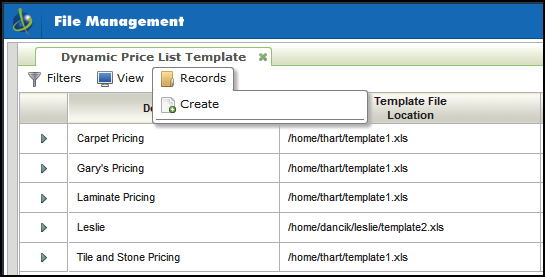
4 The Create Record window appears.
Note: The actual templates are user built spreadsheets built using Dancik supplied code and formulas. The screen shown below provides the IFS location the Sales Portal needs to access the templates.
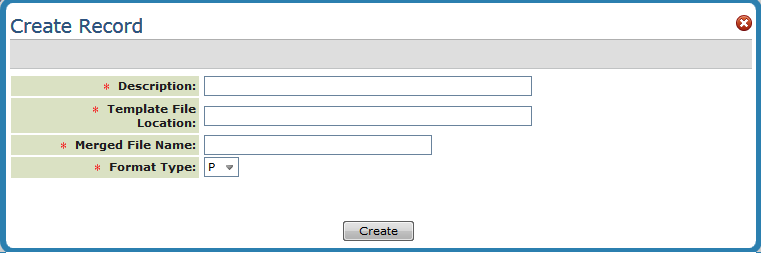
3. The Template File Location is where the Sales Portal is going to look for the template.
4. The Merged File Name will be the title of the attached price list when it is sent out via email.
Updating a Dynamic Price List Template
1. To update an entry, click the option arrow to the left of the record and select Update.
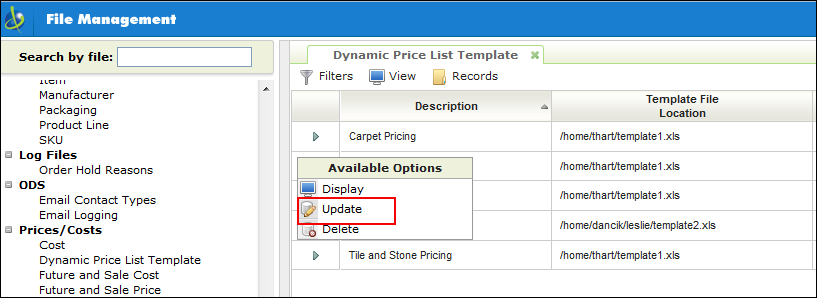
The Update Record window appears.
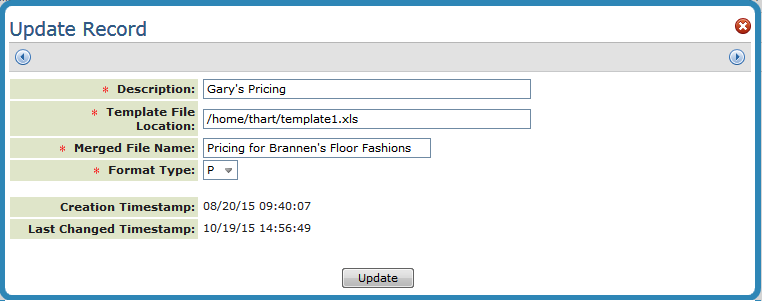
The Template File Location is where the Sales Portal is going to look for the template.
The Merged File Name will be the title of the attached price list went it is sent out via email.
1. On the Customer Information window, click Send Price List.

2. On the window that appears, select a pricing template. The pricing templates are stored and maintained through Navigator File Management.
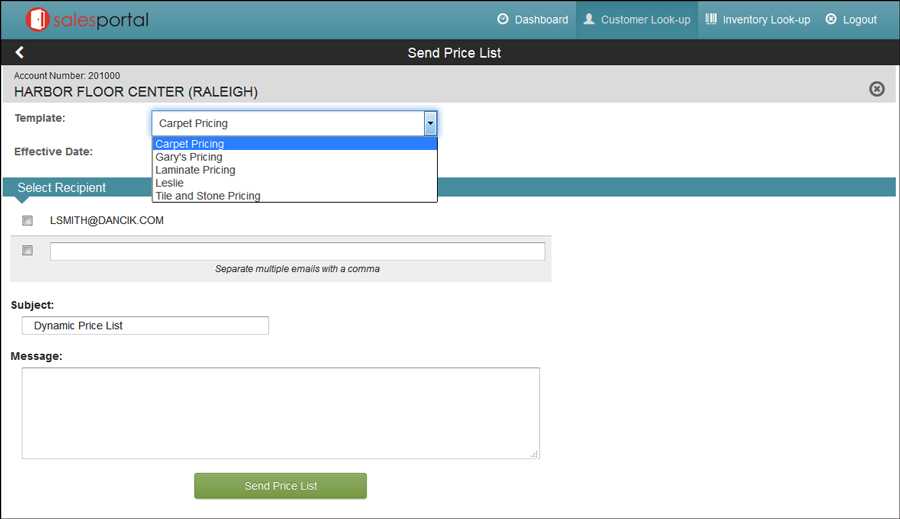
The recipient(s) displayed are pulled in from the account's Phone Number file (part of the Billto file). All the contacts that have been set up to receive emails are displayed.
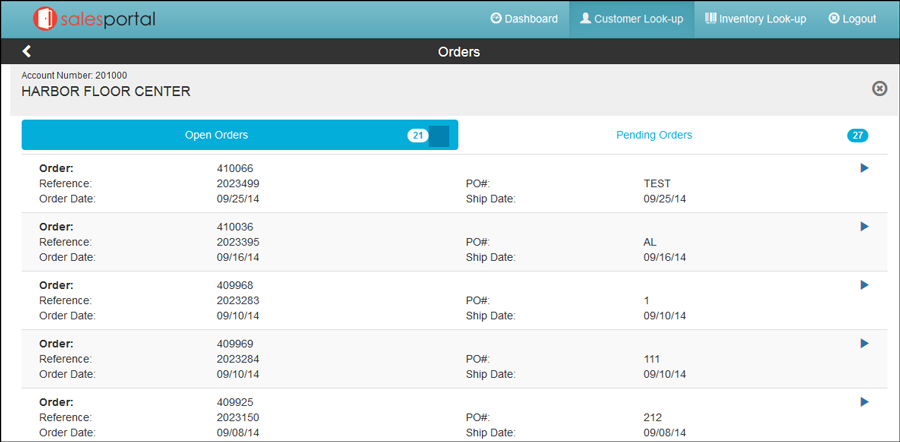
This option list all the open and pending orders for the account.
|
Open Orders are orders that haven’t been invoiced yet. An order is considered open even if it contains only one line that has not been invoiced.
Pending Orders are unprocessed orders which can include temporary holds and quotes.
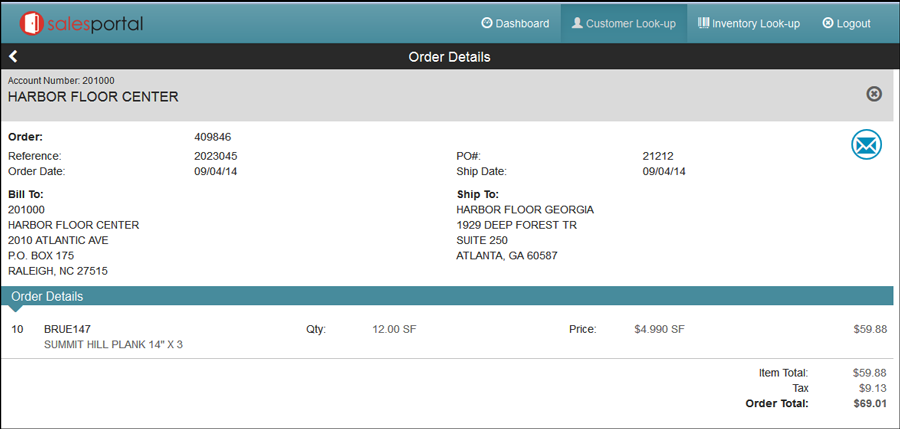
Click an order to see its details.
|
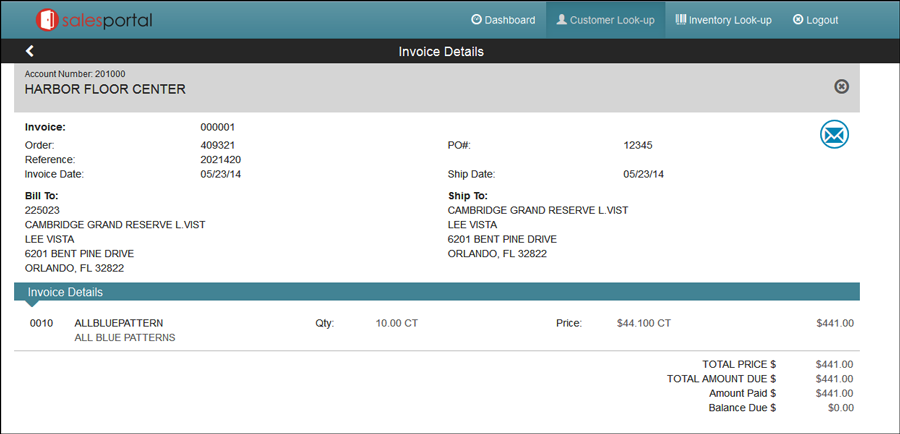
This option allows you to search for an invoice for the account.
|
Note: Use the Inventory Inquiry to get a listing of invoices for the account.
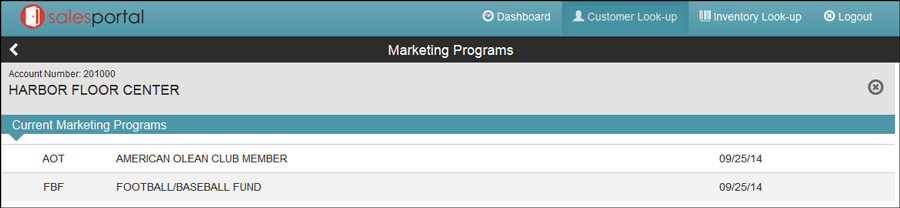
This option gives you a quick glance into the marketing programs this customer is participating in.
|
The date shown is the date the marketing program was created. Marketing programs are created using the Fund File.
Customers are assigned to Marketing Programs in the Billto File.
Note: On the Green Screen, the marketing codes are assigned via the F14 - Codes function on the Billto Profile.
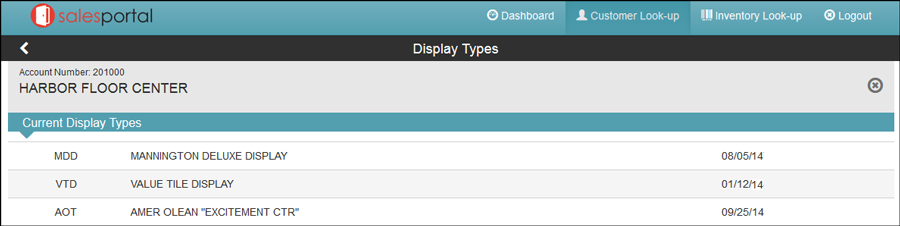
The Sales Portal automatically tracks composite sales of all customers that have each display. You can use display types for sample tracking by creating a display code for each major sample category. Display types can also use marketing programs and displays for assigning promotional prices and for generating reports, mailing lists, and recurring invoices.
|
Note: Note: Displays must be established in the Classification Codes File and are assigned to customers in the Billto File.
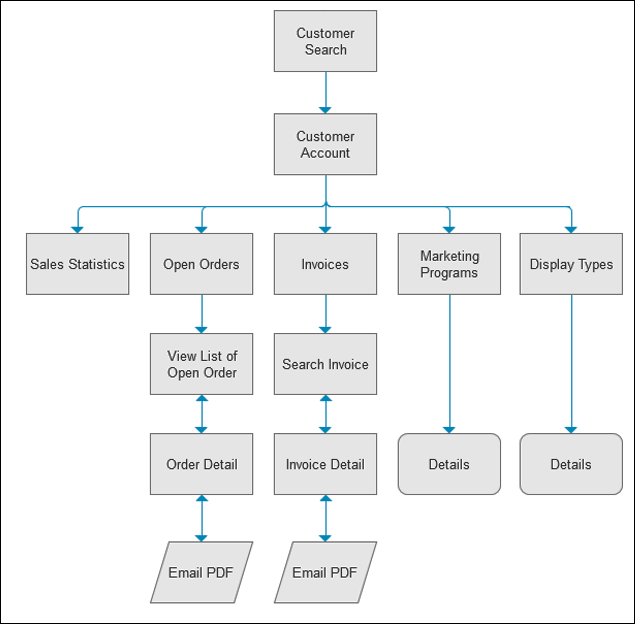
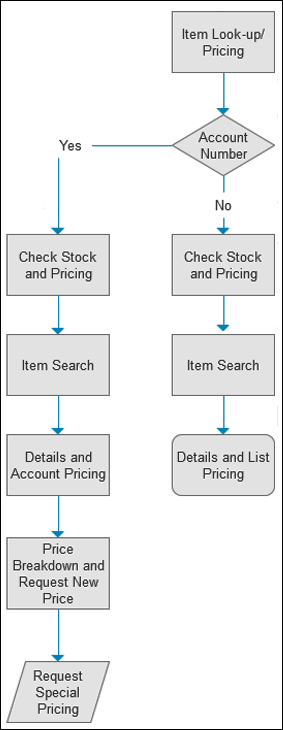
As shown in the following flowchart, an inventory inquiry can be account specific or generic.
|
1. Select the Customer Look-up option on the Sales Portal dashboard.
2. Search for and then select a customer.
3. Click Inventory Look-up to view inventory and pricing specific to the active account.
4. When the Inventory Look-up link is clicked, the Inventory Look-up window appears with three buckets of selectable information.
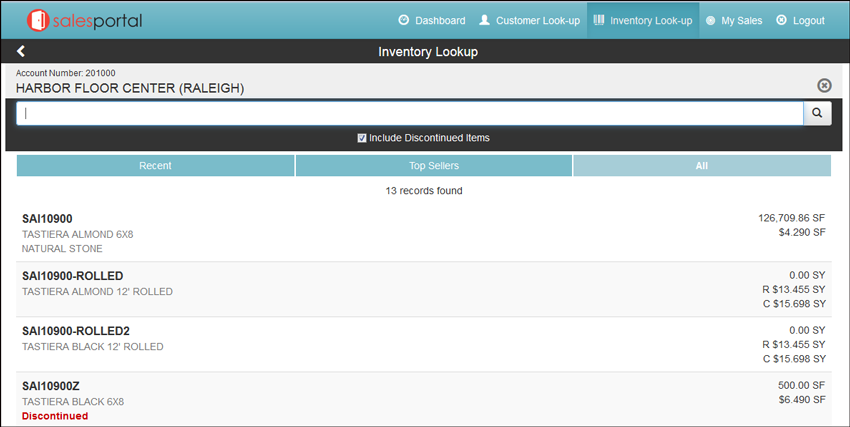
— Recent - Shows the 10 most recent items searched on by this account.
— Top Sellers - Displays the top 25 best selling items for the account.
— All - Allows for a search through all items.
The Include Discontinued Items feature has to be activated via the setting Default Option for Discontinued Items in Item Search in the System Wide Setting - Options to Enable Item Keyword Search. Items are designated as discontinued by the following settings in the Item File:
Date Discontinued - The date on which the item is discontinued or the date your supplier stops carrying the item. Items with a date entered here appear on the Discontinued Items List.
Policy - Item Policy DI
5. After performing a search in any of the three buckets, Recent, Top Sellers or All, click on an item to access the Item Details window.
Note: Product images can be uploaded via the Item/Image Cross Reference File (menu option SET 307).
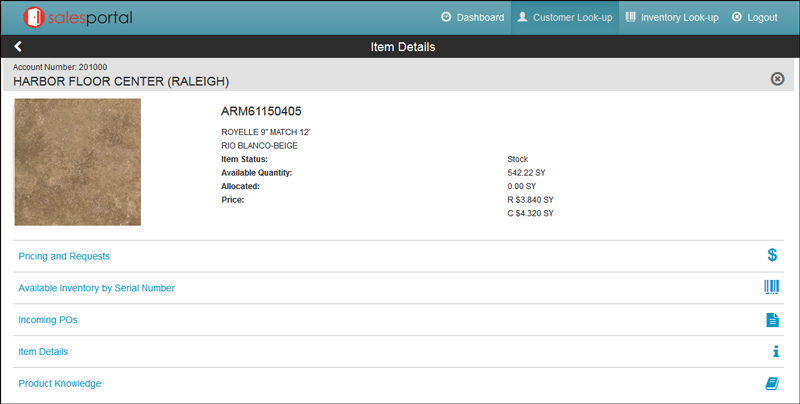
6. Click Pricing and Requests to see pricing that is specific to the active account.
7. Enter a quantity and click Roll or Cut (if it is a rolled item) to toggle between the prices to see the differences. A roll (R) or cut (C) indicator precedes the price.
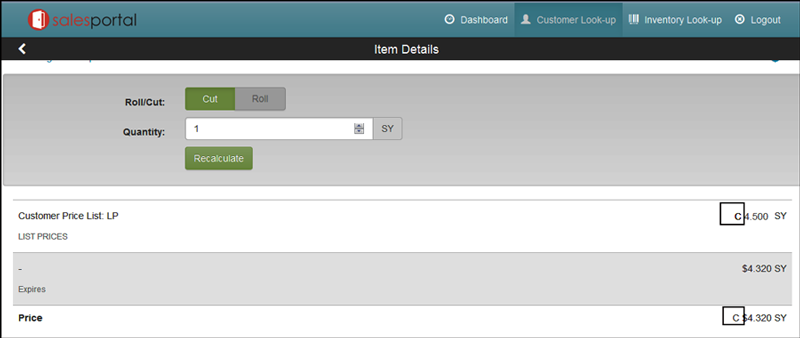
8. To toggle between the prices, click the price you want to see and then click Recalculate.
9. Use the Special Price feature to request special/promotional pricing for this customer. The price shown is the List Price. In this example, we are giving the customer roll pricing.
Enter the new special price. The system checks to see if the new price falls into the GP% margin set-up for the item. Here is a breakdown of how the system calculates the GP% for an item:
— The standard cost AND the cost from the SKU file for the customer's warehouse are checked. The higher of the two costs, plus the GP% are sent back.
If the new price falls within the specified GP% for the item, the message “Price is within margin. GP%” appears along with a Start and End date for the new pricing, which is essentially a promotion.

10. Enter a Job Name and/or Job Number and determine if the promotional pricing file is going to be for an Item or for an entire Price Class.
Note: The Job Name and Number is added to the promotional file that gets created when/if the approving manager approves the special pricing.
11. Use Apprv Mgr drop down menu to select an approving manager.
Note: Approving Managers are designated by entering a “Y” in the Pricing Approving Mgr field of a user’s Control User File Maintenance (path: NAV 5>option “U”, the setting is on the first screen).
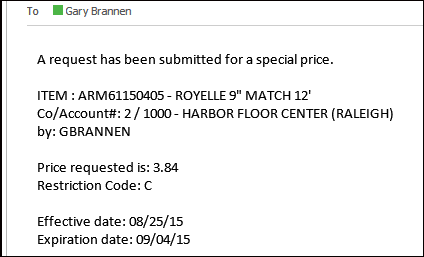
12. When Send Request is clicked an email is sent to the Approving Manager.
|
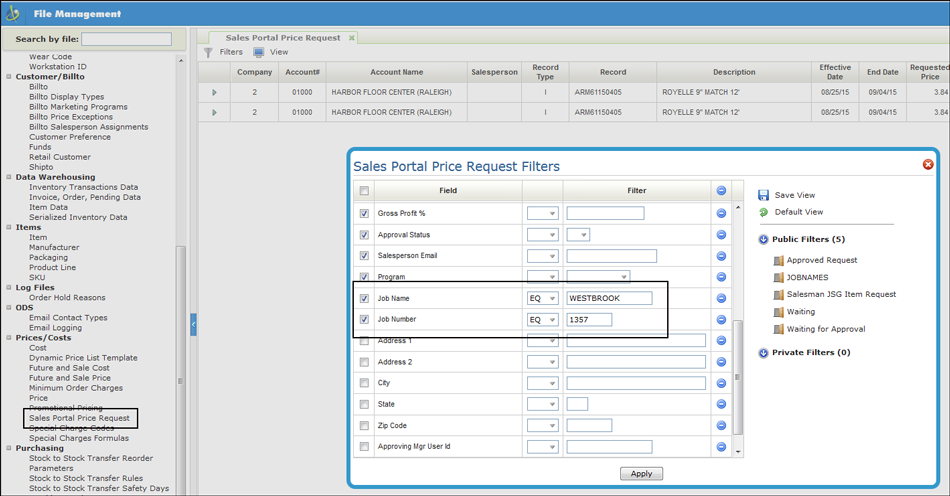
13. A record for the special pricing request is entered into the Sales Portal Pricing Request section on the Navigator File Management application. The record can be found by using the Job Name or Job Number filters.
|
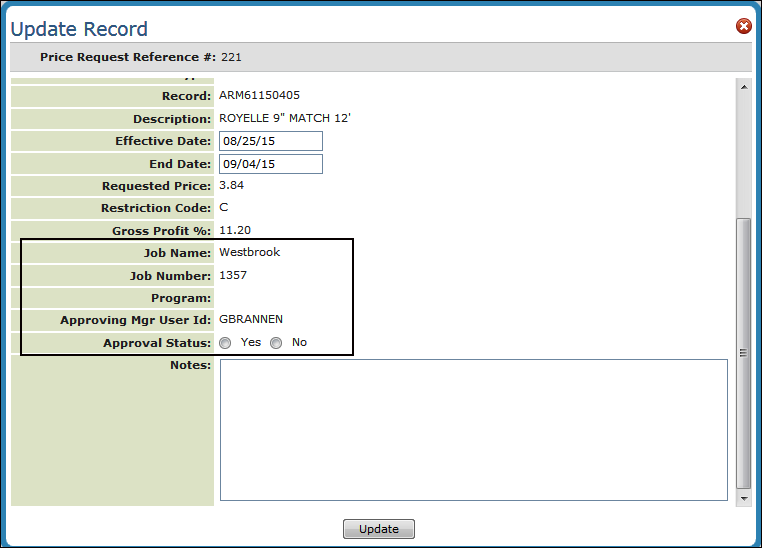
14. To approve or deny the special pricing request, the manager clicks the option arrow to the left of the record and select Update. The settings pertaining to the Sales Portal pricing request, including the Approval Status setting, are located near the bottom of the window.
|
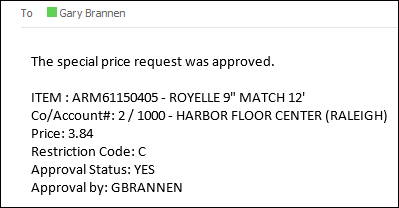
15 When the manager approves or denies the special pricing request, an email is sent to the sales person alerting them of the pricing request status.
|
16. If the manager approves the special pricing request, a new promotional pricing file is created. It can be found by using the Job Name and/or Job Number filters.
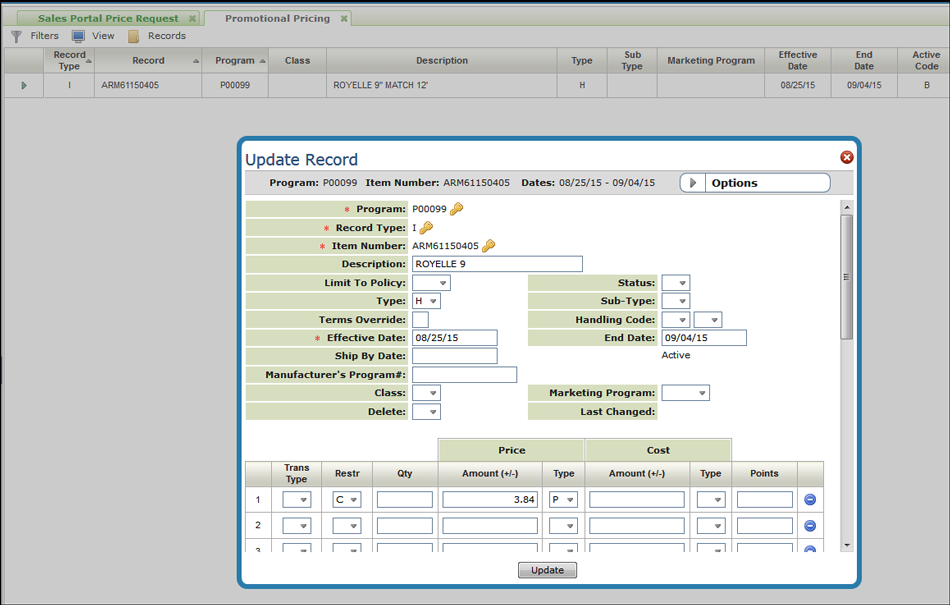
17. To look into the details of the newly created promotional pricing record, click the Options arrow and select Update.
|
By clicking the Inventory Look-up link in the top menu bar you can perform a search on all inventory in the system.
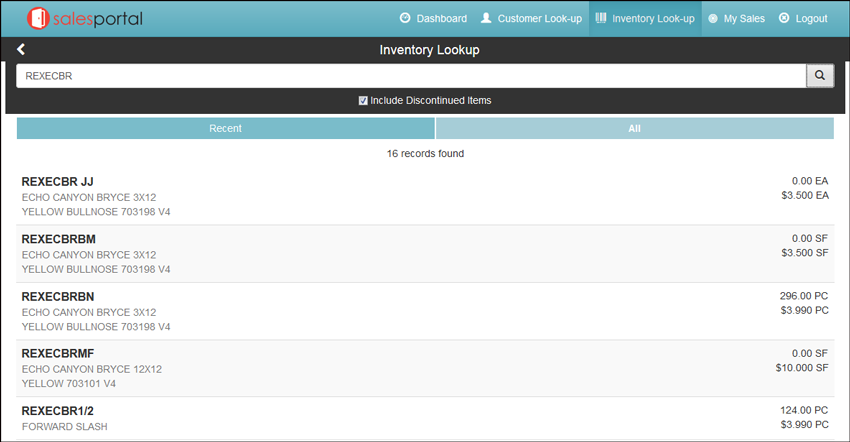
Note: The last 10 items searched on are listed under Recent.
The Include Discontinued Items feature has to be activated via the setting Default Option for Discontinued Items in Item Search in the System Wide Setting - Options to Enable Item Keyword Search. Items are designated as discontinued by the following settings in the Item File:
Date Discontinued - The date on which the item is discontinued or the date your supplier stops carrying the item. Items with a date entered here appear on the Discontinued Items List.
Policy - Item Policy DI
Click on an item to display its details.
|
This information is the same as described above under the Account Specific Inquiry. However, the pricing shown is List Pricing and does not include any account specific pricing information that affects pricing such as funds or requests for different prices.
This functionality allows a salesperson or sales manager to view sales statistics.
Set-up
Granting Permission to My Sales - Salespeople or Sales Managers have to been access to the My Sales functionality via the Navigator menu.
Use of the following Navigator Menu options:
NAV 1 - Global Access - Path to grant access: "A" in Sales Portal Web App/ "Y" Allow User to access to My Sales Widget.
NAV 2 - Authority Class Level - Path to grant access: "W" for an authority class/"A" in Sales Portal Web App/ "Y" Allow User to access to My Sales Widget.
NAV 5 - User Level - Path to grant access: "W" for an User/"A" in Sales Portal Web App/ "Y" Allow User to access to My Sales Widget.
System Wide Setting - Options for Sales Portal - This System Wide Setting contains two options that limit the orders a salesperson can see in the My Sales and Customer Information portions of the Sales Portal. For more information, refer to Options for Sales Portal.
Salesperson File - The Sales Manager setting ties the salesperson to a sales manager and allows the sales manger to access the salesperson’s statistics.
Nav 5 - Control User File Maintenance - Two fields can limit access to sales information.
Access menu option NAV 5
Enter a “U” to update a record.
The two fields are Salesperson ID and Sales Manager ID.
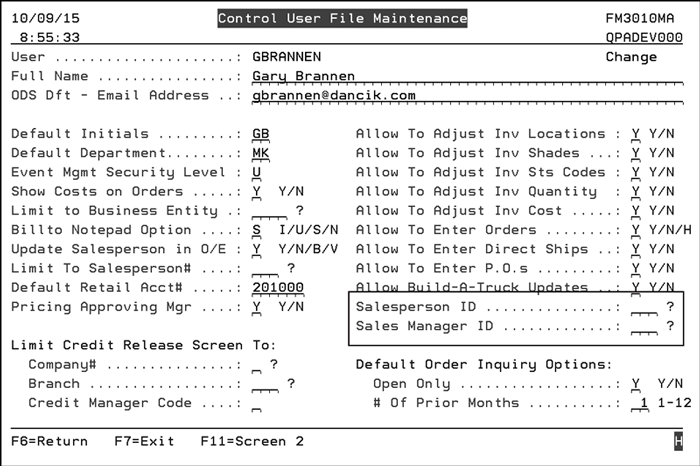
The Salesperson ID field is validated against the Salesperson File and the Sales Manager ID is validated against the Sales Manager File.
The Limit to Salesperson#, Salesperson ID, and Sales Manager ID fields work together as follows:
Sales Portal wants at least one of the 3 fields populated.
If you are not trying to limit anything anywhere other than on the sales portal then you can populate Salesperson ID and leave the Limit to Salesperson# field blank.
If you are restricting throughout the application currently and have the Limit to Salesperson# field already populated then you do not need to populate the Salesperson ID for the sales portal.
How the Salesperson ID and Sales Manager ID settings work:
Salesperson ID
Check the Sales Relationship table in SET 28.
If an entry is found, identify all Salespeople ID in Table including the original ID.
Then search Salesperson File for all records for the salespeople IDs identified in above and return the results.
If no record is found in the Sales Relationship table, return results for Control Panel Salesperson ID.
Sales Manager ID
Search the Salesperson File for the Sales Manager field.
Return all Salespeople associated with the Sales Manager ID.
Both a Salesperson ID and a Sales Manager ID is entered
Both the Sales Person and Sales Manager files, and their associated files and tables, are checked and the results are listed as one on the Sales Portal.
Checking My Sales
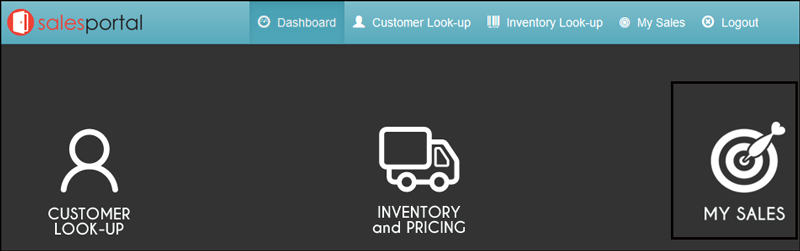
1. Access the Sales Portal and click the My Sales icon.
Note: If the My Sales icon does not appear, check the Control User File Maintenance (NAV 5) to ensure a salesperson is entered into the Limit To Salesperson# setting.
2. If a Sales Manager is accessing the information, as in this example, they have access to all the salespeople that report to him.
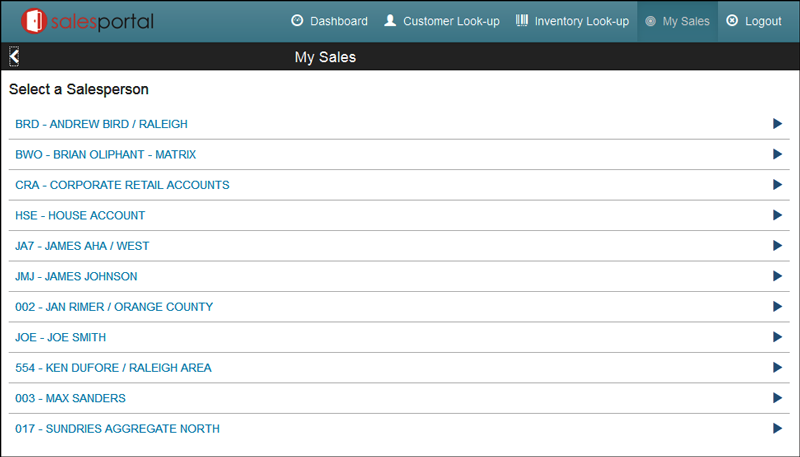
3. Click a Salesperson to access the following sales information:
Sales Statistics
Sales Month- By-Month
Open Orders
Sales Statistics
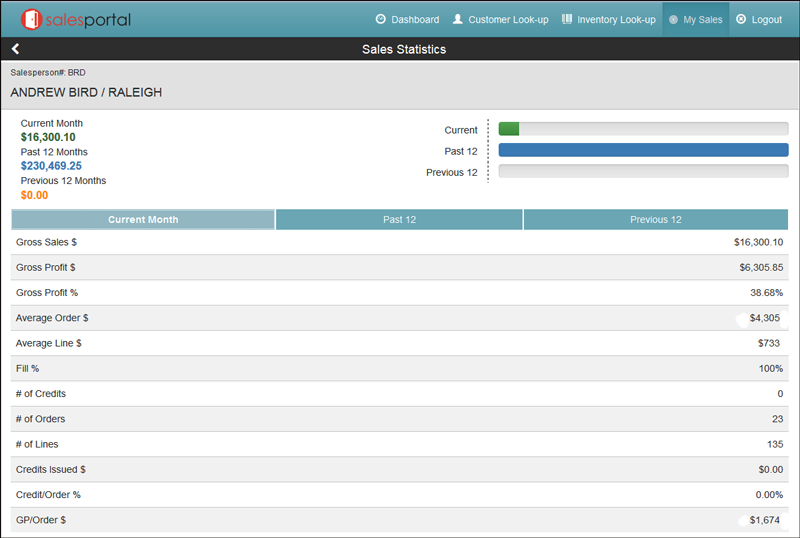
Note: The information displayed is imported in from the Salesperson File.
You can toggle between the following time periods:
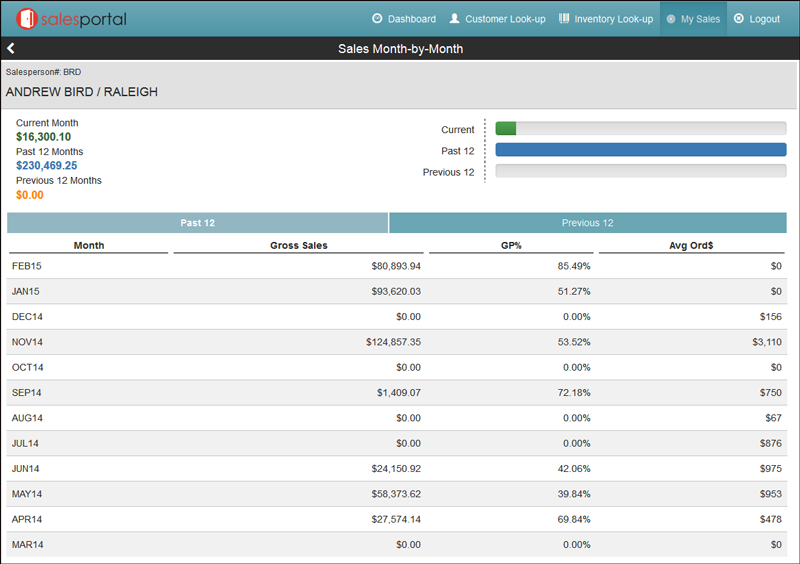
Current Month- Orders that are currently open and have not been invoiced.
Past 12 - These sales are based off of today's date for the past complete 12 months.
Previous 12 - Based off of today's date for the previous complete 12 months. These sales are from 24 months ago.
Sales Month-By Month
You can check the month-by-month sales for the Past 12 months or the Previous 12 months.
Open Orders
This part of the Sales Portal lets you check on Open and Pending orders for a salesperson. If the order was assigned to multiple salespeople, the order displays in all the assigned salespeople’s My Orders inquiry.
Open Orders are commitments from the customer to buy products but the orders haven’t been invoiced yet.
Pending orders include quotes and estimates.
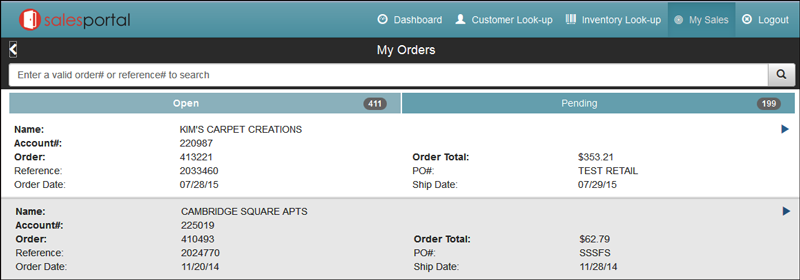
Note: An order is shown if it has at least one detail line or message line that includes a dollar amount and that line has not been invoiced.
Click the arrow at the extreme right of the window to view the order details.
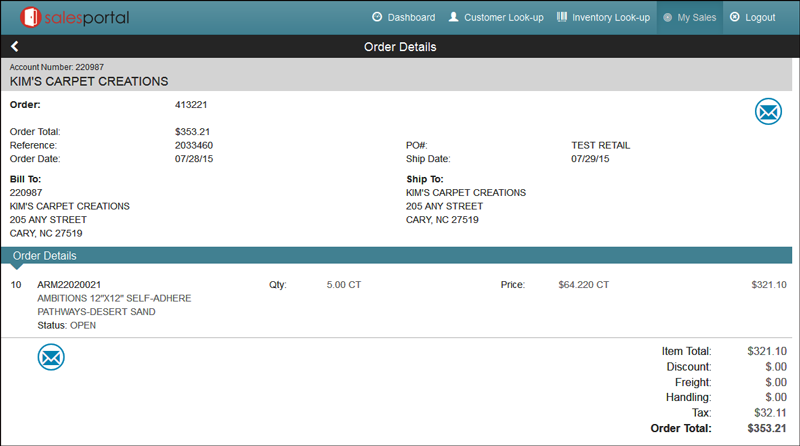
Review the order as needed and/or click the mail icon to send an email to the contacts set-up as internet contacts (Number Type I) on the Phone Number screen of the Billto File.