Need more info or you couldn't find what you were looking for, let us know by sending an email to: support@dancik.com.
Navigator Order Management
Entering Customer Orders In Navigator
Item Information in Navigator Order Management
Message Lines and Miscellaneous Charges
Inventory Analysis in Navigator Order Management
Customer Savings Message in Navigator Order Management
Entering Customer Orders In Navigator
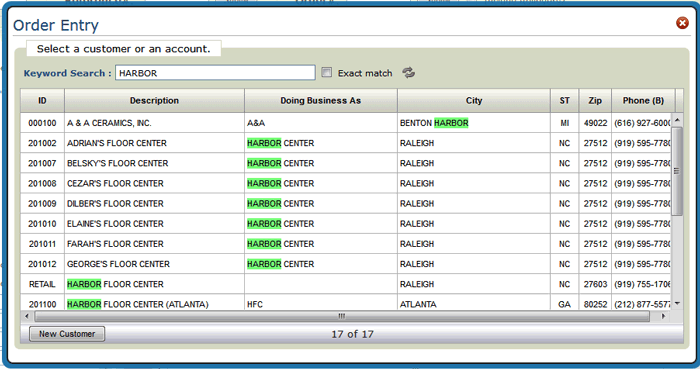
1. After selecting New Customer Order from the New Order drop down menu in the upper left-hand corner, enter or search for a customer or account number.
The Keyword Search searches through the following criteria for matches:
Account Number (from the Billto File) - If an exact account match is found an order is automatically started.
Description (from the Billto File)
Last/First name (for Retail accounts)
DBA (from the Billto File)
City (from the Billto or Retail File)
State (from the Billto or Retail File)
Phone numbers (numbers only; do not insert hyphens, spaces, or parenthesis)
2. Highlight and click on the desired customer. If the customer is not listed, the user has the ability to add a new “retail” customer. Clicking New Customer takes you to the File Management application of Navigator where you can add the new customer or update an existing one.
If the new customer will be on payment terms, the customer should first be added under Billto File Management.
Note: For a description of all the fields on the order header, refer to Order Header.

An order reference number is assigned when an order is started. If a customer cancels during order entry, the reference number is deleted and is not used again.
Note: By clicking the drop down arrow to the left of the Account#, you can confirm/edit the order header, shipto information and add miscellaneous lines and changes applicable to the account.
3. The next step is to add a PO number. Click anywhere in the order header or click the drop down arrow to the left of the Account# and select Edit Header.
4. Enter a PO# in the field provided.
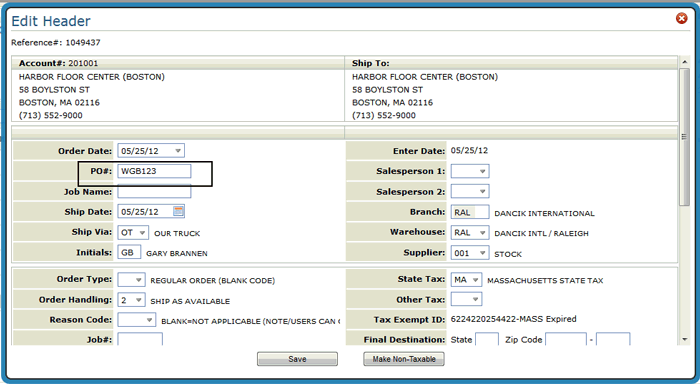
5. Direct shipments can be identified in the Order Header by entering warehouse DIR as the warehouse.
6. The Make Non-Taxable button acts as a toggle switch between taxable and non-taxable. Tax information for taxable orders is inserted from the Billto or County Files. If an order is already taxable (contains tax codes on the Order Header Screen), then the button removes the tax codes and makes the order non-taxable. If the customer is tax exempt, the current tax ID will be displayed on the order header.
Note: The screen also shows whether or not the tax exempt ID has expired. If it has, a new tax exempt ID should be entered using menu option SYS 605/606.
7. Click Save to return to the order entry window.
8. Enter an Item#, Quantity and UM, then click Add. If you are not limited to a default manufacturer, via the User Web Control Panel File Maintenance (SET 32 option "Y"), the three character manufacturer code has to be entered as part of the item number.
If you do not know the item number, click the drop down arrow to the right of the field. This accesses an item keyword search. You can select to include discontinued items. Items are considered discontinued if they have a date entered in the Date Discontinued field in the Item File and/or have a DI as an item policy code. The key word search is controlled by the System Wide Setting - Options to Enable Item Keyword Search.
Entering a negative number in the Quantity field signifies a credit. Credits require a Y or N in the Received field. To get to the Received field, click the expand arrow in the middle of the Add Line window. It is on the right-hand side of the window.
If a "special" item is entered, the system recognizes it and automatically populates the fields and settings associated with special items. Items are designated as special items in the Item File via the Inventory (Y/N/S) setting.
The Multi-Line Entry button enables you to enter multiple item numbers simultaneously. If you enter a bill-of-material or kit item, the Multi-Line Entry screen displays. This screen allows the user to view all of the components associated with a Bill-of-Material or kit item. The user then has the option of selecting those components (e.g. an item with a different shade or pattern) requested by the customer. ISO, which is mandatory for multi-line entry, runs and prompts the user to confirm the allocations or back ordered items. You can then accept or reject the ISO selections. If accepted, all line items are created at once. Multiple line item entry can be used when working from faxed or written order requests or any time a customer presents a list of items, rather than entering one item at a time.
If you encounter the error message “Item cannot be sold to this customer” it means the item that you are trying to order has lock out pricing established in the Promotional Pricing File or on the Customer Price Exception screen within the Billto File. A user has the ability to override the price if their Navigator Control Panel setting (NAV 5 option Y) “Allow A Price Override To Bypass Error Message On “Locked Out” Items” is set to “Y”. If the user has the authority to override the price, they can bypass the error message by entering only the item number and clicking on the “Add” button. On the Add Line window that displays, the price of 99999.99 can be overridden.
9. The system can automatically check for duplicate orders for an item during the order entry process. This check can alert you to possible situations where an item is already on an order, hold, or quote for a customer.
Note: This feature is only activated if the System-Wide setting “Options for Order Entry - Duplicate Order Warnings” is activated.
From the Potential Duplicate Orders window you can perform the following by clicking on the arrow to the right of an order:
View order
Delete Current Order and Switch to Selected Order - The order you are currently working on will be deleted and the system switches you over to the selected order, hold, or quote.
Leave Current Order and Switch to Selected Order - This option does not delete the order you are entering, but it does switch you over to the selected order, hold, or quote.
Note: The current order (the one you are leaving) is assigned a reference number and is saved as an unprocessed order. All the information you entered up to the point of leaving the order is saved.
10. If Dancik’s Inventory Selection Optimizer (ISO) is activated (via the Auto-ISO Option on page two of the web access control panel (NAV 5, option "Y"), the system automatically selects inventory based on established ISO rules.
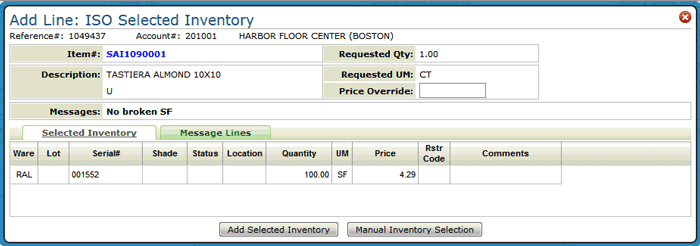
11. Click Add Selected Inventory.
Note: Refer to Manually Selecting Inventory for more information on manually adding items to the order.
The inventory is added to the order.
If a lock symbol is displayed to the right of the order number, this is an indication the order is being updated within Navigator or on the iSeries (green screen). If the user attempts to edit the order, they will receive a message informing them of the user date and time - This order is locked by JSMITH on 05/30/12 at 03:44 PM.
If the user attempts to edit a locked order and they do not receive an error message, this indicates that they currently have this order open within another Navigator session. They should exit this order and access it via their other NAV session.
Note: If the customer is getting a savings on the cost of an item, a message detailing the savings can appear below the item. For more information on this functionality, refer to Customer Savings Message.
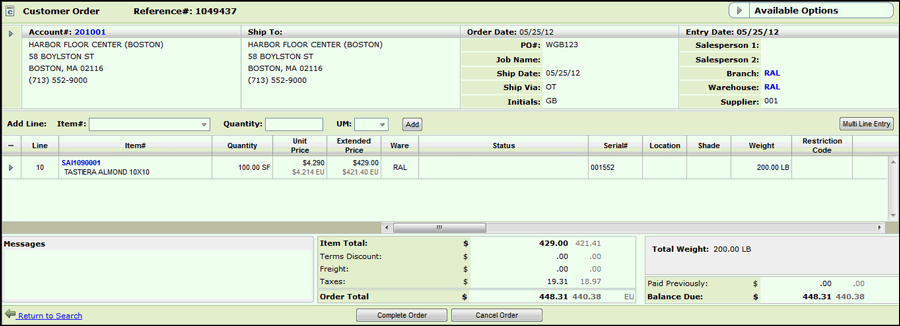
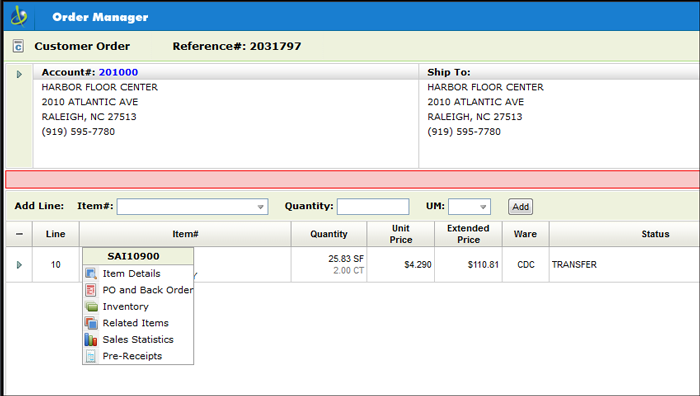
12. The arrow to the left of the item allows you to edit or cancel the line item. You can also add, update or inquire on any messages, add shipping charges for the line item, and access the price calculator. (Assoicated File - Sending an Email when an order line is cancelled).
Note: Clicking on the hyphen “-” or addition “+” symbols allows the user to expand or collapse the display panel. The addition “+” symbol allows the user to view header and detail line messages associated with the order. The hyphen “-” symbol allows the user to view only detail lines associated with an order.
13. Click on an item to access additional information such as any purchase and/or back orders that affect it, sales statistics for the item, and related items. For more information about these features refer to Additional Item Information.
14. Notice that in the example screen shown earlier, the Unit and Extended Prices are shown in two currencies; American dollars and European Euros. To display an order in a foreign currency, the following settings are required:
Within the Customer Preference File (FIL 38), a currency code has to be entered in the Customer Currency Code For Invoices field.
The Currency Code Exchange Rate (SET 11) - has to be set up for the enter the foreign currency code and the exchange rate.
15. The Messages displayed in the lower left-hand corner, are imported from the Billto File for the customer. Vital messages can be prefixed with a "*" in the Billto File. These messages are highlighted in red.
If cross referenced orders and/or invoice were entered on the Xref Ord#/Inv# fields of the order header, those order/invoice number appear in the Messages box.
16. When you are finished adding items to the order, click Complete Order at the bottom of the screen. in the lower right-hand corner. Otherwise, clicking on Return to Order Search leaves the newly created order as unprocessed. The Cash Register screen only appears if the user’s Navigator Control Panel (NAV 5) is set to display the cash register. Otherwise they will be presented with a list of available print options.
Note: If the System Wide Setting - Navigator Print Options is activated, a PDF order acknowledgement is produced. This allows you to review the order to ensure the order is correct.
The Cash Register screen supports secure cashier codes, gift cards, and other functions for recording and balancing cash.
Note: The single payment cash register is not supported in Navigator.
17. Enter a valid cashier code and payment information. Cashier codes are created via the Cashier_Code_Maintenance_-_ACT_116 file.
Note: If the setting Cash Register Screen is not activated in your User Web Control Panel (NAV 5, screen 2), the Cash Register screen does not display. Instead you will see the End-of-Options panel.
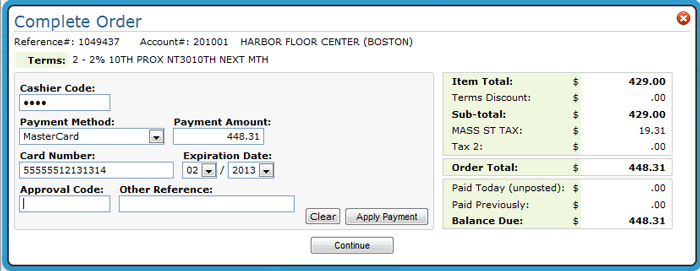
Note: To mask the credit card number ensure the setting Verify credit card number for this payment method is activated. This setting can be found on the Payment Method Code Table Maintenance application.
18. Enter the necessary payment information and then click Apply Payment and then Continue.
Note: Payment methods are user defined by your system administrator in the Payment Methods File. We recommend establishing codes such as CA = Cash, CH or CK = Check, and a code for each type of card. You can also set up special codes to represent Gift Card Purchases, Non Payment, etc.
19. After the payment is applied to the order, click Continue again to access the End-of-Order Options window.
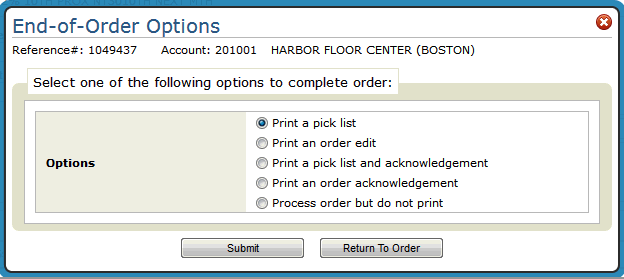
Some of the print options might not be available. For example, if the order is assigned an order handling code of 5 - Must Ship Complete and the order has back order lines on it, the Print a pick list and Print a pick list and acknowledgement options are not available. Order Handling codes are assigned on the Order Header.
20. Select an option. The option Process order but do not print directs the system to process the order then send it to the open order file, but no pick list or acknowledgement is generated. Printing an order edit will leave the order as unprocessed.
The End-of-Order options vary depending on what type of order you are creating. For example, the printing options for processed orders include options for printing a pick lists and picking labels.
Note: Printers for pick lists are designated in the Warehouse File (FIL 8). Printers for the other documents (quotations, material selection forms and acknowledgements) are designated in the Web Control panel (NAV 5 option “Y”). For more information refer to Printing.
Note: If a pick list is printed, the order notepad can be stamped with who printed the pick list. This functionality is activated via the option Update Notepad when Order is printed as a Pick list on the System Wide Setting - Notepad Format Options.
21. If your Control User File (menu option NAV 5 "U" option) is configured to send order acknowledgements via ODS, when either Print a pick list and acknowledgement or Print an order acknowledgement is selected you are presented with options for sending out the order acknowledgement.
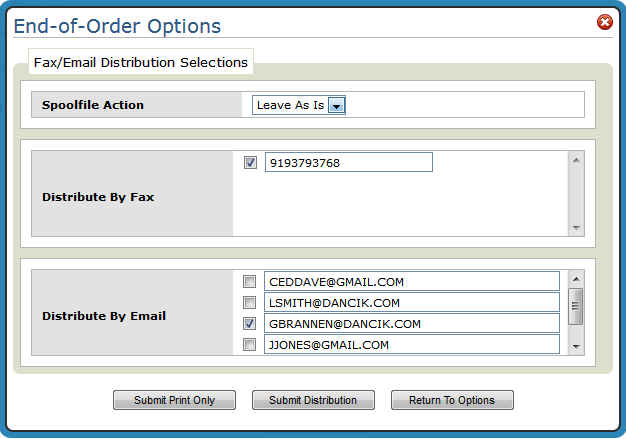
Note: The fax number and email recipients are pulled from the Phone Number File (SYS 802).
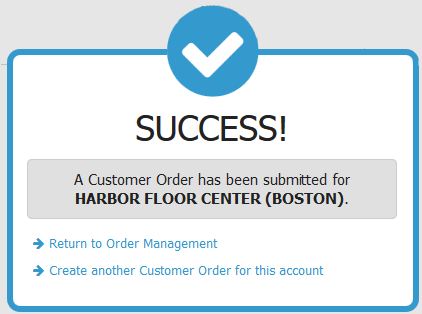
22. The final step in the order entry process allows you to start another order for the same account or you can return to the main Order Management window.
Item Information in Navigator Order Management
Clicking on the item allows you to obtain the following additional information.
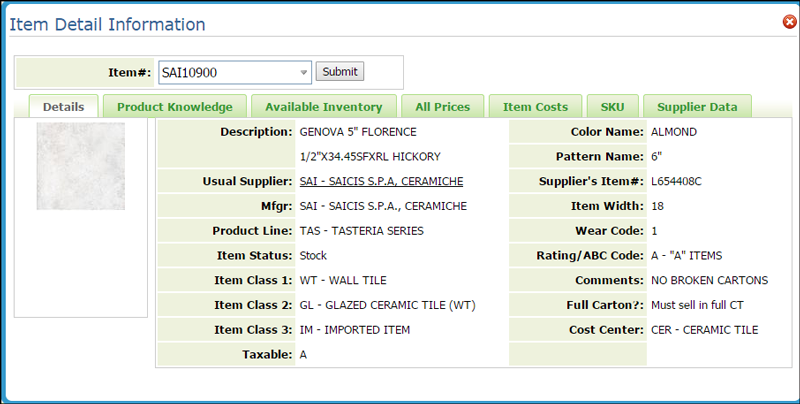
This option pulls up the Item Detail Information window that has the following five tabs:
This option pulls information from the Item File Profile screen.
Notes about the Item Detail Window
Item images and the configuration steps to view them are set up in the Item/Image Cross Reference File (SET 307).
The item information to the right of the image comes from the Item File.
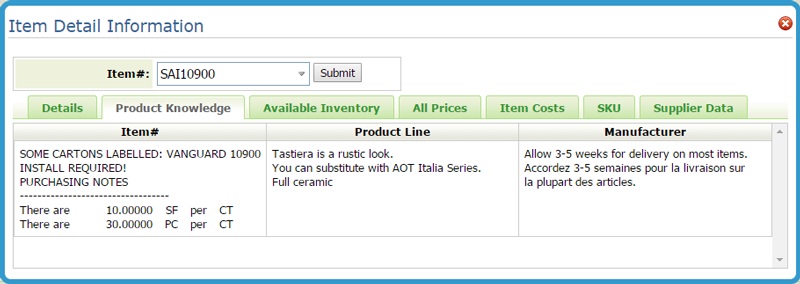
The System Wide Setting - Options for Navigator controls whether or not Purchasing Notes display. Some of the Purchasing Notes might be not be applicable to sales and therefore don not need to be included.
The packaging information under the title Item# comes from the Item Special Instructions and Packaging programs.
The information under Product Line comes from the Product Line Special Instructions.
The information under Manufacturer comes from the Manufacturer File Special Instructions.
This tab breaks down inventory availability for an item by serial number. The status codes on the right-hand side are user defined and are created using the Order & Serial# Status Codes (SET 7) application. Status codes can be assigned at the time of receipt or during an inventory adjustment.
The All Prices Inquiry enables you to view all available prices for an item, and depending upon user authority, all costs, and gross profit percentages. The All Prices window shows every regular price within the system, including all transaction types, restrictions, quantity breaks, and price lists.

This tab brings in information from the Cost File. The Cost File establishes cost structures called cost classes, that you can assign to groups of items. You can assign items with identical costs and cost structures to the same cost class, and when costs or the cost structures change, you only need to update the Cost File. Cost classes are assigned to items within the Item File Maintenance Program.
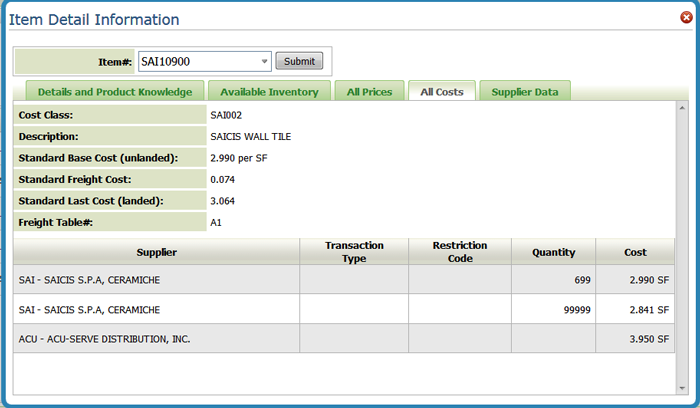
This tab contains cost information such as:Average cost, Last Cost, and Freight Cost. It creates one place for item costing information. Plus, the cost information is automatically updated.
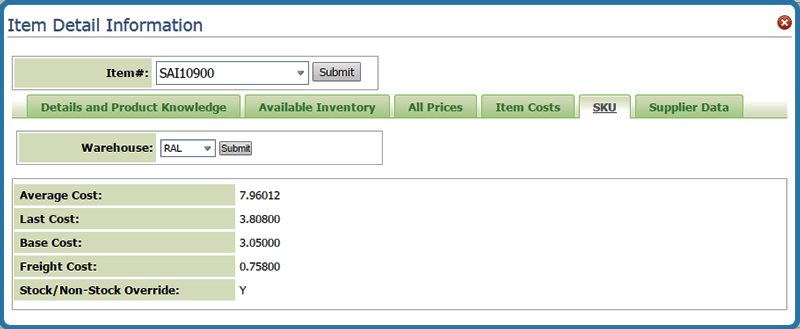
Note: The warehouse dropdown only includes warehouses that the user is authorized to view. The user control panel controls warehouse access.
Average Cost - The average unit cost of the onhand quantity for this SKU. A true weighted average is used. If this is a serial numbered item, then the average cost is for all serial numbers onhand in the warehouse and lot for this item. Do not confuse lot with serial number; multiple serial numbers can be in one lot number.
Last Cost - The unit cost of the last receipt for the SKU. It is the last landed cost.
Base Cost - The base (material) portion of the last cost.
Freight Cost - The freight portion of the last cost.
Stock/Non-Stock Override - Y (stock) or N (non-stock) comes from the Stock/Non-Stock Override field of the SKU File.
The Supplier Data tab uses the fcb2b web service inventoryinquiry to retrieve item information from a supplier’s system.
Checking a Supplier's Item Data
There is some set-up involved to populate the Supplier Data tab with information.
Channel Management Solutions (CMS) - In order to use this functionality, CMS must be activated on your system.
Item File (FIL 2) - The item has to have a Usual Supplier# and a Suppliers' Item# assigned.
Supplier File (FIL 3) - The F11 = B2B Config function allows you to add the URL and API access keys. For more information, refer to Supplier File - FIL 3.
Checking a Supplier’s Item Data
Click the Supplier's Data to access the supplier’s system to obtain inventory information about the item.
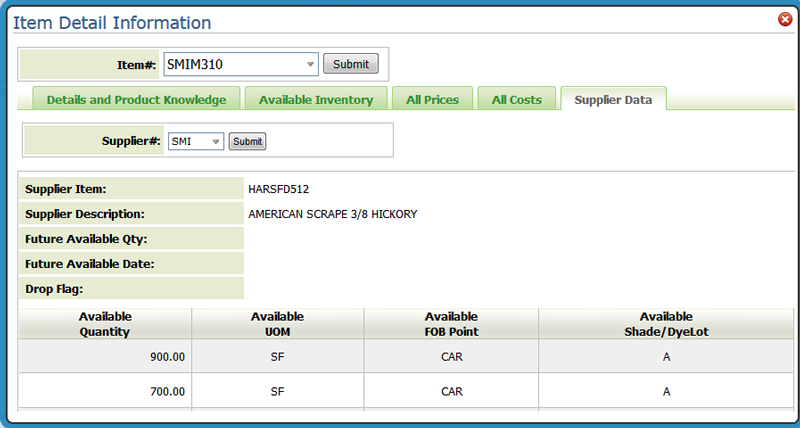
The Available FOB Point is the warehouse that the item will ship from.
Use this option to research purchase and back orders and how they can affect your future inventory.
The Status code is a two-character code that indicates the type of transaction. Some of the more common status codes you will encounter are:
C - Customer Order |
||||
CA - order assembled staged and ready to be picked up or delivered. |
CB - back order. |
CD - order is delayed missed truck, inventory shortage, etc. |
CF - open future order. Customer order against incoming stock. |
CH - hold - not a confirmed order. This is a permanent hold. HH indicates temporary hold. |
CO - open order. |
CT - open transfer order. Transferring from this warehouse to another. |
CL - bar code label has been printed. |
CS - order has been shipped. |
|
P - Purchase Order |
||||
PB - back order |
PK - purchase order confirmed by supplier. Dates and quantities are accurate as shown. |
PP - For imports, it can be used to mean Paperwork Received or Received at Port. For domestic purchases, it can be used to mean partially received but receipt is not yet processed in the computer. |
PT - in transit in route from supplier, or scheduled for transfer from another warehouse. |
PD - purchase order delayed. |
PO- open purchase order |
PR - received in full but receipt is not yet processed in the computer. |
PJ - purchase order has been rejected. |
|
|
This option allows you to view current inventory levels for an item based on warehouse, serial number, and location.
The transaction history displays each transaction in chronological order. It relates to the specified item at the specified warehouse and, if applicable, for the specified lot and serial number.
The Related Items function is a powerful tool that allows you to quickly check the total available inventory for items related to the current item. It allows you to harnesses the power of the information already in your inventory files. For example, let's say a customer wants a certain item, but you are out of stock, and they say “what else do you have like that?”.
You can look for related items that share the same:
Product Line - Product lines link items into groups that are usually defined by the manufacturer. Product lines are, whenever possible, set up to reflect the product lines that appear in a manufacturer's catalog.
Product Line and color name - This search directs the system to find related items based on the values in the Product Line and Color Name fields of the Item File. In some instances where color is not important or applicable to an item, the Color Name field can contain other information such as style, texture, type, or finish. For example, tools can be categorized by type, such as trowel or saw.
Note: Color Name is a required field when creating items. Dancik recommends that color names should be somewhat general and used consistently. For example, use “white” for the various shades of white, so that customer service can quickly search for inventory with that color name without having to search for every shade of white.
Product line and pattern name - Pattern names are assigned in the Item File and can be used to further define the item. Some examples of pattern names are: for tile 4x4 (for tile), berber (for carpet) and 20 LB (for installation material).
Manufacturer and color name
Manufacturer and pattern name
Manufacturer, color, and pattern name
Item classes - Items can be assigned up to three item classes. Item classes are user-defined codes for further classifying the item. Class 1 is the most general of the three item classes. It is also the most important because it is used in the pricing and salesperson assignment programs. Price lists and promotional pricing can be assigned to a customer for specific item Class 1 entries.
Item class 2s can offer a more specific classification and item class 3s are used only if other meaningful classification is needed for your entries in the Item Class 1 and 2 fields.
Note: Item classes are assigned to items in the Item File. If the item class fields are not used, the message “No Records Found” appears.
If the item you are inquiring about is a BOM, the BOM/Kit tab is available and displays the component items as maintained in the Bill-Of-Material/Kit File (FIL 39).
Note: The Qty available is the onhand minus the allocated quantity. Even if inventory is assigned to a status of L (lost), # (in suspense), or I (being inspected) it is included in the quantity available calculation. You can chose to display or hide the Qty Available of a BOM via the System Wide Setting - Options for Bill of Material.
Use this option to review current, past (last year) and previous (2 years ago) of prior sales information.
Note: Access to the Sales Statistics has to be granted at:
the Global level, (via menu option NAV 1)
the Authority Class level (via menu option NAV 2)
the user level (via menu option NAV 5).
Pre-receipts are receipts that have been entered or transmitted by EDI, but not yet posted. They may be in the process of being updated with locations, or filling back orders, or are simply not ready to be posted. This feature enables you to see these entries from Order Entry and other parts of Navigator.
Pre-Receipts can be checked from the item number options; which are available when an item number is hyper-linked. In this example, we are starting a new order, but hyper-linked items, and therefore the pre-receipts option, are available in several other parts of Navigator including order change, Inventory and Invoicing.
1. Clicking the Pre-Receipts link displays the Pre-Receipts for the item.
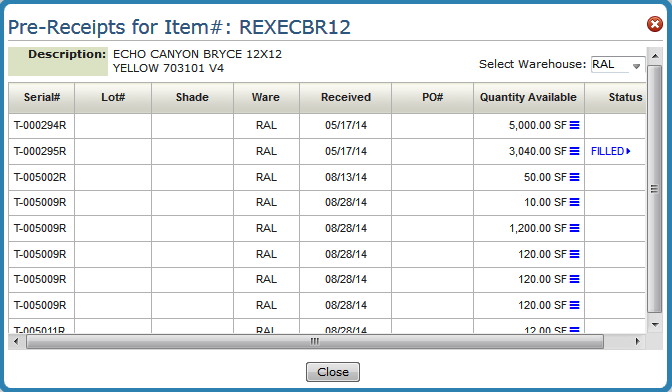
2. The initial pre-receipts shown are for the warehouse used on the order detail line. Use the drop down menu to access more warehouses available to the user. Enter *** to view pre-receipts for all the warehouses.
Note: Users can be limited to specific warehouses through their control panel or Authority Class.
3. To see the pre-receipt in a different unit of measure,
click the conversion icon (![]() )to
the right of the displayed Quantity Available.
)to
the right of the displayed Quantity Available.
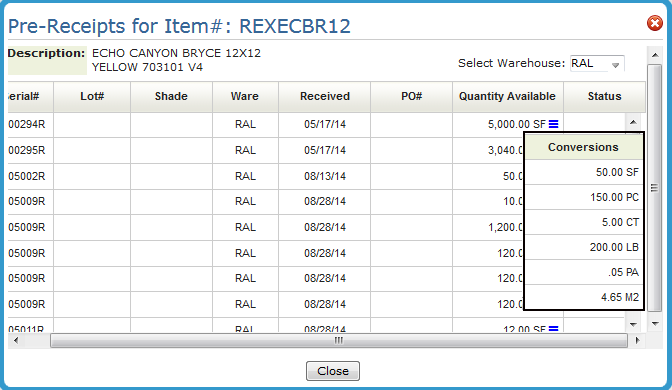
The unit of measure conversions come from the Packaging File.
4. If any of the pre-receipts are already allocated to an order, the message FILLED appears. You can click FILLED to display the customers whose orders are being filled with that receipt.
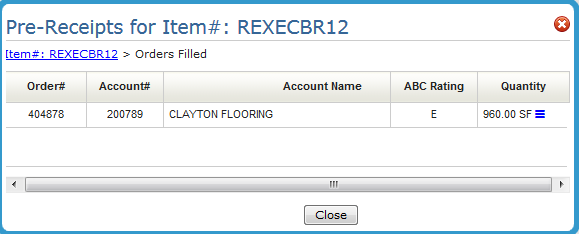
The ABC Rating is assigned to an account in the Billto File. The rating lets you decide if you want to use the inventory for a higher rated customer.
Additional Charges in Order Management
This option directs the system to search for additional charges that can be applied to the order. Additional charges can be defined in several parts of the system and can be assessed according to branch, state, marketing program, and other criteria. For example, additional charges for “Fuel Surcharges” can be different in each of your branches, different based upon marketing programs, customer account number, etc.
Other examples of additional charges are: carpet freight, estimating charge, installation service fee, will call service fee, and minimum order charge.
When the Additional Charges option is selected a window similar to the following appears.
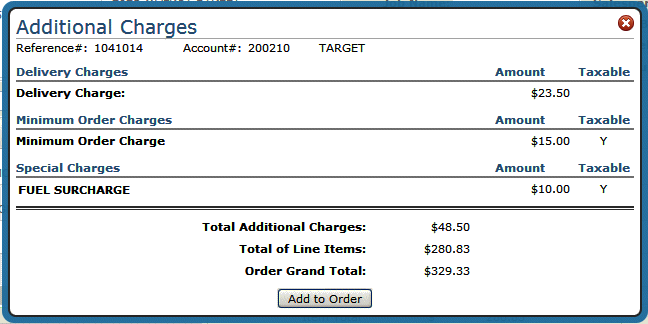
Note: The Taxable information can be changed via the respective charge table (i.e. the Minimum Order Charges table)
If the Add to Order button is not displaying, you have not been granted permission to add additional charges via Navigator (NAV) menu option 5 - Control User File Maintenance. To access the Allow To Apply Additional Charges During Order Entry setting, enter a “U” to update a user’s setting and then press F11 to access the second page of settings.
Associated Files
The Special Charge Codes Table is designed to assess additional charges on your invoices, mainly for the purpose of freight and fuel cost recovery.
Special Charges Formulas Table - enables you to define which customers are affected by each special charge, and how that charge is calculated. The Special Charges Formulas can vary for the same special charge code, based on branch, state, marketing program, and other criteria. For example, special charges for “Fuel Surcharges” can be different in each of your branches, different based upon marketing programs, customer account number, etc.
Minimum Order Charges File - You can use this file to automatically charge customers a minimum order charge when a single order or a group of orders is less than a specified dollar amount.
Delivery Charges File - Use this file for assigning and assessing delivery charges. You can use this program to control delivery charges by warehouse, truck route, account number, and state. You can enter varying delivery charges on each of these levels.
System Wide Setting - Options for Shipping Charges Within Order Entry - This setting includes options to activate the Order Entry Shipping Charge Table, establish rounding options, establish surcharges percentages which can allow you to recover costs such as rising fuel prices.
Message Lines and Miscellaneous Charges
Message lines and charges can be added to an order at the header or detail line levels.
On the Order Header by clicking the arrow to the left of the account number. Message lines applied at the header level apply to the entire order.
At the Order Detail level by clicking the arrow to the left of an item. Message lines applied at this level only apply to the specific line they are attached to.
These message lines can be used to enter sidemarks, warehouse comments, or miscellaneous charges applicable to the order.
If the line number is 10, the first message line will be 11. Each line can have a maximum of 9 message lines.
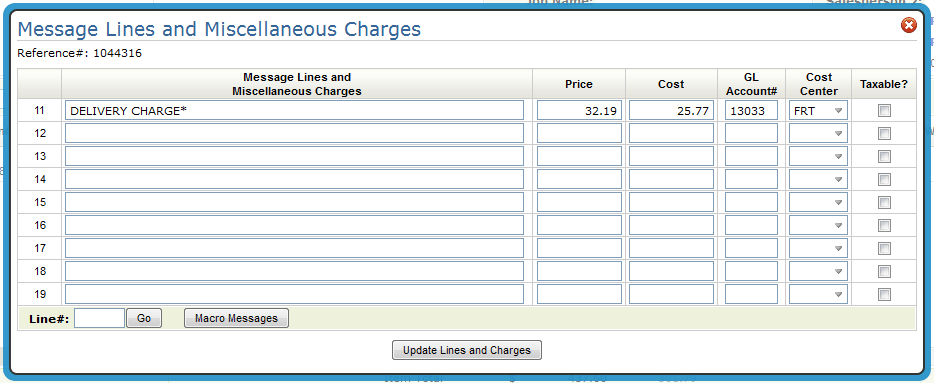
The text of the first message line is displayed in the Notes column of the order line.

Note: If an item has a policy code of RD, as entered in the Item File (FIL 2), the Special Instruction screen automatically appears. An item description must be entered before proceeding. Item policy code RD is normally used for generic miscellaneous items.
Price/Cost - Enter the extended price or cost if this represents a miscellaneous billing line.
General Ledger# - Enter a general ledger account number, if applicable.
Cost Center - This is the cost center to use if the message lines contain prices or costs.
A character at the end of a message indicates that the message/charge is taxable (in the example above Delivery Charge has a “*” at the end) . The setting Charge Tax On Freight on the Control Panel (menu option SET 1) allows you to set the default for making all miscellaneous charges taxable or nontaxable for taxable customers and orders. If the default is set to nontaxable, adding a character such as * or = to the end of the message/charges makes that line taxable.
Z* at the beginning of a message directs the system to not show pricing information on Direct Ship POs. Click here for a complete write-up on the Z* message qualifier.
Macro messages enable you to insert standardized messages when entering orders. These messages can consist of business related messages, display or sample programs, billing, and special order cancellation charges.
Note: Macro messages are created using the Macro Message Manager (menu option SET 23).
Click the Macro Messages button to display the Macro Messages screen.
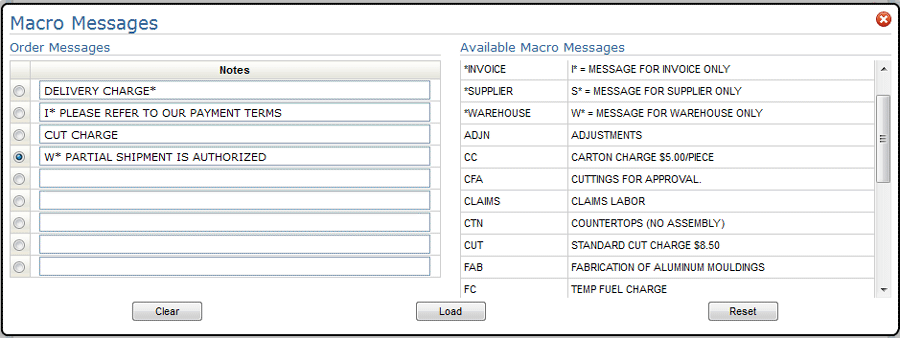
In the example shown above, three macro messages have been added to the order. The Delivery Charge message was added earlier on the Message Lines and Miscellaneous Charges window.
Notice that some of the messages use the format I*, W*, S* etc. Using these formats tells the system to only include the messages on specific printed documents:
W* (Warehouse messages) - Will print on all documents used in the warehouse.
C* (Customer messages) - Will print on all customer documents.
I* (Invoice messages) - Will print only on quotations, acknowledgements and invoices.
S* (Supplier messages) - Will print only on purchase orders.
O* (Order messages) - Will print on all customer documents except invoices.
J* (Job Orders) - allows you to invoice a job order showing only the total amount for the job, and the description of the job, while eliminating all of the line item details from the invoice.
Z* - directs the system to not show pricing information on Direct Ship POs. Click here for a complete write-up on the Z* message qualifier.
This window, accessed from the order header options arrow, indicates where the product will be shipped.
Note: If you are working on a processed order, click the Edit Order button near the bottom of the screen. This allows the system to include the ShipTo Address option in the Available Header Options.
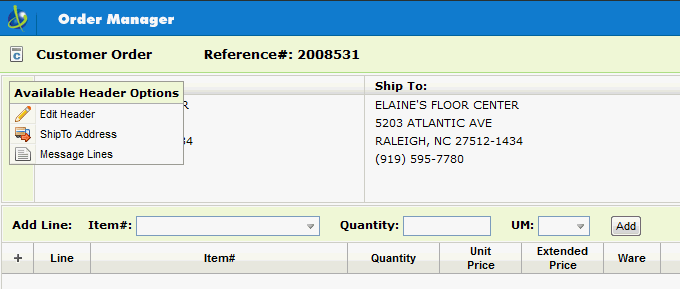
When the ShipTo Address option is selected the following window appears.
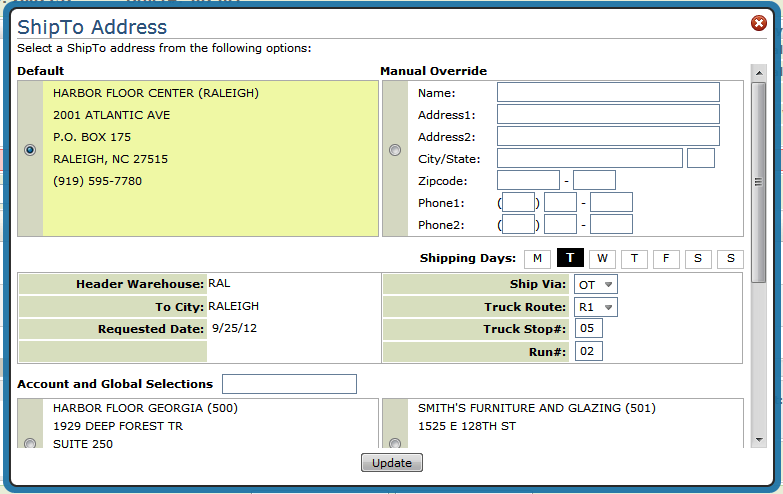
The Default address comes from the Billto file (FIL 1).
Use the Manual Override area to enter a shipto address if different from the default.
The Header Warehouse, To City, and Requested Date are pulled in from the order header.
A darkened shipping day, in the example above Tuesday, signifies the day that the truck route is scheduled to run. The initial shipping days available are based on the truck route entered on the order header. Changing the truck route either on this screen or on the order header can change the available shipping days.
Note: If a truck route is not specified on the order header, none of the shipping days will be available (blackened out) and the shipping information (Shipvia, Truck Route, Truck Stop# and Run#) is not populated.
The shipto addresses at the bottom of the screen come from the Shipto File (FIL 15). These are alternate shipping addresses that have been used for previous customer orders.
Use the Account and Global Selections field to search through the alternate shipping addresses.
System Wide Setting - Options for Taxing Based Upon Shipto Address - Contains several options such as Auto-fill State & City from Tax By Zip Table if Zip Code Found and Make Zip Code Mandatory that pertain to the Shipto screen.
Routes File
Interwarehouse Transfer File.- used to calculate scheduling for transfers.
Inventory Analysis in Navigator Order Management
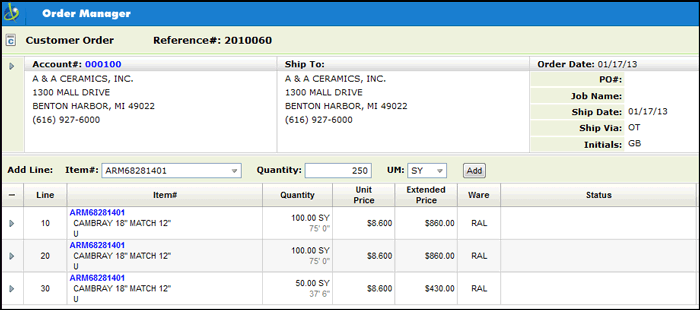
Inventory Analysis allows you to select single or multiple items (both serial numbered and rolled items) manually. A confirmation window at the end of the inventory selection displays the total quantity requested, the total quantity selected, and then the difference, which is the balance left to select.
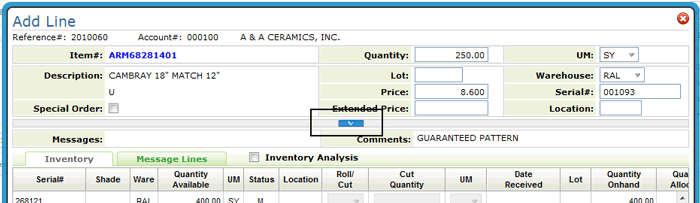
1. The Inventory Analysis functionality can be activated when manually selecting inventory to fill an order. On the order detail window, enter the item and the quantity and UM.
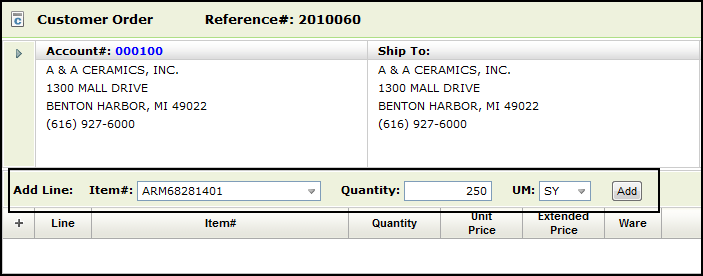
2. Click Add to access the Add Line window. Notice the Inventory Analysis option.
3. When Inventory Analysis is activated, the Roll/Cut, Cut Quantity and UM fields also become active and editable.
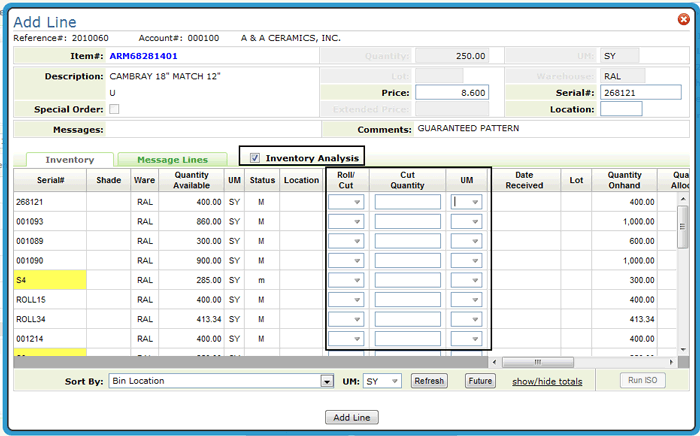
If Inventory Analysis is not activated, the default, only one serial number can be added at a time and the Roll/Cut, Cut Quantity and UM fields are not editable. Furthermore, in the default selection method, the selected serial number appears in the Serial# field in the upper left-hand corner.
If Inventory Analysis is selected, the window expansion option is no longer available. The information contained in the expanded window applies to only one serial number. When using Inventory Analysis, multiple serial numbers can be selected so the information is not applicable.
Note: The Lot, Warehouse, Serial#, Location, Extended Price, Special Order fields/options also become inactive.
4. After Inventory Analysis is activated, you can selected multiple serial numbers and then use the Roll/Cut, Cut Quantity and UM fields to edit the selected inventory.
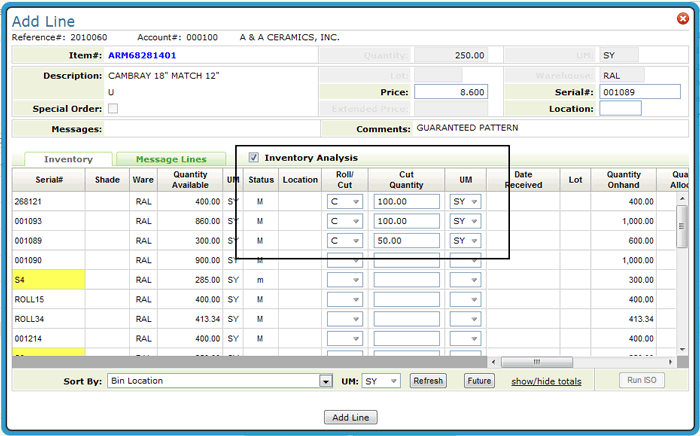
Cut/Roll - Designates if the full roll quantity is going to be used or if a cut to the roll is needed. There are two options:
R - Roll - allocates the entire roll. If R is selected the entire roll quantity is automatically inserted in the Cut Quantity field.
C - Cut - a quantity must be entered and available for allocation.
Note: The Cut/Roll field does not display for non-rolled items.
Cut Quantity - Quantity being requested. The quantity cannot be more than the order quantity/UM value. For example, a quantity of 100 PC can be entered if the order was for 50 CT, as long as 100 PC is not more than 50 CT.
UM - Ordered item unit of measure. The default is the UM on the order.
Note: The Status field shows the serial number status. Inventory status codes may be user-defined. However, the system supplied codes include: u = unopened roll or bundle, o = open roll or bundle, M = measured Balance, m = measured balance, with one cut made after measuring, # = in suspense, L = lost, I = being inspected.
5. Click Add Line. The Confirm Selections window appears. The Confirm Selections window displays the serial numbers you selected to fill the order. If a quantity was entered on the Add Line window, the total quantity of the selected serial numbers is compared to the requested quantity.
The price can also be overridden.
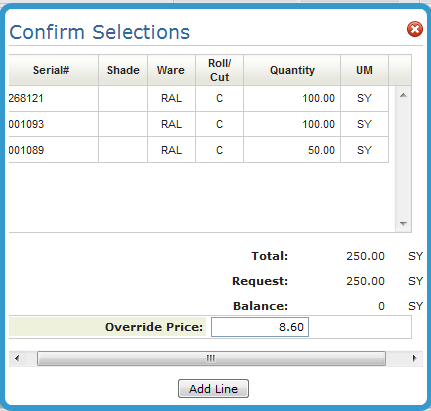
6. After confirming your selections and entering a new price, if needed, click Add Line to enter the serial number onto the order.
Note: If you need to make changes to your serial number selections, close the Confirm Selections window to return to the Add Line window.
Customer Savings Message in Navigator Order Management
Generating the Savings Message
This functionality, activated by a System Wide Setting, automatically generates a message line that shows the customer how much they saved with any special pricing given them.
Note: Multi-Unit orders are not included in this enhancement.
System Wide Setting - Options for Printing Price Savings on Customer Documents
This system wide setting lets the system know which price list to base the savings calculation on.
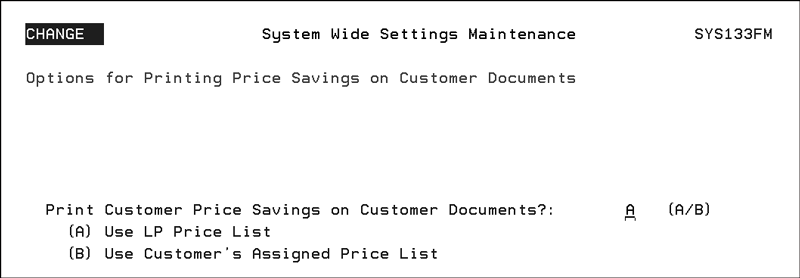
Option A - Compares selling price to the list price (LP price record)
Option B - Compares selling price to the price list assigned to the customer in the customer’s Billto file.
Blank - The setting is not activated.
Customer Preferences File
The customer must be authorized to see pricing. This is done via the setting Print prices on Order Acknowledgements.
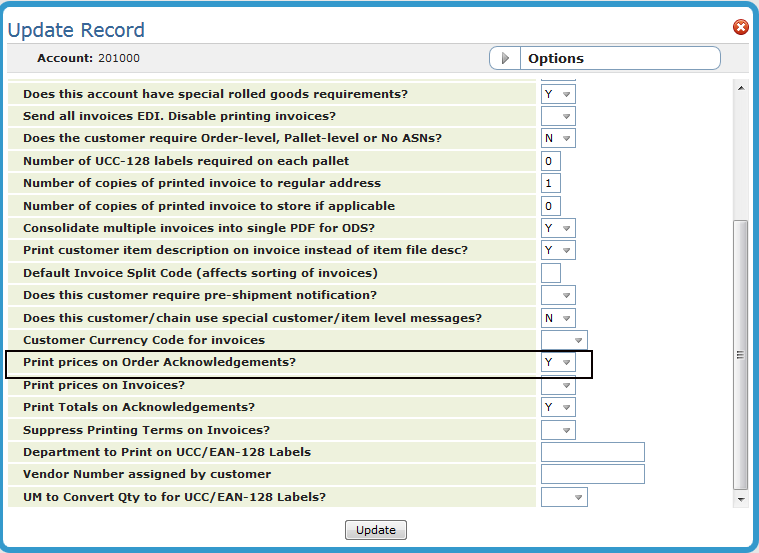
If the Print prices on Order Acknowledgements is set to “N” the savings message is not displayed.
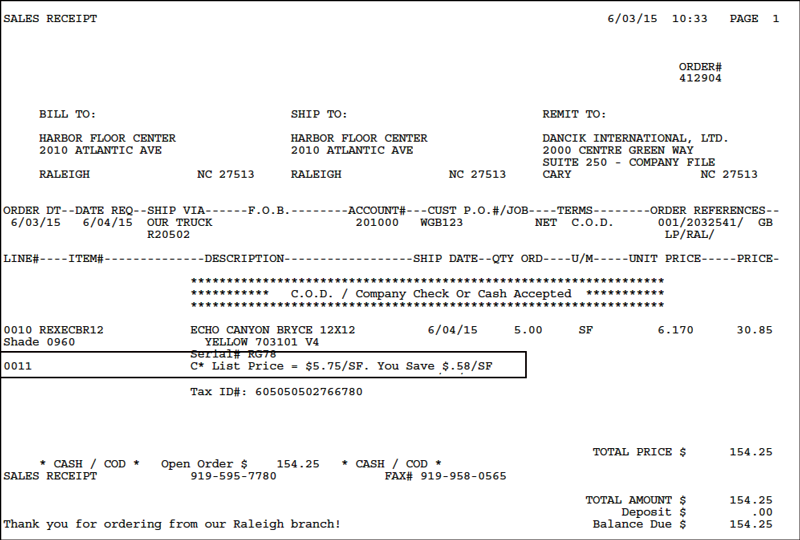
Generating the Savings Message
The savings message line is automatically generated during Navigator Order Entry.

Note: The savings message only prints when the price for the item is lower than the list price.
Notes:
If a you cancel an order line that has a savings message line the savings message line will need to be cancelled as well.
If you combine like items on invoices, via the System Wide Setting - Options for Invoices, the system will consolidate the inventory line but not the message line.
The savings message is also printed on Invoices and Order Acknowledgements (shown below).
This option provides a way to get messages to people or departments that may not always be signed into the system. For example, messages can be sent to a pick list printer or a bar code label printer in the warehouse where in some cases the printer is monitored more often than the screen.
Note: In order to use this functionality, a AS400 user profile must be assigned a menu bar that includes the Send Printed Messages option. Menu bars are assigned to users via the Attention Program field of the user's profile (accessed by entering WRKUSRPRF on a command line). For more information, refer to How to Assign Menu Bars to Users.
1. Click on the user's name within the menu bar.
2. Select Send Printed Messages.
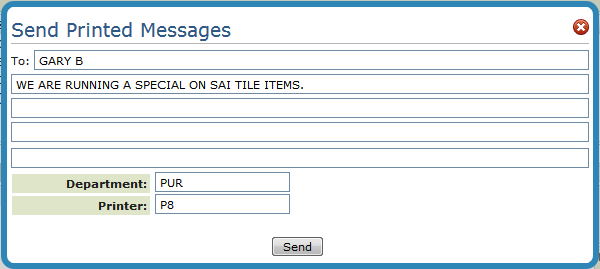
3. You can enter a Department, a Printer or both. If you enter both, the message will be sent to both the printer assigned to the department and the printer entered.
Departments are created and maintained via the PRTMSGDEPT system cross reference table (accessed via menu option SET 5). Printers are assigned to a department in the table as well.
4. Click Send to have the message printed at the designated printer.
Navigator Web Control Panel (NAV 5 option Y) - Contains options that restrict users to a specific company, warehouse, or branch. This also controls whether the user is set to a retail environment, ability to run automatic ISO, and form controls for printed documents.
Navigator Control Panel (NAV 5 option U) - Contains several options relating to Order Management and sending documents via ODS.
Customer Preferences File (FIL 38) - You can use the Customer Preferences File to activate many special functions and preferences such a default order handling code and printing prices on Order Acknowledgements.
Company Settings (SET 3) - Includes some Miscellaneous Options such as Roll / Cut / Balance (3 Price Option) and Force B/O To The Stocking Matrix Warehouse that affect order entry.
Item File - The Item File is used extensively to describe and classify products. Several of the fields such as the policy code, discontinued date, and cost information related directly to order management.
System Wide Settings (SET 4) - There are several settings that help manage order entry. Among them are:
— Item Policy NB Options (Control the NB Quantities Policy)
— Options to Enable Item Keyword Search
— Options for Order Acknowledgements
— Options for Order Acknowledgements - Part 2
— Options for “Must Ship Complete” Orders
— Options for Customer Order Contacts
— Options for Order Acknowledgments
— Options for Order Entry Date Required
— Options for Taxes On Will Call Orders
— Order Status Codes Changes in Order Entry
— Options for Bill of Materials