Need more info or you couldn't find what you were looking for, let us know by sending an email to: support@dancik.com.
Creating Invoices in Navigator
Creating Invoices Step-by-Step
Adding Orders to the Pending Invoices Table
Edit Pending Invoices in Navigator
Clearing Orders from the Navigator Pending Invoices Table
Produce an Invoice Edit Report
Here are the basic steps needed to generate invoices in Navigator:
Click Pull Order to Invoice under the Create tab
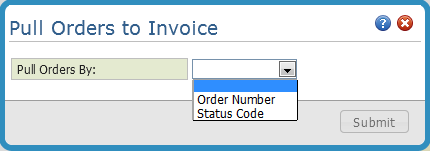
Select a Pull by Method:
- By Order Number
- By Status Code
The orders that match your Pull by criteria are added to the Pending Invoice table
In the Pending Invoices table, select the orders you want to invoice and then click Create Invoices
If needed, use the Create Invoice Options dialog box to override invoice defaults and set printing instructions
The newly created invoices are accessible under the Inquire tab.
Creating Invoices Step-by-Step
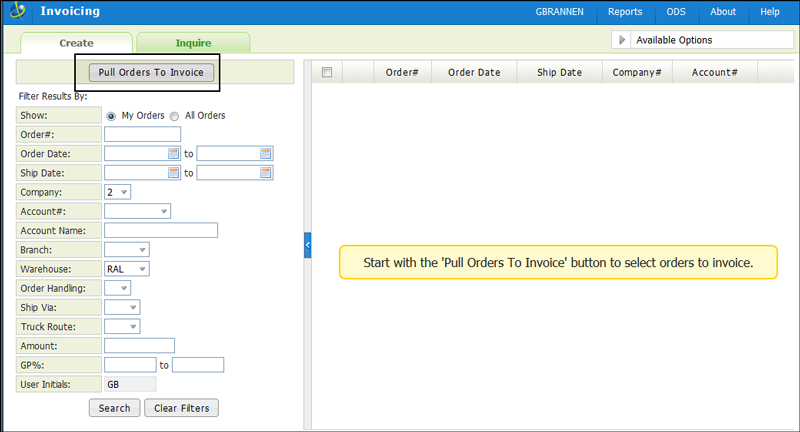
1. On the Create Tab, click Pull Orders to Invoice.
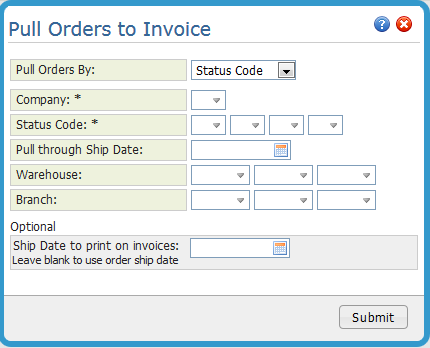
2. The Pull Orders to Invoice dialog box pops up. Click the drop down arrow and select a method to pull invoices with.
Note: The "pull by" options available depend on the user's access as set in the Control User File Maintenance (menu option NAV 5 option "U" on the green screen).
This option enters invoices one order at a time. When an order is invoiced using this option, the order's notepad is automatically updated to show who made the change and when and where it was made. This provides a simple way to track who, when and where invoices are created using this method.
If you only need to add one or two orders this option is probably the way to go. Enter an order number to invoice and select to invoice specific lines or invoice the whole order.
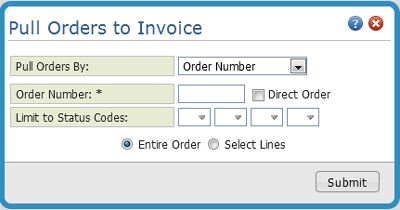
Use the Limit to Status Codes fields to only pre-select lines on the invoice at that particular status code. Some invoices can have several lines and these settings allow you to automatically limit the invoicing to specific lines instead of having to manually select lines.
If Select Lines was selected, the Edit Invoice window appears. Select the lines you want to invoice.

After selecting the lines, click Save.
When complete, click Return to Search to access the Pending Invoices table.
When Entire Order is used, the entire order is invoiced and automatically added to the Pending Invoice table. It will override all statuses. Back orders are omitted.
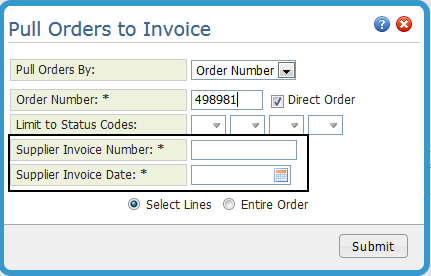
Direct Orders are shipped directly from the supplier to the customer. If Direct Orders is selected two new fields appear that allow you to enter the Supplier Invoice Number and Supplier Invoice Date.
This option searches for all orders with the status code(s) specified. All lines at the specified status are invoiced, as if each order had been keyed individually. A list of the orders & lines invoiced is created.
This option, when combined with efficient warehouse procedures, can virtually eliminate the Order by Order invoicing function in all wholesale sales environment.
Note: Back Orders and Direct Ships are omitted.
Field Name |
Description/Instructions |
Company |
Your default company number displays here. Only this company will be invoiced. |
Enter Status Codes |
Enter up to four status codes that indicate a line item can be invoiced. You must enter at least one status code. We recommend that the S Status code (indicating shipped) be used for invoicing by status code. The program automatically invoices only the lines at the status code(s) entered here. |
Pull Through |
Enter a date to pull all orders with the ststus(es) up to the entered ship date. |
Warehouse |
Enter the header warehouse codes to invoice or leave blank to include all header warehouses. |
Branch |
Enter the branch codes to invoice or leave this field blank to invoice all branches. This field enables you to run invoices separately at each branch and run invoice batches by company and branch in order to use separate pre-printed forms. Adhere to the following guidelines when printing invoices in a decentralized multi-branch environment:
|
Pull through |
Enter a ship date here only if you want to update the ship date that appears on invoices. This allows you to invoice yesterday’s shipments in a 24 hour warehouse environment. If you leave this field blank, the existing ship dates from the Order File are used. |
Click Submit to add orders/lines meeting the selection criteria to the Pending Invoices table and to generate the Price Variance and Invoice by Status Code Reports.
Invoicing by status codes works as follows:
The program automatically invoices the line items that are at the selected statuses and match your parameter entries. It then prints a list of the orders invoiced. You should proceed only after reviewing this report. The report displays the reasons why an order is not invoiced (i.e., order on credit hold or has not gone through the Close-A-Truck program).
The invoices are then ready to print and are accessible via the Inquire tab for Today's invoices.
The program either cancels or leaves open (back orders) any uninvoiced line items on invoiced orders according to the Order Handling Code.
Print invoices.
Note: All point of sale and direct ship invoices are bypassed when invoicing is done by status codes. This prevents duplicate billing when these invoices are accidently scanned or updated to an S status. Direct ship invoices are bypassed because it requires the user to enter the supplier’s invoice number and a date.
Partially shipped orders that are returned to credit hold status when back orders are filled can be invoiced, even though on credit hold, using this option. The Enter Invoices Program, in which you create invoices one at a time by order number, will not allow you to invoice an order that is currently on credit hold. The Invoice by Status Code Program extracts only the items marked as shipped, and leaves the remaining lines on credit hold. This situation occurs only when a signal order has some lines being invoiced and other lines being back order filled at the same time.
Adding Orders to the Pending Invoices Table
After selecting an invoice pulling option and entering the necessary parameters, click Submit. The orders that meet your criteria are added to the Pending Invoices Table.
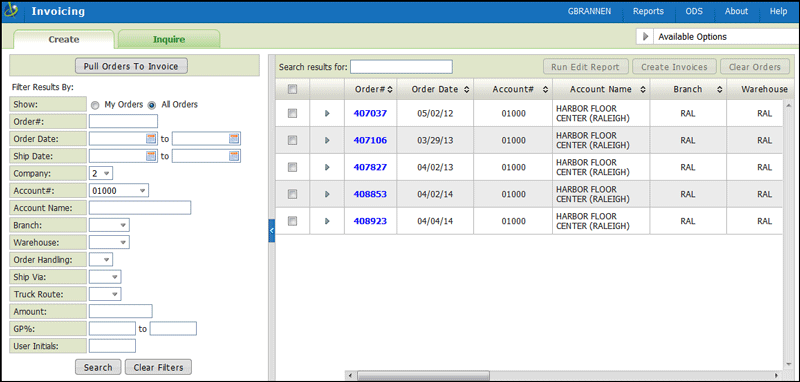
Note: If you need preliminary printed verification of orders about to be invoiced, or to list all unprinted invoices, select the orders then click Run Edit Report. An edit does not cause any processing to occur. The order still remains accessible for corrections and printing.
Select the orders you want to invoice and click Create Invoices in the top right hand corner of the table.
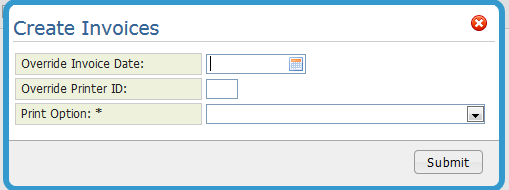
Use the Override Invoice Date and Override Printer ID fields to override the invoice defaults. The default for the invoice date is today's date and the printer default is established on page three of the users Web Control Panel (menu option NAV 5 option Y).
The following Print Options are available:
Print if forms are loaded and aligned - Use this option if the invoice forms are in the printer and printing can commence immediately.
Print if forms need to be changed and aligned - This option directs the invoices to a printer, but it doesn’t automatically print them. It gives you time to get the invoice forms ready to print. They can then be printed when the printer is ready.
Create but leave on hold in spool file - This option creates the invoices, but does not print them. Instead the invoices are placed on hold in the spool file. Use this option if you distribute invoices via fax and email.
Note: You will need to release the spool file to print invoices using ODS.
Click Submit to generate the invoices. The newly created invoices can now be viewed under the Inquire tab.
Note: Orders stay in the Pending Invoices Table until they are:
Selected and an invoice is created for them via the Create Invoices button.
They are invoiced through night jobs. You can invoice automatically each night (or day) using the IBM-supplied AS/400 job scheduling utility and the IN/INSCHECL program.
Edit Pending Invoices in Navigator
1. On the Pending Invoice Table, click on the option arrow to the left of the order number to access the Order Options pop-up.
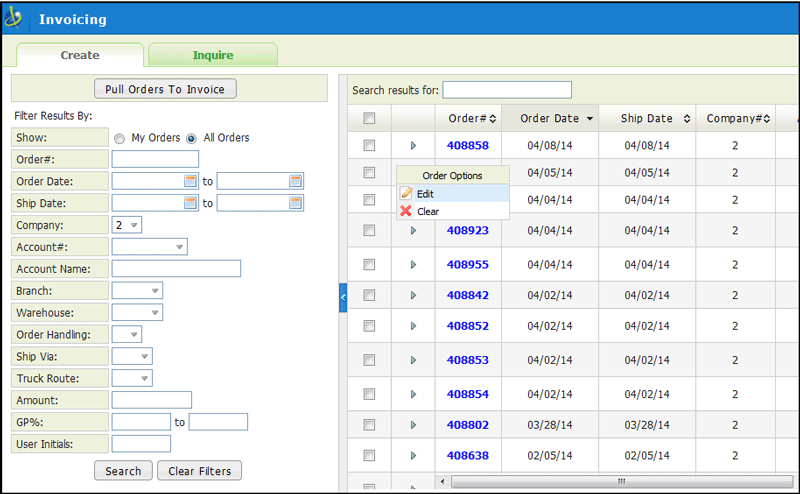
2. Select Edit. The details of the Invoice appear.

Note: Click the double arrow icon to collapse the Order Header Information.
3. Select the order lines you want to invoice and add any applicable charges such as freight and/or handling charges.
If you need to do more editing than selecting lines to invoices or adding additional charges, click the order link to access the order.
Note: Backordered lines cannot be selected for editing.
4. Click Save to update the Total Amount Due.
You can edit and save pending invoices as many times as you want. Each save will calculate the Total Amount Due for the selected Lines.
Depending on your invoicing settings, additional charges (e.g. Delivery charges, minimum order charges, and/or special charges) may be applied when the invoice is processed via the Create Invoices button in the top right hand corner.
Notes
The calculations for GP$ and GP% are essentially a four part process
First Total Price is calculated: Total Price = TOTAL PRICES (INCL ALLOW) + TOTAL MISC PRICE + TOTAL Hand Charge/Discount + Freight
Then the Total Cost is calculated: Total Cost = TOTAL COSTS (INCL ALLOW) + TOTAL MISC COSTS
GP$ = Total Price - Total Cost
GP% = ($GP / Total Price) * 100 (rounded to 2 decimals)
The exchange rate information comes from the Currency Code/Exch Rate Table (SET 11).
The system checks the field Customer Currency Code For Invoices in the Customer Preference Table Maintenance (FIL 38) to see which currency conversions to use.
Clearing Orders from the Navigator Pending Invoices Table
The Clear Orders button allows you to remove several records at once.
1. On the Pending Invoices Table, select the orders you want to clear. The Clear Orders button becomes active.
![]()
2. When orders are cleared from the Pending Invoices Table they are moved back into the Order system. They can be added to the Pending Invoice Table through another invoice pull.
3. Orders stay in the Pending Invoices Table until they are:
Selected and an invoice is created for them via the Create Invoices button.
They are invoiced through night jobs. You can invoice automatically each night (or day) using the IBM-supplied AS/400 job scheduling utility and the IN/INSCHECL program.
Produce an Invoice Edit Report in Navigator
Select an invoice or invoices to run an invoice edit for using the check boxes shown below. Once selected, the Run Edit Report button becomes active so that you can produce invoice edits and associated reports.
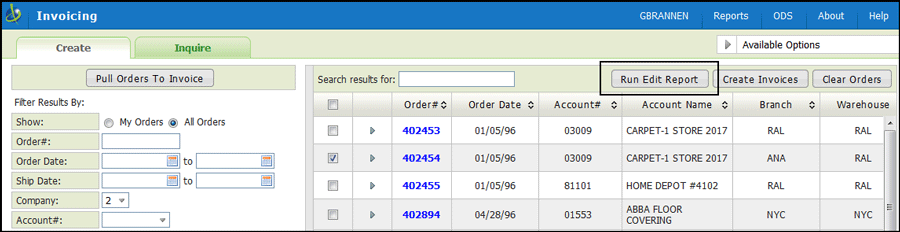
Run an edit if you need preliminary printed verification of orders about to be invoiced, or to list all unprinted invoices. An edit does not cause any processing to occur. The order still remains accessible for corrections and printing.
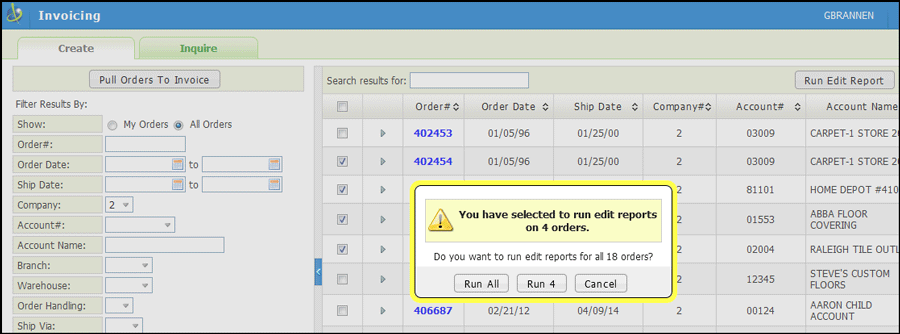
You can run the report for all the orders selected for invoicing for a company or you can limit the report to specific orders. If you do not select any orders, all the orders in the pending file are included.
Use the Override Invoice Date and Override Printer ID fields to override the defaults. The default date is today’s date and the printer default is established within the web control panel (NAV 5).
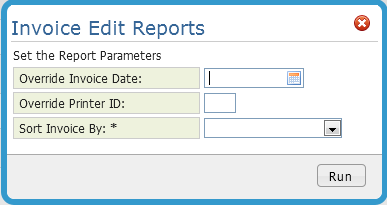
Invoices are marked with the operator who loaded them into the Pending Invoices table. When running edits, printing invoices or clearing orders, you can select just your orders or all orders.
Note: Operator initials have to be entered in the Default Initials field of the control panel (NAV 5). If an operator does not have their unique initials entered, an invoice edit cannot be run for them.
The Invoice Edit can be accessed via the Spoolfile Reports under ODS.