Need more info or you couldn't find what you were looking for, let us know by sending an email to: support@dancik.com.
Entering AR Deposits in Navigator
Splitting Payments Between Accounts
Auto Post Small Differences in Payments
Note: To access several training videos pertaining to AR, click here.
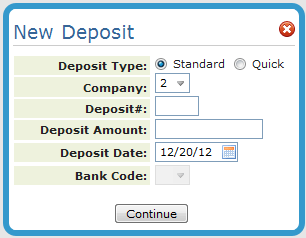
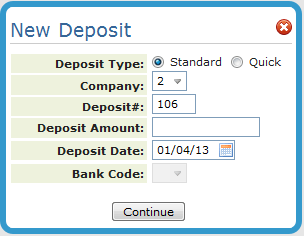
1. Click the New Deposit button and enter the deposit information.
The Deposit Amount can be 0. This can be useful in cases such as when matching an advance deposit to an invoice.
Click Quick to use the Quick Deposit feature. You can use this option to store and retrieve daily deposits for cash applications. You could also use this option to quickly post cash to an account as on-account and then go back later to apply on-account to the appropriate invoices. For more information, refer to Quick Deposits.
Note: For more information refer to Quick Deposits.
2. Click Continue to access the AR Ledger window.
Note: The Bank Accounts are established via the Bank Code Maintenance option (ACT 113).
3. Enter a check number, check amount (amount can be zero) and an account number. Tabbing out of the Account# field refreshes the window to show the open invoices for the account.
Accounts are locked to prevent another user from paying invoices in the same account.
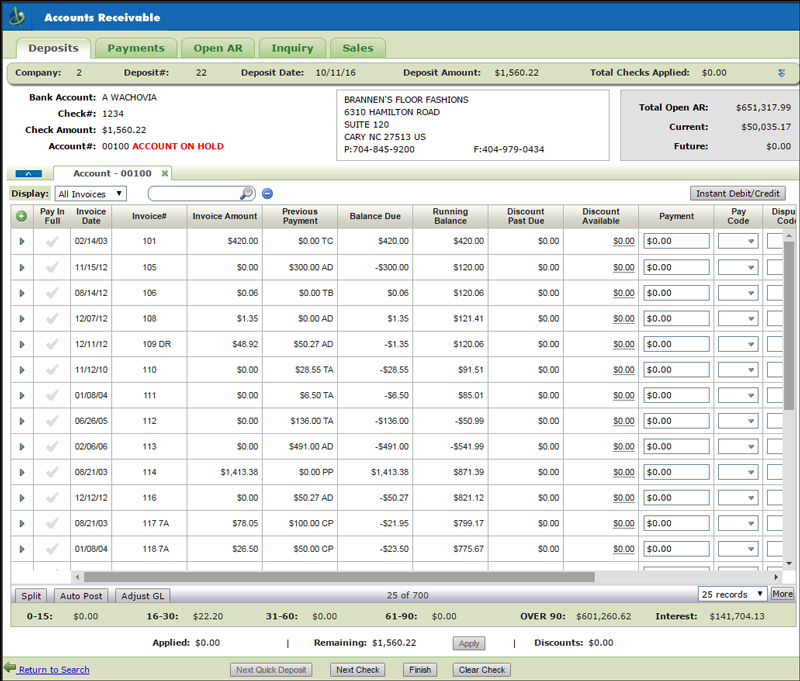
Note: The lock symbol signifies the invoice has already been selected to be paid in another deposit that has not been posted. When the invoice is posted the lock is removed. The invoice locking functionality does not transfer between Navigator and the iSeries (green screen) applications. If you select a "locked" invoice, the message This invoice does not belong to this deposit and cannot be updated appears.
Click the double arrow symbol in the upper right-hand corner to display a summary of checks entered for this company and deposit.
4. Use the Display options to filter the invoice displayed. You can view:
All invoices
Balance Due invoices
Zero Balance invoices.
Note: This filtering functionality is linked to the Company Setting (menu option SET 3 option 2 AR and Credit Options) Show Current Paid Items on AR Ledger. If this setting is set to "N", the only filtering option is to view Balance Due invoices.
5. To pay an invoice in full, simply click the Pay in Full column. The balance due is automatically inserted into the Payment field and the proper payment code is assigned.
6. If you are not paying an invoice in full, enter the payment amount in the Payment field and select a Payment Code. Some of the more commonly used payment options are:
Partial Pay
Credit Partial
Note: The Payment Codes can also be displayed in other areas on the screen (mainly in the Invoice# and Previous Payment columns).
7. DC stands for dispute code. This code identifies transactions either the customer or accounts receivable personnel are disputing. Example codes are:
C - Customer is partially paying and waiting for a credit for the balance of the invoice.
D - Customer has been denied a discount taken with the payment.
Note: You can create codes to fit your business practices. This is done via option 104 - A/R Dispute Codes File on the Accounting File Maintenance menu.
8. As you are applying payments against invoices, the applied amount increases and the remaining amount will decrease.
9. When you are finished paying invoices for the current account you can:
Click Next Check and enter the payments for another account's invoices.
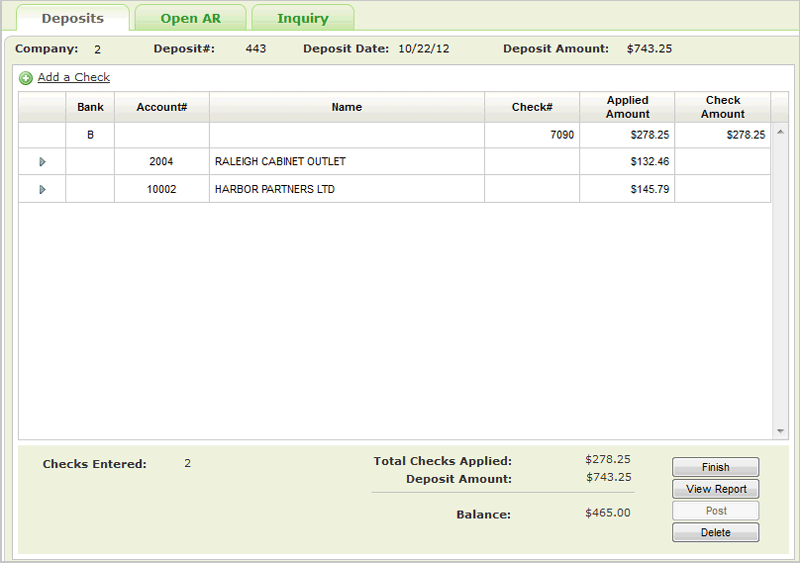
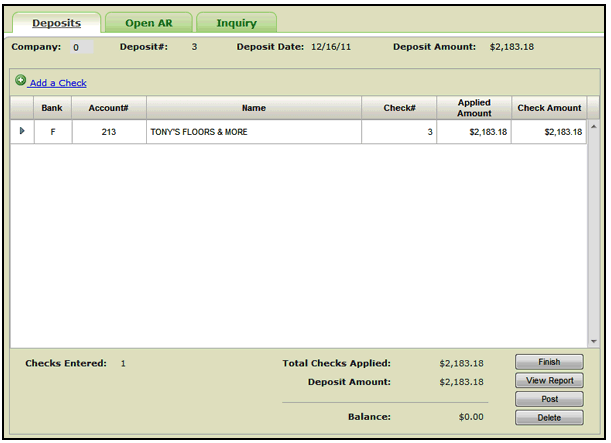
Click Finish to display a summary of the checks you entered for the deposit.
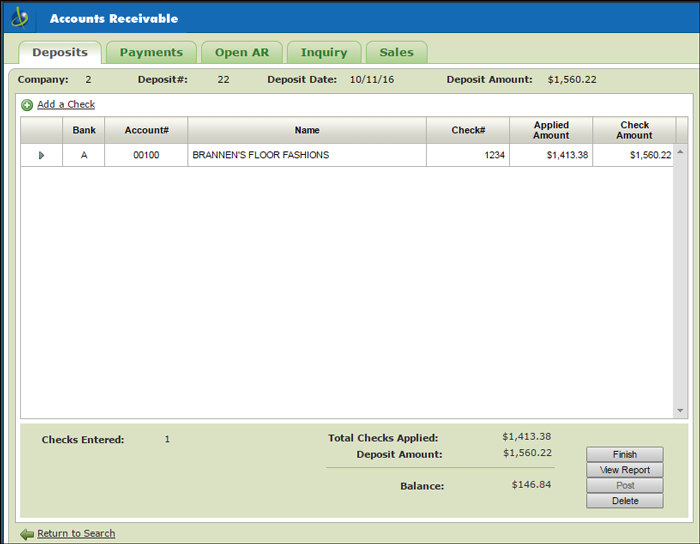
On the summary screen you can click:
Add a Check - Returns to the AR Ledger screen where you can enter another check for the same company and/or account or enter a different company and/or account.
Finish - Returns you to the initial AR screen with any unposted deposits displayed.
If the deposit amount(s) applied do not equal the deposit amount initially entered, the following warning displays.
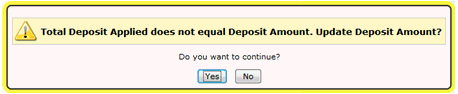
You can choose to continue by clicking Yes or return to the Ledger screen and update the deposits by clicking No.
View Report - Displays the AR Deposit Report which shows the deposit activity for the deposit number.
Post - Apply the checks applied to your customers invoices into the system.
Delete - Removes the deposit.
The Auto Post button, in the left-hand corner of the AR window, allows you to automatically apply the amount received to the oldest open receivables first. Credits are included in the auto post.
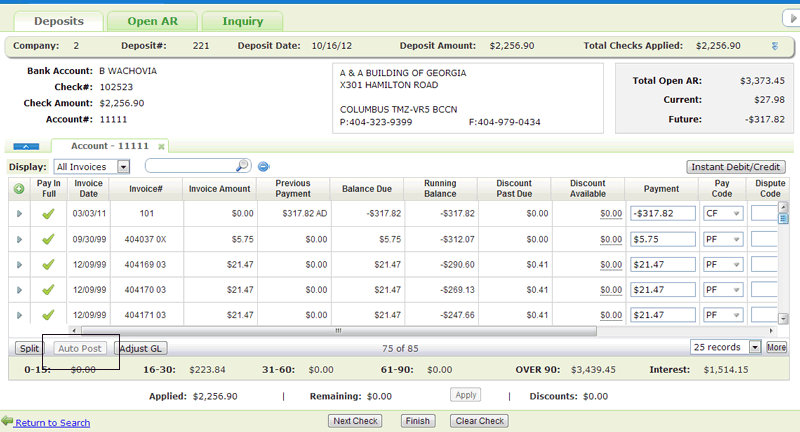
The auto post function applies cash to the first open item it finds and continues until the entire amount of the check has been applied.
Note: In Navigator, the Auto Post functionality is still available even after cash has been applied manually. This is an enhancement over the character based (green screen) system, where Auto Post is rendered inactive after a manual transaction has occurred.
The following pay codes are used:
PF - to clear open debits
CF - to clear open credits
The Auto Post button becomes inactive when:
One check is paying multiple accounts (Split has been clicked and multiple account tabs are open).
Open invoices are less than the payment amount.
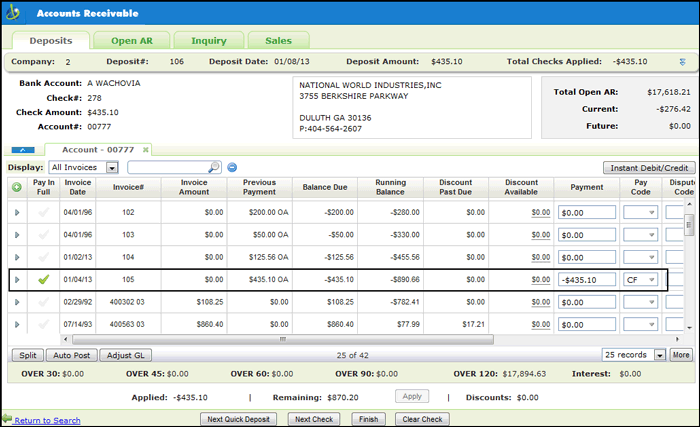
Splitting Payments Between Accounts
If you have more than one check paying invoices across multiple accounts, you do not have to separate the check number and amount by accounts. Enter the full check amount and apply invoices to all of the accounts without changing check number or amount by clicking on the Split button in the lower left-hand corner of the AR Deposits window.
Note: The split functionality can be used multiple times.
The following example displays an invoice being paid in full. The Split button is located in the lower left-hand corner of the window.
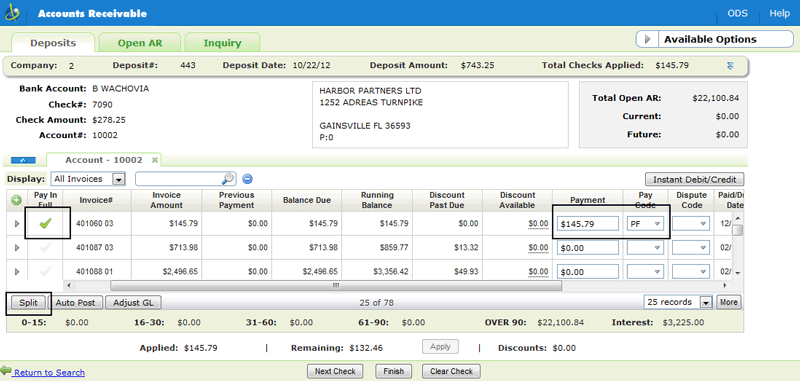
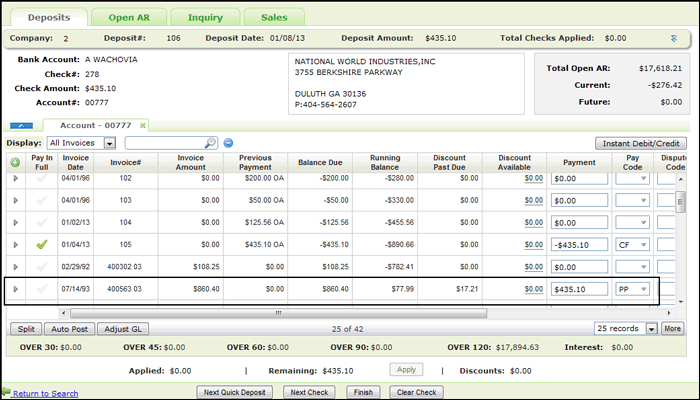
When Split is clicked, you can enter the next account to enter payments. The accounts you are working on within split checks are considered in use.
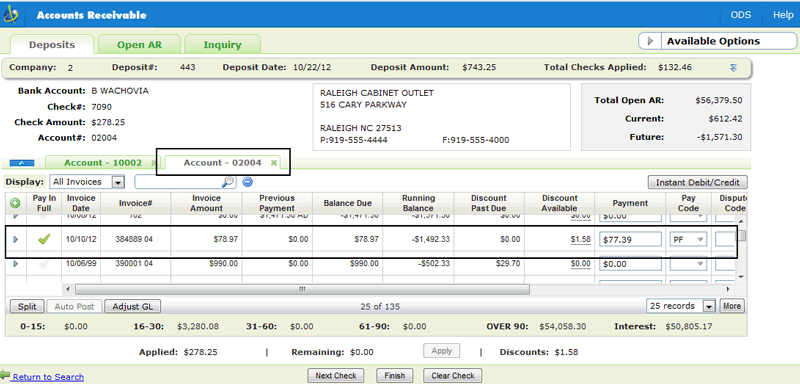
Note: Clear Check clears all the entries for all the account tabs. It essentially allows you to start over from the beginning.
Enter the payments for the new account and click Finish to access the Deposit Summary window with the accounts grouped by check number.
On the summary screen you can click:
Finish - Returns you to the initial AR screen with any unposted deposits displayed. If the deposit amount(s) applied do not equal the deposit amount initially entered a warning displays.
View Report - Displays the AR Deposit Report which shows the deposit activity for the deposit number to include all the information for the split checks.
Post - Apply the checks applied to your customer's invoices into the system.
Delete - Removes the deposit.
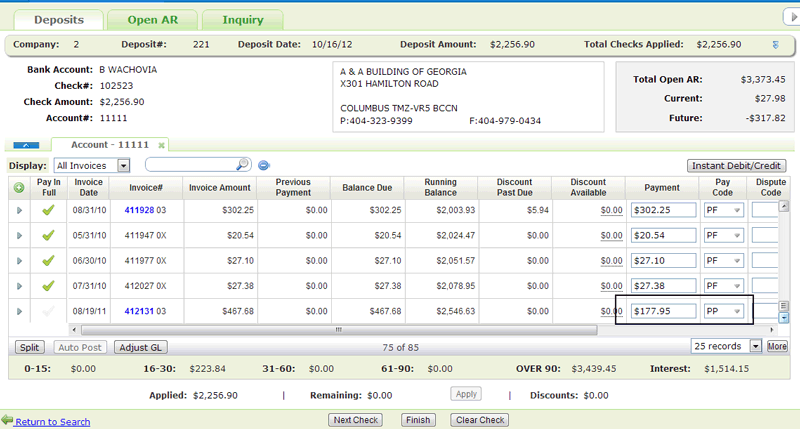
Auto Post Small Differences in Payments
Setting over and under payment limits
Click the Apply button to automatically clear small payment discrepancies while applying cash.
In the following example:
A check was received for $165.00.
An invoice of $165.80 was paid in full.
$.80 was left on the invoice.
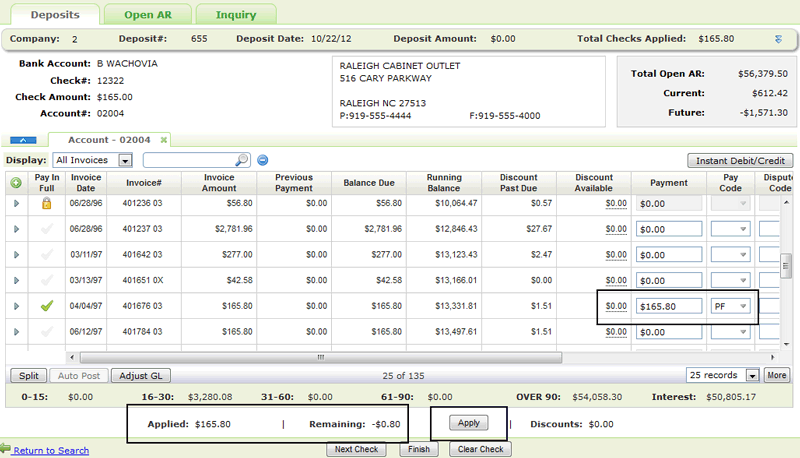
Overages are applied as negative discounts.
Shortages are applied as positive discounts.
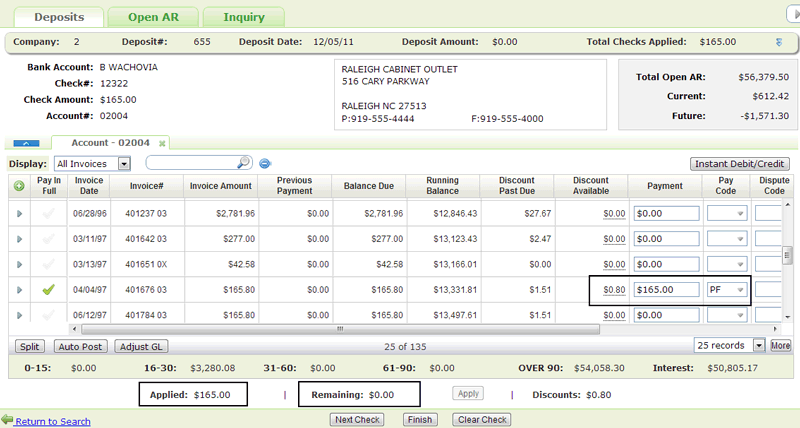
When Apply is clicked:
the remaining balance is inserted into the Discount Available column.
the invoice is marked as paid in full (Pay Code PF).
the Remaining balance is set to 0.00.
the amount Applied is updated.
Inactive Apply Button
The Apply button is inactive (grayed out) under the following circumstances:
The remaining balance does not fall between the over and under payment limits.
No cash has been applied yet. At least one transaction has to be performed for the Apply button to become active.
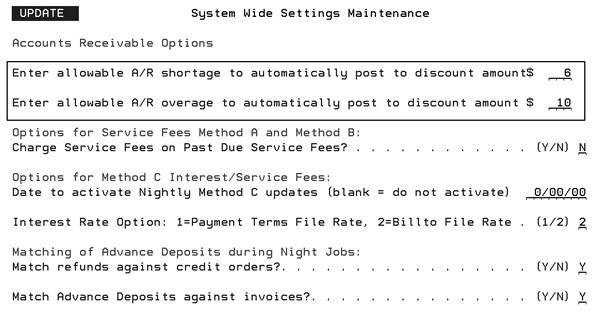
The allowable underpayment limit,and allowable overpayment limits are set via the System Wide Setting - Allowable Payment shortage/overages on AR.
1. On the System Settings Menu, select option 4 - System Wide Settings.
2. Enter an action code and password and search for the setting Allowable Payment shortage/overages on A/R.
3. Enter the dollar amounts in the shortage and overage fields.
Applying Cash Directly to the Miscellaneous Cash Account
Adjusting the Miscellaneous Cash Account while Working in an Open Account
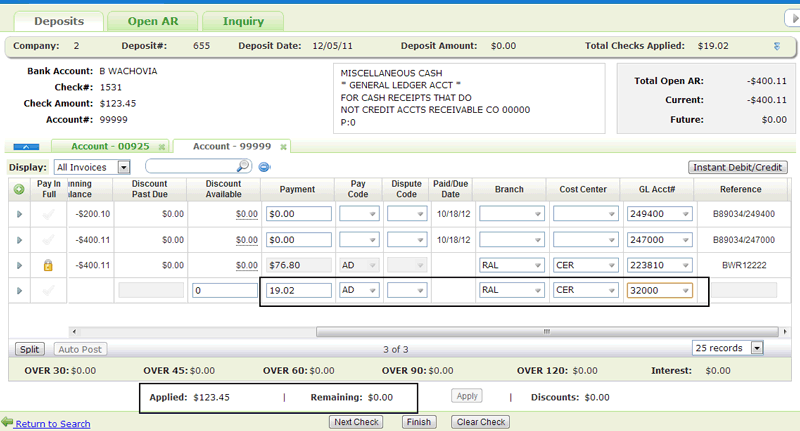
Applying Cash Directly to the Miscellaneous Cash Account
This feature allows for the entry of checks that are not associated with any customer’s account, and any adjustments against invoices from a customer’s account to offset to the general ledger. The checks can be posted to a general ledger account#, branch, and cost center. An example is an insurance check refund. The default miscellaneous cash account is 99999.
The method for entering cash in the Miscellaneous Cash account is basically the same for entering any other deposits. However, when account 99999 is used the Discount Available and Order# field on the AR Deposits window are replaced by Branch, Cost Center and GL Account# fields.
The only Pay Codes that are available are: OA (on account), AD (Advance Deposit) and GL (General Ledger).

Adjusting the Miscellaneous Cash Account while Working in an Open Account
This method allows you to adjust GL through miscellaneous cash against a customer's account.
Click the Adjust GL button to apply Miscellaneous Cash while working in an account other than 99999 (miscellaneous cash).
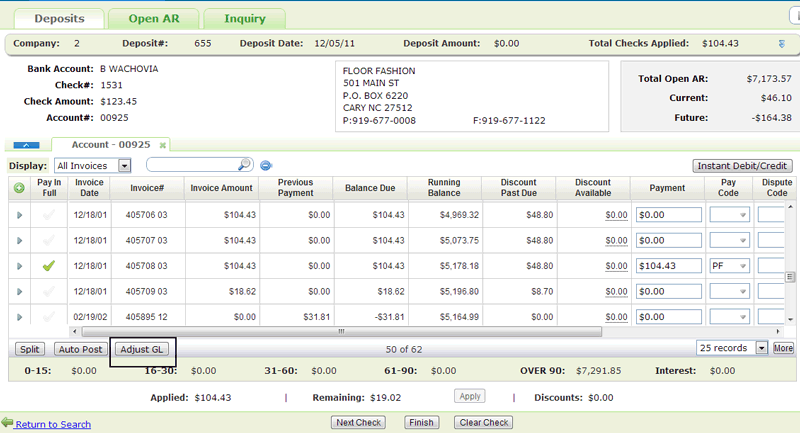
The Miscellaneous Cash account (account number 99999) is opened and the remaining cash is applied to it.
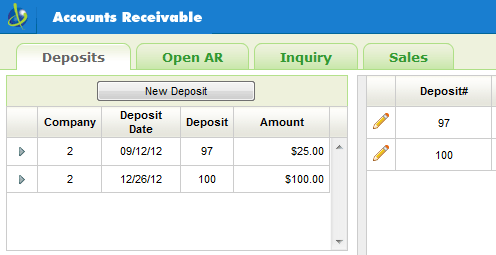
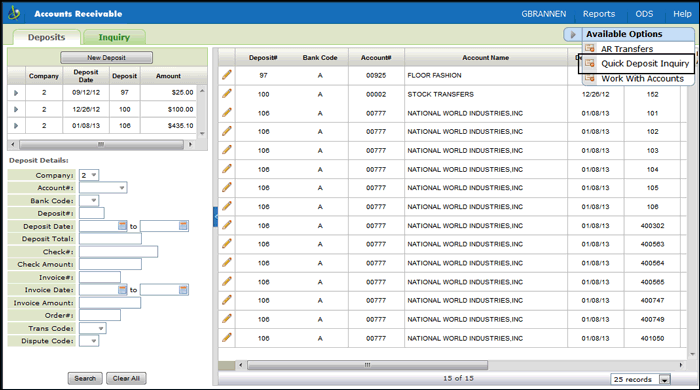
Use the filters on the left side of the screen to narrow your deposit search. Keep in mind these filters apply only to unposted deposits.
Note: Only the deposits made by the person signing in are shown.
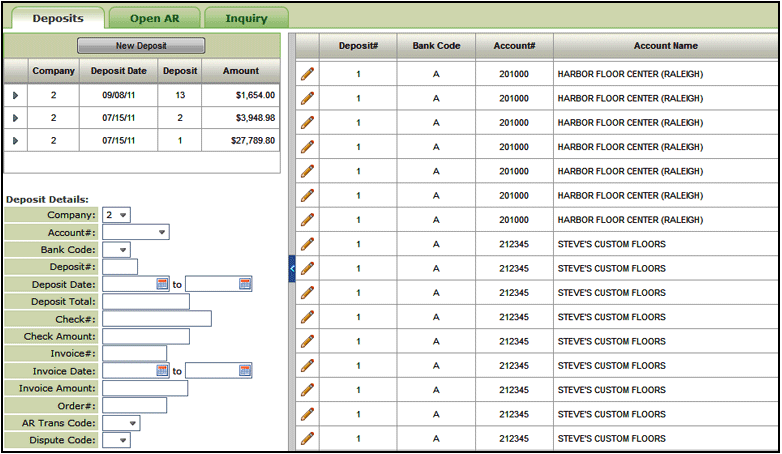
Click the pencil icon to access the AR Ledger screen for that deposit.
The unposted deposit summary is shown directly under the Deposit tab.
Click the arrow to the left of a deposit to display the Available Options.
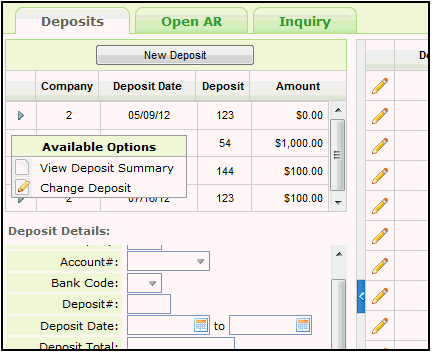
Displays the Summary screen which includes the following information about the deposit:
Bank
Account number
Check
Applied Amount
Check Amount
On the summary screen you can also:
Add a Check - Returns to the AR Ledger screen where you can enter another check for the same company and/or account or enter a different company and/or account.
Finish - Returns you to the initial AR screen with any unposted deposits displayed.
View Report - Displays the AR Deposit Report which shows the deposit activity for the deposit number.
Post - Apply the checks applied to your customers invoices into the system.
Delete - Removes the deposit.
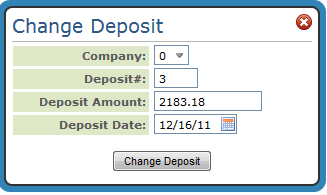
This option allows you to change the deposit information as needed.
This option for adding AR transactions allows you to quickly enter or post cash to an account as on-account and then go back later to apply to the appropriate invoices.
Posting and Applying Quick Deposits
Applying Quick Deposits without Posting
1. On the Deposits tab, click New Deposit.
2. The New Deposit window appears. Click the Quick Deposit radio button and enter the deposit information. Before you enter the checks, you must enter a deposit number, deposit total, date, and bank code.
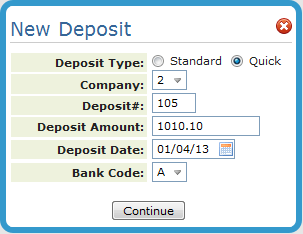
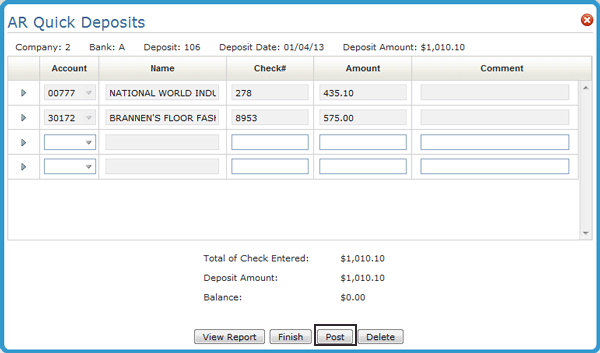
3. Press Continue to access the AR Quick Deposits window. This is where you will actually enter the checks.
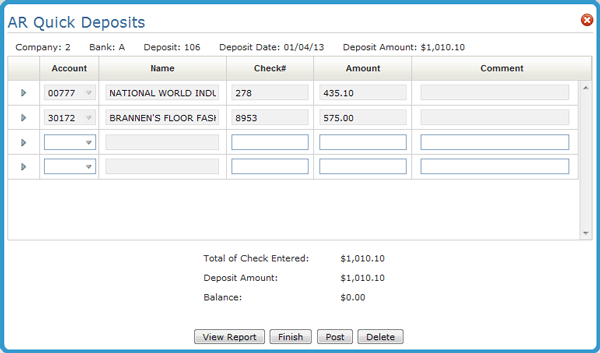
In this example, the amount of the checks entered equals the deposit amount. If the Total of Checks Entered and the Deposit Amount do not match, the quick deposit batch cannot be posted. However, you can click Finish and then go into the accounts to apply the cash from Quick Deposit.
4. After entering all the checks, click one of the buttons at the bottom of the window.
View Report - Prints a deposit listing of all entries. This deposit report looks similar to a deposit slip, especially when printed on a laser printer.
Finish - Leaves the quick deposit unposted and accessible by any user via the Quick Deposit Inquiry (under Available Options).
Post - Posts the quick deposit entries to AR. It will only post if the total checks entered are equal to the deposit total. This posts each check as an OA (on-account payment). This gives you the advantage of quickly updating the customer AR balances and their available credit, before the more time consuming task of reconciling each payment and applying to specific invoices. Later, when you apply these checks to invoices), you will enter cash with deposit totals and check totals equal to zero. This is because you will be clearing the previously posted on-account payment against invoices, and not actually posting additional cash.
Delete - Deletes
the entire quick deposit. To delete individual deposits, click its
option arrow (![]() ) and select
Delete Deposit.
) and select
Delete Deposit.
Posting and Applying Quick Deposits
1. On the AR Quick Deposit window, click Post
2. This posts the Quick Deposits into their respective accounts in an "on account" status.
3. To verify the on account entry, click the Inquiry tab.
4. Enter the account number in the search filters.
5. Click the drop down arrow to the left of the account and select AR Ledger.
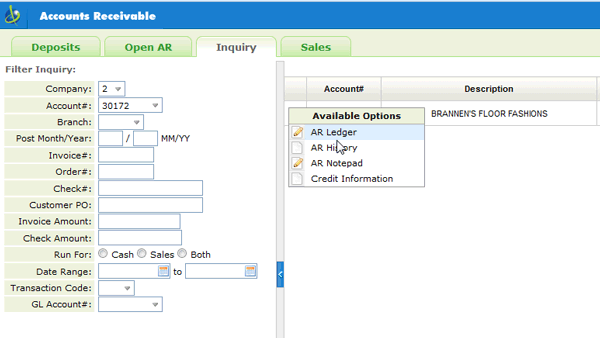
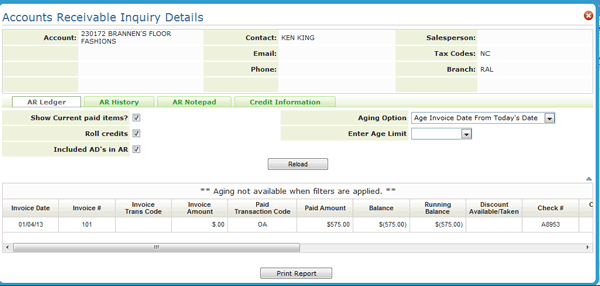
6. Verify that the quick deposit was placed on account.
Applying Quick Deposits without Posting
1. On the AR Quick Deposit window, click Finish.

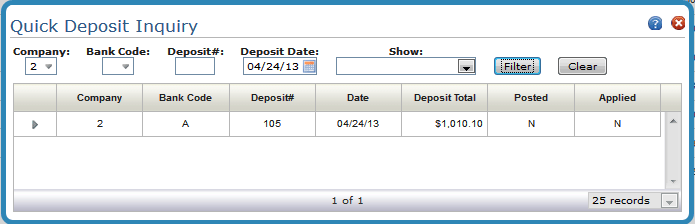
The Quick Deposit Inquiry window appears. Use the filters to find your quick deposit. Exit out of the window.
2. The quick deposits are not posted. but they are entered into the AR system and can be applied to their respective accounts via a standard deposit.
3. On the main AR Window, click New Deposits on the Deposits tab.
4. The New Deposit window appears. In order to apply unposted quick deposits, the Company, Deposit#, and Deposit Date must match what was entered for the quick deposit.
5. Press Continue to access the Deposits screen.
6. Enter the account number. If there is a quick deposit entered for the account the following message appears.
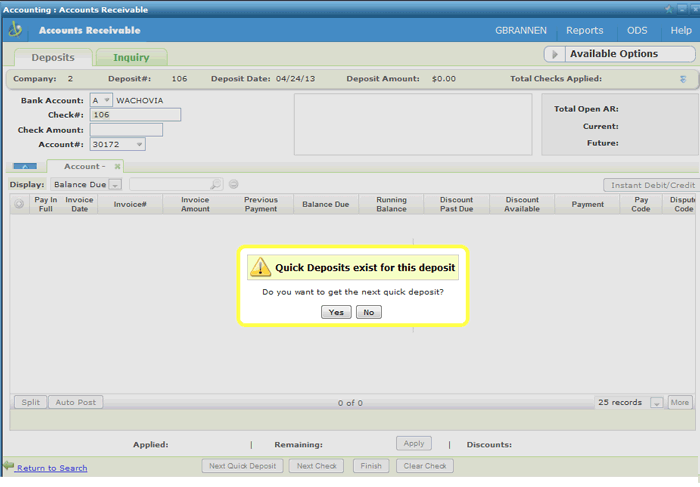
7. If Yes is clicked, the check number is automatically entered.
Note: The check amount is automatically entered if the quick deposit was not posted.
Tab or click out of the Account field to display the account's transactions. Look for the quick deposit if it was posted as on account.
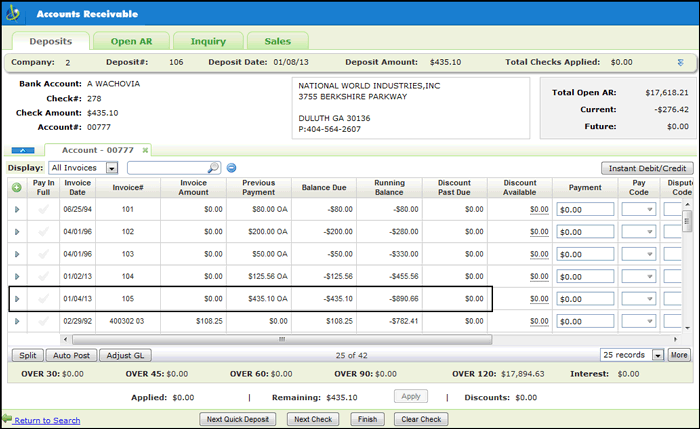
8. To use the on account money to pay invoices, click its Pay in Full column. The amount gets moved over to the Payment column and a Pay Code of CF is entered.
9. Apply the quick deposit as a full or partial payment against an invoice. In the example shown below, a partial payment was made.
10. If there are more accounts with quick deposits in the batch. click Next Quick Deposit and repeat this steps for those accounts.
11. Continue with viewing and posting your deposit from standard deposit.
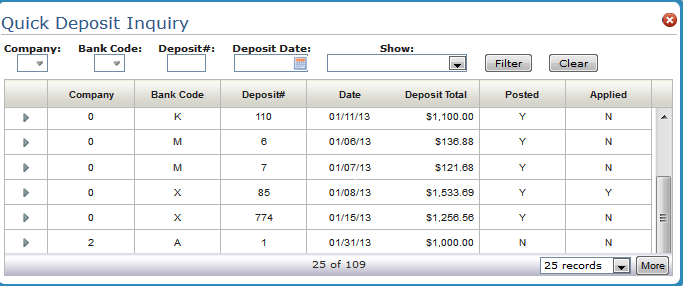
This Available Option allows you to search for and edit quick deposits.
Use the filters at the top of the window to only show the quick deposits you want to see.
Instant Credit Debit Notes Report
Use the Instant Credit/Debit button to apply debits or credits to an account without going through the normal Order Entry and Invoicing process. These transactions are considered a manual sale and a report is created only as a reference. You cannot view this invoice number through the normal computer generated invoice program.
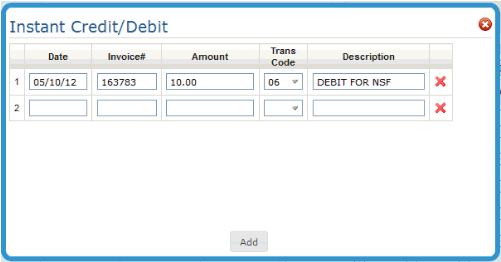
Credits to an account should be entered as a negative number.
Click Add to close the window and add the entry to the AR Ledger.

Instant Credit/Debit Notes Report
When Instant Credits/Debits are applied, an Instant/Debit Notes report is automatically generated and placed in the user's spool file. The report is labeled ARUPDATE.
