Need more info or you couldn't find what you were looking for, let us know by sending an email to: support@dancik.com.
Navigator Inventory Inquiry
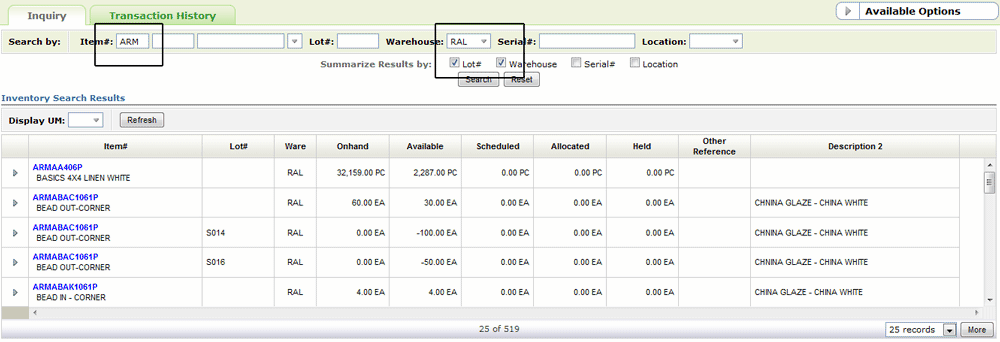
There are several variations of Inventory Inquiries. The more filters you use to search the more specific your search will be. These searches are not item specific. This means that even if you enter a complete item number other, very closely related, item numbers might also be included. For example, if you search on item number FAW 2222 5, results for item number FAW 2222 56 might also be included.
Inquiring across Multiple Warehouses using the Warehouse Matrix
A default inquiry with serial number inquiry
Inventory Inquiry Display Options
Available Options in Inventory Inquiry
Inventory Inquiry Field Descriptions
Files Associated with Inventory Inquiry
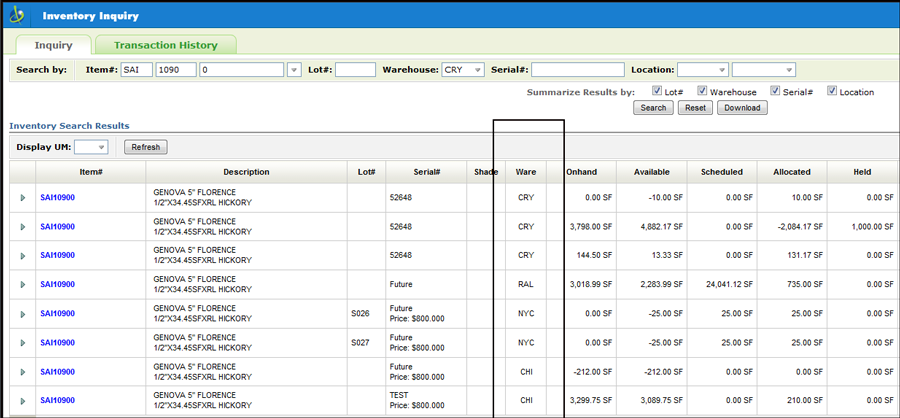
Inquiring across Multiple Warehouses using the Warehouse Matrix
If the Warehouse Matrix file is activated (*MX is entered in the DFT Search Warehouse field of the User's Web Control Panel path: NAV 5, Option "Y"), several warehouses can be displayed on an Inventory Inquiry.
The default inquiry is by warehouse and lot.
Note: Clicking on an item displays Additional Information such as what purchase orders and back orders affect the item and what are the related items.
In this inquiry:
Only the manufacturer portion of the item number was entered.
A warehouse is identified in the Warehouse field so the results are only for that warehouse.
If a warehouse was not specified, the inquiry would be across all the warehouses you have access to.
The results are sorted by Lot number.
A default inquiry with serial number inquiry
Including a serial number search allows the system to drill down further.
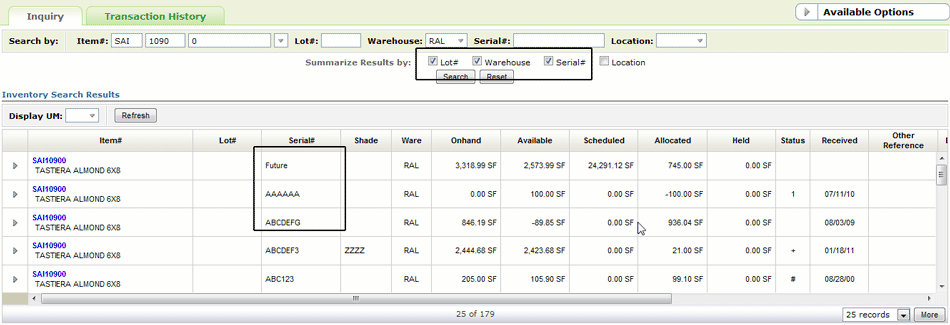
A serial number of Future or BO means the inventory is on order, but has not yet been received and/or assigned a serial number.
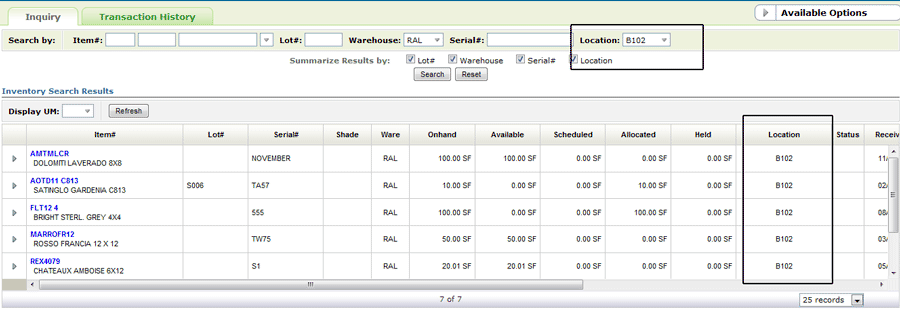
A location inquiry is limited to the specified warehouse. If a warehouse is not entered, the default warehouse, as set in the Control Panel, is used.
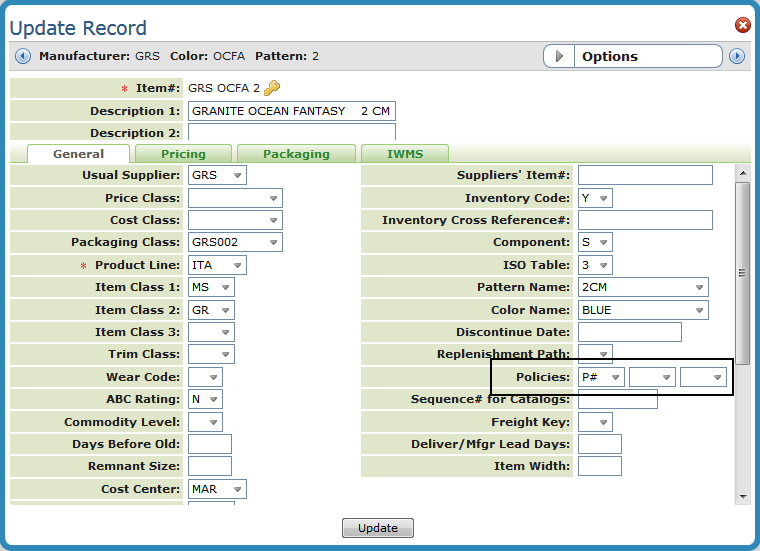
Slab images can be viewed in Navigator Order Management and Navigator Inventory Inquiry. The intent behind this functionality is to provide customer service with the ability to view the slab being selected in Navigator Order Management.
Viewing Slab Images in Navigator
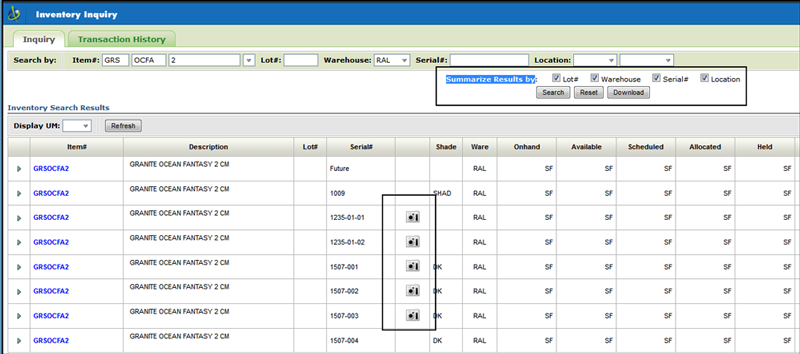
Item File - Slab items are coded with a P# in one of the 3 item policy codes.
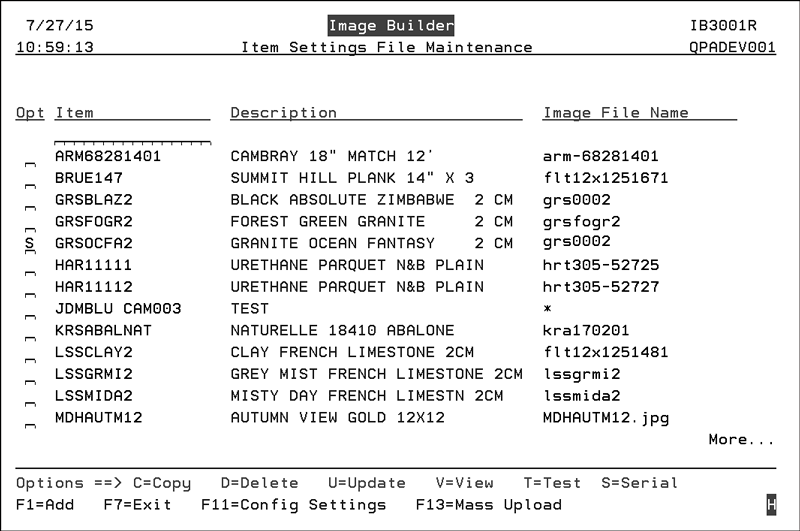
SET 307 - Item/Image Cross Reference File - The slab item needs to have an image set up.
Viewing Slab Images in Navigator
When performing an Inventory Inquiry and all the Summarize Results by parameters are selected, the camera icon appears.
This functionality provides the ability to arrange the information displayed in an Inventory Inquiry.
Note: Although useful for everyone, this enhancement was implemented for our slab customers so they could move the length and width information closer to the slab serial number.
1. Access Navigator Inventory Inquiry and enter an item; in this example it is a slab item.
2. Click the Display Options icon in the upper right hand corner of the window to display the following options.
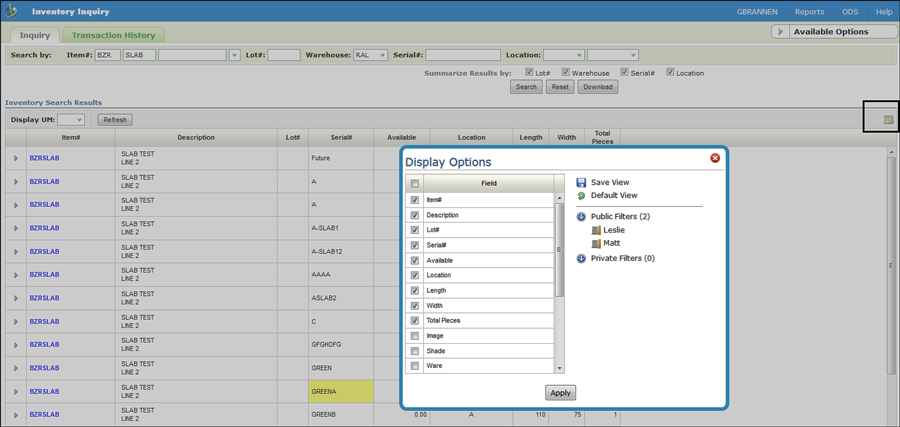
3. Select the fields you want to display in the Inventory Inquiry.
4. You can resequence the fields by clicking on them and dragging them to a new position. In this example, length and width were moved to be right after the serial number.
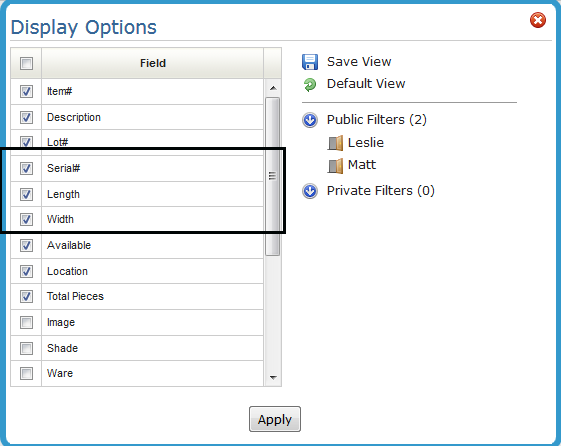
5. If you want to preserve your settings, click Save View.
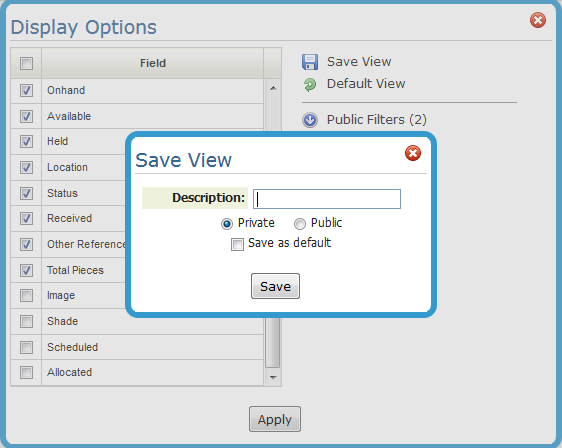
Public reports are available for all to use. Any user can delete or edit a public report. Private reports are only accessible to the person who created them.
6. Click Save to return to the Display Options window.
7. Click Apply. The Inventory Inquiry display refreshes to display the changes and you are able to save the new view as public or private.
Available Options in Inventory Inquiry
These options are accessed in the upper right hand corner.
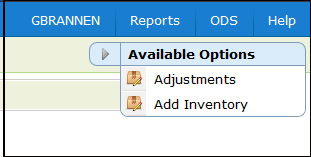
This option allows you to add inventory without having to go through the receiving process. It's main purpose is to add inventory into the system so it can be accessed and accounted for within the Inventory Inquiry screen.
Note: Use the Adjustment option to add to existing inventory or remove inventory.
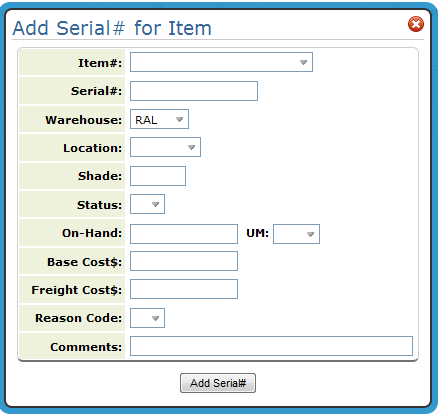
Complete the fields as needed.
When the inventory is added back into the system, the UM gets converted to the "Native" UM for the item. Native UMs are established in the Item File via the Order Entry U/M setting. When you access the added inventory in Inventory Inquiry the quantity is displayed in the native UM.
Enter a Base Cost or Freight Cost only if you want to override the default costs. established by cost class in the Cost File. Enter either cost as the cost of "1" unit of the native UM. For example, enter 3.00 if the cost of a SF is $3.00.
There are a couple of places to access additional information about an Item.
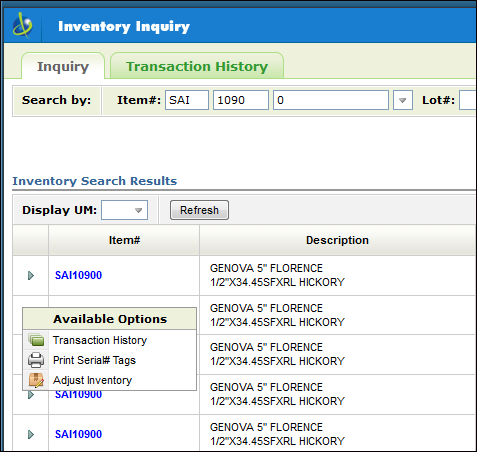
From the Options arrow to the left of an item
These options are accessed via the options arrow to the left of an item.
Inventory Adjustments in Navigator
The transaction history displays each transaction in chronological order. It relates to the specified item at the specified warehouse and, if applicable, for the specified lot and serial number. The system creates and maintains a separate stock card for each item at each warehouse.
Transaction History can be accessed in the following ways:
Clicking the arrow to the left of an item on the Inquiry screen limits the transaction history to that item.
Clicking on the Transaction History tab allows you to search by several different parameters.
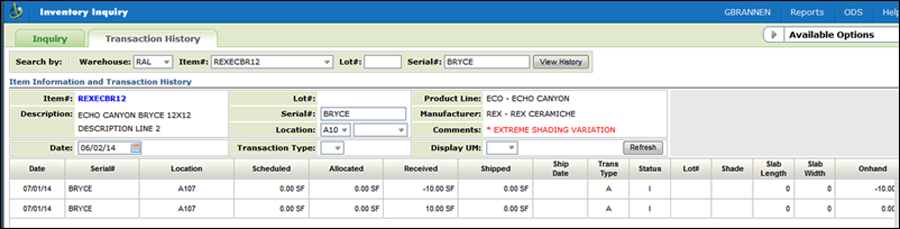
1. Use the Search by parameters at the top of the screen to narrow the search as needed.
Note: The entire item number is required.
2. The Date and Transaction Type fields can be used to further narrow the search results.
If you enter a date, the history appears starting from that date. By default, the date is set to start at the last month of activity. You can change the date, or remove the date to show all transactions currently on the system for that item or warehouse number.
Note: All open customer orders or open purchase orders display even if they are prior to the selected date.
To limit the inventory search to a certain type of transaction, enter a transaction code in the Transaction Type field.
3.To convert quantities to a specific unit of measure, enter the unit of measure in the Display UM field.
The following table describes the transaction history information.
Information |
Description/Instructions |
Date |
This is the transaction date which effects the availability of stock. It is the date of the transaction; except for purchase orders and incoming transfers in which case it is the estimated time of arrival, and customer orders in which case it is the order date. The order date is not always the date on which the order was entered. At the time of entering an order, Order Entry operators can override the Order Date to allocate the inventory at a later date. Future orders are entered with the order date overridden to the date on which material is expected to be available. |
Scheduled |
These are the quantities scheduled on order from suppliers. These quantities are posted by the Purchase Order Entry System. |
Allocated |
These are the quantities allocated to customer orders that have not yet been invoiced. A negative in this column indicates an open return authorization or credit. These quantities are posted by the Order Entry System. |
Received |
These are the quantities physically received into stock. A negative amount in this column indicates an adjustment which decreased stock. |
Shipped |
These are the quantities physically shipped from stock. A negative amount in this column indicates a credit with stock returned. |
Ship Date |
This is the date that a customer order is scheduled to be shipped or picked up from the warehouse, or that a purchase order is scheduled to be shipped by supplier. An entry of 02/22/22 indicates that a ship date was not entered. |
Trans Type |
Indicates the type of transaction. These codes are system defined. Some examples are:
Use the Transaction Type selection box to limit the display to a specific transaction type. |
Status |
The status codes can vary depending on the Transaction Type. Some examples are: Transaction Type: A - Adjustment
Note: Adjustment transaction codes are created and maintained through the ADJSTCODES table in System Tables Maintenance (SET 29). Transaction Types: C - Customer Order and P - Purchase Order
For customer orders and purchase orders, these status codes can be updated using option 13, Update Order Status and Shipping Data, on the Customer Orders Menu or Purchase Orders Menu. They can significantly enhance your ability to service customer inquiries. For example, you can quickly enter an R code on a purchase order when received. If work is backlogged, the actual receipt could take hours or even days until it is processed. The R code alerts all users that the material is in-house and can be sold. Note: Status codes for orders are created using SET 7 - Order & Serial# Status Codes. You can also go to SET 7 to view a complete list of codes. H - Temporary Hold
|
Onhand |
This is the quantity physically on-hand for the date specified. A negative amount in this column indicates that stock was invoiced prior to being received, or that an inaccurate physical count or adjustment was entered into the computer. |
Net Available |
This is the quantity available as of each date listed. It takes into consideration all transactions including customer orders and purchase orders. These available-by-date figures are significantly different and more informative than the summarized available figure on the Inventory Inquiry screen. The summarized figure is quantity onhand less customer orders. This screen expands on that figure to show what will be available day by day. Additionally, this screen includes temporary holds code HH, which are not deducted from the summarized figures. |
Reference |
The information in this field changes according to the transaction type. For example, for holds it can display the initials of the person who put the inventory on hold and the workstation that was used. |
4 .Click on a Transaction to display its details.
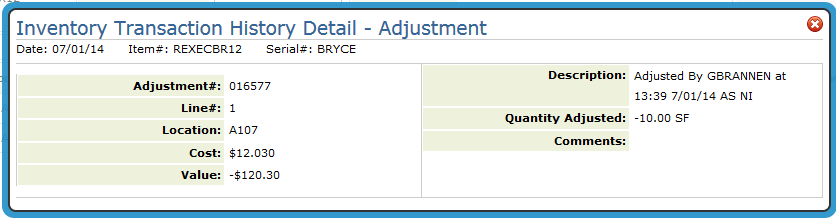
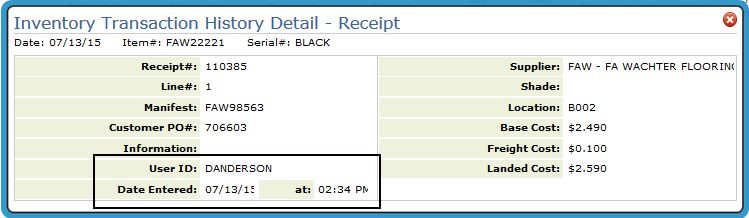
Receipts also show the User ID, Date Entered and where the receipt was entered.
When inventory adjustments are made, the program where the adjustment was made is recorded and then displayed in the Description box. The current adjustment program codes are:
AI - Adjustment by Item# - menu option INV 2 (IVADJ1)
AL - Adjustment by Location - menu option INV 10 (IVAJD4)
AP - Adjustment by API - IWMS menu (EF048R)
AS - Adjustment by Serial# - menu option INV 2 (IVADJ2)
CC - Adjustment by Cycle Count - Cycle Count menu CYC (IVCCUP)
II - Adjustment in Inventory Inquiry - menu option INV 1
I5 - Adjustment by - System Maintenance Special Update (IVAUD5)
MW - Adjustment by Mass Writedown - menu option INV 8 (WRTD01)
NI - Inventory quantity adjustments made in Navigator.
TR - Transfer API - Receipt of Transfer (EF040R)
WH - Warehouse Move - menu option IWMS
WS - Adjustment by Writeoff Small Qty - System Maintenance Special Update (IVWO01)
11 - Adjustment by System Maintenance Special Update (IVAUD11)
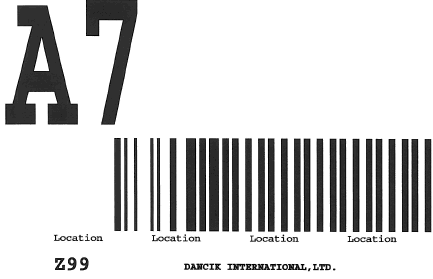
This option, accessed via the options arrow to the left of an item, allows you to print a tag for each serial number. Each serial number tag is printed on a special form in large block letters/numbers. These tags are then attached to rolls for easy reading of serial number at a distance.
You have the option of printing tags on either bar coded labels, or bar coded paper.
Note: An IPDS printer is required to print bar codes on regular paper.
Bar coded label
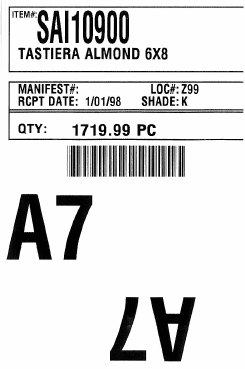
Bar Coded Paper
Inventory Adjustments in Navigator
Accessing the Inventory Adjustments Window
Files Associated with Inventory Adjustments
Accessing the Inventory Adjustments Window
There are a couple of ways to access inventory adjustments window:
Click the options arrow to the left of a specific record with item, serial, number, location data. This option is available only when inventory search results are summarized by LOT#, WAREHOUSE, SERIAL #, and LOCATION.
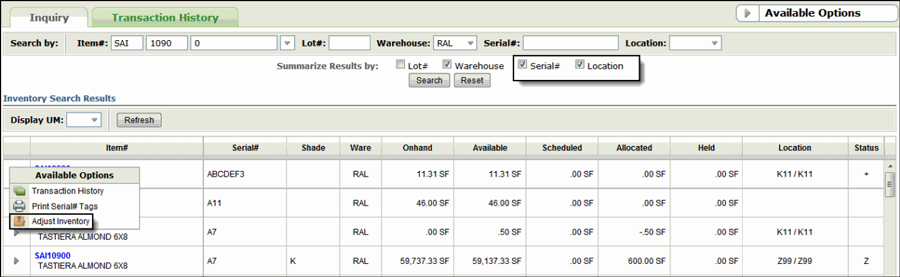
Note: As shown in the graphic above, the inquiry must include the Serial number and Location. If not the Adjust Inventory option does not display.
This option imports the item information (e.g. the serial number and location) into the Inventory Adjustments window.
From the Available Options drop down menu in the upper right-hand corner.
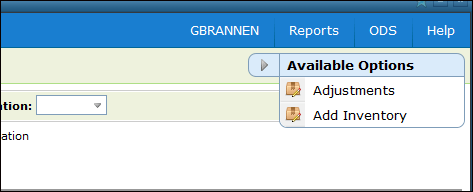
This option allows users to update inventory which does not appear in the inventory inquiry screens. You have to manually enter the item's serial number and location.
1. A serial number and location are required. If you access the adjustments screen by using the option arrow from the Inventory Inquiry screen, the serial number and location are automatically populated.
2. Click Submit. The screen refreshes to show the item's information.
The Serial# Status tab is informational only. It shows the current status and current fiscal year statistics for this item at this warehouse. The costs shown relate only to this stock keeping unit this item or shade/lot number at this warehouse. The system can maintain separate costs for each item/lot/slab/serial number, as well as separate costs at each warehouse. The list price comes from the Price File or Item File, and the gross ratio percentage is based on the list price less the average cost.
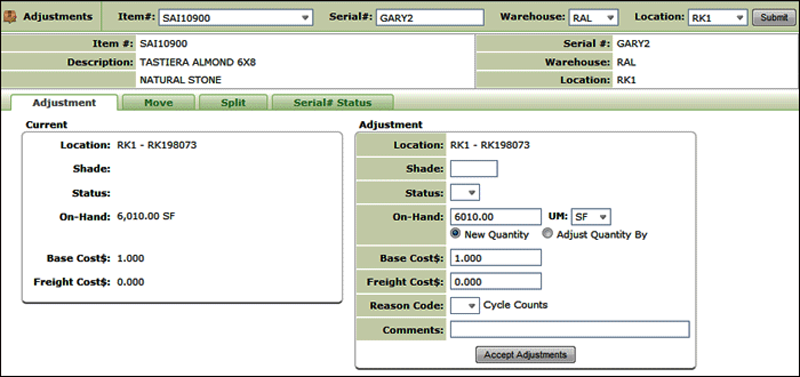
3. On the Adjustments tab, Enter the quantity being adjusted in the On-Hand box.
Select New Quantity to replace the quantity with the value entered. Select Adjust Quantity By to add or subtract quantity on hand by the value entered. If the amount is to be subtracted from inventory, enter a minus sign before the quantity.
If quantity does not need to be changed, but you want to let the system know that you performed a cycle count and the quantity in the system was correct, then enter zero quantity, any valid U/M, and a reason code C for cycle count.
If the quantity you need to enter is bigger than the field allows, you can split the balances into two or more serial number/bin locations.
If the quantity is set or adjusted to zero, the item is removed from the Inventory Inquiry listing when you run an inventory inquiry for the item and serial number.
Note: If you click the Return to Inquiry link at the bottom of the window, the "zeroed" item is still displayed in the Inquiry listing. To remove it simply resubmit the inquiry.
This tab allows you to move inventory from one location to another. You can also change the shade and status of the inventory. You can only move the entire on-hand quantity.
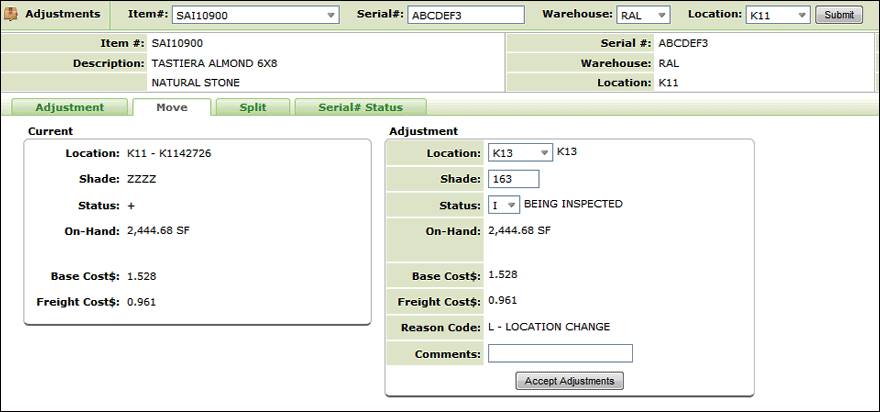
The system has the option on whether or not to process location changes on allocated stock. If your option is set to not process a location change on allocated stock, such as if you change a location on 100 cartons of tile with 20 cartons allocated. Instead, the system creates a new line consisting of 80 cartons at your new location while leaving the 20 allocated cartons at the old location. This method maintains accurate inventory screens. You must be careful when changing size and location at the same time. For example, if a roll balance shows as 4 feet, 2 inches in the system at location A12 and the roll is reported as 4ft. measured and moved to A13. You must enter this in two steps. First change the location, then refresh your screen. Now that the serial number is in its new location, you can change the size. If you attempt to change both location and size on the same line, the system creates a new line of 4 feet at location A13 and leaves a two inch piece at location A12.
If your option is set to process location changes on allocated stock, such as if you change a location on 100 cartons of time with 20 cartons allocated, the system changed the location of that line and the 20 allocated cartons from the old location to the new.
Note: When changing locations in Inventory Inquiry program (update mode), any holds against a serial number are updated with the new location, and the quantity available plus the quantity held will move to the new location. Only quantities allocated to actual orders will remain in the old location.
Use this option to split up inventory quantities for storage or for any reason (i.e. some of the inventory might be damaged).
In order to view all the information to intelligently split inventory, you need to include all the information (including the serial number and location) in the inquiry.
Adjust the inventory as needed.
Files Associated with Inventory Adjustments
SET 2 – User control Panel
Allow User To Adjust Inventory Locations
Allow User To Adjust Inventory Shades
Allow User To Adjust Inventory Status Codes
Allow User To Adjust Inventory QTY
Allow User To Adjust Inventory Cost
Default Sort For Inventory Analysis Screen
SET 4 – System Wide Settings
Negative Inventory Control Settings
Inventory Adjustments by Item
Inventory Receipts/Immediate Posting
Inventory Transfers/Immediate Posting
SET 14 – Warehouse Settings Table
Change Location on Open Orders for S/N Location Change?
Clicking a hyper linked item provides the following information.

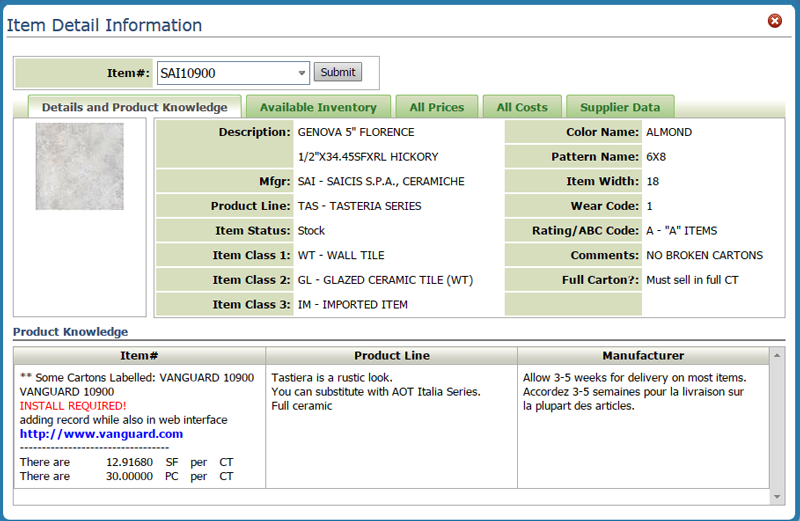
Details and Product Knowledge
This option pulls information from the Item File Profile screen, the Item File Packaging screen, Item File Special Instruction screen, the Product Line File, and the Manufacturer File Special Instructions.
Item images and the configuration steps to view them are set up in the Item/Cross Reference File (Set 307). The View in a Room feature only works with the Internet Explorer browser after logging into Image Builder.
The item information comes from the Item Profile (FIL 2).
The information under Items comes from the Item Special Instructions and Packaging screen. (F10 and F12 off the green screen Item profile screen).
The information under Product Line comes from the Special Instructions screen of the Product Line File (FIL 12).
The information under Manufacturer is pulled from the Special Instructions screen of the Manufacturer File (FIL 4).
Available Inventory
This tab breaks down inventory availability for the item by serial number. Most of the status codes on the right-hand side are user defined and are created using the Order & Serial# Status Codes (SET 7) application. Status codes are usually assigned when inventory is adjusted.
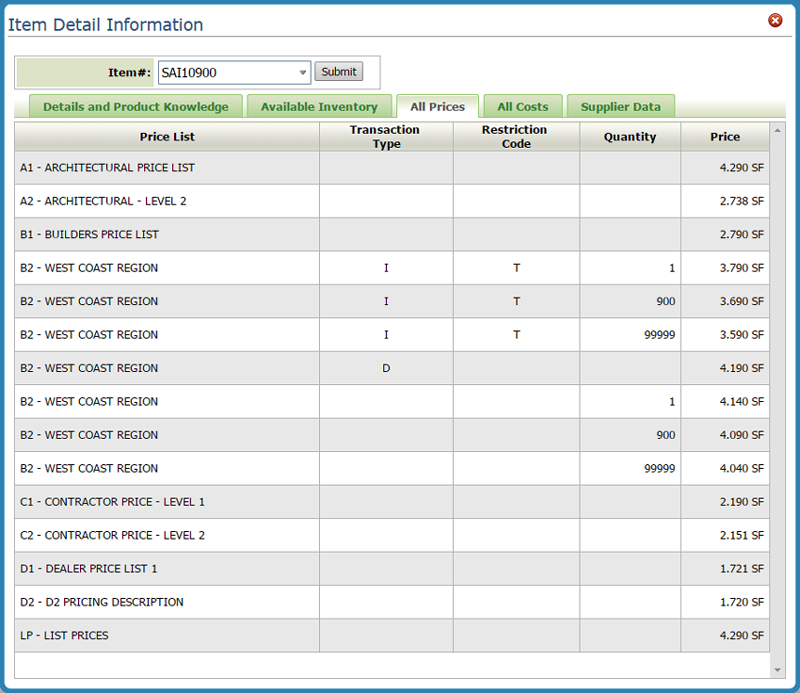
All Prices
The All Prices tab shows every regular price within the system, including all transaction types, restrictions, quantity breaks, and price lists.
Some price lists can contain multiple prices depending on several parameters and restrictions such as cuts, direct ships, and quantity breaks.
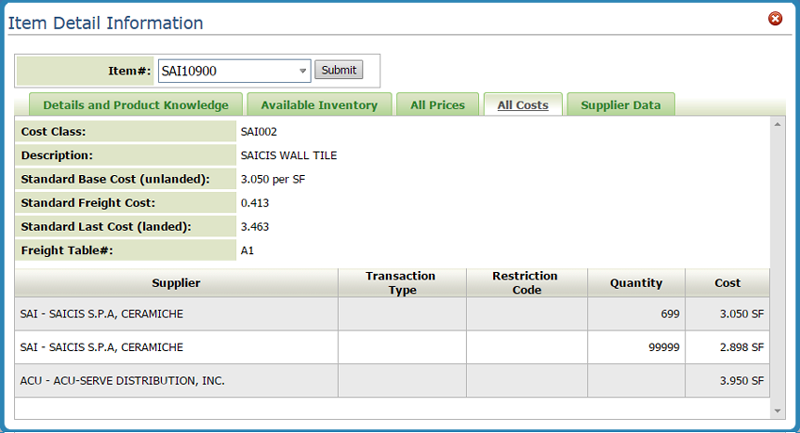
All Costs
The All Costs tab shows all costs as stored in the Cost or Item files.
Supplier Data
The Supplier Data tab uses the fcb2b web service inventoryinquiry to retrieve item information from a supplier’s system.
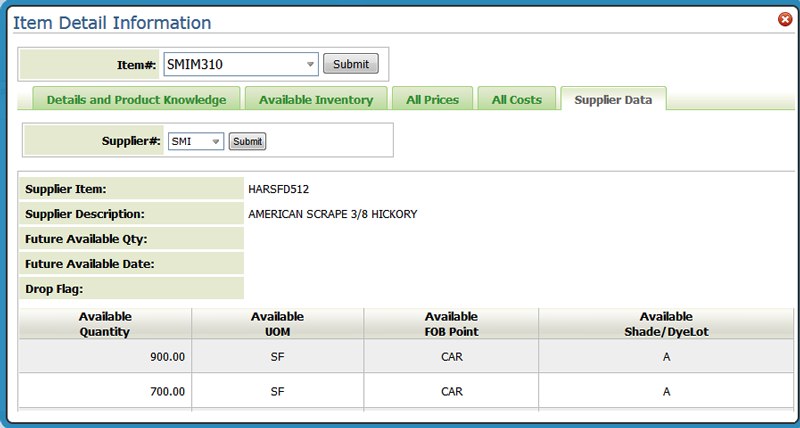
Note: There is some green screen set-up involved with using the Supplier Data tab. For more information on this set-up, click here.
Use this option to research purchase and back orders and how they can affect your future inventory.
The Status code is a two-character code that indicates the type of transaction. Some of the more common status codes you will encounter are:
C - Customer Order
CA - order assembled staged and ready to be picked up or delivered.
CB - back order.
CD - order is delayed missed truck, inventory shortage, etc.
CF - open future order. Customer order against incoming stock.
CH - hold - not a confirmed order. This is a permanent hold. HH indicates temporary hold.
CO - open order
CT - open transfer order. Transferring from this warehouse to another.
CL - bar code label has been printed.
CS - order has been shipped.
P - Purchase Orders
PB - back order
PK - purchase order confirmed by supplier. Dates and quantities are accurate as shown.
PP - For imports, it can be used to mean Paperwork Received or Received at Port. For domestic purchases, it can be used to mean partially received but receipt is not yet processed in the computer.
PT - in transit in route from supplier, or scheduled for transfer from another warehouse.
PD - purchase order delayed.
PO- open purchase order
PR - received in full but receipt is not yet processed in the computer.
PJ - purchase order has been rejected
The Related Items function is a powerful tool that allows you to quickly check the total available inventory for items related to the current item. It allows you to harnesses the power of the information already in your inventory files. For example, let's say a customer wants a certain item, but you are out of stock, and they say “what else do you have like that?”.
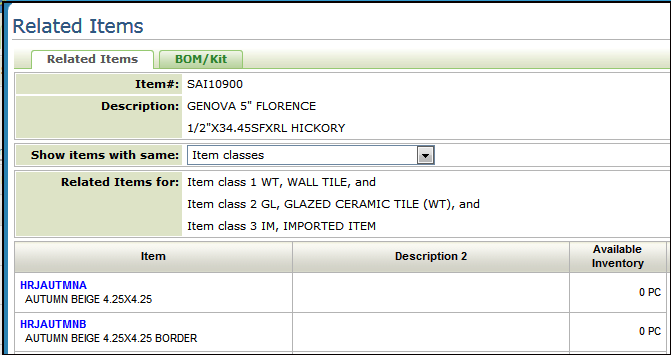
You can look for related items that share the same:
Product Line - Product lines link items into groups that are usually defined by the manufacturer. Product lines are, whenever possible, set up to reflect the product lines that appear in a manufacturer's catalog.
Product Line and color name - This search directs the system to find related items based on the values in the Product Line and Color Name fields of the Item File. In some instances where color is not important or applicable to an item, you can use the Color Name field other information such as style, texture, type, or finish. For example, tools can be categorized by type, such as trowel or saw.
Note: Color Name is a required field when creating items. Dancik recommends that color names should be somewhat general and used consistently. For example, use “white” for the various shades of white, so that customer service can quickly search for inventory with that color name without having to search for every shade of white.
Product line and pattern name - Pattern names are assigned in the Item File and can be used to further define the item. Some examples of pattern names are: for tile 4x4 (for tile), berber (for carpet) and 20 LB (for installation material).
Manufacturer and color name
Manufacturer and pattern name
Manufacturer, color, and pattern name
Item classes - Items can be assigned up to three item classes. Item classes are user-defined codes for further classifying the item. Class 1 is the most general of the three item classes. It is also the most important because it is used in the pricing and salesperson assignment programs. Price lists and promotional pricing can be assigned to a customer for specific item Class 1 entries.
Item class 2s can offer a more specific classification and item class 3s are used only if other meaningful classification is needed for your entries in the Item Class 1 and 2 fields.
Note: Item classes are assigned to items in the Item File. If the item class fields are not used, the message “No Records Found” appears.
If the item you are inquiring about is a BOM, the BOM/Kit tab is available and displays the component items as maintained in the Bill-Of-Material/Kit File (FIL 39).
Note: The Qty available is the onhand minus the allocated quantity. Even if inventory is assigned to a status of L (lost), # (in suspense), or I (being inspected) it is included in the quantity available calculation. You can chose to display or hide the Qty Available of a BOM via the System Wide Setting - Options for Bill of Material.
Click on a related item to access more information.
Use this option to review current, past (last year) and previous (2 years ago) of prior sales information.
Inventory Inquiry Field Descriptions
Field Name |
Description/Instructions |
Item# |
An item number is made up of three components: the manufacturer, color, and pattern. An entry into at least one of these fields is required. Entries in more than one of these fields helps the system to choose the most appropriate available display sequence. You can enter into each field individually to search by that field alone, or enter as much as you know of the item number to limit a search of the system. Entering only a manufacturer code displays all items for that manufacturer in item number sequence. |
Lot |
When applicable, also enter the lot number along with entries in the previous fields. A separate Stock Card Screen is created by the system for each lot number. Enter an item number and leave the lot number field blank to see all lot numbers for that item. Do not confuse the lot number field with the serial number or with the shade field for serial number items. A lot can include multiple serial numbers. Your company may not utilize all available features. Therefore, make sure you understand from your data processing manager when/if you do use the lot number and/or serial number options. For example, item XYZ123 in warehouse NYC has 3 lots. The blank lot number (no lot number) is for regular saleable material. Lot Number REM is for remnants and off shade material. Lot Number CLM is for returned claims material. If the item number is defined as a serial number item, then each lot will also have its own serial numbers. XYZ123 lot REM will have its own serial number, as will XYZ123 lot CLM. |
Serial |
Enter a serial number of an item to view the stock card of that serial number. If you enter a serial number, you can also enter a warehouse to limit the search to that warehouse. If you leave the Warehouse blank, the first match to the requested serial number in any warehouse will display. If more than one item has a quantity on-hand for the requested serial number, only the first item found is displayed. |
Warehouse |
Enter the three-character warehouse number for which you are inquiring. If you leave this field blank, stock for all warehouses is displayed. This field can be used in several ways to affect the results.
|
Location |
Entering a location narrows the search to that specific location. Leaving it blank broadens the search to all the locations in the specified warehouse. |
Display UM |
Select a unit of measure to display quantities in a unit of measure other than the normal unit of measure for each item. Entering a unit of measure will also cause the program to display to a more precise fraction, where applicable. For example, if you enter SF square feet, SY square yards, CT cartons or M2 square meters, in this field, the quantities are displayed to two decimal place accuracy, instead of rounded to the nearest unit. |
Files Associated with Inventory Inquiry
Business Entity - This file allows you to define a “business” as being any combination of companies, branches, and cost centers. The main purpose of the business entities concept, is to serve as a parameter set for various reports and inquiries. All of the business entity parameters/restrictions apply to Inventory Inquiry except: cost center and combination codes.
Note: Users are assigned to a business entity via the users control panel (menu NAV option 5).
Work Station Control Panel File - Used to establish defaults and search restrictions.
System Wide Setting - Options for Display of Future Inventory (blank serial#s) - This option lets you choose what appears in the Serial # column (the options are blank, future, or BO) when you perform a Search by Serial Number for inventory that is on order, but has not yet been received and/or assigned a serial number.
Navigator Menu - Access to several features such as item sales statistics has to be granted at:
the Global level, (via menu option NAV 1)
the Authority Class level (via menu option NAV 2)
the user level (via menu option NAV 5).
Control User File Maintenance (NAV 5 option “Y”)
The field DFT Inventory Screen Type allows you to select how the inventory information is displayed.
There are several “restriction” fields that can be used to limit an inquiry to a default warehouse, manufacturer, or to manufacturers assigned to the default company.
The control panel can be used to establish defaults. Several of these defaults affect Inventory Inquiry’ some examples are: DFT Roll U/M, DFT Serial#/Roll Search View, and DFT Days-Old to Highlight.
Warehouse Matrix - This file enables you to define the sequence of warehouses displayed when the system displays the Inventory Serial Number Screen. A different sequence can be displayed based on where the customer is serviced from or where is user is located. The Warehouse Matrix File also has the effect of limiting the warehouses from which stock should be displayed depending on the customer’s or user’s designated warehouse. If the Warehouse Matrix functionality is activated, multiple warehouses can display in the Ware column.