Need more info or you couldn't find what you were looking for, let us know by sending an email to: support@dancik.com.
Navigator Purchasing
Entering a Purchase Order in Navigator
Entering a Purchase Order in Navigator
Creating a purchase order is nearly identical to entering a customer order. POs can be cancelled, deleted, and edited the same as customer orders.
To watch a video on entering a PO for carpet, click here.
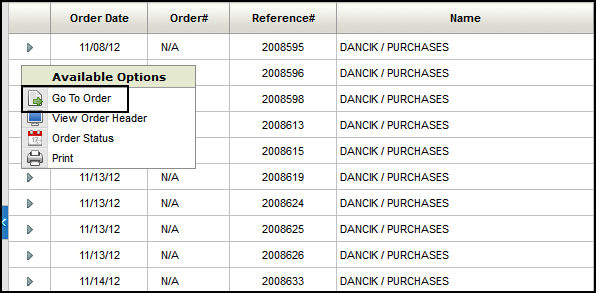
1. On the initial purchasing screen, choose to enter a new purchase order or access an existing one.
Note that the purchasing account 00001 is already entered into the search filters. This is the system defined account number for purchasing in the Dancik system.
2. To edit an existing purchase order, click the arrow to the left of it then select Go to Order.
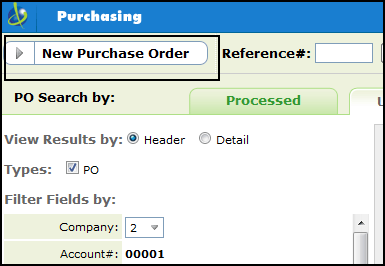
3. To start a new purchase order, click New Purchase Order in the upper left hand corner of the screen.
4. If a user is not restricted to only one company, they must select a company.
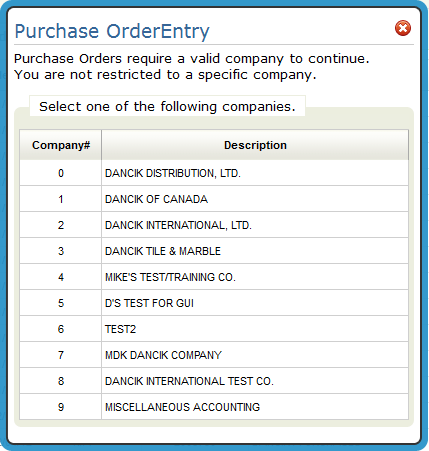
Users are restricted to one company via the Restrict This Work Station To setting on the Navigator User Web Control Panel or the Work Station Control Panel File on the iSeries (menu option SET 1).
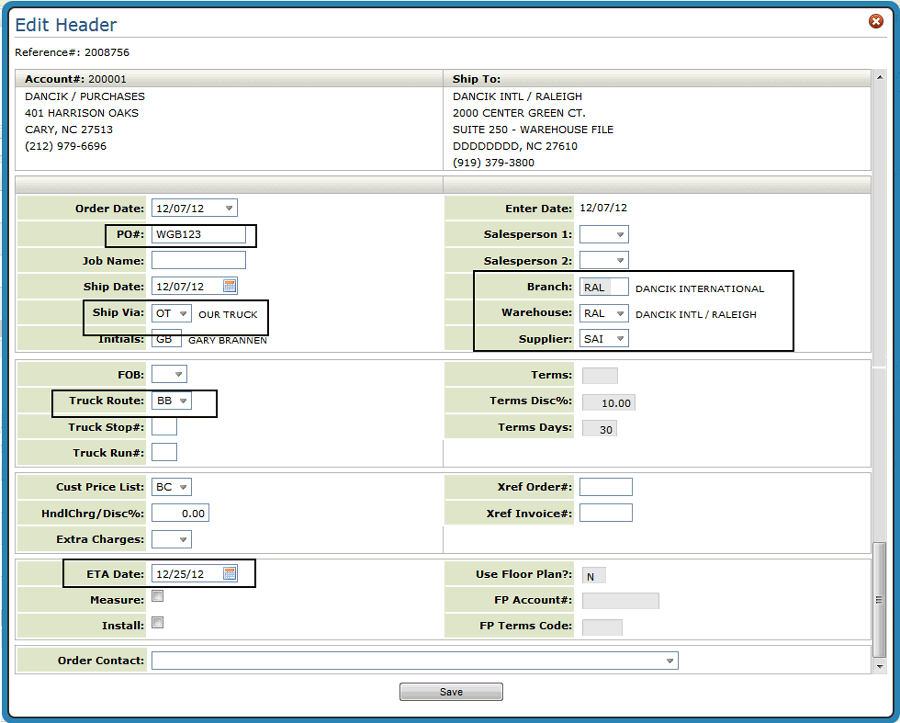
5. Select a company. The next window to appear is the Order Header. The Order Header window lets you enter general information about the purchase order. The Order Header screen is also used when you process orders from your customers (Order Entry). Because of that, there are a lot of fields that do not pertain to purchase orders. In the following figure, the fields required to enter a purchase order are circled.
Field |
Description |
PO# |
This number, code, or name can be useful in tracking the purchase order. Enter numbers or letters, or both. You can search for purchase orders by this field after the PO is processed. If you have multiple references, use this field for the reference that is most important or most frequently referred to. Then, use the Job Name field to enter other references. |
Ship via |
Enter the code representing the method of shipping for the order. Ship via codes are defined and maintained through the Categories/Classification section of the File Management Navigator application. Your company can define and maintain its own set of ship via codes. The Ship Via setting automatically populates if a default ship via code is entered in your Control Panel. Note: In Navigator, the control panel is accessed via the User Web Control Panel in the User/Security section of the File Management application. On the iSeries, it is accessed via menu option SET 1. |
Date Req |
Enter the date the customer wants the order shipped or picked up. Today's date automatically appears as the default. |
Branch |
The branch code determines which branch gets sales credit for the order. Do not confuse the branch number with the warehouse number, which determines the location of the stock, or the point of shipment. The two codes do not have to be the same. Note: The default branch is determined by the entry in the Control Panel for your workstation. In Navigator, the control panel is accessed via the User Web Control Panel in the User/Security section of the File Management application. On the iSeries, it is accessed via menu option SET 1. |
Supplier |
The code for the company or vendor you are placing the order with. When entering special orders, the program warns you whenever you attempt to purchase an item from a supplier that is not listed as a supplier of that item. In these cases, the special order supplier is compared to the suppliers in the Item and Cost files. If a match is not found, a warning is issued. You can continue with the order, but at least you know that the supplier is not a regular supplier. |
Warehouse |
Enter the warehouse code where you want the order shipped to. This warehouse address prints as the Shipto address on the purchase order. The default for this field is the warehouse assigned workstation control panel. You can override this default. Note: In Navigator, the control panel is accessed via the User Web Control Panel in the User/Security section of the File Management application. On the iSeries, it is accessed via menu option SET 1. |
Truck Route |
The Truck Route defines the departure time, cutoff time, and call after times for each day of the week for each warehouse and route. In addition, this file enables you to assign and calculate the number of days for a delivery to be made to your customers prior to and after the cut off time for each truck route by warehouse. Note: Truck Routes are created in the Routes File (DEL 1). |
ETA |
This field is used for purchases, direct shipments and special orders. Otherwise, enter the estimated time of arrival to the warehouse or shipto destination for this order. This date is entered in MMDDYY format. This date is shown on Inventory Inquiry Stock Card Screen as the scheduled date. After the order is processed, this date can be updated using the Update Order Status and Shipping Data program. |
6. Enter the Order Header information and click Save. The window that appears is where you start entering the items you want to order.
Enter the items and their respective quantity and UM.
Note: To search for items, click the drop down arrow in the Item# box.
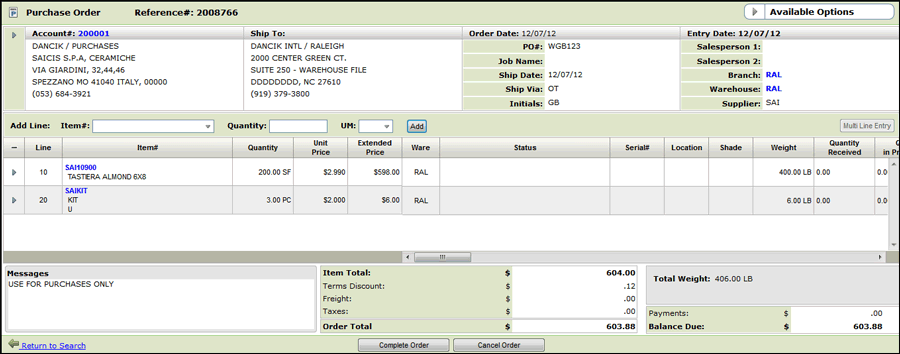
7. After entering all the items, click Complete Order. The End-of-Order window appears.
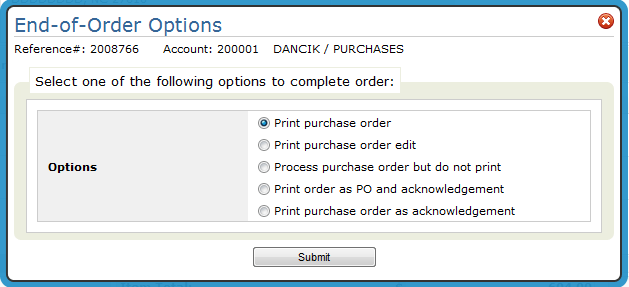
Print purchase order - Processes the order and creates a PDF file that can be accessed via the ODS heading in the upper right-hand corner. You can then send the PO to the supplier via email, fax, mail, or by several other methods. This option enters the ordered inventory into the system. It shows up in an inventory inquiry as being scheduled for arrival with the delivery date based on the ETA date set on the Order Header screen.
Print purchase order edit - An order edit contains the same information included on the actual purchase order, but it does not get processed by the system. The purchase order edit is a good document to send to a supplier to ensure they have the quantity you need and all the information (i.e., cost) is correct. This can save you from having to update or delete a purchase order.
Note: This option does not process the order or allocate inventory.
Process purchase order but do not print - This option enters the ordered inventory into the system. It shows up in an inventory inquiry as being scheduled for arrival with the delivery date based on the ETA date set on the Order Header screen. The order can be accessed and changed through the Processed tab.
8. If your Control User File (menu option NAV 5 "U" option) is configured to send order acknowledgements via ODS, when either Print order as PO and acknowledgement or Print purchase order as acknowledgement is selected you are presented with options for sending out the PO and order acknowledgement.

Spoolfile Action - This field determines what happens to the spoolfile after the PO is distributed. The valid options are:
— LEAVE - This leaves the spooled file in the output queue as though it had been manually printed
— RELEASE - This sends the spooled file to the output queue in a *RELEASE status
— HOLD - This sends the spooled file to the output queue in a *HOLD status
— DELETE - This deletes the spooled file after it has been distributed
Distribute by Fax and Distribute by Email -Fax numbers and email addresses set-up in the Phone Number file for the supplier are automatically imported. You can change existing entries or add to new ones.
Click:
- Submit Print Only - Sends the document(s) to the printer designated in the Workstation Control Panel for printing POs
- Submit Distribution - Distributes the documents by either fax or email to the selected recipients.
- Return to Options - Returns to the End-of Order options window.
System Wide Setting - Options for Purchasing Discontinued Items - This series of settings allow you to prevent purchasing of discontinued items for regular POs, special orders, and direct shipments.
Note: Discontinued items are identified by a past date in the Discontinued Date field and/or a policy code of DI in the Policies field of the Item File Profile screen (FIL 2).
System Wide Setting - Options for Purchase Orders - This option allows you to choose the default file used to populate the payment terms and FOB code during purchase order entry. You can also activate the Purchase Order Approval System.
Supplier File - If you send POs electronically via Dancik's Output Distribution System (ODS), the suppliers fax number and/or email address are picked up in the Supplier File.
Master Control User Settings (NAV 5 option "U") - Grants or denies the ability to enter POs and to see prices on POs.
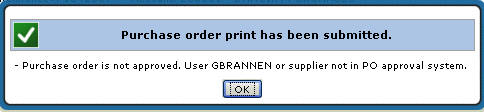
Purchase Order Approval System - The Purchase Order Approval System ensures that only authorized POs for approved amounts are issued to your suppliers. A purchase order “escalation ladder” can be created for individual users and managers. Each user and manager can be assigned dollar limits for purchase orders they are allowed to issue without approval. The Purchase Order Approval System supports limits that vary based on supplier. When first entering a P.O., the total amount is tested against the entries in the P.O. escalation ladder and if it exceeds the user's limit, an email is sent to the designated manager for approval.
The P.O. Approval System can be set to go through the approval process again when any increases are made to the value of the P.O. When a P.O. is approved, an email is automatically sent from the approving authority to the originator of the P.O.
If you get an error message similar to the following, you need to refer to the documentation on setting up the Purchase Order Approval System.
Navigator Purchasing Suggested Reorder Calculator
This option provides real time reorder and usage information on items you specify.
To watch a video of the Reorder Calculator in action, click here.
The Reorder Calculator is accessed from the Available Options on the first window of Navigator Purchasing.
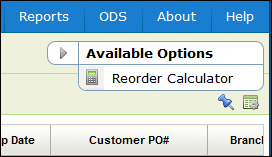
1. Select Reorder Calculator from the Purchasing Available Options drop down list in the upper right-hand corner.
Enter a item number
The default warehouse established in the Control Panel is automatically inserted in the Warehouse field.
The default Date Range is set at 6 months.
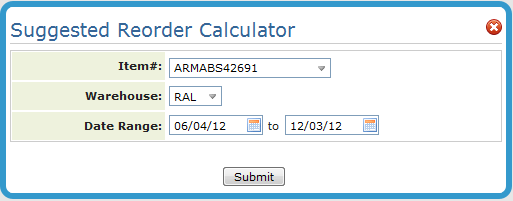
2. Click Submit.

Filters
Filter |
Description |
Growth Factor % |
This field enables you to apply a simple global growth factor to your usage figures. For example, if you expect 10% growth over the historical usage averages, then enter 10.00 in this field. If you expect a 10% decline, enter 10.00- . The average usage figure (and average activity figure) will be adjusted by this percentage, up or down. It is recommended that this field be used to adjust for upcoming promotions, seasonality, and other instances where you expect a change the system cannot predict. You can also use this concept after a promotion. For example, if you are basing the forecast on the past three months usage, and there was a promotion during those months, you may want to apply a negative growth factor when the promotion ends. |
Stocking Matrix? |
The Stocking Matrix File provides powerful features you can use to control purchasing and back orders in a multi-warehouse environment. You should enter data into the Stocking Matrix File if you have multiple stocking warehouses and need the features described in this chapter. A stocking matrix is a set of rules that govern where stock is carried to meet the demands of each geographic grouping of customers. If you do not use the Stocking Matrix File, the system assumes that stock should be replenished to the warehouse where it was stocked. For example, if the stock was picked from warehouse NYC, then without a stocking matrix, the system assumes that stock in NYC should be replenished. If this replenishment method is satisfactory for your operation, or if you have a single stocking warehouse, you do not need to use this file. With a single central stocking warehouse, you should run the reorder reports for all warehouses combined. |
Omit Remnants? |
You can include or omit remnants from the availability calculations. Remnants are available quantities of a single serial number or lot number that are less than or equal to the remnant quantity/size as entered individually for each item in the Item Master File. This concept only applies to material that usually must be sold from the same or matching serial numbers, lots, or rolls. This parameter is ignored for items that are not stocked by serial or lot number. If you choose to omit remnants, the reorder report ignores the available quantity of any serial or lot number that is less than the remnant quantity in the item master record. For example, let’s say the total quantity available = 1000, consisting of three serial numbers of 900, 25, and 75. If the remnant size is 80, then the Reorder Report only considers that you have 900 available. |
Omit Back Orders required after |
Enter a date that beyond which back orders are not included in the suggested reorder calculations. |
Only Fill Back Orders? |
This option only covers open back orders, as opposed to ordering for stock replenishment. An example of how this option can be helpful, is if you need to order on an emergency basis, and don't have time to fill your next truck. You are filling on an LTL (less than truckload) basis, and just want what is absolutely needed to fill the back orders in house. |
Sales or Activity? |
Allows you to base the report on sales or activity. Sales information is based on items that have invoiced. Activity is defined as sales plus the change in open order quantities for the selected date span. |
Usage and Reorder Information
Term |
Description |
Average Month Activity |
Activity equals the quantity sold plus the change in open order quantity for the month. This figure is the average monthly activity for the date span entered. |
Average Month Sales |
The total usage divided by the number of months in the selected date span. |
Quantity On hand |
The amount physically in stock. |
Stock Allocations |
The portion of the allocated figure that has been assigned to stock. (Allocated - Back Orders = Stock Allocated) |
Quantity Back Ordered |
The portion of the allocated figure that has not been assigned to stock. (Qty Back Ordered = Allocated - Stock Allocated) |
Quantity Available |
The amount onhand less the amount allocated. |
Quantity Scheduled |
The amount currently on open purchase orders (on order) from suppliers. |
Net Available |
The amount available plus the amount scheduled, It is the total available including what is on purchase orders. |
Reorder Point |
The quantity to reorder based on the average usage and the reorder parameters in the Product Line, ABC, Purchasing Rules, and SKU Files. |
Lead Time |
The number of days between placing a purchase order for the item and receiving it. |
Net Available After Lead |
Net available after lead time is the amount you will have net available after a time frame equal to your lead time. If this figure is negative, you will probably be out of stock even if immediate action is taken. Net Available After Lead Time equals Net Available less lead time in weeks multiplied by average weekly usage. |
Suggested Reorder Quantity |
The quantity to reorder which will cause net available to equal the amount to stock within the lead time (amount needed in order to achieve the amount to stock based upon usage and the reorder parameters). |
Quantity Sold by Month |
The total quantity sold for each of the last six months. |
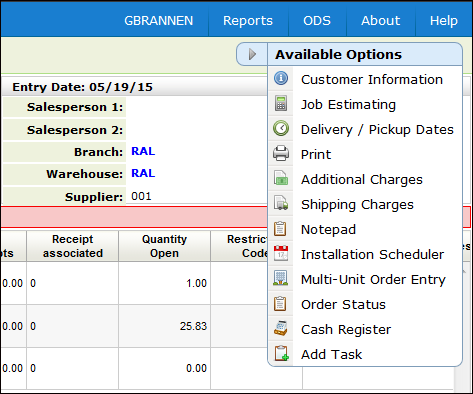
Available Options in Navigator Purchasing
The Purchase Order Management Available Options are accessed via the drop down menu in the upper right hand corner.
Additional Charges in Order Management
Navigator Order Management Notepad
The Customer Information Window enables customer service to view customer information pulled from the Billto File. The window displays the customer's salesperson or salespeople, default ship via, truck route, county, tax codes, comments, phone number, and special instructions.

Note: Job estimating has to be turned on via System Wide Setting - Options for Job Estimates & WIP Reporting.
This feature allows you to track estimated job totals and estimated job costs against actual billing and costs. This is primarily for commercial projects in which Work In Progress (WIP) reporting and accounting is required. You can enter, update, or inquire on costs and estimates.
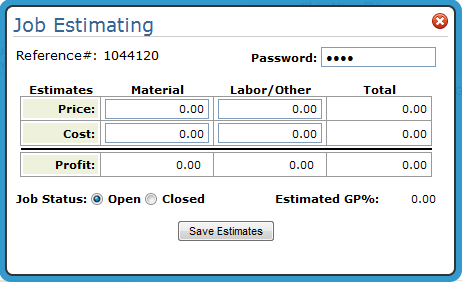
Enter the information as follows:
Total Price Estimate - Enter an estimate for the material and/or labor. This is an estimate for what you are going to charge your customer for the material and/or the labor. After entering material and/or labor prices, the system automatically totals them.
Total Cost Estimate - Enter your material and/or labor costs. After entering material and/or labor costs, the system automatically totals them.
Total Profit Estimate - After entering both price and cost information, the system automatically calculates the profit estimates.
The Estimated Gross Profit percentage is automatically calculated.
Flag the order as open or closed. This information is used as a parameter of the Work in Progress report, but has no effect on the order itself.
This window provides delivery information for the items on the order.
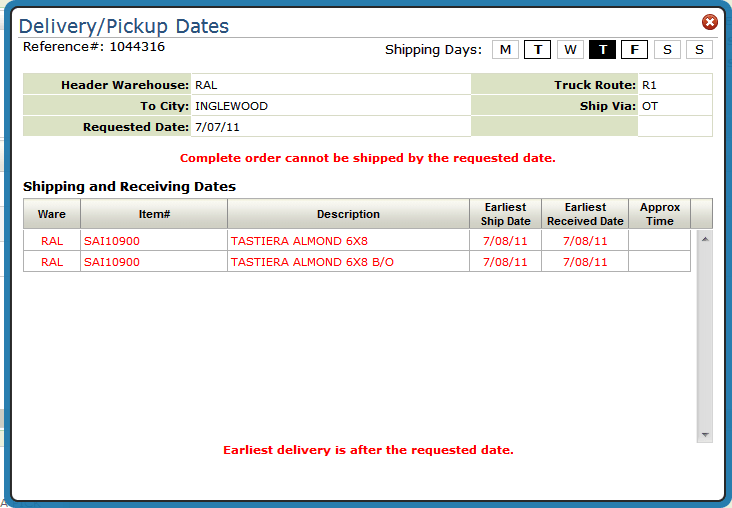
The system consults other parts of the system to calculate the best ship dates:
Routes file for the number of days that are added based on the Customers specific truck route. If back ordered items are received and available by a certain day of the week (and cutoff time), the program adds that number of days to the expected delivery. If items need to be transferred, the program adds the transfer time.
The Interwarehouse Transfer File to consider how long it takes the inventory to move from one warehouse to the warehouse it will ship from.
Order Handling Codes - Some order handling codes such as code 5 for “MUST SHIP COMPLETE” automatically prevents shipment of orders until the last back order has been received.
- Order handling codes are assigned to an order on the order header.
- A default order handling code can be assigned to a customer through the Customer Preference File.
- Order handling codes are created and maintained in the ORDERHAND table accessed via menu option SET 29.
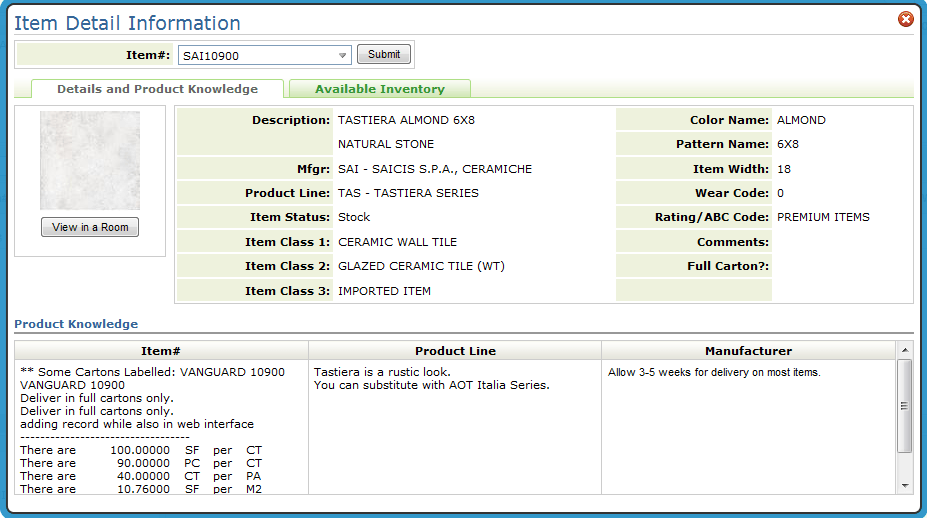
Clicking on the item allows you to obtain the following additional information.
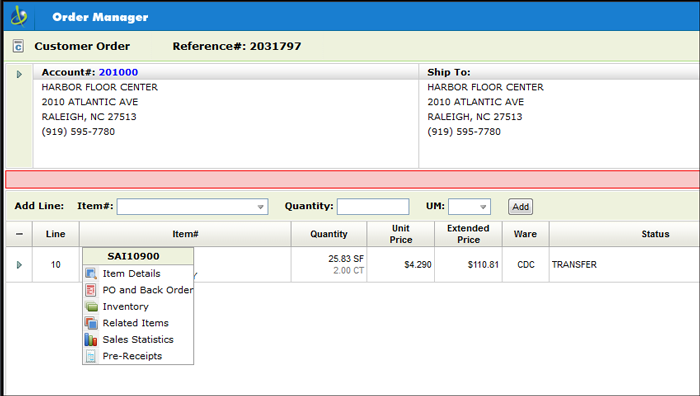
Details and Product Knowledge
This option pulls information from the Item File Profile screen, the Item File Packaging screen, Item File Special Instruction screen, the Product Line File, and the Manufacturer File Special Instructions.
Notes about the Item Detail Window
Item images and the configuration steps to view them are set up in the Item/Image Cross Reference File (SET 307).
The View in a Room feature only works after logging into Image Builder.
The item information to the right of the image comes from the Item File.
The packaging information under the title Item# comes from the Item Special Instructions and Packaging programs.
The information under Product Line comes from the Product Line Special Instructions.
The information under Manufacturer comes from the Manufacturer File Special Instructions.
Available Inventory
This tab breaks down inventory availability for an item by serial number. The status codes on the right-hand side are user defined and are created using the Order & Serial# Status Codes (SET 7) application. Status codes can be assigned at the time of receipt or during an inventory adjustment.
Use this option to research purchase and back orders and how they can affect your future inventory.
The Status code is a two-character code that indicates the type of transaction. Some of the more common status codes you will encounter are:
C - Customer Order |
||||
CA - order assembled staged and ready to be picked up or delivered. |
CB - back order. |
CD - order is delayed missed truck, inventory shortage, etc. |
CF - open future order. Customer order against incoming stock. |
CH - hold - not a confirmed order. This is a permanent hold. HH indicates temporary hold. |
CO - open order. |
CT - open transfer order. Transferring from this warehouse to another. |
CL - bar code label has been printed. |
CS - order has been shipped. |
|
P - Purchase Order |
||||
PB - back order |
PK - purchase order confirmed by supplier. Dates and quantities are accurate as shown. |
PP - For imports, it can be used to mean Paperwork Received or Received at Port. For domestic purchases, it can be used to mean partially received but receipt is not yet processed in the computer. |
PT - in transit in route from supplier, or scheduled for transfer from another warehouse. |
PD - purchase order delayed. |
PO- open purchase order |
PR - received in full but receipt is not yet processed in the computer. |
PJ - purchase order has been rejected. |
|
|
This option allows you to view current inventory levels for an item based on warehouse, serial number, and location.
The transaction history displays each transaction in chronological order. It relates to the specified item at the specified warehouse and, if applicable, for the specified lot and serial number.
The Related Items function is a powerful tool that allows you to quickly check the total available inventory for items related to the current item. It allows you to harnesses the power of the information already in your inventory files. For example, let's say a customer wants a certain item, but you are out of stock, and they say “what else do you have like that?”.
You can look for related items that share the same:
Product Line - Product lines link items into groups that are usually defined by the manufacturer. Product lines are, whenever possible, set up to reflect the product lines that appear in a manufacturer's catalog.
Product Line and color name - This search directs the system to find related items based on the values in the Product Line and Color Name fields of the Item File. In some instances where color is not important or applicable to an item, the Color Name field can contain other information such as style, texture, type, or finish. For example, tools can be categorized by type, such as trowel or saw.
Note: Color Name is a required field when creating items. Dancik recommends that color names should be somewhat general and used consistently. For example, use “white” for the various shades of white, so that customer service can quickly search for inventory with that color name without having to search for every shade of white.
Product line and pattern name - Pattern names are assigned in the Item File and can be used to further define the item. Some examples of pattern names are: for tile 4x4 (for tile), berber (for carpet) and 20 LB (for installation material).
Manufacturer and color name
Manufacturer and pattern name
Manufacturer, color, and pattern name
Item classes - Items can be assigned up to three item classes. Item classes are user-defined codes for further classifying the item. Class 1 is the most general of the three item classes. It is also the most important because it is used in the pricing and salesperson assignment programs. Price lists and promotional pricing can be assigned to a customer for specific item Class 1 entries.
Item class 2s can offer a more specific classification and item class 3s are used only if other meaningful classification is needed for your entries in the Item Class 1 and 2 fields.
Note: Item classes are assigned to items in the Item File. If the item class fields are not used, the message “No Records Found” appears.
If the item you are inquiring about is a BOM, the BOM/Kit tab is available and displays the component items as maintained in the Bill-Of-Material/Kit File (FIL 39).
Note: The Qty available is the onhand minus the allocated quantity. Even if inventory is assigned to a status of L (lost), # (in suspense), or I (being inspected) it is included in the quantity available calculation. You can chose to display or hide the Qty Available of a BOM via the System Wide Setting - Options for Bill of Material.
Use this option to review current, past (last year) and previous (2 years ago) of prior sales information.
Pre-receipts are receipts that have been entered or transmitted by EDI, but not yet posted. They may be in the process of being updated with locations, or filling back orders, or are simply not ready to be posted. This feature enables you to see these entries from Order Entry and other parts of Navigator.
Pre-Receipts can be checked from the item number options; which are available when an item number is hyper-linked. In this example, we are starting a new order, but hyper-linked items, and therefore the pre-receipts option, are available in several other parts of Navigator including order change, Inventory and Invoicing.
1. Clicking the Pre-Receipts link displays the Pre-Receipts for the item.
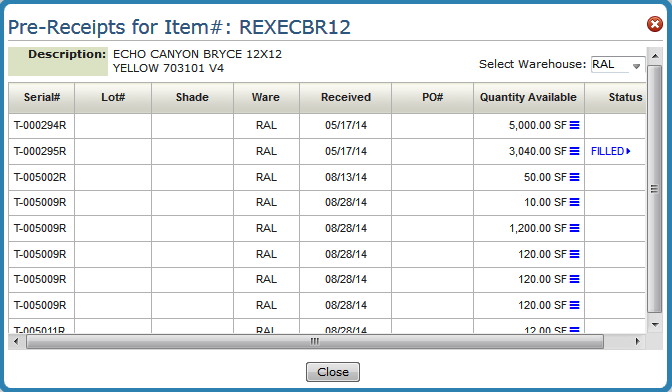
2. The initial pre-receipts shown are for the warehouse used on the order detail line. Use the drop down menu to access more warehouses available to the user. Enter *** to view pre-receipts for all the warehouses.
Note: Users can be limited to specific warehouses through their control panel or Authority Class.
3. To see the pre-receipt in a different unit of measure,
click the conversion icon (![]() )to
the right of the displayed Quantity Available.
)to
the right of the displayed Quantity Available.
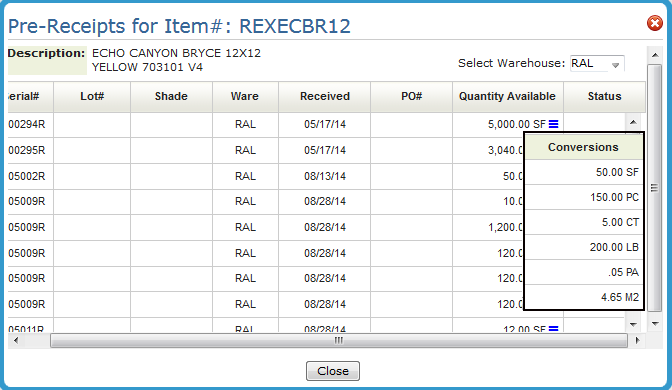
The unit of measure conversions come from the Packaging File.
4. If any of the pre-receipts are already allocated to an order, the message FILLED appears. You can click FILLED to display the customers whose orders are being filled with that receipt.
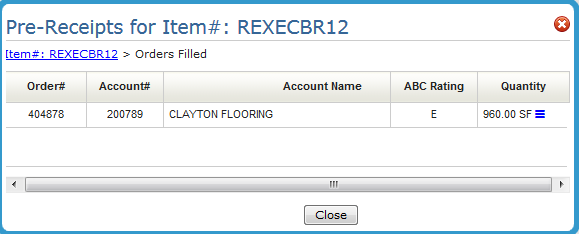
The ABC Rating is assigned to an account in the Billto File. The rating lets you decide if you want to use the inventory for a higher rated customer.
Additional Charges in Order Management
This option directs the system to search for additional charges that can be applied to the order. Additional charges can be defined in several parts of the system and can be assessed according to branch, state, marketing program, and other criteria. For example, additional charges for “Fuel Surcharges” can be different in each of your branches, different based upon marketing programs, customer account number, etc.
Other examples of additional charges are: carpet freight, estimating charge, installation service fee, will call service fee, and minimum order charge.
When the Additional Charges option is selected a window similar to the following appears.
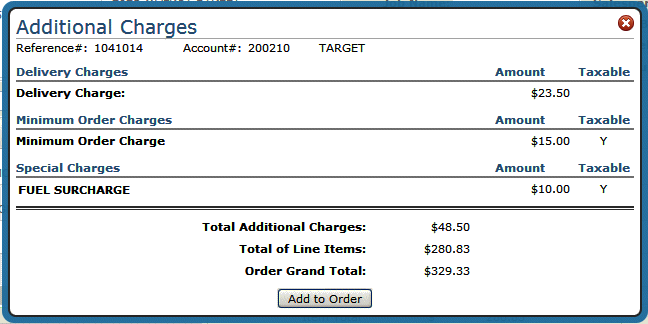
Note: The Taxable information can be changed via the respective charge table (i.e. the Minimum Order Charges table).
If the Add to Order button is not displaying, you have not been granted permission to add additional charges via Navigator (NAV) menu option 5 - Control User File Maintenance. To access the Allow To Apply Additional Charges During Order Entry setting, enter a “U” to update a user’s setting and then press F11 to access the second page of settings.
Associated Files
The Special Charge Codes Table is designed to assess additional charges on your invoices, mainly for the purpose of freight and fuel cost recovery.
Special Charges Formulas Table - enables you to define which customers are affected by each special charge, and how that charge is calculated. The Special Charges Formulas can vary for the same special charge code, based on branch, state, marketing program, and other criteria. For example, special charges for “Fuel Surcharges” can be different in each of your branches, different based upon marketing programs, customer account number, etc.
Minimum Order Charges File - You can use this file to automatically charge customers a minimum order charge when a single order or a group of orders is less than a specified dollar amount.
Delivery Charges File - Use this file for assigning and assessing delivery charges. You can use this program to control delivery charges by warehouse, truck route, account number, and state. You can enter varying delivery charges on each of these levels.
System Wide Setting - Options for Shipping Charges Within Order Entry - This setting includes options to activate the Order Entry Shipping Charge Table, establish rounding options, establish surcharges percentages which can allow you to recover costs such as rising fuel prices.
Adding Shipping Charges in Navigator Order Management
Shipping charges can be added to an order using one of two methods:
Via the Additional Options drop down box located in the upper-right hand corner. This option bases the charges across all lines of the order.
By clicking the arrow to the left of an item. This option bases the shipping charges on this line only.
Both options deliver the Shipping Charges screen.
The Ship Via assigned on the Order Header is automatically populated in the Ship Via field. To see all the valid shipping charges, clear out the Ship Via code and click Refresh.
Note: The shipping charges are pulled in from the Shipping Charges By Zip Code table (CUS 20). Shipping charges are created and maintained via Shipping Charges By Zip Cd Table (FIL 44).
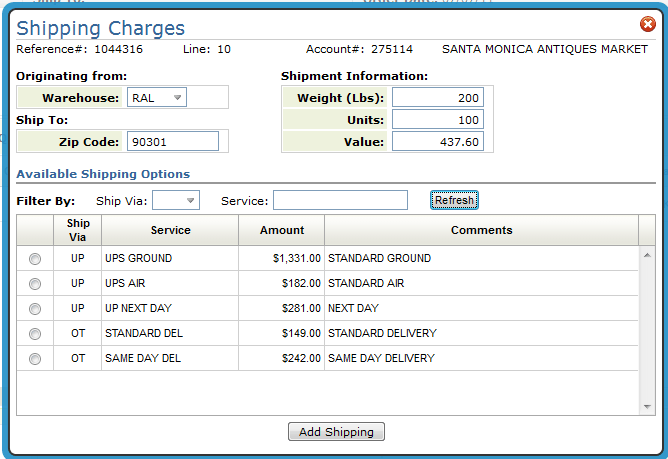
Use the settings, Weight, Units, and Value to base the shipping rates on. Use them separately or in combination to get a shipping quote. For example, if you have a six line order, but only three lines were ready to ship, you could enter the information (i.e. weight, units or value) from those lines and get a shipping rate just for those three lines.
The other fields, From Warehouse, Zip/Postal Code, Ship Via, and Service, are “limit to” fields. Use these fields to narrow your inquiry down as needed.
Ship via codes represent the method of shipping for the order. Some examples are: UP - UPS, CC (Common Carrier), and OT (Our Truck). If left blank, all Ship Via codes are considered.
The Service field further defines the method of shipping. For example, for ship via code UP (UPS) there could be several different services such as same day, standard delivery, etc.
Select a shipping charge and then click Add Shipping. You are asked where you want to apply the shipping charge.
The charges can get added as a miscellaneous line under a specific line number. Or, they can be added as a 9966 line after the last line of the order.
Note: Once order lines get invoiced they cannot be invoiced again. If you choose to add the shipping charges across the entire order (as a 9966 line) and the order gets invoiced, you cannot update or add to the 9966 shipping charge line. However, you can still add shipping charges against individual lines (i.e. line 11 for order line 10) as long as the line being changed has not been invoiced.
The following example shows shipping charges entered against line 10 and also as a 9966 line.
|
The notepad records most of the activity on the order.
For example, if the option Update Notepad when Order is printed as a Pick list on the System Wide Setting - Notepad Format Options is activated, you can track who prints pick tickets for customer and transfer orders.
Note: If the order is a transfer order and the transfer pick list is system generated, the notepad is stamped with the user who started the printorder job.
The Installation Scheduler allows you use sub-contractor data to determine the next available installation date for each line on order. The daily work schedule can then be reviewed and manually updated, if necessary.
Note: Use the Installation Scheduler menu (menu option INS) to create installation teams, enter installation schedules and perform other set-up procedures.
Click the Measure tab and fill in the following information:
Measure - When this setting is activated, the order is updated as measurement job. Even if you do not immediately schedule the measurement, everyone can see that the order requires measurement.
Installer - Installation companies are created via menu option INS 3.
Measure Team - Measurement teams are created via menu option INS 2.
Measure Status: The options are: U - Unmeasured, S - Scheduled, M - Measured, R - Ready to Install
Measure Status Date - This date is related to the measure status. It allows you to record/track changes in measurement statuses.
Requested Measure Date - This is the date the customer wants to do their measure.
1. Select an order and then open the Installation Scheduler option. The following screen appears.
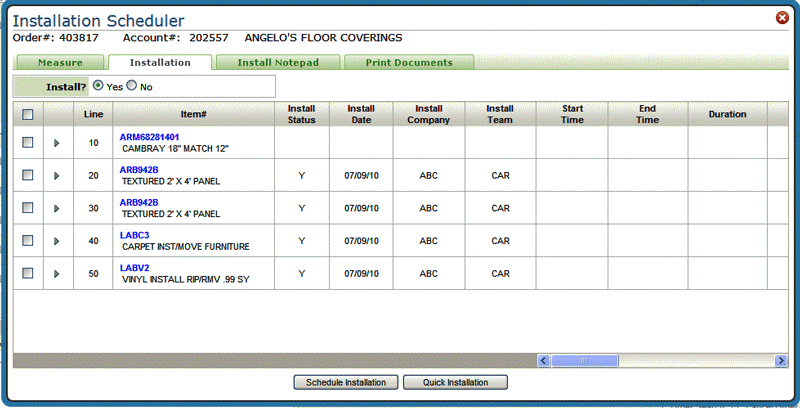
2. If this is an installation job, the Install? setting must be set to Yes. When this setting is activated, the order is updated as an installation job. Even if you do not immediately schedule the installation, everyone can see that the order requires installation.
There are three ways to schedule an installation:
Clicking the arrow to the right of a line
This option is designed to schedule an installation for one item on an order.
1. Click the arrow to the right of an item.
2. Select Edit Details.
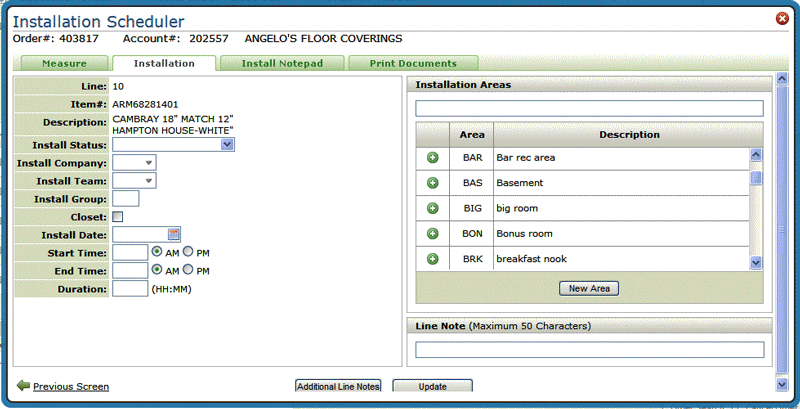
3. Add or change information as needed. You can use this window to note the area(s) of the house where the product is going to be used and to record any notes about this specific line.
Note: Notes for the whole order are added through the Install Notepad tab.
4. The Install Group is a user-defined code for associating multiple order lines as a single installation.
5. It is important to note that the date and time entries (i.e. Install Date, Start Time, End Time) entered are not checked against the sub-contractors schedule to ensure they are in fact available.
6. Click Update to schedule installation for the order line.
Using the Schedule Installation Button
This method lets schedule installation from one to all of the lines on an order. Dates and times are also checked against the sub-contractors schedule.
1. Select the order lines to schedule installation for and click Schedule Installation.

2. Use the top part of the screen to filter the Installation Teams displayed in the bottom portion of the screen. For example, you can set the Cost Center to carpet to only show installers that work with carpet. Furthermore, you can use the Hours Required field to show only those installers who have enough time available for the job. For example, if you enter 8 in this field, only the teams with 8 available hours will display.
The bottom portion of the screen displays, in date sequence, all the teams matching your selection criteria.
The information to the right shows how many jobs/hours the installer has available or already allocated. If there are no entries in the Jobs Avail and Hours Avail fields, that installer cannot be used since he is already booked up for that day.
3. Select an installer and click Schedule Selected Date and Team.
4. On the next window, entries are required in at least two of the time fields (Start Time, End Time, and Duration). The third time is automatically calculated from the two entries. For example, if a starting time and duration are entered, the ending time is automatically calculated.
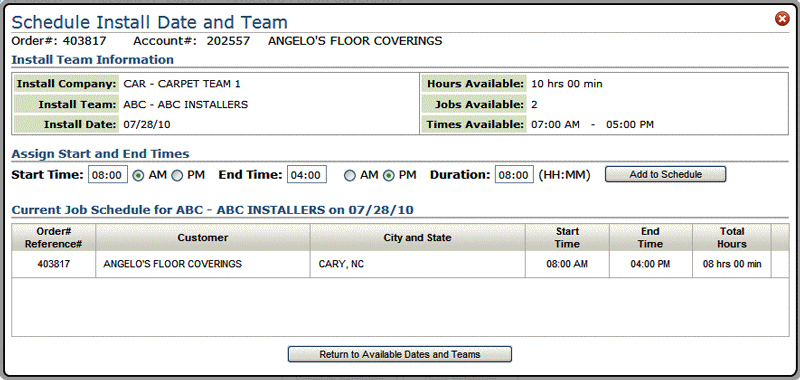
5. Click Add to Schedule.
The Quick Installation button on the bottom of the Installation Scheduler window allows you to schedule an installation for the entire order quickly and easily. It is important to note that the Install Date is not checked against the sub-contractor’s schedule to ensure they are in fact available. However, if you are sure that an installer is free on the required date, this option can quicken the Installation Scheduling process.
Simply enter an installation company, team, and date and then click Update All Lines.
The following installation documents are available:
Customer Installation Agreement Form - Provides a preliminary agreement form that can be discussed and agreed upon with the customer.
Customer Labor Approval Form - Provides an approval form for the customer to sign.
Installation Worksheet - Provides a copy of the materials being installed and the quantity needed.
Labor Purchase Order - Produces a purchase order for the labor charges and shows which Installation Team is responsible for each line. A summary of labor dollars for each installation team is included.
Select a report and click Next to select the report parameters.
There are several omit (O) or include (I) parameters. If you include parameters the report only runs for the parameters entered. For example, if you only wanted to see the scheduled jobs, enter an S in the Installation Status field and an I in the I/O field.
If you omit parameters, the report runs for all the parameters except the ones you enter.
The Printer, Copies, Form and Drawer parameters let you make the following print settings:
select the default Printer or OUTQ. If an OUTQ is entered, the report can be accessed via the ODS heading in the upper right-hand corner. If the OUTQ is attached to an actual printer or print device, a hard copy is produced.
establish the number of Copies to print.
select a Form code such as blank for non-laser or “L” for laser.
designate a specific Drawer that contains the appropriate paper stock for printing Installation Documents. For example, you might use one drawer of the printer to store letterhead.
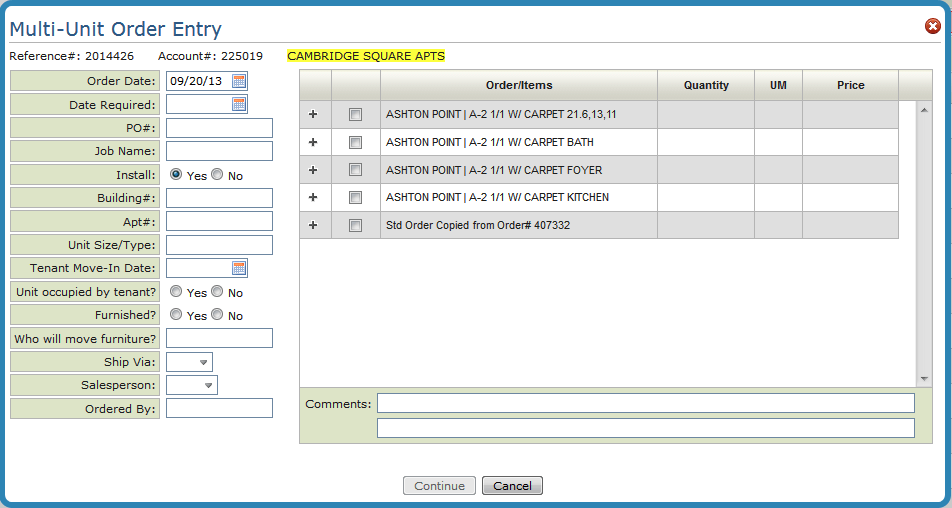
This option allows you to access the Multi-Unit functionality at any stage of an order.
Multi-Unit functionality incorporates existing standard orders already built for an account to enable quick easy order entry in Navigator.
Note: For more information on Multi-Unit Order Entry, refer to Multi Unit Functionality.
Navigator Order Management Notepad
The notepad is where you can enter notes about an order. The system also automatically records events such as line status updates,, quantity changes, and price changes.
Notepad for Unprocessed Orders from non-interactive users
Search Notepad
Preforms a string search through an order’s notepad screens. Often the notepad contains pages of data. This scan provides a quick and easy way to find exactly the information needed. Easily find all changes related to a user, a phrase, a date, a line number, etc.
Order Details
This tab displays dates and times related to the creation of an order.
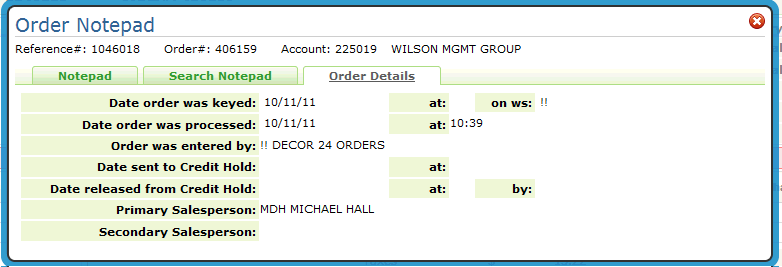
Field |
Description |
Order Header Was Keyed |
Date and time the header screen of the order in the original order entry session was entered. For EDI orders, it is the date and time the EDI order entered the system. Special Workstation Codes
|
Order Was Processed |
The date and time the order was assigned an order number and processed, but the order was not necessarily printed. If the order was originally a hold, this could be a different date than the date the header was created. |
Order Was Entered By: |
This is the initials and name of the person who keyed the order. If there are initials, but no name, then the name is not defined in the Classification Codes File. |
Sent To Credit Hold |
This is the date and time the order was sent to credit hold, if it was sent to credit hold. |
Released from Credit Hold |
This is the date and time the order was released from credit hold; if it was released. The initials or authorization code for release are also shown. |
Primary Salesperson Secondary Salesperson |
The Salesperson initials are pulled from the Salesperson field on the Order Header screen. The full name is pulled from the Salesperson File. |
Notepad for Unprocessed Orders from non-interactive users
The Notepad for Unprocessed orders contains the reasons why the order was not processed.
Note: This functionality only applies to non-interactive users; which basically encompasses Décor 24, Channel Management Solutions (CMS) and the Armstrong Sales Portal. Orders entered by interactive users (i.e. orders are entered from a work station that is assigned work station ID) are not in scope at this time.
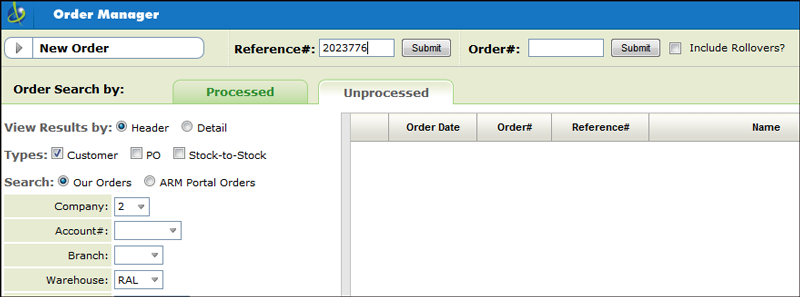
1. Click the Unprocessed tab.
2. If you know the Reference number enter it in the Reference# box at the top of the window. If you don’t know the reference number, use the search filters in the left hand pane to select search parameters. In this example, a reference number is entered.
|
3. Click Submit to access the order.
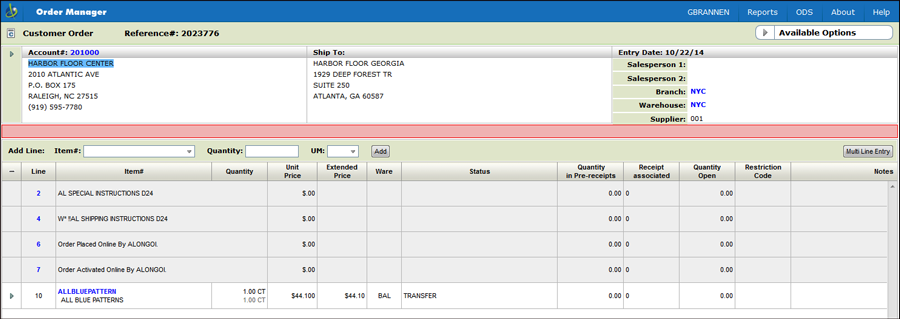
|
4. Notice that the order has a message line for special instructions and another one for shipping instructions. If the conditional release parameters were activated and set-up for this Décor 24 order, the order is placed into the Unprocessed Order File.
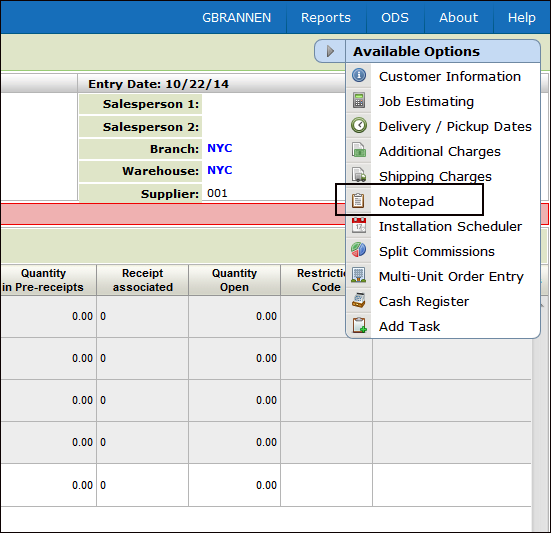
5. You can check on the Order Hold Details by accessing the Notepad via the Available Options in the upper right hand corner of the window.
|
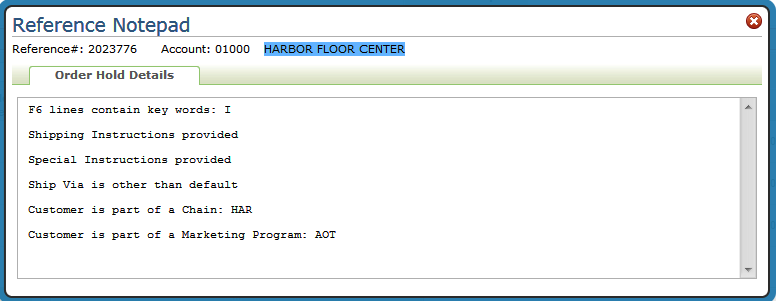
6. When Notepad is clicked the Order Hold Details window appears displaying the reason why the order is unprocessed.
|
Note: The order can be manually processed by clicking the Complete Order button at the bottom of the screen.
System Wide Setting - Options for Order Hold Process
Conditional Order Release in Decor 24
Receiving Purchase Orders in CMS
Navigator File Management - Order Hold Reason Codes
This option allows you to inquire on and/or update the status and shipping dates of customer orders and purchase orders including ship dates on lines that will not actually ship - such as “labor/expense” items and credit memos.
Some status codes, such as the number sign for closed orders, are assigned by the system and can not be changed. You may update an order's status code as many times as necessary. For example, the status of a purchase order may change from O to D, to K, to T, to R, before it is closed. Use this screen to view or update the shipping, ETA dates and status of orders.
Note: Status codes are established under option 7 - Order & Serial# Status Codes Table on the System Settings (SET) menu. Click here to see example order status codes.
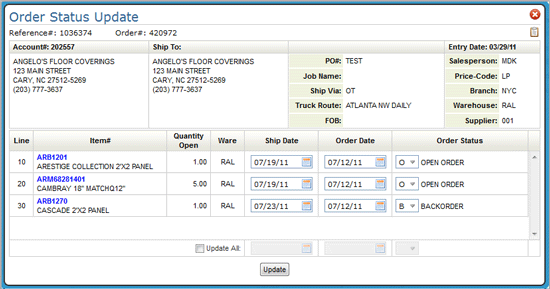
To change the status, ship or ETA dates of all lines on the order, activate the Update All box at the bottom of the screen. Enter the new data in the corresponding fields.
To change the status of one of the items listed on an order, enter the new status code for the item or use the drop down box.
To change the ship date or ETA date simply enter a new date. If ETA does not apply, as with customer order from stock, the ETA field is not displayed.
Order status should be updated in a logical sequence. You may have particular situations to address at your company and want to assign a new or altered meaning to these status codes. This is perfectly acceptable as long as the new meanings are documented for your staff.
The following example shows the logical flow of an order through the system for a Regular In-Stock Customer Order:
1. Order entered, print pick list. Status = blank or O.
2. Order picked. Status changed to X.
3. Order placed in staging area awaiting delivery or pick up. Status changed to A.
4. Order delivered or picked up. Status changed to S.
5. Order invoiced. Status automatically changed to # for closed.
The example above may be too detailed for many warehouses, especially without bar codes and scanners, but the sequence illustrates how the status codes can be effectively utilized.
This available option allows you to access the cash register window from anywhere in Order Entry.
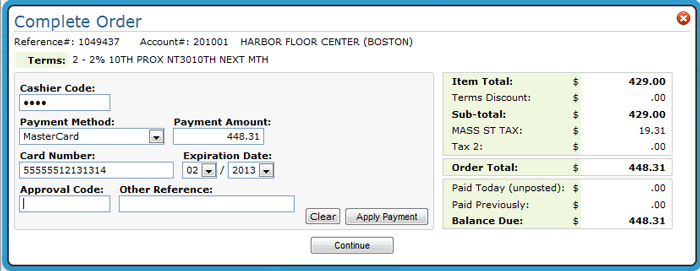
Note: To mask the credit card number ensure the setting Verify credit card number for this payment method is activated. This setting can be found on the Payment Method Code Table Maintenance application.
1. Enter the necessary payment information and then click Apply Payment and then Continue.
Note: Payment methods are user defined by your system administrator in the Payment Methods File. We recommend establishing codes such as CA = Cash, CH or CK = Check, and a code for each type of card. You can also set up special codes to represent Gift Card Purchases, Non Payment, etc.
2. After the payment is applied to the order, click Continue again to access the End-of-Order Options window.
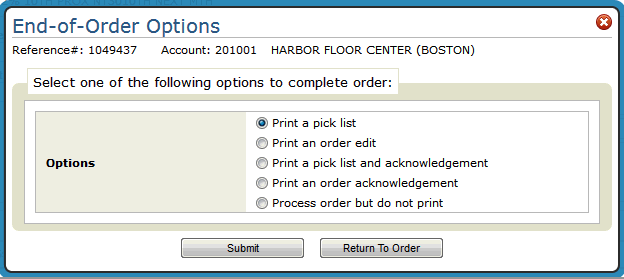
3. Select an option. The option Process order but do not print directs the system to process the order then send it to the open order file, but no pick list or acknowledgement is generated. Printing an order edit will leave the order as unprocessed.
The End-of-Order options vary depending on what type of order you are creating. For example, the printing options for processed orders include options for printing a pick lists and picking labels.
Note: Printers for pick lists are designated in the Warehouse File (FIL 8). Printers for the other documents (quotations, material selection forms and acknowledgements) are designated in the Web Control panel (NAV 5 option “Y”). For more information refer to Printing.
4. If your Control User File (menu option NAV 5 "U" option) is configured to send order acknowledgements via ODS, when either Print a pick list and acknowledgement or Print an order acknowledgement is selected you are presented with options for sending out the order acknowledgement.
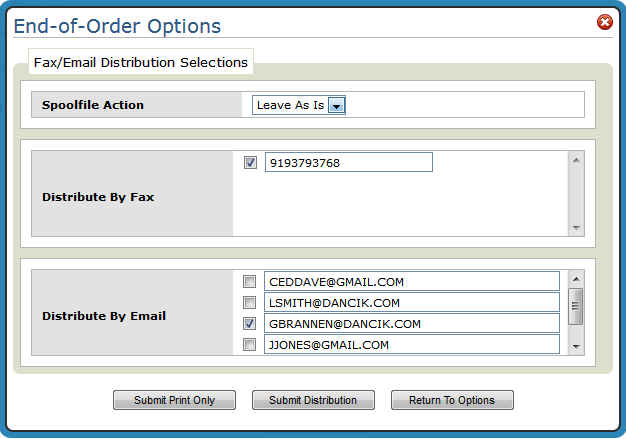
Note: The fax number and email recipients are pulled from the Phone Number File (SYS 802).