Field Name |
Description/Instructions |
||||||||||||||||||||||
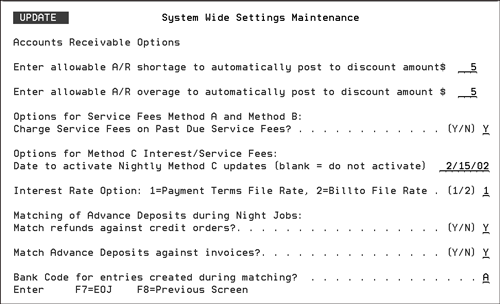
Defines what AR payment variances are automatically accepted by the system without balancing further. You can enter Accounts Receivable system settings for automatically clearing small payment discrepancies while applying cash. You can set an allowable underpayment limit, and an allowable overpayment limit, which is tested on a check by check basis while applying cash. This option allows you to enter the allowable shortages and overages to automatically discount when applying cash. These shortages and overages should be entered in full dollar amounts only. These amounts are allowed on a check by check basis. Two parameters that pertain to Method C Interest/Service Fees and three options that pertain to Auto-Matching of debits and credits are included in this setting. Method C is an alternative to Method A and Method B interest/service charge processing. Parameters have also been added to control the AR Auto-Matching program which automatically matches credits and debits for the same order on AR.
|
|||||||||||||||||||||||
Activate Serial Number Price, Dimension and Additional Features |
This setting allows users to maintain pricing and dimension information on specific serial numbers for rolled good items with an item policy code of A#. This functionality is designed to support items such as rugs that require information be maintained at the serial number level. This functionality also supports rolled goods that can be cut both in width and length. This functionality only applies to manual inventory selection in order entry/change. If this flag is on, ISO will not find these serial numbers. If this setting is activated, serial level pricing and dimensions are used by key parts of the system such as receiving, order entry (non ISO), inventory inquiry, etc. Note: Dancik’s automated processes, such as ISO and Automatic Back Order Fill, will ignore serial numbers set up with nonstandard widths. This ensures that unexpected widths are never ordered without user approval. Note: Serial number level pricing is not supported Decor 24 or Selection Sheet Manager. Note: Serial number level pricing does not include information from funds or promotions. Best Practice For one of a kind items, set ISO to automatically display inventory, so users can see their selections. One of a kind items (such as individually priced rugs) should not be preferred by ISO, but if a user requests such an item, ISO should display the available serial numbers. Note: For more information on Serial Level Pricing, refer to Serial Number Level Pricing and Dimensions. |
||||||||||||||||||||||
When the Auto-Fax program is called, it prefixes the fax number with the entry on this screen. This enables you to use Auto-Fax applications with phone systems that require preliminary digits and pauses to reach an outside line. For example 9+ will dial 9 and wait one second before the AS/400 will dial the fax number.
The second and third lines... Include all numbers that should be dialed prior to the phone number. (Including pauses) Ex) 9+ ...simply provide an example entry for the first line, Auto-Fax Phone Number Prefix. |
|||||||||||||||||||||||
This option disables the automatic printing of back order pick lists in the invoicing process. Back order pick lists, in invoicing, are created for lines appearing on invoices as unshipped or partially shipped. In a warehouse environment where paper pick lists are kept on file, the back order pick list replaces the original invoiced pick list. It contains the lines remaining to be shipped. These documents are not needed in a paperless warehouse. |
|||||||||||||||||||||||
Gives the option of setting the Back Up Option for night jobs.
Warehouse personnel can utilize all features on the Warehouse Menu starting approximately half way through Night Jobs. This reduces down time for warehouse night shifts by approximately 50%. If you set this option to perform backup before Night Jobs, the system performs as follows:
Note When following the above procedures your night shift warehouse personnel should experience a consistent schedule of downtime versus uptime. The backup and restricted portion of Night Jobs should take a similar amount of time each night. However, there are two jobs that can affect this schedule. When you request to change item numbers (which causes all files to be read and reorganized) that program must run in a restrictive state. Therefore, downtime will be greater on nights when item changes are run. You should schedule item changes for weekend nights. End of Month close of Accounts Receivable must also run in a restrictive state. Therefore, warehouse personnel should be alerted when End of Month will be run. Associated Files |
|||||||||||||||||||||||
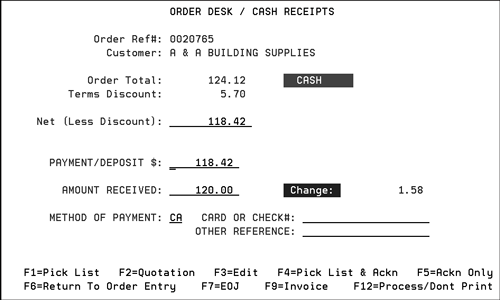
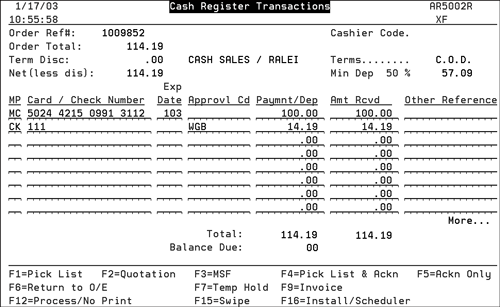
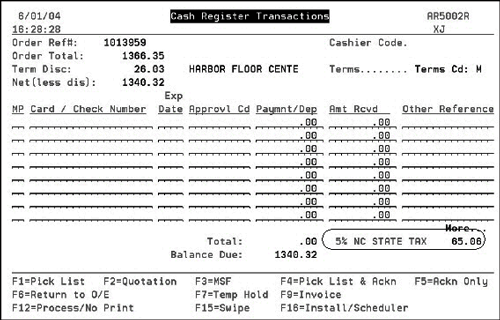
This setting controls which of the two available cash register screen options should be activated. Option 1 activates the simple version of the Cash Register screen for companies that do not have a large focus on cash sales. Option 2, activates a much more comprehensive cash register screen, with ability to process multiple payment methods against the same order at the same time, card swiping, gift cards, and more. Option “1” retains the previously available cash register screen formats and functions. The selection you make, 1 or 2, affects all the workstations on your system. Cash Register Payment Screen Method - Enter 1 to allow only a single method of payment per order to complete transactions. Enter 2 to allow multiple methods of payment per order, plus the extended features. If you selected select Payment Method 2 - Multiple Payment Method, you can keep or change the defaults contained in the next two fields.
Note: The Method 2 Report Defaults are applied to all Cash Reports unless overridden. Example of the Single Payment cash register screen
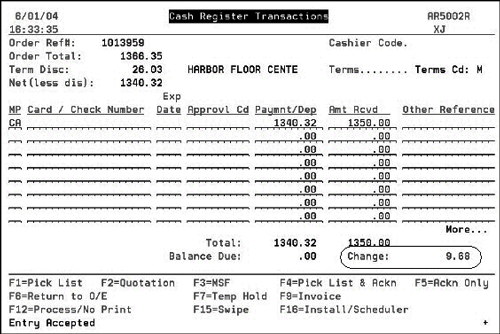
Example of the Multiple Payment cash register screen
Note: The Cash Register screen only appears at work stations where the Control Panel is set to Cash Register Screen = Y. Displaying Tax Information on the Cash Register screen - This option controls the display of taxes on the cash register screen is at the bottom of the Cash Register Environment Options screen. For example, if both state & local taxes were charges, it could show:
In Canada it could show:
As shown below, the tax fields appear where the Change field usually appears.
If there is any change required, then the Change field supersedes the tax fields when Enter is pressed.
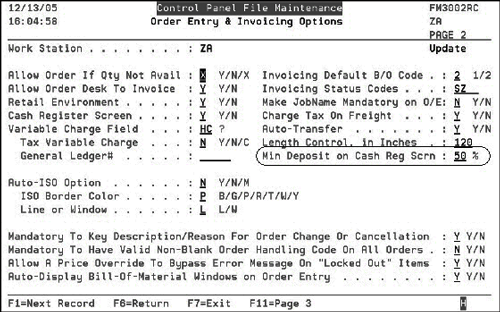
Display the amount that is ready to ship? (total less back orders) - This feature shows the user how much of an order is “ready to ship”, in case your policy for COD orders is to collect only what can be taken. The “ready to ship” amount is “total order charges less back ordered items”. Enforce the Min Deposit % from Control Panel on Cash Register Screen? - Enter a Y to adhere to the setting made in the Min Deposit % on Cash Reg Scrn on the Control Panel (menu SET option 1). Enter an N to suggest but not enforce the entry in the Min Deposit on Cash Reg Scrn. The default for this setting is Y. This forces a payment to be made on a cash or COD order. When set to N, the minimum payment message still displays at the bottom of the Cash Register screen, but instead of being mandatory it is a simply a payment suggestion. The % deposit set in the control panel, via the Min Deposit On Cash Reg Scrn field, is based on the total order amount (including any BOs) and not a percentage of the “Ready to Ship” amount. The concept of deposit is always related to a future pickup. In the screen shown below, the control panel is configured so that 50% of the order has to be paid before completing the order process.
When accepting payment for an order, if the Enforce the Min Deposit % from Control Panel on Cash Register Screen? field is activated the system will not continue processing an order if less than 50% of the amount owed is paid. The statement Payment cannot be less than 50% of amount due appears at the bottom of the cash register screen. For COD & CASH Orders: These options, at the bottom of the screen, ensure that warehouse personnel remember to collect COD orders not paid in advance. The idea of these options is to show the user how much of an order must be paid at any point that the cash register screen is looked at. These options do not apply to Order Entry (since the status codes are not yet established), although the Min Dep% can apply as usual.
Scenarios The following scenarios provide examples of how the COD and Cash order settings work.
|
|||||||||||||||||||||||
Specifies the detail level of reconciliation of manifests between the AP and receiving systems. This option enables reconciliation to be broken down by cost center within each manifest. When this option is selected, you are presented with two options. Select one, both, or neither, of the following:
|
|||||||||||||||||||||||
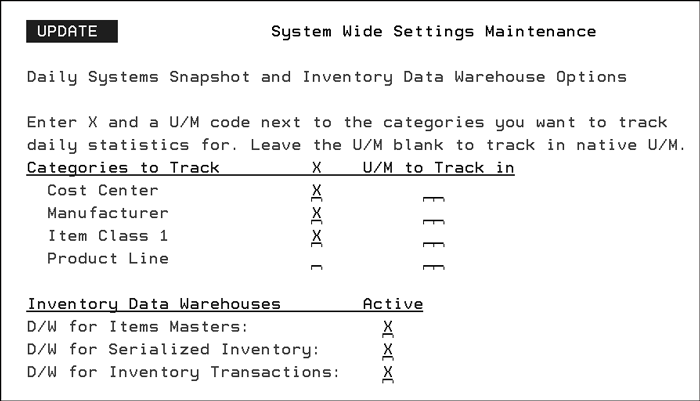
Daily Systems Snapshot The top part of the screen enables or disables the creation of records in the Daily System Snapshots file. The Daily System Snapshots File is optional and is required only for the Daily System Snapshots Analysis Reports.
Once activated, the system takes a daily snapshot of the following statistics:
These statistical snapshots are taken during the night jobs, except for inventory receipts which are taken when receipts are posted. There are four categories of statistical snapshots: Cost Center, Manufacturer, Item Class 1, and Product Line. Select the categories relevant to your operation. The disk space requirement is minimal for all categories except perhaps Product Line, which can consist of many records depending on your data setup. The Daily System Snapshots File consists of one record per day, per category selected. For manufacturers, we recommend that all categories are selected. The Daily System Snapshots Analysis Report includes your vital sales, ordering, production, and inventory information on a single page. Distributors, importers and retailers should select only the categories to be monitored on a daily basis. To select any of the four categories, enter an X in the selection field. You can optionally enter a UOM code for all selected categories. The UM code you enter causes all quantity statistics to be converted to that particular UM. When there is no conversion factor found, the program assumes a conversion factor of zero and the quantity is not included. The UM option is an important feature because it allows you to track total market penetration in a single common UM. For example, if you sell vinyl tiles, ceramic tiles, and carpet, you can track those in cartons, square feet, and square yards respectively. The ceramic tile may have some items sold in square feet, but others in pieces and sheets. By specifying square feet (SF), you can monitor all these different products in a single unit of measure. The Daily System Snapshots File contains sales dollars and gross profit figures, as well as quantities. Inventory Data Warehouse Options The options on the bottom part of the screen activate the Data Warehouses. For more information on Data Warehouses, click here. |
|||||||||||||||||||||||
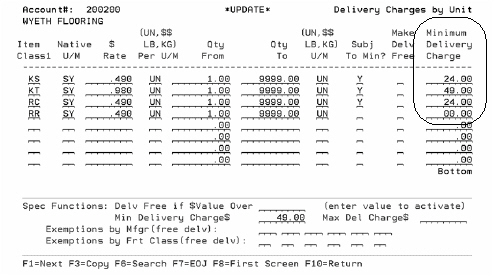
This system wide setting activates the functionality for basing Minimum delivery charges on the type of product shipped. This setting only applies to Delivery Charges by Unit.
If the Minimum Delivery Charges by Item Class functionality is activated, a Minimum Delivery Charge field is available for every Item Class.
Note: For more information, refer to Basing Delivery Charges on the Type of Product Shipped. |
|||||||||||||||||||||||
This option gives you the capacity to schedule deliveries while not including the delivery charges, during invoicing. This feature provides more flexibility in scheduling and charging delivery fees to customers. This option is enacted during the invoicing and COD reports process, through the use of delivery ship via codes or FOB codes noted in the System Wide Settings.
This screen allows you to enter up to three delivery Ship Via codes and three FOB codes. When invoices are processed, any that are flagged with the codes entered here will not be assessed for delivery charges. This will also apply to COD pick lists, if you apply delivery charges at that time, and it will also apply to the COD Reports option. Note The Ship Via codes and the FOB codes work in an “and/or” relationship. For example, if you entered a Ship Via code but no FOB code, the delivery charge for the shipment will still be suppressed. Example If you had a route established under an OT Ship Via, but used a common carrier instead of your own truck when it was more cost effective, you could charge for your OT deliveries, but ship collect when using common carriers. In order to accomplish this, you could suppress delivery charges based upon your Ship Via code (for common carrier) or your FOB code for “collect”. Associated Files Where and How Delivery Charges are Assessed |
|||||||||||||||||||||||
Enables or disables the undelete function in the Invoicing program. The F5 function allows you to issue a second invoice against orders already invoiced in Today’s batch. The F5 feature is a powerful, but potentially dangerous feature. Unless your staff is carefully trained in its use, and it is absolutely necessary to require the F5 function, we recommend disabling the option. |
|||||||||||||||||||||||
Installation/ |
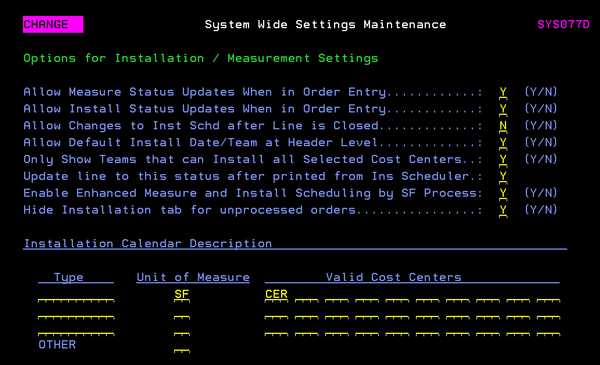
This is a series of settings that control the activation and use of the Installation Scheduler module, for companies that either schedule or perform on site measurement and/or installation services. The Installation Scheduler provides access to installation information. Daily work schedules can be reviewed and updated.
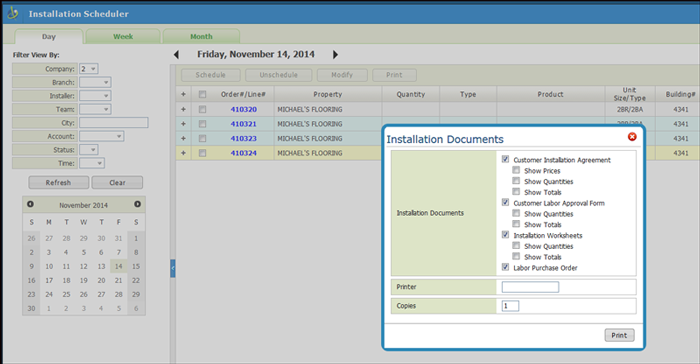
If an option is set to N, it will not display within the Scheduler/Status feature during order entry. Setting the option Allow Changes to Installation Scheduler after Line is Closed to N prevents any installation or measurement updates or changes to a closed (invoiced) line via the Installation Scheduler. Update order line to this status after printed from Installation Scheduler - Enter the status code, in this example it is “S” for shipped, that the order line will be updated to when installation scheduler documents are printed. Follow this path to get to the Installation Scheduler Documents window:
Note: The order can also be checked via menu option CUS 10 on the green screen. Enable Enhanced Measure and Install Scheduling by SF Process - When set to “Y”:
Hide Installation tab for unprocessed orders - When set to “Y” hide Installation tab for Unprocessed Orders. Default is “N”. Note: For a detailed write-up on how the settings Enable Enhanced Measure and Install Scheduling by SF Process and Hide Installation tab for unprocessed orders affect Installation Scheduler click here. |
||||||||||||||||||||||
These settings activate the systems needed to manage the transfer of material between International warehouses. Cross border transfers of material must go through the “purchase/receive” process, including currency conversions. This process adds the necessary additional charges such as duty, exchange and additional freight to the receiving warehouse. It brings the same features used in Dancik’s transfer system within a single country to international (cross-border) transfer. The International Transfer process eliminates any double keying of customer transfer orders, and facilitate global views and global selection of inventory regardless of the country. The underlying processes (to convert between currencies and apply duty and/or other charges) is transparent to the user while satisfying accounting requirements. The settings are:
Associated Files |
|||||||||||||||||||||||
This feature gives you the following options to control both the content and automatic running of the Invoicing Pricing Analysis Report and Promotion Pricing:
Enter Y or N next to each of the above options. Entering Y next to the first option causes the Pricing Analysis Report to run automatically whenever you run the Invoicing By Status Code program. The other parameters control the content of the report. |
|||||||||||||||||||||||
These options control how the NB (No Broken Units) Policy in the Item File is applied during the Order Entry process. Normally the NB policy applies to the “smallest sales UM” field in the Item File. Enter X next to any of the special NB policy features you wish to activate.
Note These parameters apply to regular Order Entry only. They do not apply to orders entered with ISO. Associated Files |
|||||||||||||||||||||||
The items effected by this functionality are coded with policy G# in the Item File Policy field. The first set of options control when the system makes the adjustments to onhand inventory after a laminate cut is requested. These options apply only to laminate orders in which a requested size is cut from another size. The options are:
The Laminate Cut Date Options provide for the ability to choose one of three dates to use as the “last receipt” on a laminate item serial number that is cut and returned to inventory. Note: This date options affect inventory aging reports.
|
|||||||||||||||||||||||
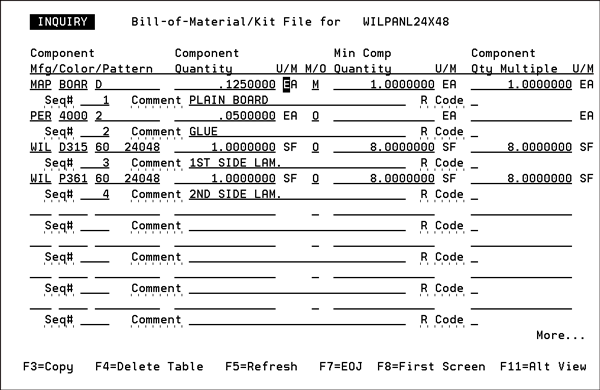
Enter a Y to activate the Light Manufacturing and Assembly System. This application combines Order Entry and Bill Of Material concepts, to process orders for light manufacturing and assembly of finished goods. The primary concept in manufacturing is finished goods being manufactured from components. This application relieves component inventories and adds to finished goods inventory. Finished goods items: New finished goods items are entered as regular items except that they MUST include policy code ‘S2’, to indicate the item is primarily manufactured to order. The standard costs entered for these items should be the ‘standard cost of manufacturing’. This standard cost should include all components and processes used to create the item, including labor. Finished goods items do not have to be completely precise. For example, for laminated panels, you can enter a unique item number for each type of board, board thickness, and class of laminate, but not for each specific combinations of items (which could be countless). As orders are taken, specific colors and sizes may be specified. No changes to the item file would be required. Component items: Component items are entered as regular items in the item file. No special codes are needed, as they can be sold as is, or as a component of a finished goods item. Bill-Of-Materials File: A BOM file entry is required for all finished goods (policy S2) items. The BOM should include an entry of each component that needs to be adjusted from inventory to create the item. Items in the BOM may be overridden. Include the most applicable (popular) component items, and then the user can override to specific choices when the item is ordered. All items should be entered with a quantity ratio of component quantity to finished goods quantity, when applicable. The following screen is an example of a light manufacturing bill-of-material. The only thing that differentiates light manufacturing Bills-Of-Material from other Bills-Of-Material is the policy S2 in the item file of the finished good items.
|
|||||||||||||||||||||||
The Master File Update Log is an audit file which tracks whoever made updates to certain master files. This system-wide setting activates the Master File Update Log feature.
The above screen lists the files integrated with the Master File Update Log. Enter a Y next to the files you want activated. It causes all updates to those files to write an entry in the log. The entry shows who made the update, to what record, and when. In certain cases, the log captures the screen or the field updated. The log can be viewed using the View Log of the Master File Updates Program, found in the Utilities section of many menu bar programs. Note Be aware that an environment of frequent file updates can cause this file to become quite large. Do not activate this feature if disk space is very limited on your system. |
|||||||||||||||||||||||
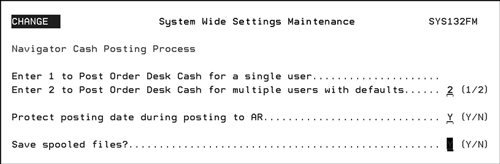
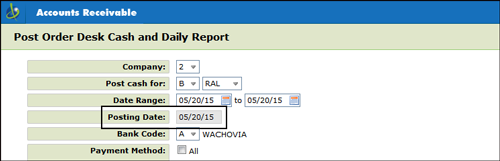
The options in this setting allow you to choose the method for Posting Cash in Navigator.
For more information on Option 2, refer to Post Order Desk Cash Defaults. Note: These settings only effect Navigator Cash Posting. They do not effect the Order Desk Cash Posting process in the green screen.
Enter a “Y” in the Protect posting date during posting to AR to take away the ability to change the posting date when posting order desk cash. The field will be grayed out and today’s date is defaulted in.
The setting Save spooled files places the reports produced during the cash posting process, Order Desk Daily Cash Report and Cash Edit Report, in a HOLD status. If this setting is not activated, set to “N” the reports are automatically deleted after they are printed. |
|||||||||||||||||||||||
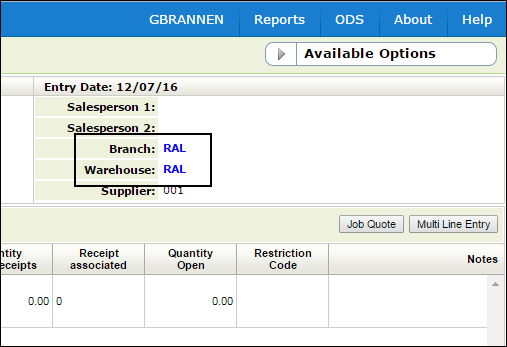
This setting Populate Branch with Header Warehouse for Non-Direct Orders allows you to update the branch on the order header in Navigator Order Management. This setting was implemented in Dec 2016 to ensure the warehouse performing the bulk of the customer service gets credit for it. If set to N, the branch is defaulted in from Billto File (for centralized customer service operations) or from the user control panel for decentralized and/or retail customer service operations.
When set to Y, update the branch on the order header to the header warehouse during order entry. Restrictions: This functionality does not apply to direct orders, purchase orders, or stock transfers. Editing Branch and/or Warehouse Both the Branch and the Warehouse can be changed by editing the Order Header. Click the option arrow to the far left of the order header, and select Edit Header.
|
|||||||||||||||||||||||
This setting directs the system to automatically display a PDF file of the order when Complete Order (for new orders) or Process Order Change (for existing orders) is clicked in Navigator Order Management.
Review the PDF to ensure the order is correct.
This print preview functionality applies to processed and unprocessed Customer Orders, Quotes, Direct Ship Orders and Credit Orders. It does not apply to Purchase Orders or Stock to Stock Transfer Orders. |
|||||||||||||||||||||||
This option controls system-wide settings for negative inventory. You can control enable or disable entries that create a negative onhand balance inventory in the three Inventory related programs: A Y entry in these fields causes the respective program to issue an error message instead of allowing the inventory onhand balance to become negative. |
|||||||||||||||||||||||
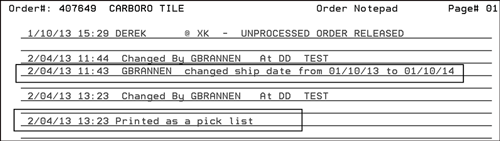
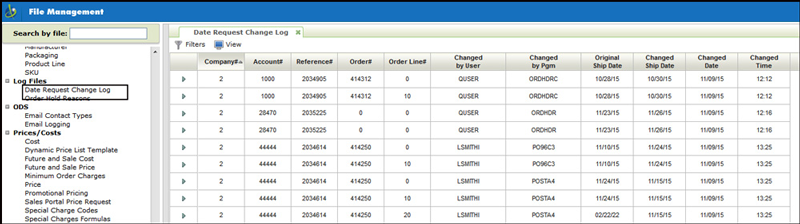
This setting includes two options that direct the system to stamp an order’s notepad whenever the Date Required is changed and/or when the order or purchase order is printed as a picklist.
|
|||||||||||||||||||||||
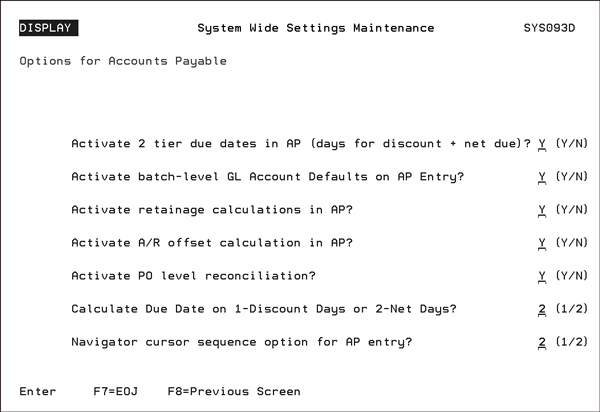
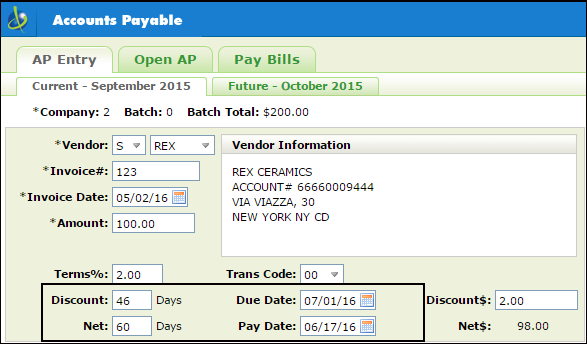
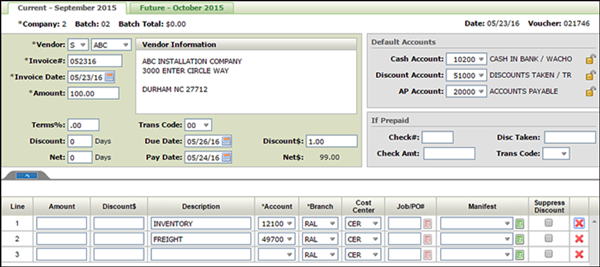
If this setting is activated, the field Paymt Terms 00000 % 000 Days Net 000 appears in the Supplier File (FIL 3), the Vendor File (FIL 14), and in the AP Entry program (AP1). It also directs Night Jobs to automatically process due date changes when the “due for discount date” passes. Note - You can run a report, via option SYS 414, at any time that can list and update AP Invoices that are past their discount due dates.
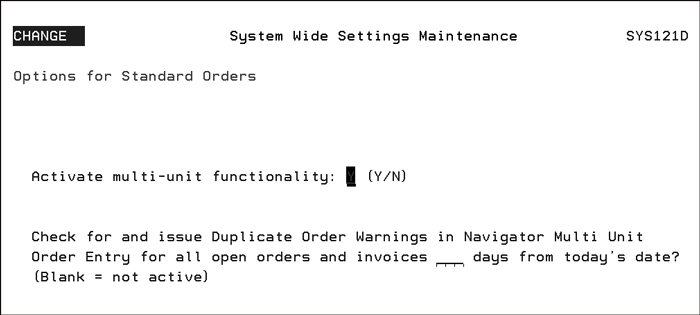
The next two settings affect Multi-unit functionality.
Note: Other files that are associated with the two settings above are: Navigator Supplier File and Navigator Vendor File.
WARNING: Activating the PO level reconciliation will change the way that the AP 217 Unvouchered Receipts Listing looks at the cleared manifest records. Manifests cleared by the traditional method don’t reference the PO or PO line#. Therefore, everything from before activating this setting will show back up on the Unvouchered Receipts Listing. Two ways to accommodate this transition are:
Sequence 1 (the default) moves the cursor through the following sequence: Company # Batch # Vendor/Supplier Qualifier Vendor/Supplier Code Invoice # Invoice Date Invoice amount (Tab out of this field defaults terms code from supplier file and updates due date and pay date as well when supplier has no terms information). Line Detail Amounts Sequence 2 - moves the cursor through the following sequence (differences are highlighted): Company # Batch # Vendor/Supplier Qualifier Vendor/Supplier Code Invoice #: Invoice Date Invoice amount Terms % Discount (Days) Net (Days) Due Date Pay Date |
|||||||||||||||||||||||
This setting contains two options.
If set to N, then Allocation Swapping flags the allocated line as "Not Selected By ISO", and other processes such as Flexible Allocations can NOTre-allocate the line. This is the default setting, and is how the system works if this setting is not updated.
By entering a Y in this option, the Eligible for Reallocation field appears during the Allocation Process. |
|||||||||||||||||||||||
This option customizes the sorting of the AR Cash Application Edits. You can choose to sort AR Cash Application Edits by Bank/Check Number; the default response. You can also choose to allow users to select from a list of sort options. If you choose this option, users are prompted to select a sort option each time they request the AR Cash Edit. Note The AR Cash Application system includes a feature that allows a single check number to be applied to multiple accounts. This feature only functions properly when the cash edit is sorted by Bank/Check#. Except for this feature and the sort sequence, the output with each edit sort option is identical. |
|||||||||||||||||||||||
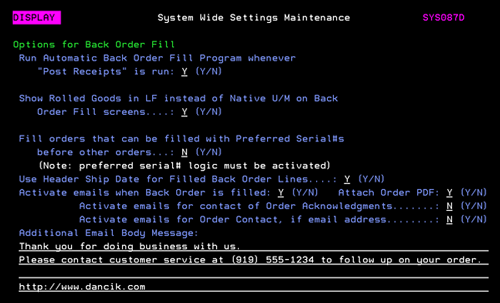
These settings support the automatic updating of back order ETA dates based on open purchase orders and manufacturer production schedules. These automatic back order date changes can be set to run nightly and/or on demand via menu option PUR 19.
Note: In order to activate any of the other settings, this setting has to be activated.
Note: If you set up the Stocking Matrix File to control the warehouses that all back orders are assigned to, then you do not need to specify any global warehouses here.
Note: A customer type code is assigned to each customer in the Customer Type field of the Billto File (FIL 1). ABC codes enable you to categorize and rate customers. For example, you might designate your most important customers with an ABC code of “A”. Note: ABC codes are created using the ABC Code File (FIL 34) and are assigned to customers via the Billto File (FIL 1). You may create up to ten levels of priority. The system processes each level in sequence. All others (any customers not fitting into any of the priority codes) are processed at priority level 50. Therefore, assign “higher priority” using priority numbers 01-49, and “lower priority” using priority numbers 51-99. The priorities you set here should coincide with the priorities set in the Warehouse Settings for Automatic Back Order Fill (SET 35).
Since several of the available order status codes are user defined you can create a status code that means “back order date is based on production schedule”. Some of the user defined order status codes are @, $, %, G, M, N, W, Y, Z. Note: Unlike system-defined order status codes, user-defined status codes have no implicit meanings within any system programs. For example, whereas the system recognizes that status codes X, A, and S are used within the picking and shipping activities, the system does not attempt to assign meaning to the user-defined codes. This program updates all back order dates and statuses as follows:
|
|||||||||||||||||||||||
This setting includes two options that pertain to filling back orders.
If this option is not activated, the Automatic Back Order Fill program has to be activated via the F2 function on the Fill Back Order screen that appears when option 4 - Fill Back Orders is selected off the INB menu (INB 4). Do not activate this feature unless you have completely established all other settings for automatic back order fill including the Algorithm Matrix and Warehouse Settings for Back Order Fill.
Note This controls the default unit of measure. You may switch between LF and the native U/M on the Back Order Fill screen. Note The only exception to this setting is if a complete roll or multiple full rolls were ordered. In that case, the UM of RL displays.
|
|||||||||||||||||||||||
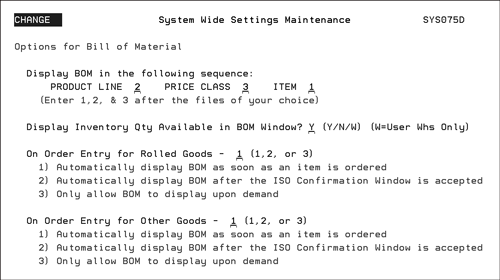
In order to fully use the capabilities for Bill of Materials, you must first make entries under the System Wide Setting - Options for Bills of Material. This system wide setting presents you with four options for displaying bills of materials (BOMs). Use these options to control when and how the a bill of material is displayed.
|
|||||||||||||||||||||||
Note: This system wide setting refers to the features on the Manufacturing menu (MFG) and is not related to Light Manufacturing. This setting works in conjunction with the Bill-of-Material application for manufacturing. This application lets you create bill of materials for finished goods. These bills of materials can then be used to perform inventory adjustments which add to finished goods and relieve components or raw materials. This System Wide Setting contains three inventory adjustment codes that are used when a finished goods bill of material is received. Enter an inventory adjustment code for each of the three items: finished goods, the components used in manufacturing. and for additional adjustments (which are used when yields are not what were expected). The following shows an example of how these settings can be used to account for inventory.
In this example, finished goods coming in from the manufacturer have an adjustment code of E (Received from Manufacturer). The components used to make those finished goods are coded with an F (Used by Manufacturing). Any additional adjustments are coded J (Manufacturing Exceptions). Additional adjustments account for situations when more (or less) components are used than what was expected. |
|||||||||||||||||||||||
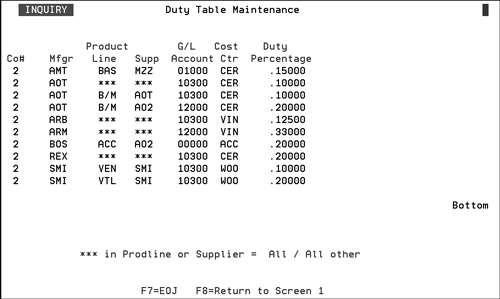
This option presents you with three choices applying duty rates to containers. You can choose to use the existing duty rates table, use the percentage entered in the Build-A-Container program, or use the duty table unless overridden within Build-A-Container. Select one of the three options.
The duty rate has to be manually entered. If a duty rate percentage is not entered, a duty cost is not charged. The program computes the duty amount, by multiplying total value ordered by the duty percent, and then allocating to each item based on the relative value of each item. Note Build-A-Container is option 19 on the Purchasing menu. Container are entered using option 1 on the Build-A-Container menu.
|
|||||||||||||||||||||||
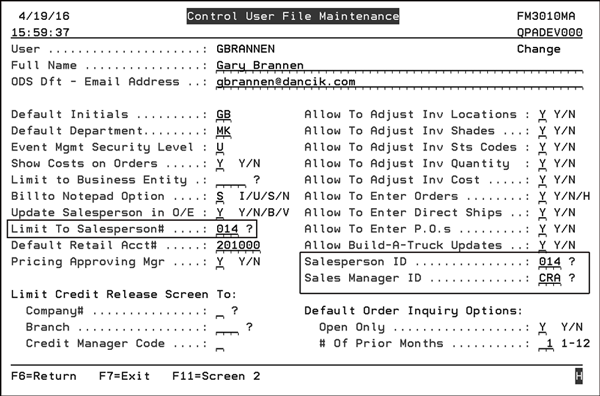
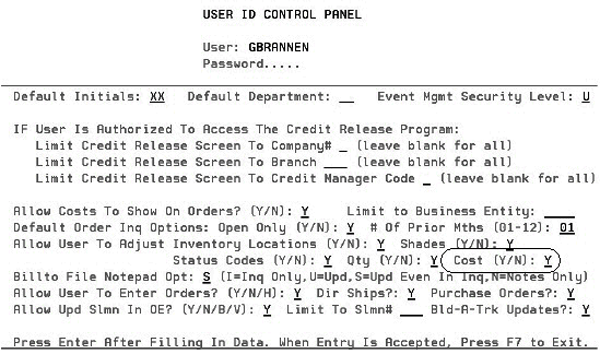
This setting allows you to assign and maintain user access and security by user name instead of by Work Station ID. Additionally, most applications will be able to assign control panels to work station IDs up to 10 characters long, instead of the previous 2-character restriction. Historically access and preference settings to Dancik’s green screen applications has been controlled by the two character Work Station ID. And this functionality will continue if this new System Wide Setting is not activated. This setting is part of an ongoing effort to improve the access to and seamless operation of our system. However, if the two character Workstation ID meets your needs we recommend that you do not activate this functionality. If the System Wide Setting - Options for Control Panel is activated, control of the applications is passed over to the control panel used by Navigator and accessed via menu option NAV 5 - Control User File Maintenance. Since Navigator is already controlled by user name when this functionality is activated Navigator and the work station based applications (green screen) will use the same data for settings and security. Associated Files Master Control User File (Menu Option SET 32) The setting Work Station overrides User Control Panel directs the system to use the work station control panel settings; even if the system wide setting is active. This override feature allows you to maintain the work station settings and controls for users of specific applications and terminal devices like cut stations and RF guns, which require the settings of the workstation to take priority over the user's settings. To access this override setting: • Go into menu option SET 32. • Enter a “Y” to access the Web Control Panel • The setting is at the top of the screen.
Control Panels for 10-character Work Station IDs As part of the ongoing effort to improve the access to and seamless operation of our system, you will be able to set up control panels for work station IDs of any size, up to 10 characters. Note: In Navigator, this is unnecessary because all Navigator (and other web application) controls are by user. |
|||||||||||||||||||||||
To Determine if there has been activity, use the Cost Drivers History Inquiry.
|
|||||||||||||||||||||||
These credit hold codes perform the same functions as some of the established codes except they can omit open order information from the credit calculation.
They affect the following areas of the system:
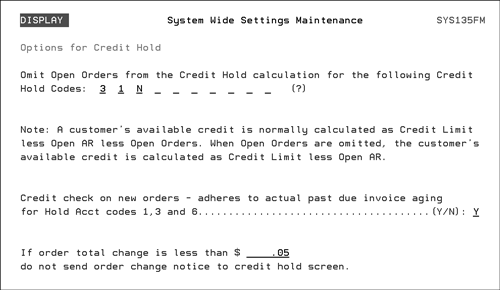
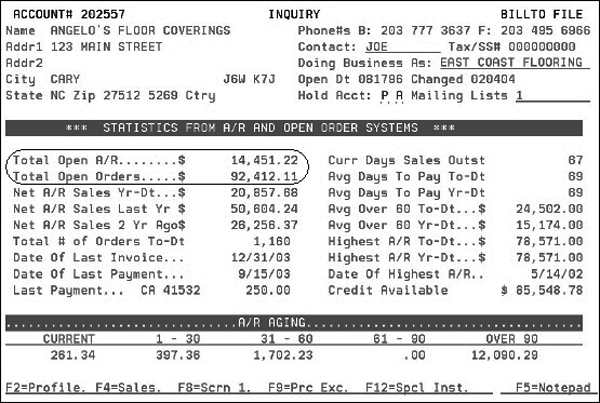
You may enter any of the available credit hold codes on this screen. Omit Open Orders from the Credit Hold calculation for the following Credit Hold Codes - You may enter any of the available credit hold codes on this screen (C, 0, 1, 3, 6, P, Q, R, S, T). Any codes entered into this screen will no longer consider open orders as part of the credit formula. Note: To display a listing of all the code, enter a “?” in the field and press Enter. As an example of how these credit hold codes work, consider the following screen from the Billto File.
If the customer’s credit limit is set at 100,000 and they are currently using a credit hold option of C, they are not allowed to make any more purchases because their open orders (92,412.11) plus their open Accounts Receivables (14,451.22) is more than 100,000. If the credit hold code is changed to P, the customer can still place orders. Code P takes the open order total data out of the credit limit calculation. The setting Credit check on new orders - adheres to actual past due invoice aging for Hold Acct codes 1,3 and 6 adds logic to credit hold aging days. Prior to the introduction of this setting in 2014, if a customer based their credit hold on the days an invoice was past due, the credit hold would take effect on the first day of the aging range. For example, if a customer is set up to go on credit hold if a payment is 1-15 days past due, the system would place them on credit hold if the payment was 1 day past due. This setting directs the system to use the higher number in the aging range; in this example 15. The setting If order total change is less than $ ____ do not send order change notice to credit hold screen allows you to limit the activity on the credit hold screen. Changes made to an order total below the entry in this setting are not sent to the credit hold screen . |
|||||||||||||||||||||||
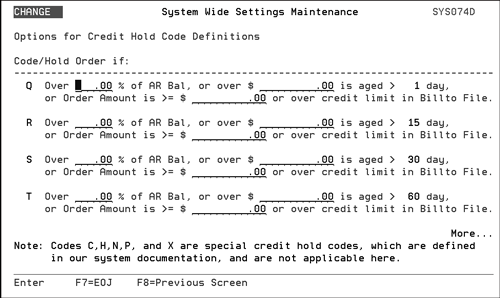
This system wide setting lets you establish credit hold parameters for almost all of your credit hold codes. Note Codes C,H,N,P, and X are special credit hold codes and are not applicable here. Use these settings to identify and stop potential problems.
If a customer is assigned a credit hold code, during order entry if any of that code’s limits are breached an warning message displays and the order cannot be processed. Note: Credit hold codes are assigned to customers via the Hold Acct field on the Billto screen. As an example of how this settings work, consider the following setting for credit code Q.
If an order exceeds 10% of the accounts receivable balance, or if 200 dollars or more is one day past due, or the order amount is at or over 199 dollars over the credit limit the order will not be processed unless the code is changed. Note: If you use this feature, you have to define credit hold parameters for all the credit hold codes. |
|||||||||||||||||||||||
This setting contains two options that control costs on credit memos.
|
|||||||||||||||||||||||
These settings activate and work in conjunction with the Customer Contacts field on the Order Entry Header screen and the contact information contained in the Phone Number File. This functionality enables you to link orders to specific contacts, and to tie promotions and spiffs to those contacts. The settings that comprise this option are described below.
— displays the order contact field on the Order Entry and Order Change header screen. — a pop-up window that displays the contact information, for the customer account, from the phone number file. — activates report options that can list sales based upon the order contact.
Note Cost Drivers are costs that are associated with line items within the Dancik Distribution and Retail systems. They are used to identify costs or expenses that are not part of the product cost, but still may affect the profit on the sale of the item. For example, a cost driver can be set to accumulate a marketing cost against all orders for certain customers or products. The marketing costs are accumulated and may be used for reporting purposes, and for matching against actual marketing expenses.
Note Phone number entries are designated via the Type field of the Phone Number File. The Phone Number File is accessed via F10 on the Billto File (FIL 1).
|
|||||||||||||||||||||||
This setting directs the Customer Search program to skip customers based on their A/R Statement Code. AR Statement codes control how the customer’s monthly statements are formatted. You can choose between open item or balance forward styles. You can also choose not to print statements for customers. Note AR statement codes are created through the ARSTATEMT table accessed via the System Cross Reference Table program (SET 5) and are assigned to accounts through the Billto File (FIL 1). |
|||||||||||||||||||||||
This system wide setting allows you to specify the type of external cutting machine counter model, Veeder Root, Fusion, or Red Lion. These counters may be interfaced to as part of Dancik’s special cutting station programs. After selecting one of the counter types, the system only uses the signal from that counter to send measurements to the cutting station. |
|||||||||||||||||||||||
These settings provide the ability to change both the location and serial number when entering cycle count tickets via option CYC 3.
If the first two settings, Allow change of location during a cycle count and Allow change of serial# during a cycle count are activated two new fields (Change Location to and Change Serial# to) appear on the Cycle Count Update Screen. |
|||||||||||||||||||||||
Options for Decor 24 Order Release “Duplicate Order Warnings” |
Activating this setting allows the CUS 15 - Manage Unconfirmed Dial-In Orders program to flag duplicate orders. Note CUS 15 is widely used with Decor 24 and CMS. It enables customer service personnel to view, release or process orders that were entered by online/B2B customers and salespeople, but not yet processed. The default is N which directs CUS 15 not to flag duplicate orders. |
||||||||||||||||||||||
This setting works with the Days From Warehouse field in the Truck Route File Maintenance (DEL 1) program to control the impact of weekends on calculated arrival date displayed in order entry. Enter a Y for the weekend day that you want delivery dates to fall on. This allows the Truck Route File Maintenance to include Saturday and/or Sunday in arrival date calculations. Entering an N essentially blacks out the weekends and rolls the arrival date to the following Monday. |
|||||||||||||||||||||||
This option allows you to add an additional surcharge to your delivery charges to help recover additional costs such as rising fuel prices. The charge is based on the current total delivery charge. If the Delivery Charge is manually entered the Delivery Surcharge is not applied. In order for a delivery surcharge to be applied, a Delivery Charge amount has to be entered in the Delivery Charges File (FIL 27). Here's how it works:
Use the Include company/branch combinations setting to:
|
|||||||||||||||||||||||
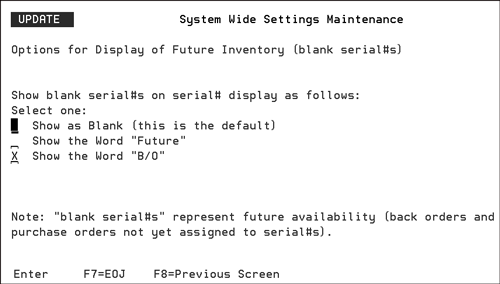
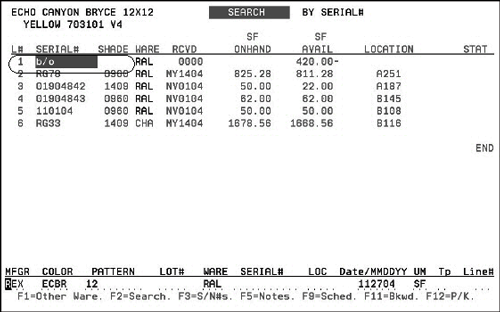
This option lets you choose what appears in the Serial # column when you perform a Search by Serial Number for inventory that is on order, but has not yet been received and/or assigned a serial number. Note This affects the Roll/Serial number searches - in order entry, order change, inventory inquiry, and item search. When this setting is selected, the following screen appears.
Select one of the options. As shown in the following figure, your selection appears in the Serial# column when you perform an inventory inquiry by serial number and there is inventory that is on order but has not yet been received or assigned a serial number. The “blank serial#” always represents your back orders.
|
|||||||||||||||||||||||
This setting allows you to change the term “Handling Charge” to another term. This term is then used on Invoices and Order Acknowledgements. The term and its relative information only shows on an invoice or order acknowledgement if it is a positive percentage. Negative percentages (discounts) are shown using the default term “Discounted”. The main purpose of this enhancement is to provide businesses with another way to recoup fuel charges by renaming Handling Charges to Fuel Surcharges. If this field is left blank, the default, Handling Charges, if applicable, appears on your documents. |
|||||||||||||||||||||||
This option prevents cost changes on pre-receipts from Inter-Company suppliers. When working with receipts, as from EDI or CMS, if this option is activated, inter-company costs are protected. This feature ensures that costs on inter-company receipts and invoices remain balanced. This option affects receipts from suppliers coded as Inter-Company (option C) on the Supplier Type Code in the Supplier file. Note If ADDING a receipt manually, cost fields are left accessible for updating. |
|||||||||||||||||||||||
Use this setting to activate the Intercompany Transfers GL Interface table. |
|||||||||||||||||||||||
Inventory Mass Updates and Writedowns is a series of extremely powerful inventory functions. It enables you to revalue inventory, write off small quantities, prepare G/L journals for “books only” revaluations, and update serial number status codes using a variety of options and parameters. All options can be run in a test mode, so that a report listing the results of an entry can be printed prior to actual updates. These settings can help avoid errors when performing mass updates. As shown below, they affect the third screen of the Inventory Mass Update and Writedown procedure (INV 8).
If one of the settings is activated, that action must be performed on the above screen. For example, if Must specify a Warehouse is flagged to Y, then the process will not continue until one is entered. Note If the setting Display users default warehouse is activated, the warehouse used comes from the Control Panel (SET 1). |
|||||||||||||||||||||||
If the settings (Display Promo Program # when Promo Price is shown separately and Display Promo Program Description when Promo Price is shown separately) are activated, the promotion program number and/or the promotion description (from the promotion file) display on the invoice. This applies only to promos that cause the promotional portion of the price to show separately underneath the regular price. Consolidate invoice lines w/same item, warehouse, serial#, and price, allows you to group invoice lines together. This consolidates invoices when the orders were split across multiple locations/warehouses by IWMS or ISO. This helps to ensure that invoices match order acknowledgements and the originating order. This option also consolidates invoice lines with identical and/or blank message lines Sidemarks present some tricky situations for splitting and then consolidating lines. Sidemarks are the lines that immediately following a detail line (line 0011 for 0010, or 0021 for 0020). Note A message line is NOT considered a sidemark if it has a dollar value. Under the following conditions, split lines can be consolidated:
If the following conditions apply, lines cannot be consolidated:
If a single discount is available, show message on invoice: “Deduct xxxx.xx if paid by mm/dd/yy” If the invoice is affected by payment terms that include a discount for early payment, activating the If a single discount is available, show message on invoice: “Deduct xxxx.xx if paid by mm/dd/yy” setting directs the system to print the message Deduct $xxxx.xx if paid by mm/dd/yy phrase on the invoice. Notes:
Note Invoice forms are designated on page 3 of the Control Panel File (SET 1). |
|||||||||||||||||||||||
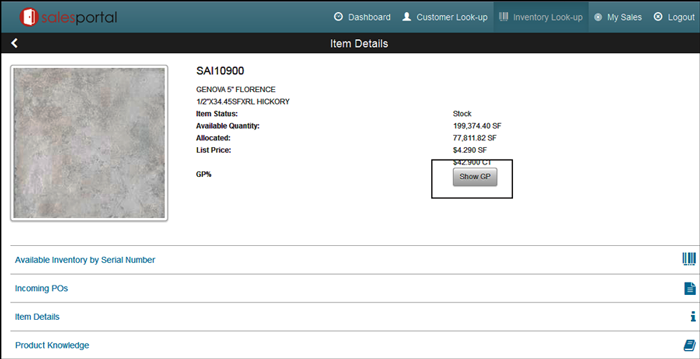
This setting grants or denies permission to change the manufacturer’s code portion of an item number. Note The manufacturer’s code is the first three characters of an item number (SAI 1090 0). |
|||||||||||||||||||||||
This setting allows for the display of the Job Estimates screen within Order Entry and Order Change. The Order/Job Estimates screen enables you to enter the total price, total cost, and total estimated profit for an order. This is designed primarily for commercial jobs, that involve multiple shipments and partial billings, and require “work in progress (WIP)” reporting. |
|||||||||||||||||||||||
A “job style” order allows users to display comment lines and omits the underlying line-item details. For example, a job can include several products, plus various services, freight, labor etc. On regular orders, all line items are listed, followed by a total. A “job style” order lists just a description of the job (to whatever level of detail you want to include) and an overall job total. Job style orders are created via:
Job style orders allow you to customize the presentation of the job description on the order. The description can be entered on comment lines using a J* prefix. When used in this convention only J* lines will appear on customer facing documents. This System Wide Setting allows you to suppress the printing of pricing data on J* comment lines on pick list and pack list. To suppress the printing of prices on J* comments on pick and packing list with price data included in the last position of the comment field, activate the setting. Note:Click here to see an example of a Pick List with J* comments. |
|||||||||||||||||||||||
Options for Labor & Fund Items (Items with Comp. Codes L & F) |
This is a series of settings that control how Labor and Fund items are handled in various applications. Labor items are items with component code “L” that represent non-inventory sales such as labor, services, or freight. Fund items are items with component code “F” which are used only for customers to deposit into or withdraw from marketing funds. Select the field Options for Labor & Fund Items (Items with Comp. Codes L & F), and press Enter. The next screen to appear lets you make decisions regarding the use of labor and/or fund items. The options on this screen are described below:
Note: You can only activate one of the next two options. They can both be set to N, but they cannot both be set to Y.
This allows you to charge for labor and funds items even if they are not at the status you normally use to invoice lines. You can update the status on the inventory items being shipped yet have the related labor and fund items be invoiced without updating the status of the labor and fund items. Note: These invoicing strategies for labor and fund items are very similar to how miscellaneous lines (F6 lines) are invoiced along with regular line items. These strategies apply mainly to “Invoicing by Status Code”. Example of Invoicing Labor/Fund Items
The following figure shows an order with the above parameters.
|
||||||||||||||||||||||
This setting allows our customers who are using Dancik’s form overlay functionality (introduced with Dancik Systems Update 2005) to change the language on the forms as needed. The available languages are English (the default), French, and Spanish. As of this point, only invoice form overlays are affected. If you want to use the ability to change languages on your invoices, and other documents, enter a Y in the Do you want to control invoices by language code field. Enter the default language in the What default language code would you like to use field. To display a listing of the available languages, enter a “?” and press Enter. When invoices are run your default language is used unless another language code is found for specific customers, in the Billto File. Note For more information on setting up and using this feature, refer to the Invoicing Manual. |
|||||||||||||||||||||||
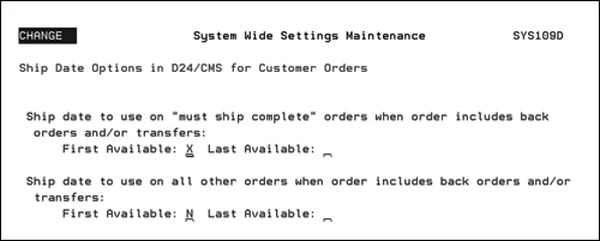
Orders are considered incomplete if they are “Must Ship Complete” orders, but still contain at least one back ordered line. These options activates system wide controls for “Must Ship Complete” orders.
Note The “must ship complete” logic can be violated if you choose to reprint orders from the Customer Service Menu. Option 2 from within the reprint function is the only option that will violate the “must ship complete” logic. You can also choose how your cutting station displays. This feature does not alter the usual processes for Must Ship Complete orders. It does allow you to fine tune how the cutting station is integrated into your usual processes for these orders. The following options are available:
If you are in update mode, the most current selection will be shown. If the selection is ever left blank, it will default back to 2. |
|||||||||||||||||||||||
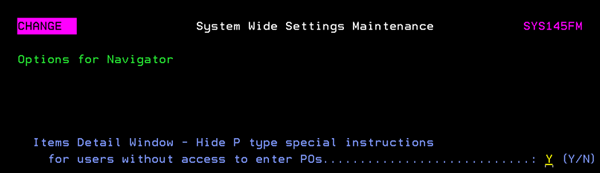
Includes the setting Items Detail Window - Hide P type special instructions for users without access to enter POs that hides Purchasing notes from users who do not have access to enter POs.
Associated Files
|
|||||||||||||||||||||||
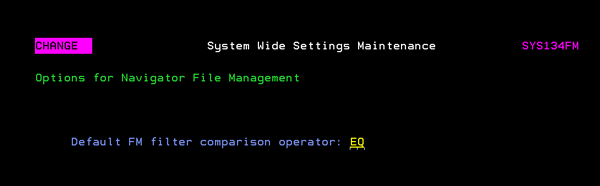
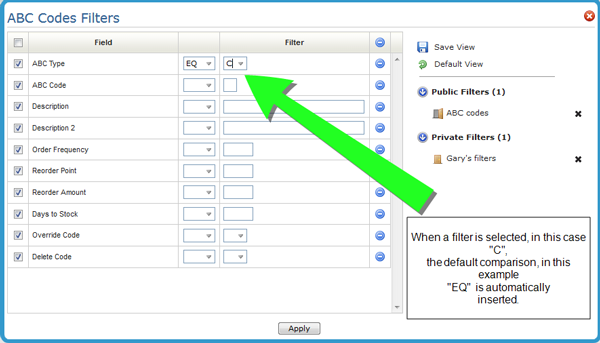
The setting Default FM filter comparison operator allows for the establishment of a default comparison in the Navigator File Management Filters.
If anything is entered into the filter box, and the comparison box is blank, enter the Default FM Comparison.
|
|||||||||||||||||||||||
This option allows you to set the number of days until a Remittance Advice expires. The remittance advice transactions in the AR Payments Tab in Navigator will be removed by night jobs after the expiration days established by this setting are passed. A zero or blank value denotes no expiration. Note: Refer to Payment System Set-up Menu for more information on making online payments. |
|||||||||||||||||||||||
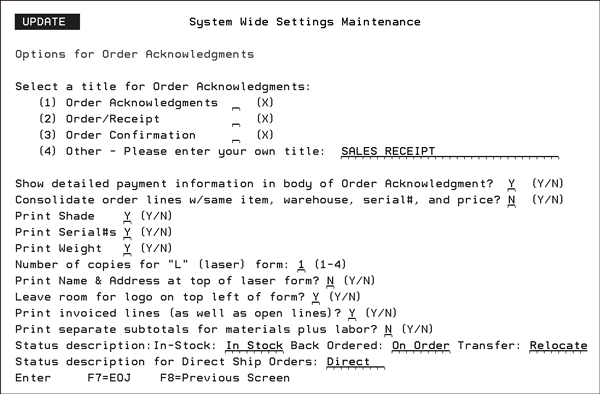
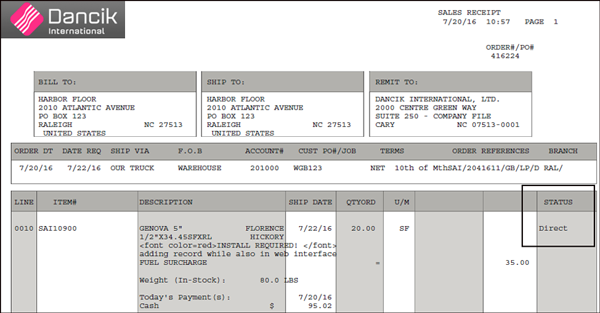
This is a series of options that control how Order acknowledgements print. You may specify the title of Order acknowledgements to be left as is, or be changed to “Sales Receipt” or a user-defined title. You may also choose to include detailed payment information, regarding the payments received that day against the order being printed.
Select a title. When you place an X by your choice and press Enter it is automatically inserted into the entry line to the right of option 4. Create your own title by entering it after option 4. To display payment information on the order acknowledgement, enter a Y in the last field. This payment information is limited to payment received on the day the acknowledgement is issued. However, the balance due includes all payments made to date. Note: The detailed payment option relates only to systems with option 2 Cash Register Screen activated in the System Wide Settings. Consolidate order lines w/same item, warehouse, serial#, and price? - Activating this setting by, entering a Y, combines order lines that are for the same item serial number, at the same price, and from the same warehouse. Instead of having multiple lines for the same item this setting combines all like information (same item, serial number warehouse, and price) into one line with a total quantity. The default is N. Sidemarks present some tricky situations for splitting and then consolidating lines. Sidemarks are the lines that immediately following a detail line (line 0011 for 0010, or 0021 for 0020). Note: A message line is NOT considered a sidemark if it has a dollar value. The following rules apply to consolidating sidemarks: Under the following conditions, split lines can be consolidated: — Lines that are split by ISO will be consolidated if the last line created by ISO has the sidemark - and the other lines have no sidemark. This is because when ISO creates multiple lines, users will press F6 and enter sidemarks after the last line. — Lines that are separated due to back order fill (where it takes more than one receipt/line to fill a single order line), will be consolidated if the original (back ordered) line has a sidemark and the new lines do not. This is because back order fill leaves the sidemarks on the original line(s). — Lines that are separated due to the use of the Split Line program (where the new lines are usually added to the bottom of the order), will be consolidated if the original line has a sidemark and the new lines do not. This is because the Split Line program leaves the sidemarks on the original line(s). If the following conditions apply, lines cannot be consolidated: — the lines have different item numbers, warehouse, serial numbers, or unit prices. — the lines have different line-item ship dates. — one line is open, and one is cancelled or invoiced. — if the two detail lines have 2 different sidemarks, they should not be consolidated. You can purposely keep lines from consolidating by entering different sidemarks. Print Serial#s - If this option is set to Y, serial numbers are printed on the Order Acknowledgements. Print Weight - If this option is set to Y, the total weight of the order is printed on the Order acknowledgement, broken down by in-stock items and back ordered items. Number of copies for “L” (laser) form - This field allows you specify the number of copies of an Order Acknowledgement to print on a laser printer. If left blank, 1 is assumed. Print Name & Address at top of laser form - This field lets you decide whether or not to include your company name and address at the top of the Order Acknowledgement form. Laser printed order acknowledgements, as designated by an L entry on the Control Panel, do not require preprinted forms and therefore are well suited for faxing and emailing. However, customers who want to use the laser acknowledgement format on a pre-printed form, may now turn off the address that prints at the top of the form, and use that space on the pre-printed form, for a logo. Leave room for logo on top left of form - Leaves room at the top left of the form to allow for pre-printed information. Print invoiced lines (as well as open lines)- Enter a Y to include both invoiced and open order lines. The default is N, which causes only open lines to print on an order acknowledgement. Print separate subtotals for materials plus labor - Enter Y to print subtotals for material versus labor at the bottom of the order acknowledgement. Status description - This option lets you change the “standard” status descriptions to better match your companies processes. If there are no entries the defaults, In-stock, On Order, and In Stock, are used. Status description for Direct Ship Orders - allows you to change the “standard” status descriptions to better match your companies processes. If there are no entries the default, Direct, is used. This functionality only works with laser printers (form code “L” in the Print Orders on setting on the Control Panel).
|
|||||||||||||||||||||||
These two settings give you control over what prints on an Order Acknowledgement. Print REPRINT when request is from Order Change or Order Inquiry - When this option is activated, and an order acknowledgement is generated from either Order Change or Order Inquiry REPRINT is also printed. The paths for generating order acknowledgements from these two programs are as follows:
— CUS 10 to access Order Inquiry — F10 to print the order — F5 to print the Order Acknowledgement
— CUS 11 to access Order Change — Continue through Order Header, Shipto, and Order Detail screens. — On the Order Detail, screen press F7 to display several printing options — Select F5 to print Order Acknowledgement Print “No ETA” in b/o date column if date is 2/22/22 - Enter a Y here to direct the system to print No ETA in the Back Order Date column instead of 2/22/22. A back order date of 2/22/22 indicates that there are no purchase orders or production schedules that can fill the order. If the setting is not activated, 2/22/22 prints as the date in the Back Order Date column. |
|||||||||||||||||||||||
The Date Required field on the order header screen controls when the order is required to be shipped or picked up. Note If you are using the Delivery System, the next available truck route delivery date for your customer displays automatically. This option provides you with three default date choices.
After this setting is made, the Date Required field on all Order Header will reflect the option you selected.
Note Date-Req. is a required field in Order Entry. Therefore, if you set the default to “No Date”, the user is prompted to enter a date. |
|||||||||||||||||||||||
This System-Wide Setting contains several settings and controls for alerting users when a customer orders an item that is already on any of the following open transactions for the same customer:
The basic functionality is as follows: The system checks files, as selected in the System Wide Setting, for a match on customer account# and item. If any matches (potential duplicates) are found, a window is displayed listing all of the potential duplicates, and allowing the following options to the user:
Business Case Consider using this feature for the following reasons:
When this option is selected, the following screen appears.
Note Whenever you make any changes to these settings, users must sign off the system and then sign back on for the changes to take effect. This is true for most system settings, because they are only accessed at the beginning of a user’s session.
|
|||||||||||||||||||||||
When reviewing an order (F1) during Order Entry, the following options impact how funds are displayed on the review screen.
The default setting is option 2.
|
|||||||||||||||||||||||
This setting controls how the Item File Order Entry UM works. The default option is N, which forces the Order Entry UM field to equal the native pricing UM. Normally, you will want all orders, purchase orders, and invoices to be stored in the system with prices and costs in the native UM only. Then you may use various system tables to control the units of measure on printouts and documents. If you enter Y in this option the system allows the Order Entry program to accept an order in an alternate UM and store the price and cost in that UM without first converting it. This can cause confusion when viewing certain screens and reports, and has been known to inadvertently lead to keying errors. We recommend you enter Y for this option with caution and adequate training for all users. |
|||||||||||||||||||||||
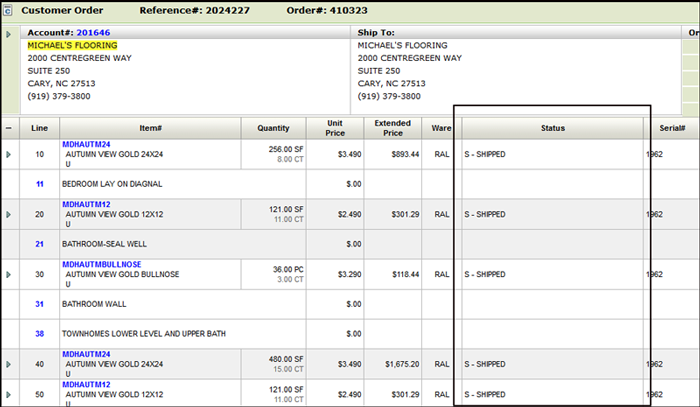
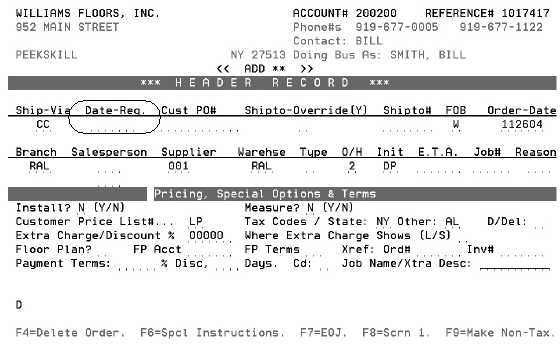
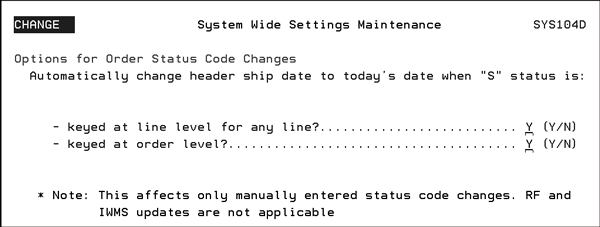
Whenever the Order/Shipping Status Update program (CUS 13) is used to update the status of an entire order or a single line to “S” (shipped) the current date can be automatically inserted into the Ship Date field, of that line, and of the header screen. This functionality, working in conjunction with the Force Invoice Date = To Keyed Ship Date field in the AR and Credit Options portion of the Company Settings (SET 3), allows invoice dates to match the shipping date. This system wide setting activates the ability to automatically change the ship date to today's date at the line or header level.
Click here for a complete write-up on this feature. |
|||||||||||||||||||||||
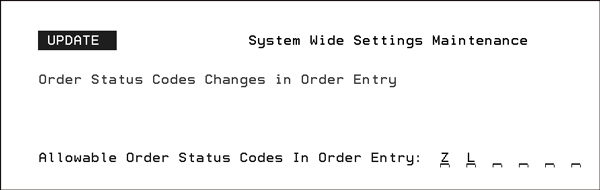
This setting enables you to list the order status codes that are valid within the Order Entry program. This option is ideal for indicating statuses such as “ready to pick” or “already taken at counter”, right from the Order Entry program.
Note: The default setting is not to allow status codes to be entered within the Order Entry program.
|
|||||||||||||||||||||||
Permanent Holds are holds (sometimes referred to as “reserves”) that are processed orders with an Order Type of “H”. Do not confuse permanent holds (which are processed orders) with temporary orders (which are unprocessed orders). These new settings enable you to automate various functions based upon this order type. The available functions enable you to (a) automatically send all permanent holds to the Credit Hold screen, (b) release permanent holds from either the Credit Hold screen or the Order Change screen by removing the “H”, and (c) prevent release of permanent holds from the “pick pool” screen. Make a Y or N entry into each one of the fields.
You can set or inquire about the shipping status of a detail line through the Open Order File/ Status Update screen. It is accessed via the F12 - Shipping Data/Status function key from the order entry/inquiry screens. To change the Order Type field, you must access the header through Order Change. Strategy for use of Permanent Holds The use of the order option H (Permanent Hold) can be an effective alternative to the use of comments or the “will advise” ship via code, when you want to hold an order while waiting for the information or approval. Order type H may be used for:
|
|||||||||||||||||||||||
This is a series of options that affect the way pick list documents are printed. You can choose to show the status code of each line item on pick lists, and to indicate which items should or should not be picked based upon the status codes.
1. If you want status codes to display on the pick list for each line, enter a Y in the Show Order Status Codes for Each Line Item? field. 2. Next, decide if you want to limit (I) the pick list to certain status codes or if there are status codes you want to omit (O) from the list. You can only choose to include or omit, not both. By limiting your pick lists to only include lines at certain status codes, or by omitting lines at certain status codes you are not actually removing the lines from printing. Rather, you are notating that only certain items should be picked based upon their status codes. In the example of a pick list shown below, notice status code B items are labeled “not at status to pick”. This directly relates to the settings made on the Options for Pick Lists screen shown above. 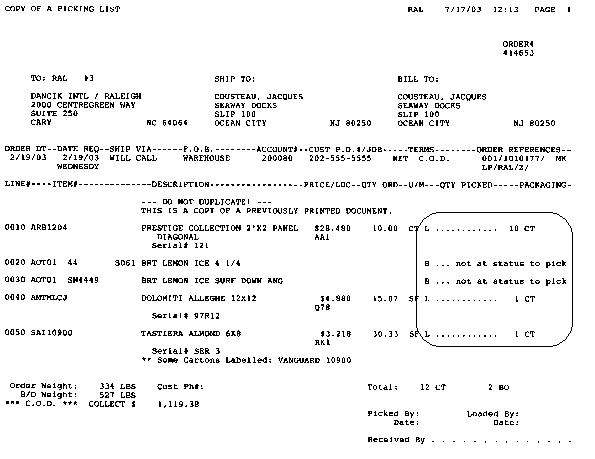
In the example above, the status code of each line shows to the left of the area in which warehouse personnel indicate what they have picked. Any status that you designate to omit (or not include) shows as not at status to pick. If you are using the bar code pick labels and the pick pool, printed pick lists are not needed. However, if you have not yet activated bar coding and the pick pool, these pick lists techniques can emulate some of the functions and controls of bar code labels and the pick pool. The option Print area location as part of the location causes the warehouse area to print as part of the location when printing pick lists. This enhancement is for non-IWMS warehouses that use paper pick lists. It’s OK if IWMS is active, but the program will not look at IWMS files. Note Warehouse areas are created through the Warehouse Areas Table (SET 16). Areas are used to group locations in your warehouse into zones or areas. Each area can be assigned its own bar code printer and each area can be configured for the picking of the bar code labels. |
|||||||||||||||||||||||
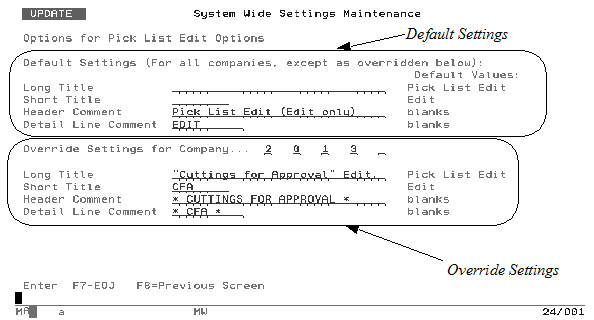
This option lets you customize the pick list edit document that may be sent to your warehouse by customer service personnel prior to officially processing an order. This enables you to generate documents unique to your operation. A good example of this feature’s use is a “cuttings for approval” document that could be used for fabrics, carpet, and other items that need an approval of a sample before the order is shipped. The Options for Pick List Edit Screen can be utilized for special functions such as: “Pick Quantity Confirmation”, “Shade Approval”, and “Cuttings for Approval”. Note The Pick List Edit Options screen is divided into two panels. The first panel shows the default settings that apply to pick list edits for companies not specified in the second panel of the screen (the customizable settings by company).
In the Override Settings for Company field, enter the company number that will use the override settings instead of the default settings. Enter information into the Override fields. The pick list will display these fields, instead of the defaults, for the companies entered in the Default Settings for Company fields. This gives you the ability to have two schemes for using the pick list edits, depending upon the company. These entries are visible from two places within the system. The label of the prompt that appears in a customer service order entry to print options, and on the pick list edit document itself. If you have your pick list printer option set to “XX” in your warehouse file (for paperless picking), then pick list edits will be directed to your Control Panel Print Orders On printer. In this case, you may need to redirect these edits. A customized pick list is shown below.
Note: Pick labels are never generated for edits. |
|||||||||||||||||||||||
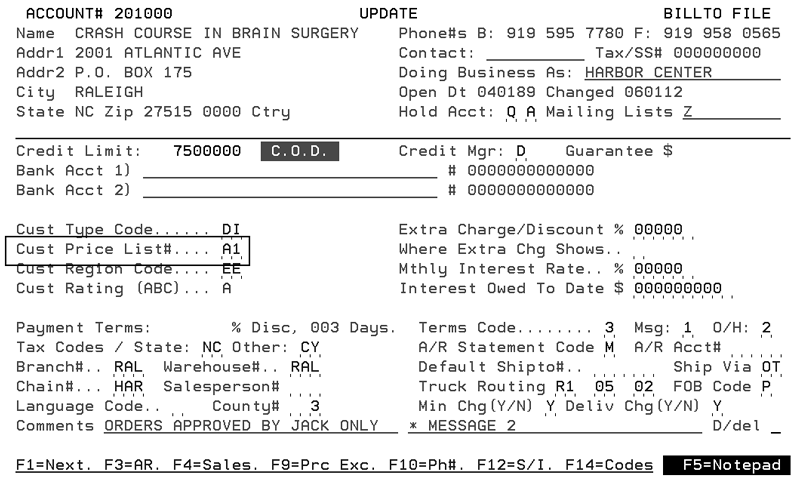
The system accesses prices based on the customer's price list for the item. If there is no price for that customer's price list, the following occurs:
Associated Files
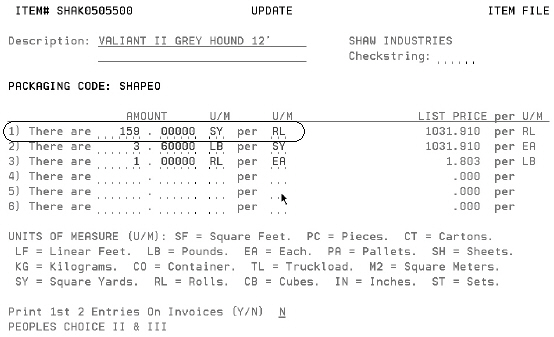
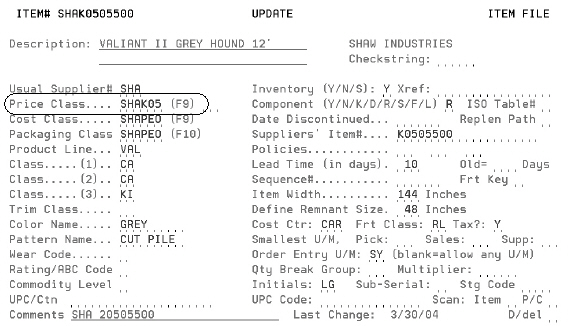
The Cust Price List setting establishes the customer’s default pricing level. You can create multiple pricing levels in your system and assign each customer a default level. For example, you might have a builder’s price (B1) and a list price (LP) for each item. You would use LP pricing for cash (over the counter) sales and B1 pricing for builders. You can establish exceptions to the default pricing levels for customers for particular items. This field only establishes a default price level that customers receive when they aren’t eligible for any special deals. Pricing within Order Entry When an order is entered, the system performs the following:
Price classes are based on manufacturers. They included groups of items from the same manufacturer that your company prices identically for your customers. Price Class should include an entry for each price list. For example price classes for the manufacturer SHASTA could include: — SHASTA LP - List prices. List prices are the base or standard prices — SHASTA BP - Includes builder prices for SHASTA products — SHASTA KD - Includes key dealer prices for SHASTA products.
— List pricing is used. This occurs when the setting Use List Price (LP) as the default price list when customer's price list is not found is activated. — The error message “Price is not Found” appears. This occurs when the above setting is set to N. |
|||||||||||||||||||||||
Businesses with several warehouse locations can choose to assign pricing based upon the servicing warehouse, rather than a set price per customer regardless of the servicing warehouse. This system wide setting works in conjunction with the Warehouse Price List Cross Reference table. Note To use the Warehouse Price List Cross Reference table, you have to activate Options for Pricing by Warehouse. Enter a Y in the Activate the Warehouse Price List Cross Reference Table. This allows the system to automatically change the price list, according to the Warehouse Price List Cross Reference table, when a header warehouse is changed during order entry. |
|||||||||||||||||||||||
Lets you choose to print AR Statements on a laser printer, conventional forms, or overlays. The field Enter option for printing A/R Statements can have one of the following values:
|
|||||||||||||||||||||||
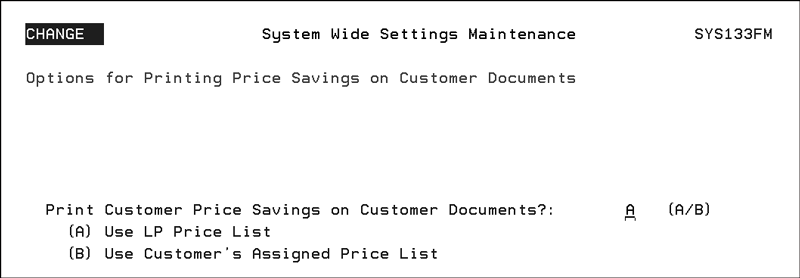
This setting activates directs Navigator Order Management to automatically generate a message line that shows the customer how much they saved with any special pricing given them. Note: Multi-Unit orders are not included in this functionality.
Associated Files: Customer Preferences File - The customer must be authorized to see pricing. |
|||||||||||||||||||||||
This series of settings allow you to prevent purchasing of discontinued items for regular POs, special orders, and direct shipments. Note Discontinued items are identified by a past date in the Discontinued Date field and/or a policy code of DI in the Policies field of the Item File Profile screen (FIL 2). For each of the three types of purchase order, enter up to four policy codes and a Y if you want to prevent purchase orders for items with a discontinue date prior to today.
|
|||||||||||||||||||||||
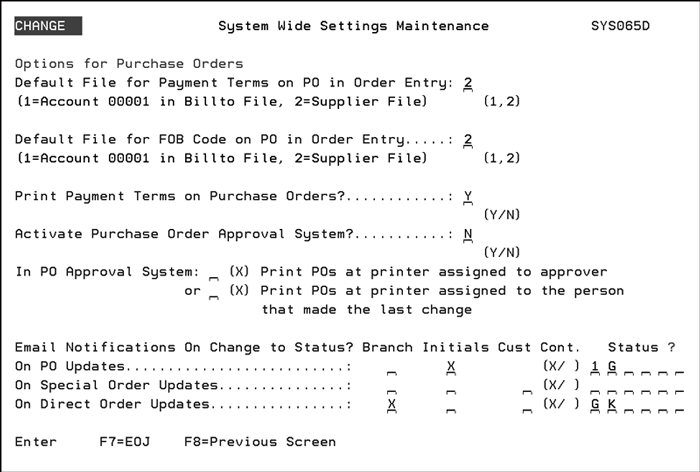
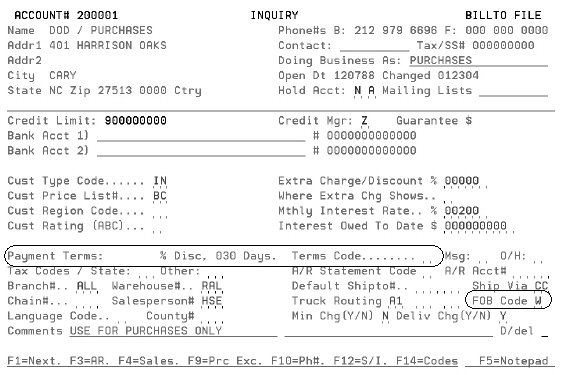
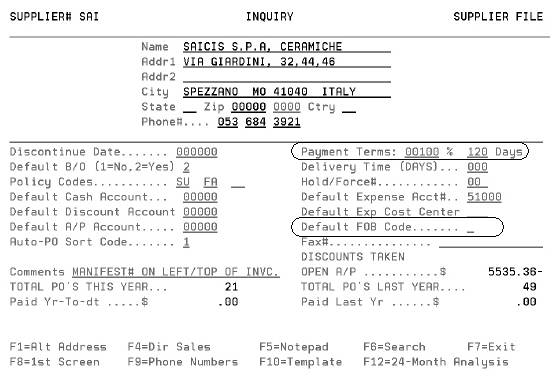
This option allows you to choose the default file used to populate the payment terms and FOB code during purchase order entry. These defaults can be overridden during order entry. Note These features apply to purchase orders that are automatically created, as well as to purchase orders that are keyed manually.
Examples of the Billto File and Supplier File Payment Terms and FOB code fields are shown in the following figures. Note On all systems, the Billto Account 00001 is set-up as a purchasing account. Billto File for Account 00001 (Purchasing)
Supplier File
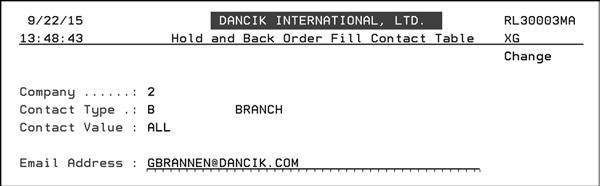
Enter the email recipient: Branch - The branch where the purchase order was created. The branch email information comes from the Hold and Back Order Fill Contact Table (menu option SYS 921).
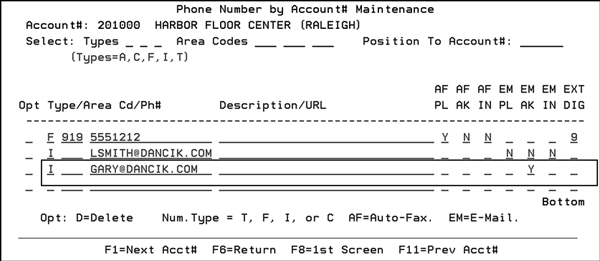
Access the Hold and Back Order Fill Contact Table and create a record for a branch or update an existing one. In the SYS 921 entry shown below, anytime a PO line is changed at any branch for company 2 to a status of B, D, or K (from the screen shot above) an email is sent to GBRANNEN@DANICK.COM. Initials - The operator who created the purchase order. The operator’s email information comes from the Hold and Back Order Fill Contact Table (menu option SYS 921). Access the Hold and Back Order Fill Contact Table and create a record for the Operator or update an existing one. Customer Contact - This stakeholder entry only applies to special purchase orders. Order contacts are entered on customer orders. Regular POs are not tied to a customer order like special POs are. The customer contact email comes from the Phone Number File Maintenance (menu option SYS 802). The Phone number file can be set-up by Account or Supplier. In this example, it is set-up by account. The following settings must be made for an entry to be considered a customer contact and therefore receive an email: — It must be an “I” nternet type. — The EM AK (email acknowledgement) setting has to have a “Y”.
3. When a Purchase Order Line has its status changed to one of the statuses entered in the System Wide Setting an email is sent out to the selected stakeholders; Branch, Person who created the PO, and/or Customer contact for special orders. Note: PO statuses are changed via the Cancel &/or Change Open Orders programs. An example email is shown below. The Related customer order number (bolded below) is only displayed for special orders. Other than that the emails for regular POs and special POs are the same. Purchase Order: 0706550 Related customer order: 410757 New status: K Old status: A Changed by ALONGO on 09/21/15 Customer Account: 201645 Customer Name: MICHAELS FASHION FLOORS |
|||||||||||||||||||||||
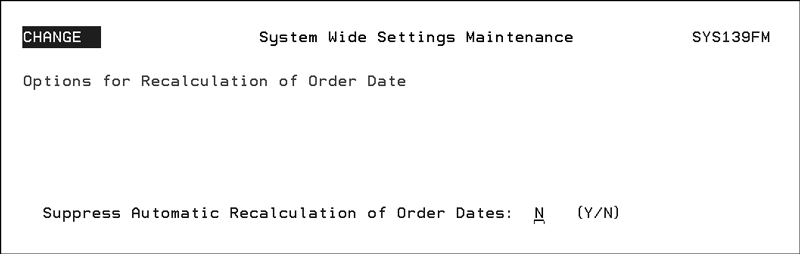
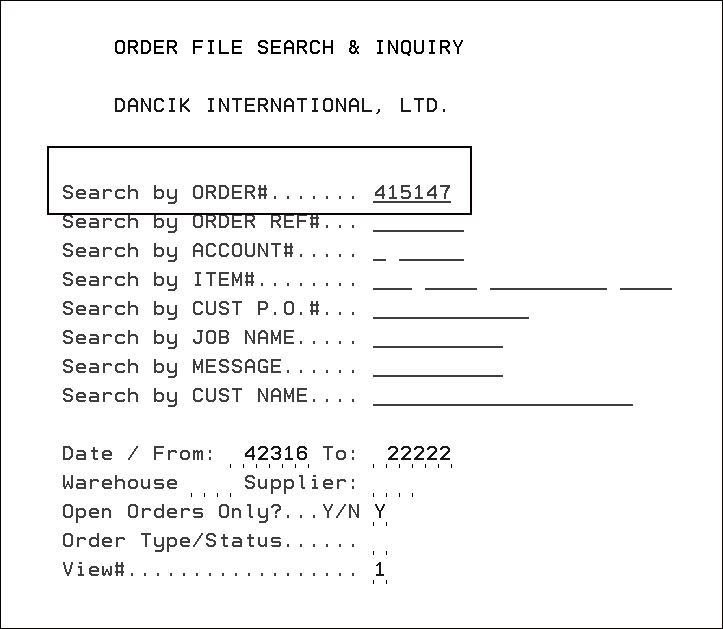
If set to “N” (the default) the system process for recalculating order dates does not change. If set to “Y” the order dates for backordered lines on customer orders do not get updated even if the rest when the order gets a date change. Note: Direct ship (warehouse = DIR), Purchase orders and any order lines with allocated inventory are not included in this functionality. Changing Order Dates 1. Access the order to change via one of the order change programs CUS 10 or CUS 11. In this example, CUS 10 is used.
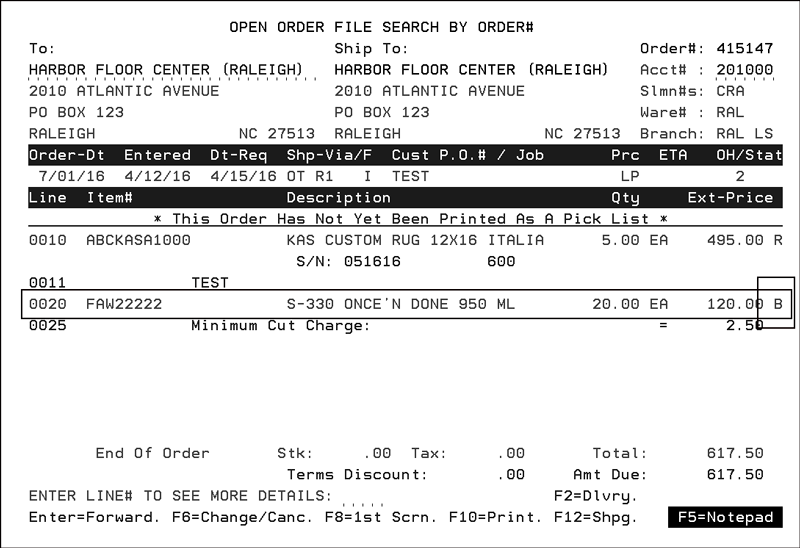
Press Enter to access the order. Notice line 20 is a back order.
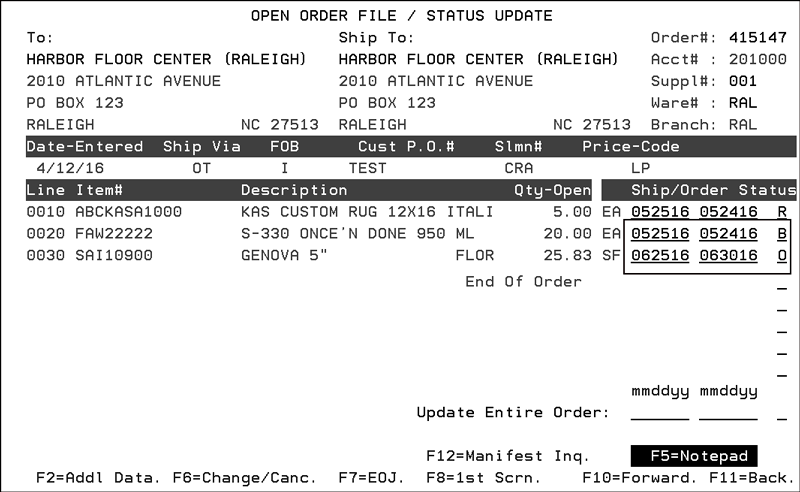
2. If you add another line, in this example line 30, with the System Wide Setting - Suppress Automatic Recalculation of Order Dates set to “N”, the ship date for line 20, a backorder, will automatically change to be the same as the order date. If the setting is set to “Y” the ship date on line 20 is not automatically updated. 3. To check the order and ship dates, press F12. Notice that in the example below, the Order Date for line 20 did not change after line 30 was added.
Note: The Ship Date and Order Date can be manually changed on the F12 screen. |
|||||||||||||||||||||||
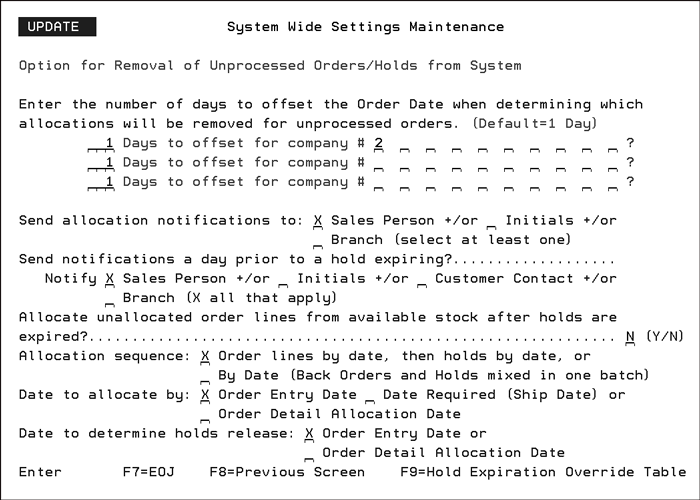
Options for Removal of Unprocessed Orders/Holds from the System |
Enter the number of days to offset the Order Date when determining which allocations will be removed for unprocessed orders - You can specify the number of days until held inventory (for unprocessed orders) is automatically released by the system. If no entry is made in this field the setting is global and applied to all of the companies on your system. The global setting is for Night Jobs to automatically release holds—putting them back into available inventory—during the second night after the hold was placed, based on the order date on the order header. This field gives you more control and flexibility in handling inventory holds.
Every night, Night Jobs retrieves the setting for each inventory temporary hold on the system. This setting is added to the Order Date of the header of the temporary hold, resulting in a “last date to hold.” If the current date is past this “last date to hold,” the hold is released, and inventory is made available. Note Orders that do not allocate inventory are not removed. Note This feature can be used in conjunction with the Max Days Variance in Control Panel. Automatically reshuffle allocations of holds nightly - Enter a “Y” in this option to use the inventory allocated for dropped hold orders to be used to fill back orders. This setting activates the Held Orders Table which displays all the orders that are in a hold status. Send notifications a day prior to a hold expiring - Activating this option directs the system to check the Hold and Back Order Fill Contact Table for an email address related to the order by salesperson, operator, branch, or account contact. An email is then sent letting those concerned know that a held order is getting ready to be released and any held inventory is going to be allocated to other orders. Allocate unallocated order lines from available stock after holds are expired - Activating this option directs the system to use inventory released from expired held orders to fill back orders.
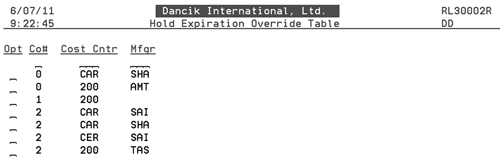
Allocation sequence - Choose to fill orders and holds or back orders and held orders first. Date allocate by: Order Entry Date or Date Required (Ship Date) - Both of these dates are entered on the Order Header. The Order Date is the effective date for allocating inventory. Truck routing programs use the Date Required (Ship Date) when planning delivery schedules. Date to determine holds release - The Order Entry date is entered on the Order Header and is the effective date for allocating inventory. The Order Date is the effective date for allocating inventory so the Order Date is the date used for for the Order Detail Alloc Dt. F9 - Hold Expiration Table This table, accessed by pressing F9, enables fine tuning of the expiration rules at a cost center and/or manufacturer level. If a match is found that pertains to a particular hold, the settings in this table override the existing expiration parameters set in the Enter the number of days to offset the Order Date when determining which allocations will be removed for unprocessed orders fields.
Note: Co# and Cost Center are mandatory. Manufacturer is optional. A blank manufacturer is interpreted as “all other manufacturers within the cost center” The table is read as follows:
|
||||||||||||||||||||||
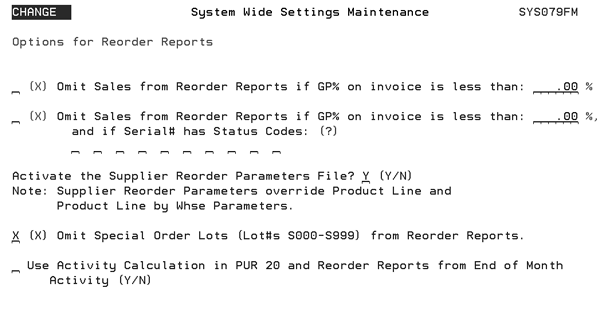
This option contains settings allow you to do the following:
These settings allow you to do the following:
The business goal is NOT TO encourage or increase a reorder amount based on the sale of remnants, odd lots, and close-out (blow-out) material. This enhancement is meant to eliminate the potential problem of a flurry of low-margin “blow-out” sales triggering the same type of increased reorder qty as normal “full-margin” sales. Use this setting to eliminate sales that are either below a specified margin (GP%), or sales that were marked with certain specified status codes. The elimination of these sales reduces the usage and activity figures on the Reorder Reports, and therefore effect the “suggested reorder quantities” and the quantities on automatically generated replenishment purchase orders. The first two settings remove sales that fall within their scope from any usage calculations on the Open Order Reports. Using these settings in combination allow for two different GP% to be checked:
Note: For more information on configuring the Supplier Reorder Parameters File, refer to Supplier Reorder Parameters Table for Purchasing in the File Maintenance Manual.
Note: Special orders are automatically assigned lot numbers between S000-S999. If the special order lot numbers go beyond S999, the lot numbers start back over again at S000.
If not activated, the default, item numbers that include shade and lot information will not be included in assessing reorder requirements. Note: The shade and lot number, if included as part of the item number, are the last four characters of the item number. |
|||||||||||||||||||||||
This setting allows you to establish the price list to use on the Retail Price Labels. These labels show your price and can be attached to items such as area rugs, rolled good remnants, and odd lots of tile, and stone. The system uses the list price entered as a default when establishing prices to print on the retail labels. If no price list is entered, the system automatically inserts “LP”, list price, into the field. |
|||||||||||||||||||||||
Use this setting to automatically assign roll pricing to an order line when the quantity ordered is greater than or equal to the average roll size within item packaging. This prevents you from having to manually change from cut to roll pricing during order entry or order change if the quantity ordered is greater than the average roll. Note: If order lines are back ordered, this setting will not impact back order fill logic.
If a pricing restriction is specified (e.g. via the “R” field on the order detail screen on the iSeries or in the Restriction Code field in Navigator’s Order Management), that pricing restriction is enforced. Associated Files Item File - Use the Packaging Class field to assign a packaging class to an item. Packaging can be entered specifically for an item by leaving this field blank and pressing F10. However, we highly recommend that you use Packaging Classes to save time and effort when multiple items share the same packaging information. Packaging File - The Packaging File establishes packaging and conversion factors called packaging classes that can be assigned to groups of items. Items with identical packaging conversions can be assigned to the same packaging class, and when the packaging conversions change, only the Packaging File needs to be updated. An Example To show how this setting works, let’s order the same item in two different quantities. The first quantity is over the average roll size and the second is under it. Here is the packaging file for the item. Notice that 159 SY is equal to an average roll.
Note: You can get to the Packaging File by pressing F10 from the Item Profile screen or via the Packaging File menu option. Next we will check pricing for the item we are going to be ordering. We can see on the Item Profile for the item that it is assigned to Price Class SHAK05.
Press F9 to see the pricing details. As shown below, the “C”ut price is 7.504 and the “R”oll price is 6.490 per SY.
In order entry, we will order two cuts of the item on two different lines. The quantity for the first line is more than the average roll size established in the packaging file and the quantity for the second line is under the average roll size. After entering the lines, press F1 to review the order and notice the two different prices. The first price is the roll price and the second one is the cut price.
|
|||||||||||||||||||||||
If your business generates more than 400,000 invoices or orders a year, you should consider activating this new and easy method of archiving. This process can essentially automate the archiving of your old orders and invoices. This setting provides two options:
Activating either setting, for Orders and/or Invoices, directs the system to start real time archiving. What this means is that when a duplicate order number/invoice number is generated the older number, if it is closed, is moved from the “active” files to an Order Rollover File. These archived files are still available for searches and reports. Note: It is HIGHLY recommended that if you activate either of these settings you do not go back and deactivate them. If you activate and then deactivate the rollover system, the orders and/or invoices that were sent to the rollover files cannot be accessed when the rollover system is deactivated. Decide if you want to create Audit files (OROAUDIT for orders and IROAUDIT for Invoices. These audit files were created for use by Dancik personnel to track each transaction that is moved to the rollover files. The options are:
|
|||||||||||||||||||||||
|
Options for Sales Portal |
These options limit the orders a salesperson can see in the My Sales and Customer Information portions of the Sales Portal.
Restrict Order views in My Sales - If set to “N” the display of orders is not restricted. If set to “Y”, the system compares the user’s logon information to the following areas to see there is a match on the order’s salesperson on the order; if there is a match the order/order line is displayed:
In the example shown above, the salesperson has access to orders entered from three other salespeople. Restrict Order views in Customer Information - If set to “N” the display of orders is not restricted. If set to “Y”, restrict the orders under the same guidelines as the setting Restrict Order views in My Sales. Example Logon to the Sales Portal and click on the My Sales tab. Notice in this example the salesperson is Jack Parsons (code 014).
Click Open Orders. In this example, the Salesperson is limited to only the orders he is associated with.
Note: Notice that some of the lines show the order totals and some don’t. If one or more lines on the order is suppressed, the Order Total does not show. Click on an order to see it’s details.
The same rules apply in regards to displaying the Order Total on this window as on the My Orders window. Which is if one or more lines on the order is suppressed, the Order Total does not show. With the System Wide Setting option Restrict Order views in My Sales set to “N” the user has unrestricted access to all the open and pending orders. The option Show GP% on Inventory Lookup adds a GP% column to Sales Portal and Navigator Item Inquiries. By automatically calculating and showing the GP% errors can be reduced as opposed to manually calculating it.
|
||||||||||||||||||||||
This setting contains options that allow you to control special pricing and price requests.
Minimum GP% for override price request - Enter the minimum amount, based on GP%, for a pricing override to be accepted. Maximum number of days for the expiration date for promo - Enter the maximum number of days from the current date that the expiration date of the promo created may be in effect. Price request promo program# edit mask - This option allows you to add a mask to the program numbers created by this process. The remaining characters after the edit mask will be populated by a revolving number wheel.
Price request default promo sub-type - Promo sub types allow you to further categorize the price request. The values for this field are maintained in the System Tables Maintenance (SET 029) in the table PROMOSUBTP. For example, use this code to categorize promotions that include rebates from manufacturers:
Price request default promo class - Use this setting to include or omit promotions when printing price lists. For example, you can have promo classes that determine whether or not a promo should be included on a price list. The available options are:
Note: The values for this field are maintained in the System Tables Maintenance (SET 029) in the table PROMOCLASS. |
|||||||||||||||||||||||
Note: Option SYS 605 - Tax Exemptions By State/Province File Maintenance allows for customers to have multiple tax exemption numbers per state or province based on beginning and ending dates.
The use case outlined below is supported when the existing settings above and the new Always make order non-taxable if Billto file has no tax codes is set to Y. 1. Order is entered for a billto with no tax codes. 2. Zip code entry is found but no updates are made to order header based on absence of codes in bill to file. 3. Tax exempt table (SYS 605) is checked but not necessary based on no tax codes in billto file. 4. Order is made taxable by pressing F9 toggle This taxation rule override is honored in subsequent order changes even when auto recalculation logic is set to 'Y' 1. Order is entered for a billto with tax codes. 2. Zip code entry is found and codes are updated on order header based on presence of tax codes in bill-to file. 3. Tax exempt table is checked and no exemptions are found. 4. Order is made non-taxable by pressing F9 toggle. |
|||||||||||||||||||||||
This System Wide Setting contains options for:
Assign salesperson based on parent or child item for a crossover item Crossover items are one or more item numbers that share the same inventory item in the XREF field of the item master. The two items have the same inventory but can have different item numbers and different descriptions. You can use crossover items to market the same product under multiple numbers and names. For example, two different customers can have exclusive sales rights to the same item. Both customers can place orders under their own assigned item numbers and descriptions, and receive all documents (pick lists, invoices, bar code labels) with their assigned item numbers and descriptions, even though the actual inventory is the same. The item containing the inventory is known as the parent item. The child/dependant items have a value in the XREF field of the item master. The first option in this System Wide Setting, Assign salesperson based on parent or child item for a crossover item, allows you to use the parent or child item to calculate and show salesperson commissions on Commissions Reports (menu options COM 5 and 6). Note: This option only applies to companies that do NOT assign a salesperson on the Order Header via the Billto File (FIL 1). The following are some examples of how this setting can be used:
Writing off sales commissions on unpaid invoices Negative commissions calculations are based on the extended price of the invoice line items and not the invoice total. This ensures that any extra fees or charges such as taxes, delivery charges or fuel surcharges are not factored in. Note: Code WZ is the Dancik assigned Accounts Receivable code for writing off an invoice.
|
|||||||||||||||||||||||
This setting controls the updating of receipt dates onto inventory serial number records. These dates appear on the inventory serial number screens, and are used by ISO for inventory selection. There are two settings (Points if old (older than DAYS OLD in Item File) and Points per month old) on the first ISO screen that use receipt dates to assign points to inventory based on age. The serial number receipt date is updated according to the rules described above in several different transactions within the system:
Options Never update the receipt date for a new receipt, if item is received to an already existing serial# & location - This setting does not update the receipt date of inventory when the inventory is placed in a location with inventory of the same serial number. In effect, it does not reset the age of the inventory (both existing and new) that ISO uses to assess points. Always update the receipt date for a new receipt, if item is received to an already existing serial# & location - This setting uses the last in first out (LIFO) model. If this setting is selected, existing and new inventory of the same serial number and location are updated to the date of the latest receipt. Only update the receipt date for a new receipt if onhand is zero, when item is received to an already existing serial# & location - This setting is similar to the one above, except the receiving date for new receipts is only updated when there isn’t any existing inventory with the same serial number in the location. |
|||||||||||||||||||||||
Activate this setting to log changes to an order’s ship date into Navigator File Management. When this setting is activated, when a ship date is changed, at either the header or detail level, a log record is entered into the Date Request Change Log option in Navigator File Management.
|
|||||||||||||||||||||||
This system wide setting contains the following settings:
If either setting is activated and a problem occurs, i.e., no ship via code is entered or an invalid ship via code is entered, the following message displays. ERROR / Invalid Ship Via Code |
|||||||||||||||||||||||
This setting activates a pop up window within Order Entry and Order Change that displays shipping rates based on a variety of parameters. You can use the information to inform a customer of shipping costs or changes in shipping costs. When a rate is selected, the charge appears as a line on the order. Enter a Y to activate the table. This ensures that during order entry the person entering the order has access to rate and freight information. The following rounding options are available:
These options control the application of surcharges which can allow you to recover costs such as rising fuel prices. Add surcharge of ______ to all shipping charges - Enter the percentage of the shipping charges that you want to add as a surcharge. I/O __ Ship Via Codes________ for surcharge (blank = include all) - Enter the Ship Via codes that you want to include or exclude for the surcharge. The system follows this flow to check for a surcharge and if needed to add it to the shipping charges:
|
|||||||||||||||||||||||
This system wide setting contains 5 options for slab allocation.
Note: For more information on how these settings effect Navigator, click here. |
|||||||||||||||||||||||
These settings activate the Special Charges feature for Invoices and COD orders. The Special Charges functionality is similar to Minimum Order Charges except you can assign multiple charges to a single order and these charges are assessed on every invoice. For example, if a delivery of 5 rolls of carpet results in 3 invoices, each of the invoices can show a carpet freight related to the SY (or other specified special charge parameter). The special charge on the invoice is clearly labeled (i.e. Carpet Freight). Special order charges can be quoted from within Order Entry and Order Change. This allows real time quotes to customers concerning estimated costs. Furthermore, these special charges work in conjunction with any applicable delivery or minimum charge fees. They do not replace any other applicable fees. Note For more information on creating and configuring special charges, refer to the File Maintenance Manual.
|
|||||||||||||||||||||||
This setting enables you to automatically update customer special order status and dates, when the related special purchase order has it’s status and/or ETA date updated.
Note: The above two settings also apply to the Update Shipping Data By Vessel Name program (menu option PUR 15). If a setting is activated, the corresponding Customer Back order status/ship date is also updated. The customer back order is only updated until it is filled. Changes to the purchase order dates or status do not affect back orders once they are filled.
Note: This setting does not apply to orders that are on Credit Hold.
We recommend that the first time this setting is activated you run PUR 4 - Print Special Order Purchases. Then review the spoolfile to check on the special POs that were created. If the Special PO is not current, you can go into menu option PUR 11 Cancel &/or Change Open Orders &/or POs to cancel or void them.
For more information on the Automatic Generation and Distribution of Special Order POs, click here. |
|||||||||||||||||||||||
These settings activate the special payment plan for Floor Plan options and allow them to be used during Order Entry instead of regular payment terms. Floor Plan allows for special financing arrangements that enable you to offer products to your customers at preferred terms, thereby increasing your presence with the customer. Floor Plan is normally associated with sales by manufacturers and distributors to retail stores. The basic theory behind the offering of a Floor Plan to a customer is that if the customer has more of your inventory on the floor, then he or she is more likely to sell more of your inventory. Note Floor Plan was introduced with Release 7 Version 1. Before Activating this Feature Before using this feature, ensure the Retail Environment is turned off at the work stations that are able to assign floor plan terms. This is done via the control panel. 1. Type CONTROL on a command line and press Enter. 2. On the screen that appears, enter a password and select a control panel. 3. Press F11 to proceed to the second page of settings. As shown below, set the Retail Environment field to N. Note: The use of special payment plans does not apply to the retail environment, because retail work stations are locked out of changing the terms fields, which we usually set to “Cash”. However, these features may still be used by retailers, by accessing the order from a manager’s work station that is not locked into the retail environment.
To Activate Floor Plan 1. On the System Settings Menu (SET), select option 4 - System Wide Settings. Scroll through the settings until you get to the setting Options for Special Terms Payment Plans. 2. Select the option by entering a U in its Opt field. The following screen appears.
3. To use a Floor Plan payment option instead of a regular payment plan, enter a Y in the field Activate the use of the Floor Plan Terms File for Payment Plans. 4. The next field, Auto-populate the regular payment terms code field with * , when an FP Terms is entered, ensures that when you enter a Floor Plan Payment option, that uses multiple payments, the regular payment terms field is flagged to whatever you designate here. For example using the settings shown above, if a an order is entered in Order Entry and a multiple payment Floor Plan option is used, then the regular payment terms code field (CD) auto-populates with a *. The screen shown below shows an entry of 6E (six equal payments) in the FP Terms field. The regular terms code field auto-populates with an *. Also make sure that whatever code is entered here, is also a valid code in your Payment Terms file. In this example, the Payment Terms file contains the code *, with a description of “payment plan”. Note: The Cd field does not change immediately upon entry of a qualified FP Terms code. When you press Enter to proceed with the order the file is updated, and, you can then press F11 to return to the Order Header (shown below) and the Cd field will appear. However, you do not need to use F11 to view the filled in order for it to have been changed in the order file.
|
|||||||||||||||||||||||
This setting activates the Multi-Unit functionality on a system wide basis.
Multi-unit functionality facilitates the needs of our customers who service large commercial business on multi-unit commercial and residential properties. The option Check for and issue Duplicate Order Warnings in Navigator Multi Unit Order Entry for open orders and invoices __ from today's date allows you to enter the number of days you want the system to check for potential duplicate orders. |
|||||||||||||||||||||||
This setting contains options that provide control over your stock-to-stock transfers, which are always entered using account number 2 (X00002).
Show additional interwarehouse freight in separate column on inventory registers - This setting affects the Receipts Update option (INB 5). If the setting is activated, it separates the freight, which then appears on the Transfer Report (RIV 7) in a separate column. If set to “N”, the Add'l Freight column is zero, and the additional freight is added into the total value column. Note: Additional freight is always broken out separately for customer transfers.
If set to “Y”, the Add'l Freight column is populated (in this example with $1.60).
The user must be granted permission to update cost through the Allow User To Adjust Cost on the User ID Control Panel (SET 2).
The user has to be granted permission to update cost through the Allow User To Adjust Cost on the User ID Control Panel (SET 2). Associated Files
|
|||||||||||||||||||||||
This setting activates the Will Call Tax Table. This table allows tax codes to be dynamically changed based upon the Header Warehouse. For example, if a customer normally assigned to warehouse NYC will pick up at warehouse PHI, then this table can automatically change the tax rates from a will call tax rate PHI to a will call tax rate for out of county or out of state customers from NYC.
Place an Y in the Activate the Warehouse Will Call Tax Table field to activate the table. If activated, Order Entry uses the information contained in the Will Call Tax Table to assess taxes based on the business address of the customer as well as the address of the warehouse. If this feature is not activated, Order Entry uses the tax codes as defined in the warehouse file for will call (customer pick-up) orders. |
|||||||||||||||||||||||
This setting lets you activate the Tax by Zip Code Table. The Tax by Zip Code table allows you to establish taxes for a single zip code or a range of zip codes. If activated, the Tax by Zip Code table takes effect when the normal account shipto address is overridden.
For example, if a shipment is made to an address that is overridden while entering an order (such as a job site), there will not be any pre-assigned tax codes for the new address. This setting and table allows for automatic tax code assignment based upon the shipto zip code. Note This setting works in conjunction with the Order Entry Shipto screen and the Final Destination State and Zip Code fields.
Note All the settings except Make order tax exempt if a current exemption is found in the Tax Exemptions By State/Province File are dependant on the first setting, Activate the Tax by Zip Code Table, being activated.
Note: This only applies to Shipto Overrides.
The last two options are intended for companies that use the Tax By Zip Code Table (FIL 43), and store tax exemption numbers in the Tax Exceptions File (SYS 605).
|
|||||||||||||||||||||||
This setting works in conjunction with the option TRA 1 - Transportation Planning (TRA 1) on the Transportation Planning menu. These settings dictate a cutoff time and day before an email message is sent out alerting those concerned that updates have been made to a shipping manifest. If the settings were set as: Notify Cutoff Time?....... 12:30 Notify Cutoff # of Days?.. 01 When a change was made to a manifest anytime after 12:30, one day prior to the shipping date an email would automatically be sent to the recipients set up in option TRA 15. A third setting, Show Telephone number, appointment date & time on BOL?, allows you to print a telephone number, appointment time, and warehouse information on a BOL. Note BOLs are generated using menu option - Warehouse Shipping Reports. The ability to print telephone number, appointment date and time only effects BOL formats 2 and 4. Format 2 is the default BOL that most companies use. It prints on a Non-Laser form that is usually a multi-part form. Format 4 is the BEAR format. It is the similar to format 2, but the SCAC code and the Bill of Lading number are barcoded. |
|||||||||||||||||||||||
This option prevents the entry of an incorrect End-Of-Month date when closing out a month in either the AP or AR systems.
The defaults are automatically inserted into the fields. Using the default entries, an operator could not process AR EOM if the date entered was 10 days before or after today’s date. Furthermore, if AP EOM is being run the date cannot be more than 10 days before today’s date or 20 days after. If an incorrect date is entered during EOM, that does not fit within the range of valid dates, an error message appears. Note If the these System Wide Settings are left blank, the system will not perform the date check. It is highly recommended that you activate these settings. |
|||||||||||||||||||||||
Using this system wide setting you can change the default titles on the Vessel/Container Search and Inquiry Screen, and on related reports. The Vessel/Container Search and Inquiry Screen provides a quick and simple search through the vessel and container information on your system. You can change the headings of two of the columns to more closely match your business terminology. Changes made to the titles are reflected on all the programs that use either the L/C or the BOL fields for Vessel/Container management. The areas affected are as follows:
When this option is selected, the following screen appears.
Unless changed, the Dancik labels of B.L/Ctnr# and L/C# are going to be used on the Vessel/Container Search and Inquiry screen (as shown below).
Note: For more information on how to use the Vessel/Container Search and Inquiry screen, refer to “Vessel/Container Search and Inquiry” in the Purchasing Manual. To change the titles, simply enter the new titles in the Enter Your Label If Different fields as shown below.
Note The L/C# field is 14 characters long, and the B.L./Ctnr# field is 10 characters long. Many companies prefer using a full container number as their main tracking number, and many companies do not use L/Cs (letters of credit). Therefore, relabeling the L/C# as CONTAINER# (as shown above) may be of benefit to you. The figure below shows the Vessel/Container Search and Inquiry Screen with the new titles.
|
|||||||||||||||||||||||
This system setting activates a keyword search. This functionality allows you to search on a single keyword or a combination of keywords. The search utilities a wide variety of item data throughout the system, including item description, manufacturer name, color, and pattern.
Entering a Y in the Enable Item Keyword Search field activates the keyword search option. Furthermore, it enables night jobs to rebuild the search file every night. Note Rebuilding the item search file should be done during night jobs. The amount of time needed to rebuild the file varies depending on the amount of items in your system, but it can take several minutes. By rebuilding the item search file every night, you are assured that any new items are included as well as any updates. Options
The actual search is performed via menu option Enhanced inventory search (INV 12) .
When set to “I”, omit the discontinued items that do not have any available inventory. Include the discontinued items that have available inventory, i.e. on hand - allocations. For more information, refer to Item Search Enhancements.
If you enter N, then the keyword search remains in the existing “single selection mode”, where you can only enter “X” next to a single item, and that single item is returned into the order entry (or order change) program. Enter a Y to activate “multiple selection mode”, where you can enter “X” next to as many as 30 items on the search screen, and all of the selected items are returned into the order entry (or order change) program. The items appear on the Multi-Line Order Entry Screen (which is the same screen that is used for Bills Of Material, Related Items, and Kits). Quantities can then be assigned to the items as needed.
Option 1 includes an F11 Fold/Unfold function key that includes the information shown if option 2 is selected. Option 2 simply shows it on the screen without having to use the F11 function key. |
|||||||||||||||||||||||
The system will automatically calculate the next available delivery date in accordance with customer delivery schedules. If you do not want the system to automatically calculate a back order shipping date, you can use this system-wide setting Option to suppress automatic recalculation of ship dates.
|
|||||||||||||||||||||||
This setting enables you to automatically suppress pick labels or pick pool entries for certain types of orders. This is particularly important for “Credit and Re-bill” orders, in which the debit line is for billing purposes only, and should not be re-shipped. Credits do not automatically generate pick labels or entries in the pick pool. This feature is meant to manage debit order lines that should not be physically handled.
When entering credit memo and rebill, as for a pricing correction, you create a credit line followed by a debit line with the correct price. This is done automatically by the Quick Credits feature. Quick Credits puts a credit code on both lines. If you do not use Quick Credits, you should manually key a credit code on both lines. Then, for example, you could suppress pick labels for the credit code you use for these credit/rebill lines.
For example, if you use a special Ship Via code for “Billing Only”, when no goods should be picked, then that code could be used to suppress picking.
In this example, order lines at status # -invoiced, S - Shipped, and A - staged and assembled will not be sent to the pick pool, and therefore not print as labels. |
|||||||||||||||||||||||
Certain types of invoices, such as zero value invoices and invoices for EDI customers may not require printed versions, even though they need to be processed by the invoicing system. Eliminating certain invoices from printing saves you money by reducing postage, paper usage, and the costs associated with handling these invoices. This feature eliminates the need to print invoices and leave them on hold in a spool file, and then reprint them in accordance with the Customer Preference file.
The System Wide Settings for Invoice Suppression options have an “and/or” relationship. For example, the option Terms Code has six suppression codes. If an invoice has one of these codes, it will be suppressed from printing. If multiple options have invoice suppression entries, they operate under an “or” type relationship. This system wide directs which invoices are printed using menu options IVC 4 (Printing Invoices) and IVC 12 (Printing Copies). The Invoice has: settings on the top part of the screen were designed for use with IVC 4. The setting Suppress Printing and ODS Distribution of Invoices if Total Amount of Invoice is between__ and __ is designed for use with IVC 12. The settings are set-up like this because IVC 12 was introduced later than IVC 4 and is more sophisticated. The best practice is to run IVC 4 with option 3 to get invoice numbers assigned. Then go to IVC 12 with your invoice number range and print them. The following table explains the fields on the Options to Suppress Printing of Invoices screen:
Note: The default for this screen is to leave all the values blank. For Y/N options the default is N. If an invoice meets the print suppression criteria it will not print. Note: An exception to this occurs in order entry. When entering in a 100% discount and an “L” is entered in the Where Extra Charge Shows field the invoice will not print if suppressing invoices when the Value of Zero field is set to “Y”. However, if an S is entered into the field the invoice will print. Note: Printing invoice copies via the F9 function from within Invoice Inquiry bypasses the options for suppressing invoices from printing. Consider the following examples for the use of the Suppress ODS Distribution of Invoices if setting. Example 1 The settings on this screen direct ODS to not send credit invoices, but send zero dollar invoices.
Example 2 These settings suppress the distribution of credit invoices and zero dollar invoices.
Example 3 These settings direct ODS to distribute credit invoices, but not zero dollar invoices.
Example 4 Use these settings to direct ODS to allow credits, but to suppress distribution of invoices that are less than $1.
|
|||||||||||||||||||||||
Order Reason Codes give you the ability to further classify your orders. This setting gives you the option to make Order Reason Codes mandatory during order entry and order change. Making the Order Reason Codes mandatory can provide more details in order reporting.
Enter a “Y” in the Order Reason Code Required setting to make the entry of an Order Reason Code Mandatory during Order Entry and Order Change. If this setting is activated, the default reason code is pulled in from the Reason CD field in the Billto File; if one is assigned. Use the setting, Companies that will NOT follow the above settings, to designate the companies where the use of Order Reason Codes is NOT mandatory. |
|||||||||||||||||||||||
Defines the level of detail appearing on the packing lists. If this option is left blank, packing lists show only lines with status codes S as being shipped, and show all other lines as “back ordered”. If you are currently using packing lists, and want lines to show as shipped even if not as status S, enter status codes on this screen. If the new status codes parameter is filled in, packing lists can show lines other than those shipped and indicate whether or not each individual line was shipped. For example, if you enter S and A for this parameter, only S and A items are listed as shipped on packing lists, but items not status S or A can be listed on the packing list showing as back ordered. This option assists your customers in reconciling open items on their purchase orders to your packing lists.
— L - Line Level. This is the default. All line items are printed in the sequence in which they appear on the order. This is the most detailed version. All message lines on the order also appear, except those with prefix codes that prevent printing on picking and packing lists. — S - Serial Number Level Consolidation. All detail lines with the same item and serial number are combined. For example, if multiple bin locations for the same item and serial number are on the order, they are added together and printed on one line. — I - Item Level Consolidation. All detail lines with the same item number are combined. For example, if multiple serial numbers or bin locations for the same item are on the order, they are added together and printed as one line. — Do not confuse this option with the Include/Omit parameters available when running packing lists. The Include/Omit parameters determine which lines appear on the packing list. This option controls how they appear, based on their status.
Note Credits, returned goods, and special orders are never consolidated regardless of the selected option.
If you want lines to show as shipped even if not as status S, enter those status codes. If the status codes parameter is filled in, packing lists can show lines other than those shipped and indicate whether or not each individual line was shipped. For example, if you enter S and A, only S and A items are listed as shipped on packing lists, but items not status S or A can be listed on the packing list showing as back ordered. This option assists your customers in reconciling open items on their purchase orders to your packing lists.
If the setting is 1, only one packing list is printed. If the setting is 2, the original packing list is printed and a duplicate is also printed. Note: The default setting is 2 which directs the system to print 2 packing lists per spooled file. There is a minimum of 1 Packing List and a maximum of 9 Packing Lists per spooled file copy.
- Enter a valid order status code. To display a listing of valid codes, enter a “?” in the field and press Enter. - If the setting is left blank, the default, then the order/line status remains at the current status. Note: Order Status codes are created and maintained through the Order & Serial# Status Codes program (menu option SET 7). - When a packing list is printed the order/line is automatically updated to reflect the new status. Note: The order’s notepad is also updated to note the change of order status.
|
|||||||||||||||||||||||
This option controls the system-wide settings for serial number tags. If Y is entered, serial number tags can be printed for non-rolled goods from the Receipts And Back Order Fill Menu. If N is entered, serial number tags can only be printed for rolled goods. Serial number tags are bar coded and can be printed on bar code labels or 8 1/2 x 11 laser paper. These tags can be used to label and track pallets, rolls, crates, and slabs. |
|||||||||||||||||||||||
This option contains the following four settings that control if and how retail names appear, and activate access to the retail customer file from certain applications.
The following forms, reports and inquiries are some of the programs affected.
Some of the programs that are affected by this change are: Order Entry and Search, Allocation Swapping, Inventory Inquiry, Back Order Fill, Forms, Open Order Reports, and Order Inquiry.
Note: If you leave all company fields blank, the settings apply to all companies.
|
|||||||||||||||||||||||
Activates the automatic assignment of serial numbers in the receiving process. Enter Y to activate the system’s ability to assign serial numbers automatically in the Enter Receipts program. Activate the specific functions required, either in the Manufacturer file or the Product Line file. The system assigns default serial numbers or unique serial numbers, as specified in those files. In order for this setting to work, a serial number range has to be entered in the setting Unavailable Serial Number Ranges. If you do not have any unavailable serial number ranges that you need to define, you must at least enter all zeros. |
|||||||||||||||||||||||
Omits certain inventory serial numbers from being counted in reorder reports, based on status codes.
|
|||||||||||||||||||||||
Ship Date Options in D24/CMS for Customer Orders
|
These system settings calculate the arrival of transfer and back orders. Note: The screen for D24/CMS is shown below, but the screen for EDI orders is virtually the same; except for the heading.
At least one, and only one, field for each setting is required.
|
||||||||||||||||||||||
This option enables you to specify the status codes that should trigger the auto-transfer process. These parameters affect the Update Order Status and Shipping Data Program and the Warehouse Menu’s Update Order Status Programs.
When any of the status codes listed on this screen are entered or scanned, the system takes the following actions:
— The material being ordered is assumed to have arrived at the destination warehouse. An actual stock-to-stock transfer is recorded, and the order now is allocated against the stock just transferred into the destination warehouse. — If the material was scanned into a new bin location, then that bin location is now shown on the order and the inventory. If no new bin location is specified, the program automatically assigns bin location Fxxx, where xxx is replaced by the originating warehouse. For example, FRAL is assigned to transfers “from Raleigh”. This bin location scheme is applicable only to serial numbered items. The new bin location shows on all order inquiry and inventory screens. Scanning of the actual staging locations override this code. — If the item being transferred has a valid freight key code in the Item Master File, the Interwarehouse Freight Costs table is accessed. Additional costs are added to the cost of the transferred goods, both on the order and within inventory. — If the option Enter Y to print Audit Report for each Auto-Transfer, is activated then a transfer report is left on hold in the Print Spool File for all auto-transfers. — The order notepad is updated for each auto-transfer. |
|||||||||||||||||||||||
This option controls how dates on the Stock Card Screen are set for back orders. The default option is O (order date). The O option sets the stock card date to the order date causing the back orders to display in order date sequence, often referred to as “first come/first serve”. The S (ship date) option sets the stock card date to be the ship date. If you use ISO as your primary method of order entry, the S option preserves the ship dates ISO assigns. If you often override back orders ship dates to dates such as 12/31/2005, then the S option may interfere with your ability to determine the sequence to fill the back orders. |
|||||||||||||||||||||||
Specifies the ranges of serial numbers the system should bypass if the automatic serial number assignment is active. This setting is required if you are using the automatic assignment of serial numbers feature; activated by entries in the Manufacturer file or the Product Line file. Once activated, the receiving system assigns a unique six-digit serial number, based on these number ranges.
|
|||||||||||||||||||||||
Restricts the entry of cost centers and item codes in the Item Master file, unless those codes are defined in the Cost Center and Classification files, respectively.
Activating this option directs the system to perform the following:
Note This option currently applies only to item classes 1, 2, 3, and the item trim classes. |
|||||||||||||||||||||||