Need more info or you couldn't find what you were looking for, let us know by sending an email to: support@dancik.com.
Line Level Options in Navigator Order Management
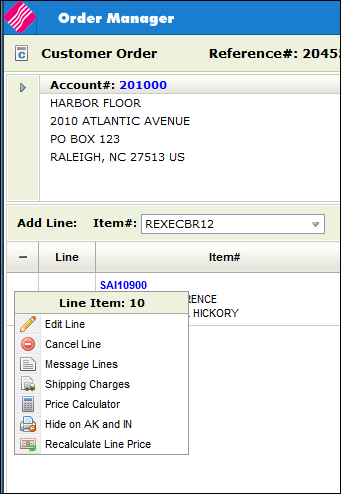
These options are accessed by clicking on the options arrow to the left of a line.
Splitting Navigator Order Lines (only for processed orders)
This options brings up the information for an existing order line.
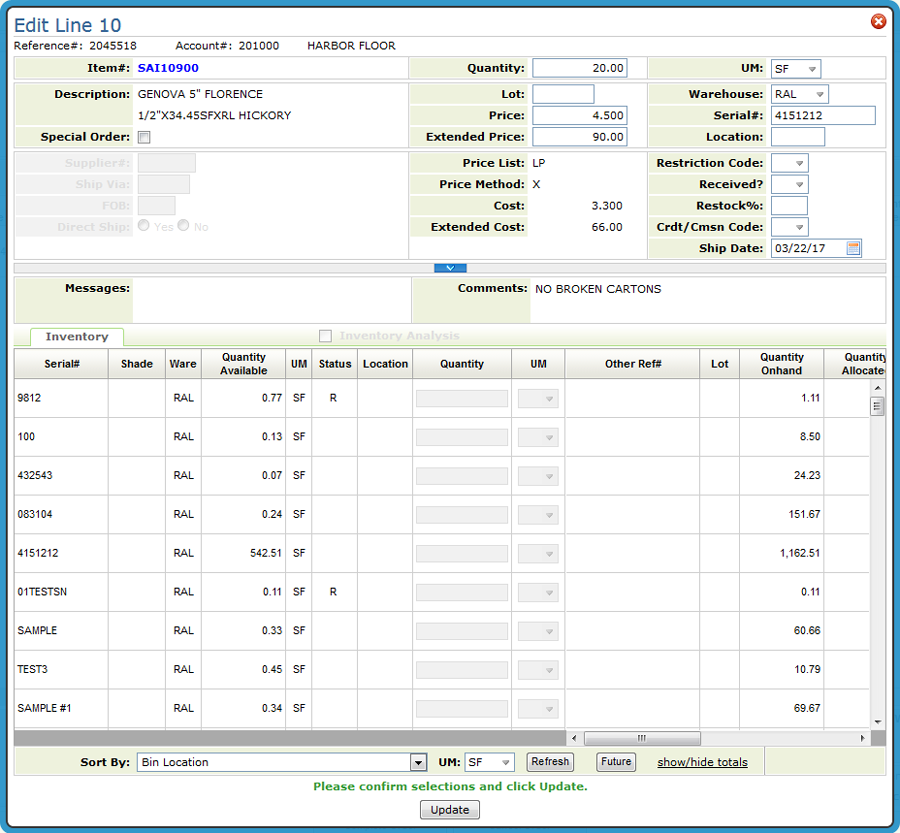
Some of the setting, such as Price, require permission to be able to manually change them. Permission to manually change prices has to be granted via the Allow Price Override setting in the Order Management Application Permissions. Accessed via the options on the NAV menu.
While in Edit mode, individual lines can be cancelled.
When an order line is cancelled, an email can be sent out. Refer to Sending an Email when an order line is cancelled for more information.
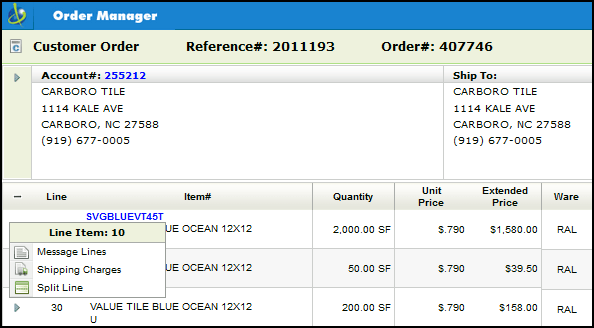
Message lines and charges can be added to an order at the header or detail line levels.
On the Order Header by clicking the arrow to the left of the account number. Message lines applied at the header level apply to the entire order.
At the Order Detail level by clicking the arrow to the left of an item. Message lines applied at this level only apply to the specific line they are attached to.
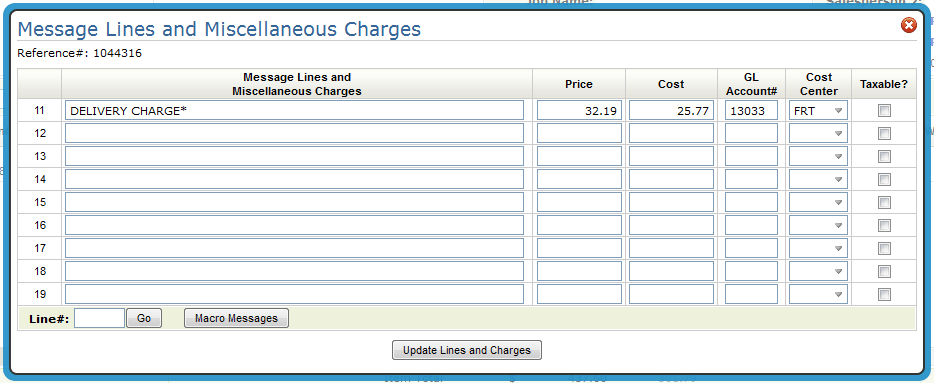
These message lines can be used to enter sidemarks, warehouse comments, or miscellaneous charges applicable to the order.
If the line number is 10, the first message line will be 11. Each line can have a maximum of 9 message lines.
Note: If an item has a policy code of RD, as entered in the Item File (FIL 2), the Special Instruction screen automatically appears. An item description must be entered before proceeding. Item policy code RD is normally used for generic miscellaneous items.
Price/Cost - Enter the extended price or cost if this represents a miscellaneous billing line.
General Ledger# - Enter a general ledger account number, if applicable.
Cost Center - This is the cost center to use if the message lines contain prices or costs.
A character at the end of a message indicates that the message/charge is taxable (in the example above Delivery Charge has a “*” at the end) . The setting Charge Tax On Freight on the Control Panel (menu option SET 1) allows you to set the default for making all miscellaneous charges taxable or nontaxable for taxable customers and orders. If the default is set to nontaxable, adding a character such as * or = to the end of the message/charges makes that line taxable.
Z* at the beginning of a message directs the system to not show pricing information on Direct Ship POs. Click here for a complete write-up on the Z* message qualifier.
Macro messages enable you to insert standardized messages when entering orders. These messages can consist of business related messages, display or sample programs, billing, and special order cancellation charges.
Note: Macro messages are created using the Macro Message Manager (menu option SET 23).
Click the Macro Messages button to display the Macro Messages screen.
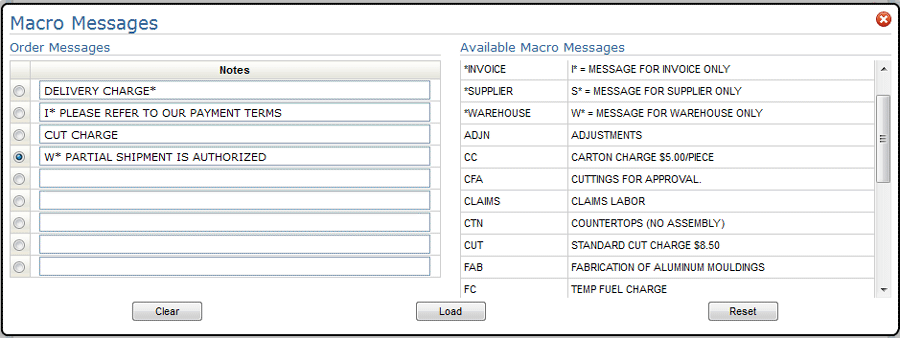
In the example shown above, three macro messages have been added to the order. The Delivery Charge message was added earlier on the Message Lines and Miscellaneous Charges window.
Notice that some of the messages use the format I*, W*, S* etc. Using these formats tells the system to only include the messages on specific printed documents:
W* (Warehouse messages) - Will print on all documents used in the warehouse.
C* (Customer messages) - Will print on all customer documents.
I* (Invoice messages) - Will print only on quotations, acknowledgements and invoices.
S* (Supplier messages) - Will print only on purchase orders.
O* (Order messages) - Will print on all customer documents except invoices.
J* (Job Orders) - allows you to invoice a job order showing only the total amount for the job, and the description of the job, while eliminating all of the line item details from the invoice.
Z* - directs the system to not show pricing information on Direct Ship POs. Click here for a complete write-up on the Z* message qualifier.
Shipping charges can be added to an order using one of two methods:
Via the Additional Options drop down box located in the upper-right hand corner. This option bases the charges across all lines of the order.
By clicking the arrow to the left of an item. This option bases the shipping charges on this line only.
Both options deliver the Shipping Charges screen.
The Ship Via assigned on the Order Header is automatically populated in the Ship Via field. To see all the valid shipping charges, clear out the Ship Via code and click Refresh.
Note: The shipping charges are pulled in from the Shipping Charges By Zip Code table (CUS 20). Shipping charges are created and maintained via Shipping Charges By Zip Cd Table (FIL 44).
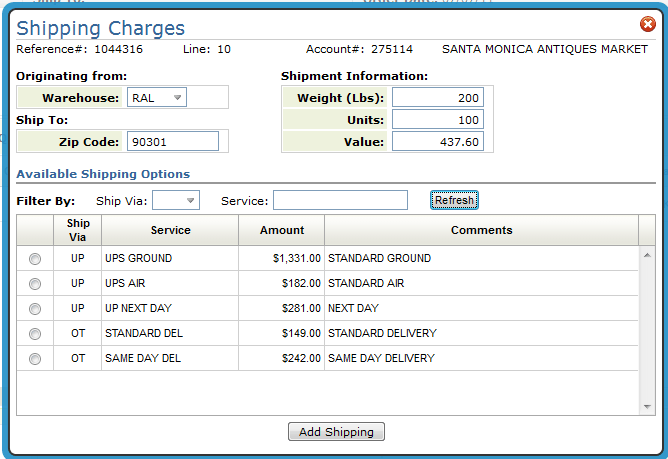
Use the settings, Weight, Units, and Value to base the shipping rates on. Use them separately or in combination to get a shipping quote. For example, if you have a six line order, but only three lines were ready to ship, you could enter the information (i.e. weight, units or value) from those lines and get a shipping rate just for those three lines.
The other fields, From Warehouse, Zip/Postal Code, Ship Via, and Service, are “limit to” fields. Use these fields to narrow your inquiry down as needed.
Ship via codes represent the method of shipping for the order. Some examples are: UP - UPS, CC (Common Carrier), and OT (Our Truck). If left blank, all Ship Via codes are considered.
The Service field further defines the method of shipping. For example, for ship via code UP (UPS) there could be several different services such as same day, standard delivery, etc.
Select a shipping charge and then click Add Shipping. You are asked where you want to apply the shipping charge.
The charges can get added as a miscellaneous line under a specific line number. Or, they can be added as a 9966 line after the last line of the order.
Note: Once order lines get invoiced they cannot be invoiced again. If you choose to add the shipping charges across the entire order (as a 9966 line) and the order gets invoiced, you cannot update or add to the 9966 shipping charge line. However, you can still add shipping charges against individual lines (i.e. line 11 for order line 10) as long as the line being changed has not been invoiced.
The following example shows shipping charges entered against line 10 and also as a 9966 line.
|
This line level option allows you to toggle between Hide on AK and IN and Show on AK and IN.
Note: This functionality must be activated via one of the options on the NAV menu. When the option is activated, order lines can be suppressed from printing on order acknowledgements and invoices. For more on the Set-Up for this functionality, click here.
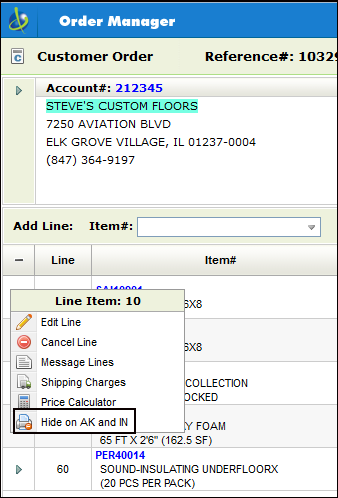
If the line is hidden, a no print icon (![]() )
appears next to the option arrow.
)
appears next to the option arrow.
Note: Hiding or Showing a line does not impact the calculation of the order totals.
When the hidden line is invoiced, the Invoicing application also shows the hidden icon for the line.
Price Analysis and Discount Calculator
The Price Analysis and Discount Calculator, available in the green screen via the F24 wildcard window in Order Entry, has been added to Navigator.
Note: The Price Analysis and Discount Calculator is available during order entry and for existing unprocessed orders.
This tool allows you to:
Override the price of a line item by entering a new price value.
Apply a discount percentage to a specific line item price.
Calculate a new price based on a targeted gross profit percentage.
View the description of the price lists, restriction codes, promotions, and funds that make up a given price.
Note The Price Analysis and Discount Calculator is not available for purchase orders.
As with most Navigator enhancements, access has to granted through the Navigator Menu.
|
There are three levels of granting access:
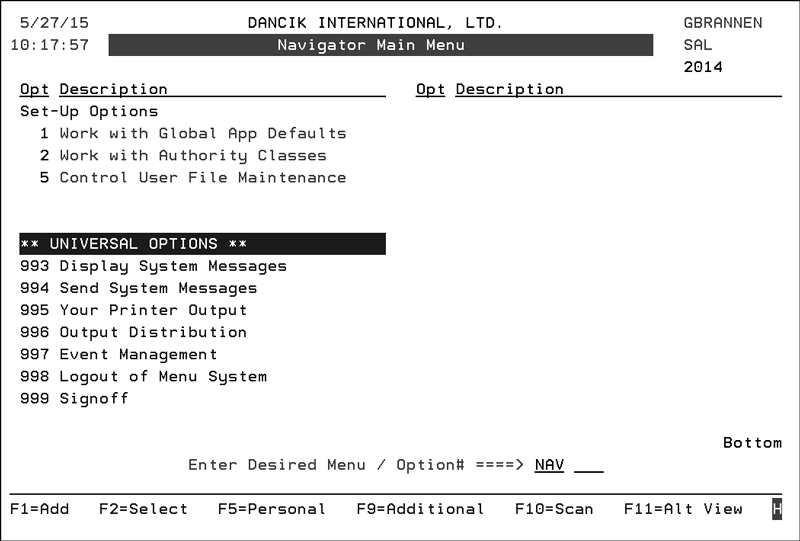
NAV 1 - Work with Global App Defaults - This one grants access to everyone. Follow this path: NAV 1>“A” for Order Management>”Y” for Allow Price Calculator.
NAV 2 - Work with Authority Classes - Authority classes allow you to group users together, they can be created based on system access restrictions or on a user's functional areas such as AP clerk, order clerk, or customer service. They allow you to customize the level of access a group of users has within Navigator. Authority classes override global settings. To grant access at the authority class level follow this path: NAV 2 Work with Authority Classes >”W” for the appropriate authority class>“A” for Order Management>”Y” for Allow Price Calculator.
NAV 5 - Control User File Maintenance - This option grants access at the user level. It overrides the Authority Class settings. Follow this path: NAV 5 - Control User File Maintenance>”W” for the appropriate user>“A” for Order Management>”Y” for Allow Price Calculator.
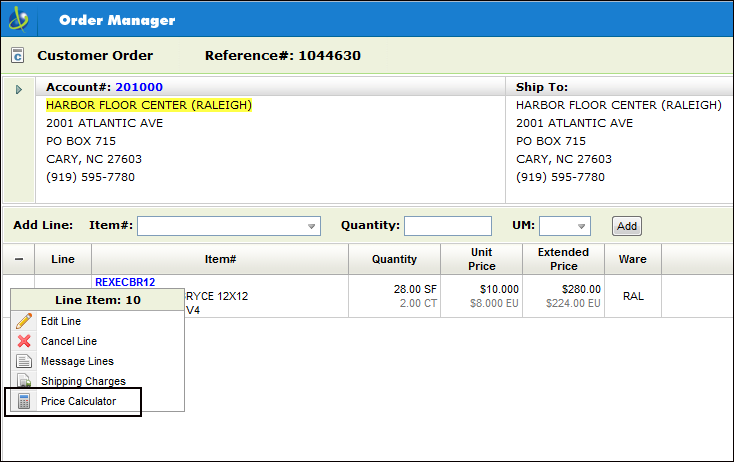
Accessing the Price Calculator
1. Start a new order, quote, direct ship order, transfer order or credit order. You can also select an existing unprocessed order.
2. Click the Line Option arrow to the left of a line and select Price Calculator.
|
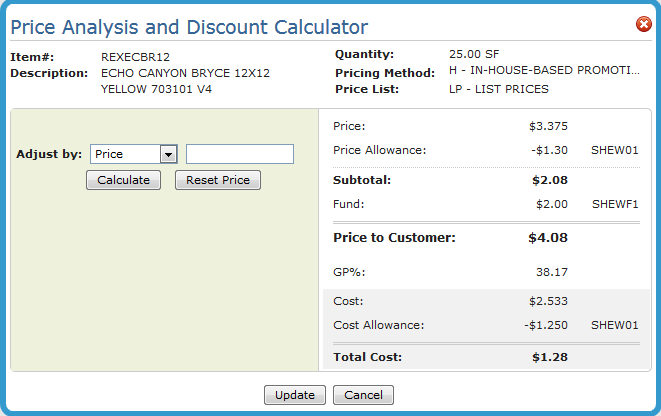
3. The Price Analysis and Discount Calculator window appears.
|
Note: If the user is not permitted to see cost in Order Entry, as designated on the user control panel, then the GP%, Cost and Cost Allowance fields are not displayed. The setting Allow Costs To Show On Orders can be accessed via this path: NAV 5 - Control User File Maintenance>”U” to update a user’s settings>the Allow Costs To Show On Orders setting is on the first page of settings.
4. Use the Adjust by drop down to adjust the price by:
Price - The list price is displayed here. Entering a new price value updates the current price and adjusts the GP% accordingly. You can restore the original price, after it is overridden, by clicking Reset Price.
Discount% - The discount% is always set to zero when the screen is first displayed. This field is separate from the header discount% field. You can enter a discount%, which recalculates the price and GP%. A negative value, -10.00 for example, can be entered.
GP% - Entering a new GP%, recalculates the price. A negative value (for example -10.00) can be entered.
5. The Price Allowance and Fund figures come from the Promotional File. Promotions can be created for several parameters. In this example, the Price Allowance of -$1.30 comes from a promotion set up for the manufacturer; REX. The Fund amount of $2.00 comes from a promotional file based on the item.
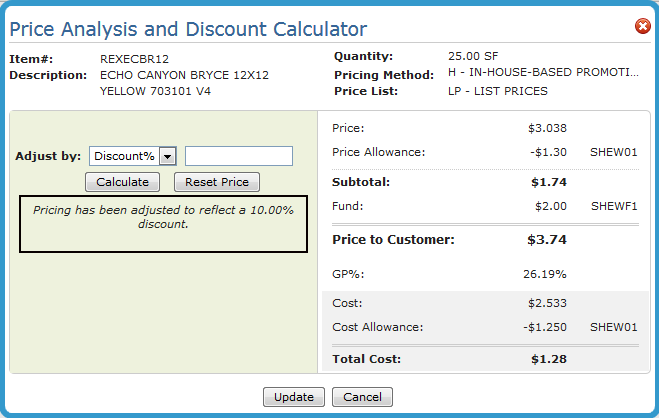
6. Select an Adjust by method, enter the new value and click Calculate to update the pricing information.
If you choose to adjust by Discount a note appears letting you know the percentage the price is being adjusted by.
|
Note: If you choose to adjust pricing by entering a new GP% value. The new GP% value is displayed on the screen.
7. The pricing is updated to reflect the adjustment; in this example a discount of 10%. The 10% discount caused the Price and the GP% fields to be recalculated. The discount is applied against the price, and then the GP% is recalculated based on the cost and the new lowered price.
Note: Click Reset Price to return to the original pricing.
8. You can adjust the pricing as much as needed. Every time you enter a pricing override, be it by price, Discount% or GP%, the adjustment is made against the original price from the order. Once you click the Update button the pricing on the order changes and that becomes the new “original” pricing.
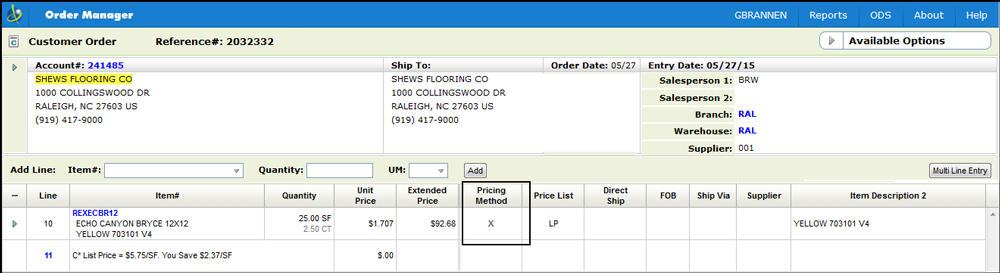
9. Click Update to change the line pricing on the order and return to the order. The repriced line is assigned a Pricing Method of “X” which signifies the pricing was overridden.
|
This option reset pricing to the “default” pricing at either the line or order level.
Default Pricing takes in account pricing and fund promotions, points, terms and other pricing strategies.
Notes:
at the line level - only available in Order Edit.
Available regardless of user authority based on the new setting; Allow Price Overrides.
Only works for open lines
Not available for canceled or closed lines (lines in # status).
A notepad entry is made indicating a line/order price recalculation was performed.
Splitting Navigator Order Lines
This feature allows you to split an order line item into two order line items, each with part of the total quantity.
Order lines can only be split on processed orders.
The following are situations were an order line cannot be split:
An item on the line has a no break (NB) item policy
The order line has been invoiced
The order line is on backorder
This feature is accessed by clicking on an order line's option arrow (at the far left of the order line) and then selecting Split Line.
Selecting the Split Line option displays the Split Line on an Order window.
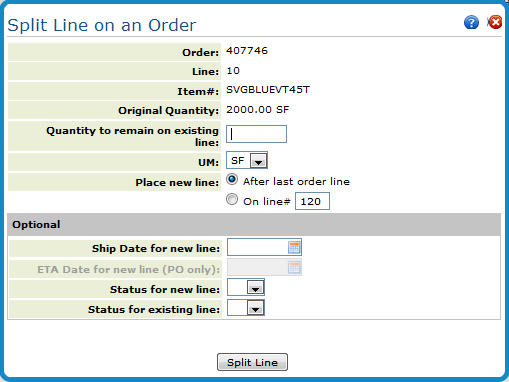
Field |
Description |
Required Entries |
|
Quantity to remain on existing line. |
Enter the quantity remaining on this line number, after the line is split. The difference is put on the new line created when the line is split. |
Unit of measure |
Select the UM related to the quantity stated above. |
Place new line |
Controls the line# of the new line.
|
Optional Entries |
|
Ship Date for new line |
Optionally enter a ship date for the new line. Leave this field blank for the ship date on the new line to remain the same as the existing line. |
ETA Date for new line (PO only) |
Leave this field blank for customer orders. |
Status for new line |
Optionally enter a status code for the new line. Leave this field blank for the status code on the new line to remain the same as the existing line. |
Status for existing line. |
Status codes allow you to identify the status of each line of each order as it moves throughout the system and your warehouses. |