Need more info or you couldn't find what you were looking for, let us know by sending an email to: support@dancik.com.
Access to all Navigator applications can be granted or restricted globally, by authority class, or by user. Global settings (NAV 1) are the initial settings, Authority Class settings (NAV 2) override the global settings, and User settings (NAV 5) override both global and authority class.
When you first access the program you are presented with a filters screen. Using the Filters dialog box, inquiries can be made across all the AP accounts based on your specific parameters. For example, a report can be generated that list regular invoices for a particular time-frame (Post Month/Year).
Note: The ![]() icon, in the upper right-hand corner,
accesses the filter screen from any part of the application.
icon, in the upper right-hand corner,
accesses the filter screen from any part of the application.
Entering different search parameters in the Filters Tab can take you to different parts of the AP Inquiry screen.
Not entering an account number takes you to the complete listing.
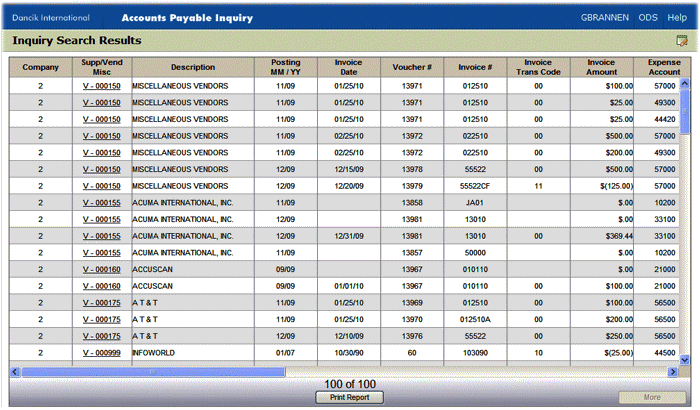
Entering only a company and a vendor or supplier takes you to the AP Ledger screen.
Entering a company, account, and any other parameter takes you to the AP History screen.
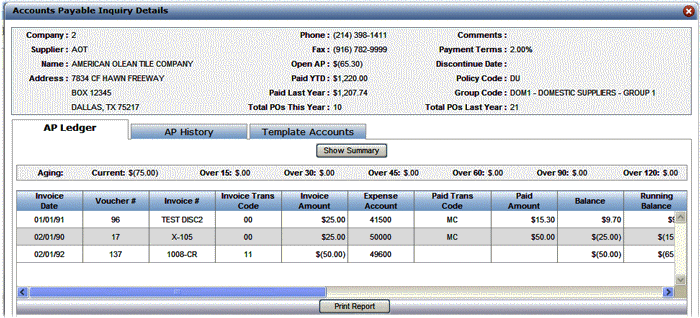
The A/P Ledger Screen program shows all open payables for each vendor account on the system. The ledger includes open, current monthly activity.
Note: The vendor/supplier information at the top of the screen is imported in from the Vendor or Supplier File.
Notes
The transactions are initially sequenced by vendor’s invoice date. However, clicking on a column heading rearranges the information in either ascending or descending order based on that heading.
Items with the same vendor invoice date are sequenced by voucher number. Items expensed to two or more expense accounts appear on two or more separate lines, each having the same voucher number.
Each open payable is on a separate line.
The aging parameters give you a dollar summary of your past due payments.
The Invoice Transaction Codes represent the processing of any cash disbursement made for this item. The available codes are:
0B - Bill-in-conjunction invoice from vendor / brokerage |
0V - Purchase of inventory invoice (x00001 acct#) |
00 - Invoice From Vendor/supplier |
01 - Regular Brokerage Invoice |
05 - Debit memo / brokerage |
10 - Credit memo or reversal |
11 - Credit memo from vendor/suppl |
14 - Credit memo from vendor/suppl for intercompany invoice |
21 - Transfer of open payables credit from this account. |
22 - Transfer of open payables credit to this account |
23 - Transfer of open payables debit from this account. |
|
Note: A complete list of the Invoice Paid Transaction codes can be obtained by running the A/P Transaction Codes List (menu option AP 204).
AD - Check/Advance Deposit to Vendor. |
CF- Full use of unapplied payment to vendor or cred from vendor |
CP- Part use of unapplied payment to vendor or cred from vendor |
LC - Paid by letter of credit, bank transfer, draft or acceptance |
MC - Manual check to vendor |
NA - A/P debit applied / no payment |
NC - A/P debit applied / no payment due to a/r credit to vendor. |
ND - A/P debit applied / with payment due to a/r credit to vendor. |
OA - Check / on account to vendor |
PF - Computer check / full payment of vendor invoice. |
PP - Computer check / partial payment of vendor invoice. |
WN - Check reversal / reverse A/P disp. debit / chk redeposited |
WP - Reversal of a/p disp. credit |
|
|
This Paid Date can show one of two dates:
— If no payment has been received, the date that the item is scheduled to be paid displays.
— If a payment has been received, the check date displays.
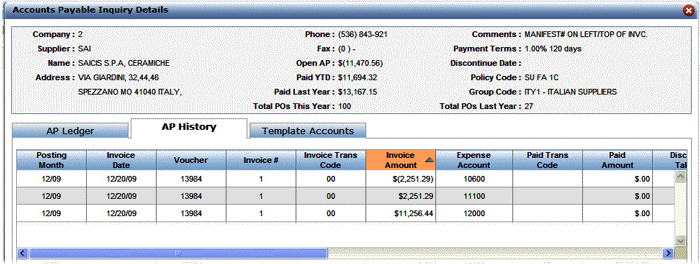
This option presents a chronological history by accounting month and date for each vendor or supplier. This program shows each transaction, including invoices, credits, adjustments, and payments. It also shows which invoices were paid and the check numbers.
Notes:
The Cash Account, AP Account, Branch, and Cost Center are defaulted in from the Vendor or the Supplier Files.
The Invoice and Paid Transaction codes used are the same codes used in the AP Ledger.
The Manifest Number is manually assigned via the Enter Receipts program (menu option INB 1) when inventory is received. This number can be used to match A/P invoices to receipts before or after vouchering them.
This tab imports default information in from the Supplier or Vendor File. When you create a Supplier/Vendor Template, it becomes the default A/P Entry screen for all invoices entered for the supplier.
If the invoices for this supplier are in a foreign currency, you can also view the default exchange rate account numbers and cost centers for A/P.
Note: To use the exchange rate feature, you must first set up the Exchange Rate Table and the Supplier Currency Code Table in the System Settings Menu.
Notes:
The information at the top comes straight from the Supplier or Vendor File.
The Group Code, in the top part of the screen, allows you to assign a supplier/vendor to a group. This grouping provides another level of organization of payments. For example, you can group vendors by the type of product or service they provide, and generate checks by group. You can set up groups for installers, import suppliers, domestic suppliers, etc.
Note: Supplier/Vendor groups are established via ACT 120.
The Policy Codes, in the top part of the screen, are assigned in the Supplier or Vendor file. They trigger special processing or identify certain suppliers or situations. These can be user-assigned or assigned by Dancik International. Some examples are:
AD - Allow Duplicate Invoice#s for this Supplier/Vendor |
AF - Auto-Fax purchase orders to this Supplier. |
DU - Auto-Duplicate Supplier/Vendor Code on A/P Entry Screen |
FT - Convert P.O. rolled goods quantities to Feet + Inches. |
NC - No Cost. Don't print costs on purchase orders. |
NN - No Name. Don't print customer name on special order P.O.s. |
RV - Restricted View. Suppl/Vendor requires high-level password. |
SD - Print Supplier's Item & U/M on P.O.'s. |
SI - Print the Supplier's Item# only on P.O.s, not our Item#. |
SU - Convert P.O. quantities to the Supplier's U/M. |
1C - One Check - Issue a separate check for every invoice. |
1P - One Purchase Order per page on faxable worksheet P.O.s. |
99 - Issue 1099 form for this Supplier/Vendor. |
|
|
The setting Invoice Amount in Foreign Currency, if activated, denotes that this vendor/supplier’s invoices are processed in foreign currency. If activated, the fields Default Exchange Payable Account and Cost Center and Default Exchange Clearing Account and Cost Center must also have entries.
The Amount, Discount, Description, Acct, Brn, and Cctr fields display established defaults for the supplier or vendor’s invoices.
If you get an recurring invoice that is the same every month (e.g. from your internet provider or a contractor) you can enter the amount and the rest of the information. This will save you steps in having to reenter the information every month.
If the amount varies from month to month, do not enter an amount, but the rest of the fields can be used.
A “Y” entry in the Suppress column directs the system to suppress any discounts for this line.
1. The first step after clicking Print Report is to give the report a file name and change the description if needed.
2. Click Continue to generate the report.
3. The reports are retrieved by clicking the ODS link in the top-right corner. In ODS, access the IFS Reports and select your report to open it as a spreadsheet.