Need more info or you couldn't find what you were looking for, let us know by sending an email to: support@dancik.com.
This menu system allows open invoices to be paid online.
The sequence of steps for setting up the system to make online payments varies based on which payment option you plan on using:
For Payment Request or Remittance Advice payment options:
— Create Payment Option for Payment Request or Remittance Advice via menu option PAY 3.
— Create a Payment Profile for Payment Request or Remittance Advice via menu option PAY 1.
— Add Payment Option from Step 1 to F9 Option on Payment profile.
For Credit Card payments (At the current time, July 2015, the only credit card processor Dancik uses is Heartland).
— Create Payment Institution for Heartland via Pay 4.
— Create Payment Option for Heartland Gateway via PAY 3.
— Create Payment Profile for Heartland Gateway via PAY 1.
— Add Payment Option from Step 1 to F9 Option on Payment profile.
For all payment options, the Payment Profile needs to be linked to an individual Decor 24 user via menu option D24 2 or all Decor 24 users via the global Decor 24 settings (menu option D24 1).
Note: Currently Online Payments can only be made via Decor 24.
• Users can update other payment features as follows:
— Heartland Gateway users need to map payment codes associated with transactions in AR Payments tab to values from ACT 115 via PAY 5.
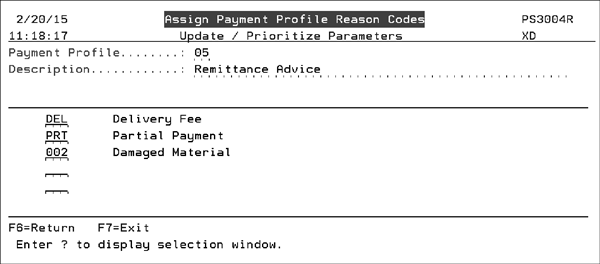
— For Payment Profiles where short payments are authorized, set up reason codes in menu option PAY 2 and add them to F8 Reasons on Payment profile via PAY 1
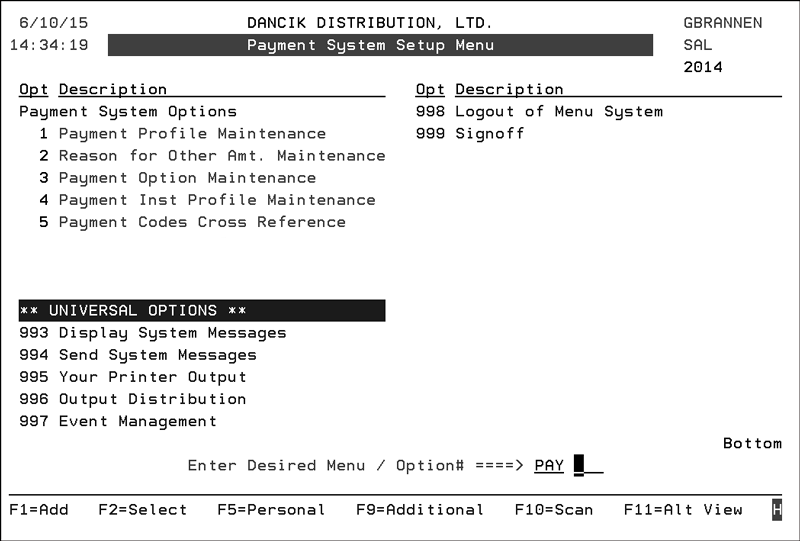
Five set-up options are available on the Payment System Setup Menu that support online payments.
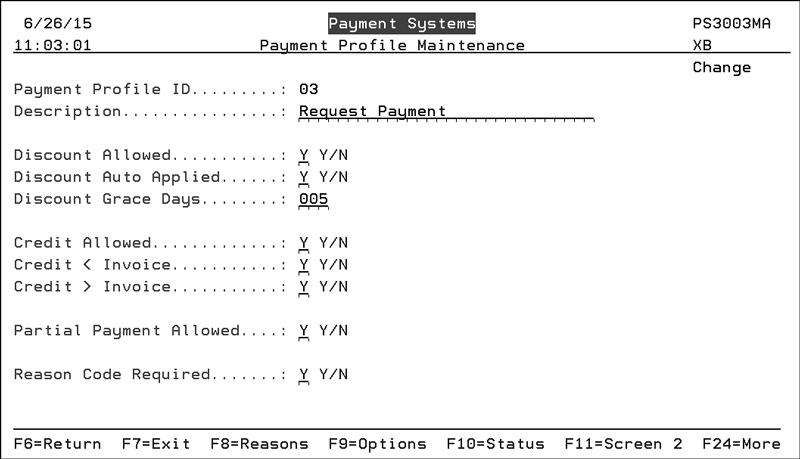
PAY 1 - Payment Profile Maintenance
Use this option to create payment profiles that allow or deny access to specific functionality within the online payment process.
1. Access menu option PAY 1 - Payment Profile Maintenance. The established payment profiles are listed.
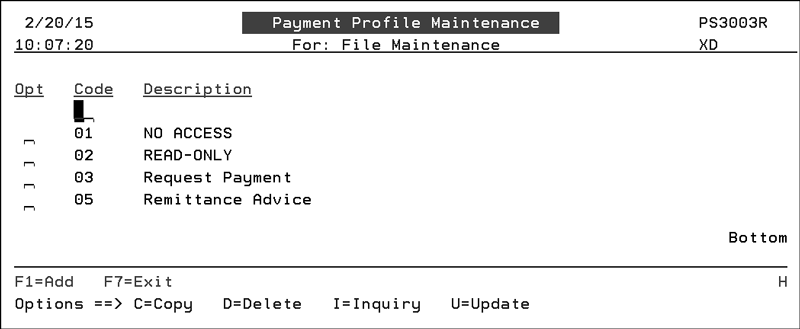
Payment profile 01 - No access is intended for customers who are not allowed to use this new functionality but are allowed to see prices.
Payment profile 02 - Read Only allows customers to view Payment History but not create new payments.
2. To create a new Payment Profile press F1.
3. To update an existing one, enter a “U” in its Opt field and press Enter.
|
4. Each Payment Profile is assigned a 2 character numeric code and a description.
Setting |
Description |
Discount Allowed
Discount Auto Applied
Discount Grace Days |
Enter a “Y” in the Discount Allowed field to allow discounts on invoice payments. When discounts are not allowed, discounts do not display in the invoice table. When discounts are allowed the Discount column will display the discount amount and the balance will reflect the amount of discount - which will prevent user from having to enter the amount -less discount in the other amount field. If Discount Auto Applied is activated, the discount amount is automatically applied to the invoice. Enter the number of Discount Grace Days for the discount to be taken within (this value will be added to extend the days in which discount amount appears). |
Credit Allowed
Credit < Invoice
Credit > Invoice |
Enter a “Y” to allow the user to apply credits toward the payment. The setting Credit < Invoice allows the customer to apply a credit to partially pay an invoice ($50 credit applied to $100) The setting Credit > Invoice allows a credit to be applied to an invoice less than credit amount ($100 credit applied to a $50 invoice). |
Partial Pmt Allowed |
Enter a “Y” to allow the user to enter a payment amount OTHER than invoice total. |
A special situation exists if:
In this situation, the following error is displayed “Credit amounts cannot be less than total amount due”. |
|
Reason Code Required |
Enter a “Y” to make a reason code mandatory. The reason codes available for this payment profile are accessed via the F8=Reasons function.
The Reason Codes are created via menu option PAY 2 - Reason for Other Amt. Maintenance. |
Note: If a Payment Option is used, we recommend it not be deleted. Deleting a Payment Option that has been used for payments will result in the loss of data in the Transaction History and also in the Accounts Receivable Payment data.
Function Keys
Function Key |
Description |
F8 = Reasons |
Use this function to add payment reason codes to the profile. |
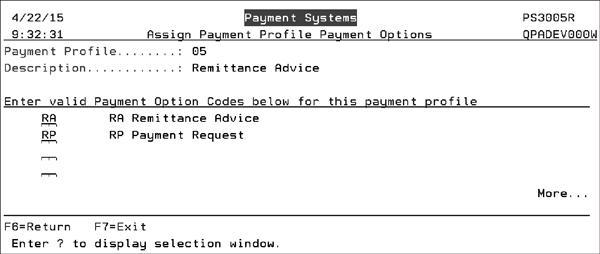
This function controls the payment options available on the Payment Method drop down list.
|
|
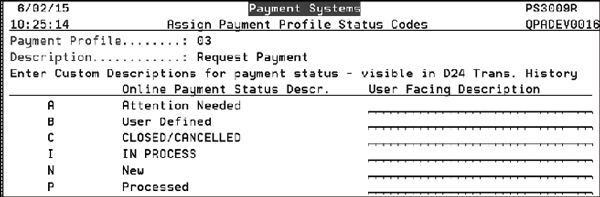
F10=Status |
These invoice status descriptions allow you to track the Transaction History.
|
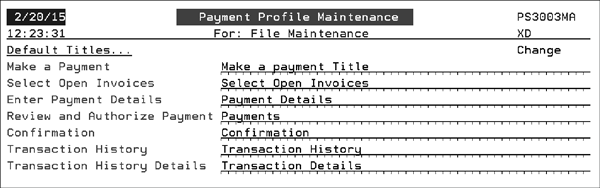
F11=Screen 2 |
This option presents you with 4 screens that allow you to change the verbiage on the titles. labels, headings, and buttons on the Decor 24 application to better suit your business terminology.
Press F11 to work through the screens. |
F13 - Trans Codes F14 - Disputes F15 - Splits |
Use these functions to omit invoices that contain the entered AR transaction codes, Dispute Codes, and Split codes. If a code is entered on these screens, any invoices containing that code will not be eligible for payment in Décor 24 via this payment profile. |
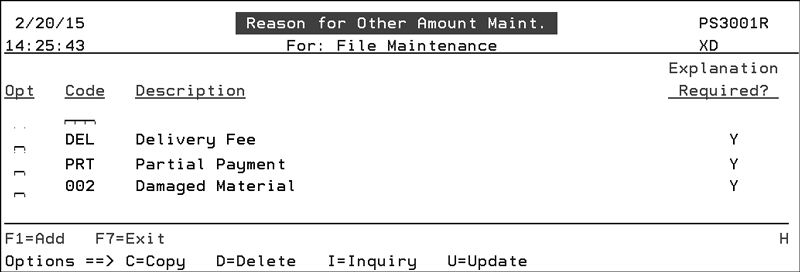
PAY 2 - Reason for Other Amt. Maintenance
This option allows you to create reason codes for partial payment or “short” payments on an invoice. For example, a customer might not want to pay a delivery charge or some of the material was damaged.
1. Access the menu option PAY 2- Reason for Other Amt. Maintenance. The established codes appear.
|
2. To create new codes press F1=Add.
3. To update existing codes enter a “U” in their respective Opt field.
4. These codes are used if an amount other than the full invoice amount is paid.
Note: Users have to be granted permission to make partial payments via the Payment Profile option (PAY 1).
5. Enter a “Y” in the Explanation Required setting to require the user to enter comments in the Additional Comments box when making a partial payment.
|
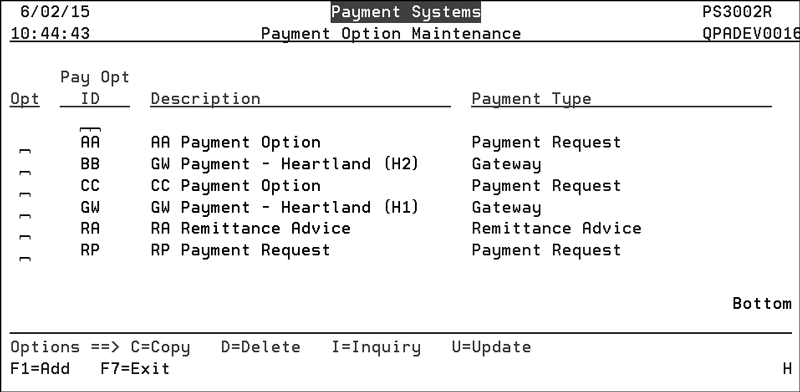
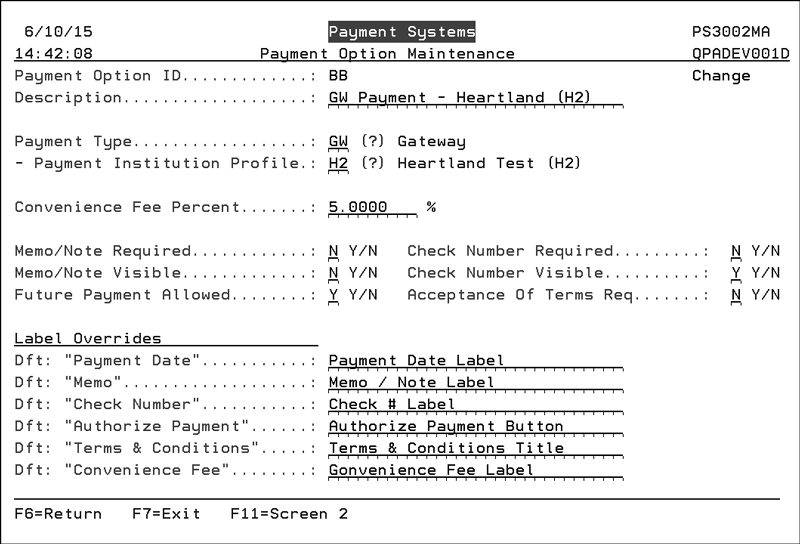
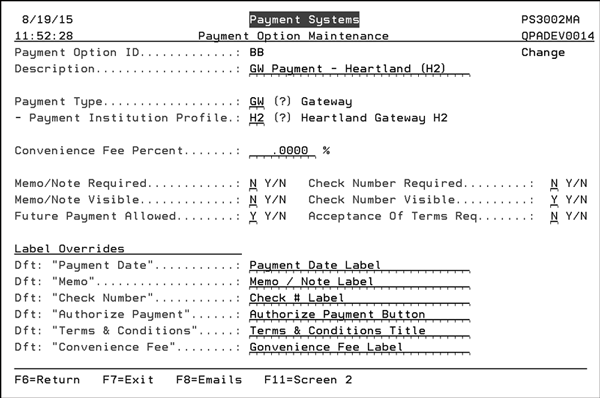
PAY 3 - Payment Option Maintenance
Use this option to create and maintain the payment options that are accessed via the F9=Options on the Payment Profile screen.
|
Enter a “U” to update the details behind a Payment Option.
|
The setting Payment Institution Profile ties the payment option to a payment institution, such as Heartland, established via menu option PAY 4. The Payment Institution Codes are supplied by Dancik.
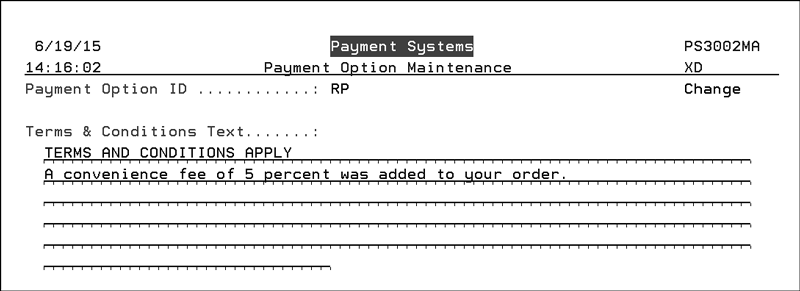
The Convenience Fee Percent allows you to increase the payment total by the percentage entered. The convenience fee can be set-up on the Dancik system for each payment type. For example, you might charge a 5 percent convenience fee for credit cards and a 3 percent fee for checks. If you use the Dancik system to assess convenience fees, you will need to fill out the Terms & Conditions Text on screen 2. Press F11 to access screen 2.
|
The Label Overrides, at the bottom of the screen, allow you to change the text on the Decor 24 Review and Authorize Payment window.
|
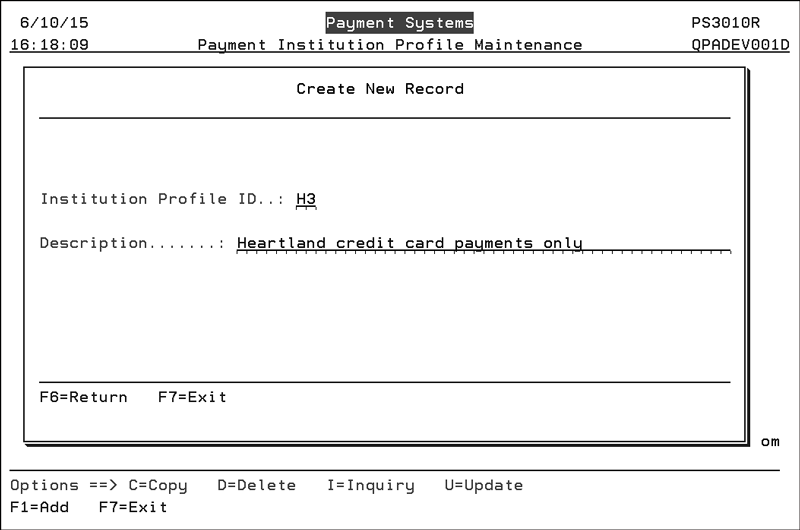
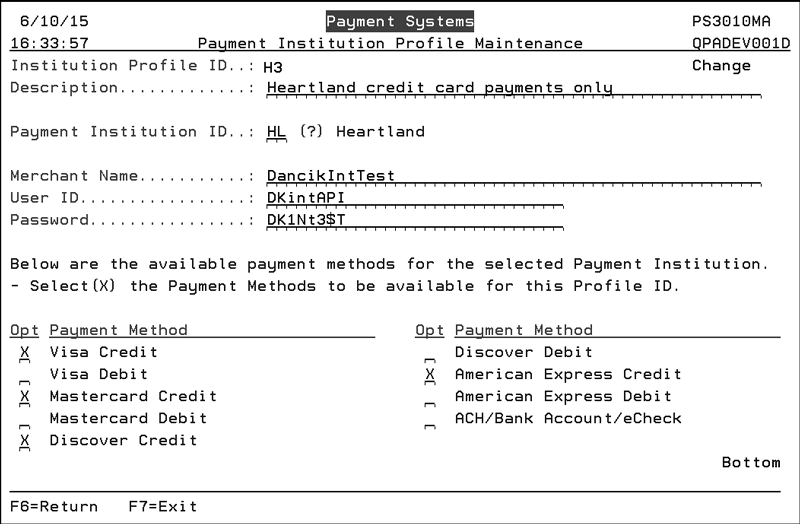
PAY 4 - Payment Inst Profile Maintenance
This option allows you to create and maintain the third party payment institution that allows your customers to pay online.
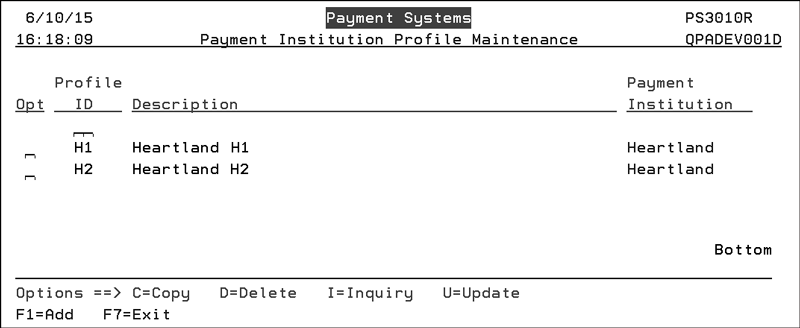
Press F1 to create a new Payment Institution Profile. This payment profile is going to be for a customer who only accepts credit cards.
|
Press Enter to add more information about the profile.
|
Enter the Payment Institution ID code. These codes are created by Dancik. At the current time, June 2015, only Heartland (HL) is available.
Enter the Merchant Name, User ID, and Password given to you by Heartland.
Select the Payment Methods for this profile. Do not select Payment Methods that are not set up in the Merchant Account that you have established with your payment processer (i.e. Heartland).
The payment methods selected are the ones that will display will making payments using the Heartland payment portal.
|
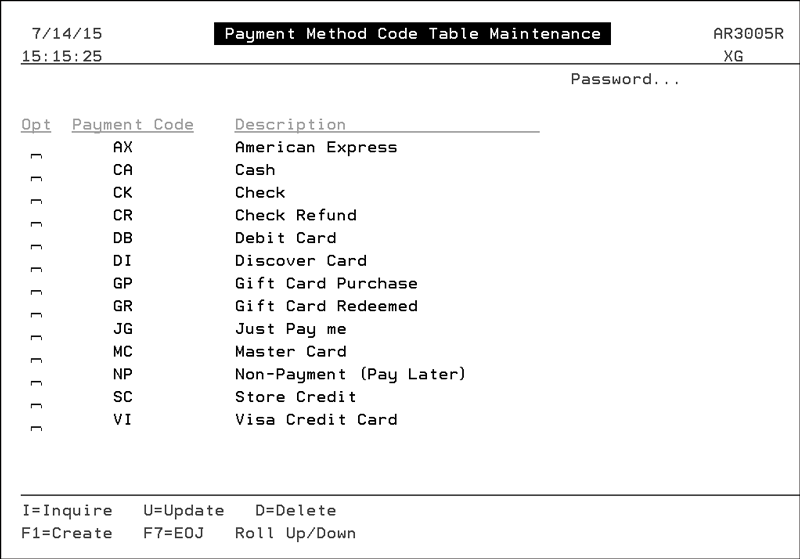
PAY 5 - Payment Codes Cross Reference
This file cross references the payment methods shared between the Dancik system and your payment processor to Payment codes used by Dancik’s accounting systems.
Note: In order for a payment method to be cross referenced to a payment code, the payment code must be created in the Payment Method Code Maintenance File (ACT 115).
|
The descriptions listed under the heading Payment Method are shared between Dancik and your payment processor.
The Payment Codes are used by the Dancik Accounting system. These codes are created in the Payment Method Code Maintenance File (menu option ACT 115).
In order for a payment method to be cross referenced to a payment code, the payment code must be created in the Payment Method Code Maintenance File.
At the current time, July 2015, only Decor 24 uses the online payment functionality. The following example, demonstrates how to make an online payment in Decor 24.
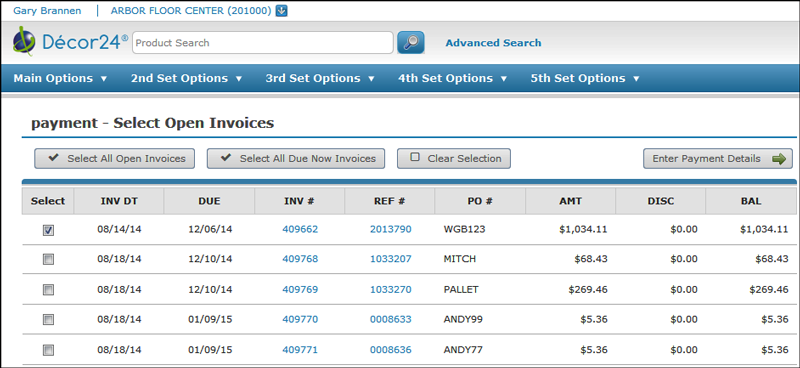
1. Access the Open Invoices.
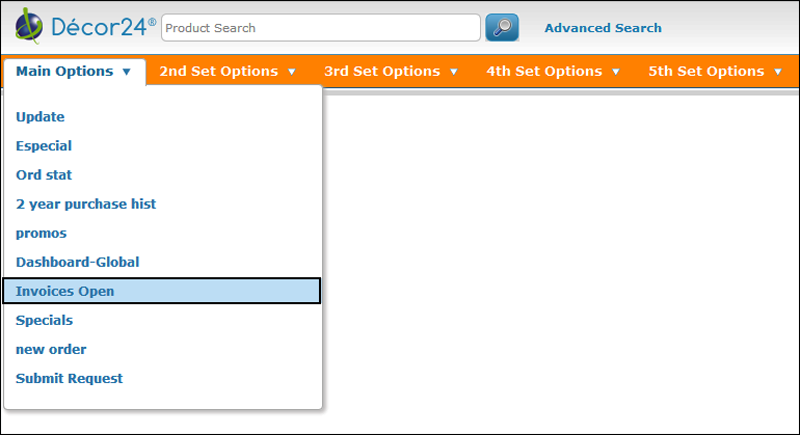
In this example, the Open Invoices are accessed under the Main Options. However, it can be located under any of the other tabs depending on where the link ../de6210h.html/main was entered in the Décor 24 menu options D24 12-16.
A listing of all the open invoices appears.
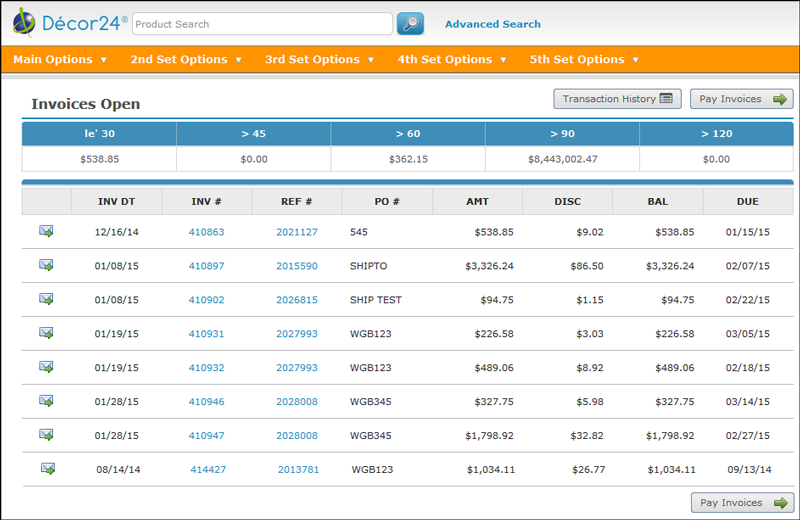
Note: Invoices that are in process, already paid or are just waiting to clear are not included in the open invoices listing.
Note: Keep in mind that almost all the titles, labels and buttons on the Decor 24 windows can be customized to meet your business terminology. The text on the Open Invoices window shown above can be changed via the Open Invoices: Headings section on screen v2 Screen 6 of the Presentation settings (menu option D24 3).
2. Click the Pay Invoices button in the upper right hand corner.
Note: If the Transaction History and Pay Invoices buttons do not appear, check to make sure the correct payment profile is assigned at the global or user level.
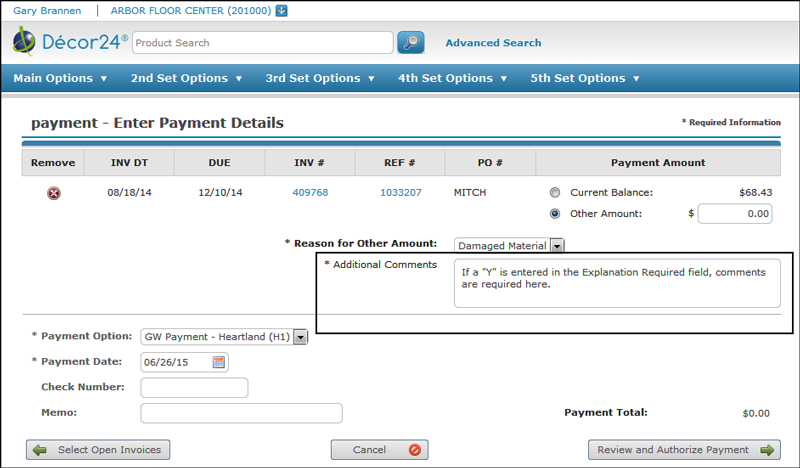
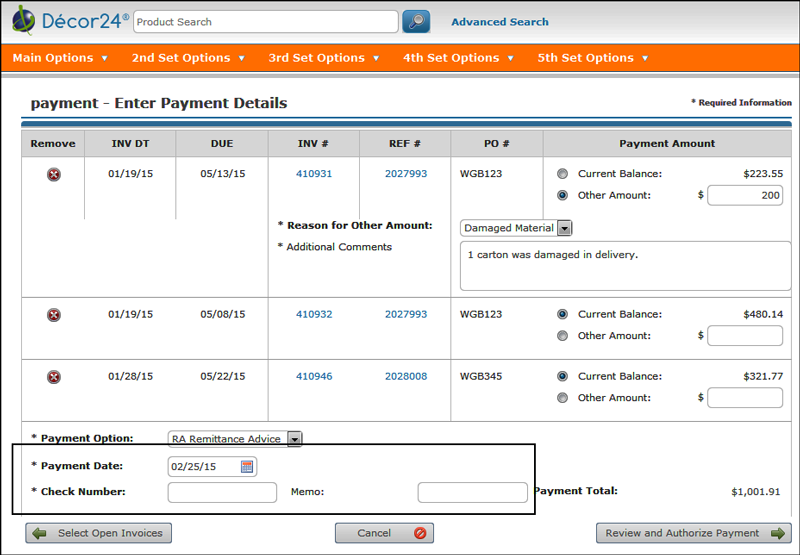
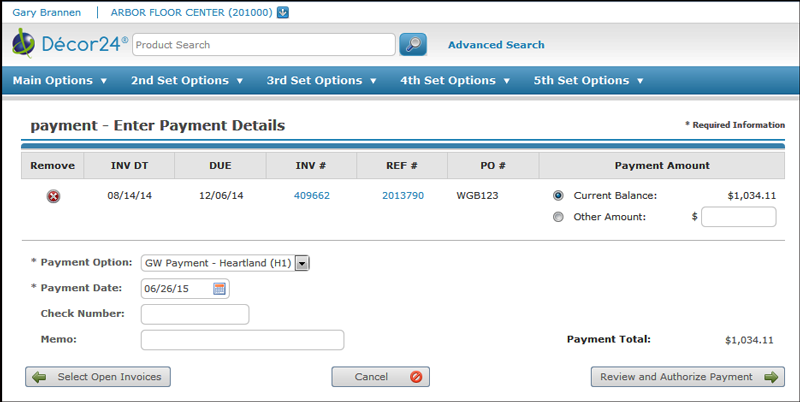
3. Select the invoice(s) to pay and then click Enter Payment Details at the bottom of the window. The Payment Details window appears.
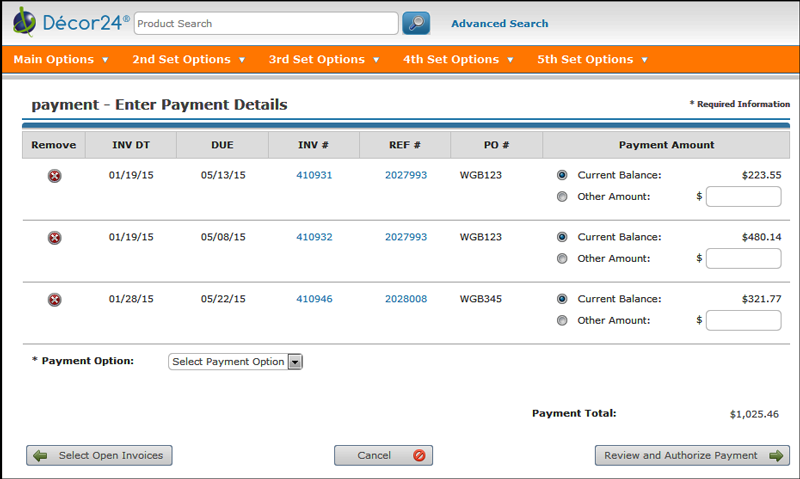
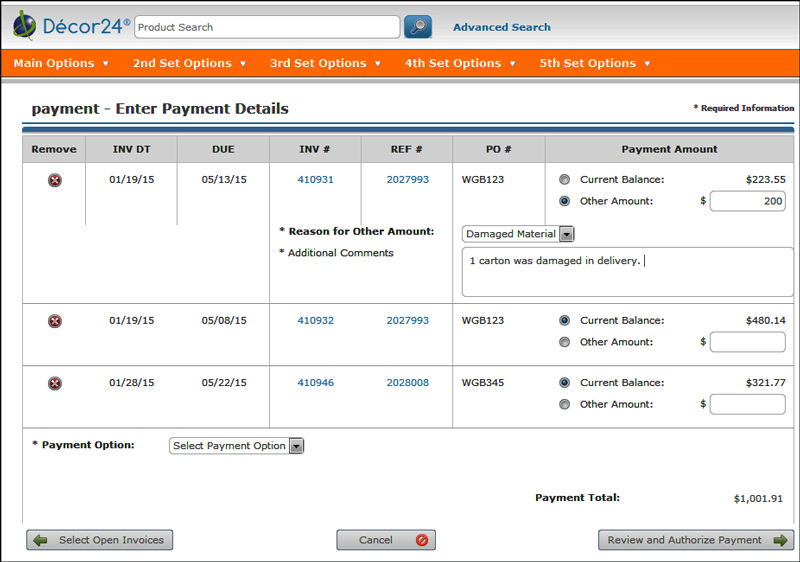
4. You can pay the Current Balance or an Other Amount. In this example, the first invoice is not being paid in full. When this happens, depending on your payment profile settings, a reason and comment might be mandatory.
5. Select a Payment Option. The payment options are user defined (via menu option PAY 3), but three we recommend are:
Gateway (GW) Payment - This option directs the user to a third party real time online payment application such as PayPal or Heartland. Use this option for electronic payments such as credit and debit cards and/or e-checks.
Note: Refer to Making a Payment through Heartland for an example of this payment method.
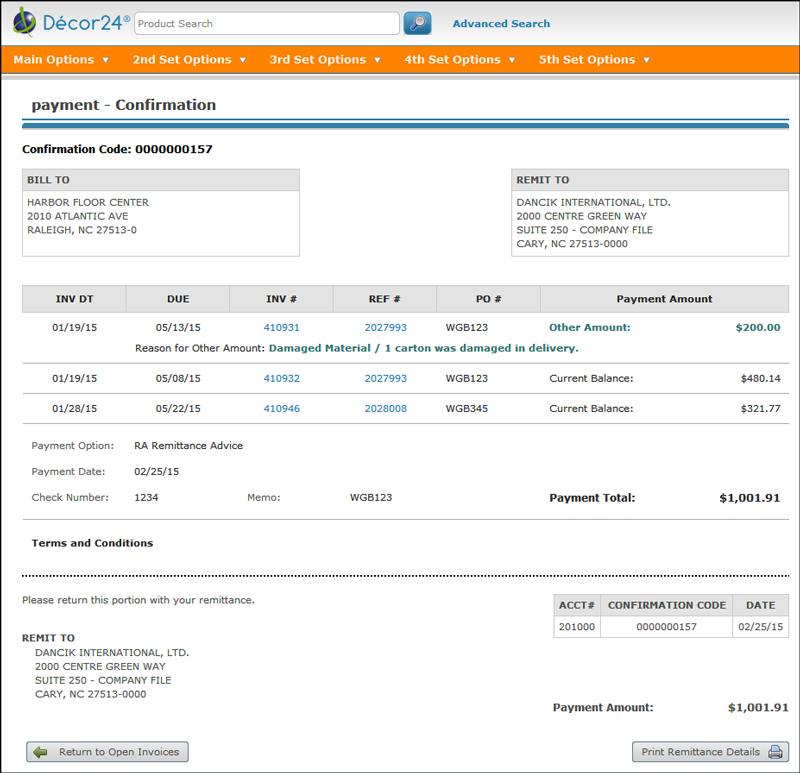
Remittance Advice - This option produces a printed document that can be mailed to the customer along with the payment.
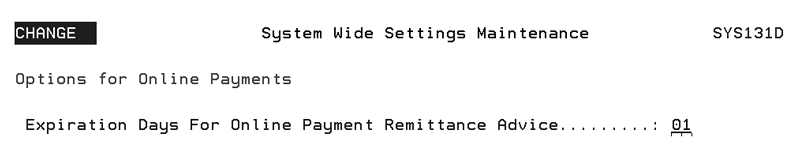
Note: The System Wide Setting - Options for Online Payments allows you to set the number of days until a Remittance Advice expires. The remittance advice transactions in the AR Payments Tab in Navigator will be removed by night jobs after the expiration days established by this setting are passed. A zero or blank value denotes no expiration.
|
When the Remittance Advice Transaction is removed from the AR Payments Tab, the invoice will be eligible for selection via D24 Pay Invoices features if it has an Open balance in AR.
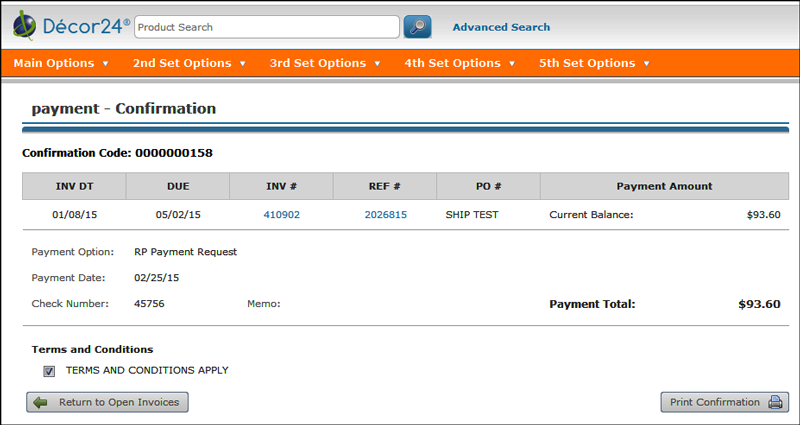
Payment Request - This option allows for a payment to be applied against the bank account on file for the customer. Keep in mind that payment accounts are stored and maintained outside of Décor 24. Décor 24 does not collect or store sensitive financial information such credit card, debit card or bank account information.
6. When a payment option is selected, some other fields appear.
|
7. Enter the necessary information.
Note: These fields are made mandatory via the Payment Option Maintenance application accessed via menu option PAY 3.
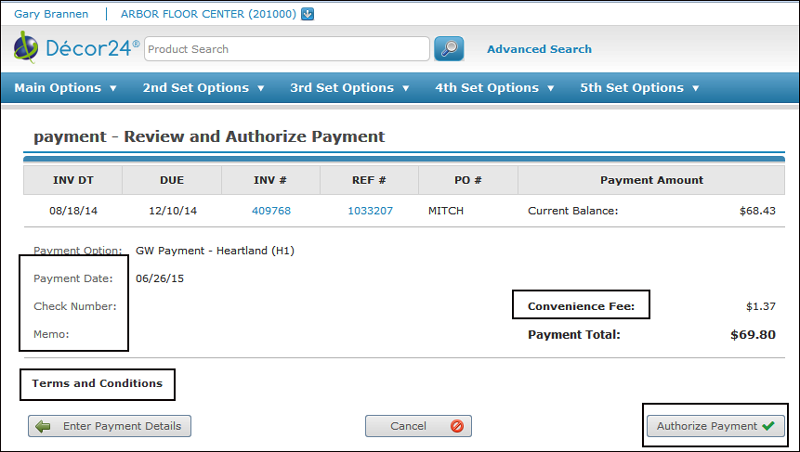
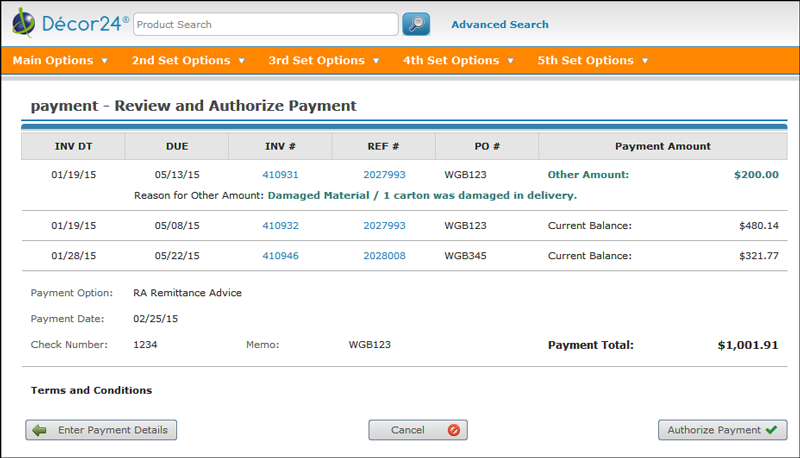
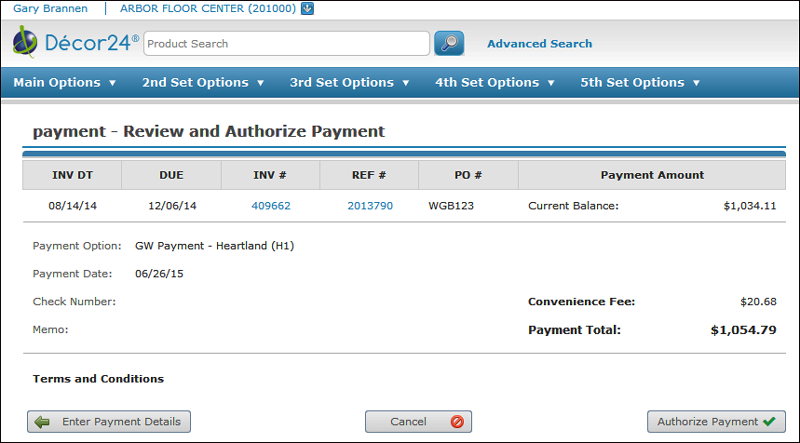
8. Click Review and Authorize Payment to access the following window.
|
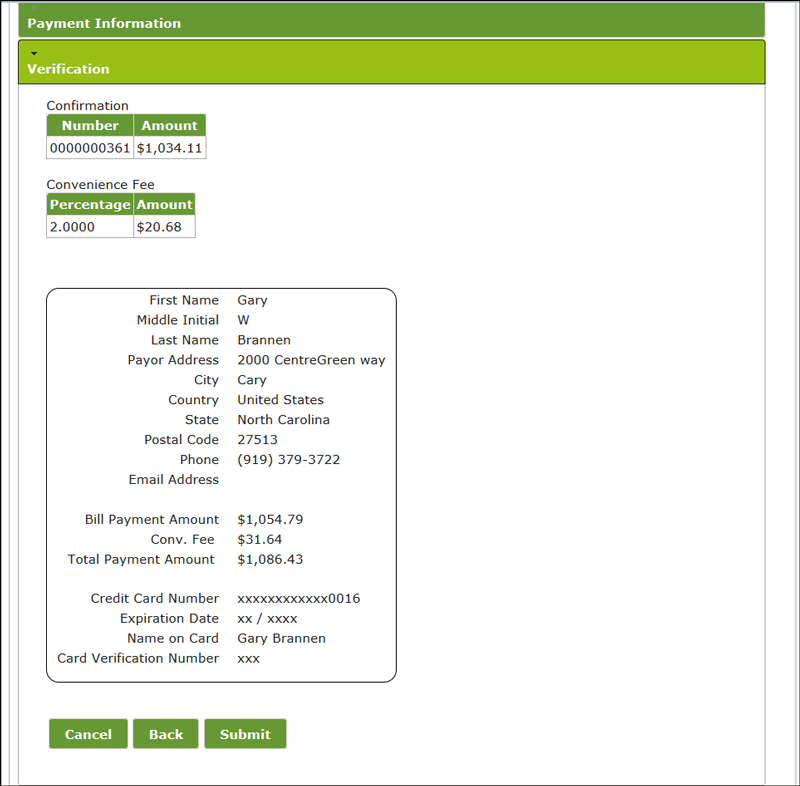
9. Review the payment details and if they look good, click Authorize Payment.
If Remittance Advice was used as the Payment Option, a payment confirmation screen appears. Click Print Remittance Details in the lower right hand corner to produce a printed or PDF copy to send to the customer.
|
If Payment Request is used as the Payment Option the Payment Confirmation window serves as a notice to the billing department to charge the account on file.
|
10. After the payment has been authorized, the invoices are no longer available on the Open Invoices window.
Making a Payment through Heartland
Heartland is a third party real time online payment application that Dancik teamed up with to allow electronic payments such as credit and debit cards and/or e-checks.
1. In this example, the Open Invoices are accessed under the Main Options. However, it can be located under any of the other tabs depending on where the link ../de6210h.html/main was entered in the Décor 24 menu options D24 12-16.
|
A listing of all the open invoices appears.
|
Note: Invoices that are in process, already paid or are just waiting to clear are not included in the open invoices listing.
Note: Keep in mind that almost all the titles, labels and buttons on the Decor 24 windows can be customized to meet your business terminology. The text on the Open Invoices window shown above can be changed via the Open Invoices: Headings section on screen v2 Screen 6 of the Presentation settings (menu option D24 3).
2. Click the Pay Invoices button in the upper right hand corner.
3. Select the invoice(s) you want to pay and then click Enter Payment Details.
4. The Enter Payment Details window appears. You can pay the Current Balance or an Other Amount.
5. Select a Payment Option. Today’s date is automatically inserted into the Payment Date field.
|
6. Click Review and Authorize Payment and take a look at the payment details.
|
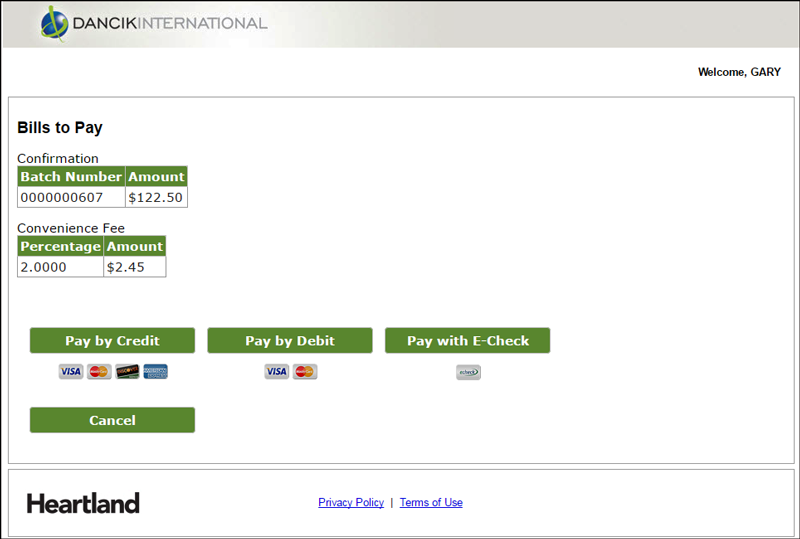
7. If it looks ok to proceed, click Authorize Payment. This is where the Heartland pay portal is accessed.
|
Notice that only credit cards are the available payment method. These payment options are selected in menu option PAY 4 - Payment Inst Profile Maintenance.
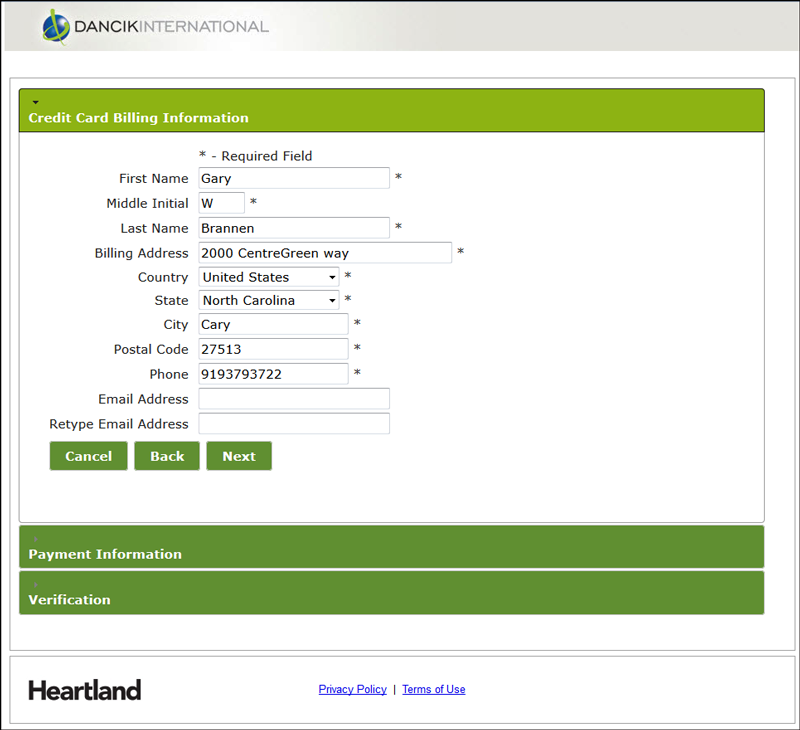
8. Click Pay by Credit and enter the Billing Information.
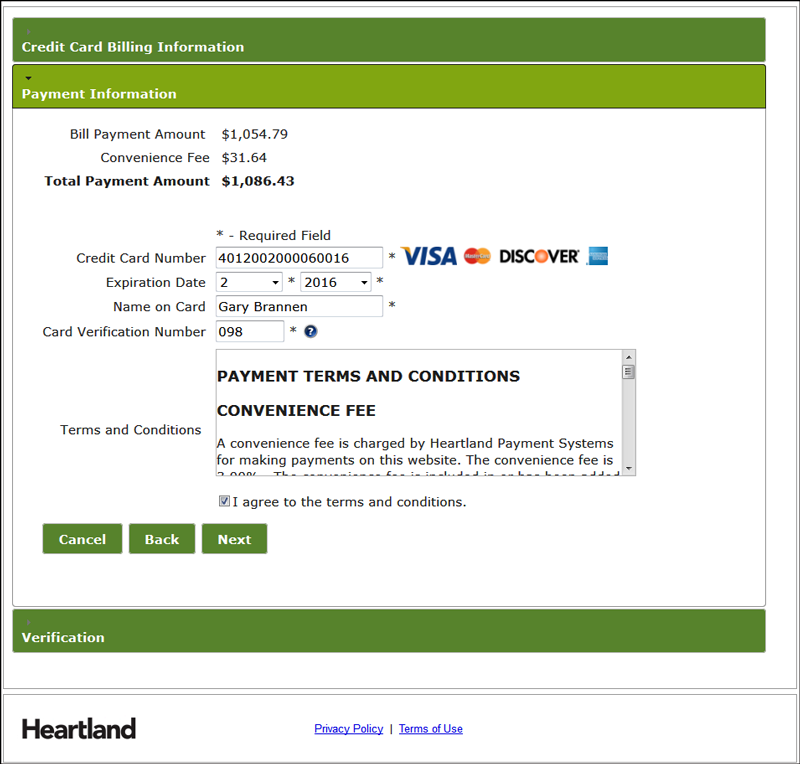
|
9. Click Next and enter the Payment Information.
|
10. Click Next to verify the payment.
|
11. Click Submit to process the payment.
Accounting for the Online Payments
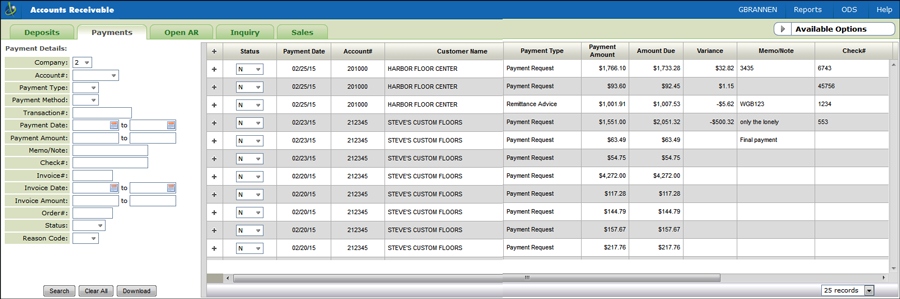
All payment information is passed from the paying application to Navigator AR where it is “staged” for efficient review and posting to Accounts Receivable.
A “Payments” tab has been added to the Navigator Accounts Receivable application that shows all the payments made online.
|
You can use the filters on the left hand side of the window to show only specific payments. For example, the Status filter can be used to show only Processed payments.
Note: A “C” status allows invoices to be selected again in Decor 24 on-line payment.
This window is mostly informational that shows the AR department payments that have been submitted by your customers.
However, the Status of a payment can be changed. This change is reflected in the Transaction History window.
Note: Click the Download button at the bottom of the filters to create a CSV spreadsheet of the payments. Click the View Report tab at the bottom of the results to produce a summarized PDF of the online payment transactions. The contents of both the Download and View Report options are dependent on the filters selected.
Navigator Menu
Access to the AR Payment tab can be accessed at:
— The global level via menu option NAV 1 - Work with Global App Defaults (path: NAV 1>Option “A” for Accounting> “Y” for option Allow User to Access Payments Tab in A/R).
— The Authority Class level via menu option NAV 2 (path: NAV 2> “W” for an Authority Class > Option “A” for Accounting> “Y” for option Allow User to Access Payments Tab in A/R).
— The User level via menu option NAV 5 (path NAV 5> “W” for a user> Option “A” for Accounting> “Y” for option Allow User to Access Payments Tab in A/R).
Navigator AR Pmts Tab Status Code - ACT 122
The status codes used on the Payments tab are created and maintained the Online Payment Status Codes screen accessed via menu option ACT 122.