Need more info or you couldn't find what you were looking for, let us know by sending an email to: support@dancik.com.
Multi Unit Functionality
Several features are included in the system to facilitate the needs of our customers who service large commercial business on multi-unit commercial and residential properties.
Multi-Unit Installation Scheduler
Multi-Unit Vendor and Supplier Files
Multi_Unit_Functionality_in_Decor_24
Order Management for Multi-Units
Order Management has been enhanced to include functionality for multi-unit business. This functionality incorporates existing standard orders already built for an account to enable quick easy order entry in Navigator.
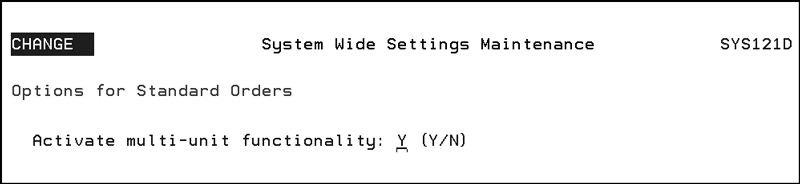
System Wide Setting (SET 4) - Options for Standard Order
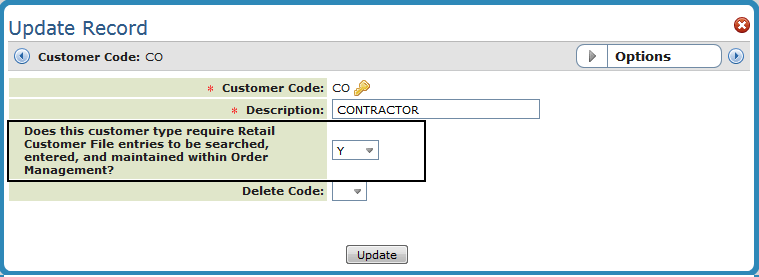
Classification Codes File - Customer Type
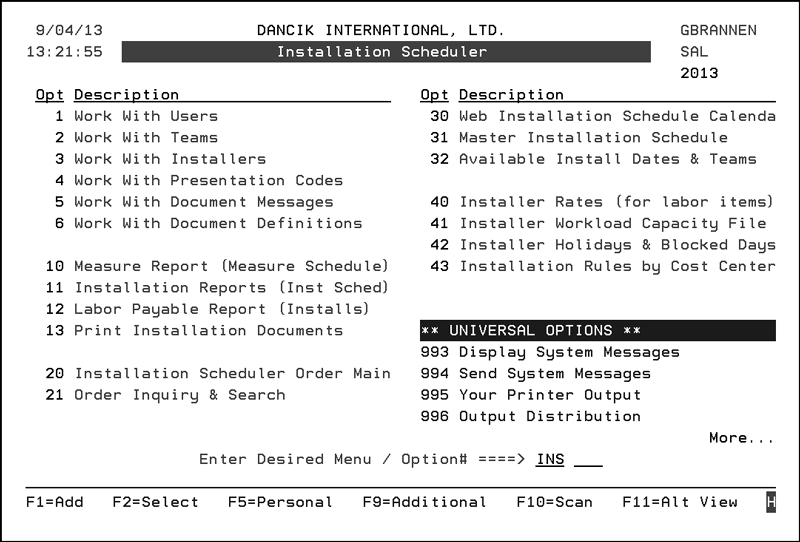
Installation Scheduler Menu_ (menu option INS)
System Wide Setting (SET 4) - Options for Standard Order
This system wide setting activates the multi-unit functionality within Order Management.
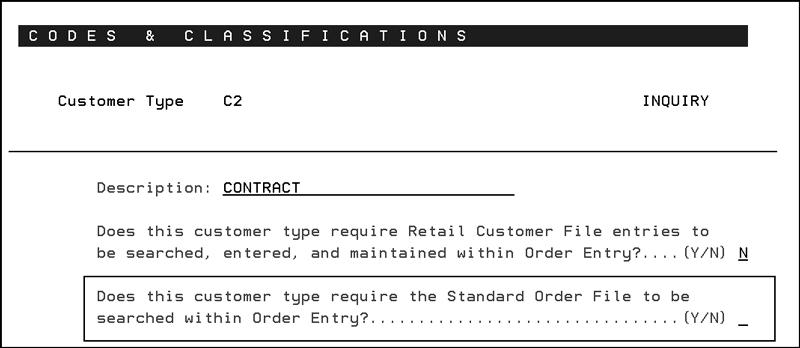
Classification Codes File - Customer Type
The option Does this customer type require Retail Customer File entries to be searched, entered, and maintained within Order Management allows you to narrow the multi-unit functionality to only those accounts that you have Standard Orders created for.
Note: The System Wide Setting - Options for Standard Order activates the Multi-Unit functionality system wide. The Customer Type option allows you to filter the Multi-Unit functionality by account.
Navigator Set-up
Follow this path to get to the new option: File Management>Customer Type>Update or Add a record.
Green Screen Set-up (FIL 19)
Follow this path to get to the new option: Menu Option FIL 19>Category Type CT>Customer Code>F2.
A Standard Order is a model or template of an order which can be copied into a real order to save time when entering repetitive orders. Standard orders can be completely generic, or related to a specific customer account or chain. Standard orders can be created “from scratch” or by copying actual orders.
The Standard Order File contains as many standard (model) orders as needed, per customer account or chain, and as many “generic” standard orders as needed. Generic standard orders are entered under account number 000000, and can be selected by any customer.
Installation Scheduler Menu (menu option INS)
The installation scheduler is an application to manage your measurements and installation jobs. Use it to build your database of installation teams and installers.
1. Within Navigator Order Management, start a new Customer Order.
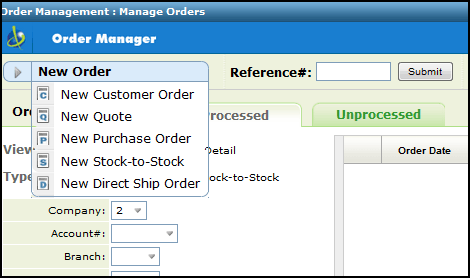
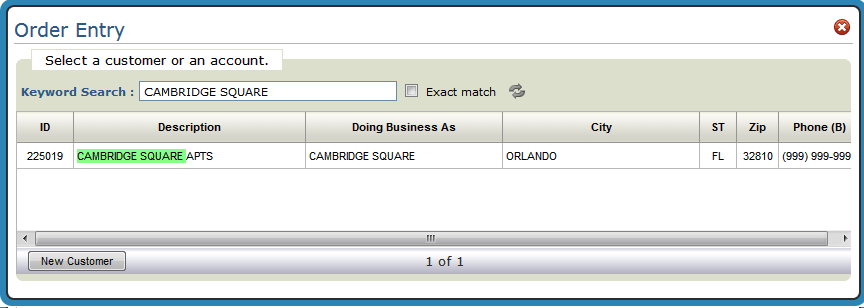
2. Next, select an account to work with.
Notes for setting up accounts in a Multi-Unit environment:
— Create separate accounts for individual properties.
— Accounts can also be set-up at the management company level.
— Accounts can be linked together for reporting purposes by the chain code assigned in the Billto File.
3. If you have the Multi-Unit functionality activated, the Multi-Unit Order Entry window appears.
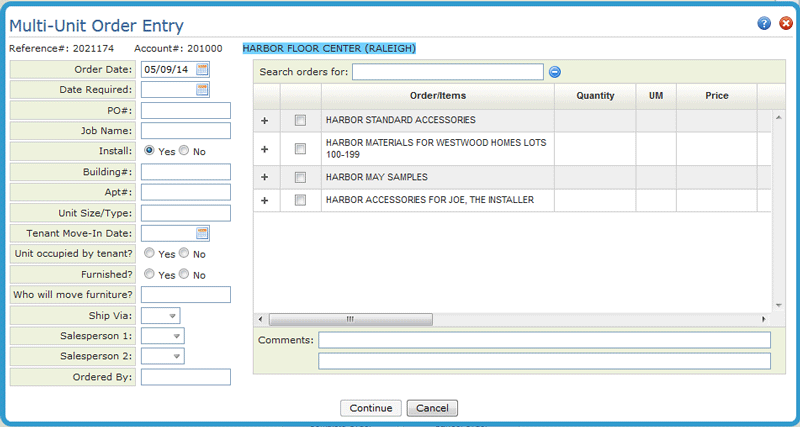
4. Notice the Standard Orders already available for this customer.
Note: The sequence of the orders can be changed via the Seq setting in the Standard Order File.
Click the “+” sign next to an order to expand it to see the items included with it.

Note: The Comments come from the header comments in the standard order file. If multiple standard orders are selected, the Comments fields are grayed out.
5. Select one of the available standard orders and then click Continue.
The Multi Line Entry window appears.
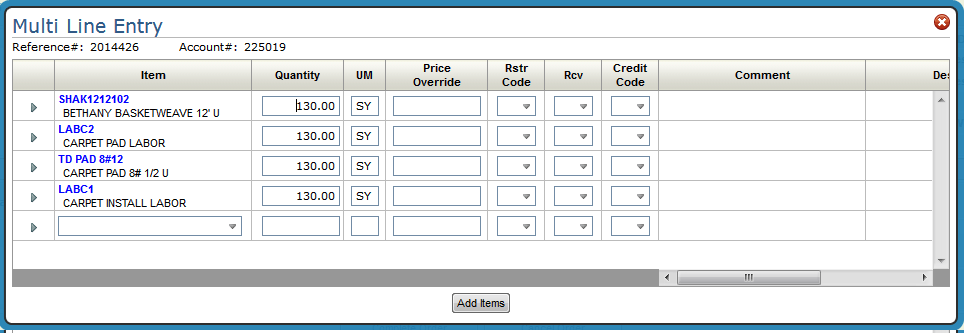
The Multi Line Entry window enables you to enter multiple item numbers at once and create order line items simultaneously.
6. Click Add Items. The system uses ISO to check and select stock, and display all items and their availability.
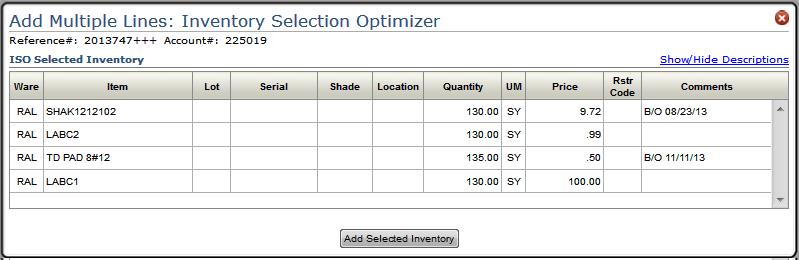
7. Click Add Selected Inventory to create order lines for all the items.
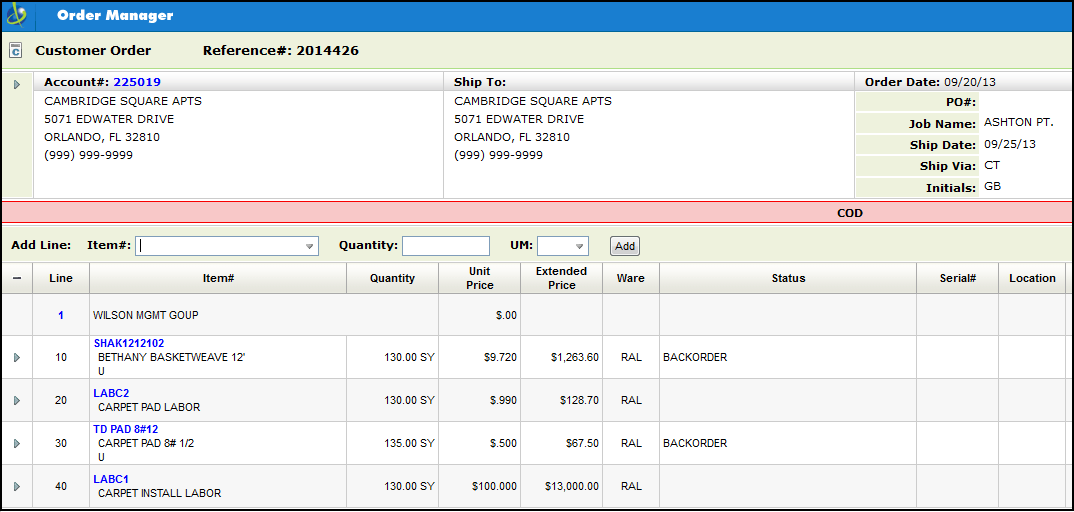
8. From this point, continue through the normal order entry process to place an order for the items.
Multi-Unit Installation Scheduler
The Installation Scheduler has been integrated into Navigator. At the current time, this new Installation Scheduler functionality directly supports multi-unit customer needs.
Using the Installation Scheduler
System Wide Setting - Options for Installation/Measurement Settings
System Wide Setting - Options for Installation / Measurement Settings
This is a series of settings that control the activation and use of the Installation Scheduler module, for companies that either schedule or perform on site measurement and/or installation services. The Installation Scheduler provides access to installation information. Daily work schedules can be reviewed and updated.
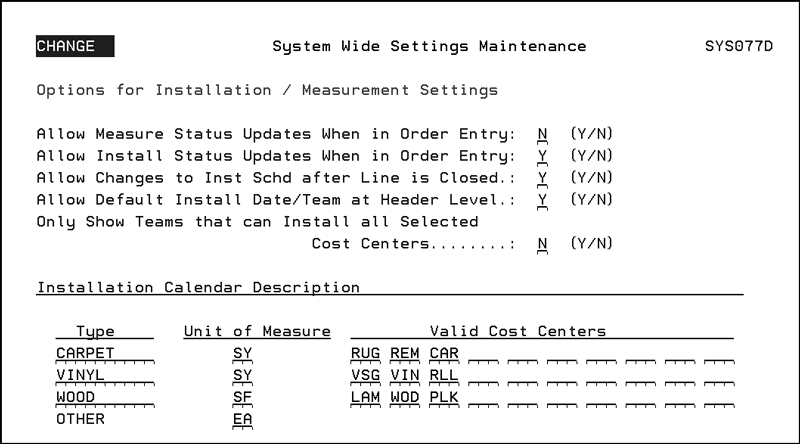
If an option is set to N, it will not display within the Scheduler/Status feature during order entry.
Setting the option Allow Changes to Installation Scheduler after Line is Closed to N prevents any installation or measurement updates or changes to a closed (invoiced) line via the Installation Scheduler.
The Installation Calendar Descriptions at the bottom of the screen allow you to assign titles and UMs for up to 4 product types.
The Valid Cost Centers are where Installation Scheduler pulls the information shown on the Day. Week and Month tabs.
Use this green screen menu to set-up the Installation Scheduler.
Using the Installation Scheduler
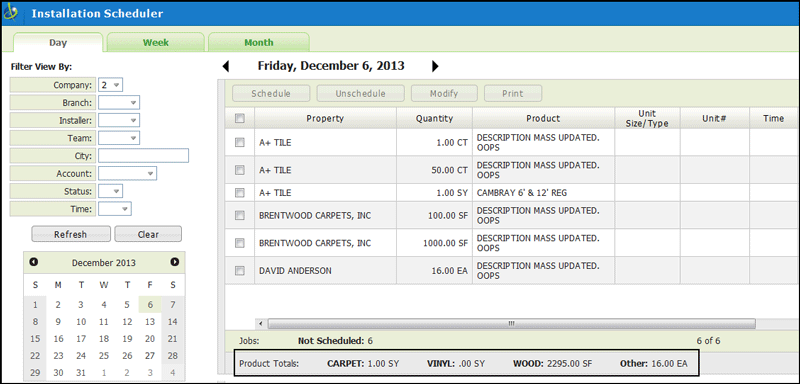
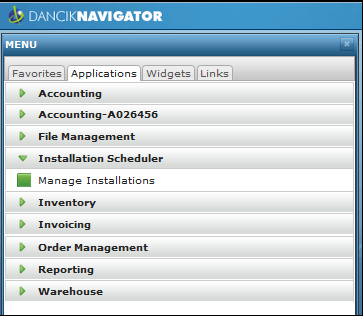
1. Select Installation Scheduler from the list of Navigator Applications.
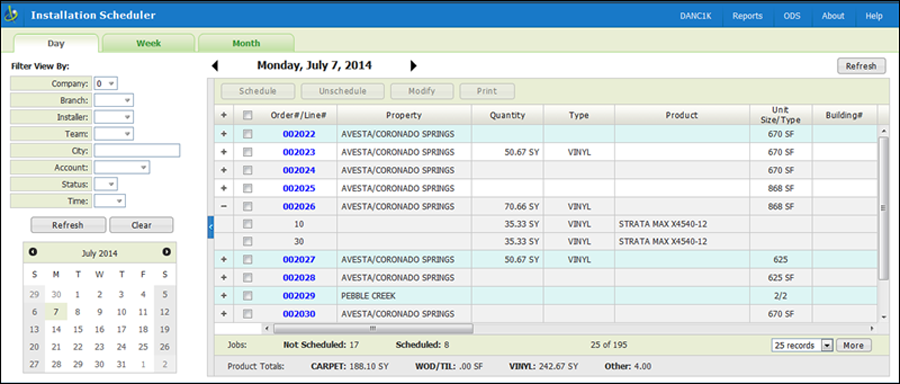
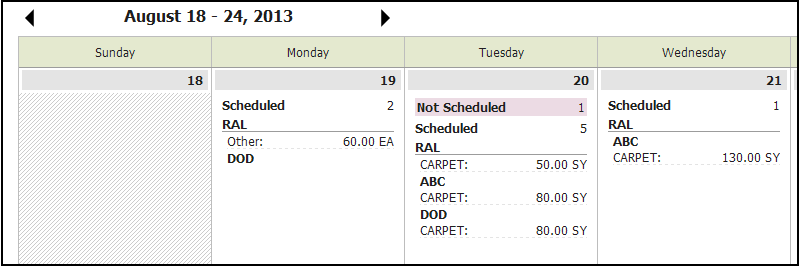
2. You can view your installations by the day, week, or month. The Day tab is the first tab displayed and is where you schedule the day’s installations.
Notes
The order is all on one line, click the “+” icon to expand the order to show its details.
If an order line is all for one product and in the same unit of measure, the line will show the total for the order line.
If an order line is highlighted in:
Blue – the total order is scheduled for installation
Yellow - indicates the order is partially scheduled for installation.
The orders shown have been identified for installation on the order header.
The order’s ship date determines what date it appears on the installation scheduler. For example, the orders shown above have a ship date of September 4.
Orders that are shaded have already been scheduled for installation.
To access the order in an inquiry mode, click the order’s link under the Order# /Line# column.
Unscheduled jobs are jobs that had been scheduled and someone went in and removed from schedule or “Unscheduled”. As opposed to Not Scheduled jobs which have never been scheduled.
3. Select the order(s) you want to schedule. If an order is already scheduled, the Schedule button becomes inactive.
Note: If you select a combination of scheduled and unscheduled orders, all the action buttons (Schedule, Unschedule, Modify and Print) are inactive.
4. Select the orders you want to schedule for installation and click Schedule. The Schedule Installations window appears.
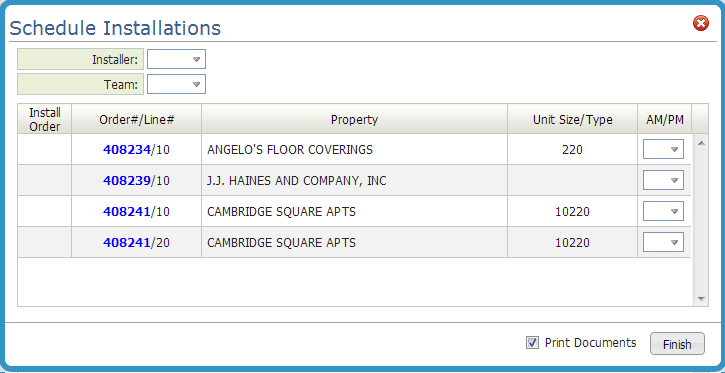
5. Select a Installer and a Team. If the Installer/Team combination already has installations scheduled, those installations are given scheduling priority and appear at the top of the list.
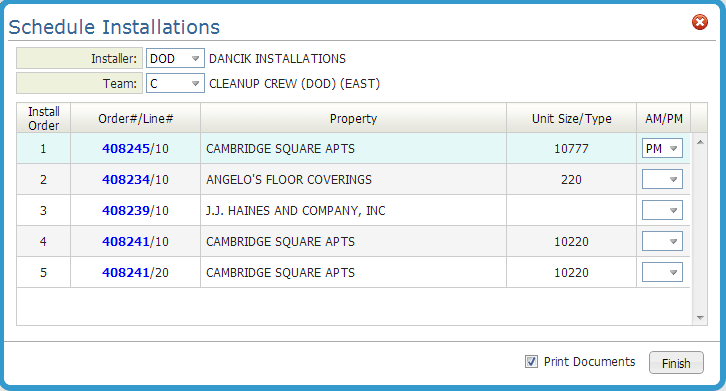
Note: The order listing can be resequenced by dragging and dropping the orders as needed.
6. Click Finish. If you have the Print Documents option activated, you are presented with the four available reports.
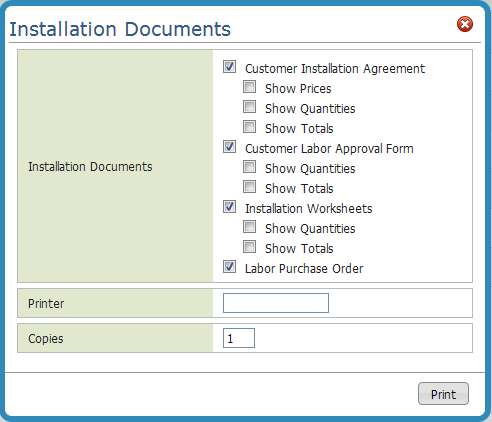
Customer Installation Agreement - Provides a preliminary agreement form that can be discussed and agreed upon with the customer.
Customer Labor Approval Form - Provides an approval form for the customer to sign.
Installation Worksheet - Provides a copy of the materials being installed and the quantity needed.
Labor Purchase Order - Produces a purchase order for the labor charges and shows which Installation Team is responsible for each line. A summary of labor dollars for each installation team is included.
7. Enter the Printer and number of Copies.
Click on the Week or Month tab to see the installations scheduled for that time frame.
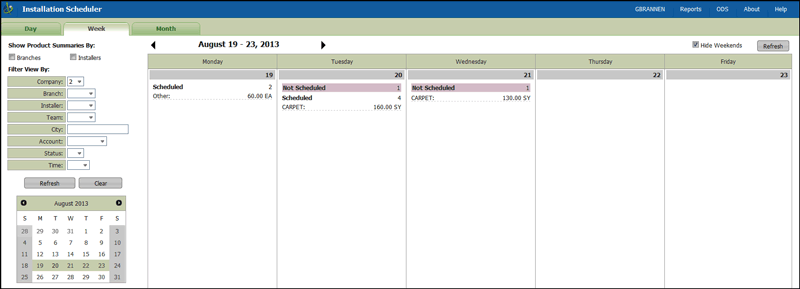
These views provide a quick glance into the Scheduled and Unscheduled orders and the totals installed for products (i.e. carpet or tile).
Note: To get a more detailed view of the orders, click on the date. This brings up the Day tab.
Both the Week and Month views have the Show Product Summaries By: Branches and Installers options. Activate these options to display the total products installed broken down by branch and/or installers.
Multi-Unit Vendor and Supplier Files
Settings in the Navigator Supplier and Vendor Files allow you to establish a retainage amount for installers. These settings define defaults used when systematic retainage is calculated. Retainage represents a percentage withheld from labor payable. The retained amount is documented and stored for individual vendor / supplier.
Associated Files
This functionality has to be activated via the System Wide Setting - Options for Accounts Payable.
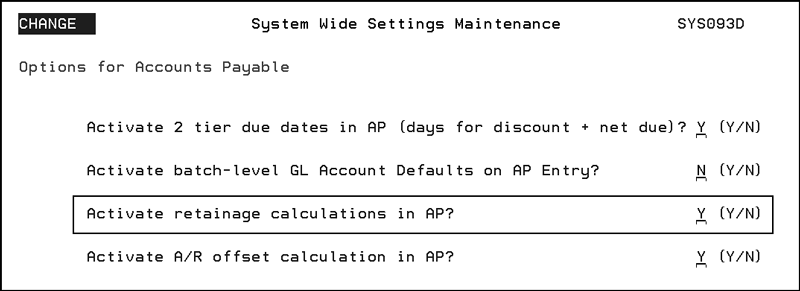
If the setting Activate retainage calculations in AP is activated and retainage defaults are defined in either the Supplier or Vendor files retainage is calculated during labor payable voucher creation. The system creates two vouchers; one is for what is due the installer and the second is for the retainage percentage. This setting also controls if the option for voucher creation is active within the labor payable report.
Setting up Retainage in the Navigator Vendor and Supplier Files
1. Access either the Vendor or Supplier File.
2. Create a new record or update an existing one to access the Create Record or Update Record window.
3. Scroll down to display the Installers Retainage Terms fields.
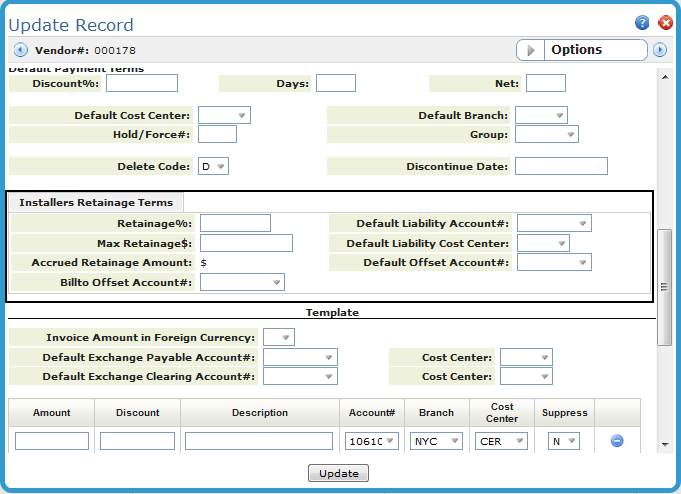
The following table describes the Installers Retainage Terms
Retainage% |
The percentage to withhold from the installer's payment. |
Max Retainage$ |
The cumulative amount that can be withheld from the installer's payments. |
Accrued Retainage Amount |
Cumulative retainage amount withheld to date. |
Billto Offset Account# |
AR account used during the calculation of credit payable when labor payable report is loaded into AP entry. Credit amounts are determined by open receivables within this account. |
Default Liability Account# |
Liability account used by retainage calculations. This account number overrides system default liability account. If no entry is made the default G/L accounts payable account number entered in the Company File is used. |
Default Liability Cost Center |
You can allocate the expense to a specific three-character cost center number or code, or to no cost center by leaving the field blank. This cost center overrides system default cost center. |
Default Offset Account# |
Account used by credit payable voucher calculations. This account number overrides system default liability account. |
Multi Unit Functionality in Decor 24
Several features are included in Décor 24 to facilitate the needs of our customers who service large commercial business on multi-unit commercial and residential properties.
This functionality incorporates existing standard orders already built for an account to enable quick easy order entry.
A Standard Order is a model or template of an order which can be copied into a real order to save time when entering repetitive orders. Standard orders can be completely generic, or related to a specific customer account or chain. Standard orders can be created “from scratch” or by copying actual orders.
The Standard Order File contains as many standard (model) orders as needed, per customer account or chain, and as many “generic” standard orders as needed. Generic standard orders are entered under account number 000000, and can be selected by any customer.
Multi-Unit functionality uses the orders created in the Standard Order File.
The Multi-Unit functionality has to be activated at either the global (D24 1) or user level (D24 2). The setting Allow access to Multi Unit on screen 7 of both the global and user settings.
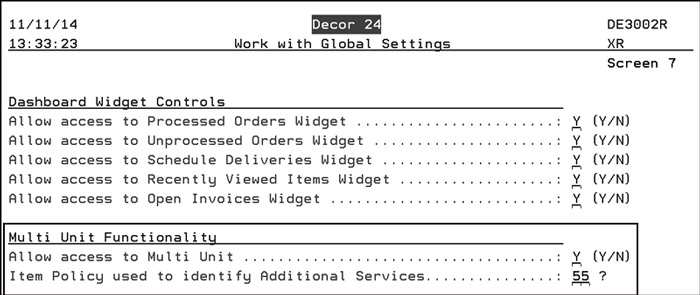
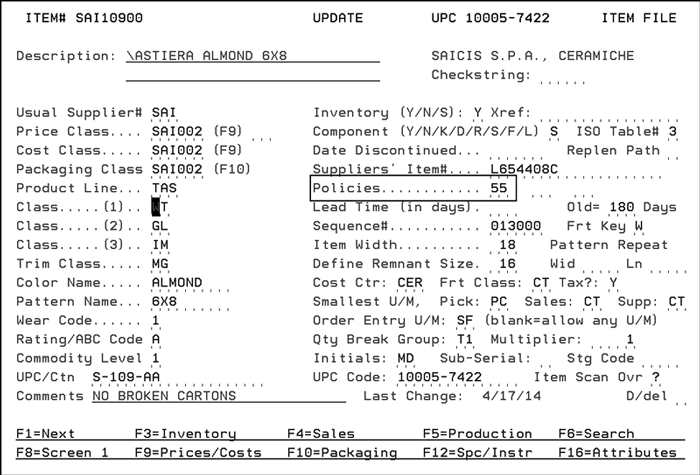
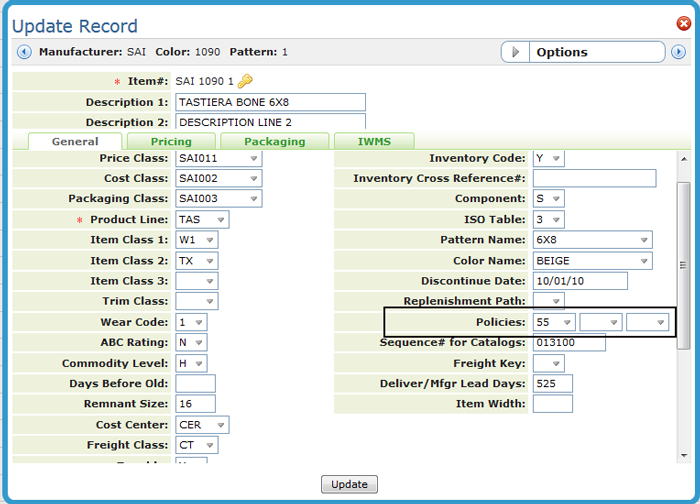
The setting Item Policy used to identify Additional Services allows you to identify additional services or charges to the multi-unit order. The Item Policy code “55” was created specially to add items to Décor 24 orders.
Item Policy codes are assigned to items via the Item File.
Green Screen Item File
Navigator Item File
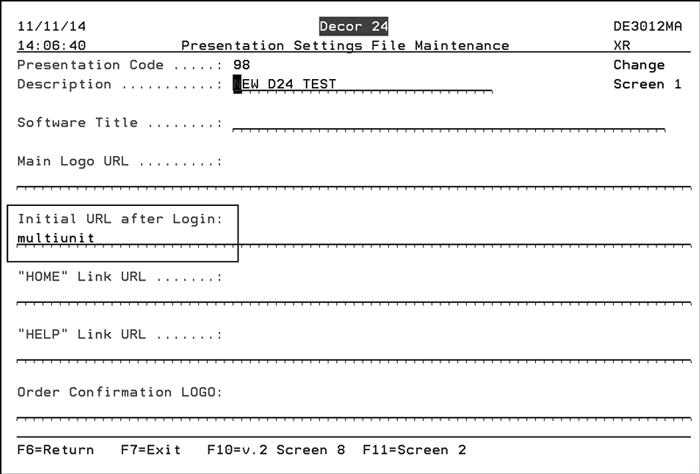
The new URL multiunit can be entered for the setting Initial URL after Login on the first screen of the Presentation Settings (D24 3). This ensures that the standard orders set up for the customer will appear right after the user logs into Décor 24.
1. Access Décor 24 and begin an order.
2. If your presentation setting is set up to show the multi-unit order window upon login, the first window you will see is the standard orders created for this account.

Note: All the Header and Detail line comments are displayed on the order. If more than one standard order is selected, the first order's header comments are assigned to line numbers 8 and 9. The numbering of the next order's header comments is based on the amount of detail lines on the first order. For example, if the first standard order contained two lines then the second standard orders header comments begin on line 28 and 29 of the order.
If more than one standard order is selected
3. Select an order(s) and click Load to Order Entry. If any items have been flagged with Item Policy 55 they will appear next on the Additional Services window.

4. Select any applicable services/charges to add to the order.
5. Click Continue to proceed to the first screen of the checkout process.
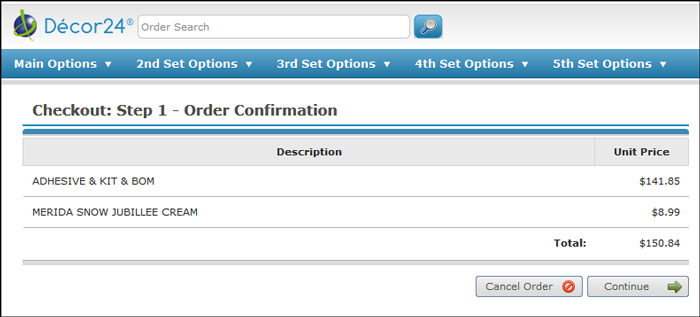
6. Review the order and if it is ok click Continue.
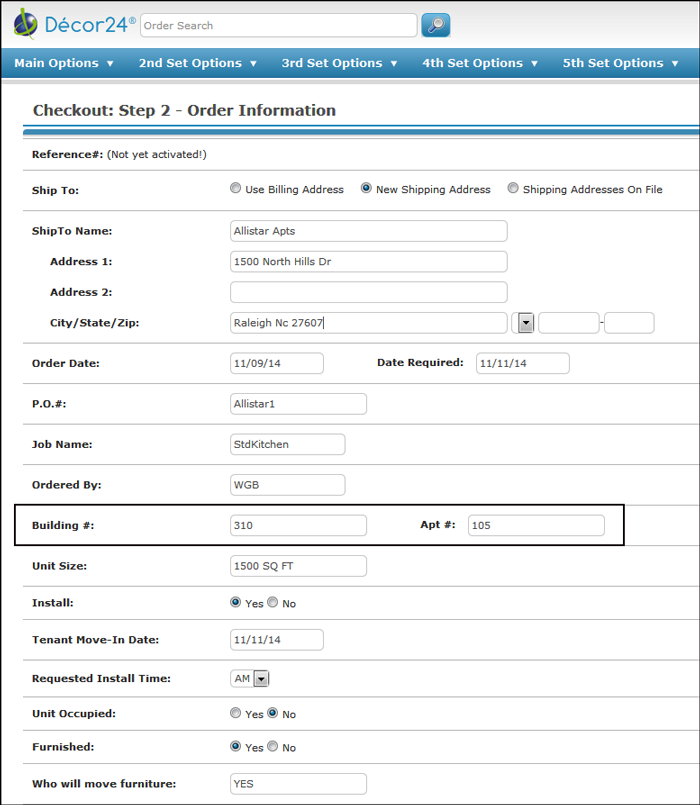
7. Screen 2 of the checkout process is where you enter additional information about the order such as the PO number and the shipping address.
Notice that the window has been updated to include fields related to multi-unit order entry.
8. Click Continue to proceed to step 3 of the checkout process. The multi-unit information is displayed in the middle of the window.
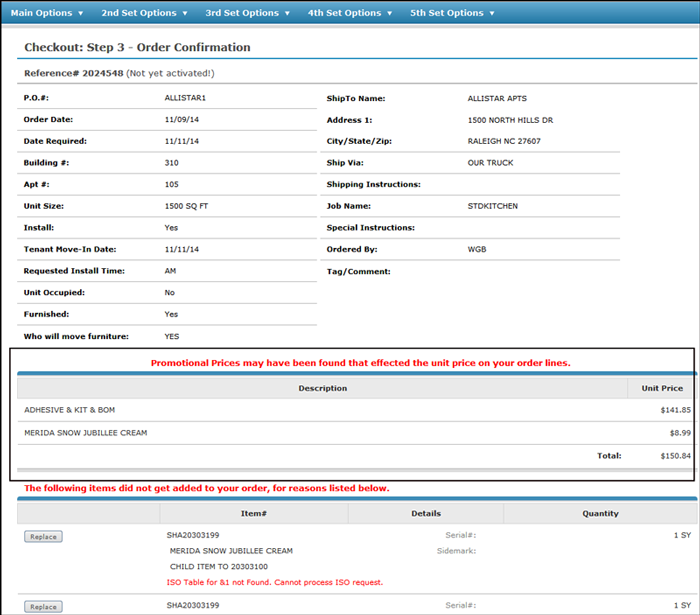
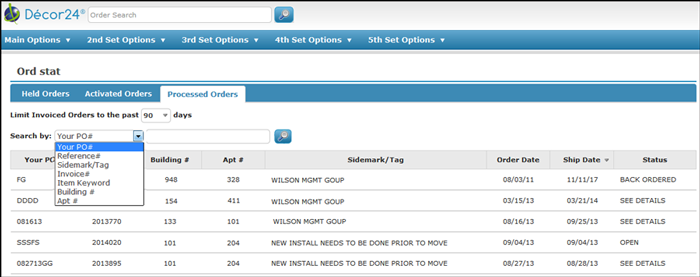
If Multi-Unit functionality has been activated, when order statuses are checked for the multi-unit information such as building and apartment number displays.
Note: The Multi-unit information only displays for processed orders.
Building# and Apt# can be used as Search By parameters.