Need more info or you couldn't find what you were looking for, let us know by sending an email to: support@dancik.com.
Warehouse Shipping Reports - WAR 8
This option provides a series of reports used to manage the loading and shipping of your orders. The reports may be printed for any selected date range and a number of other selection and sort parameters. Although these reports are primarily designed for optimizing deliveries and loading trucks, they may also be used in any warehouse environment to help measure and organize the work load. Selection criteria for reports can be set up on the Reports Default Maintenance Screen to enable the user to customize each report. Defaults are unique for each report type and warehouse for customer shipments, and report type and from/to warehouse combinations for transfers.
Note: For information on the F5 function, refer to Shipping Document History. For more information on the F9 function, refer to Warehouse Shipping Reports Defaults.
Sending Load Sheet information to ROADNET
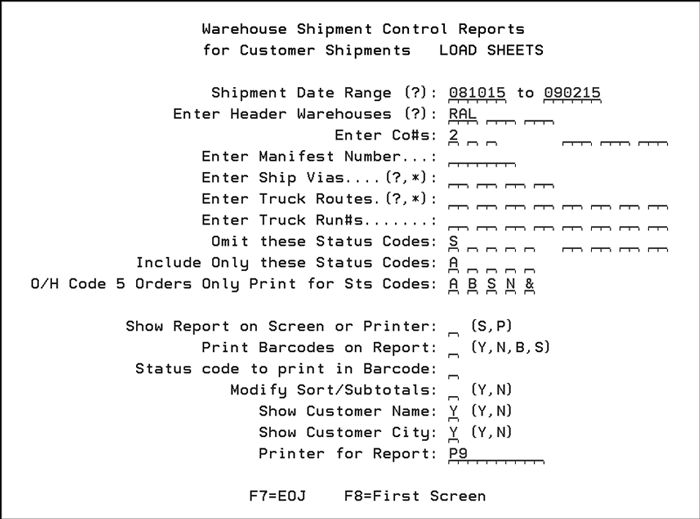
This is used to list the items which are ready to be loaded or shipped. This report can include the items for any combination of up to eight Ship Vias and eight Truck Routes. You may also select to include up to five status codes or omit up to five status codes. You can display this report on the screen prior to or instead of printing. You also have the option to include bar codes which are used to update the status of the order line when loaded or shipped. For example, the report can contain a bar code for each item to be loaded which contains the order number, line number, and the status code of your choice. Shipping personnel can then quickly scan the report once the items are loaded thereby updating each loaded line to the status as bar coded on the report. You may only print bar codes on the load sheet if you print them on an IPDS printer. We recommend using any of the small IBM laser printers.
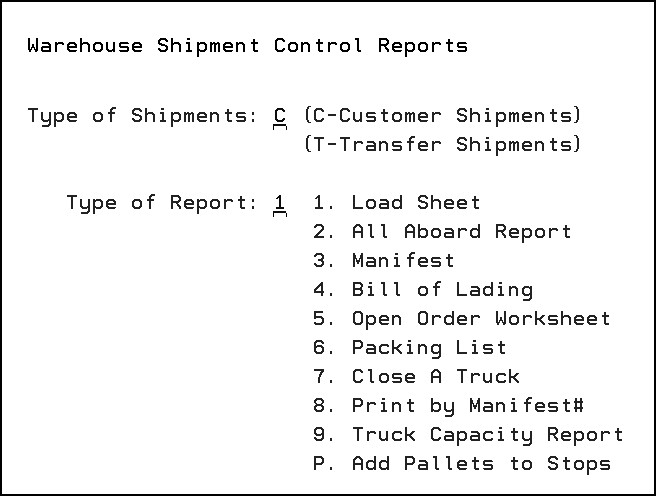
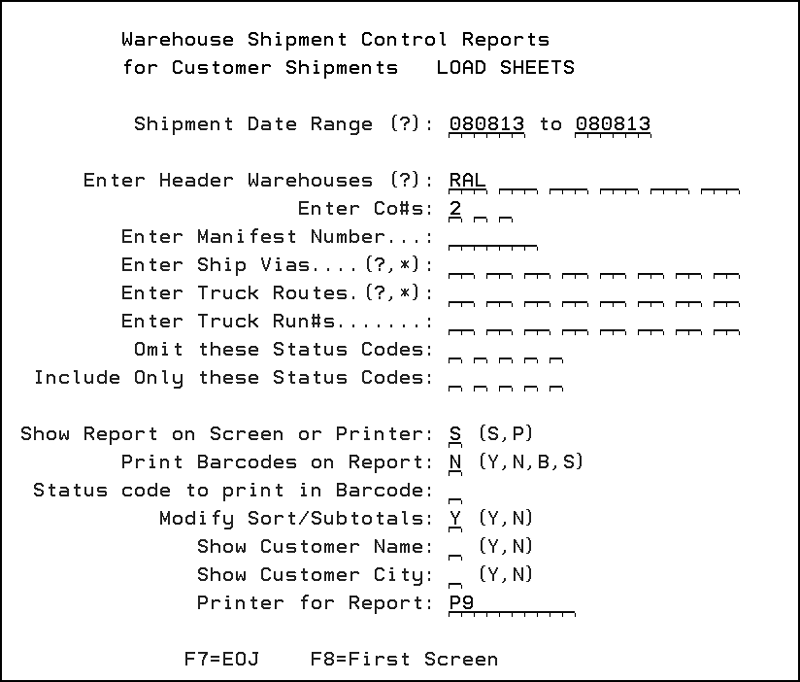
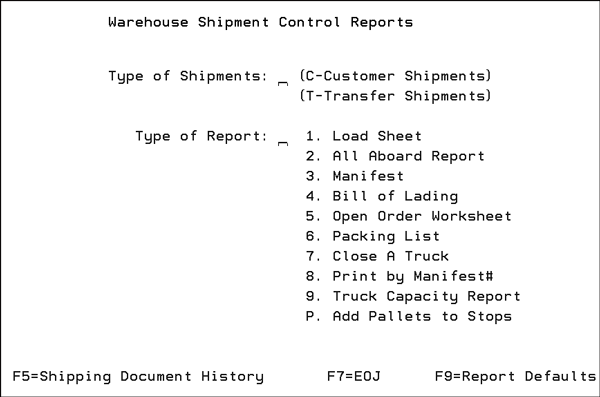
1. Select for Load Sheet, and choose Customer Shipments or Transfer Shipments. The following screen appears.
Field Name |
Description/Instructions |
Shipment Date Range |
The range of ship dates to include on the report. These relate to the ship dates on the orders. A date in this field is required. |
Enter Header Warehouses |
Enter the warehouses here you wish to include on the report. The header warehouse is the shipping warehouse. |
Enter Co#s |
Enter the companies to include on the report. Leave this field blank if you are selecting warehouses. |
Enter Ship Vias |
Enter the ship via codes to include on the report. These codes relate to the ship via codes on the orders. You can insert a question mark (?) in the field to access a list of values. |
Enter Truck Routes |
Enter the truck routes to include on the report. An asterisk (*) indicates any character. For example, C* means all truck routes beginning with the letter C. You can insert a question mark (?) in the field to access a list of truck routes. |
Enter Truck Run#s |
Truck run numbers are used to sub-divide the customers on a truck route. You can schedule alternate ship dates for specific runs within a route, instead of having to reschedule an entire route. In addition, delivery charges can be different for different run numbers within the same route. |
Omit these Status Codes |
Enter status codes to omit from the report. For example, you may want to omit orders already shipped. In that case, enter an S in the field. |
Include Only These Status Codes |
Enter status codes to include on the report. For example, you may want to include items in the staging area. In that case, enter an A in the field. |
O/H Code 5 Orders Only Print for Sts Codes |
This field prevents printing/processing of shipping reports for orders assigned to Order Handling (O/H) code 5 (must ship complete); unless all the lines on the order contain one of the entered status codes. If any line on the order contains a different code, then the entire order is skipped. Note: Orders are assigned an O/H code on the Order Header in Order Entry. |
Show Report on Screen or Printer? |
Enter S for screen or P to indicate print. If you choose to display the screen, F1 is available to print the report from the screen. |
Print Barcodes on Report? |
Load Sheets may be printed with or without bar codes. The bar codes represent the order#, line#, and the status to which the line should be changed. Normally load sheet bar codes are used to scan and update orders to status “S”, which then enables automatic billing by status code.
The B option prints a large bar code that is nearly the width of the page. This bar code is designed to be read by long range scanners. The Y option prints a small bar code that is designed for scanners that are not long-range. |
Status Code to print in Bar Code |
Enter the status code you want placed in the bar code. This is the status code to which the order line will be set when scanned. |
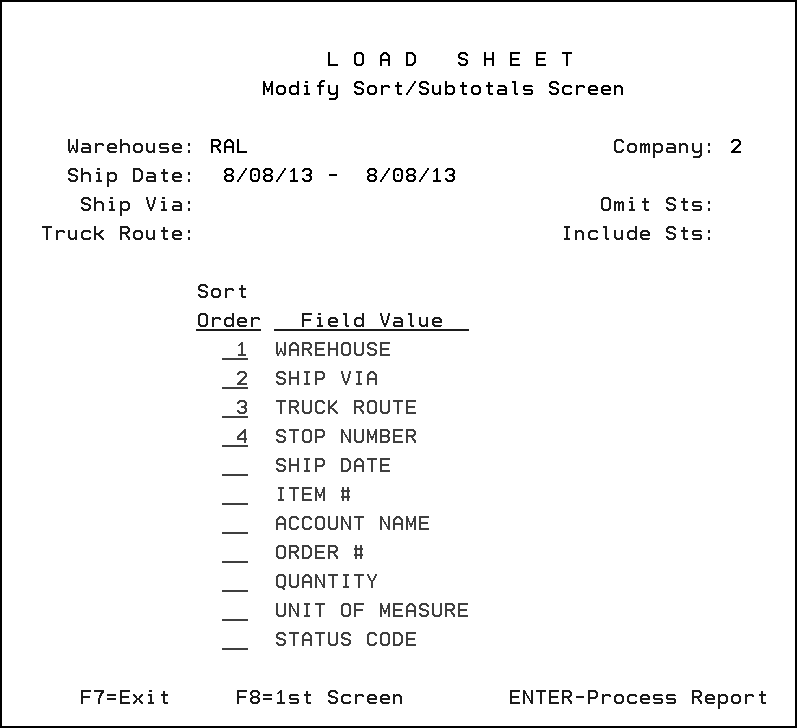
Modify Sort/Subtotals |
Enter Y for yes or N for no. This option allows you to change the sequence in which the orders appear on the report. These can be set in the Report Default File Maintenance. |
Show Customer Name |
Enter Y for yes or N for no. |
Show Customer City |
Enter Y for yes or N for no. |
Output Queue for Report |
Enter a valid output queue or printer ID to which you want the report to print. |
The following figures display two load sheets. Both include the bar code option; the first one uses the small bar codes (option Y in the Print Barcodes On Report field) and the second uses the large bar codes (option B in the Print Barcodes On Report field).
Report 1

Report 2

The following is a screen version of a load sheet, including a warehouse message.
|
Warehouse messages are order messages that are prefixed with W*.
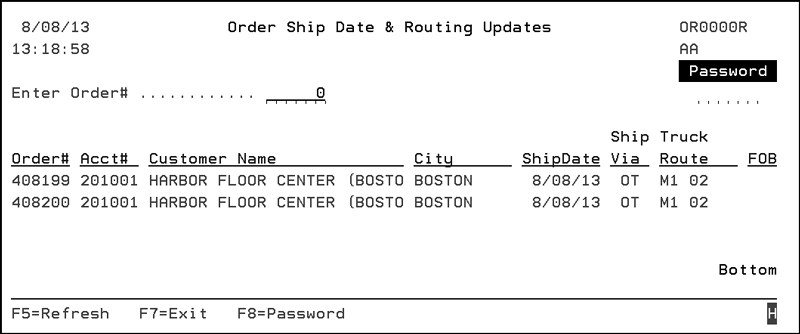
Note: The F9 function passes the order numbers currently on the load sheet screen into the Order Ship Date And Routing This feature allows you to quickly change or assign ship dates, routes, stops, and FOB codes to all orders on a load sheet screen. For example, if you are displaying a load sheet on screen as shown below, press F9 to update those orders.
Load Sheets can display in the following two formats:
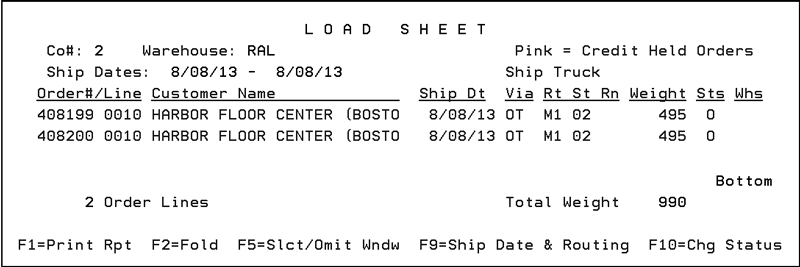
Regular/Complete Load Sheet Format
This format displays all of the details of the printed load sheets except for the bar codes. Press F6 to display the folded (summary) version.
|
Condensed/Folded Load Sheet Format
This version of the load sheet displays a summary of all the lines that would appear. This version enables you to quickly check for lines that are not at the required status. Press F6 to display the detailed version. After displaying Load Sheets and All-Aboard Reports, you can press F1 to immediately print them.
|
Load sheets for inter-warehouse transfers can combine multiple destination warehouses, or multiple incoming warehouses, on a single load sheet. Enter *** (three consecutive asterisks) as the “to” warehouse in order to combine all the “to” warehouses on one load sheet. This can be used to provide a better way to sort the load sheet if a remote warehouse is sending its transfers through a central warehouse, and then on to the destination warehouse. Enter *** (three consecutive asterisks) as the “from” warehouse in order to combine all the “from” warehouses on one load sheet. This function can provide work load assessment for a central or cross docking warehouse.
The following screen shows the entries for a combined transfer load sheet.
|
In the above example, assume the load sheet is being requested from warehouse RAL, which has transfers for branches NYC, PHI, and PIT, and which must all pass through a central warehouse in BAL. In this case, warehouse RAL is getting a combined load sheet for the NYC, PHI, PIT and BAL warehouse transfers. That load sheet may be sorted by warehouse or by other criteria. The load sheet represents all of the goods going to or through BAL.
The BAL warehouse can run a load sheet for *** in the “from” warehouse and BAL in the “to” warehouse to obtain a load sheet for all transfers coming to their warehouse.
The printing style of multi-warehouse load sheets is controlled by the Warehouse Report defaults. Warehouse Report defaults are set using F9 from the main Warehouse Shipping Reports Screen. When setting the defaults for the *** functions, an option labeled “All WHSE on 1 Report” is displayed. If this option is set to N or left blank, the process runs all possible transfers and prints separate load sheets for each warehouse. If the option is set to Y, the top of the load sheet is changed to show warehouse “all” and each individual line will note which warehouse the line is going to.
Load Sheets versus All Aboard Reports
The Load Sheets and All Aboard Reports have the same printed formats, but are meant for different purposes.
Load Sheets - These should be used to facilitate the actual loading of trucks or assembling of types of orders such as will-call, versus UPS, versus Fed-Ex, etc. Load Sheets normally are set to show anything that is staged but not yet loaded or shipped. Therefore Load Sheets should include only lines at your status code(s) for “Staged”, but not loaded/shipped.
All Aboard Reports - These should be used to see if everything is ready to be loaded/shipped. All Aboard Reports would normally be set to show all lines that are assigned to the truck route or ship via you are working on, EXCEPT for lines already loaded/shipped. Therefore, the All Aboard report shows everything not yet loaded or shipped, regardless of its status. This report will show if there are items scheduled to be shipped that are not ready - such as items not yet picked, items still in credit hold, items still on back order yet scheduled to ship today.
Best Practices - Set defaults for both of these reports, so your warehouses can use both for distinct purposes similar to what is recommended above. The defaults for each report are flexible and allow for different options for customer shipments versus interwarehouse transfers.
Sending Load Sheet information to ROADNET
Load sheet information can be exported to the Roadnet® Transportation Suite via the IFS. Some of the information passed is:
Item number
line quantity
line UM
line weight
1. Load Sheets are built using menu option WAR 8 - Warehouse Shipping Reports.
2. Enter a “C” as the shipment type and a 1 for load sheet in the Type of Report field.
|
3. Enter the necessary parameters on the screen that appears.
|
4. Press Enter and then add up to four sub sorts.
|
5. Press Enter to process the Load Sheet Report.
|
6. Press F9 to access the ship date and routing information.
|
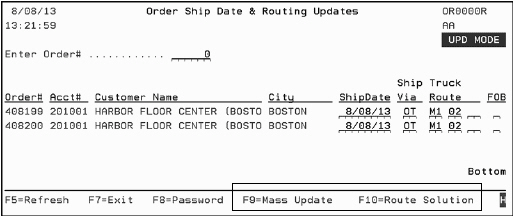
7. Press F8 and enter the necessary password. The F9 and F10 functions appear.
|
8. Press F10 to generate the routing solution.
|
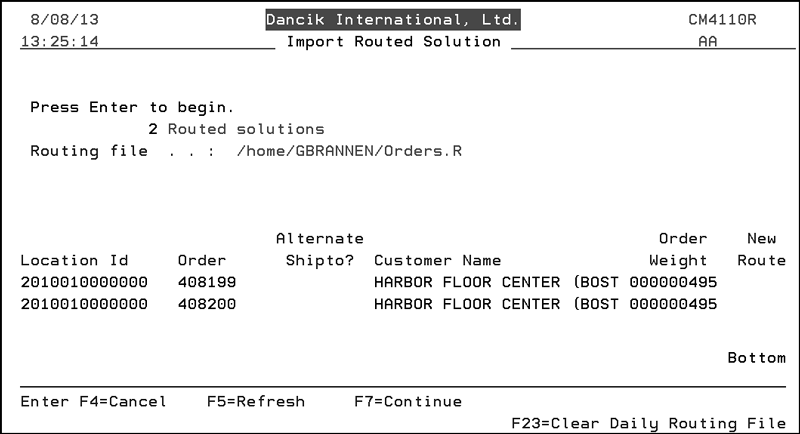
9. When F10 is pressed the user is prompted to choose either a summary “R” option or detail “D” option. If “D” option is selected the data in Orders.R file will be in detail - if “R” option is selected the data in Orders.R will be summary.
10. The directory where the files are placed is listed on the F10 screen, shown above, as the Routing File. In this example, the directory is /home/GBRANNEN/Orders.R.
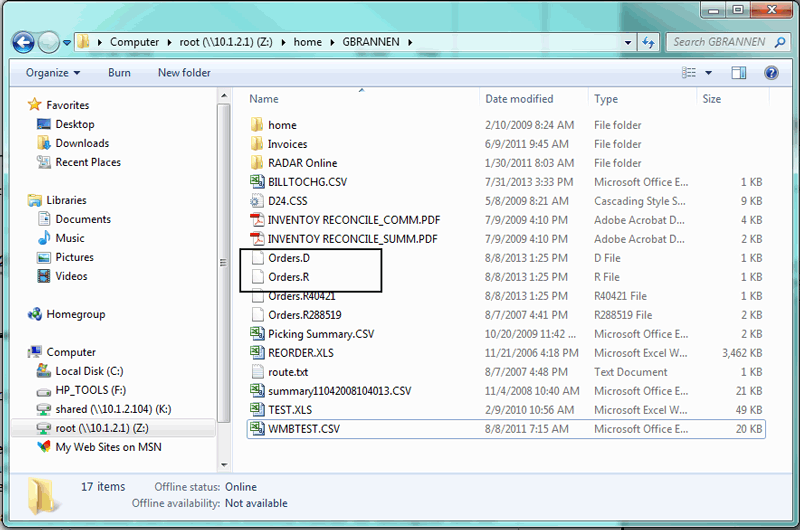
11. Go into the IFS and locate the Order.R file.
|
12. The file is ready to be imported into Roadnet. If you want to open it up and look at the contents you can use Wordpad. The format for both the Regular and Detail reports are shown below. The part of the Detail File in italics was added as part of this enhancement.
Regular (Summary) File
Account # Order# Customer Name Weight
2010010000000 408199 HARBOR FLOOR CENTER (BOSTON) 000000495
2010010000000 408200 HARBOR FLOOR CENTER (BOSTON) 000000495
Detail File
Account # Order# Customer Name Weight Item# Qty UM
2010010000000 408199 HARBOR FLOOR CENTER (BOSTON) 000495 ARM68281401 001000 SY
Use this report to perform a final check prior to closing the truck to ensure that all items which were scheduled to be shipped are on the truck. Ideally, this report should be blank if all lines have been placed on the truck and scanned or updated as shipped. You can display this report on the screen prior to or instead of printing. The selection criteria is very similar to the Load Sheets.
This report is used to list all of the orders which have been loaded or shipped on a particular shipment. It lists number of items, weight and value of all the items on a truck, sorted in a variety of sequences, including stop number and customer.
This report contains all of the fields necessary to download to the TRUCKSTOPS system, which is a third-party program for truck routing. Dancik International does not officially endorse or link its products to the Truckstops system. However, a simple download of the Manifest Report allows the Truckstops Program to perform various routing functions.
This is similar to the Manifest in that it prints information regarding the orders which are shipped on a truck. The primary difference is that the Bill of Lading can print on a pre-printed form, and in a summarized format, based on the freight classification codes associated with each item. Furthermore, the Bill of Lading is a DOT required document.
When this option is selected, the BOL Parameter screen appears.
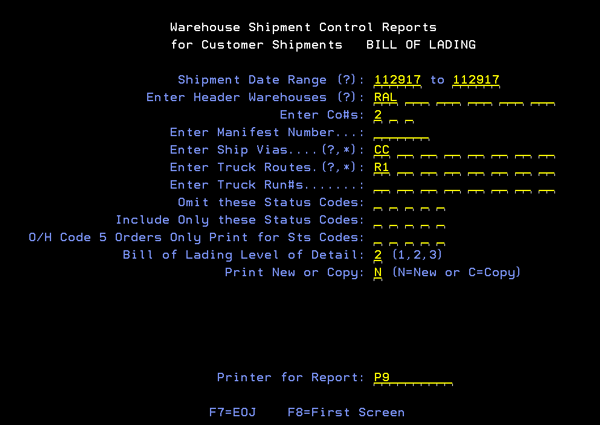
Enter the parameters you want to include on the BOL.
The Bill of Lading Level of Details are:
Detail 1 = bill of lading document (unique number) for each item/customer/Stop
Detail 2 = bill of lading document (unique number) for each Customer/Stop
Detail 3 = bill of lading document (unique number) for each Customer/Order
Note: Hazardous goods can identified on the BOL. The Hazardous field within the Classification Code File (FIL 19) can be used to identify a freight class as hazardous. Hazardous freight classes are highlighted on the BOL and are printed first.
The setting Print copy or new controls reprocessing and reprinting of the Bill of Lading:
N - Reprocesses the BOL. Only lines not already on a BOL will be included. If users wish to include order lines which were are already assigned BOL #, then use WAR 19 to reset BOL for those order lines
C - Reprints the BOL. Reprint will generate BOL for order lines that match criteria entered in WAR 8. The BOL #’s that are found on those lines will be reprinted in accordance with the following constraints:
BOL will generate as it originally printed when VICS option active
OR
BOL will generate with lines that match criteria entered in WAR 8 when Standard option is active
When Standard option is active, order lines that do not match criteria will not be printed by either N -reprocess or C –reprint options. In these instances, use War 19 to print copy of the BOL as it omits the status test – enter appropriate option by all BOL’s that are required via WAR 19 when more than one is needed.
The Dancik Enterprise system now supports the Voluntary Interindustry Commerce Standards (VICS) for Bills of Lading (BOLs). The objective of standardizing the Bill of Lading is to ensure that the shipper, the carrier, and the customer (the consignee) are all receiving the information they need for the processing of the goods through the supply chain. The standard VICS BOL is intended for U.S. Less Than Truck Load (LTL) and Truck Load (TL) ground transport. Included with the standard Bill of Lading form is a standard Bill of Lading number. The standard Bill of Lading form and number ensure that all key data elements are present and documented in a uniform manner.
In order to use the VICS BOL format, an Intelligent Print Data Stream (*IPDS) printer must be used. *IPDS printers can produce the non-text features (bar codes and tables) used on the VICS BOL. Dancik supports several IBM *IPDS printers.
Note: For more information about *IPDS printers, contact Dancik Client Services.
Use of this standard Bill of Lading will result in:
An established uniform format for accurate shipment documentation across the supply chain.
Ease of tracking shipment information with the use of the standard Bill of Lading number.
A means of bar coding the critical data within the Bill of Lading form for ease of capturing the data.
Reduced carrier and office administrator time used to process the information from the Bills of Lading.
Cost reduction through the elimination of redundant forms.
Note: For more information, about VICS refer to their website: http://www.vics.org/home.
Setting Up Customers to Use the VICS BOL
System Cross Reference Table File Maintenance
1. The settings that direct the system to print VICS compliant BOLs are located in the Customer Preferences File. Access it via option 38 on the File Maintenance Menu.
|
2. On the screen that appears, enter a company number or chain code.
|
Note: Preferences set by account override those set by chain code.
3. Press Enter to display the first screen of Customer Preference settings.
|
4. Press F10 to access the second set of settings.
|
5. To establish BOL printing defaults, press F2. The following screen appears.
|
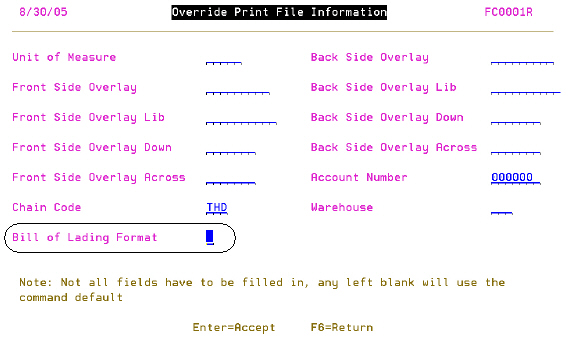
6. Enter a U to update/establish a BOL format. There are three pages of printer settings. The setting that controls the BOL format is located on the third page.
|
7. The field that controls the BOL format is Bill of Lading Format. At the current time, there are two options:
6 - For a Lowes format BOL. Has a 17 digit bill of lading number. SCAC and Carrier Pro numbers are barcoded together.
7 - For a Home Depot format BOL. Has a 12 digit bill of lading number. SCAC and Carrier Pro numbers are barcoded individually.
Note: If the field is left blank, your default BOL format is used.
System Cross Reference Table File Maintenance
The table VICBOL# must be configured. This table cross references a “From” value into the first six digits of the 17 digit VICS BOL number. This helps to ensures unique numbers are assigned to every BOL.
1. Access the VICBOL# table via option 5 - System Cross Reference Table on the System Settings Menu (SET).
2. Only one entry is needed. In the From Values column, enter the value (i.e., RDC number, store number, etc) that you want to cross reference. In the To Values column, enter the six digits that you want to appear as the first six numbers in the BOL number.
|
An example of the laser printed VICS BOL is shown below.
Page 1 (spool file is titled BOLPRINTP)

Page 2 (spool file is titled BOLPRINTP2)

Bill of Lading formats 4 and 5 can include an additional page that includes information for the trucking company picking up the inventory.
BOL Format 4 - Prints on a Non-Laser form that is usually multiform. The SCAC code and the Bill of Lading number are bar coded.
BOL Format 5 - is the same as format 4, except it prints 2 copies back to back.
Note: BOL formats are assigned to warehouses via the F9 Default screen.
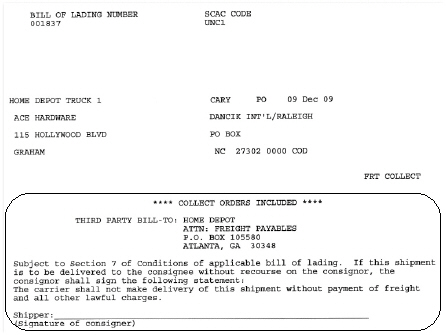
This functionality is designed for distributors working with The Home Depot. It can be reconfigured by Dancik to work with any customer by changing the Third Party Bill-to address and creating a system table for the customer.
Associated Files/Settings
System Table 507FOB
This table must have entries to trigger the use of the these features on the BOLS.
|
How table 507FOB works:
An order is received through EDI.
The Billto File for the account on the order is checked for a truck route in the 507FOB table.
If the truck route is listed in the From column, the FOB code, in the TO column, overrides the FOB code on the order and triggers the additional information to be included.
Using the table shown above as an example, if an order is received with a truck route of R1, the FOB codes gets changed to “2” Freight Collect.
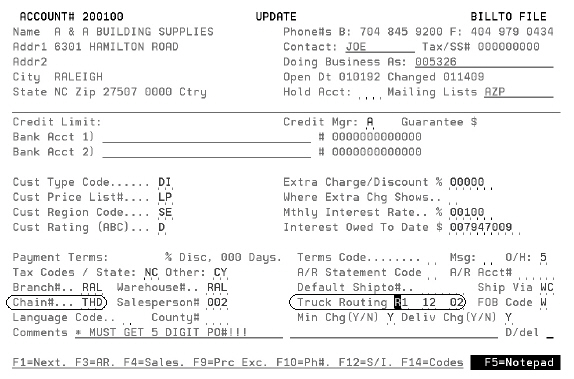
Billto File (FIL 1)
The Chain# field has to have THD for The Home Depot and the Truck Routes have to be designated for The Home Depot.
|
Example BOL
|
This report lists open orders for specified date spans, status codes, ship vias, truck routes, and so on, in various sort sequences. It contains information useful in measuring total workload, based on dates, status, and so on. It is similar to the Open Order by Ship Date Report.
These reports can be configured to print with barcodes. This enables this document to be scanned like a load sheet. However, in order to print barcodes, you must have an *IPDS printer designated in the Printer for Report field and the report has to be run in detail mode; as set in the F9 defaults screen.
|
The packing list is an optional document that you can print on an order-by-order basis or a truck-by-truck basis. It can serve as proof of delivery. Packing lists generally follow the same format as the picking lists except for these distinctions:
Packing lists are generally run at shipping time, and therefore display the order at its most current status.
Packing lists can be run based on the status of each line, such as “only status X items”, or “all except status S” items.
Packing lists always show weight line by line.
Packing lists do not show information that is only relevant for picking.
There is an option to print line item weights on picking lists. This option must be activated in the Warehouse Settings File. Once activated, the weight appears in the space previously reserved for warehouse personnel to check off each item picked. That space is reduced by half to allow for the weight field.
Packing lists can optionally include items included in the order, but not currently shipped. This allows your customers to see everything included on their purchase order to you, whether or not it was included in the current shipment. The shipped material is printed as shipped, and unshipped material shows as “Back ordered.” This feature does not pertain to fill/kill orders, for which back orders or unshipped materials are automatically cancelled.
Note: This feature is activated or deactivated via the System Wide Settings - Packing List Consolidation Level & Print Options.
When running packing lists by manifest number, if a single order is split on multiple manifests, on the same day, packing lists will show “Not On This Manifest” next to any line that is being shipped, but is listed under a different manifest number.
Item, Product Line and Manufacturer file special instructions will print on all versions of packing lists. This includes hazardous material information that is entered in these files.
Packing list can be run on a laser printer. This is controlled by entering an L in the FormCode field for Packing List on screen three of the Work Station Control Panel File (SET 1).
Note: Packing lists can also be run from the cash register screen for processed orders.
An example packing list is shown below.

The Close-A-Truck option allows you to print manifests, bills of ladings, and packing lists from one screen. You can also enter a commercial carrier’s pro number and the trailer or vehicle number. If you are using EDI, it allows you can configure the system to automatically send the Motor Carrier EDI documents (Load Tender - 204 and Bill of Lading - 211) to your EDI partners. Carriers usually offer reduced rates for electronic transmission of Bill of Lading information, as it reduces their operating costs.
Note: These documents can also be sent manually via option 19 - Bill-of-Lading/Manifest/Drop Inquiry on the Warehouse menu. For more information, refer to Bill-of-Lading/Manifest/Drop Inquiry - WAR 19.
Electronically sending Motor Carrier EDI documents requires the set-up of the following three system tables as well as custom mappings arranged by Dancik International, working with your carrier’s EDI department.
TRUCKRT Table - This table establishes the documents for each partner ID. The From values represent Partner IDs. Notice that the To values consist of the document number (204/211), a space, and then Carrier Name.
XXXTRUCKRT (Referencing Ship Vias and Truck Routes) - For each Partner ID, ship via and truck route information needs to be specified. Notice that the first character in the From value is the ship via, followed by a space and then the truck route. Every truck route for that ship via needs to be specified for the system to recognize it as a Motor Carrier order. If a ship via and truck route is not entered into this table the Motor Carrier document will not be sent.
XXXFOB (Freight of Billing Cross Reference) - In addition to System Cross Reference, Freight Of Billing needs to be specified for each Partner ID.
Note: System tables are created and maintained via option 5 - System Cross Reference Table on the System Setting menu (SET).
1. When this option is selected, the following screen appears.
|
2. Place an X by the document(s) you want to print.
3. The Carrier Pro# and Vehicle # fields give you shipment tracking capabilities. If needed, enter or scan a number into these fields.
Note: In some situations, the Close-A-Truck program must be run to invoice an order.
This option allows you to reprint documents by manifest number.
|
Enter a warehouse code, a valid manifest number and one of the report types. This option can be used to print an original or a duplicate copy of any of these documents, as long as a manifest number has been previously assigned.
Document |
Description |
Load Sheet |
A load sheet is printed including all of the lines previously assigned to the selected manifest number. |
Manifest |
A manifest report is printed including all of the lines previously assigned to the selected manifest number. |
Bill of Lading |
All bills of lading for the selected manifest number are printed. If bills of lading have never been printed before for the orders on this manifest, then new bill of lading numbers are assigned. If bills of lading have already been printed, then they are reprinted with their original bill of lading numbers. |
Packing List |
Packing lists are printed for all order lines previously assigned to the selected manifest number. |
Master Pick List |
A master pick list is printed for all lines previously assigned to the selected manifest number. |
The Truck Capacity Report displays the capacity of the truck route in weight, cubes, and number of stops so that dispatchers can reallocate orders to different routes if needed.
From the Warehouse Shipment Control Reports Program, select C for customer shipments, and 9 for Truck Capacity Report.
The following Parameter Screen appears.
|
Enter the necessary parameters. Parameters with an asterisk (*) are mandatory. F11 retrieves the parameters of the last use of this program for each user.
Parameter |
Description/Instructions |
How To Run Job |
Enter I to run interactively, which means that the report displays on the screen. Enter B to run as a batch job, which means a report is generated. In the example, the I option is selected. |
Company# |
Enter a company number. |
Shipment Date Range |
Enter the range of shipment dates to include, in MMDDYY format. |
Header Warehouse(s) |
Enter up to six header warehouses to process. The report is always sorted by header warehouse. |
Ship Vias |
Enter up to eight ship via codes to include. |
Truck Routes |
Enter up to eight truck route codes to process, or leave blank to include all truck routes. |
Omit These Status Codes |
Enter up to four order status codes to omit, or leave blank to include all status codes. |
Only Use These Status Codes |
Enter up to four order status codes to include. Use this parameter or the previous parameter, but not both. |
Outq |
If printing the report, you can override to any printer outqueue. Enter a question mark (?) to choose from a list of available printers. |
After you enter the previous Parameter Screen for an interactive report, the following screen is displayed.
|
Both the printed and screen versions of the Truck Capacity Planning report sort the dates by Header Warehouse and then by Ship Via Codes within the warehouse. The interactive version displays the above screen, listing all combinations of Header Warehouses and Ship Via codes found. Select from the displayed list by entering X next to your choice.
The following screen summarizes the data by ship date and then by truck route within each ship date.
|
You can use the following options and functions:
Press F2 to position to the warehouse and ship via selection, so you can select a different warehouse or ship via if applicable.
Press F6 to return to previous screen.
Press F7 to exit program.
Press F10 or F11 for different views, which display an analysis of cubes and number of stops respectively.
Enter option 5 next to any line to see details including the weight, cubes and stops analysis for that truck route and date.
Enter option 6 next to any line to see the customers and orders in stop sequence for each truck route and date.
Field |
Description/Instructions |
Opt |
Options. 5 = display detail with all three analysis statistics. 6 = display customer, stops and orders. |
Ship Date |
The ship date for the route. |
Truck Route |
The truck route code and description. |
Total Weight |
The total weight including all orders on that route and date, that are at the status you have requested. |
% Full |
The total weight of the route divided by the maximum allowable weight for that route. |
The following screen displays the alternate view for lines and stops. Alternate views are accessed via the F10 and F11 keys.
|
This view of the screen displays the total number of line items included on the route for each date, the number of stops and the percentage full based on stops. The %Full field is calculated by dividing the number of stops by the maximum allowable stops for that route. The maximum allowable weight, cube and number of stops is stored in the Routes File.
The following screen displays the alternate view for cubes.
|
This view of the screen shows the total cube for each route and date, and how full the truck is based on cube. The %Full field is calculated by dividing the cube of the orders on that route and date by the maximum cube for that route.
Note: The < sign indicates the total cube column is incomplete. This means at least one item included in that total did not have a valid conversion factor for computing cubes. There must be a conversion to unit of measure CB in order to calculate cubes.
The following screen is displayed by entering option 5 next to any route/date line. It displays the totals, maximum allowed values and the percentage full based on all three ways of measuring routes: weight, cube and number of stops.
|
The following screen is displayed by entering option 6 next to any route/date line.
|
The above screen displays a truck route in greater detail. This screen displays all of the orders on that route, sequenced by stop number. You can display further detail by entering option 5 next to any line. You can update shipping and routing information by entering option 2 next to any line. When you enter option 5 for details.
The following is the detail screen of the Truck Route Capacity Report.
|
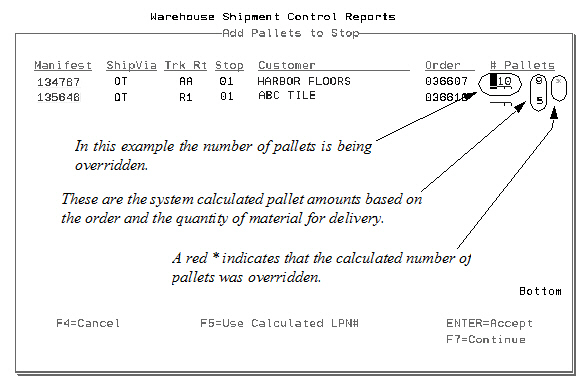
This option allows you to manually enter the number of pallets used for each stop on a manifest. This provides a cross reference to ensure that what is actually loaded on the truck is what the order called for. Furthermore, it allows you to recover the costs of pallets.
Enter either a C or T as the Shipment Type. Enter a P in the Type of Report field and press Enter. The next screen allows you to assign the number of pallets. Enter the necessary parameters and press Enter. The Add Pallets to Stop screen appears.
On this screen you can:
Override the system calculated number of pallets. This number of pallets is based on LPNs issued by the system. One LPN = One pallet.
or, press F5 to Use the Calculated number of pallets. If the # of Pallets field is left blank, the calculated number of pallets is used.
|
The Warehouse Shipping Reports Screen, includes an Audit File Inquiry. It is a window similar to the Bar Code Pool Print History Window. A record is added to the Warehouse Shipping Reports Audit File whenever a user selects option 3 (Manifest), 4 (Bill of Lading), 6 (Packing List), or 7 (Close-a-Truck) from the Warehouse Shipping Reports Program. The window displays the date and time the option was run, the ship via, truck route, and status codes that were selected and also the documents and options processed. This is an informational window only. No updates are allowed. It also supports the question mark (?) field in the Date Selection field, and enables you to position to specific ship dates.
Press F5 from the Warehouse Shipping Reports Screen to display the following screen.
|
Field Name |
Description/Instructions |
List Records for this Date (?) |
Enter the date for which the history log should be listed. You can enter a question mark (?) in order to select from a pop-up calendar window. |
Date Run |
This is the date the Warehouse Shipping Report option was run. |
Time Run |
This is the time the Warehouse Shipping Report option was run. |
Warehouse Selected |
These are the warehouses selected when the report option was run. |
Ship Via/Truck Routes |
These are the ship vias and truck routes that were selected when the report option was run. |
CAT |
This column displays YES if Close-A-Truck was selected, or NO if Close-A-Truck was not selected. You can run the various shipping report options with or without Close-A-Truck. |
Omit Sts/Include Sts |
These are the order status codes that were omitted or included when the report option was run. |
Document |
This is the document printed when the report option was run. If multiple documents were requested at one time, multiple entries will show on this screen, one for each document. |
Warehouse Shipping Reports Defaults
The Warehouse Shipping Reports Program enables even greater customization via its default settings screen. Default settings are accessed via F9 from the first screen of the program. Default settings can be entered for each report and each warehouse.
Load Sheet Defaults
The screen below shows the default settings for load sheets.
|
The Warehouse Reports Default Maintenance screen allows you to store report default values for each warehouse, and for each combination of warehouse for transfers.
You can create defaults for any combination of values on this screen. For example, you can create Customer Shipment Load Sheet defaults for each warehouse. On the above screen, enter C for customer shipments, 1 for load sheets, and you header warehouse.
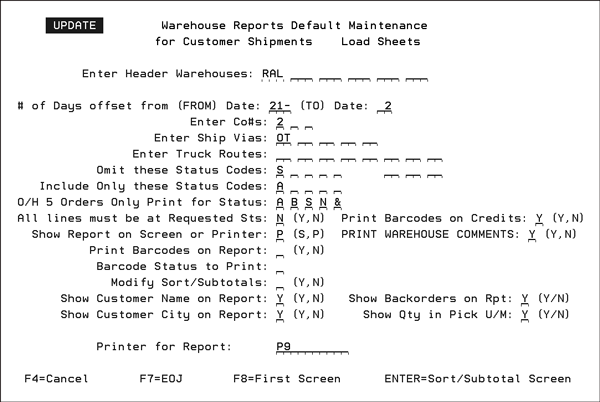
The above Load Sheets Default Screen includes the following options.
O/H Code 5 Orders Only Print for Sts Codes - This field prevents printing/processing of shipping reports for orders assigned to Order Handling (O/H) code 5 (must ship complete); unless all the lines on the order contain one of the entered status codes. If any line on the order contains a different code, then the entire order is skipped. Orders are assigned an O/H code on the Order Header in Order Entry.
Show Back Orders – Enter a Y to show the back orders that were scheduled to be loaded, but have not yet arrived.
Show Qty in Pick U/M – Enter Y to convert quantities to picking unit of measure
Print Barcodes On Credits - Enter Y to print bar codes under credits appearing on load sheets. Enter N to suppress bar codes under credits on load sheets.
Print Warehouse Comments - Enter Y to show warehouse comments on both the screen and printed versions of Load Sheets and All-Aboard reports. Enter N to omit warehouse comments. Warehouse comments are defined here to coincide with the way W* comments appear on pick labels. The program includes only the first W* comment it finds applicable for each order or line. The program first looks for a W* message just beneath the line item and then looks on message line numbers 1-9.
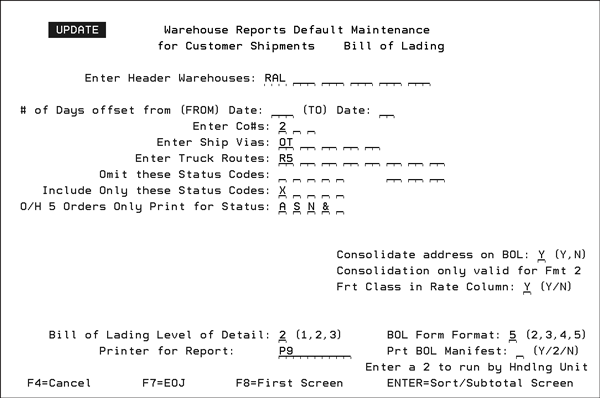
Bill of Lading Defaults
Notes about these defaults
When the Consolidate address on BOL option is activated, addresses are shortened to three lines whereas a normal address can be four lines. This can help if you are experiencing overwriting problems between the address block and the actual form when printing the Bill of Lading.
Note: Customer Preferences can override some BOL default settings.
The PRT BOL Manifest option separates the items on the BOL by one of four handling units: pallets, rolled goods, cartons, other. It also provides a total of each handling unit by count and weight. It works with all BOL formats. A shortened example of a BOL run by Handling codes (option 2) is shown below. Notice the inventory on the BOL is broken down into the four handling units with a total at the bottom.
Note: The Freight Class codes will vary depending on the settings in your Classifications file (FIL 19).
The BOL Form Formats are:
— Format 1 - By Item
— Format 2 is the default BOL that most people use. It prints on a Non-Laser form that is usually multiform.
— Format 3 is not really used, it was to print on the old pick list format, (The wide form).
— Format 4 is the BEAR format. It is the same as format 2, but the SCAC code and the Bill of Lading number are barcoded.
— Format 5 is the same as format 4, except it prints 2 copies back to back.
— Format 6 and 7 are the VICS formats which are laser documents. Format 6 = 17 digit Bill of Lading number and Format 7= 12 digit Bill of Lading number
The Freight Class column shows the handling unit. In this example, there is: 1 pallet, one rolled good, one carton, and one miscellaneous box of flooring materials. This can be a useful tool for quickly identifying what is on a truck.

Integrated Warehouse Management System
Warehouse Shipping and Routing Interface Menu
System Wide Setting - Daily Systems Snapshot and Inventory Data Warehouse Options
System Wide Setting - Options for Pricing by Warehouse
Change Header Warehouse of an Order - SYS 415
Automatically Build Warehouse Locations Table - SYS 610
Warehouse Price List Cross Reference Table - SYS 904
Warehouse Will Call Tax Table - SYS 905
Delivery System and Transportation Planning
Item Statistics By Warehouse File - FIL 20
Product Line Statistics By Warehouse File - FIL 21
Interwarehouse Freight Cost Table - SET 8
Warehouse Settings Table - SET 14
Warehouse Locations Table - SET 15
Warehouse Areas Table - SET 16
Warehouse Matrix File - SET 17
Warehouse Capacity Planning Mode - SET 27
Auto Back Order Fill Warehouse Settings - SET 35
Integrated Warehouse Management System_(IWMS) FAQs
Can I still reorg my inventory during EOM step 12 while the warehouse people are signed on?
Can my warehouse staff log in even during night jobs?
Is there a way to change the warehouse on an open purchase order?