Need more info or you couldn't find what you were looking for, let us know by sending an email to: support@dancik.com.
Update Order Status and Shipping Data - CUS 13
Function Keys on the Open Order File / Status Update Screen
F24 - Order Inquiries and Archived Files Menus
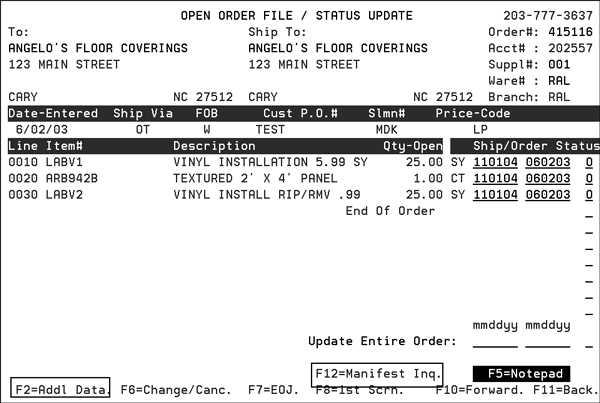
The Update Order Status and Shipping Data program allows you to inquire on and/or update the status and shipping dates of customer orders and purchase orders including ship dates on lines that will not actually ship - such as “labor/expense” items and credit memos. It also allows the entering and updating of other information related to purchasing and importing.
1. To access this program, enter 13 from the Customer Orders Menu or Order Desk Additional Functions Menu and press Enter. The Order/Shipping Status Update screen appears.
Note: You can also access the Order/Shipping Status Update screen by pressing F12 from the Order Inquiry and Search program.
Function Keys
F10=Print/Cash - Press F10 to print and/or apply cash to an order from the first screen of the Update Order Status and Shipping Data Program. This makes it easier to release pick lists for orders that are awaiting firm ship dates.
F21 = Order Inquiry - If you do not know the order number, press F21 to display the Order Inquiry and Search program. Once you have located the order, press F12 to return to this program.
F24 = Displays a menu bar with two options: Order Inquiries and Utilities and Archived Files. For more information, click here.
2. Enter the order number you want to inquire on or update and press Enter.
The status codes listed are the only ones recognized by the system. Some status codes, such as the number sign for closed orders, are assigned by the system and can not be changed. You may update an order's status code as many times as necessary. For example, the status of a purchase order may change from O to D, to K, to T, to R, before it is closed. Use this screen to view or update the shipping, ETA dates and status of orders.
|
Note: Enter a “?” in the Status column to the right of the Update Entire Order field to access a complete listing of all the status codes. You can also click here to access a listing of the order status codes. If the listing comes up empty, then no status codes have been loaded in the Status Codes Table. Status codes are established under option 7 - Order & Serial# Status Codes Table on the System Settings (SET) menu.
To change the status, ship or ETA dates of all lines on the order, move the cursor to the respective Update Entire Order fields at the bottom of the screen. Enter the new data in the corresponding fields under the status, ship or the ETA date columns. Press Enter. If ETA does not apply, as with customer order from stock, the ETA field is not displayed.
To change the status of one of the items listed on this order, move the cursor to the Status field of the corresponding line item and enter the letter of the new status. Press Enter. Repeat for all the line items you want to update.
To change the ship date or ETA date of one or more of the items listed on this order, move the cursor to the Ship or ETA field of the corresponding line items and enter the new date. Press Enter. Repeat for all the line items you want to update. If ETA does not apply, as with customer order from stock, the ETA field is not displayed.
Order status should be updated in a logical sequence. You may have particular situations to address at your company and want to assign a new or altered meaning to these status codes. This is perfectly acceptable as long as the new meanings are documented for your staff.
The following example shows the logical flow of an order through the system for a Regular In-Stock Customer Order:
Order entered, print pick list. Status = blank or O.
Order picked. Status changed to X.
Order placed in staging area awaiting delivery or pick up. Status changed to A.
Order delivered or picked up. Status changed to S.
Order invoiced. Status automatically changed to # for closed.
The example above may be too detailed for many warehouses, especially without bar codes and scanners, but the sequence illustrates how the status codes can be effectively utilized.
Function Keys on the Open Order File / Status Update Screen
Two additional function keys are available on the Open Order File / Status Update Screen.
F2_Addl_Data_(On_Water_Tracking)
F24 - Order Inquiries and Archived Files Menus
F2=Addl Data (On Water Tracking)
This function allows you to lets you view and update information about orders that are being delivered via a ship.
|
You can update fields individually or you can update the entire order at once through the Upd Entire Ord field.
Field Name |
Description/Instructions |
Vessel |
Enter the vessel name or other name/code which identifies a single shipment. For example, ABC 11/93 could be entered to indicate the November 1993 shipment from supplier ABC. Assigning a vessel name or code to your incoming shipments and even to the customer back orders placed against these shipments gives you a powerful tool for updating order status and dates. Using option 15 on the Purchase Orders Menu, you can update all orders related to the vessel in a single entry. |
B/L Ctnr# |
Use this field to enter bill of lading or container numbers. |
L/C# |
Enter the letter of credit number in this field. |
Notes |
Enter short comments, such as 6 pallets, here. These notes and all other fields on this screen can be included in the purchasing spreadsheets available on the Purchasing and Receiving Reports Menu. |
Port ETA |
For imports, enter the estimated time of arrival date to the port of entry. This is in addition to the regular ETA field which represents the date of arrival in your warehouse. |
Port |
For imports, you can enter a three-character abbreviation for the port or city of arrival. |
A Manifest File Inquiry Screen is available form the Update Order Status and Shipping Data Programs. It is accessed by pressing F12.
|
The Manifest Inquiry screen displays the manifest and bill of lading data for a shipped order. Most of this information is available only if you utilize the Warehouse Shipping Reports or Close-A-Truck Programs. Those programs are used to generate bills of lading and other shipping documents. All users can utilize this screen to display the description of a carrier, ship via, or truck route.
The following screen is the F11 alternate (detailed) view of the manifest information.
|
Field Name |
Description/Instructions |
Order |
The order number. |
Reference |
The order reference number. |
Route |
The truck route code and description. |
Ship Via |
The ship via code and description. |
Drop |
The system assigned drop number if manifests or bills of lading were generated. |
Item |
The item number. |
Line |
The line number within the order. |
Manifest |
The system assigned manifest number if manifests were generated. |
Bill of Lading |
The system assigned bill of lading number if bills of lading were generated. |
Line Wgt |
The weight in pounds of each line item. |
Pro Number |
The shipment number assigned by an outside carrier. |
ASN Transmitted |
An indication of whether or not an advanced ship notice was transmitted to the customer for the shipment. N/A indicates that ASNs are not applicable to this order. |
Truck Closed |
An indication (Yes or No) of whether the Close-A-Truck procedure was run for this shipment. |
UCC Labels within Order |
If applicable, the number of UCC labels used within the order. |
UCC-128 Pallet No. |
If applicable, the UCC-128 pallet numbers assigned to each line that was shipped. |
F24 - Order Inquiries and Archived Files Menus
The Order Inquiry, and Update Order Status And Shipping Data Programs has a “wildcard” function accessing special related programs.
The F24 menu bar contains two menus; Order Inquiries And Utilities, and Archived Files.
|
Menu Option |
Description |
Order Inquiry By Ship Date |
Displays orders in a ship date range, by customer, and by truck routes. |
Bill of Lading/Manifest/Drop Inquiry |
Displays the orders included in a bill of lading, manifest, or drop. |
Build-A-Truck |
Displays customer orders in detail and in summary, and allows you to display weights, build truckload shipments, and release picking instructions. |
Order Ship Date and Routing Updates |
Quickly updates the ship dates, ship via, truck routes, and FOB codes by order number. |
Credit Held/Released Orders History Inquiry By Reference# |
Displays credit hold and release information by order reference number. |
Bar Coded Pick Labels Audit |
Displays an audit showing when bar coded pick labels were printed. The audit can be changed by order number or by date and time. |
Line Splitting Utility |
Splits a single order line into two lines. For more information on this feature, refer to Split Line Feature. |
Shipto Search |
This option enables you to search for an account's shipping address and to search for orders based on overridden shipto names job sites, and so on, that can be entered during the order entry process. For example, if an order was entered with a shipto override of James Street Shopping Center, you could find the order here by entering James Street. Often customers that have multiple locations are assigned different accounts for each location. In that case, the Shipto File is not necessarily used, and you would search for the individual stores or locations using the Customer Search File. |
Allocation Swapping |
Allocation Swapping is the ability to easily switch orders between a status of allocated (assigned to inventory) and unallocated (on back order). Allocation Swapping includes the following features: View all orders for an item, with various sorting options.
For more information on this feature, refer to Allocation Swapping. |
Unprocessed Orders and Holds Inquiry |
Connects you to the Temporary Hold and Unprocessed Order Inquiry Program to search for unprocessed orders and temporary holds by branch, customer, and item number. |
Display Potential Duplicate Credits |
A potential duplicate credit is defined as any other credit memo cross referenced to the same original invoice or order number as the credit memo you are beginning to enter. This option connects you to a program that allows you to check for these instances. |
Assign Pro Number to Item |
Pro numbers are the shipment number assigned by an outside carrier. For more information on this feature, refer to Assign Carrier PRO#s in Order Entry. |
Change Account# and/or Branch/Slmn# of Open Order |
You can change the following order information via the Order Inquiry program.
A typical use of this feature can be to change from a customer’s account number over to his/her contractor’s to get a better price. This option allows you to make the necessary changes including using the contractor’s price structure. Furthermore, if any items on the order were “hand priced” they can be bypassed. |
These feature allows you to split an order line item into two order line items, each with part of the total quantity. This is done when a single line item is to be partially shipped.
Note: The split line program checks for NB rules at SKU level as well as at item level. (SKU file NB rules, if found, overrides Item File NB rules).
When this option is selected, the Split an Order or PO Line screen displays. Enter the necessary parameters and press Enter.
|
Note: The split line program checks to see if another user is in Order Change, and will not allow a split line until the other user is out of the Order Change program. This prevents another simultaneous order change from overwriting the split line change.
Fill in the applicable fields as described below, and press Enter to split a line.
Field |
Description |
Order# or PO# |
Enter a six-digit order number. |
Line# |
Enter the line number of the line to be split. |
Quantity to remain on the existing line. |
Enter the quantity remaining on this line number, after the line is split. The difference is put on the new line created when the line is split. |
Unit of measure |
Enter the UM related to the quantity stated above. |
LAST, FIRS, or a Line# |
Controls the line# of the new line. Enter LAST to create the new line after the last line on the order. Enter FIRST to create the new line on the first free line after the line being split. You can also enter an unused four digit line number to use for the new line. LAST is the default. |
Ship Date For New Line |
Optionally enter a ship date for the new line. Leave this field blank for the ship date on the new line to remain the same as the existing line. |
ETA Date, if a PO, for New Line |
Leave this field blank for customer orders. |
Status Code For New Line |
Optionally enter a status code for the new line. Leave this field blank for the status code on the new line to remain the same as the existing line. |
Status Code for Existing Line. |
Status codes allow you to identify the status of each line of each order as it moves throughout the system and your warehouses. Examples of status codes are:
|
|
Menu Option |
Description |
Archived Orders and Purchase Orders |
Displays a list of archived order and purchase order files. You can select an archived file, and display the archived orders. |
Archived Invoices |
Displays a list of archived invoice files. You can select an archived file and display the archived invoices. |
Note: Refer to the Archive and Purge Menu - ARC for details about purging files, and inquiring archived files.
Installation Scheduling & Order Status Update in Order Entry