Need more info or you couldn't find what you were looking for, let us know by sending an email to: support@dancik.com.
Accounting Set-up
Chart_of_Accounts_File_-_ACT_7
Miscellaneous_Vendor_File_-_ACT_3
Chart_of_Accounts_by_Branch_and_Cost_Center_-_ACT_8_and_ACT_9
AR_Statement_Message_File_-_ACT_10
AR_Supplier_Billto_Cross-Reference_File_-_ACT_11
Tax_Identification_Number_File_-_ACT_12
GL_Cross_Reference_by_Branch_or_by_Warehouse__ACT_13
AR_to_GL_Interface_File_-_ACT_101
Invoicing_to_GL_Interface_File_-_ACT_102
Inventory_to_GL_Interface_File_-_ACT_103
AR_Dispute_Code_File_-_ACT_104
Base_Commission_Rates_File_-_ACT_106
Commissions_Exceptions_File_-_ACT_107
GL_Account_Validation_Table_-_ACT_108
AP_and_GL_Defaults_Maintenance_File_-_ACT_109
AR_Customer_Floor_Plan_Assignments_-_ACT_110
Floor_Plan_Payment_Terms_File_-_ACT_111
Accounts Receivable Transaction Code Description Maintenance_-_ACT_112
Bank_Code_File_Maintenance_-_ACT_113
Supplier_Cross_Reference_Table_Maintenance_-_ACT_114
Payment_Method_Maintenance_-_ACT_115
Cashier_Code_Maintenance_-_ACT_116
Maintain_Salesperson_Assignments_-_ACT_117
Business Entity File - ACT 118
GL_Account_Sub-Categories_File__ACT_119
Supplier_and_Vendor_Groups_File__ACT_120
Intercompany_Transfer_GL_Interface__ACT_121
Navigator_AR_Pmts_Tab_Status_Code_-_ACT_122
Chart of Accounts File - ACT 7
Multiple general ledger accounts for each branch
Things to consider when creating chart of accounts
You can use the Chart of Accounts to review your net month-end posting entries for the current and previous period as well as a simple 12-month budget. Create each account, denoting it as an asset, liability, equity, income, or expense.
The Chart of Accounts File contains a record for each account. Each record contains:
The title and category of each account
A place to enter a 12-month budget
A 24-month summary of activity for the account.
Note: Do not make chart of accounts entries for a company until you have entered a Company File record.
Before creating Chart of Accounts, you should be familiar with the following:
Understanding of accounting principles
Understanding of cost centers
Understanding of branches
Understanding of funds, file backs, rebates, cost drivers
To give you recommendations in creating your chart of accounts for a single GL account number or multiple accounts numbers for the same description.
Ex: Creating account number for sales.
30000 - Sales
vs.
30000 - Sales - Tampa
30001 - Sales - Miami
30002 - Sales - Orlando, etc.
This outline also addresses topics where you may need to review your current accounting process. This can change your chart of accounts and alter the reporting on your financial statements.
In creating the chart of accounts, notice that there are six digits. The first digit is reserved for the company#. The next five digits can be used for your chart of accounts for that company#.
The most commonly used chart of accounts separates the assets in the 10000 range, liabilities in the 20000 range, equities in the 30000 range, income in 40000 range, cost of goods in 50000 range, and all other income and expenses in the 60000 - 90000 range.
Note: Anything that posts to GL requires the company, a GL account number, followed by a three digit branch (optional), and three digit cost center (optional).
1. On the Accounting/File Maintenance menu, enter option 7- Chart Of Accounts File. The Initial Chart of Accounts File screen appears.
2. Enter the Company Number and the Account Number for the chart of accounts. Use any five-digit number from 00000 to 99999. Account numbers should be assigned logically. When multiple companies are on the system, assign similar account numbers to the same companies. For example, the account number for Computer Supplies is the same, except for the first character in the company account.
The most commonly used Chart of Accounts separates the accounts using the following ranges:
Assets: 10000-19999
Liabilities: 20000 - 29999
Equities: 30000 - 39999
income: 40000 - 49999
costs of goods: 50000 - 59999
all others: 60000 - 90000
3. Enter A to add a new chart of account record, U to update or change an existing chart of accounts record, or I or leave blank to inquire an existing chart of accounts record.
4. Enter the Password, if necessary. The lower-level password allows limited field access, the higher level allows total access. Press Enter. The Detail Chart of Accounts screen appears.

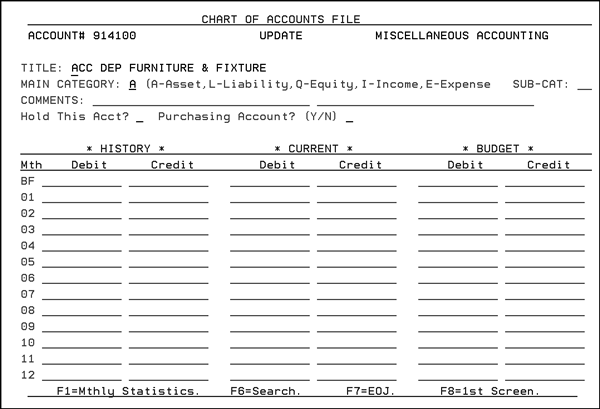
The top line of this screen shows the complete account number, company number, account number, mode, and company name. The term account number refers to either all digits in a six-digit field or the last five digits in a five-digit field. The system often indicates what company number is used and only needs the five-digit portion. The mode is either Update, Add, or Inquiry according to the action code entered. The company name shown is entered in the Company File under the company number.
The following table describes the Chart of Accounts fields.
Field Name |
Description |
Title |
Enter the name of this account using the two 30-character lines provided. This title appears on most screens and reports accessing this account number. For better readability, use only the first line when possible. |
Main Category |
Enter one of the following valid category codes:
These categories are used for some reports. However, you can define other groups of accounts. |
Sub-Cat |
Use this field to further divide the main category. You should define codes for the categories that are meaningful for your company, for example, CA for current assets, NC for non-current assets. |
Comments |
You can enter up to 60 characters for notes and comments. |
Hold? |
Enter Y in this field to disable an account from being posted to via the AP or GL systems. This entry does not affect existing balances in the account, but prevents further posting. Held accounts are noted on the Chart of Accounts Search and Listing. |
Purchasing Account |
Enter Y if this account is used in AP for invoices from suppliers to reconcile AP vs. Receipts. This field is used by the AP Entry Manifest Window and by AP Reconciliation Reports when the system needs to include only purchasing figures. Enter a Y in this field for any purchasing accounts that will be reconciled to inventory value. Note that we do not recommend entering Y in any freight accounts, even though you may consider them part of purchasing. Normally, freight is reconciled differently than material cost. |
The rest of the screen is divided into three sections: History, Current, and Budget.
Note: The Current and History sections are accessible for entry or update only if the high-level password is entered.
History Section
Contains last fiscal year figures.
High-level password allows access to the history column
Current Section
Contains this fiscal year’s figures.
High-level password allows access to the history column.
Note: Do not change any numbers in the Current or History sections after a month is closed. Changing the data in this file WILL NOT change the detail audit trail.
Budget Section
Accessed with any level password.
Completed at the beginning of each fiscal year, and used for comparative analysis to simple 12- month budget.
These sections comprise seven columns and 13 rows. The first column shows the months of the fiscal year. The first row, BF, shows the Balance Forward from the end of the previous fiscal year. The screen changes automatically to reflect the fiscal calendar of the company this data represents.
The remaining six columns divide the three sections into Debits and Credits. The 13 rows consist of a balance forward from the previous year and a row for each of the 12 months.
The debits, minus the credits in the BF row of the Current section must equal the sum of all of the history column debits, minus the sum of all of the history column credits for assets, liabilities, and equities. The months of the fiscal year need not be entered. They appear automatically based on the end-of-fiscal-year entry in the Company file.
The Debit and Credit figures represent the total account activity for a given month or year, not the net activity. For example, an account with debits totaling 100 and credits totaling 90 in a given month is listed as:
Debit |
Credit |
Debit |
100 |
90 |
not 10 |
Using this method preserves the total activity and the net activity.
Each debit or credit field is defined as an 1-digit number with two decimal places.
Note: $100.00 is shown as 10000. The largest acceptable number is 99999999999 representing 999,999,999.99.
5. Complete the fields and press Enter. The “Accepted” message appears beside the mode at the top of the screen, or an error message appears at the bottom of the screen. If the Accepted message blinks on the screen, then the data has been recorded in the file. If an error message, appears, correct the entry, and press Enter again. Repeat until the Accepted message blinks.
Single general ledger account#
If you were to create one account number for each category such as sales, cost of sales, etc., the following are advantages and disadvantages of creating one chart of accounts for each category:
Easy set up for interfaces. The interface is set up once per each category (Cash, Sales, Inventory).
Wherever a GL account# is requested, enter the one account number as the default. For Example:
— Assigning expense accounts to the Supplier and Vendor File, you would enter one account number that represents the accounts being posted.
— Assigning Macro Messages File (this is a customer service template where they can enter pre-recorded miscellaneous charges to customers, so that they do not have to remember the GL# to post the charges), you would enter one template for the miscellaneous charge and the one GL number that represents that miscellaneous charge.
Creating one GL account number for chart of accounts the system keeps track of each branch and cost center as it posts transactions to GL at month end.
General ledger is at the combined account transactions. To analyze the individual branches/cost centers, you need to request the general ledger report for that branch/cost center.
Financial reporting - you can run a combined financial statement for all branches and cost centers on one report. Then copy the same report and assign the new reports to run the individual branch/cost center, or multiple branches/cost centers.
You cannot list each branch separately on the same report as in the multiple general ledger account#s (see Multiple general ledger account#s below).
Note: This is the recommended method as it is easier to maintain and requires less initial set up. The same information for financial statements is obtainable by requesting the individual reports.
Multiple general ledger account#s for each branch:
Each interface is set up multiple times depending on how many account numbers you have for the same category: Ex: If you have a general ledger account number for Sales and you want to create a different chart of account number for the different branches, your chart of accounts would show something similar to the example below for sales:
Account # |
Description |
030000 |
Sales - Tampa |
030001 |
Sales - Miami |
030002 |
Sales - Orlando. |
When creating an interface for Sales to GL, you need to create this interface three times for the different branches since each branch has its own account number.
Wherever a GL account# is requested, you have to make sure that the default expense account# has the three separate account numbers representing the three branches.
For Example:
1. Assigning expense accounts to the Supplier and Vendor File. You can set up default expense account numbers. Since each branch has its own GL account, you need to set up as many default GL account numbers based on the number of branches/cost centers. A user entering AP invoices can remove the GL account numbers not used.
2. Assigning Macro Messages File - You can set up miscellaneous charges in order entry with the corresponding GL account number. Since each branch has its own GL account number, you would need to set up as many default messages per the number of branches/cost centers. User entering misc. charges in order entry needs to select the correct one.
If creating a separate account number for each branch, you must use and set up the GL Validation Table. This ensures that the proper branch/cost center is coded to the correct account.
General Ledger Report shows the individual accounts. There is not a report to combine the same account transactions (only financial statements can combine the same account).
Financial reporting - you can create a report to combine all the categories together and create a summarized financial statement.
To run the income statement for the individual branches/cost centers, you would need to create a report that has the chart of accounts assigned to that branch/cost center.
Having multiple chart of accounts for the same category, give you the ability to list the accounts one under the other. For Example:
Account # |
Description |
030000 |
Sales - Tampa |
030001 |
Sales - Miami |
030002 |
Sales - Orlando |
035000 |
COGS - Tampa |
035001 |
COGS - Miami |
035002 |
COGS - Orlando |
On designing the Income Statement, you can combine all the above into one account or you can create a detail Income Statement to show the sales of each branch one under the other.
Press F1 to access this screen. This is an alternate and often a clearer version of the current and history sections. Decimal places and the comparative net figure balance of each month are shown, as well as the net figure for each month from the previous year.
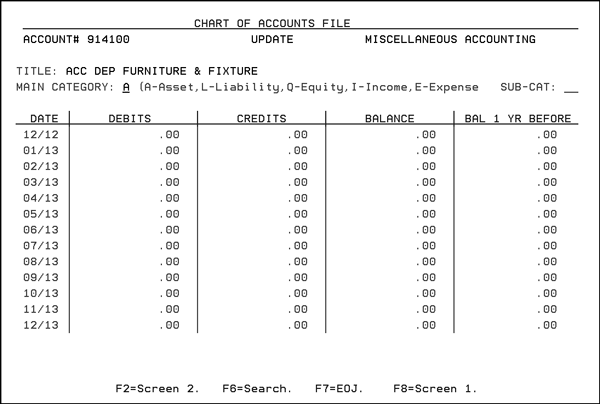
The first row (12/2) is the balance forwarded from the previous fiscal year, which, in this example, ends in December. You can press F8 or Enter to return to Screen 1, or F7 to return to Menu Files. F6 takes you to the Chart of Accounts Search program.
Things to consider when creating chart of accounts
The following are topics you need to consider when running AP End of Month. The following are discussions that should be reviewed. Their implementation may cause you to change your processes.
Topic |
Considerations/Recommendations |
Refunds |
You need to remove the credit invoice from the customer's account due to a refund check through AP. The AR department applies this amount to the GL number. Make sure AP department is aware of the same account and amount to post the refund check. |
AR Invoice is offset by AP Invoice |
You need to remove AR invoices billed to your suppliers from the AR because they in turn have sent a credit via an AP invoice. The AR department applies this amount to the GL number. Make sure the AP department is aware of this same account and amount to post the offsetting transaction. |
Direct Ship Cost of Sales |
You may want to create a direct ship “clearing account”. This is so that when you invoice the direct ship, the credit is to the clearing account and AP will offset the same account upon receipt of supplier's invoice instead of putting it into inventory. |
Cost Driver |
Cost Drivers are costs that are associated with line items within the Dancik Distribution system. They are used to identify costs or expenses that are not part of the product cost, but still affect the profit on the sale of the item. The “Cost Driver” is the mechanism that assigns the appropriate cost to the line items that were subject to free delivery. Another important use of Cost Drivers is to track rebates or expenses that are directly tied to line item sales, but are not necessarily reported or managed on a line-by-line basis. For example, you want to track the 3% rebates give to the buying group on a quarterly basis. Make sure that you are aware of the cost driver set up and which ones are mapped to affect GP. You can create journal entries from the cost driver to record the rebates to your customers. If using this feature, you may want to create the offsetting account number when the system creates the journal entry to post the different types of cost drivers. |
Funds/Overbills |
Funds/overbills are extra charges incurred to the customer for a trip program. The system posts all funds into one GL account. You will need to create a manual entry from this one account into the different fund accounts. |
Sales Tax |
The system posts all sales taxes into one GL account. You will need to create a manual entry from this one account into the different sales tax accounts. |
Cost Allowances |
Cost Allowances refers to file backs expected from the manufacturer. Make sure file backs are entered in the system so that your margins on the system and GL are reflected by these transactions. |
Recording Inventory |
If you increase inventory through AP, you should consider changing this to the method as described below in AP vs. Manifest Reconciliation. Inventory would then be increased during receiving. This gives you more utilities to reconcile inventory. |
AP vs. Manifest Reconciliation |
The AP vs. Manifest Reconciliation can assist you in reconciling your receipts against the AP invoices for cost variances and capture your outstanding receipts (accruals). Using this procedure with other GL interfaces will assist you in reconciling your inventory value. Determine what GL account number you will use to post AP invoices from suppliers. If your Inventory to GL Interface for receiving is set up to do the following: 
Note: The purchases account may also be known as “Purchases Clearing or Unvouchered Receipts (liability account)” or a variety of other terms. Upon receipt of the invoice from the supplier the following journal would be recorded: 
|
Recording Cost of Goods Sold |
If you currently calculate the cost of goods sold on an Income Statement using the periodic method, you should consider changing this process. The system can record the cost of goods sold through the sales interface where the cost of the materials sold are mapped to the cost of goods sold account. Using this method allows you to match your cost of goods sold to the sales reports and statistics. |
Chart of Accounts by Branch and Cost Center - ACT 8 and ACT 9
Chart of Accounts Search - AP 7
Chart of Accounts for Foreign Currency
Duplicate Chart of Accounts For New Company - SYS 204
Can I delete a GL account from the chart of accounts
Why am I getting the Message “Purchasing entries must be made prior to using this function key”
Direct Ships Accounting Procedures
Miscellaneous Vendor File - ACT 3
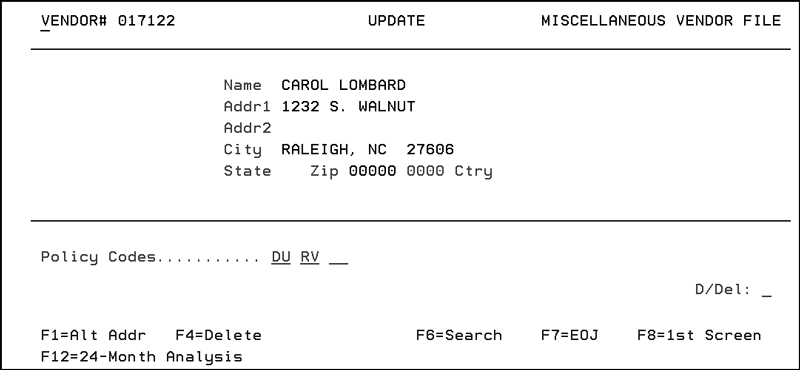
You can set up miscellaneous vendors records for one-time purchases. When entering AP invoices, specify M for miscellaneous vendor. You can also specify if this miscellaneous vendor requires a 1099. The system sets up a temporary record in this file. This program is only used for correcting addresses or deleting miscellaneous vendors. AP statistics for miscellaneous vendors are stored in Vendor 000000 in the Vendor File. This record is labeled Accumulated Statistics for Misc Vendors.
Field Name |
Description |
Policy codes are used to trigger special processing or to identify certain vendors or situations. The following codes can be user-assigned, or assigned by Dancik.
|
|
D/Del |
Enter D if you want to delete this miscellaneous vendor record. Only delete the record if this vendor has no open transactions, and the vendor’s balance is zero. |
Function Keys
Function Key |
Description |
F1=Alt Addr |
Use these fields to record alternate address, city, state, zip code, country and phone information for the vendor. Enter a "Y" in the Use As "Remit To" Address on Checks setting print this address as the remit to address on accounts payable checks. |
F4=Delete |
Deletes the record. |
F12=24-Month Analysis |
You can view purchasing history of this vendor, and “drill down” through all accounts payable details. The screen that appears shows the number of invoices (vouchers) entered within each of the 24 months for the vendor, and the total amount of those invoices/vouchers. The company number is set to your default company. If you are not restricted to a company you can override the company number or leave it blank to show totals that combine all companies. Press F2 to choose between viewing Vouchers/Payables or Payments/Disbursements. |
Navigator Miscellaneous Vendor File
How can I get a Listing of Payments made to (M) Miscellaneous Vendors
Chart of Accounts by Branch and Cost Center - ACT 8 and ACT 9
These options allow you to create and update the Chart of Accounts by branch or cost center. The settings within each option are the same.
The Chart of Accounts by Branch File is an optional file for companies with multiple branches. A record for each account number for each branch is automatically established by the system. You do not have to enter records in this file. Once you have created the Chart of Accounts File, the system creates the records in this file, as necessary. You can use this file to create financial statements for each branch and to enter simple 12-month branch budgets.
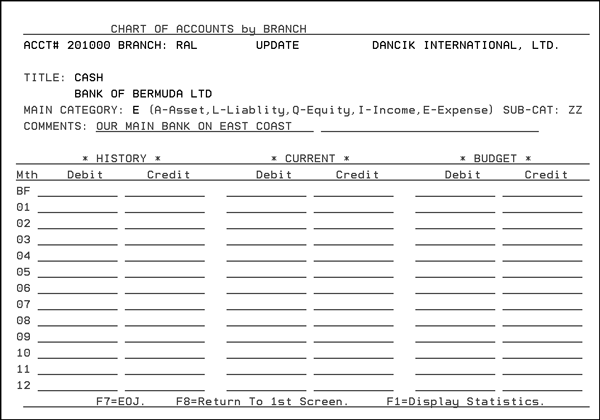
Field Name |
Description |
Title |
The title from the main Chart of Accounts File. |
Main Category |
The category from the main Chart of Accounts File. One of these five valid category codes appears:
|
Sub-Cat |
The subcategory from the main Chart of Accounts File. |
Comments |
The comments from the main Chart of Accounts. |
Chart of Accounts File - ACT 7
Chart of Accounts Search - AP 7
Chart of Accounts for Foreign Currency
Insert Total Of Branch Budgets Into Company Budget's File - SYS 205
AR Statement Message File - ACT 10
Note: This file relates to Accounts Receivable application only.
You can reserve two areas on the customer statement for printing messages. The main area is on the top of the statement, beside the customer’s name and address. The second area is a single line to the left of the total amount due. These areas are usually used for messages that change frequently, and concern things such as new products, sales, specials, change of address, and new locations. Messages that never change should be preprinted on forms. These messages can only be unique to each branch, and not unique to each customer or salesperson, for example.
1. On the Accounting File Maintenance screen, select option 10 - AR Statement Message File.
2. Enter the Company # and Branch # of the branch for which you are creating a message, and press Enter. The screen displays five message lines.
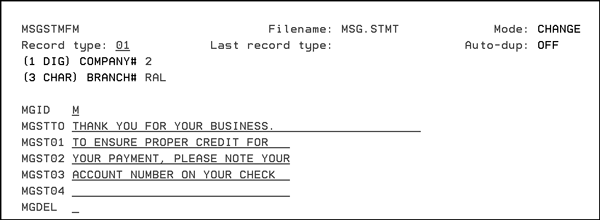
Note: Press the Shift key to enter uppercase key letters when entering the branch. This program accepts lower case letters, but all of your branch codes are in upper case only. If a message appears saying, “Record Not Found,” check the company number and branch number you entered. Correct any errors and try again. If the message is repeated, press F10 for Entry mode and re-enter the company number and branch number. Fields for your messages should now appear on the screen.
Accounts Receivable Special Functions
How Do I Print a Statement message
AR Supplier/Billto Cross-Reference File - ACT 11
The AR (accounts receivable) Supplier/Billto Cross-Reference allows you to “link” a supplier and a customer account, so that transactions relating to a supplier (which also affect AR) can be managed automatically. Specifically, in the Brokerage Sales Model, a direct ship invoice from a supplier to customer results in an AR due (commission) from that supplier. The system supports AR for only customer Billto accounts, so you need to establish a Billto record for the receivable due from the supplier and link that account to the supplier via this file.
Once the brokerage pricing features have been activated in the system, use the supplier account/Billto cross-reference feature to specify which Billto account the brokerage receivable should be posted to.
The receivable for the supplier is posted to the customer account ledger associated with that supplier. It is posted with AR transaction code, OQ, and the same invoice number as the customer’s invoice from which the receivable was generated.
1. On page 1 of the Accounting File Maintenance Menu, enter option 11 - AR Supplier/Billto Cross Reference File. The AR Supplier/Billto Cross-Reference File screen appears.
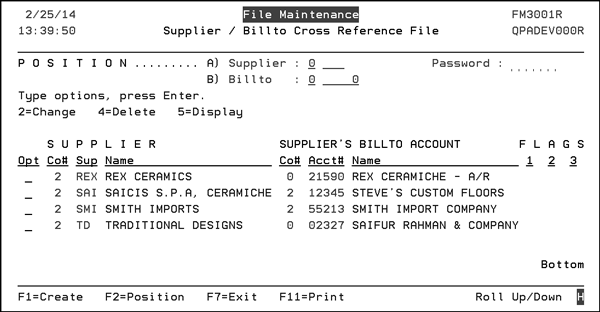
This screen displays the supplier/Billto cross-references you have created. In the example above, direct ship invoices within company 2 for supplier REX are cross-referenced to account 21590 in AR.
Often the account name is the same as the supplier name, but as shown, that is not a requirement. The Billto record can be an agent or third party slated to receive the AR.
The fields on the AR Supplier/Billto Cross-Reference File Screen Fields are described as follows:
Field |
Description |
Supplier/Billto |
Enter the Supplier and/or Billto numbers to position the list of records to a specific record in the listing. Leave this field blank to see all entries, starting from the beginning of the file. |
Password |
Enter a password, if required. The password controls whether you can create or update records or if you can simply inquire on the supplier/Billto cross-reference file. |
Opt |
Enter one of the following options in this field:
Note: If you enter option 4 for an account, the program shows a verification screen, where you can cancel, in case you selected the Delete option by mistake.
|
Supplier Co number |
The company number related to the supplier of the cross-reference record. This, and the supplier number, are cross-referenced to the corresponding customer company/account number on the same record line. |
Sup (Supplier) |
The supplier number of the cross-reference record. |
Supplier Name |
Supplier’s name from the Supplier File. |
Billto Account Co number |
The company number of the cross-reference record. This, and the customer account, are cross-referenced to the corresponding supplier company/number located on the same record line. |
Acct. number |
This column contains the customer account number of the cross-reference record. |
Billto Acct. number Name |
This column displays the customer’s name. |
Flags |
These fields are not currently active |
The function keys on the AR Supplier/Billto Cross Reference File Screen are described as follows:
Function |
Description |
F1 |
To go to a screen where you can create a Supplier/Billto cross-reference. The high-level password is required. |
F2 |
Takes you to the position fields at the top of the screen, where you can position the search to a specific supplier or Billto. |
F11 |
Lets you to print a report based on selection criteria, listing the Supplier/Billto cross-references. |
Tax Identification Number File - ACT 12
This feature lets you to maintain the Tax ID for issuing 1099s to vendors, suppliers, and miscellaneous vendors.
1. On the Accounting/File Maintenance menu, enter option 12 - Tax Identification Number File. The Tax Identification Number Maintenance window appears.
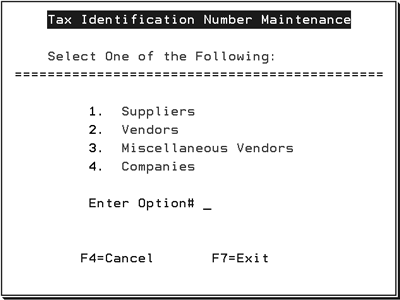
2. Select Supplier, Vendor, Miscellaneous Vendor, or Companies. A window appears that shows you the assigned Tax ID numbers.
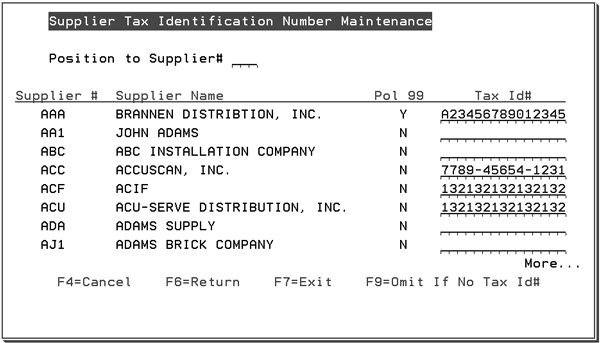
3. If you know the supplier number, enter it into the Position to Supplier field, and press Enter. The list repositions to start from that supplier number.
4. The Pol 99 field shows Y if any of the policy fields contain 99. The 99 means the vendor or supplier requires a 1099-MISC form each year.
5. If necessary add, delete, or change the Tax Id#.
Note: F6 returns you to the previous screen, and F9 shows only records that have a Tax ID number.
GL Cross Reference by Branch or by Warehouse (ACT 13)
This option allows you to configure cross-references between warehouse and branch codes. These cross references are used by applications that interface with GL to correctly post GL entries. This functionality is mainly used when there is not a 1 to 1 ration between warehouse and branch codes. (e.g. more than one warehouse is assigned to a branch or warehouse codes do not correspond to branches).
Note: The programs that use these cross references are: GL 111 Sales Summaries By GL Account (Invoicing to GL Interface), GL 112 Inventory Summaries By GL Account (Inventory to GL Interface), and GL 113 Accounts Receivable to General Ledger Interface.
Prior to the introduction of this functionality in 2011, branch and warehouse cross references were created by entering the UPDDATA WHSXBRN and UPDDTA BRNXWHS commands. The entries made in these files did not consider multiple companies. For example, if an entry was made where warehouse RAL cross referenced to branch CHA that entry applied to all companies. With this menu option, GL cross references can be company specific.
1. Go into the Accounting File Maintenance menu (ACT) and select option 13- GL Cross Reference by Branch or by Warehouse.
2. Select to set-up a cross reference from branch to warehouse or from warehouse to branch.
|
3. Press Enter to access the table.
|
4. In the table shown above, there are two companies that use the RAL warehouse. Each of them cross reference to a different branch. Company 0 has two warehouses that cross reference to the same branch.
For company 0, GL entries for warehouse RAL are cross referenced and are posted to branch ANA.
For company 0, GL entries for the NYC warehouse are cross referenced and posted to branch ANA.
For company 2, GL entries for the RAL warehouse are cross referenced and posted to branch AIR.
Note: The Cross Reference Table is not used by Dancik’s Channel Management Solution's (CMS) AP Processes.
Sales Summaries By GL Account - GL 111
Inventory Summaries By G/L Account - GL 112
Report for Interfaces - 110 List G/L Interfaces With Other Applications
AR to GL Interface File - ACT 101
Step-By-Step_-_Creating the AR to GL Interface
The AR to GL Interface File lets you to link AR to GL according to your company’s individual specifications. Once activated, an automatic journal entry is created each month during the final step of the AR End-of-Month Close. The journal entry is placed into Batch 00 of the GL system.
Details of AR to GL Interface
The AR to GL Interface captures all data for the month up to the last Night Job. For example, if you entered cash transactions today, running the AR to GL Interface immediately after entering them excludes these transactions, because you have not run a Night Job.
The AR to GL Interface allows the entry of cash application codes, manually generated, and user-defined transaction codes.
The detail entry screen to enter your GL account numbers to debit and credit depends on the type of transaction codes.
You can request the AR to GL Interface to create your journal entries for the current month or previous month only.
We recommend that you request the AR to GL Interface to create the entries in test mode first. Verify your entries, then rerun the AR to GL Interface Report in update mode. The journal entries created are part of batch 00 (system generated journal entries appear in this batch only).
Step-By-Step - Creating the AR to GL Interface
1. Select option 101- AR To GL Interface File on the Accounting / File Maintenance Menu. The Initial AR to GL Interface File Screen appears.
2. Enter a one-digit Company number.
3. Enter a two-character AR transaction code you want to inquire about, update, or add to the file. Refer to the AR Transaction Code Listing for codes that are already set up in the system, or enter ? to see a listing of the codes.
Note: You must enter an interface record for every AR transaction code, except for those labeled as computer generated. If you omit an interface record for an AR transaction code that is used by the AR system, the resulting journal entry will have a missing account number and will appear as an error on the journal edit.
Interface records should not be created for AR transaction codes that are labeled as computer generated. These codes are generated from the Invoicing system, which has its own interface to GL (See Invoicing to GL Interface File - ACT 102). The Invoicing To GL Interface allows sales to be journalized in much greater detail than the AR Interface would. In fact, the only sales that are journalized by the AR Interface are sales that did not come from Invoicing. These are probably write-offs and miscellaneous sales and credits.
Note: You can run a list of all AR transaction codes from the AR Reports Menu.
4. Press Enter to display the Branch Code and Bank Code fields.
Note: You can record the cash transaction codes interface at the branch and/or bank code level.
The AR to GL Interface Cash Transaction Code Detail screen appears, where you enter the GL account numbers to debit and credit for this cash transaction code.
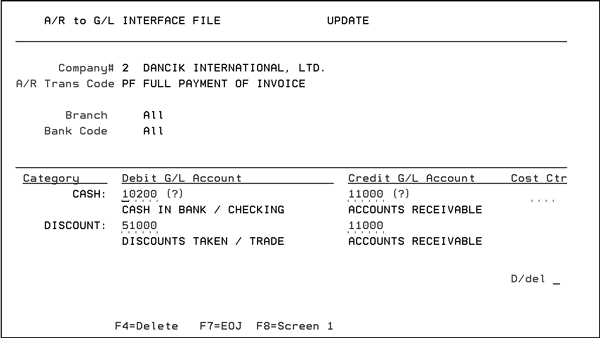
5. Enter the GL Account numbers to debit and credit.
6. If the transaction code entered on the first screen is manually generated or user defined, the phrase Manually Generated appears below the AR Trans Code description.
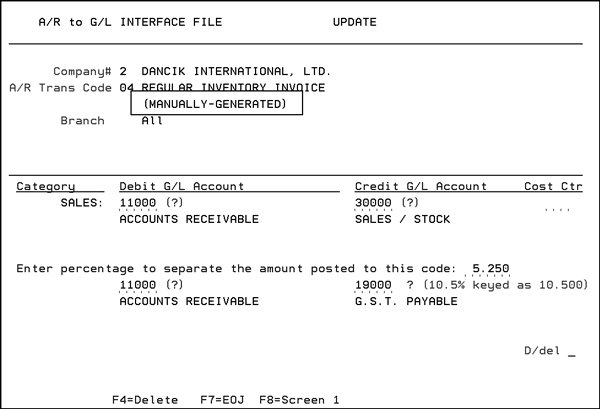
7. When working with manually generated transaction codes, you can take a percentage of the total amount posted to this transaction code to go into another GL account number, for example, sales tax, you can enter the percentage and the GL account number to debit and credit.
8. Run the AR to GL Interface Report, on the Accounts Report menu (RAR) select option 203.
Create a bank code file for cash application. This is used in the AR to GL Interface, if you have different GL account numbers for the different bank codes used during cash application.
Note: For more information, refer to Bank Code File Maintenance - ACT 113.
Create and maintain the AR Transaction Codes. This is done via ACT 112 - AR Transaction Code Desc. Maint.
This option is also in the GL Reports Menu (option 13).
Invoicing to GL Interface File - ACT 102
The Invoicing To GL Interface File lets you link Invoicing Sales to GL according to your company’s individual requirements. Once activated, an automatic journal entry is created each month when you run the Sales to GL Summary Report. The journal entry is placed into Batch 00 of the GL.
Note: This interface is very flexible, letting you to create a very simple interface, or a very detailed and “fine-tuned” interface. Read the procedures carefully, and apply only the features you need.
1. On the Accounting/Maintenance Menu enter option 102 - Invoicing To G/L Interface File. The Initial Invoicing to G/L Interface File screen appears.
2. Enter a one-digit Company number.
3. Enter a one-character Transaction Type Code, as described below:
I - Sales from inventory stock
D - Direct ship sales
S - Special order sales that use the Special Order System
M - Mill direct bill. Direct ship sales that are invoiced by the manufacturer directly to your customer, for which you only collect a commission
C - Intercompany sales to customers designated as intercompany by the IC customer type code in the Billto Customer File.
4. Enter a three-character Branch code to limit to a specific branch, or leave blank to include all branches.
5. Enter a three-character Warehouse code to limit to a specific warehouse, or leave blank to include all warehouses.
6. Enter a three-character Cost Center code to limit to a specific cost center, or leave blank to include all cost centers.
7. Enter Action code A to add a new transaction code, U to update change an existing code, or I or leave blank to inquire about or view an existing code, and press Enter. The Detailed Invoicing to G/L Interface File screen appears.
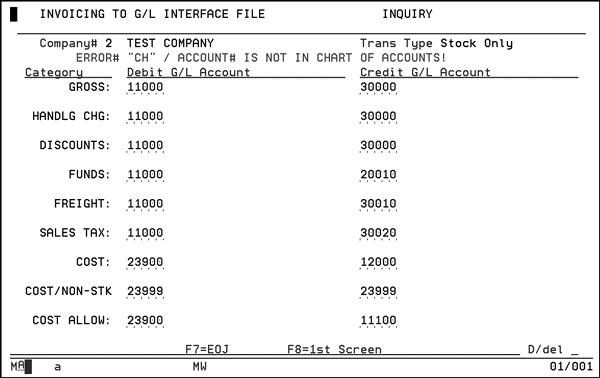
Note: The GL System lets you have a single master account number, and journalize for branches and cost centers with each account number. You can assign the same account numbers regardless of branch or cost center. Depending on how you have structured your chart of accounts, you may not need to create interface file records for each branch, warehouse, or cost center. If you have different account numbers for each branch or cost center, you need to create separate interface records for them.
To test this interface, use Sales Summaries By GL Account on the Sales Reports Menu or on the G/L Demand Reports Menu. The sort options you choose when running the report should coincide with your entries in this file.
8. Define the G/L account to debit and the GL account to credit for each category of sales, as shown. Each category relates to a column of the Monthly Invoice Register.
Note: The Invoice Register also contains columns for Misc F6 Sales and Misc F6 Cost. These columns do not need to be included here, as all miscellaneous F6 transactions let the operator enter a GL account number and are, therefore, automatically interfaced to GL when this interface is activated.
Some notes about Invoicing to GL Interface File, Detailed Screen:
Cost allowances should also debit a cost-of-sales account and credit rebates receivable. Note that cost allowances are usually negative and, therefore, would actually credit (reduce) cost of sales and debit (increase) rebates receivable.
The Cost/Non-Stk category is for returns that did not affect inventory. These are costs that affect the Invoicing system for the purpose of G.P. percentage and commissions payable. The Invoicing to GL Interface File, Detailed screen shows cost/non-stk debited and credited to the same clearing account. This allows GL to track the activity in the account while the balance always remains zero.
As no inventory is involved, no cost applies from a GL standpoint. The actual cost, if any, is probably posted through another system, such as inventory or AP.
To set up the Invoicing to GL Interface File: example_1
To set up the Invoicing to GL Interface File: example_2
To set up the Invoicing to GL Interface File, example 1
You are a single-branch, single-company number operation, and you do not break sales into multiple cost centers.
1. Create the following interface records:
Company 0, transaction type code I, all other fields blank
Company 0, transaction type code D, all other fields blank
Company 0, transaction type code S, all other fields blank
Company 0, transaction type code M, all other fields blank
Company 0, transaction type code C, all other fields blank
2. When you run G/L Sales Report and create monthly journal, you must choose to sort by company number only.
To set up the Invoicing to G/L Interface File, example 2
You are a single-company operation, with branches NYC and STL, and you do not break sales into multiple cost centers.
1. Do one of the following:
If you have a single master G/L account number, regardless of the branch, then complete the fields exactly as shown in Example 1. When you run G/L Sales Report and create monthly journal you must sort by company number/branch.
If you have separate G/L account numbers for each branch for example, 10101 for Sales NYC and 10102 for Sales STL, then create the following interface records:
— Company #0, transaction type code I, branch NYC, all other fields blank
— Company #0, transaction type code D, branch NYC, all other fields blank
— Company #0, transaction type code S, branch NYC, all other fields blank
— Company #0, transaction type code M, branch NYC, all other fields blank
— Company #0, transaction type code C, branch NYC, all other fields blank
— Company #0, transaction type code I, branch STL, all other fields blank
— Company #0, transaction type code D, branch STL, all other fields blank
— Company #0, transaction type code S, branch STL, all other fields blank
— Company #0, transaction type code M, branch STL, all other fields blank
— Company #0, transaction type code C, branch STL, all other fields blank
2. When you run the G/L Sales Report and create the monthly journal, sort by company number/branch.
Labor/Expense items bypass all inventory automatically, but still affect sales and cost of sales. The Invoicing to GL interface should be updated to properly account for these items.
For example, you will probably want to assign these items to special cost centers, which are then mapped to the appropriate GL accounts.
Note: Labor/Expense items may be used effectively to manage jobs and projects that include labor, such as installations and fabrications.
Recommended Accounting Techniques for Labor/Expense Items
Try to have pre-set prices, costs, and profit margins for each labor/expense item.
Use cost centers for Labor/Expense items as follows:
— Use a separate set of cost centers for the labor/expense items than those that are used for your inventory items. This enables you to direct the “Invoicing to GL Interface” to use special GL accounts whenever these special labor/expense cost centers are used. For example, Cost Center LAB could map to GL accounts for “Accrued Labor”.
— If you add the price of labor into inventory items, such as charging 15.99 SF for an inventory item instead of 10.99 for inventory and 5.00 for labor, then you may need to use the cost centers that relate to each product, and not create separate new labor cost centers. For example, labor items that relate to carpet should be coded to the carpet cost center, wood labor to the wood cost center, etc. This will keep the statistics by cost center accurate, because both the prices and costs are in the same cost center (carpet product plus carpet labor, etc.).
Note: This approach is not recommended unless you absolutely must include the price of labor within the price of the product. It is also not recommend because it does not allow for accurate GP analysis at the item and line item level. It is recommended that your labor/service items are marked up in a similar way to marking up inventory.
Create separate labor items for each type of labor related to each product cost center (ceramic, carpet, etc.)
Carefully plan how the Invoicing to GL Interface should work for these items.
In order to analyze the “fabrication” or “installation” side of your business, try to identify all the items associated with fabrication and installation, so that reports can zero in on those items.
Entering Invoices From Orders - IVC 1
Invoicing by Status Codes - IVC 2
Sales Summaries by G/L Account - GL 111
Inventory Maintenance - Best Practices
Inventory to GL Interface File - ACT 103
The Inventory to GL interface lets you link inventory transactions such as receipts, adjustments, and transfers, to the GL according to your company’s individual requirements.
Note: The actual report is run via option 112 on the General Ledger Menu (GL).
The Inventory to GL Interface is flexible in allowing you to enter a simple interface or complex format.
Note: The Extended Interface format is recommended if you want to interface with the G/L. The simple interface does not include all of the user-defined inventory adjustment. Only system- suggested adjustment codes are used to create journal entries. The simple interface ONLY creates the journal entry.
1. The initial screen in this process configures the interface format. Select a Option 2 and press Enter. Option 2 superseded option 1 several years ago.
2. Enter an Action Code and Password if necessary, and press Enter.
3. Select a company to work with and press Enter. The next screen to appear allows you to configure Receipts, Transfers, or Adjustments.
4. Enter an X in the Opt column to select an option and press Enter. In this example, Receipts was selected. The screen that appears shows the different types of receipts that appear on the Inventory to GL report.
|
5. To further define Inter-Company receipts by warehouse, enter an X into the Opt field of the system level record (for all warehouses), or any specific warehouses, and press Enter.
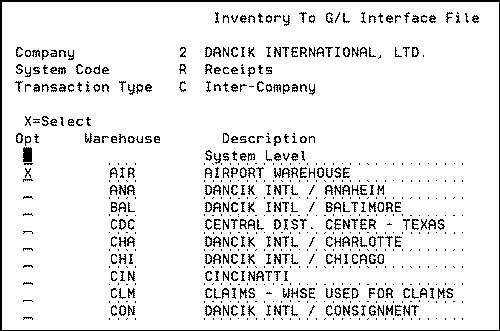
Note: The top portion of the screen displays your choices and your progress.
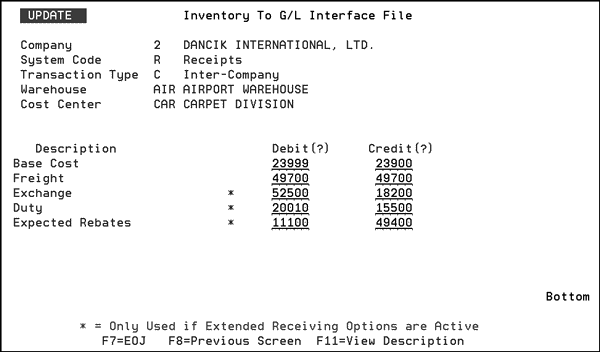
6. The next screen in the process of configuring the Inventory to GL report is to assign by cost center.
7. Select the system level record, or a cost center and press Enter. The next screen allows you to enter the appropriate General Ledger accounts that will be affected when the GL interface is run.
Inventory Summaries By G/L Account - GL 112
Inventory Receipts by Item Number - INV 5
Inventory Receipts (pre-receive and back order fill) Menu - INB
Extended Receiving Functions (Duty, Exchange) and the Inventory to GL Interface
Report for Interfaces - 110 List G/L Interfaces With Other Applications
What cost to use - Average Cost or Standard Cost
Inventory Maintenance - Best Practices
AR Dispute Code File - ACT 104
The AR dispute codes let you to designate whether an invoice is in dispute because of errors in charges such as freight, tax, or pricing. Alternately, you can age or omit the disputed invoices from accessing finance charges.
1. On the Accounting File Maintenance menu, enter option 104 - AR Dispute Codes File.
The suggested dispute codes are as follows:
C - Claim/Credit Pending
D - Discount Not Allowed
F - Refused Freight Chg
O - Overpaid Invoice
P - Pricing Error
T - Refused Sales Tax
2. On the Profile screen, enter a one-character dispute code to inquire about, update, or add to the file.
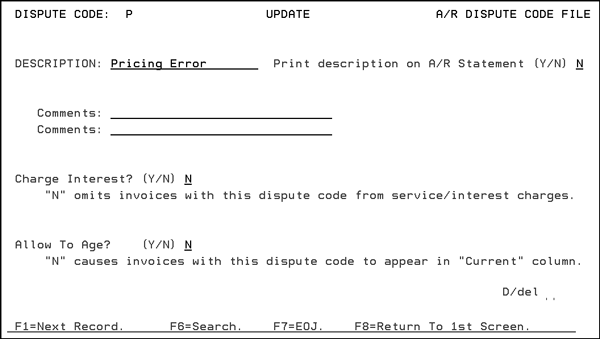
Field Name |
Description/Instructions |
Description |
Displays the type of dispute. |
Print Description on A/R Statement? |
Enter Y if you want the dispute description printed on the A/R statement. |
Comments |
You can enter two lines of remarks to help in future references to this action. |
Charge Interest? |
Enter N to omit invoices with this dispute code from service/interest charges. |
Allow To Age? |
Enter N to cause invoices with this dispute code to appear in Current column. If the dispute code Age Normally field is set to N, all items with that dispute code remain in the current column regardless of the actual age. This option affects all accounts receivable screens, reports, and statements. |
D/DEL |
Enter D in this field to delete this record. |
The following function keys are available from this screen.
Function |
Description |
F1 |
To go to the next dispute code without going back to the first screen. This is helpful if you are updating or viewing record by record within the A/R Dispute Code File. |
F6 |
To search for dispute codes. |
F7 |
To return to menu. |
F8 |
To return to first screen. |
AR - Entering Cash on the Ledger Screen
Print_Open_A_R_Audit_Reports_-_RAR_103
AR - Enter_Cash_via_Data_File_Utility_Screen
You can set up multiple discount levels for payment terms, enter special descriptions for terms, and institute an option for Terms by Product. Terms by Product is activated by assigning a customer or an order to terms code M. The system then checks the Product Line File for the terms related to each product. This means that a single order can have lines with different terms. The system automatically divides the order into multiple invoices when invoiced at one invoice for each set of terms found on the order.
The Payment Terms File defines each payment terms code. The code can be assigned to a customer via the Billto File, or to an order on the Header Screen. A one-character code can be used instead of the payment Terms Percentage and Terms Days fields, or in some cases, in addition to the other terms fields. Any set of terms that can be defined by combining the Terms Percentage and Terms Days fields can also be defined by creating a terms file record with the same percentage and days.
Do not use the following pre-defined Terms Codes:
* - Use Floor Plan Payment Terms File - ACT 111
M - Manufacturer’s term assigned to products
1 - 10th of the following month, cut-off 25th. You can add % discounts to this term code.
2 - 10th of the following month, cut-off 30th. You can add % discounts to this term code.
1. On the Accounting/Maintenance Menu, select option 105 - Payment Terms File. The Payment Terms File screen appears.
2. Enter the necessary information and press Enter.
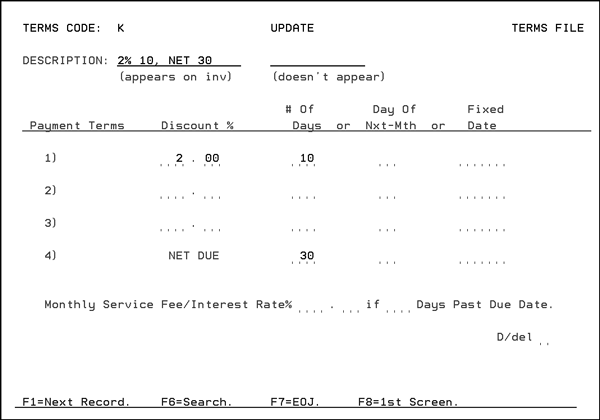
The Payment Terms File includes up to three different discount percentages with corresponding days, plus a net due date. It can accommodate all terms that have a due date for discount, and separate complex terms such as 5% 10 days, 4% 15 days, 2% 30 days, or Net 45.
3. The field at the bottom of the screen, Monthly Service Fee/Interest Rate%..... if...... Days Past Due Date, only appears if the Method C Interest Charges/Service Fees is activated in the Company File. Method C is an alternative to Methods A and B interest/service charge processing. The service fee/interest rate is a monthly rate.
The number of days past the Net Due date is considered the “grace period” before service fees are assessed. This field can not be set to less than 1. Having this option in the Payment Terms file provides for service fee variations, based upon the customer and/or products. This is more flexible than a “global” approach.
The Service Fee/Interest Rate% field can be left blank indicating the Billto File interest rate should be used instead. If this rate is entered, then all invoices with this terms code that are subject to service fees/interest charges will use this rate.
Terms, Discounts, and Handling Charges
Floor Plan Payment Terms File - ACT 111
Company Settings Option 2 - AR and Credit Options
Applying Interest Charges
How Transactions are Aged
AR Customer Floor Plan Assignments - ACT 110
Cash Receipts by Terms Code Report - RAR 109
How can I see terms at Order Inquiry
Why can't I change order terms through the F6 function?
Promo for different terms code for direct orders only.
How do I make a billto customer have COD terms?
Base Commission Rates File - ACT 106
This file allows you to establish and update commission rates for your sales force. You can also add or subtract from a commission (by percentage points) using several parameters. Base commissions may be adjusted based upon gross profit percentage, age of invoices, and other factors. For example, this file supports a positive or negative percentage for “cuts”. This means you can either raise or lower commission rates if the order is a cut. Cuts are identified by the “C” code in the restriction field of a line item and are usually associated with rolled goods or laminates.
1. When this option is accessed via the Accounting Files or Commission menus, and a password is entered, the following screen displays. This screen displays all of the base commission records already established on your system. You can create base commissions that are very general, such as one rate for an entire company, including all branches, cost centers, and salespeople. You can also create very specific base commission rates that apply to one salesperson and/or cost center. In the example below, the most specific record shown is for company 2, branch RAL, cost center ARM, and salesperson BWO. A line item must match all of the criteria for that commission record to be applied.
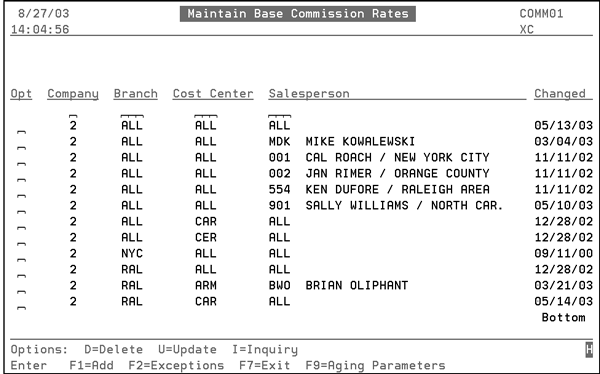
2. You can search by entering values above any of the columns. Enter the necessary code in the Opt column of the entry you want to work with, inquire on, or delete. The following screen is an example of a Base Commission record.
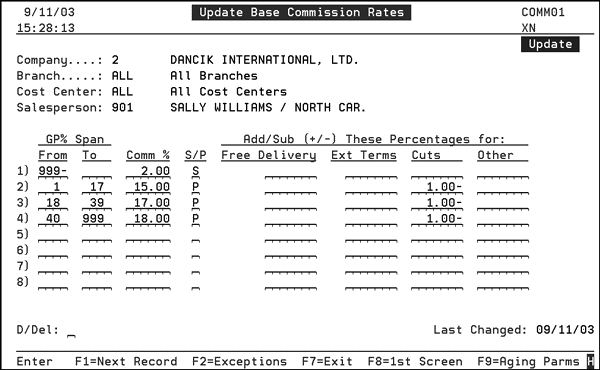
The example above applies to salesperson 901, for sales with any branch and cost center within company #2. The commission rates shown above should be interpreted as follows:
Sales with gross profit percentage of 0.00% or less receive a commission equal to 2.00% of the sales value. (This entry covers all sales that have zero gross profit margin, or a negative gross profit margin. This may be important to compensate for sales of “drops” and other “below cost” items.)
Sales with gross profit percentages between 1-17%, receive a commission of 15.00% of the gross profit value.
17.00% of gross profit is paid on sales with gross profit percentages between 18-39% (with rounding the commission range is between 17.5-39.49%).
18.00% of gross profit is paid on sales with gross profit percentages above 40% (with rounding the commission range starts at 39.5%).
A 1.00% reduction in commission is applied to sales flagged as “cuts”.
The fields on this screen are described in the following table.
Field Name |
Description |
G.P.% Span From - To |
From - Enter the gross profit percent to begin your span. This percentage must be less than the G.P.% To field on the previous line. To - Enter the gross profit percent to end your range span. The number you enter must be greater than the amount in the From field. The system rounds the percentage on the invoice. For example, 1.49% will round down to 1% and 1.50% will round up to 2%. |
Comm% |
Enter the commission percentage to apply if the G.P.% Span is met. Assume two decimal places when entering a commission percentage. For example, you can enter 2.00 if you want to apply a 2% commission for G.P.% Spans met. |
S/P |
Sales/Profit - Enter S if the percentage applies to sales or P is the percentage applies to profits. |
Free-Deliv |
If the Billto file Delivery Charge field is set to N and the sale is a delivery (has a truck route), the percentage entered will be added or subtracted from the commission rate. This figure should normally be entered as a negative number. |
Ext-Terms |
This field is not active, as this feature was superseded by the F9 screen. |
Cuts |
You can either raise or lower commission rates if the order is a cut. Cuts are identified by the C code in the resurrection field of a line item and are usually associated with rolled goods or laminates. The percentage you enter will not apply to special orders or direct shipments. |
Other |
This field is not currently used and is reserved for future use. |
3. Press F2 to establish exceptions to the commission file. Establish exceptions and press F2 to return to the Base Commission File screen.
4. To establish commission adjustments based upon invoice aging parameters, press F9. The Update Commission Aging Parameters screen appears.
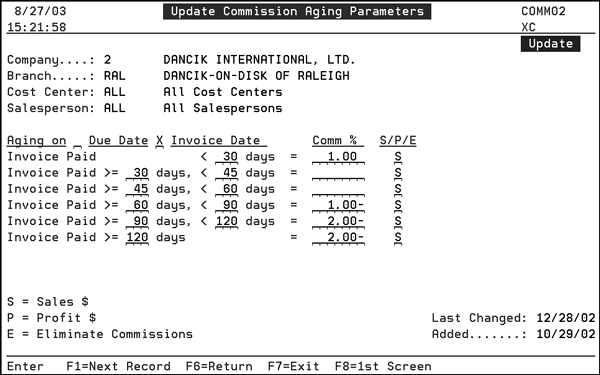
5. In the example above, if an invoice is paid in less than 30 days 1.00% gets added to the base commission. If the invoice is paid between 30 and 60 days, the commission rate is not affected. An invoice paid after 60 days but less than 90 days has its commission rate reduced by 1.00%. Invoices paid equal or later than 90 days are reduced by 2.00%. The “S” code means the adjustment is based upon sales. A “P” code means the commission adjustments are based on gross profit. An “E” code eliminates the commission altogether.
Note: The Aging Parameters screen is only applicable when the X by Y Commissions Report is run based upon payment date.
The fields on the Aging Parameters Screen are described in the following table.
Field |
Description |
Aging on ___ Due Date___ Invoice Date |
Enter X before Due Date to calculate the age of a payment comparing the payment due to the due date. Enter X before Invoice Date to calculate the age of a payment by comparing the payment date to the invoice date. |
Days fields |
Fill in all of the days fields, even if some date ranges have the same commission % entries. You can enter any numeric values, as long as the days in the left column are always equal to the days in the right column of the entry just above. This ensures that there are no “holes” in the days covered. |
Comm% |
The commission % to add or subtract from the Base Commission Rate. |
S/P/E |
S calculates commission based on sales. P calculates commission based on gross profit. E eliminates commission on payments that meet the respective aging parameter. |
6. Press F6 to return to the Base Commission screen, F1 to go to the next record in the file, F8 to go to the first screen (search), or F7 to exit.
Commissions Exceptions File - ACT 107
Assigning Salespeople to Orders
Commission Report Based on Price Class (RSA 15)
Commissions Exceptions File - ACT 107
The Commissions Exceptions File allows you to alter, eliminate, or change the commissions based on your exception parameters. Enter the most specific hierarchy first. The system looks for the first exception record and assigns it to the invoice.
Note: These exceptions only apply to the Salesperson assigned on the invoices.
1. On the Accounting File/Maintenance menu, enter option 107 - Commission Rates Exception File. The initial screen appears.
2. Enter the necessary information and press Enter. The next screen lists all of the possible exceptions.
Note: Press F6 to search and select the records in the Commission Rate Exception File.
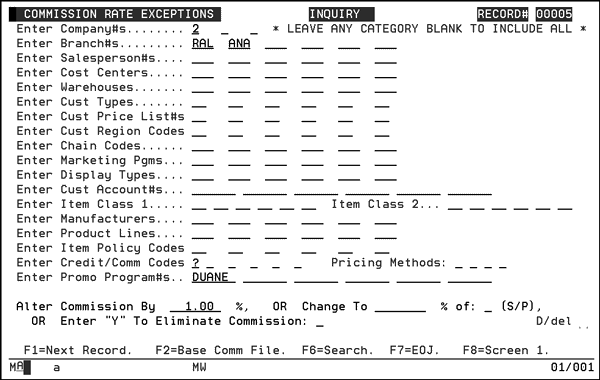
3. You can apply an exception to any combination of the parameters on this screen. You can apply exceptions for many commonly used fields, such as branch, warehouse, customer type, and item classes. You may also create exceptions that apply to special fields that relate to pricing and margins, such as by promotional program number. This option enables you to alter commission rates for specific promotional programs. This relates to the program number as it is entered in the Promotional Pricing File.
4. You can create commission exceptions by pricing method code. This option enables you to alter commission rates based on the pricing method used when the order was priced. For example, you could reduce commission every time a price is overridden, which is identified by pricing method X. You could alter commissions for all in-house promotions by specifying pricing method H.
Note: To access a listing of the available Pricing Method Codes, go into the Classification Codes File (menu option CUS 19) and enter PM as the Category.
5. You can create commission exceptions by Credit/Comm Codes, which is a code that can be entered via Order Entry and Order Change. Use the Credit/Comm code to flag certain types of sales such as “blowout price” or damaged goods, etc. You may also create commission exceptions based upon item policy codes such as policy “DI” for discontinued, and policy “SP” for “on specials list”.
6. Commission exceptions can each be one of the following three types:
“Alter By” - This type of exception raises or lowers the commission by a percentage. Many “Alter By” exceptions can be applied to the same line item.
“Change To” - This type of exception replaces the commission with the “change to” percent-age, and only one “change to” can apply to any line item. Therefore the sequence in which you enter “change to” exceptions is very important. Enter them in the sequence of “most applicable” to “least applicable”.
“Eliminate Commission” - This type of exception works exactly like a “change to” except that it changes the commission rate to zero.
7. Press F10 on the initial screen of Commission Rate Exceptions File to re-sequence the commission exception records. Each of the existing records are kept in the same order, but spaced five record numbers apart. For example, exception numbers 1, 2, and 3 would be re-sequenced as record numbers 5, 10, and 15. This sequencing enables you to insert records in between by specifying those record numbers. The program employs the following logic for adding new exception records.
8. The X by Y Commission Report, detailed versions, lists the exception record number that is assigned by the program to each exception. These are listed for each line item that has an exception applied. It is recommended that you supply a list of the exception records (and their meaning) to your salespeople, so that they can clearly see why all exceptions were made, by cross referencing number that appear on their commission reports.
Base Commission Rates File - ACT 106
Assigning Salespeople to Orders
Maintain Salesperson Assignments
X by Y Sales Commission Report (Regular Format)
X by Y Sales Commission Report (Special Format by Order Number)
Commission Report Based on Price Class (RSA 15)
Sequencing Commission Exceptions
X by Y Commissions Report with Invoices written off
GL Account Validation Table - ACT 108
You can use the GL Validation Maintenance program to prevent invalid GL account number combinations, based on the Account #/Branch/Cost Center codes. You set the flag in Company Settings to use this feature and use this file when running the GL Edit and A/P Edit to ensure that the Account#/Branch/Cost Center combination is valid.
The maintenance program has three options:
Account # table
Branch table
Cost Center table
1. On the Accounting/Maintenance Menu, select option 108 - /L Account Validation Table.
2. On this screen, select the table you want to maintain.
The table maintenance for all three tables is very similar, except that the Branch and Cost Center allow you to enter a range of account numbers, and the Account # table does not allow a range of branches or cost centers.
Note: The first column has question mark (?) lookup capability, and is based on which table you are maintaining. The Type Value and To Value fields also have question mark (?) lookup capability and the lookups are based on the Type code.
The next figure is a example GL Account Validation Table Maintenance for Account Numbers. The tables for branch and cost center are very similar to this one. Account# Table.
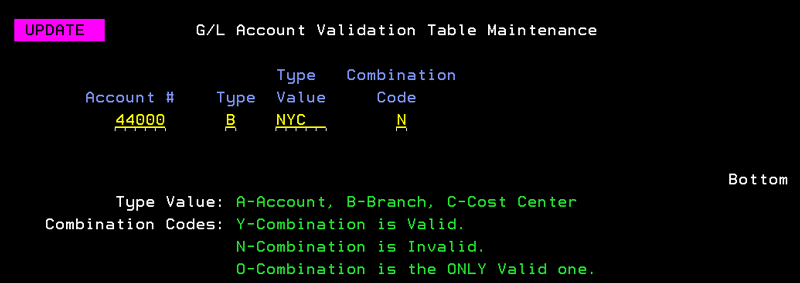
Field Name |
Description/Instructions |
Account # |
Enter a valid G/L account number. |
Type |
Enter B for branch or C for cost center. |
Type Value |
Enter a valid branch or cost center. The validation is based on which value you entered in the Type field. |
Combination Code |
Enter:
|
AP and GL Defaults Maintenance File - ACT 109
The AP & GL Default File allows you to enter variances for AP vs. manifest (receipts) reconciliation and default GL account number for various entries.
In order to utilize the Manifest window in AP Entry, the following system setup procedures are necessary.
Ensure that the purchases accounts in your Chart of Accounts File have Y in the Purchases Account field. The Y identifies those accounts as purchasing accounts for the AP Entry program and Reconciliation Reports. Purchases accounts are used for booking material purchases and should be in balance with the material (base) costs in the Receiving System.
Have a financial officer within your company fill in the AP and GL Defaults Maintenance File. This file is accessed via option 209 on the Accounting File Maintenance Menu.
We recommend setting the Warehouse Settings Table to force users to enter a manifest when receiving inventory to ensure that every receipt will have a manifest number.
1. On the Accounting File Maintenance menu (ACT), enter option 109. The AP and General Ledger Defaults initial screen appears.
2. Enter Action Code A, U, or I and a Password, and press Enter. The next screen lets you select a company.
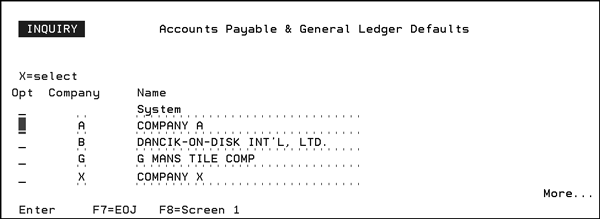
3. Type an X next in the Opt column next to your selection and press Enter. The defaults for the AP and GL files appear on the next screen.
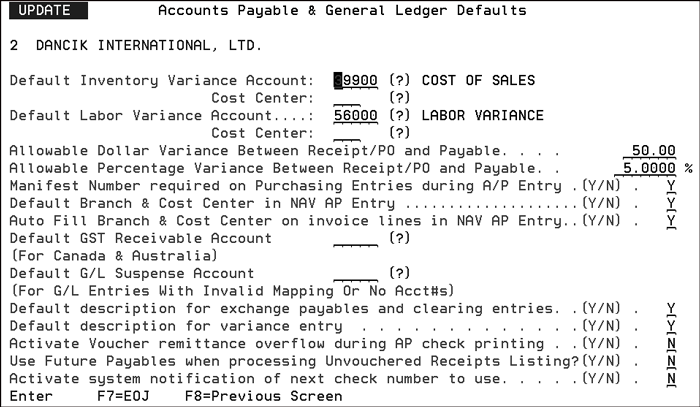
Field Name |
Description/Instructions |
Default Inventory Variance Account: Cost Center: |
Enter the GL account number to be used for recording variances between inventory receipts and AP purchases. You can enter a question mark (?) in this field to search the Chart of Accounts File and select from a list. |
Allowable Dollar Variance Between Receipt and Payable |
Enter the maximum dollar amount allowable for automatically accepting a variance when entering payables. The AP Entry Manifest Window will not accept a variance between purchases and receipts that is higher than this amount when the Accept Variance function key is pressed. |
Allowable Percentage Variance Between Receipt and Payable |
Enter the maximum percentage variance allowable to automatically accept a variance when entering payables. Note that the dollar and percentage variances must be acceptable for automatic acceptance. The AP Entry Manifest Window will not allow a variance greater than this percentage between the purchases and receipts when the Accept Variance function is pressed. |
Manifest Number required on Purchasing Entries during AP Entry |
Enter Y to force the user to enter a manifest number for all AP purchasing entries. If this option is set to Y, a manifest number is required whenever a purchases account is entered on the AP Entry Screen. We recommend that system administrators set this option to Y if AP and receiving are to be reconciled by manifest number. |
Default Branch & Cost Center in NAV AP Entry |
Directs the system to automatically import the default branch and cost center when entering AP transactions in Navigator. Note: Default branches and cost centers are established in the Vendor and Supplier Files. |
Auto Fill Branch & Cost Center on invoice lines in NAV AP Entry |
Activating this setting directs Navigator AP to insert the same cost center and branch entered on the previous line. |
Default GST Receivable Account |
Canadian and Australian companies should enter a GL account number representing GST receivable. An entry must be made in this field for the system to automatically calculate the 10% Goods and Service Tax on invoices. |
Default GL Suspense Account |
If a GL account number is entered here, it is used by automatic GL interfaces whenever an invalid or missing account number is encountered. For example, if an interface from the Invoicing System could not find a GL account number for a certain figure, this suspense account number is used. Otherwise, account number 00000 is used and shown as an error. |
Default description for exchange payables and clearing entries. |
Enter Y if you want a description of exchange payables in the description field when expensing invoice. |
Default description for variance entry |
Enter Y if you want a description of variance in the description field when expensing invoice. |
Activate Voucher remittance overflow during AP check printing |
This feature gives you the option to continue to print the Remittance Advice on the next check and void the check or to print the Remittance Advice on a blank page that you can attach to a check. This allows payment of more invoices than can be detailed on a single check stub without voiding checks in the sequence. If you activate this option, the message “See attached remittance for detail vouchers” appears on the check stub and the voucher details are printed on a separate document. |
Use Future Payables when processing Unvouchered Receipts Listing |
This option enables you to choose whether or not you want to check Future Payables on the Unvouchered Receipts Listing. Enter Y if you want the Unvouchered Receipts Listing to check the Future Payables file as well as current payables. |
Understanding AP vs. Manifest Reconciliation
Update Manifests By Receipt - AP 9
Clear/Reinstate a Manifest - AP 10
Manifest Inquiry & Listing - AP 11
Manifest Reconciliation in Navigator
Using the AP Entry Program to Reconcile AP and Inventory via a Manifest Number
AR Customer Floor Plan Assignments - ACT 110
This file is a cross-reference table that links Floor Plan companies to Floor Plan customers. In effect, this file establishes the default Floor Plan account number to use for each Floor Plan customer. This cross-reference file also specifies the payment terms.
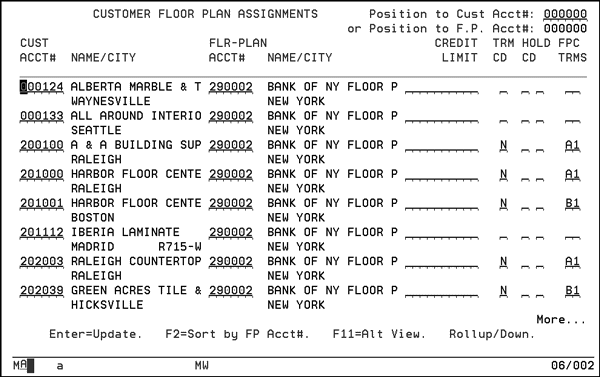
Field Name |
Description/Instructions |
Position to Cust Acct# |
This field lets you reposition the search at a specific customer account number when displaying the file in the normal sort by customer account number. |
or Position to F.P. Acct# |
This field lets you reposition the search at a specific Floor Plan company account number after pressing F2 to sort by Floor Plan account. |
Cust Acct # |
The customer account number. |
Name/City |
The name and city of the customer. |
FLR-Plan Acct# |
The Floor Plan company’s account. |
Name/City |
The Floor Plan company’s name and city. |
Credit Limit |
This field is not currently used. |
TRM CD |
The payment terms code that governs payment to you by the Floor Plan company. |
Hold CD |
This field is not currently used. |
FPC TRMS |
The Floor Plan payment terms code that governs the customer’s payment to the Floor Plan company. |
Floor Plan Payment Terms File - ACT 111
Miscellaneous Floor Plan Reports
Held_Orders_and_Credit_Release_(AR_15)
Floor Plan Payment Terms File - ACT 111
The Floor Plan Payment Terms File is used to define the terms offered by the Floor Plan company to your customers. Floor plan payment terms codes can be entered into the AR Customer Floor Plan Assignments File. Those terms codes are automatically used on all Floor Plan orders for that customer unless overridden on specific orders or invoices.
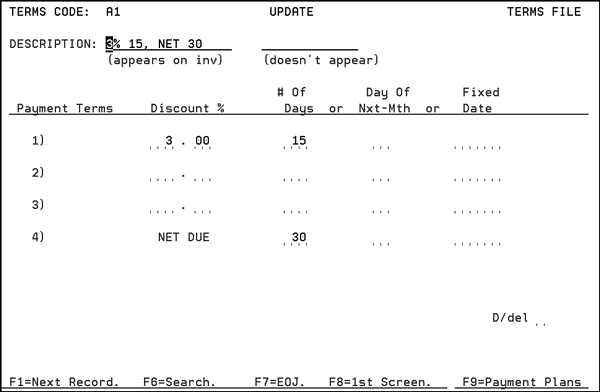
The Floor Plan Payment Terms File includes up to three different discount percentages with corresponding days in addition to a net due date. It can accommodate all terms that have multiple due dates for discount, such as 5% 10 days, 4% 15 days, 2% 30 days, or Net 45. You have a choice of entering terms as the number of days past the invoice date, a fixed day of the following month, or as a completely fixed date. You can combine these fields in any manner to create terms such as 2% 10th of next month, net due 25th of next month, or 1% 15 days, net due June 15th. You can enter data into only one of the days, day of month, or fixed date fields on each line, but you can use different fields on different lines as described above.
The following table describes the fields on this screen.
Field Name |
Description/Instructions |
Terms Code |
The code as entered in the Floor Plan Payment Terms File Entry Screen. |
Description (appears on inv) |
The description of the terms code as it appears on invoices and other documents. |
Description (does not appear) |
Extra description space for the Search Screen and terms code list. This part of the description does not appear on any documents. |
Payment Terms |
A chart consisting of up to four levels of discount in addition to a net due date. |
Discount% |
The discount percentage allowed if paid by the due date. |
Days |
The number of days from the date of invoice through which the discount or net due is acceptable. Always enter in the NET DUE days, day of month, or fixed date field. The Net Due field controls the aging of AR invoices. |
Day of Next Month |
Represents “prox” terms. Enter a day of the following month in this field. |
Fixed Date |
Enter an actual date in MMDDYY format. This is normally used for seasonal goods and you would update the date every year or every few months. |
Some of the plans can be configured for multiple payments.
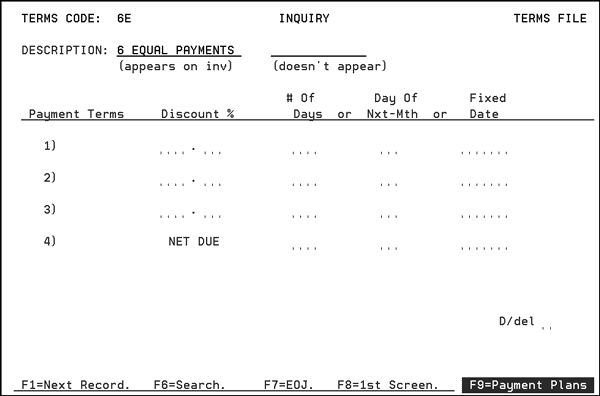
Notice the F9=Payment Plans function is highlighted. This indicates this plan includes additional information concerning the multiple payments.
Note: For payment plans that do not use multiple payments, the F9 function is not active.
|
Field |
Description |
Description (appears on inv) (doesn’t appear) |
If you want the description of the payment plan to appear on the invoice, enter a description in the appears on inv field. Enter any other description in the doesn’t appear field. |
%-of-Total To Pay |
The percentage of the total amount that each payment equals. In this example, all six payments are equal. In other plans the percentages may not be equal. These percentage must total up to 100%. |
#-Of-Days |
Number of days which the payment must be made. |
#-Of-Mths |
Number of months in which the payment must be made. |
Day-Of-Next-Month |
The day within the next month that the payment is due. |
Fixed Date |
An agreed upon payment due date. |
Cut-Off Day |
This field relates only to the Day-Of- Next-Month option. It works as follows: If you enter 15, and the Invoice Date day-of-month is after the 15th, the 1st date of the payment plan will be for NEXT month. If the Invoice Date day-of-month is equal to or before the 15th, then the 1st date of the payment plan will be THIS month. |
D/del |
Enter a D in this field to delete this record. |
You can only use one of the four possible payment parameters for any single payment. For example, if you choose to set a fixed date for one of the payments you cannot make an entry in the #-Of-Days column for that payment.
Consider the payment parameters shown above for Payment Plan 6E:
The first payment is due on the 30th of the next month after the sale.
The next three payments are to be paid 15 days apart starting 15 days after the first payment.
The fifth payment is to be to paid one month after the last of the 15 day payments.
The last payment, and the end of the plan, is scheduled for Oct. 5, 2004 (100504).
AR Customer Floor Plan Assignments - ACT 110
Miscellaneous Floor Plan Reports
Held_Orders_and_Credit_Release_(AR_15)
Accounts Receivable Transaction Code Description Maintenance - ACT 112
This option creates User Defined Payment Codes that are used to account for manually generated (invoices not done through the normal system generated invoicing program) AR transactions.
Note: The code numbers (i.e. 7A, 7B) are pre-defined by Dancik but the Descriptions are user defined.
For example, during cash entry you can enter a bounced check fee and create an immediate invoice on the customer’s account. By doing so, you are required to enter a manual transaction code.
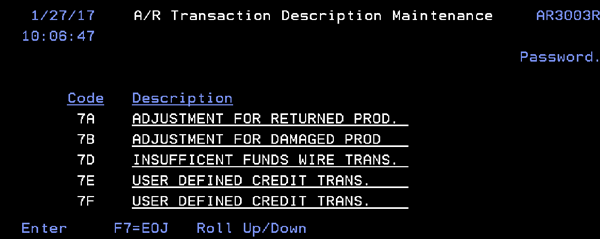
Codes 7A - 7Z are for credit invoices
Codes 8A - 8Z are for debit invoices
To create a new code or edit an existing one, replace the current text and press Enter.
Bank Code File Maintenance - ACT 113
Creating an IFS Bank File of AP Check Transactions
These codes enable you to complete the AR to GL Interface. After these codes are created, you can create your AR to GL Interface for all cash codes used in cash application, user-defined codes, and manually generated codes.
Enter the Company number, Bank Code, and Bank Name. Enter Y if you want this to be the default bank code while applying cash. Enter the general ledger account number for this bank code.
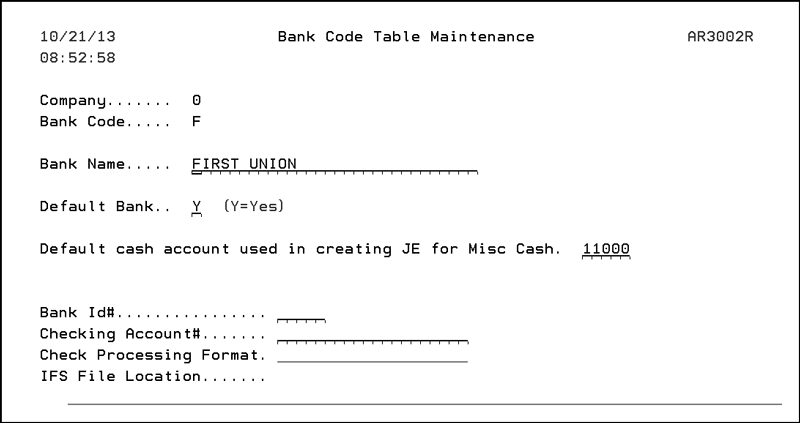
Creating an IFS Bank File of AP Check Transactions
The 4 settings at the bottom of the screen can be used to create an IFS Bank File of AP check transactions from the prior day. This file can then be transferred to your bank for import into their system.
The Bank Id# and Checking Account# are supplied by your bank. This information is similar to the routing and account numbers for a checking account.
The Check Processing Format is not used at this time.
The IFS Location is where the file will be placed on the IFS. The default location is /HOME/AMT but a new location can be entered.
Notes
The IFS file is created as part of the Night Jobs process.
Voided checks are included.
Current and future checks are included within same file.
Manually generated checks are also included.
Note: Currently the file is coded to Wells Fargo’s - Standard ARP Inbound Specification. Contact Dancik to discuss adding your bank’s specifications.
Example Inbound Bank Statement
*03002590000096140002640 - (This is the File Header.)
000026536407011300000961400026432000004875013 M COMPANY (These are Detail Records)
00002653650701130000096140002643200000331508 A & W BEARINGS & SUPPLY CO.
00002653660701130000096140002643200000655015 ABBEY CARPET COMPANY, INC
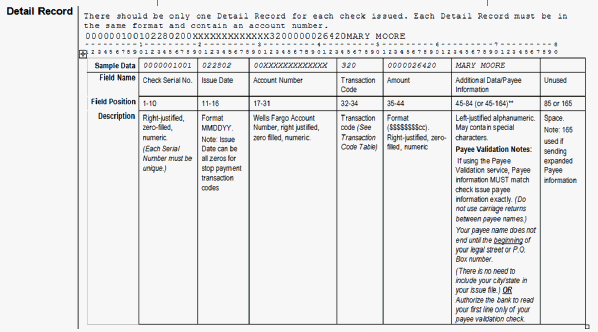
What do all those numbers mean?
File Header

File Detail Record
Supplier Cross Reference Table Maintenance - ACT 114
This table allows you to enter multiple suppliers for purchase orders and reference them to one supplier for AP entry.
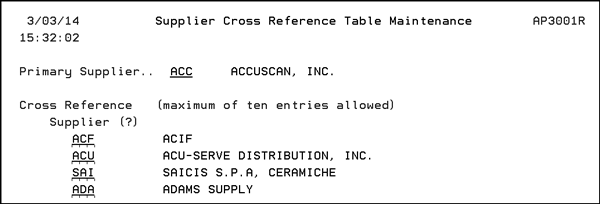
Details of Supplier Cross-Reference Table
If you cross-reference a supplier in one table, you cannot cross-reference it in another table.
The AP entry and the Manifest Reconciliation Report use the manifests entered from the cross-referenced table to reconcile.
The search for unvouchered manifests during AP entry shows all unvouchered manifests for the cross-referenced suppliers as if they were entered under the primary supplier.
Payment Method Maintenance - ACT 115
Recommended Set-up for Payment Codes
You can define your own payment method codes to control how payments are entered on the Cash Register screen and reported at the end of the day.
Some examples of payment method codes you might define are:
CA - cash
CR - check
SC - store credit
VI - Visa
MC - Mastercard
1. On the Accounting/File Maintenance menu, enter option 115 - Payment Method Code Maintenance.
2. Enter U beside a payment method to update the settings.
Note: These settings are used by several other parts of the system including the cash register screen. It is important that they are set up correctly.
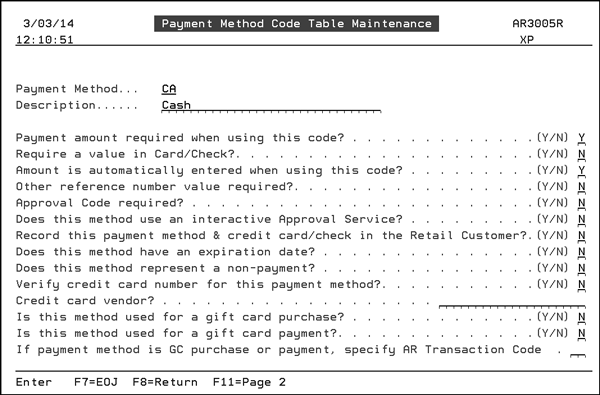
3. Press F11 to go to page 2.
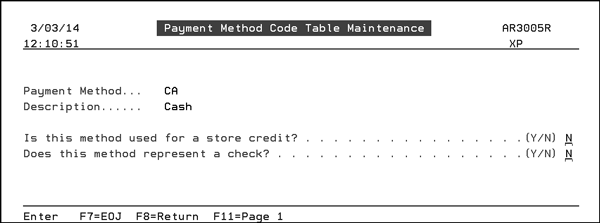
These options affect the way the Cash Register screen works for each payment method code.
Field |
Description |
Payment Method |
The Payment Method code represents how the customer is going to pay for the purchase. Examples are CA for cash, CK for check, and MC for Master Card. Payment method codes are entered into the Cash Register Screen, for each payment. The Payment Method code is the “key” to this file. |
Description |
The description of the Payment Method. |
Payment amount required when using this code? |
If this option is set to Y, when the payment code is used a payment is required; CA - cash is a good example. If this payment code represents a Non Payment or “pay later” situation, this option should be set to N. |
Require a value in Card/Check? |
Set this option to Y for credit card, gift cards, or checks. The system then requires a number to be entered in the card/check number field of the Cash Register screen. |
Amount is automatically entered when using this code? |
Entering Y in this field automatically populates the Amount field on the Cash Register screen with the purchase total. Activating this option can save time and eliminate data entry errors. |
Other reference number value required? |
The Reference field is used to enter additional information about the customer (driver’s license number, other identification). For example, you can flag payment codes for checks or credit cards to Y requiring the drivers license number to be entered in the Reference field. |
Approval Code required? |
A Y entry for this option ensures the approval code from a credit card company or bank (for a check) has to be present for the purchase to continue. The approval code is not checked for format, but if this field is set to Y, you must make an entry in the Approval Code field of the Cash Register screen. |
Does this method use an interactive Approval Service? |
This field is not activated yet. It will link the Cash Register screen to a credit card approval service, if special third-party bank-approved software is loaded onto your system. |
Record this payment method & credit card/check in the Retail Customer? |
Stores the last credit card or check number in the Retail Customer File for that customer. This can help with future orders where the customer wants to make a purchase using the same credit card. It provides a place to store retail customer payment information. You can only see this information in the Retail Customer File if you first enter the high-level password. |
Does this method have an expiration date? |
This option pertains to payment methods such as credit cards and gift cards. If you want the system to ask for expiration dates, enter a Y for this option. |
Does this method represent a non-payment? |
Set this option to Y for codes that do not require a payment amount. For example, transactions that may not require payment are when third-party financing companies are used, or payment is to be made later. We recommend that there is at least one code that represents non-payment, and allows the screen to be exited without payment. The cash register entry is still recorded showing the orders with approved non-payments. |
Verify credit card number for this payment method? |
This option pertains to credit card specific payment codes. For example, if you are setting up a payment code for MasterCard and this option is flagged Y, the system automatically verifies that the credit card swiped has a valid number. If this option is flagged Y, the next option, Credit card vendor?, must also be activated. If you are planning on using a PC with a magnetic strip reader to scan credit cards, you must first download a shareware program. This software interprets the swipe, verifies the credit card number and it must be downloaded onto every PC that deals with credit card purchases. For more information on downloading this software refer to “System-Wide Setting - Cash Register Options. Activating this setting also directs the system to mask all the numbers in a credit card except for the last four. Credit Card payment methods for Visa, Mastercard, and American Express
|
Credit card vendor? |
The full name of the credit card to be verified (American Express, MasterCard, Discovery, Visa). This option works in conjunction with the Verify credit card number for this payment method? option. You can press help (with cursor on this field) to see the valid names that are supported. |
Is this method used for a gift card purchase? |
Enter a Y here if this payment code is going to be used to purchase gift cards. An example of a gift card purchase code is GP (Gift Card Purchase). If flagged as Y, the option If payment method is GC purchase or payment, specify AR Transaction Code must also be activated. The valid AR transaction codes for Gift Card purchase are 7A-7Z. You should verify that all new codes are in your AR to GL Interface File. |
Is this method used for a gift card payment? |
If a payment code is going to be used when a gift card is redeemed this option should be activated by entering a Y. If flagged as Y, the option If payment method is GC purchase or payment, specify AR Transaction Code must also be activated. The valid AR transaction codes for Gift Card purchase are 8A-8Z. |
If payment method is GC purchase or payment, specify AR Transaction Code |
Enter the valid AR transaction code for a gift card purchase or redemption. Use a code in the range of 7A -7Z for gift card purchase, and a code in the range of 8A-8Z for a gift card payment/redemption. |
Is this method used for a store credit? |
Enter a Y for this option if the code is to be used as a store credit. One example of a store credit is when merchandise is returned and a credit is issued (instead of a cash refund) in the amount of the original purchase. Normally this payment method would not be reconciled as cash, and instead the “paid by store credit” list would be used by the AR department to key off credits. |
Does this method represent a check? |
If flagged Y, the system allows posting of payment for multiple orders with the same check number. If this option is set to N, the system will not post payments against orders that use the same check number. For example, a customer uses the same check to purchase material for himself on one order and uses the same check to purchase additional material on another order for someone else. This option allows posting of both payments into AR. |
Recommended Set-up for Payment Codes
Gift Card Purchase Store Credit Issue
No Payment Made (cash sale but customer will not pay yet)
The following screens display the recommended set-up for each payment code. Although the codes are user-defined, we recommend the following codes for your system and that you key the following set-up options.
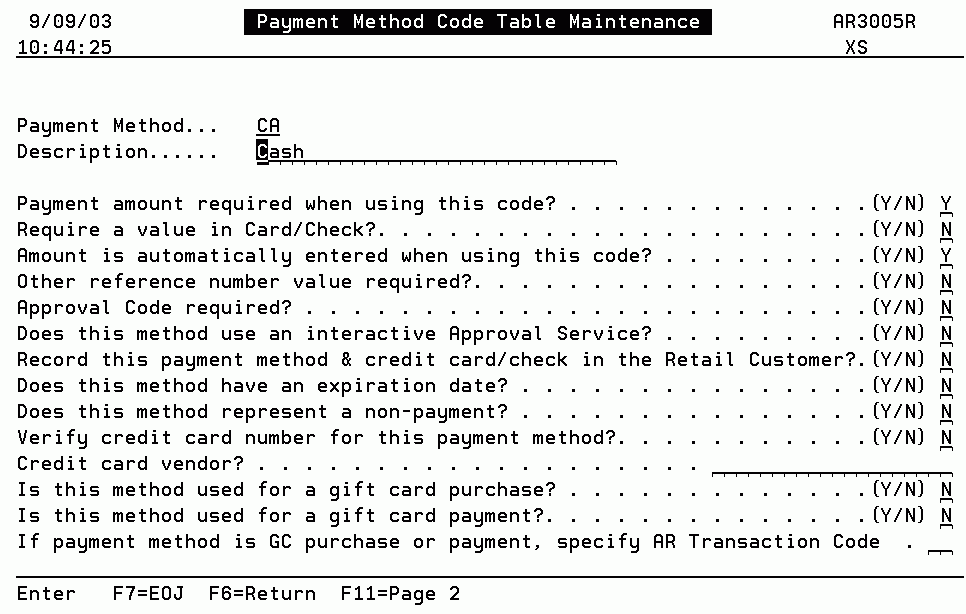

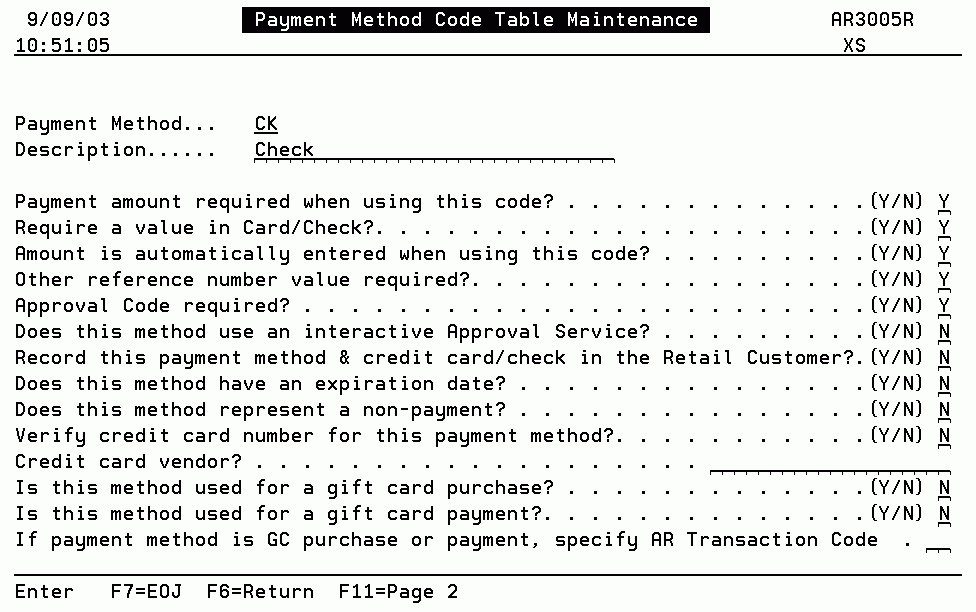

Entering a Y in the field Does this method represent a check allows you to post multiple orders with the same check number for daily cash balancing.
Note: Only nine digit check numbers are allowed.
With the above-described option set to Y, the system recognizes that the entry is a check number, and that different customers may use the same check number on any given day.
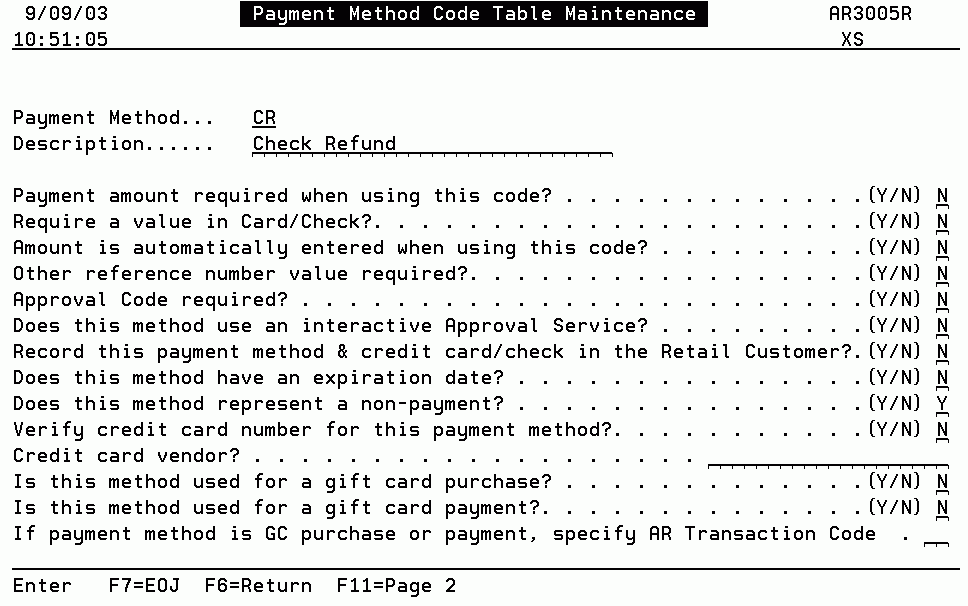

Notice that a check refund does not require an amount when entering this method. This is because the refund is not being issued to the customer from the cash register. The refund is to be issued by check, by your Accounts Payable department. This code should be used by accounting to run a listing of all check refunds so checks can be issued.
Gift Card Purchase/Store Credit Issue
The same settings can be used for both purchasing a gift card and issuing a store credit.
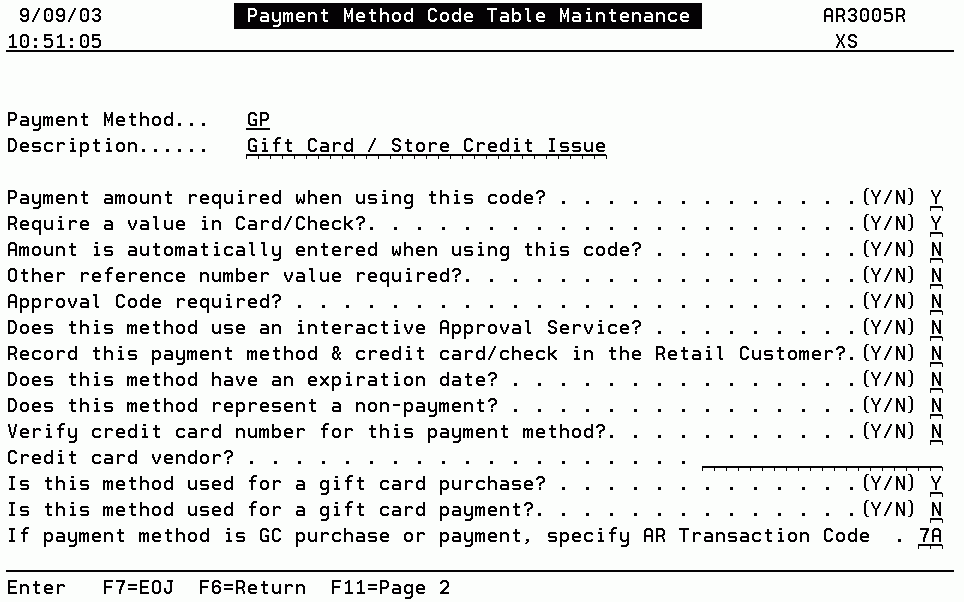

Note: Only one method of payment is allowed to be coded as Gift Card Purchase.
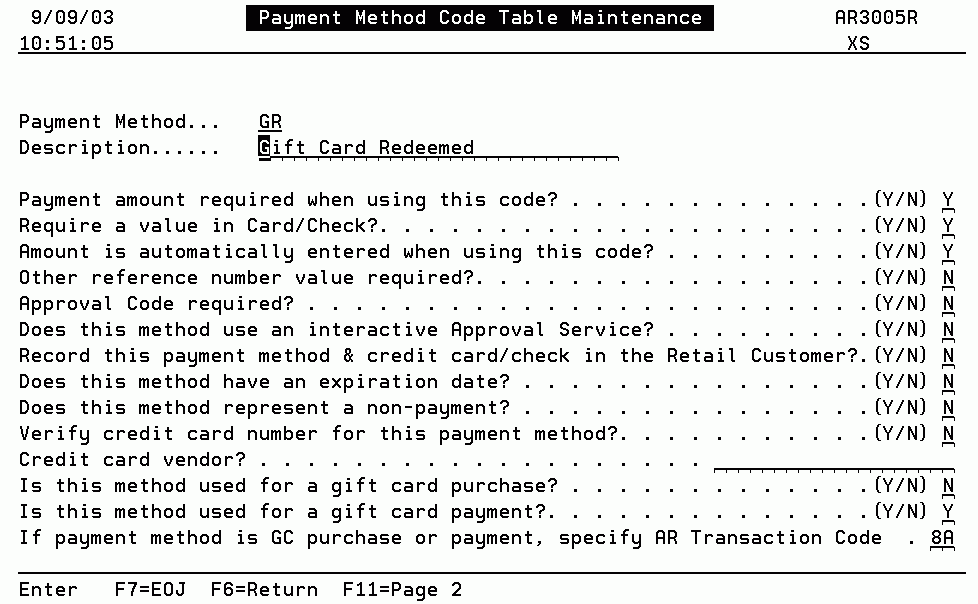

Note: Only one method of payment is allowed to be coded as Gift Card Redeemed.
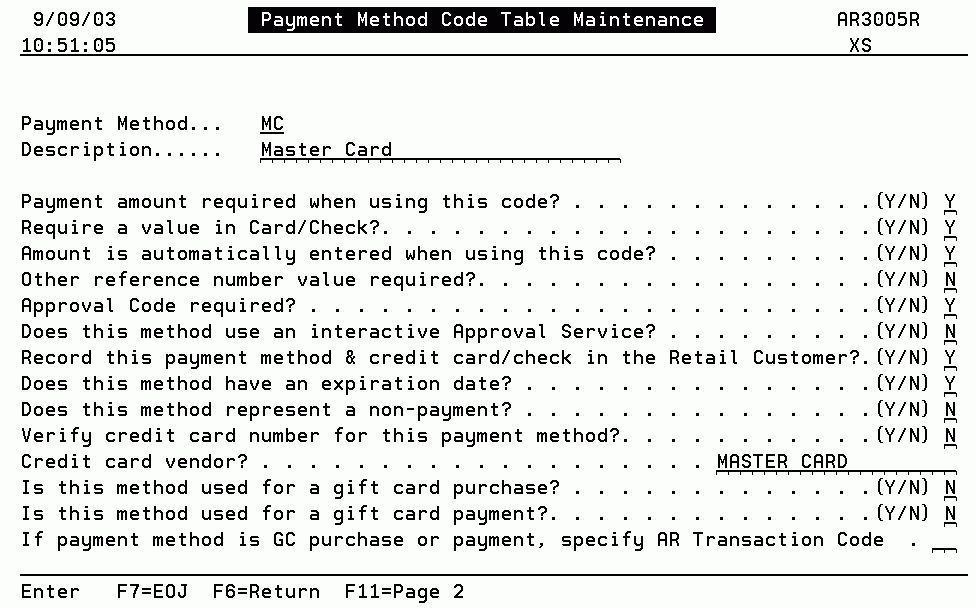

No Payment Made (cash sale, but customer will not pay yet)
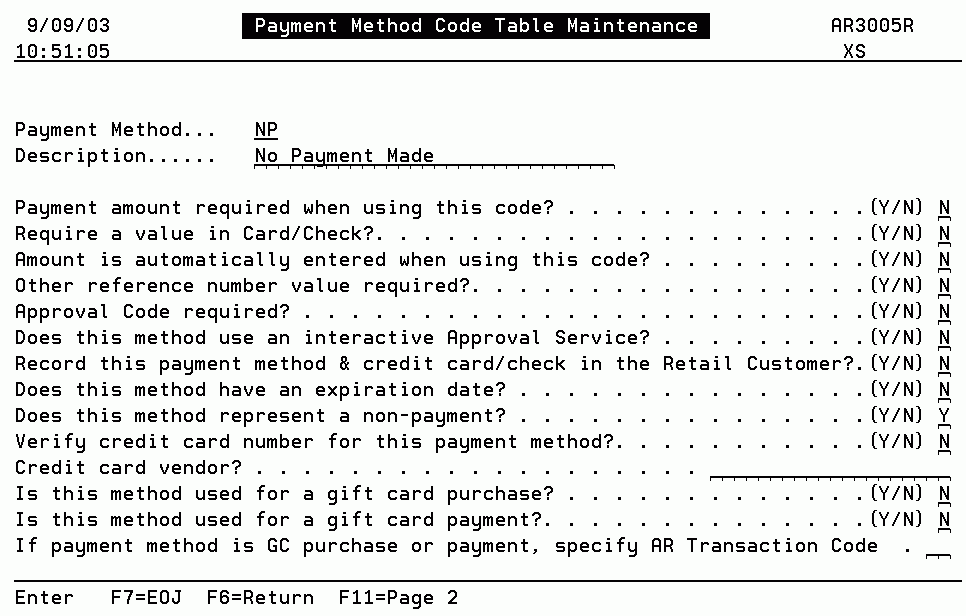

Note: It is recommended that you create a code such as NP= No Payment Made. It should be used when an exception is made for a customer that is not paying a cash order at the time that the cash register screen is displayed. Otherwise, if an order is coded to require payment, you will not be able to process/print the order until payment is entered. The “NP” entries appear on all cash reports, and therefore there is a complete record of the cashiers and orders that did not have payments applied.
System defined payment method codes are defined in the System Tables Maintenance - SET 29
Retail Cash Register Screen - The payment codes are entered on the cash register screen.
Changing retail accounts that have user defined payment methods
How do I use a store gift card in place or refunding money for customer credit orders?
Cashier Code Maintenance - ACT 116
This file establishes and maintains cashier codes that are required for entering payments in the retail environment.
The Cashier Code is what the cashier inputs on the Cash Register screen to begin the cash entry process.
1. When this option is selected, a list of the established cashiers is displayed.
2. You can inquire about a cashier or if you have the proper access you can update, create or delete a cashier code.
3. Use F1 = Create to add a new cashier.
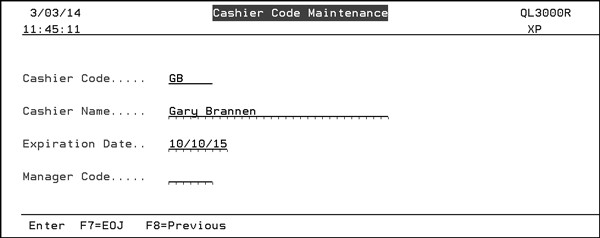
Field |
Description |
Cashier Code |
An 6 character alpha-numeric code representing a cashier. This is the code that has to be entered before the cash register screen can be used. The cashier code is treated like a password. When it is keyed onto the Cash Register screen, the characters are not displayed. |
Cashier Name |
The cashier name associated with the cashier code. |
Expiration Date |
This field allows you to set expiration dates for cashier codes. |
Manager Code |
This optional field allows you to establish a code for the cashier’s manager. This code is used for transactions requiring managements approval. |
Retail Cash Register Screen - This is where the cashier code is entered.
Maintain Salesperson Assignments - ACT 117
This maintenance program enables you to update both the secondary and primary salespersons on an order or invoice, even after it is invoiced. It requires the same password used to access the base commission file.
1. This program is accessed via option 117 on the Accounting File Maintenance Menu. When the option is first accessed, the screen is blank.
2. Enter a password to populate the screen with information from the Invoice File.
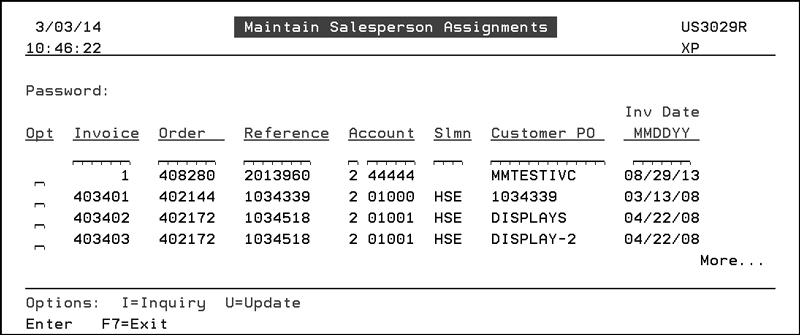
3. The information can be searched in several ways (by invoice, order, account number, etc.). The following figure shows a search by Slmn (salesperson).
4. To update a salesperson assignment, enter a U in the appropriate Opt column and press Enter.
This screen displays the primary (header) salesperson and secondary salesperson assigned to the selected invoice. These fields will be blank if no salespeople are currently assigned to the invoice, or if the salespeople are assigned to detail lines, but not at “header level”.
You may change the primary (header) salesperson, but you cannot use the program to remove the primary salesperson. You can change or remove the secondary salesperson.
The X by Y Commission Reports support an invoice-level override to the secondary salesperson’s commission rate. This may be used when you want to pay a special percentage to a secondary salesperson who helped with a sale. You can override the secondary salesperson’s commission.
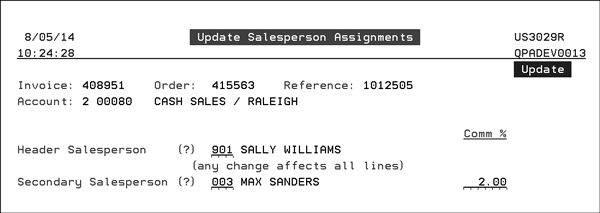
In this example, 5.00% of sales is paid to salesman 901 in addition to the commission due to salesperson 003. The commission % override is always calculated on sales not gross profit. You can not alter the commission percentage of the primary salesperson from this screen. The commission for primary salespeople is maintained using the Base Commissions and Commission Exceptions files.
All changes on this screen are documented automatically on the Invoice Notepad. The notepad shows the previous and new salespeople. If a commission override % is keyed or changed, the notepad indicates that a commission % was changed, but does not show the %, as that is not public information.
This feature can also be accessed via option 3 on the Commissions (COM) Menu.
GL Account Sub-Categories File (ACT 119)
This file, accessed via ACT 119, enables you to define the subcategories that are included in the Chart of Accounts file.
When option 119 - GL Account Sub-Categories File on the Accounting / File Maintenance Menu (ACT), the Update GL Sub Category Description screen appears.
Enter one of the Main Category codes, near the top of the screen, and press Enter. The following screen displays the Expense categories.
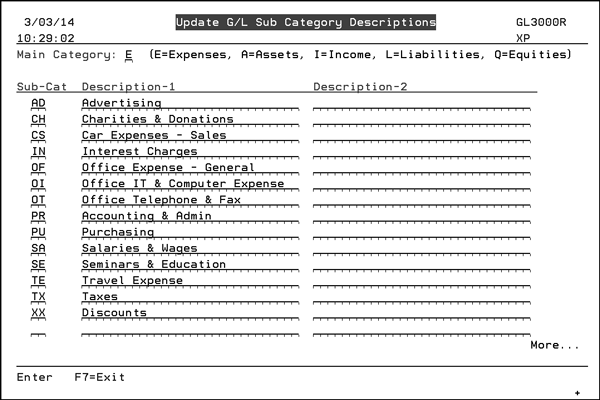
To change a description, simply type over an existing one. To add a new sub-sort code and description, roll down to a blank line and enter.
These sub-categories are used on the GL Income and Expense Spreadsheet.
General Ledger Sub Categories are created and maintained via option 7 - Chart Of Accounts File on the Accounting / File Maintenance Menu (ACT 7).
Supplier and Vendor Groups File (ACT 120)
The Supplier/Vendor Groups File allows you to create and maintain supplier/vendor groups.
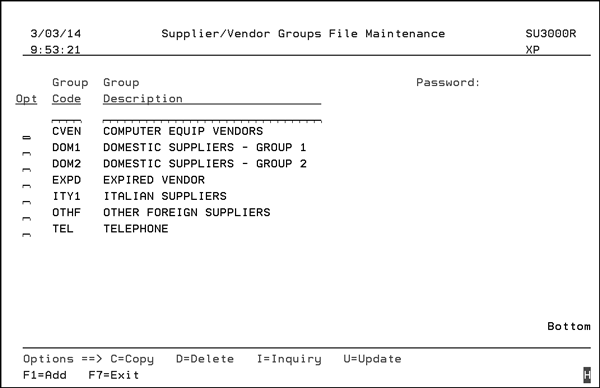
Supplier/vendor groups are included in the following parts of the system:
Cash Requirements Report - as a selection option
Check Writing programs - as a selection option.
Supplier File - As a grouping option
Vendor File - As a grouping option
These groups can be used for check writing.
Intercompany Transfer GL Interface (ACT 121)
This option defines the accounts to debit and credit for transfers between companies. It creates entries in both the transferring and receiving companies to balance the journal entries for both companies.
Prior to the introduction of this menu option (in 2011), a manual entry was needed to balance the company’s transfers.
The following functionality facilitates the transfer of material between intercompany warehouses:
A “Intercompany Transfers GL Interface File”.
The extended format of the Inventory Summary by GL Account report (GL 112) shows intercompany transfers.
1. This file, accessed via menu option ACT 121, creates balancing GL journal entries for intercompany transfers by assigning debit and credit GL accounts for each cost center for intercompany sending and receiving warehouses.
|
2. Enter the company, from and to warehouse, and the cost center.
Company numbers are assigned to warehouses in the Warehouse File (FIL 9).
Note: To make an entry all-inclusive of every cost center, enter “***” in the cost center field.
3. Enter the GL accounts to use for the debits and credits for the receiving and sending warehouse. The first setting of the GL account number is for the company number.
Note: If the Intercompany table is not found, the Inventory to GL Interface for transfers is used.
Note: Enter a “?” in a field to search through the available entries.
Inventory to GL Interface Report
The Inventory to GL Interface extended format creates the entries to both companies.
Consider the following reports.
Summary showing intercompany transfers for NYC warehouse
|
Detail showing the specifics of the intercompany transfers
|
System Wide Settings - Options for Inter Company Transfers - The option activates use of Inter-company transfers GL interface table.
Navigator AR Pmts Tab Status Code - ACT 122
The status codes used on the Navigator AR Payments tab are created and maintained using this option.
