Need more info or you couldn't find what you were looking for, let us know by sending an email to: support@dancik.com.
Examples of Entering AP Transactions
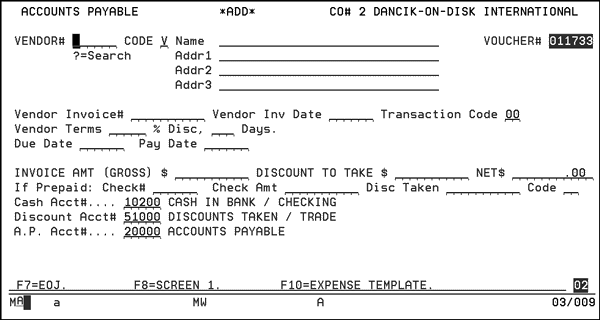
This is an interactive program consisting of three screens through which A/P invoices are entered (vouchered). It is one of the key programs in the system, featuring on-line editing, instructional error messages, and supports multiple users.
Note: Manual checks recorded through AP 1 will constitute an update to the Supplier or Vendor statistics “Paid Yr-to-dt” total. This applies to both current and future payables.
Basic Concepts and Making AP Entries
Let’s review some basic concepts about this program’s design. The system must allow for the posting of a single invoice to more than one expense account, and to more than one branch, cost center, or job. This is done as follows:
On the first Enter Transactions Detail Screen, you enter all information relating to the invoice, including the total invoice amount. On the second Enter Transactions Detail Screen, enter information that breaks down the invoice by expense accounts. Very often only one expense account is involved, and you enter the total invoice amount to that expense account. However, you can post to as many different expense accounts as necessary, each on a separate line. Similarly, you can post an amount to different branches, cost centers, and jobs. You can enter as many lines as is necessary to distribute the expense as needed. For example, to post a single insurance bill to three different branches, you could enter one third of the amount on each of three separate lines, leaving the expense account number the same but changing the branch number.
The sum of the amounts posted to all expense accounts, branches, cost centers, and jobs for an invoice must equal the gross invoice amount as entered on the second Enter Transactions Detail Screen. The systems sees unequal sums as an error. The control total for the invoice shown at bottom left of screen does not indicate an equal condition, and the edit will be out of balance and not allow you to post the batch to the A/P ledger. Watch the control totals on the screen. They show the running totals, which you can compare to the gross invoice total.
Press Enter to record the data on the first Enter Transactions Detail Screen. You either get an error message or, if the entry is accepted, the second Enter Transactions Detail Screen appears.
Note: When you try to enter a duplicate invoice number for a vendor or supplier in the same batch, or for the same vendor or supplier, or equal to any previously posted batches, the system stops processing the invoice and displays an error message. The only situation the system might not catch is when two users are entering the same invoice into two batches on two different work stations at the same time. However, your procedure should delegate A/P entry to one input operator to avoid duplicate entries.
When the screen reappears, the Line number is increased by 1, and you can enter the next line of the invoice.
When you have finished entering the invoice, press F1.
You can change any of the entries on the first screen or press Enter to save them. The second screen shows your line 0001 entries.
In summary, the system reviews your entries for this invoice screen-by-screen. You can make changes wherever you want. Remember, if you do not press Enter, no data is recorded. Do not press F1 or F9 before pressing Enter.
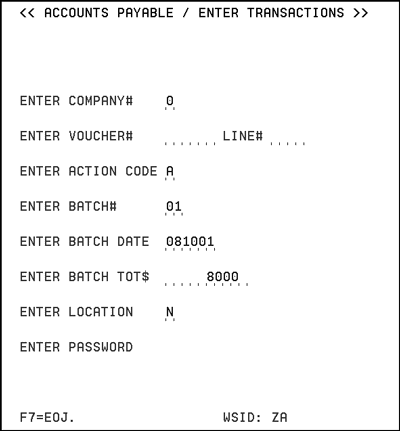
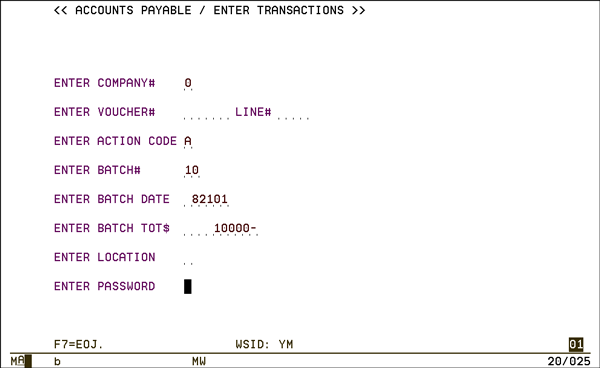
1. On the Enter Accounts Payable Transactions Menu, select option 1 - Enter A/P Transactions.
Field Name |
Description |
Company# |
Enter the company number to which all transactions in the batch will be posted. |
Voucher# |
Skip this field unless you are correcting, adding to, or viewing a transaction already entered in this batch. The A/P system automatically assigns voucher numbers. Voucher numbers are the system’s unique identifiers for each transaction you enter. |
Line# |
Each voucher number can have many line numbers, but usually only one line per voucher is necessary. Skip this field unless you are correcting, adding to, or viewing a transaction already entered in this batch. The system assigns line numbers consecutively starting with line 0001 for each voucher number. Example: An invoice from your landlord containing billing for plumbing services and for rent might be posted on two line numbers. The first line 0001 would post the rent portion of the invoice to the expense account for rent. The second line 0002 would post the plumbing portion of the bill to another expense account. |
Action Code |
Valid action codes are:
|
Batch# |
If you are controlling bills to be posted by grouping them into batches, enter the assigned batch number here (any number from 01 - 99). After a batch has been edited and posted, you can reuse the batch number. |
Batch Date |
Whether or not you intend to use the batch control system you must enter the batch date. The system inserts the current date as the default, but you can enter another date, if necessary. This date appears on the A/P ledger and reports as the voucher date, which is the date the transaction was entered into the system. |
Batch Total |
Enter the total dollar value for the batch number assuming two decimal places. The batch total is the gross total of all vendor payable transactions such as invoices and credit memos in this batch. The system shows and compares the batch total to the total amount entered while you are using the program. Note: Do not include any payment or discount amounts in the batch total. |
Location |
Enter the one-character code assigned to your office location. You control these codes. For example, N = New York, D = Dallas, L = Los Angeles. These location codes can later be used for sorting transactions by the office that entered them. Leave blank if you only post A/P transactions in a single office. |
Password |
Enter the password required to use the program. You must enter a valid password to see screens 2 and 3. |
Default GL Accounts for this Batch |
These fields allows you to assign GL accounts for an accounts payable invoice batch. This enables you to change the regular defaults, assigned in the Company File, to better accommodate different payment methods (such as credit cards). Use of these “batch” defaults eliminates having to make changes to every individual invoice. They display without values, until you enter the batch default account numbers. These accounts remain as the defaults until the job is ended by pressing F7. Note: This feature has to be activated via the setting Activate batch-level GL Account Defaults on AP Entry on the System Wide Setting - Options for Accounts Payable. |
Controls |
These fields will only display after you have entered at least one transaction These three fields are display fields only, and no entry is necessary or allowed. They do not appear on the screen when the program is first requested. The Gross control field is the total of all line amounts on the last invoice entered in the current batch. The Discount control field is the current total of discounts to take for the last invoice entered in this batch. The Batch control field is the current total of all invoices entered in this batch. |
2. Make the necessary entries and press Enter.
Field Name |
Description |
Vendor# |
Enter the six-digit vendor number if the transaction references a vendor in the Vendor File. Enter the three-character supplier number if the transaction references a supplier in the Supplier File. Skip this field if the transaction references a vendor or supplier that is not in either file, and will be considered a miscellaneous vendor. After you enter this number, press Enter. The vendor/supplier name and address are automatically entered. |
Code |
The valid vendor codes are: V - If the vendor number references the Vendor File. S - If the vendor number references the Supplier File. M - If the vendor number references neither file miscellaneous vendor. A temporary record will automatically be created by the program. Note: Use code M if you want to post A/P invoices without entering a record in either the vendor or supplier files. Enter the vendor's name and address in the lines provided. The voucher number of the transaction is used as the Miscellaneous Vendor Number. You can access miscellaneous vendors the same way you do regular vendors and suppliers when viewing or processing the A/P ledger. |
Name, Addr1, Addr2, Addr3 |
Use these four lines only when using vendor code M. Enter the name and address of a miscellaneous vendor. This information will appear on all reports, checks, and screens for this miscellaneous vendor. When using vendor codes V or S the system shows the name and address from the respective master file in these four lines. Note: When using codes V or S you cannot change the information in these fields. To change a vendor’ or supplier’s name or address you must use the File Maintenance programs. |
Voucher # |
This is the system-generated voucher number for every A/P invoices entered. You cannot update this field. |
Vendor Invoice# |
This is a 10-character alphanumeric field. When entering vendor invoices or credit memos, enter the number that the vendor has assigned to it. This number will appear on the check that pays for the invoice or uses the credit memo. It is the vendor’s reference number. If you are entering adjustments, enter the invoice number that the adjustment relates most closely to or another meaningful reference. To prevent duplicate invoices from being entered, the system does not accept invoice numbers that have been previously entered. |
Vendor Invoice Date |
Enter the date printed on the vendor’s invoice or credit memo. Note: If you are issuing checks based on the vendor’s invoice date, be careful to enter the correct date. You should also be aware of vendors who predate their invoices in order to receive early payment. Don’t confuse this date with the Voucher Date entered in the Batch Date field on screen 1. You assign the Voucher or Batch Date. The vendor assigns the Vendor Invoice Date. |
Transaction Code |
Enter the payables transaction code which best defines this transaction. Payables transaction codes always begin with a number, and cash disbursements transaction codes always begin with a letter. The two payables transaction codes you will use most often, if not exclusively, are 00 and 11 - credit memo from vendor. Note: Use menu option AP 204, to generate a complete list of the transaction codes. |
Vendor Terms |
These are numeric fields. Always use two decimal places when entering percentages. For example, if a vendor or supplier’s terms are 1.5 percent discount if paid within 30 days, enter as 0150% Disc, 030 Days. If you leave these fields blank, the terms, if any, in the Vendor or Supplier files will be used. They will appear after you press Enter. |
Disc, Days. Net Days |
These fields allow the due date on an accounts payable invoice to be automatically changed when the due date for discounts has passed. For example, if a supplier's terms are “2% 15 Days, Net 30”, then the AP system initially sets the due date at 15 days from the invoice date. With this feature activated, via a system wide setting, if the invoice is not paid by the due date, then the due date will be changed to be 30 days from the invoice date. These types of terms are referred to as two tier terms, as they have 2 due dates - one to get the discount, and a final ‘net due” date. Discount terms are pulled from the Supplier and/or the Vendor File, and used as the default terms in the Accounts Payable entry screen. Terms may be overridden on the Accounts Payable Entry screen. For example:
Note: In order for the Net__Days part of the terms field to display, the System Wide Setting - Options For Accounts Payable has to be activated. |
Due Date |
If you leave this field blank, the program will calculate the due date by adding the terms to the vendor invoice date. For example, if the vendor invoice date is 111501 and the terms are 0200% Disc, 030 Days, then the program will assign 121501 as the due date. If you enter a due date, the program will not override what you entered. |
Pay Date |
If you leave this field blank, the program will enter the due date as the pay date. If you enter a pay date the program uses your entry. This field is important if you intend to issue checks by pay date. You can assign a scheduled pay date that can override the actual due date. |
Invoice Amount Gross $ |
Enter the full amount of the vendor’s invoice or credit memo. Gross amount, in this case, is the amount before taking a discount. If you are entering a credit amount, press Field Minus after entering the dollar amount for negative values. Note: Enter the total invoice amount even if the invoice contains many separate charges or line amounts. You can enter the separate line charges on Screen 3. Remember to use two decimal places. |
Discount To Take $ |
The amount in this field is the discount available to be taken. Entering a value into this field does not commit you to actually deducting the discount amount from payment. It serves as a reminder on cash requirements reports and will be considered when bills are selected for automatic payment. If you leave this field blank, the program calculates the discount available to take by multiplying the terms and the invoice amount. For example, if the terms are 0200% Disc, 030 Days and the invoice amount is $10,000.00, then the discount to take is $200.00. You cam ignore this field for now, and calculate discounts at check writing time. |
Net $ |
You cannot edit this field. It shows the result of subtracting the discount from the gross invoice amount. |
If Prepaid... |
This line consists of four fields: Check#, Check Amt, Disc Taken, Transaction Code. Use this line only if you are entering transactions that were previously paid. If you are reversing a check posted from a previous method, enter the check information here. You can also enter information about a check that does not relate to an invoice. For example, an advance deposit or an on-account payment to a vendor. Note: The prepaid line consists of cash disbursements information. The amounts entered in the Check Amt field are not considered part of the batch total. The batch total consists only of the amounts entered in the Invoice Amt field. |
Check# |
This field is only applicable to prepaid expenses, manual checks, and check reversal. Enter the number of the check that paid the invoice. |
Check Amount |
This field is only applicable to prepaid expenses, manual checks, check reversal. Enter the amount of the check that applies to this voucher entry. Example: If the check paid two invoices, only enter the amount that applies to the invoice currently being entered. When entering the second invoice you would enter the same check number and the amount that paid for the second invoice. |
Disc Taken |
This field is only applicable to prepaid expenses and manual checks. If the payment entered in the check amount field included a cash discount, enter the amount of the discount here. |
Cash Disbursement Transaction Code |
This field is only applicable to prepaid expenses and manual checks. Only a few transaction codes are valid here. They include MC manual check, AD advance deposit to vendor, OA on-account payment to vendor, WN check reversal, NA, NC, ND, and WP. Enter the code that best describes this disbursements transaction. |
Cash Acct# |
The default G/L cash account number entered in the Company File appears here. You can override it by entering another account number. This is the cash account to use for payment when the check is issued. For a prepaid expense/manual check, it is the cash account already used for payment. All cash requirements and check writing reports are sorted by cash account number. Note: The account number pulled in from the Company File can be overridden by any defaults entered on the Enter Transactions Screen. |
Discount Acct# |
The default G/L cash discount account number entered in the Company File appears here. You can override it by entering another account number. This account number will be used for posting to the G/L if a cash discount is to be, or was taken. Note: The account number pulled in from the Company File can be overridden by any defaults entered on the Enter Transactions Screen. |
AP Acct# |
The default G/L accounts payable account number entered in the Company File appears here. You can override it by entering another account number. Note: The account number pulled in from the Company File can be overridden by any defaults entered on the Enter Transactions Screen. When you enter a vendor’s invoice, you usually debit expense and credit Accounts Payable. When you issue checks, you debit Accounts Payable and credit Cash, and sometimes credit Purchase Discounts. The default account numbers are used to create the G/L entries. |
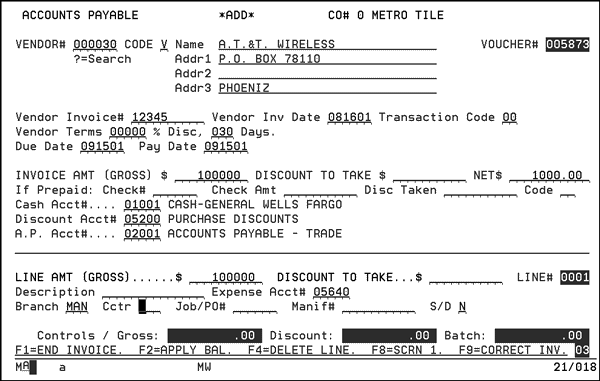
3. After completing the fields, press Enter. The screen expands allowing you to enter more information about the transaction.
Field Name |
Description |
Line Amount Gross $ |
Enter the amount to post to the expense account number, branch, cost center, and job on this line. This amount can be a portion of the gross invoice amount, or the entire gross invoice amount. Note: Cost centers and job numbers are optional. Ignore these fields if you are not accounting by Cost Centers or Job numbers. |
Discount To Take |
Enter the amount of the discount you actually intend to take on the portion of the invoice to which this line relates. Entering an amount in this field does not commit you to deducting the amount from payment. Leaving it blank does not prevent you from deducting an amount from payment at check writing time. If you leave this field blank, the discount to take will be automatically calculated based on the terms from screen 2. You can override the amount in this field during cash disbursements. |
Line# |
You cannot edit this field. It displays the current line number of the current voucher. The line numbers for each voucher are assigned consecutively starting with line 0001. |
Description |
This is a 14-character alphanumeric field. You can enter any information that may be useful in identifying or describing this entry. It can print on your checks depending on your check format. |
Expense Acct# |
The default expense account number appears here if entered in the vendor’s or supplier’s file. You can override it by entering another account number. This field should contain the expense account number to which the Line Amount will be posted. After pressing Enter the name of the expense account appears beside the account number for verification. |
Branch |
You can allocate the expense to a specific three-character branch number or code, or to all branches by entering ALL. The branch specified in the vendor file is automatically entered. |
Cost Center CCTR |
You can allocate the expense to a specific three-character cost center number or code, or to no cost center by leaving the field blank. The cost center specified in the vendor file is automatically entered. |
Job#/PO# |
You can allocate the expenses to a specific job by entering the job number in this field or you can enter the last five digits of the purchase order number. You can use the PO number to link direct ship orders to A/P invoices for reconciliation. |
Manifest # |
You can allocate expenses to a specific manifest number by entering the manifest in this field. |
1099 (Y/N) |
This field appears when only when you enter A/P invoices for Miscellaneous vendors. Enter Y if you want to issue a 1099 for this miscellaneous vendor. |
S/D |
The default for this field—Suppressed Discount—is N. Enter Y if you want to suppress a discount for that line only. Then, you can enter a discount percentage that applies only to certain items on an invoice. Leave N on the lines you are applying the discount to, and on the lines you are not taking the discount, enter Y. For credit memos, you must use Y to prevent a negative discount. This field has no effect if neither a discount percentage nor a discount dollar amount is entered. This feature applies to suppliers who invoice for products and freight on a single invoice, but only let you take a discount on the product. |
Controls |
These three fields contain the running balances of entries made in the Line Amt and Discount To Take, fields of Screen 3. You cannot edit these fields. The Gross control field contains the sum of all entries in the Line Amt field for the current invoice. The Discount field contains the sum of all entries in the Discount To Take field for the current invoice. The Batch field contains the sum of all entries in the Line Amt field for all invoices in the current batch. These fields are updated every time you press Enter on screen 3, and are compared to the fields you have created on screens 1 and 2. The Gross control field is compared to the Invoice Amt field on screen 2. The Discount control field is compared to the Discount To Take field on screen 2. The Batch control field is compared to the Batch Total field on screen 1. When the amount in a control field is equal to the amount in the field to that it is being compared, it appears brighter than the other fields. When it is greater it flashes (depending on your terminal), indicating an out-of-balance condition. |
The following table describes the function keys on the Enter Transactions Detail screens.
Field Name |
Description |
F1 |
To end processing of the current invoice and to return to the first screen to enter another invoice. |
F2 |
Automatically posts the entire invoice amount or the remaining amount to an expense account. Any unvouchered invoice amount is posted to the designated expense account. Use this function when only one expense line is required. |
F4 |
To delete the current line. Deleted lines are not processed. If you make an error, simply type the correct information over the error. Only use F4 to delete, not to correct. Deletions are useful if you have entered duplicate or extra lines. |
F8 |
To return to the first detail screen. |
F9 |
Allows changes to the current invoice. After pressing F9, the first detail screen appears in update mode. You can make changes and then press Enter. You must press Enter on Line 0001 to record the changes on Screen 2. Press Enter on each line of the invoice. Press Enter again to returned to the first screen. |
Examples of Entering AP Transactions
Note: For examples and information on maintaining open invoices and vouchers see Current Open Payables Maintenance - AP 8.
Example 2 - Posting a Single Vendor Bill to Two Different Expense Accounts
Example 3 - Posting an Invoice and Manual Check at the Same Time
Example 1 - Posting a Vendor Bill
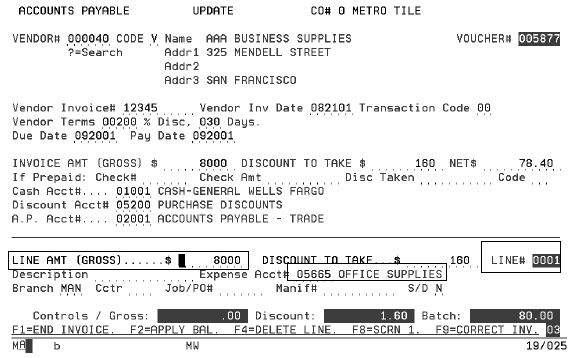
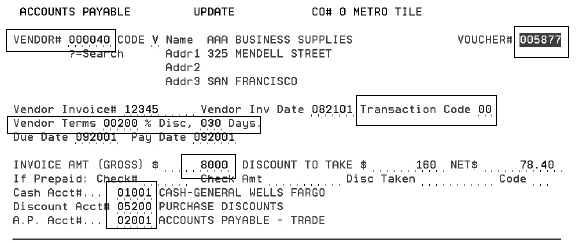
This example shows all of the steps and field entries necessary to post an $80.00 invoice for office supplies from AAA Business Supplies. Assume that AAA Business Supplies has a vendor number of 000040.
1. From the Enter Accounts Payable Transactions menu enter 1- Enter Transactions to go to the Accounts Payable Enter Transactions screen. Complete the screen as shown.
The invoice is made out to your company, which is entered in the Company File as company 0.
You do not need to enter the voucher number or line number. The system assigns the voucher number and line number when adding new transactions.
Use Action Code A to add new transactions.
Assign a batch number—any number between 00 - 99. This batch included only one invoice. So, the batch total is also $80.00.
The entry is made on a terminal in New York, and you have assigned the code N for New York. You could choose any code, but be consistent. This field is not mandatory.
The Batch Total is not required.
Enter the password if necessary. The password does not appear.
2. Press Enter to go to screen 2. The following notes pertain to screen 2.
The Vendor# 000040, for AAA Business Supplies, is entered with code V for vendor.
Note: To search available vendors, enter “?” in the Vendor# field.
The terms are 2.00% discount if paid within 30 days. Let the system calculate the discount available to be taken, by leaving the Discount To Take field blank.
Note: Vendor terms are created in the Vendor File (FIL 14).
The Invoice Amt as stated on the vendor's invoice is $80.00.
By leaving the Due Date and Pay Date blank, you let the system automatically calculate them according to the supplier’s 30 days terms.
The invoice is not prepaid, so skip the Prepaid field.
Accept the default Account Numbers 01001, 05200, and 02001, which the accounting manager has entered in the Company File record for company 0.
The system assigned voucher number 005877 to this transaction.
You do not have to override the default transaction code 00, which means Invoice From Vendor.
3. Press Enter to expand the screen.
The default Expense Account, 05665 for Office Supplies, from the vendor’s Vendor File record appears.
The system assigns Line Number 0001 to this transaction.
Enter the total invoice amount in the Line Amt field; since you are posting the total invoice amount to a single expense account.
Leave the Discount to Take field blank. The program automatically calculates it.
Accept the default Expense Acct # of 05665, but you could have overridden this account number with another expense account number.
In this example, a specific branch, MAN, is entered. Enter branch ALL if the expense is allocated across all branches in company 0.
You could also allocate the expense to a cost center or job number/purchase order number by using the Cctr and Job# fields.
When this part of the screen is first accessed, the control fields are all still at 0.00, because you have not yet entered a line item. After you press Enter, the control fields include the data entered. The control fields are updated after accepting the first line. The Gross and Batch controls display in high intensity characters indicating that the totals are now equal to the Invoice Amt$ Gross entered on Screen 2 and Batch Tot$ entered on Screen 1.
|
4. No further entries are needed. Press F7 to end the job.
Example 2 - Posting a Single Vendor Bill to Two Different Expense Accounts
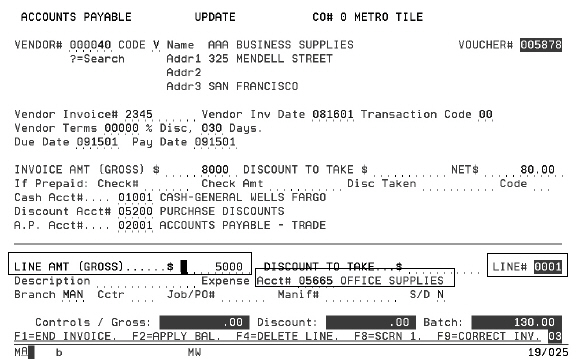
This example shows how you can break down an $80.00 invoice from AAA Business Supplies into expense accounts for computer supplies and office supplies. The invoice consisted of two line items: $50.00 for office supplies; $30.00 for computer supplies.
The following figure shows $50.00 applied toward office supplies. Complete the fields as follows:
The default expense account 05665 - the system grabs the description, Office Supplies, from the vendor’s Vendor File record appears.
The system assigns line number 0001 to the first line for this transaction.
Enter the amount charged for office supplies ($50.00) in the Line Amt field.
Leave the Discount To Take field blank. The program calculates the discount available to take.
|
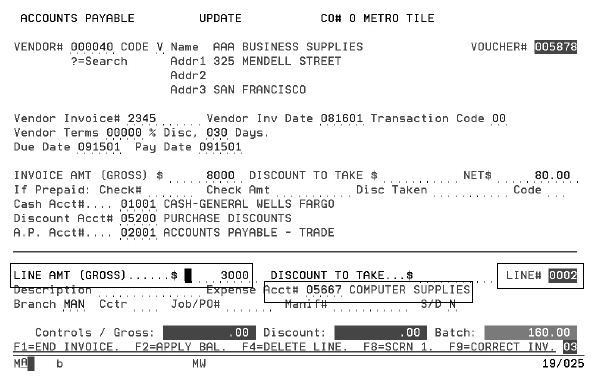
The next figure shows $30.00 applied toward computer supplies.
Press Enter to expand the screen to display the control fields and the additional fields you will need to enter this information.
Enter the amount charged for the computer paper, $30.00, and the expense account number for computer supplies, 5667 - Computer Supplies.
Leave the Discount To Take field blank to allow the program to compute the discount.
The control fields are updated and now include your line 0001 and line 0002 entries.
The Gross and Batch controls display in high intensity characters indicating that totals of your Screen 3 entries line numbers 0001 and 0002 now equal the Invoice Amt$ Gross and Batch Tot$ you entered on Screen 1 and Screen 2. The program is now set up to accept a line 0003. Since you are finished with this invoice, stop here.
|
At this point you could press F1 to end this invoice and start entry of a new invoice, F8 to end the batch and start a new one; F7 to end the job and return to the menu; or F9 to correct this invoice, if necessary.
Example 3 - Posting an Invoice and Manual Check at the Same Time
The following screens show all of the steps and field entries necessary to post a $25.99 invoice and a manual check for computer paper from Smith’s Stationary. Issuing a manual check indicates that you have already issued a check for the invoice.
1. From the Enter Accounts Payable Transactions menu enter 1- Enter Transactions to go to the Accounts Payable Enter Transactions screen. Complete the screen as shown.
|
The invoice is made out to your company, which is entered in the Company File as company 0.
You do not need to enter the voucher number or line number. The system assigns the voucher number and line number when adding new transactions.
Use Action Code A to add new transactions.
Assign a batch number—any number between 00 - 99. This batch included only one invoice. So, the batch total is also $25.99.
The entry is made on a terminal in New York, and you have assigned the code N for New York. You could choose any code, but be consistent. This field is not mandatory.
Enter the password if necessary. The password does not appear.
2. Complete all of the fields, except for the Pay Date and the fields on the prepaid line. The Pay Date is the date that appeared on the manual check issued in payment of the vendor’s invoice. Enter other information about the manual check on the If Prepaid line. Then make the following entries:
Enter the number of the manual check, 456, in the Check# field.
Enter the portion of the check that paid this invoice in the Check Amt field. In this case the check only paid for this invoice, so enter the entire check amount, $25.47. The vendor’s terms allowed for a 2.00% discount, which was taken. The invoice amount less the $0.52 discount equals $25.47, which is the amount actually paid. The $25.47 paid and the $.52 discount equal the total invoice amount of $25.99.
Enter the transaction Code, MC for manual check.
|
If you are using the General Ledger, application accounts will be affected by this double-sided transaction, as follows.
Debit |
05665 Office Supplies |
25.99 |
Credit |
02001 A/P |
25.99 |
To record office supplies expense.
Debit |
02001 A/P |
25.99 |
Credit |
01001 Cash |
25.47 |
Credit |
05200 Purchase Discounts |
00.52 |
To post a manual check and invoice you need to post two separate transactions:
a vendor invoice and
a payment to the vendor.
The vendor invoice debited expense account 05665 and credited A/P account 02001. The payment debited the A/P account 02001and credited both cash account 01001 and discounts account 05200.
Example 4 - Posting a Check Reversal - Voiding a Check
Method A - If Check is in Prior Month
Method C - Reversing Check and Invoice of Prior Month
Alternate Methods of Posting Check Reversals
Method A - If Check is in Prior Month
Use this method only if the check to be reversed was issued in a prior month, and you want to reopen the invoice. The check has been cleared from the ledger screen.
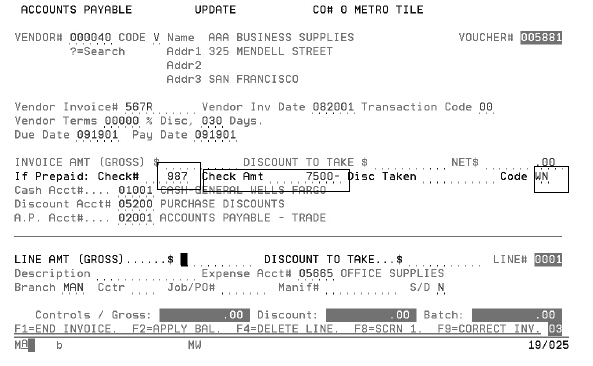
Enter the check number, the amount to reverse, in this case it is $75.00 (entered as 7500-), and the reversal code, WN.
|
Method C - Reversing Check and Invoice of Prior Month
This method is very much like the posting of two separate invoices. The major difference is that negative check amounts are substituted for positive invoice amounts. A negative check amount and a positive invoice amount have the same affect on a vendor’s A/P ledger—they each put a credit on the ledger.
This method satisfies you primary objective, which is proper G/L accounting. It reverses the affect of the original check on the Cash and the A/P accounts without affecting the expense accounts.
A check for $100.00 paying for two invoices, one for $80 and one for $20, each for computer supplies from Smith’s Stationary, was posted and paid in error during the previous month. You want to reverse the check and the two invoices. The following screens show all of the steps and field entries necessary to reverse the check and invoice.
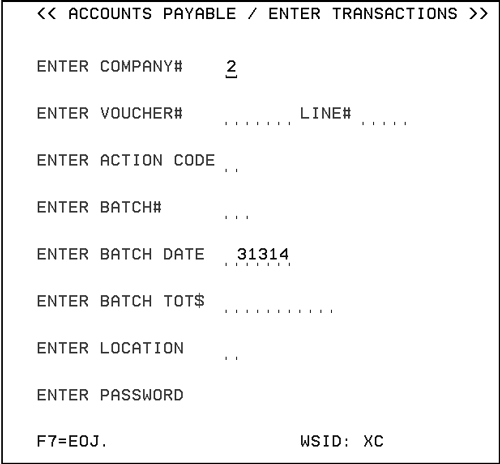
The batch total is negative. This is because you are reversing the original invoices posted. Leave the voucher number and line number blank. The program assigns voucher and line numbers for the check and invoice reversal. The batch number is a number between 01 - 99. The batch date is the date of the check reversed.
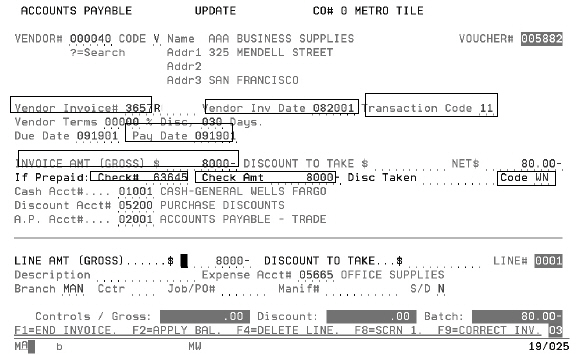
Entering the first invoice for check reversal
Notice that you are entering the check reversal one invoice at a time, with one entry for each invoice that the check originally paid.
1. Enter the Vendor Invoice# and Vendor Inv Date for the first of the two invoices that the check paid.
2. Enter the Invoice Amt, $80-.
3. Change the Transaction Code of the invoice to 11 for credit invoice.
4. Enter the Check Date, Pay Date, and Check Number of the check you are reversing.
5. In the Check Amt field, enter a negative number (8000-), which, in effect, returns the $80.00 to the cash account. The $80.00 entry also reinstates the $80.00 debt to the vendor on the A/P ledger. Enter $8000- and not $100.00-, because you are only entering the portion of the check that relates to invoice 3657.
6. Enter cash disbursements transaction Code WN, which is used for check reversals. All of the G/L account numbers must be the same as those used by the original check.
7. Enter $8000- for Line Amt, since you are reversing the invoice. You also want to reverse the expense posted.
|
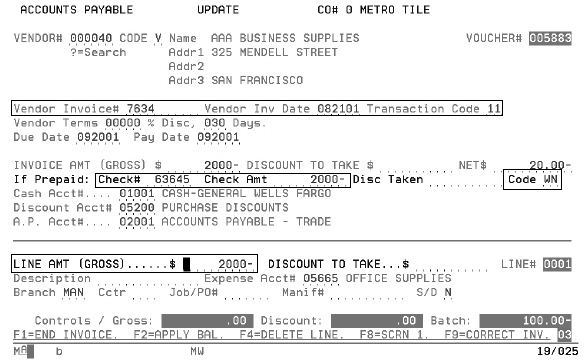
Entering the second invoice for check reversal
1. Enter the Vendor Invoice# and Vendor Inv Date for the second $20.00 invoice that the check paid.
2. Enter Transaction Code 10 of the original invoice.
3. Enter the Check# of the check you are reversing.
4. In the Check Amt field, enter $20.00-. You don’t enter $100.00- because you are only entering the portion of the check that relates to invoice 7634.
5. Enter cash disbursements transaction Code WN for check reversals.
6. Enter all of the same G/L account numbers as those used by the original check.
The program has set up line 0002 for you, but you are finished posting the part of the reversal that relates to invoice 7634, the second and last of the two invoices.
7. Press F7 to end the job.
8. Run an edit and then post the transactions. The edit shows the G/L accounting involved.
Note: After you have posted the transactions, the vendor’s ledger shows the reversal of invoices and checks. These vouchers should not show any balances. The cash has been debited and expenses have been credited.
|
Alternate Methods of Posting Check Reversals
The example shown in Method C - Reversing Check and Invoice of Prior Month is one of many different ways of posting a check reversal. This method is shown, because it is very much like the posting of two separate invoices. The major difference is that negative check amounts are substituted for positive invoice amounts. A negative check amount and a positive invoice amount have the same affect on a vendor’s A/P ledger—they each put a credit on the ledger.
The example satisfies you primary objective, which is proper G/L accounting. It reverses the affect of the original check on the Cash and the A/P accounts without affecting the expense accounts.
This example could have been entered as a single invoice entry with a check amount of $100.00- if you combined the vendor’s invoice numbers. For example, in the vendor’s Invoice# field you could have entered 500A/522B. However, when entering two invoices in one entry, you lose some of the control you have when they are entered separately. You can even take this alternative method further. Let’s say that you are reversing a check which paid for 10 different invoices, and you do not want to post the reversal on 10 separate lines. You could enter VARIOUS as the vendor’s invoice number and enter the entire reversal on a single line. The account still works out the same. Remember that check reversals, like original invoice entries, appear in the Credit column of the vendor’s A/P ledger. When you key them off to be paid or repaid you will only have the benefit of seeing the individual vendor’s invoice numbers, if you reentered them on individual lines as shown in the example. If you enter a reversal of a check that paid ten invoices, on a single transaction with VARIOUS as the vendor’s invoice number, it will be less clear as to which invoices the transaction represents. If this is not a problem for you, this method will save time.
Another method of posting check reversals can be used only if you are using a G/L system. This method is the easiest to understand, but it takes the most time. Refer to the situation in Example 4 - Posting a Check Reversal - Voiding a Check. First, using the G/L programs, credit the office supplies expense account for $100.00 and debit the cash account for $100.00. Then re-enter the two invoices just as you entered them originally. If more than one expense account was involved you would use the G/L programs to credit each of them the respective amounts. This method uses the G/L to reverse both the original expenses invoices and the check. Then you are, in effect, starting from scratch and reentering the invoices.
Paying AP Invoice By Credit Card
Handling Partial Payments in AP
Fabrication/Installation - Accounting for Labor Charges
Editing AP Transactions - AP 2
Is there a setting that controls the date span of when I can enter AP Transactions
Why am I getting the Message “Date is too Far From Today's Date”?
AP_Voucher with Foreign Currency, Accept Manifest Variance Before Hitting Enter Key
What to do when A/P entry batch tells you ERROR# “DI” / DUPLICATE INVOICE#! CHECK OPEN A/P LEDGER!