Need more info or you couldn't find what you were looking for, let us know by sending an email to: support@dancik.com.
Sending and Receiving Purchase Orders in CMS
Sending Purchase Orders Automatically
Special Considerations For Sending Purchase Orders
Sending Purchase Orders on Demand
The purchase order (an 850) is an electronic request for product. This document cannot be used to initiate purchase order changes, cancellations, inquiries, or stock reservations, as the standard does not accommodate these capabilities.
When a purchase order is processed, CMS takes all the relevant information from that order and sends it electronically to the supplier's mailbox.
Note: CMS transmits POs whether they are printed or not.
When a Customer Order is entered as a direct shipment, CMS also takes all the relevant information for that order and sends it electronically to the supplier's mailbox.
Purchase orders for special order items are sent only after the option to create special order POs has been executed.
Once an order has been sent, it is not sent again so changes to orders are not transmitted via CMS (for example: line additions, line cancellations, quantity changes, or shipping locations).
Steps CMS uses to Automatically transmit POs
When a PO is entered and processed it sits in what is called a "TODAY" file.
When CMS runs, per the timed schedule, it looks in the "TODAY" file for POs that have not been sent yet. The POs in the TODAY file are sent.
When NJs runs it moves POs from the TODAY file to a YESTERDAY file.
When NJs runs again the files in the YESTERDAY file are moved to a the HISTORY file.
When NJs finishes and starts CMS up again the TODAY file is now empty. The scheduled job is only checking the TODAY file so orders that did not get sent on the day that they were entered will have to be manually sent.
If you put an ACI in the order header to prevent it from being sent by CMS and don’t remove that ACI in the same day, before the last submission of CMS PO send jobs then you will have to send it manually.
Note: ACI is an Order Reason code that tells CMS that the order has already been called or faxed in; do not send via EDI.
Sending Purchase Orders Automatically
1. Go to the CMS menu (CMS), and select option 20 - Schedule Automatic Processing.
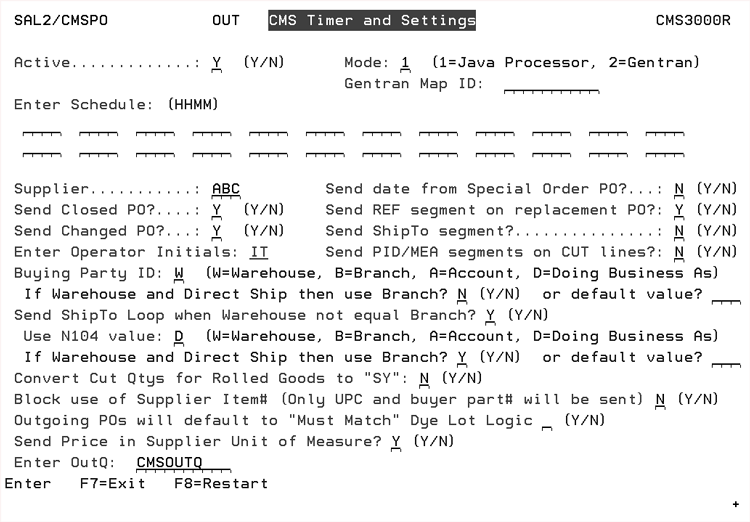
2. The CMS Timer and Settings Screen appears. Entries are required in all four fields.
Exchange Partner - Enter a the partner ID you are going to be exchanging purchase orders with. This partner ID must match the partner ID used in the CMS Transaction settings.
Transaction Type - Enter CMSPO for purchase orders
Direction - Enter O to indicate an outbound purchase order.
Action Code - There are three action codes available: A = add, I = inquiry, U = update, and D = delete.
3. Enter the information and press Enter. The Timer Settings screen appears.
4. The timer settings work in conjunction with a CMS run job in QBATCH subsystem that checks for scheduled transmissions.
Note: The supplier entered, on the Timer Settings Screen, has to match what is on the entered PO for it to be extracted.
Note: You can use the CMS Timer and Settings screen to denote direct ship/drop ship orders. Make the following entries:1) In the Buying Party ID field, enter a W. 2) In the If the Warehouse specified and Direct Ship then use Branch field, enter an N. CMS uses these settings to automatically change the X12 element N1*BY*04 to enable direct/drop shipments.
5. To cross reference, and change the Buying Party ID to a customer specified value, CMS checks the Buying Party ID against the xxxSUBC#S table. If the buying party ID (warehouse, branch, account, or doing business as) is included in the From column in the xxxSUBC#s, the customer specified value in the To column is used in the N104 segment of the X12 transmission.
Note: The above functionality requires an entry of N104MASK (From column) equals “Y” (To column) in the xxxCUST# table. If the N104MASK entry is not activated in the CUST# table, the warehouse is used as the Buying Party ID.
6. The following settings allow you to include Shipto information when the warehouse and branch are different:
Send ShipTo Loop when Warehouse not equal Branch - Enter a “Y” if you want to include the Shipto information in the N1 segment of the CMS outbound PO when the warehouse and branch are not the same.
Use N104 value - If the setting Send ShipTo Loop when Warehouse not equal Branch is activated, you can use this setting to determine the value passed in the N104 segment of the ST loop. Select one of the four options. These values come in from the order.
If Warehouse and Direct Ship then use Branch? ___ or default value - If you choose the “W”arehouse option for the N104 setting above and the order is a direct ship you can use the Branch value in the N1 segment. Or, you can use the default value field to enter any three characters to use in place of the branch.
Let’s explore how these new settings work in conjunction with the Send Shipto Segment setting.
If the Send Shipto segment setting is set to N, shipto information will not be included in the N1 segment unless:
The Shipto established in the Billto File was overridden on an order (this happens when the shipto override setting on the Order Header is set to “Y” or a shipto number is entered on the Order Header).
The setting Send ShipTo Loop when Warehouse not equal Branch is set to “Y” and that situation occurs.
7. If you do not activate the field Convert Cut Qtys for Rolled Goods to “SY”, the cut quantities for rolled good items are sent in linear feet.
8. If an OUTQ is specified, in the Enter OutQ field, then reports generated by the processing of the outbound purchase orders go to this output queue. This gives you the ability to redirect reports to specific out queues based on the partner and transaction. For example, you can direct outbound CMS purchase order edits to a specific outq and the inbound ASN edits for to a different out queue.
9. The setting Send date from Special Order PO allows you to direct the system to send the “Date Entered” to suppliers for special order items. This functionality allows you to provide a different date to your suppliers for special order lines other than the date required used on regular order lines.
Using the entry date on special order lines can help your suppliers identify the items that you want immediate shipment on.
If this setting, Send date from Special Order PO, is activated the date the special order/line was entered is sent to the supplier on the outbound 850.
If the setting is not activated, the default, the date requested as entered on the order header is sent to the supplier.
10. If the setting Send REF segment for replacement PO is activated, the REF segment below is sent and the customer PO number on the header is sent in it. If set to N then the REF segment will not be created UNLESS the order reason code in the header of the PO is REP indicating replacement PO.
ISA*00* *00* *ZZ*SAL2 *ZZ*SAL211111
GS*PO*SAL2*SAL211111*20120223*091113*1868*X*004010
ST*850*000000001
BEG*00*SA*705922**20120223
CUR*SE*USD
REF*11*211155
REF*OQ*NYC PO
11. The setting Send Shipto Segment allows you to transmit the shipto information on every 850. The default for the setting is “N” which directs the system to send the ST loop segments only when the shipto address is different than the billing address. If the setting is activated, the shipto name and address are included in the ST segment of the CMS transmission for all purchase orders for that partner; not just when there is a Shipto Override.
12. The setting Send PID/MEA segments on CUT lines ensures the sending of PID & MEA segments for Cut line items. When this switch is activated, the segments are passed in the 850 for lines that are entered for less than the average roll size. In order to send the MEA for roll line item you will still need to use the MIN* & MAX* entries on the F6 line on the order. If a MIN*/MAX* is entered for a cut line that will override the normal system generated PID/MEA created by having this setting turned on.
Note: PID is Product Item Description and MEA is measurement.
The PID will always pass UCUTSIZE.
The MEA for length comes from the conversion factor program.
The MEA for width comes from the item file.
13. The setting, Outgoing POs will default to "Must Match" Dye Lot Logic, allows you to automatically direct the system to ensure that items are from the same dye lot. Essentially this setting identifies in your outbound POs to your suppliers that you want the dye lots to match for the items you are ordering.
14. If the setting Send Price U/M instead of basis-per-Unit-Price code is set to:
"Y" - the item pricing will be in the item's native unit of measure.
"N" - the item pricing uses the code "UM" for item pricing. This directs the system to price the item in the UM requested on the PO. In the example PO1 segment shown below, the "UM" signifies that the item pricing will be in "LF".
PO1*10*19.00*LF*22.800*UM*SK*130101121*******ZZ*N*BP*MAN130101121
15. If the setting Send Price in Supplier Unit of Measure is activated the unit price is calculated against the supplier's UOM, but the PO104 (actual unit of measure) is blank: Example: PO1*10*1.00*RL*12.430**SK*ABCTESTARM.
If set to "N" pricing is based on the UOM associated with the quantity being ordered. Example: PO1*10*1.00*RL*331.60*RL*SK*ABCTESTARM where 331.60 is the price of the quantity ordered.
Tables Needed to transmit POs
The following tables can be used to transmit specific account information to your supplier. To access/create these tables, use option 5 - System Cross Reference Table File on the System Settings Menu.
DFTCMSACKC (Default CMS 855 Ack Codes) - This table allows users to set their own PO status codes based on the acknowledgement code received in an 855 from your trading partner. It can provide more flexibility in assigning order status codes to incoming Purchase Order Acknowledgements. The table allows users to set their own PO Status code values or use the Dancik defaults.
If this table is not used, the program is limited to only using the following hard coded cross referenced codes:
- IE = Item Accepted Price Pending
- IA = Item Accepted
- IR = Rejected
- R2 = Invalid Item/SKU
- R3 = Invalid Unit
- SP = Item Accepted - Schedule Pending
- IB = Item Backordered
- AR = Item Accepted & Released for Shipment
- AC = Item Accepted & Shipped
- BP = Item Accepted, Partial
- IH = Item on Hold Pending CSR Review
The table allows users to set their own PO Status code values or use the Dancik defaults.
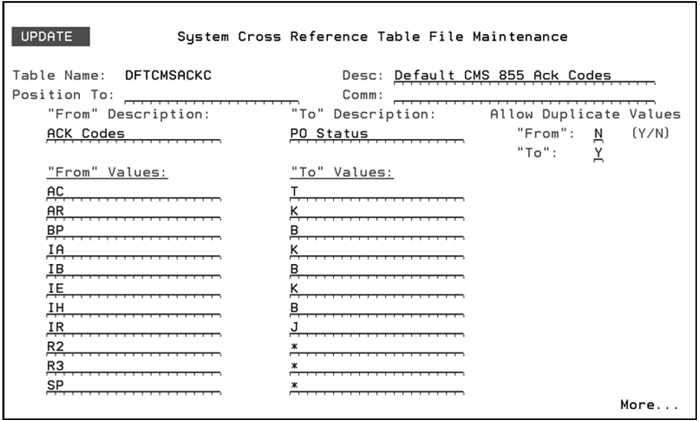
The entries in the “From” Values column are the codes your suppliers use on their Purchase Order Acknowledgements.
When a Purchase Order Acknowledgement is received, CMS cross references the “From” Values information to the “To” Values information and assigns that value to the Purchase Order status code.
The asterisks ,"*", under the “To” Values heading sets the PO status to a blank value.
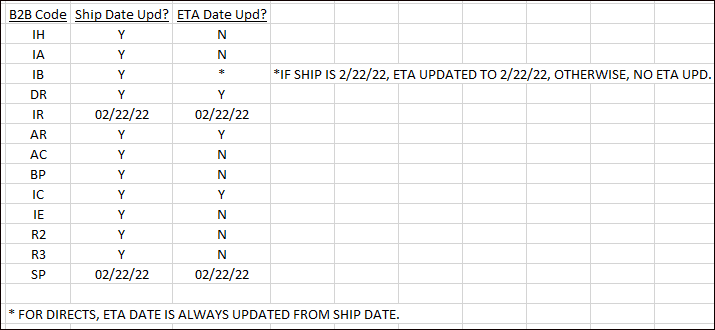
Which statuses update PO SHIP date and ETA date
The following table outlines whether Dancik CMS inbound 855 process updates purchase order SHIP date and ETA date based on the status sent by the supplier in the 855.
GENFOB (General FOB Conversion) - This table cross references Dancik FOB codes to X12 ANSI standard payment method codes. If the PO header does not contain a FOB code, “*” is used to retrieve the default pay method.
Note: The GENFOB table is used for both sending and receiving purchase orders.
|
XXXCUST# (Warehouse to Account Cross-reference) - CMS uses this table to control which account numbers are sent for each warehouse. The XXX corresponds to the supplier value established in the CMS partner configuration.
|
Note: This table can also be used to cross reference account numbers (in segment REF*11) to warehouse codes and to identify the chain store for the N104 segment of “BY” N101.
SENDCREHLD (Credit Hold Dir Orders Options) - This table is used to determine whether CMS sends purchase orders for direct shipments when the order is on credit hold. If no entry is found, the purchase order is transmitted when the customer direct order is processed. (see Special Considerations For Sending Purchase Orders).
|
The entry is global. This means that you only have to make one entry, as shown above, to cover all your trading partners.
If the table is set up as shown above, orders are only transmitted automatically via CMS if they are released from credit on the same day they are entered, and before the last scheduled transmission for that partner occurs.
The SENDCREHLD table, as shown above, requires that credit managers review transmission status, and transmit orders manually that have been on credit hold for more than a day.
XXXCARRIER (Shipvia Code to SCAC Codes)- This table cross references SCAC codes to shipvia codes. The cross referenced SCAC code is used if the Ship Via is found in this table. It controls the values populated in the TD5 segment - elements #2 and #3. If the SCAC code exists in the Classification Codes file, this value must exist in the XXXCARRIER table to correctly reflect the carrier description in the 850 extract. If no SCAC code can be determined or not found in the XXXCARRIER table a default of “ZZ” will be contained in element #2 and “COMMON CARR.” in element #3;
Note: The SCAC code is the standard code assigned to a shipper or carrier. It is required for many EDI transmissions, including Purchase Orders. Within the Dancik system SCAC codes are assigned to Shipvia codes in the Classifications Codes File (FIL 19).
|
Note: This table is mandatory if sending POs to Armstrong.
XXXTD5 - This table identifies the SCAC code found in either the XXXCARRIER table or from the Classification Code File (FIL 19) by Ship Via. If the SCAC code is found in XXXTD5 table, the TD5 segment qualifier is defined as “2” for SCAC code. Otherwise, the qualifier is “ZZ” for the Ship Via description.
|
XXXSUPITM - Controls whether a prefix of “FP” is concatenated to the supplier item number. This new value is placed in segment PO1 - element #7.
Note: “*” includes all product types.
|
Special Considerations For Sending Purchase Orders
Preventing Transmission of Select Purchase Orders
Preventing the transmission of direct ship orders
Transmission of Product Knowledge data on Purchase Orders
Controlling the N104 element on outbound POs
Optional FOB (based on pricing location from supplier)
How the ETA date gets updated on a PO.
Purchase orders can be sent via CMS in the following business cases:
Regular Purchase Orders - These purchase orders use the lines 10, 20, 30 and so on. Header comments (lines 1-9) are automatically printed on the order. Furthermore, only comment lines associated with a valid order line are included. For example, if an order has three detail lines (10, 20, and 30) and three comment lines (11, 12, and 41) only line 11 and 12 are included. Since line 41 is not associated. Only comments proceeded with codes identified above are transmitted.
Customer Direct Ships - The same rules that govern regular purchase orders comment line inclusion apply to customer direct shipments.
Special Order Purchase Orders
— Only special order purchase orders created the day the customer order is entered are sent via CMS.
— Only comment lines associated with the special order lines on the customer order are transmitted. Special order POs are sent only after the option to create purchase orders for special order items is executed.
Note: Use of miscellaneous items where comment lines provides item detail information is not recommended. CMS transmits appropriately coded item and comment lines.
In order for purchase order comments to be included with the purchase order, they have to begin with one of the following codes:
S/M - Indicates sidemark
S* - Indicates sidemark
SHADE* - Indicates shade
LOT* - Indicates dyelot
NNL* - Minimum roll length
MM* - Contract # at purchase order level
P/L - Contract # at detail level
MIN* ####.## - where number is in SY
MAX* ####.## - where number is in SY
Note: The number is four digits to the left of the decimal with two decimal places. If you enter a quantity that is less than four digits to the left of the decimal, be sure to include a space as a place holder. For example, 35.50 SY should be entered as MIN*_ _ 35.50 where the underscores represent spaces.
SHADE* &&&&&&&& - where & represents either the shade or the dye lot you are requesting
S* SAME - when you desire the quantity to be shipped from the same shade/dye lot
S* PRIORITY - when you want this order line included in the next shipment
For example, the comment line S/M Thanks for your business will be included on the purchase order.
Preventing Transmission of Select Purchase Orders
The following strategies can be used to prevent CMS from transmitting purchase.
Use Order Type Code H - CMS will not extract or transmit a purchase order that has a order type of H (hold).
Use of Order Reason Code ACI - Entering ACI as the order type code prevents CMS from extracting or transmitting a purchase order.
If a purchase order is entered with either of the above values in the reason or type codes it is not submitted. If the codes (H - Order Type code, ACI Order Reason Code) are removed or changed on the day the purchase order is entered no further action is required; CMS will extract and submit the purchase order. If the value is removed on subsequent business day or later, the purchase order must be manually transmitted the supplier using the CMS options for “On Demand” transmission.
You can prevent specific purchase orders from being sent through the utility Set Outbound PO Transmit Status (CMS 56).
Preventing the transmission of direct ship orders
By default DIR orders are sent as purchase orders to the supplier unless the SENDCREHLD system cross-reference table is configured to block transmission of these purchase orders (see Table Set-up).
It may be more appropriate to use ORD REASON CODES to control whether orders are sent to suppliers. However in either case, please note that if an order is not sent on the day it is entered, because of settings in the SNDCREHLD table or the Order reason code, the order must be sent manually. CMS only sends orders automatically on the day they are entered.
Transmission of Product Knowledge data on Purchase Orders
This feature allows users to include data from the Product Knowledge File on outbound purchase orders.
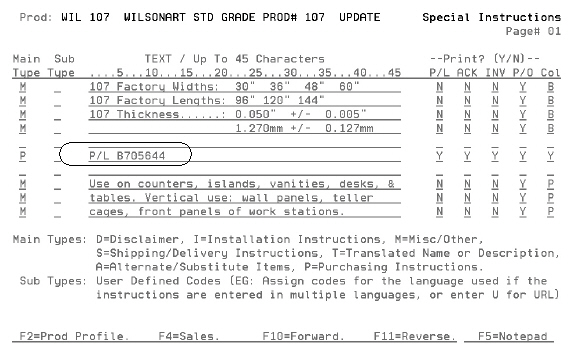
Using qualifiers supported by CMS (S*, P/L, and S/M) on Product Knowledge entries flagged to print on purchase orders will now enable this information to be sent in 850 documents. The P/L qualifier allows the subsequent data to be passed in contract pricing elements in the 850. S* and S/M qualifiers allow subsequent data to be passed in MSG elements.
P/L message lines are used to denote the price code used on the purchase order and is used by the supplier to identify the customer's price level.
S/M message lines appear on printed documents as well as the electronic version of the purchase order. These lines can be used to convey information (such as packaging or shipping instructions) to a supplier.
Note: Use of S/M to convey information to a supplier can be problematic because it may not be read by a human on the supplier side.
The following conditions apply:
P/L Lines
Contract pricing can be passed from the Order Header or from Order Detail lines.
Only one P/L entry can exist at the Order Header level; while the 850 transaction allows one-per-order line.
Product Knowledge may be entered at the MFG, Product Line, and Item level. Entries at the item level override those at the Product Line, which overrides MFG.
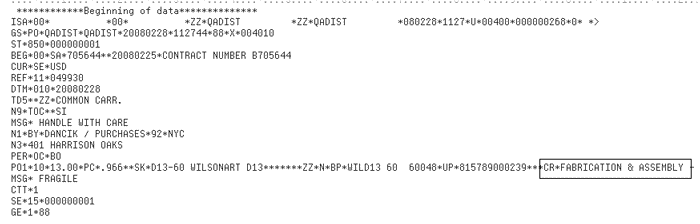
If P/L messaging exists at both levels, the F6 P/L message from the Order Header appears in the BEG segment while the F6 P/L message from Order Detail appears in the P01 segment. The following screens provide and example of this.
Product Knowledge Screen with a P/L assigned
|
These settings produce the following X12 data when the PO is transmitted via CMS. The P/L from the Product Knowledge is circled.
Adding messages (via the F6 Function Key)
A P/L message may be manually entered at the header or detail level.
|
S/M Lines
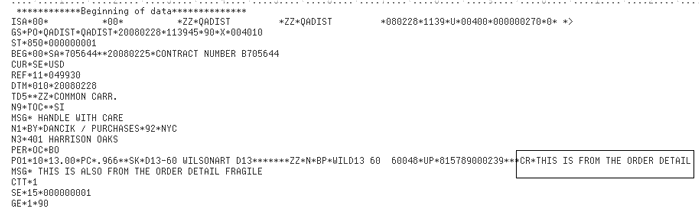
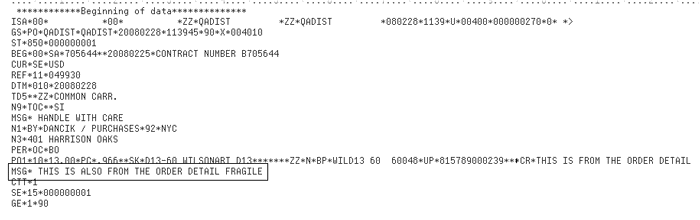
There can be multiple S/M messages within the Product Knowledge, Order Header, and Order Detail.
S/M messages at the order detail line level and Product Knowledge are combined and are inclusive (up to 1,000 MSG segments).
Controlling the N104 element on outbound POs
The N104 element normally references a warehouse code, but through the use of two tables you can control exactly what is included in the N104 element.
Table XXXCUST#
Ensure there is a N104MASK entry in the “From” value and a “Y” in the “To” value.
|
With no N104MASK entry, the value is the warehouse on the order.
If a N104MASK is found, then table SUBC#S is referenced to find the N104 value for BY.
Table XXXSUBC#S
This table cross references warehouses codes to a customer entered value that displays in the N104 segment of the 850.
|
Notes about the xxxSUBC#S Table
When the Buying Party is set to “D”, under CMS - Option #20, consider the following:
— If a table entry exists in xxxSUBC#S, for the “Doing Business As” from the Bill to account, the value contained in the “To” field will be used in the N104 segment.
— If no table entry exists in xxxSUBC#S, the value contained in the “Doing Business As” field from the Bill to account will be used in the N104 segment.
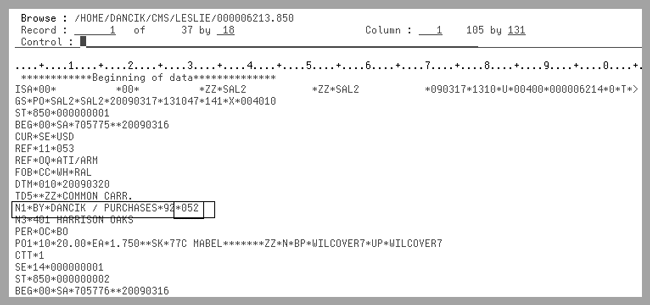
The following figure provides an example of the N104 segment that has been “masked” to display an entry different from the warehouse code on the order (the default).
Optional FOB (based on pricing location from supplier)
If your suppliers provide additional pricing information based on where the material is being shipped from, that information can be displayed in the FOB segment.
ISA*00* *00* *ZZ*SAL2 *ZZ*SAL211111
GS*PO*SAL2*SAL211111*20120223*091113*1868*X*004010
ST*850*000000001
BEG*00*SA*705922**20120223
CUR*SE*USD
REF*11*211155
REF*OQ*NYC PO
FOB*CC*WH*DAL
There are 3 places that can control this segment. Below is the hierarchy for element 3 (DAL in the example above).
Purchase Order F6 line
Partner specific FOB table in SET 5
GENFOB table in SET 5
If there is no GENFOB table the segment is not written.
Element 1 (CC in the example) comes from GENFOB cross referenced from the FOB code on the order header.
If there is no partner specific FOB table in SET 5 then element 3 (DAL in the example) is the header warehouse on the purchase order.
If there is a partner specific FOB table in SET 5 then element 3 (DAL in the example) is the value in the To column.
If there is a header F6 line qualified by FOB* then element 3 (DAL in the example) is the value typed after this qualifier.
ISA*00* *00* *ZZ*SAL2 *ZZ*SAL211111
GS*PO*SAL2*SAL211111*20120229*083258*1870*X*004010
ST*850*000000001
BEG*00*SA*705917**20120214
CUR*SE*USD
REF*11*211122
REF*OQ*PART RCV
FOB*CC*WH*DALTON
How the ETA date gets updated on a PO.
It should use the ETA date sent, unless…
IF ack01 = ‘IR’ or ‘SP’, then 2/22/22.
IF ack01 = ‘AR’, then add supplier days, if not zero.
IF ack01 = ‘AR’, then add greatest of prodware days, prodline days, and supplier days, or set to today if all of those are zero.
Sending Purchase Orders on Demand
1. On the CMS menu, select option 40 - Extract and Export Purchase Orders. The PO Extract and Export screen appears. Fill in the fields as needed:
Partner - The partner entered must be on the XML configuration file created by the web based CMS Configuration tool (refer to the Configuration section in Chapter 1). If not, the transaction will not occur.
Supplier - The value entered on your purchase order in the supplier field.
Data Source - Directs the system to the correct open order file. If the purchase order is older than yesterday’s date, enter *HISTORY. This option searches and retrieves all POs not included in the *TODAY and *YESTERDAY open PO files.
From PO# - To PO# - These settings let you enter a purchase order range. If you know the number of the purchase order enter it into both fields. If you enter a range, all POs included in that range will be submitted.
The additional fields allow you to resend a purchase order that has previously been sent, send closed POs, or send POs that have been modified.
2. Press Enter and then F2=Submit to extract and send the purchase order. You will see the message “Outbound Purchase Orders Have Been Submitted”.
The application extracts out the purchase order(s) from the designated location, and transmits the PO to the supplier based on parameters established in the CMS partner configuration.
Receiving Purchase Orders in CMS
Automatically Receiving Purchase Orders
Store Numbers to Accounts Numbers Table
Special Considerations for Inbound Purchase Orders
Receiving Purchase Orders On Demand
Configuration for Transfers between warehouses
Dealers send the 850 purchase order to distributors. It provides an electronic mechanism for the dealer to initiate orders for products supplied to the dealer by the vendor. This document should not be used to initiate purchase order changes, cancellations, inquiries, or stock reservations, as the standard does not accommodate these capabilities.
CMS retrieves customer orders from the FTP mailbox you provide for them. These orders may be automatically processed directly into your system as if they were keyed and ended in a manner which assigns an order number. Alternately these orders may be processed only as far as the unprocessed order file in your system and can be accessed by reference number.
When CMS retrieves orders, edit reports are created with information from the order including items, quantities, prices sent by your customer, shipment addresses, customer comments and shipping information.
When CMS is set to process orders without intervention by your customer service organization, inventory is automatically allocated, ship dates are automatically calculated based on routes and other settings, and the orders are ended in a manner that generates paperwork in the warehouse.
Automatically Receiving Purchase Orders
Using CMS you can automatically receive purchase orders from your customers. However, before sending or receiving CMS has to be configured to include the customers you will be exchanging POs with.
1. To set-up CMS to automatically receive purchase orders, go to the CMS menu and select option 20 - Schedule Automatic Processing. The CMS Timer and Settings Screen appears.
2. Entries are required in all four fields.
Exchange Partner - Enter the name of the company you are going to be receiving purchase orders from. This is the Partner as defined in the web configuration setting.
Transaction Type - Enter CMSPO
Direction - Enter I for inbound purchase order.
Action Code - There are three action codes available: A = add, I = inquiry, and U = update.
Note: Press F6 to access a listing of all the available CMS Transactions.
3. Enter the information and press Enter. The Timer Settings screen appears.
|
Field |
Description |
Mode |
This field tells the system if you are using Java or Gentran components for CMS transactions. If you are using Gentran (option 2), you must enter the Gentran Map ID. This value is supplied by Dancik. Note: In order to process inbound purchase orders in “real time”, the Retail Mode field must be flag with a Y and the CMSTART2 command issued. The CMSSTART2 command directs CMS to process inbound purchase orders immediately upon receipt. |
Require Unique PO? |
Use this setting to prevent or allow duplicate orders based on non-unique purchase orders at the partner level. When this setting is set to Y, a unique PO number is required on inbound purchase orders. If a duplicate purchase order is found, the following message is displayed. Warning PO# on this order has already been used, Order BLOCKED based on Customer Preference setting. Order should not be processed. |
-OR- Unique Contract#? (Ignored if Unique PO is selected) |
This setting, when set to Y, supports duplicate order checking using combined Job number and PO number. The default is N. When set to Y and a duplicate is found the following message is displayed: Warning PO#/Contract# on this order has already been used, Order BLOCKED based on Customer Preference setting” Order should not be processed. |
Enter OUTQ |
If an OUTQ is specified, the reports generated by the processing of the inbound purchase orders go to this output queue. This gives you the ability to redirect reports to specific out queues based on the partner and the transaction. For example, you can direct inbound CMS purchase order edits to a specific outq and the outbound ASN edits for to a different outq. If there is not an outQ specified, the information is directed to the path given in when setting up a CMS partner profile. |
If order cannot be shipped by customer request date back order all lines? |
Setting this field to Y directs the system to place all lines on an order into a back order status until all the items on the order can be filled. If this field is not activated, set to N, only the line that cannot be shipped by the ship date is placed into a back order status. All other lines on the order are processed to be shipped on the requested date. |
Default ship via for customer pick up orders |
This setting establishes a default ship via for pick up orders. |
If Order is received with a ship date greater than___ from the current date do not allow Ship Date to be changed to next available date by Routing System and process the order with a date requested of (mmddyy) |
In some instances customers may place orders with “future ship dates” (i.e. any date which is farther out than their next scheduled delivery date). Because Dancik order entry always calculates ship dates with the soonest possible delivery date - based on routes and material availability- this setting allows CMS users to test whether the customer’s requested delivery/ship date constitutes a “future ship date” and to use a default date which may be used in Customer Service to manage these orders. The original date on the order may not be entered on the order because there is no way to validate that it is a valid ship date based on the customer's route. This setting works in conjunction with delivery and routing system. Enter the number of days that is further out than the next scheduled delivery date for this partner so the ship date will not change. For example, if you set this field to 7 days and you receive a purchase order on April 25, but the partner requests shipment no earlier than May 17. With the 7 days setting the delivery date of May 17 will not be changed and the order will have to be manually tracked. If the delivery date is earlier than 7 days, the normal routing and delivery information is used. |
Process Inbound Regular order into Open Order file (P) or leave unprocessed (U)
Process Inbound Direct orders into Open Order file (P) or leave unprocessed (U) |
These two settings allow for different processing options for regular and/or DIRECT orders. Entering a “P” triggers orders coming in via CMS to be evaluated by the parameters set-up for CMS in the System Wide Setting - Options for Order Holds. Entering a U in these option, leaves orders unprocessed, which gives your customer service department the option/chance to review the orders to ensure they meet the business requirements of the distributor. If a CMS order is sent to the unprocessed file, it can be checked on and manually processed via the menu option CUS 16 - Search Unprocessed Orders, Holds, and Quotations. Note: All customer orders for direct shipments must contain only items that can be shipped direct from a single supplier. Orders that contain items from multiple suppliers that are transmitted with instructions to ship direct will be left in unprocessed order file. Distributors receive orders via CMS for both direct shipments and orders shipped from their inventory. These settings allow partner specific override of EDICTL table settings. Direct ship orders have a DIR warehouse value and an alternate supplier code in WARE and SUPPLIER fields on the HEADER of the order. Stock and Direct ship orders have different values in the FOB segment of the inbound order. If present these values override those found in EDICTL. When these values are blank the EDICTL table is used. Associated Files System Wide Setting - Options for Order Hold Process Decor 24 Conditional Order Release in Decor 24 Sales Portal Navigator Notepad for Unprocessed Orders |
Store Numbers to Accounts Numbers Table
Inbound orders are processed using account number information found on the incoming purchase order. When the account number supplied in the data is accurate, the Store Numbers to Accounts Numbers Table (XXXNA#S) may be used to associate specific store locations to shipto account numbers which may be established for that customer.
In order to receive purchase orders, you must construct a system table to connect CMS supplier numbers with account numbers in your system.
1. System tables are accessed and built using option 5 - System Cross Reference Table File on the System Settings Menu (SET).
2. On the entry screen that appears, enter the new table name and an action code of A. The table name should consist of a three character partner ID plus the ending of NA#s. For example, if the customer is World Floors, Inc., the name of the table could be WFINA#s.
Note: The customer has to be established in the CMS Timer Settings, and trading partner configurations to receive orders.
In the example below, the shipto account 0005000 is used when a Chain Store Number of 901 is found on the incoming purchase order.
Note: If inbound order doesn’t contain a valid account number in the REF segment, then the number provided in this segment is used when searching the XXXNA#S table (the value sent in the purchase order data should be populated in the TO column and the accurate Billto Account number should be populated in the From Column.
|
3. The To Values are the store number(s) that are sent on the inbound purchase orders. The From Values are the accounts in your system established for those store numbers.
Note: The store number and its related account number must be established in this table before the purchase order is processed into the Dancik system.
CMS processing reviews the information sent in through “Buying party - Chain Store number” to determine what value should be used when indexing the “from” values in this table.
If this table is not established, the Shipto information on the order will force a shipto override in order if present.
Special Considerations for Inbound Purchase Orders
Billing and Shipping Information
How CMS derives Billto Account Numbers and Shipto Addresses
Phone Number Support for Inbound Purchase Orders
Very rarely, if ever, will your customer request a “direct shipment” from you. Usually the customer service representative decides whether to have the manufacturer drop ship/ship directly to the customer based on the following:
Quantity (i.e., truckload)
Manufacturer offers direct shipment and there is no stock
Based on this you may need to develop simple business rules to determine how to process your customer orders.
If your customer supplies “shipto” information in the N1 segment (an N1 segment is an X12 convention that is part of a purchase order), this is used as a shipto override (shipto override flag set to Y on the order header). If this shipping information is not supplied, the Billto record is used to determine if there is a default shipto account. If not, the Billto address from your system is used.
Billing and Shipping Information
Distributors should give billing and shipping account numbers to their partners. The billing account (six digit company number + five digit account number) is used in reference segments of an inbound purchase order. No account mapping is required.
Distributors with multiple locations send three character warehouse codes in the N104 segments of the purchase order.
How CMS derives Billto Account Numbers and Shipto Addresses
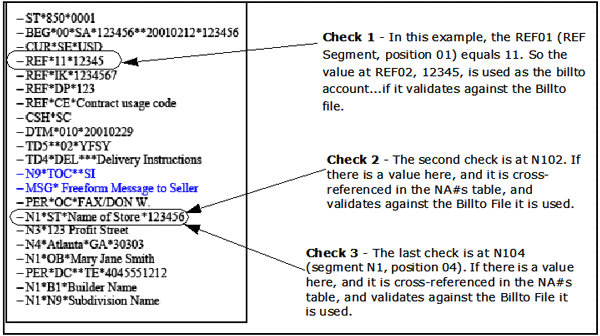
Billto Account Numbers
CMS uses three steps to assign a Billto Account number to an incoming 850.In all three steps, CMS validates the Billto account number against the Billto File.
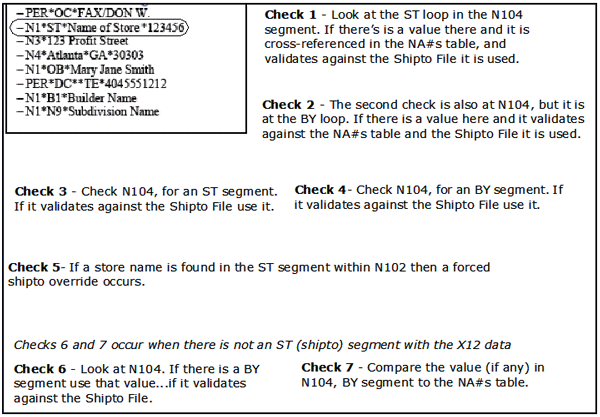
Shipto Addresses
When Shipto (ST) information is sent to the N104 value it is validated against the Shipto File. If the information found on the purchase does not match any information in the Shipto file, a Y is entered into the Shipto Override field on the Order Header and the override shipto address is used.
CMS uses the following process to identify a Shipto address.
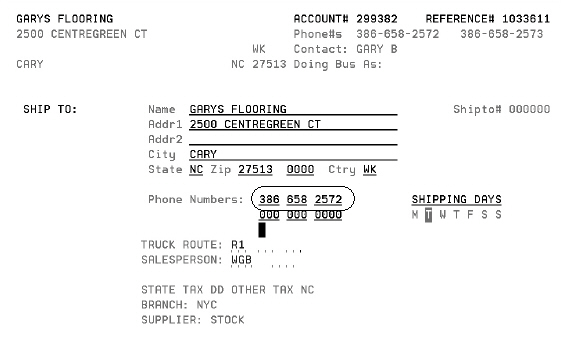
Phone Number Support for Inbound Purchase Orders
Phone number information received on inbound 850s is mapped to the inbound 850 work files and then used to populate the Phone Number field on the Shipto Screen within the Order Entry process. These phone numbers can then be viewed on the Order Entry screens, and are printed on order documents. The following has to be in place:
The PER01 segment has to equal “DC”.
The PER03 segment has to equal “TE”.
There has to be a phone number in PER03.
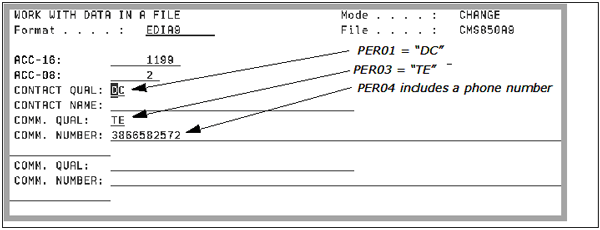
If all three of the conditions shown above are true, the phone number in PERO4 (Comm. Number field) is transferred to the Shipto screen.
|
Receiving Purchase Orders On Demand
1. On the CMS menu, select option 33 - Import and Process Purchase Orders. The PO Import and Process screen appears.
2. Enter the name of the CMS partner that you want to receive a purchase order from. The Partner field ties the request to the CMS system.
Note: The partner entered has to be established via Administration tab of the CMS configuration tool.
3. The customer ID is a three alpha code that ties the request into the Dancik system. The system uses this ID to cross-reference files and ensure compatibility.
Note: Entries in both the Partner and Enter Customer ID fields are required.
4. Press Enter to allow the system to accept your entries. If there are no errors you are directed to press F2 to submit request to receive the purchase order.
Configuration for Transfers between warehouses
How CMS Automates Transfers between Warehouses
CMS can automate the transfer of stock from one warehouse to another. These transactions resemble a stock to stock transfer since no sale is recorded as a real receivable or payable, but this process allows ISO processes to select the stock for you.
a supplier code representing each warehouse from which stock can be taken
a CMS partner ID for each warehouse/supplier
Inbound and Outbound 850 and 856 transactions configured in CMS for each partner.
an inactive company code
billto accounts for each suppliers' customers (the warehouse to which material will be shipped)
system cross reference table for each partner to ensure inbound orders are processed using the correct billto accounts
EDICTL table set up for inbound 850s
Branches create a purchase order using the traditional purchasing account. Enter supplier on the header of the PO that corresponds to the code created for the warehouse from which stock is to be shipped.
Per the partner setup in CMS 20, CMS extracts all of the purchase orders for the supplier code assigned to this partner.
Set up
Material to be shipped from warehouse RAL = Supplier RAL
Material to be shipped from warehouse NYC = Supplier NYC
Material to be shipped from warehouse ANA = Supplier ANA
1. The CMS option to export purchase orders for a supplier runs.
2. The orders for the supplier warehouse are extracted.
3. The CMS option to import purchase orders for a partner runs.
4. Orders are created for the account assigned to the warehouse from which the transfer is requested.
5. The orders must billed to relieve the inventory in the ship from warehouse.
Note: The Billtos that you assign to each warehouse reside in a separate inactive company so the receivable isn't recorded in your company file and the transaction doesn't impact sales.
How CMS Automates Transfers between Warehouses
1. If you have 3 warehouses and stock could be transferred between any of them in both directions then your setup would look something like this -
2. If your warehouses are:
— ANA
— NYC
— RAL
3. RAL can send purchase orders to NYC and ANA.
4. You need 2 Billtos for RAL.
— billto account for when RAL orders from NYC.
— billto account for when RAL orders from ANA.
5. Set up ANA and NYC the same way.
Note: The customer type should be set to IC and the customer price list should be set to AC.
Here is the RAL account when ordering from ANA.
|
6. You assign the accounts to warehouses per supplier in the system cross reference table. (SET 5).
You need a table for each supplier warehouse. For our example we have ANACUST#, NYCCUST# & RALCUST#. CMS will use these account numbers when creating the regular order for an inbound 850.
|
7. A purchase order is entered using the company's normal purchasing account. The supplier is the warehouse that the inventory is coming from.
|
8. The outbound purchase order job for supplier ANA runs.
9. The inbound purchase order job for that partner runs. Inbound 850s create the “customer order” to be filled and shipped.
|
10. This customer order is billed to relieve inventory in the ANA warehouse. The receivable is not on the active company's books.
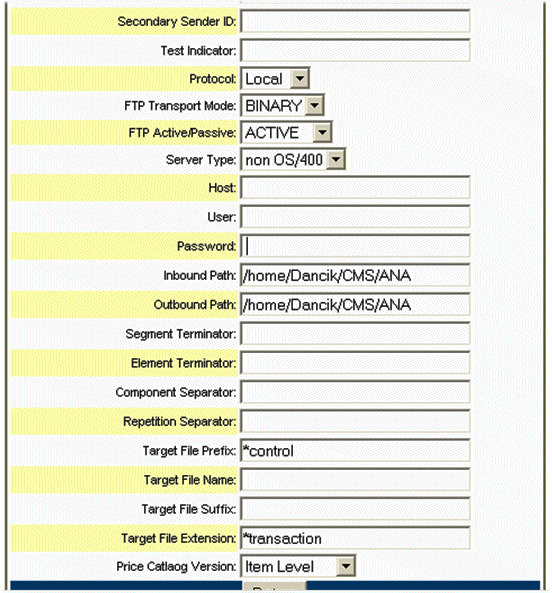
11. The CMS partner on the web can be set to put and get the files from a path on the IFS. To do this you make the protocol local and specify the path in the inbound and outbound path fields.
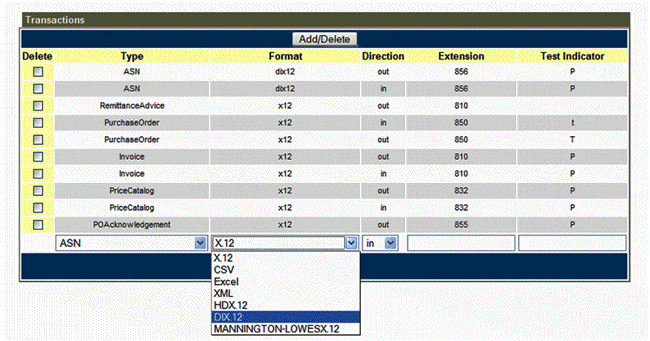
12. The 856 must be configured in the CMS partner settings to load 'pre-receipts' with the item details including serial number and costs.
Note: The Transaction Format must be configured and DIX.12 on the inbound and outbound transaction.
Adding Partners - In order to receive purchase orders, the trading partner must be established using the Administration tab of the CMS configuration application. Click Add/Modify Transactions, at the bottom of the Add Partner window. From this screen you can add, update, or delete transaction types to include Purchase Orders.
View CMS Transaction Status Log (Inbound 850, Outbound 855 & 856) CMS 54 - This option displays the status of transactions that are generated after the receipt of a purchase order. These transactions include: purchase order acknowledgements, advance shipping notices, and invoices.
Re-process Inbound ASNs, Inbound Invoices, and Inbound POs (CMS 55) - If you have an inbound purchase order (or other inbound transaction) that has errors, this option allows you to reprocess the transaction after fixing the errors. If the transaction has already been processed, the system presents a message letting you know.
View Transaction Audit Log for All Inbound and Outbound Documents (CMS 58) - Use this option to display all the transactions sent out from and received into your system.
View Status Of Outbound Transactions (CMS 59) - This option lets you know if your outbound document made it to it’s destination and if so whether or not it had any errors.
Sending and Receiving Invoices in CMS
Sending and Receiving Purchase Orders in CMS