|
Need more info or you couldn't find what you were looking for, let us know by sending an email to: support@dancik.com.
Sending and Receiving Acknowledgements in CMS
Sending Acknowledgements in CMS
Sending Acknowledgements Automatically
Sending Acknowledgements on Demand
Sending Acknowledgements Automatically
1. To set-up CMS to automatically send purchase orders, select option 20 - Schedule Automatic Processing on the CMS menu. The CMS Timer and Settings Screen appears.
2. Entries are required in all four fields.
Exchange Partner - Enter the name of the company you are going to be sending and receiving purchase orders with.
Transaction Type - Enter CMSPOACK.
Direction - Enter O to indicate outbound or I for inbound acknowledgement.
Action Code - There are three action codes available: A = add, I = inquiry, and U = update.
3. Enter the information and press Enter. The Timer Settings screen appears.
4. The Timer Settings are not used for sending Order Acknowledgements. When the order is processed, the order acknowledgement is automatically sent to the trading partner that sent the purchase order. ONLY processed purchase orders generate an order acknowledgement. Unprocessed order (i.e., orders that have been cancelled) do not generate an order acknowledgement. Furthermore, orders that are manually entered do not automatically generate an order acknowledgement.
5. Enter a transmission mode. You can choose between Java Processor or Gentran. The standard mode is 1 - Java Processor. However, if you need to use Gentran, enter IBM or ONET3 as the Gentran Map ID.
6. On outbound purchase order acknowledgements, CMS gives you four options for encoding your transactions.
W - warehouse
B - branch
A - account
D - doing business as
Enter the code that corresponds to the value you want on your CMS purchase order acknowledgement. If you specified that you want to use warehouse information, but you occasionally have purchased items that are direct shipped to your customers, you can configure CMS to use a Branch code.
7. If an OUTQ is specified, in the Enter OutQ field, then the reports generated by the processing of the acknowledgements go to this output queue. This gives you the ability to redirect reports to specific out queues based on the partner and the transaction. For example, you can direct outbound acknowledgements to a specific outq and the inbound ones to a different out queue.
Note: Gentran EDI reports cannot be directed to a specific output queue.
If there is not an outQ specified, the information is directed by the output queue setting on the user profile.
Sending Acknowledgements on Demand
Through a menu option you can send purchase orders as needed.
1. From the CMS menu, select option 41 - Extract and Export Purchase Order Acknowledgements and press Enter. The PO Ack Extract and Export screen appears.
|
2. Fill in the fields as needed:
Partner - The partner entered must be on the XML configuration file created by the web based CMS Configuration tool (refer to the Configuration section in Chapter 1). If not the transaction will not occur.
From PO# - To PO# - These settings let you enter a purchase order range. If you know the number of the purchase order, enter it into both fields. If you enter a range, all POs included in that range are submitted.
The Resend POAck field allows you to keep resending acknowledgements until the flag is changed to N.
3. Press Enter and then F2=Submit to extract and send the purchase order. If the purchase orders were sent, you will see the message “Outbound PO Acks Have Been Submitted”.
What happens behind the scenes is the program picks out the purchase order acknowledgement(s). It then transmits the acknowledgements to the Target File destination established for the user.
Receiving Acknowledgements in CMS
Receiving Acknowledgments Automatically
Receiving Acknowledgments On Demand
Receiving Acknowledgments Automatically
The set-up for receiving acknowledgments automatically is the same as for sending them. The only difference is that instead of entering an O in the Direction field you need to enter an I for inbound.
The Receiving screen includes the following setting that is not included on the Sending (outbound) screen.
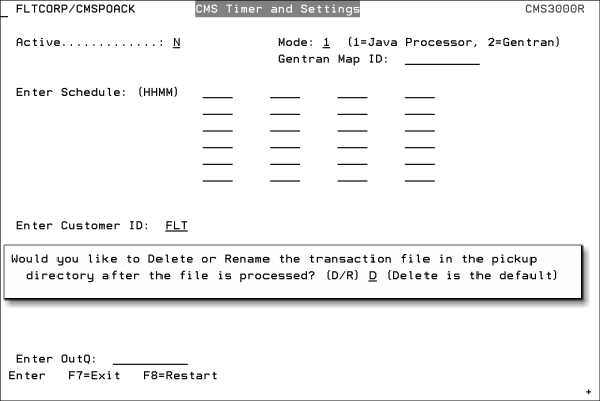
This setting directs the system to rename or delete a PO Acknowledgement after it has been picked up or transferred. Prior to the introduction of this setting in 2013, the PO Acknowledgements were automatically deleted after being picked up by the iSeries Server.
Enter a:
D - to continue the current process of deleting the PO Acknowledgement after it is picked up.
R - to rename the file by placing an “X” in front of the file name. Entering an “R” also directs the system to keep the file.
Status Update
When an 855 comes in, the PO status is updated as follows:
Code |
Description |
Dancik Status |
IE |
ITEM ACCEPTED, PRICE PENDING |
K |
IA |
Item Accepted |
K |
IR |
Item Rejected |
J |
R2 |
Invalid Item/SKU |
N/A |
R3 |
Invalid Unit |
N/A |
SP |
Item Accepted, Schedule Pending |
N/A |
IB |
Item Backordered |
B |
AR |
Item Accepted and Released for Shipment |
K |
AC |
Item Accepted and Shipped |
T |
BP |
Item Accepted, Partial Shipment, Balance Backordered |
B |
IH |
Item on Hold Pending CSR Review |
B |
DR |
Item Accepted, Date Rescheduled |
K |
IC |
Item Accepted, Changes Made |
K |
Receiving Acknowledgments On Demand
Through a menu option you can send purchase orders as needed.
1. From the CMS menu, select option 32 - Import and Process Acknowledgements. The Acknowledgements Import and Process screen displays.
2. Enter the CMS partner you want to import acknowledgements from and press Enter. All acknowledgements from that partner are pulled into CMS and processed. These acknowledgements are displayed on the CMS transaction log.
Sending and Receiving Purchase Orders in CMS
Sending and Receiving Invoices in CMS
View Transaction Audit Log for All Inbound and Outbound Documents (CMS 58) - Use this option to display all the transactions sent out from and received into your system.
Adding Partners - Click Add/Modify Transactions, at the bottom of the Add Partner window. From this screen you can add, update, or delete transaction types to include invoices.
View CMS Transaction Status Log (Inbound 850, Outbound 855 & 856) CMS 54
Re-process Inbound ASNs, Inbound Invoices, and Inbound POs (CMS 55)
View Status Of Outbound Transactions (CMS 59