|
Need more info or you couldn't find what you were looking for, let us know by sending an email to: support@dancik.com.
Sending and Receiving Invoices in CMS
Sending Invoices Automatically
Considerations for Canadian Invoices
Tables Required to Transmit Invoices
The 810 invoice bills the dealer for products purchased from the vendor.
CMS can send Invoices to your customers on a daily basis. These electronic invoices contain all of the same information found on a printed invoice for customers, including miscellaneous and delivery charges, as well as tax and terms information. CMS should be set to transmit invoices on a day by day basis after invoices have been printed in the system and before night jobs updates have been run. CMS cannot send invoices before Dancik Billing processes have been completed and Invoices have been printed. Customer Preference system settings may be used to prevent printing paper invoices for CMS.
CMS is designed to exchange transactions automatically. It is includes a timer that checks for outbound transactions as frequently as needed. The following steps describe how to configure CMS for automatic transmittal of invoices.
This option always runs against today’s invoices (i.e., anything that is printed, but is not voided using option 5 on the invoicing menu).
Note: Recommendation is to schedule this job after all invoices have been printed and any corrections have been made.
Sending Invoices Automatically
1. Access the CMS menu and select option 20 - Schedule Automatic Processing. This option lets you begin configuring CMS to automatically send transactions. Using this option establishes trading partners, types of transactions, action codes, and a timetable for the system to check for information.
The CMS Timer and Settings screen appears. Entries are required in all four fields on the CMS Timer and Settings screen.
Note: The entries made have to match the XML configuration file. If not, CMS will not operate properly. For example, the Exchange Partner name entered has to match the name included in the XML file.
Exchange Partner - Enter the name of the company you are going to be sending and receiving invoices with.
Transaction Type - Enter CMSINV for invoices.
Direction - Enter an (O) for outbound invoices.
Action Code - There are three action codes available: A = add, I = inquiry, and U = update.
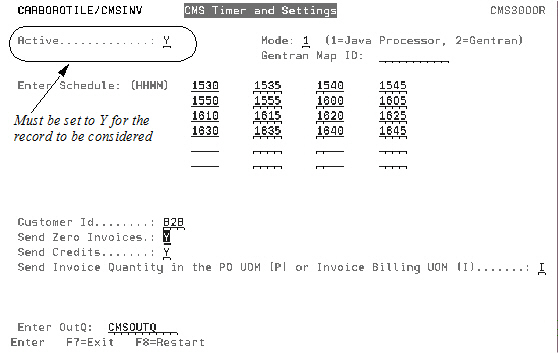
2. Enter the information and press Enter. The Timer Settings screen appears.
|
3. Make sure the Active is field is flagged as Y.
4. The timer settings work in conjunction with a CMSSTART command that checks for transactions every 5 minutes.
Note: Invoices should be scheduled to be sent at a time of day after all invoices have been printed and any problem invoices have been voided. This ensures that the scheduled invoice transactions are running against the INPRINT file (today’s invoices) and any invoices flagged for deletion are excluded.
5. Enter a transmission mode. You can choose between Java Processor or Gentran. The standard mode is 1 - Java Processor. However, if you need to use Gentran, enter IBM or ONET3 as the Gentran Map ID.
6. The Customer ID is a three alpha character code that ties the invoice to the Dancik system. The system uses this ID to cross-reference Dancik files and ensure compatibility. The system cross references this customer ID (in this case B2B) to a system table entitled B2BCUST#.
7. Flag the Send Zero Invoices and Send Credits fields with either a Y (to send applicable invoices) or an N (to not send).
8. Decide which unit of measure you want to use in the Send Invoice Quantity in the PO UOM (P) or Invoice Billing UOM (I) field. If P is selected, CMS uses the UM on the purchase order. If I is selected, CMS uses the unit of measure that appears on printed invoices.
9. If an Output Queue is specified, in the Enter OutQ field, then the reports generated by the processing of the outbound purchase orders will go to this output queue. This gives you the ability to redirect reports to specific out queues based on the partner and the transaction. For example, you can direct outbound information to a specific outq and the inbound data to a different out queue.
Note: Gentran EDI reports cannot be directed to a specific output queue.
If there is not an outQ specified, the information is directed to the path given when setting up a CMS partner profile.
Note: When sending a Credit Authorization code , the format of the header comment line is AUT*_999999. Where 999999 denotes the denotes the partner approval code. provided and keyed into the header F6 line of order.
10. If any of the following keywords are found on line 9966 or 9967, they are applied as charges. Here are the Keywords and the corresponding charge codes:
DELIVERY - C040
LABOR - E190
FUEL - D270
MINIMUM - D270
HANDLING - E190
FREIGHT - D240
The program scans for these keywords in any starting position. For example, CMS picks up on DELIVERY instead of having to have 'DELIVERY CHARGES' starting in position 1.
Note: None of the detail message lines get sent from an invoice.
Considerations for Canadian Invoices
Postal codes
In order for the “postal code” on Canadian invoices to display correctly on an outbound invoice (810), the postal code in the Billto File for a Canadian company has to be the last 7 characters in the City field.

Currency Conversions
CMS does not perform currency conversions (i.e. Canadian dollar to the US dollar).
Table Required to Transmit Invoices
In order to use CMS for invoice transmissions, the Billto Account Number Reference Table must be constructed. This table links your Billto account numbers with CMS customer supplied store numbers. The following tables are required:
1. System tables are accessed and built using option 5 - System Cross Reference Table File on the System Settings Menu.
2. On the entry screen that appears, enter the new table name and an action code of A.
3. The figure below shows an example of an Billto Account Number Reference Table.
|
4. The From values are the Billto accounts in your system that relate to the store numbers inserted in the To values.
Note: The account number and its related store number must be established in this table before invoices are processed into the Dancik system.
Through a menu driven option you can send invoices to your customers as needed.
1. From the CMS menu, select option 42 - Extract and Export Invoices. The Invoice Extract and Export screen appears. Fill in the fields as needed:
Partner - The partner entered must be on the XML configuration file created by the web based CMS Configuration tool (refer to the Configuration section in Chapter 1). If not, the transaction will not occur.
Customer ID - This is a three alpha code character that ties the invoice to the Dancik system. The system uses this ID to cross-reference Dancik files and ensure compatibility.
Data Source - Directs the system to the correct open order file. If the invoice is older than yesterday’s date, enter *HISTORY. This option searches and retrieves all POs not included in the *TODAY and *YESTERDAY open PO files.
Note: If today is specified, then only the invoices in INPRINT (today’s printed invoices) are considered. If yesterday is specified (INSAVE), yesterdays invoices are sent only if no invoices have been printed today. This gives you the ability to send invoices from yesterday without including anything that may be in the workflow from today.
From Invoice# - To Invoice# - These settings let you enter an invoice range. If you know the number of the invoice, enter it into both fields. If you enter a range, all invoices included in the range will be submitted.
Send Zero Invoices - If this field is flagged with a Y, invoices that have a zero balance can be sent. If it is flagged as N, invoices that have a zero balance are not sent.
Send Credits - Entering a Y allows you to send credit invoices. Credit invoices are where you owe money to a CMS partner. Examples of credits are if the wrong item was sent and then invoiced, or when rebates or refund are applied.
Resend Invoice - allows you to keep resending an invoice until the flag is changed to N.
2. Press Enter and then F2=Submit to extract and send the invoice. If the invoices were sent, you will see the message “Outbound Invoices Have Been Submitted”.
What happens behind the scenes is the program picks out the invoice(s) from the designated open invoicing file (Today, Yesterday, or History). It then transmits the invoice to the Target File destination established for the user.
Sales Data extracts are similar to invoices except they are not as detailed. This transaction lets you exchange sales information that concerns all the manufacturers you deal with or just a few.
The steps to transmit a sales extraction transaction are essentially the same as with an invoice. The only additional field is one that allows you to limit the information by manufacturer.
Sending Sales Extracts Automatically
Sending a Sales Extraction on Demand
Sending Sales Extracts Automatically
1. On the CMS menu, select option 20 - Schedule Automatic Processing.
The CMS Timer and Settings screen appears. Entries are required in all four fields on the CMS Timer and Settings screen.
Note: The entries made have to match the XML configuration file. If not, CMS will not operate properly. For example, the Exchange Partner name entered has to match the name included in the XML file.
Exchange Partner - Enter the name of the company you are going to be sending and receiving invoices with.
Transaction Type - Enter CMSSALES for sales and inventory data.
Direction - Indicates if the transaction will be (I) inbound or (O) outbound.
Action Code - There are three action codes available: A = add, I = inquiry, and U = update.
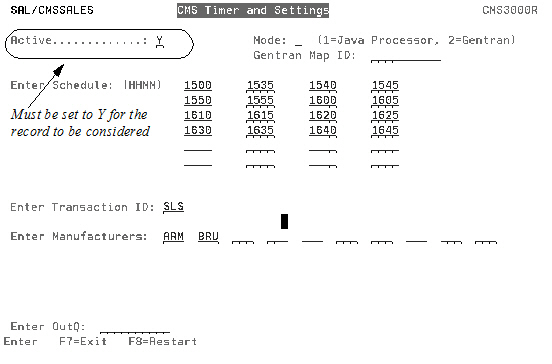
2. Enter the information and press Enter. The Timer Settings screen appears.
|
3. Make sure the Active is field is flagged as Y.
4. The timer settings work in conjunction with a CMSSTART command that checks for transactions every 5 minutes.
5. Enter a transmission mode. You can choose between Java Processor or Gentran. The standard mode is 1 - Java Processor. However, if you need to use Gentran, enter IBM or ONET3 as the Gentran Map ID.
6. The Transaction ID must be entered as SLS.
7. Enter the manufacturers you want to include in the transmission. In this example, only sales and inventory information from the manufacturers ARM and BRU will be included. If you leave these fields blank all manufacturers are included.
8. If an Output Queue is specified, in the Enter OutQ field, then the reports generated by the processing of the outbound purchase orders will go to this output queue. This gives you the ability to redirect reports to specific out queues based on the partner and the transaction. For example, you can direct outbound information to a specific outq and the inbound data to a different out queue.
Note: Gentran EDI reports cannot be directed to a specific output queue.
If there is not an outQ specified, the information is directed to the path given when setting up a CMS partner profile.
9. Press Enter to update the record.
Sending a Sales Extraction on Demand
1. From the main CMS menu, select option 44 - Extract and Export Sales Data.
|
Partner - The partner entered must be on the XML configuration file created by the web based CMS Configuration tool (refer to the Configuration section in Chapter 1). If not, the transaction will not occur. To view all the available partners, enter a “?” in the field and press Enter.
Customer ID - This is a three alpha code character that ties an invoice to the Dancik system. The system uses this ID to cross-reference Dancik files and ensure compatibility. This value is always SLS.
Data Source - Directs the system to the correct open order file. If the information requested is older than yesterday’s date, enter *HISTORY. This option searches and retrieves all sales information not included in the *TODAY and *YESTERDAY open PO files.
From Invoice# - To Invoice# - These settings let you enter an invoice range. If you know the number of the invoice, enter it into both fields. If you enter a range, all invoices included in the range will be submitted.
Note: If you do not enter an invoice range, all open invoices are included.
Resend Invoice - allows you to keep resending an invoice until the flag is changed to N.
Enter Manufacturers - Use these fields to limit the sales and inventory report specific manufacturers. Enter the three digit code(s) for the manufacturers you want to include. If you leave these fields blank, all the manufacturers on your system will be included in the report.
2. Press Enter then F2 to submit the transaction to your trading partner.
Receiving Invoices Automatically
Notes about Receiving Invoices
Tables Required to Receive Invoices
Setting up an EDI Control Table
The following describes CMS inbound invoice processes:
CMS retrieves invoice information from your supplier’s mailbox and loads it into your AP system in a special CMS voucher maintenance program.
A report is generated detailing all the information on the invoice. This report may be filed in place of the supplier’s invoices.
The AP clerk selects invoice(s) and places them in their workstation edit program.
An optional AP reconciliation reports identifies variances between the supplier’s bill and the cost of the material which has been received.
The user may post the supplier’s invoices as if they were manually keyed.
The user may decide not to post the invoices. In this case, they can return them to CMS Voucher Maintenance program for posting later.
If the user posts the invoice, it becomes an open payable on the supplier's ledger.
Appropriate GL accounts are hit by the posting based on the AP and GL defaults and system wide settings.
Receiving Invoices Automatically
1. On the CMS menu, select option 20 - Schedule Automatic Processing. On the CMS Timer and Settings screen that appears, make entries into all the fields.
Exchange Partner - Enter the partner ID of the sending supplier.
Transaction Type - Enter CMSINV for invoices.
Direction - Enter an (I) for inbound invoices.
Action Code - There are three action codes available: A = add, I = inquiry, and U = update.
2. Press Enter to access the following screen.
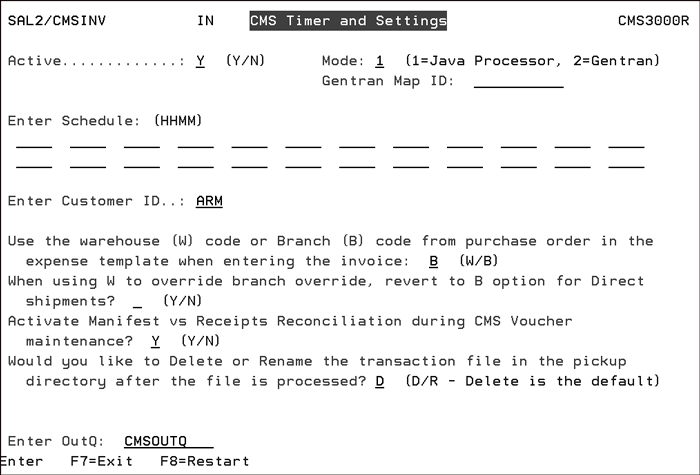
Setting |
Description |
Active |
Make sure this field is flagged as Y. |
Mode |
Enter a transmission mode. You can choose between Java Processor or Gentran. The standard mode is 1 - Java Processor. However, if you need to use Gentran, enter IBM or ONET3 as the Gentran Map ID. |
Schedule |
The timer settings work in conjunction with a CMSSTART command that checks for transactions. Enter the times in military format that you want CMS to automatically check for inbound invoices. |
Customer ID |
The is a three alpha character code that ties the invoice to the Dancik system. The system uses this ID to identify system wide setting tables used for inbound invoice processes. |
Use the warehouse (W) code or Branch (B) code from purchase order in the expense template when entering the invoice |
Enter the code (warehouse or branch) to use when booking the expense in an AP template. For example, if there is a central branch that purchases for several branches and/or warehouses, you could flag this field to W to expense the invoice to the warehouse on the invoice. Alternately, for direct ships you may want to revert back to the branch on the PO when expensing the invoice. If so, enter a Y in the When using W to override branch override, revert to B option for Direct Shipments? field. |
Activate Manifest vs Receipts Reconciliation during CMS Voucher Maint |
If you do not wish to execute AP Receipt Reconciliation and post variances to GL count, you can turn off this feature by entering N in this field. In instances where a CMS partner doesn't send ASNs or can not provide a bill of lading number in the CAD segment of the 810 you may not want the CMS AP voucher maintenance program to attempt to reconcile AP to receiving as the invoice amount will end up in Purchasing variance account of the AP edit. This setting turns off auto reconciliation process allows the AP edit to reflect the expenses and the associated GL accounts as established in the SYSSET tables. The default is Y. Note: This setting only effects invoices received after a change is made. |
Would you like to Delete or Rename the transaction file in the pickup directory after the file is processed? |
This setting directs the system to rename or delete the invoice after it has been picked up or transferred (FTP) to an iSeries server. The options are:
|
Enter OutQ |
If an Output Queue is specified, the reports generated by the processing of the inbound invoices go to this output queue. This gives you the ability to redirect reports to specific out queues based on the partner and the transaction. For example, you can direct outbound information to a specific outq and the inbound data to a different out queue. If there is not an outQ specified, the information is directed to the path given when setting up a CMS partner profile. |
Notes about Receiving Invoices
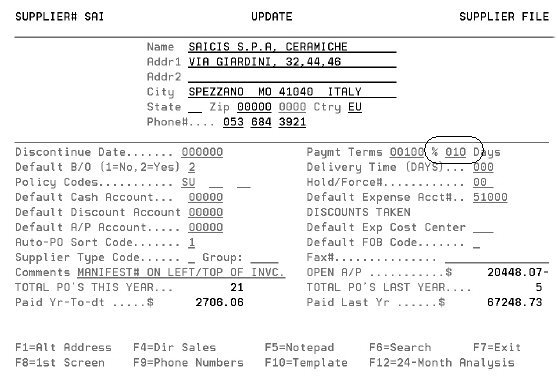
Days field in the Supplier File (FIL 3) adds to the Net Due Date
The number of days entered into the Days field of the Supplier File gets added to the Invoice Date in the 810 to calculate the what Pay Date to use on the voucher.
|
Using the example above, if the original invoice date on the voucher was Oct. 1., ten days would be added to it; and the date of Oct. 11 would be used as the pay date on the voucher.
|
Tables Required to Receive Invoices
The system uses three tables to direct and cross reference invoice information. System tables are created and maintained via menu option SET 5.
Table XXXAPDEF (A/P EDI Defaults) and XXXAPDEFDR (A/P EDI Direct Shipment Information) - This table directs the invoice information to the correct workstation and general ledger accounts.
Table XXXAPDEF (A/P EDI Defaults) and XXXAPDEFDR (A/P EDI Direct Shipment Information) - This table performs the same functions as XXAPDEF, but it is set-up for direct shipments.
XXXAPBRAN (A/P EDI Branches) - Establishes a branch code.
Note: The XXX is replaced with letters that represent a customer ID.
The process for configuring the tables is essentially the same for all three tables. Dancik will establish the necessary FROM column parameters based on information received from your trading partner.
Table XXXAPDEF (A/P EDI Defaults) and XXXAPDEFDR (A/P EDI Direct Shipment Information)
These tables are very similar. The APDEF table is for general ledger accounts and the APDEFDR table deals with direct shipment information. Direct shipments are defined as orders filled by an outside supplier and shipped directly to your customer without affecting your inventory. You may also refer to direct shipments as drop shipments or brokerage sales due to the fact that you are acting as a broker between your supplier and your customer.
|
Possible From values include: Supplier, Expense, Cost Center, Discount, Expense, Freight, and Pallet Charge.
|
The IT1 lines (inventory lines) get the GL account from the EXPENSE entry and the cost center from COST CENTER. There is currently no way to cross reference the IT1 lines to other entries.
The SAC lines have a qualifier passed in them so they can be cross referenced.
These qualifiers cross reference to FREIGHT:
— D200= STOPOFF CHARGE
— D240= FREIGHT
— D270= FUEL CHARGE
— D500= HANDLING CHARGE
— D550= HANDLING CHARGE
— G620= DELIVERY CHARGE
— H090= HANDLING CHARGE
These qualifiers cross reference to DISCOUNT:
— C310= DISCOUNT
— B340= DISCOUNT
These qualifiers cross reference to PALLET CHARGE:
— F170= PALLET CHARGE
— F180= PALLET CHARGE
Note: If you don't have an entry for PALLET CHARGE in your defaults table then it will default to the account for FREIGHT.
SAC segments that cross reference to the same FROM value will be added together to create one line on the invoice.
This table specifies the branch within your company that is related to branch names on the invoice. For example, the invoice might specify Raleigh as the billed branch. Using this table you can direct these charges to be assigned to branch code RAL. A sample XXXAPBRAN table is shown below.
|
The From values of this table correspond to the information provided in the buyer N104 segment of the X12 data from your supplier. The To values use branch and company codes in the fifth position.
Note: In the case of DIR ship orders the branch code on the customer order is used to derive the Branch code for AP voucher.
If you choose to not establish values in the XXXAPBRAN table, the branch code from the customer order is used to derive the branch value on the payables.
Setting up an EDI Control Table
CMS incorporates some EDI settings. This table provides a link between CMS and EDI.
1. On a command line, type EDICTL and press Enter. The EDI Control Table displays. Make the following entries.
MANF - The three character manufacturer code
FORMAT - The type of transaction (810 is for an invoice)
CUSTOMER NAME - Enter a brief description of the transaction.
Processing Opt - Enter a P to direct the system to process the transaction.
Reporting Opt - Activate the reporting functionality by entering a Y.
The following figure shows the minimum information needed to receive inbound invoices.
|
1. On the CMS menu, select option 31 - Import and Process Invoices. The Invoice Import and Process screen appears.
2. Fill in the Partner field. The partner entered must be on the XML configuration file created by the web based CMS Configuration tool. If not, the transaction will not occur.
3. Press Enter and then F2=Submit to import any invoices from that partner. If any invoices were received, you will see the message “Inbound Invoices Have Been Submitted”.
Behind the scenes is the program goes out to the partner’s server and picks out the invoice(s) from the designated open invoicing file (Today, Yesterday, or History). It then brings them into your system.
Adding Partners - Click Add/Modify Transactions, at the bottom of the Add Partner window. From this screen you can add, update, or delete transaction types to include invoices.
View CMS Transaction Status Log (Inbound 850, Outbound 855 & 856) CMS 54
Re-process Inbound ASNs, Inbound Invoices, and Inbound POs (CMS 55)
View Status Of Outbound Transactions (CMS 59
View Transaction Audit Log for All Inbound and Outbound Documents (CMS 58) - Use this option to display all the transactions sent out from and received into your system.
Sending and Receiving Purchase Orders in CMS
Sending and Receiving Acknowledgements in CMS