Need more info or you couldn't find what you were looking for, let us know by sending an email to: support@dancik.com.
Update Order Status -WAR 5
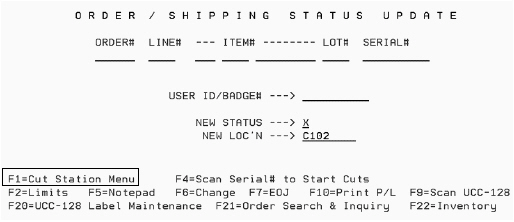
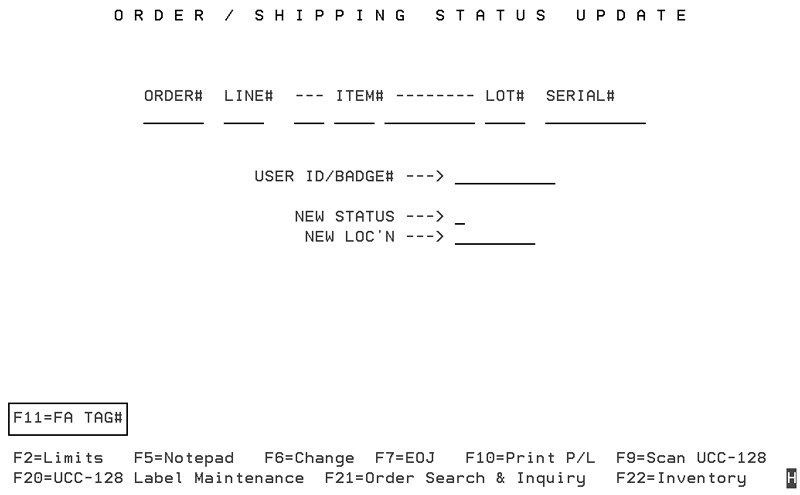
The Update Order Status and Shipping Data program allows you to inquire and update the status and location of orders.
Note: If the F1=Cut Station Menu option does not appear, go into menu option WM2 8 - Cutting Station Defaults File and make sure the workstation is set-up as a cut station.
Enter or scan the order#, line#, and the new status. The item#, serial#, and/or user id may be required for verification and for security reasons. When scanning, the ord#, line, item#, ser# and User ID is automatically entered and verified. Enter line# 9999 to indicate you want to update the entire order, and not just a single line.
Note: You can press Help with cursor in the New Status field to see a list of valid status codes.
Notes about this screen:
Locations can be changed for order lines with labor items. This allows you to identify where the order is in the fabrication process (what station etc.) not where physical inventory is located in the warehouse.
The System Wide Setting - Options for Labor & Fund Items (Items with Comp. Codes L & F) includes an option to include or exclude items coded as labor and fund items (L and F) on several reports. These items really don't belong on warehouse shipping reports because they do not represent items that are physically handled or shipped. The recommended option is N.
When the Control Panel is set to require the scan or entry of a serial number, the following logic is applied:
— If the item is a serialized item, then the user must scan or enter a serial number. Blanks are not allowed.
— If the serial number does not match the serial number on the order, an error message is displayed, indicating the user is scanning the wrong inventory.
— If the item is non-serialized, blanks are permitted and no checking is performed.
Work Station Control Panel File (SET 1) - The settings under Warehouse Order Status Update Requires Scan Of on page three of settings control what needs to be entered/scanned when updating an order.
Cutting Station Defaults File (WM2 8)- This option contains several settings for workstations that are designated as cut stations. The settings Status code for Cut Station Status Change Screen and Prevent this status code from being changed affect order updates.
Order Pick and Load Sheet Defaults - SET 38 - This option allows you to create and maintain default Pick/Load sheets for each warehouse. These settings come into effect when F10=Print P/L function is used.
F2_-_setting Limits on the Order and Shipping Status Update Screen
F10_-_Print_Packing_List_from_Update_Order_Status_Screen
F11_-_Cross_Referencing_Comments_and_Values_to_an_Order_Line
F15_-_Generating_Product_Data_Sheets
F20_UCC-128_Label_Maintenance_Screen
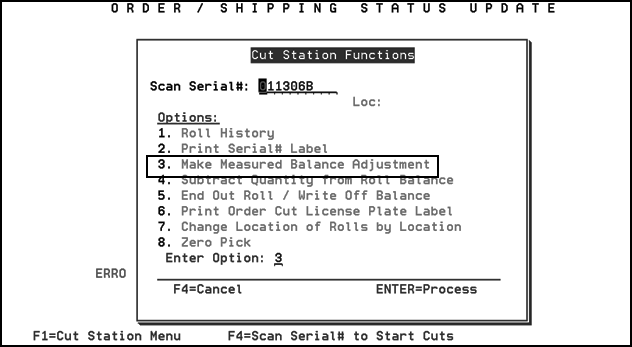
A cutting station is defined as a workstation located near a cutting machine used to perform status updates on cut orders. The Cutting Station Program is a special option within the Order/Shipping Status Update Program. Its purpose is to allow multiple cuts to be made while a roll is on the cutting machine that has more than one uncut order allocated to it.
The Cutting Station Program can be accessed from the Order/Shipping Status Update Program if the following conditions are true:
The workstation Control Panel is defined as a cutting station. (To define a workstation as a cutting station, enter C as the workstation type on screen 3 the Control Panel.)
The item being updated is defined as rolled goods.
The roll being cut has at least one additional uncut order allocated against it.
Field Descriptions for Point of Pick Cut Inquiry Screen
Printing Labels for Orders Allocated Against a Roll
The cut station program is accessed via the F1 function at the bottom of Menu Option WAR 5 - Update Order Status.
|
Note: If the F1=Cut Station Menu does not appear, go into menu option WM2 8 - Cutting Station Defaults File and make sure the workstation is set-up as a cut station.
When the Cut Station Functions appear, select option 3 to take a roll measurement.
|
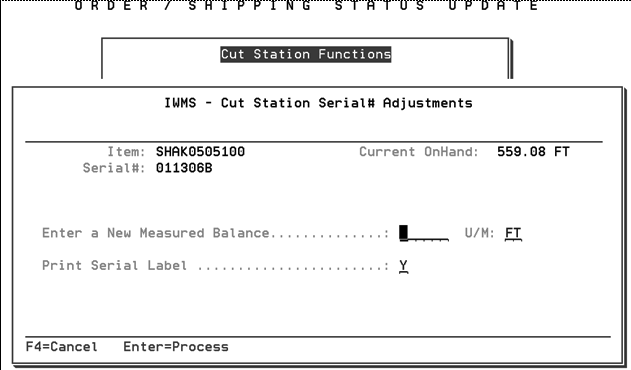
On the screen that appears, enter the new measured balance.
|
The status code of the serial number will be automatically changed to “m” (measured) unless the serial number is assigned to one of the status codes identified in the option Prevent status updates to serial # status codes below during Measurement Adjustments under the System Wide Settings - Options for Counter Interface.
To check the status of the serial number:
— Go to menu option INV 1 - Inventory Inquiry
— Enter the item number and warehouse
— Press Enter and then F3 to display the serial numbers.
Notice that the serial number that was measured and adjusted still retains it’s “D- Damaged” status.
|
The following Point Of Pick/Cut Inquiry Screen was automatically displayed when the cutting machine operator scanned the pick label for order number 406522, line 0010. It was displayed because the roll with serial number 39002953 in Location B23 had additional orders allocated to it, that were not yet cut.
|
The Cutting Station Screen displays the length physically on the roll, the length of the cut being made, and the length the remaining balance will be. The screen displays in the default rolled goods UM as specified in the Control Panel. The figures can be displayed in an alternate UM by entering in the Show In U/M field. The bottom half of the screen displays the other uncut orders allocated against this roll. The cutting station operator can see if labels have already been printed for the other uncut orders, and can request to print labels for those orders by entering a P next to the order numbers.
Depending on the system wide setting for Options for Must Ship Complete Orders, the listing of orders could vary. The order display options for “Must Ship Complete” orders are as follows:
Do Not Show if Not Complete – Incomplete orders will not display on the Point of Pick/Cut Inquiry screen.
Show, but Do Not Allow Release – Incomplete orders will display on the Point of Pick/Cut Inquiry screen but a print label may not be printed. The print label (P) column is protected.
Show and Allow Release – Incomplete orders will display on the Point of Pick/Cut Inquiry screen and a print label may be printed.
These options give you the flexibility to decide to process cuts for incomplete orders or leave them until the orders are completely filled.
Field Descriptions for Point of Pick/Cut Inquiry Screen
Field Name |
Description |
Item# |
The item number being cut. |
Name |
The description of the item being cut. |
Serial# |
The serial number being cut. |
Loc |
The bin location from which the roll was pulled. |
Qty Now in Location |
The quantity physically on the roll when it was pulled from the bin location, prior to this order being cut. The program calculates the quantity (length) that is still physically on the roll by taking the onhand quantity, and then subtracting the quantity of any orders that are at status X or further. Orders at status X, A, S,0,1,2,3,4,5,6,7,8 and 9 are considered already cut, and are subtracted from the onhand balance in order to calculate the Qty Now in Location. |
Order |
The order number and line number of the roll being cut, followed by the quantity or length to be cut for this order. |
Qty After Order Is Filled |
The quantity or length that will be left on the roll after this order has been cut or filled. |
Other Unfilled Orders for___ |
The bottom half of the screen displays a list of other uncut (unfilled) orders for this roll. (serial number and location). |
P |
This column allows you to enter a P for print. A P code causes a pick label to print for the respective order or line. |
Order |
The order number of other uncut orders for this roll. |
Line |
The line number of other uncut orders for this roll. |
Customer |
The customer name of other uncut orders for this roll. |
Qty |
The quantity of other uncut orders for this roll. |
UM |
The UM related to the quantity. |
Ship Date |
The ship date of each other uncut order for this roll. |
Via |
The ship via code of each other uncut order for this roll. |
RT |
The ship truck route of each other uncut order for this roll. |
S |
The order status code of each other uncut order for this roll. |
LBL |
This field shows Y if a pick label has previously been printed for the order or line, or N if a pick label has not been printed. This field changes from N to Y if you request a label to print using the P option. |
Pick List |
This field shows Y if a pick list has previously been printed for the order or line, or an N if a pick list has not been printed. |
Function Keys
Function Key |
Description |
F4 |
Cancel this screen. Returns to the Status Update Screen without updating the status of this line to X. Press F4 if you will not be cutting this order. |
F6 |
Return to Status Update Screen normally. The status of the order will be updated to status X. |
Note: The Cutting Station Program can only calculate the quantity or length that is physically on each roll if you utilize the standard meaning of each order status code. Orders at X,A,S,0,1,2,3,4,5,6,7,8 and 9 are considered already cut, and therefore not part of the quantity physically left on the roll.
Printing Labels for Orders Allocated Against a Roll
To print labels for other uncut orders allocated against a roll, enter P next to the orders. When a cutting machine operator enters P next to an order, the program checks to make sure the order is not on credit hold. If the order is not on credit hold, the label is printed. If you use the pick label pool, the label prints and the line is removed from the pick label pool. If the order is an credit hold, a message is displayed and the label is not printed. If a label has already been printed, the new label will be marked as a duplicate or reprint. After labels are printed, the screen is updated and redisplayed..
|
Enter the two-digit printer code if you want to override the default printer. This override feature allows the cutting operator to select additional orders to cut, and request bar code pick labels to print at a specific printer, rather than the normally assigned label printer, which might be far from the cutting station. This facilitates the use of label printers at the cut station.
F2 - setting Limits on the Order and Shipping Status Update Screen
The “limits” function enables you to prevent shipping errors. Use the “limits” function to make sure the right customer gets the right product every time. The Update Order Status Program (option 5 on the Warehouse Functions menu) enables users to tell the program what they are working on, via the use of the “F2=Limits” function. This function can limit the user’s session to a truck route, a ship via, a transfer warehouse, or a specific order number. Once the “limits” screen is set, the program only allows the scanning of orders that meet the “limits” criteria, and will reject orders that should not be processed.
If a user enters into any of these “limits” fields, then any labels/orders that are scanned must match the parameters. For example, if the “limit to” is set to a specific Truck Route, then only scans of orders assigned to that truck route are processed, and others will issue an error “Order Not On This Truck Route”
This enables a user to be set to scan for specific warehouses, ship vias, etc.
1. On the Order/Shipping Status Update screen that appears, press F2 to show the limiting parameters.
2. Place one or more limits on the order update process. Enter the order information and press Enter.
3. Only orders falling within the entered limits are updated. If the order(s) does not fall within the limits, an error message appears at the bottom of the screen.
Note: Although the screens work best with scanning barcoded pick labels, you may key the information too. Therefore, you do not require barcoding in order to benefit from these functions.
4. The Limit fields remain in effect until they are changed, or until the user exits the program with F7. You may use the other function keys shown on the screen, but you will be returned to this program with the limit fields still set. Only F7 exits this program.
5. The limit fields at the top of the screen work in the following ways:
The Limit to: Order field prevents updates for other orders.
The Limit to: Ship Via field prevents updates to orders with other ship via codes. Use this field if you are only shipping orders with a specific ship via such as “UPS”.
The Limit to: Trk Rt field prevents updates to orders with other truck routes. This enables you to ship a specific route only.
The Limit to: Warehouse fields enable you to ship based upon the “from” or “to” warehouse. You can set a “to warehouse” if you are shipping a transfer truck with one specific warehouse destination. You can enter a “from warehouse” and leave the “to warehouse” blank if you are working on transfers to any warehouse.
F10 - Print Packing List from Update Order Status Screen
The F10 function provides a choice of pick/load sheet, or packing list.
The pick/load sheet resembles a master pick list with the information needed for someone to pull a staged order. It shows staging locations, enabling user to scan the pick/load sheet and/or items as the items are loaded.
The packing list is printed using the regular packing list form and format. It only lists the items that were just scanned as “being shipped”, with other items (if any) showing that they have not yet been taken.
As an example of how these documents are used, the pick/load sheet can be run when the customer pulls their car up to the dock. When all the material is loaded, you can run the packing list and get a signature.
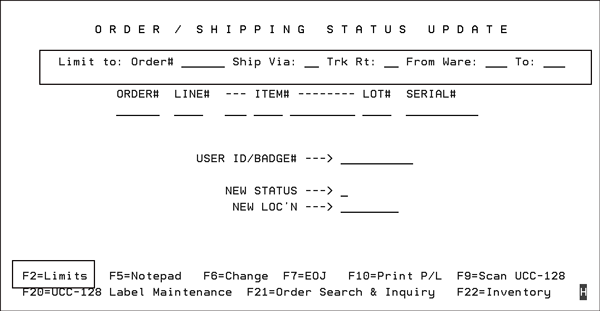
On the Warehouse Functions, select option 5 - Update Order Status. The Update Status program is displayed with various function keys including F21 to view the order, F2 to set input limits, and F10 to print pick/load sheets and packing lists.
Enter the order and line number, new status code, and other fields as required. Press Enter. Repeat this process for all lines you are shipping and then print the packing list.
On the Order/Shipping Status Update screen that appears, press F10. The window that appears enables you to print a Pick/Load Sheet or a Packing List.
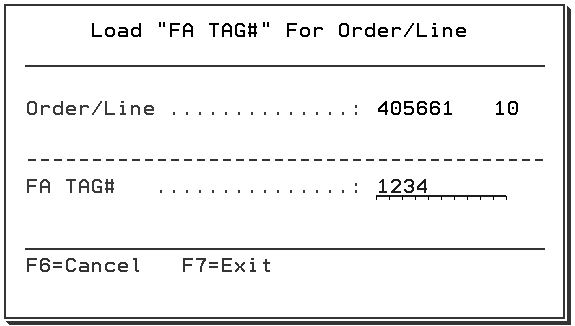
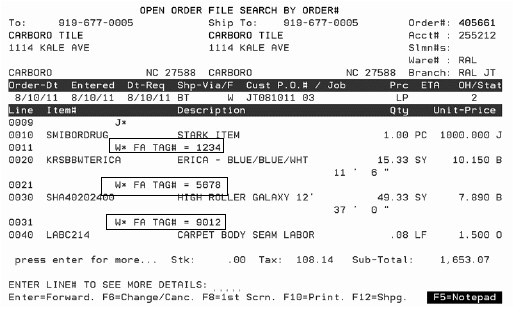
F11 - Cross Referencing Comments and Values to an Order Line
The F11 function on the Update Order Status application (WAR 5) allows an operator to enter cross reference information such as fabrication numbers or operator names too help track inventory through production. These cross-referenced numbers appear as F6-Misc. lines on the order detail line.
Associated Files
Workstation Control Panel (SET 1)
The Allow Other Ref# setting on page 3 of the Workstation Control Panel activates this functionality and also allows you to enter a different cross reference label. The default label is FA TAG# but this can be changed as needed.
Cross-Referencing information to an Order Line
1. On the Update Order Status program (WAR 5), press F11.
|
2. On the screen that appears, enter the Order/Line and the reference comment (in this example it is a FA number.
|
3. The lines are add to the order as F6 Misc. lines with a prefix of W*.
|
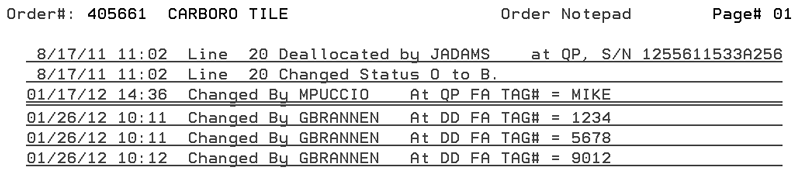
4. The information is also entered onto the Order’s Notepad.
|
F15 - Generating Product Data Sheets
Product Data Sheets contain information that must be supplied with each order. This functionality allows for easy printing of the Product Data Sheets, in pdf format, when the order is packed for shipment.
Note: For this functionality to operate as designed, it is recommended you use the latest release of Adobe’s Acrobat reader. The download is free and can be performed off Adobe's website: http://www.adobe.com.
Item File (FIL 2), Manufacturer File (FIL 4), Product Line File (FIL 12)
Directory for the Product Data Sheet pdf files
Item File (FIL 2), Manufacturer File (FIL 4), Product Line File (FIL 12)
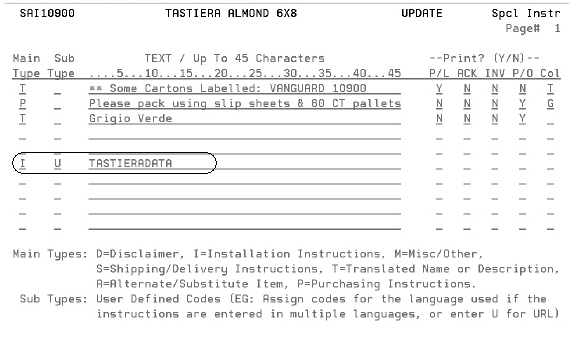
The Special Instructions Screen for these three files has to be configured so the system recognizes that the item has a Product Data Sheet. In this example, the Item File is used, but the functionality is the same for all three programs.
1. Go into the Item File (FIL 2), and select an item to work with.
2. On the Item File Profile Screen press the F12=Spc/Instr function key. The Special Instructions Screen appears. Notice the circled entry.
|
3. The Main Type must be set to I and the Sub Type has to be U. The text must be the file name of the product data sheet PDF. For example, if the PDF file is TASTIERADATA.PDF, enter TASTIERADATA.
4. You may enter the pdf file name in the F12 screen of the Item File, Manufacturer File, or Product Line File. The program can display up to three PDF files per item.
Directory for the Product Data Sheet pdf files
These files can only be located in a PRDDTA folder on the IFS directory home/www. If the PRDDTA folder does not exist, it needs to be created.
Note: An example directory path: SAL/dancik.com/home/www/prddta (where SAL is the machine name, dancik.com is the domain, and prddta is the folder where the pdf files reside).
In order for the iSERIES to access PDFs stored on a PC, the internal IP address for the system must be defined in the WM000F (IWMS - Task Transaction file) on the iSERIES. The IP address can be found by PING(ing) the system from command line if its not known.
Once you have the IP address you will need to:
go to the WEB menu and select option 100 - Work with Web Application URLs.
select the option Your system's URL
Change the URL to your internal IP address.
If the PRDDTA file needs to be setup then do one of the following:
WRKLNK command if you have command line access - Define the internal IP address under *DOMAIN with the internal link being http://the internal IP Address.
iSERIES Navigator - This utility configures the iSERIES Support for Windows Network Neighborhood (iSeries NetServer). It allows you to configure and share files so that information can be passed between the iSeries and PC.
Note: See your network administrator regarding access to and adding PDF files to the PRDDTA file.
1. On the Warehouse Functions menu (WAR), select option 5 - Update Order Status.
2. Enter and the order and line number you want to update. A badge number/name and new status code may also need to be entered.
3. Press Enter. If the item/manufacturer/product line has a Product Data Sheet set up in the Special Instructions, the F15= Product Data Sheet function key appears.
|
4. Press F15 to open the Product Data Sheet in a new browser window.
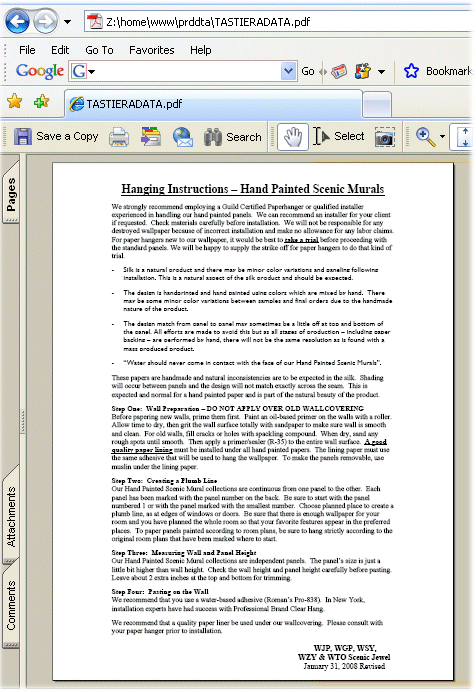
Note: Only two PDFs will open at a time. If there is a third Product Data Sheet, it opens automatically after one or both of the other PDF's are closed.
F20 - UCC-128 Label Maintenance Screen
UPS Worldship Download and the UCC maintenance screen
Assigning UCC Labels to Customers
Use this function key to print product labels.
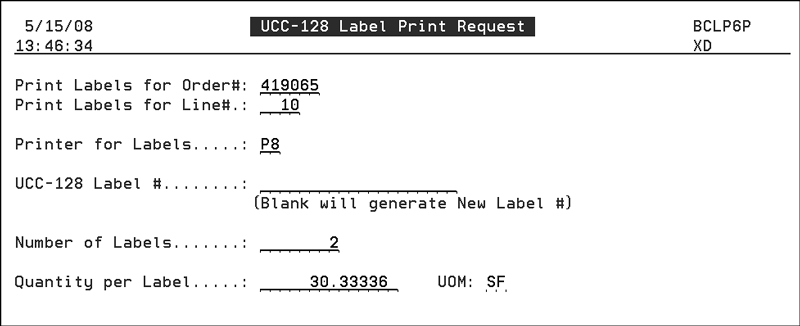
The Number of Labels and Quantity per Label is automatically calculated from information in the Packaging File (FIL 11). For line number 0010, the Packaging File, based on the UM and quantity is informing us we need two UCC shipping labels with 30.3 SF in each carton.
Note: Each label is assigned a unique UCC-128 number if no UCC-128 number is entered.
In the order shown above, the order was for 77 SF of the item on line 0010, we know that we have to override the 2 labels to 3 (30.3 x 2 = 60.6 SF). This gives us two full cartons and a partially full carton.
Press Enter to print the labels.
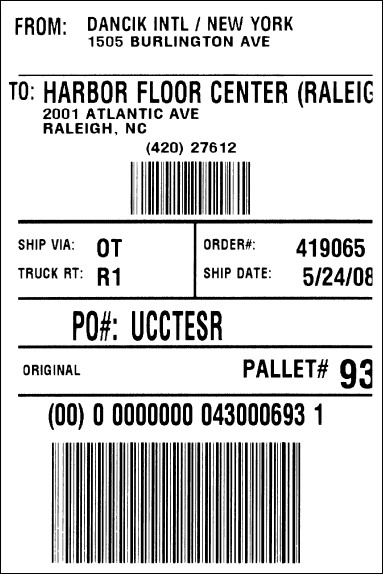
Going back to the UCC-128 Label Maintenance Screen we can see that several labels, including the one shown above, are attached to line 0010 on order 419065.
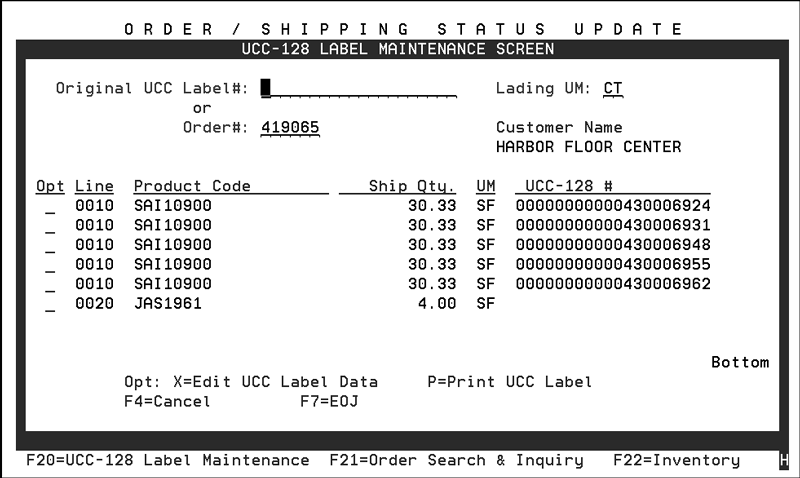
To edit the UCC label data, select a line number. All of the label numbers for the selected line appear.
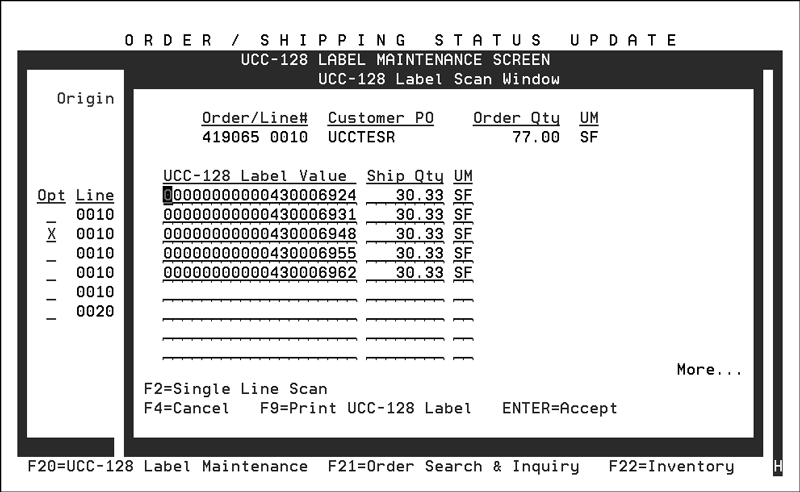
Use this screen to change the label number, quantity, and/or unit of measure.
UPS Worldship Download and the UCC maintenance screen
The WSI menu contains the set-up and user options that allow you to import and export shipping information from the Dancik system to third party shippers such as UPS and Fedex. This eliminates having to manually enter shipment information into the third party’s software application (i.e., Worldship for UPS and Fedex Ship Manager). This interface can also upload and assign tracking numbers into the orders on the core system.
The system automatically inserts the UPS tracking number into the UCC-128 Label Maintenance screen. Adding the UPS data to the UCC maintenance screen allows the CMS 856 work files (shipping notices) and 810 work files (invoices) extract to include the UPS tracking number, ship quantity and UM.
1. The process starts when order information is exported to UPS Worldship via menu option WSI 1 -Export Shipping Provider Data.
2. After the shipping information is sent to a shipping agency (UPS) the system calculates and adds the applicable shipping charges to the total cost of the order. Use menu option WSI 2 to register the charges to the customers.
3. When the shipping information is imported in from UPS the tracking number, Shipping Qty, and UM are automatically inserted into the UCC-128 Label Maintenance screen. The lines on the order display. Notice that “CT” is automatically inserted as the Lading UM. This UM is hard coded into the program. That means that the Lading UM of CT cannot be changed.
4. Enter an “X” by the order lines you want to inquire on. The UPS tracking number is automatically inserted and the Ship Qty and UM are default to “1” and “EA”.
Assigning UCC Labels to Customers
Labels are assigned to customers via the following fields and files:
The Chain field of the Billto file - This three-character code defines the account as being part of a chain store or account group. Separate account numbers that are part of the same chain should all be assigned the same chain code. For example, all Target stores should be assigned chain code TAR.
Preferred UCC/EAN-128 Label Format field of the Customer Preferences File - This field identifies the actual shipping label to use. The label code entered in this field should be one established in the Label Styles File.
Note: If a label format is not assigned to a customer, the default UCC label is used.
Integrated Warehouse Management System
Warehouse Shipping and Routing Interface Menu
System Wide Setting - Daily Systems Snapshot and Inventory Data Warehouse Options
System Wide Setting - Options for Pricing by Warehouse
Change Header Warehouse of an Order - SYS 415
Automatically Build Warehouse Locations Table - SYS 610
Warehouse Price List Cross Reference Table - SYS 904
Warehouse Will Call Tax Table - SYS 905
Delivery System and Transportation Planning
Item Statistics By Warehouse File - FIL 20
Product Line Statistics By Warehouse File - FIL 21
Interwarehouse Freight Cost Table - SET 8
Warehouse Settings Table - SET 14
Warehouse Locations Table - SET 15
Warehouse Areas Table - SET 16
Warehouse Matrix File - SET 17
Warehouse Capacity Planning Mode - SET 27
Auto Back Order Fill Warehouse Settings - SET 35
Integrated Warehouse Management System_(IWMS) FAQs
Can I still reorg my inventory during EOM step 12 while the warehouse people are signed on?
Can my warehouse staff log in even during night jobs?
Is there a way to change the warehouse on an open purchase order?