Need more info or you couldn't find what you were looking for, let us know by sending an email to: support@dancik.com.
Navigator Warehousing Reports
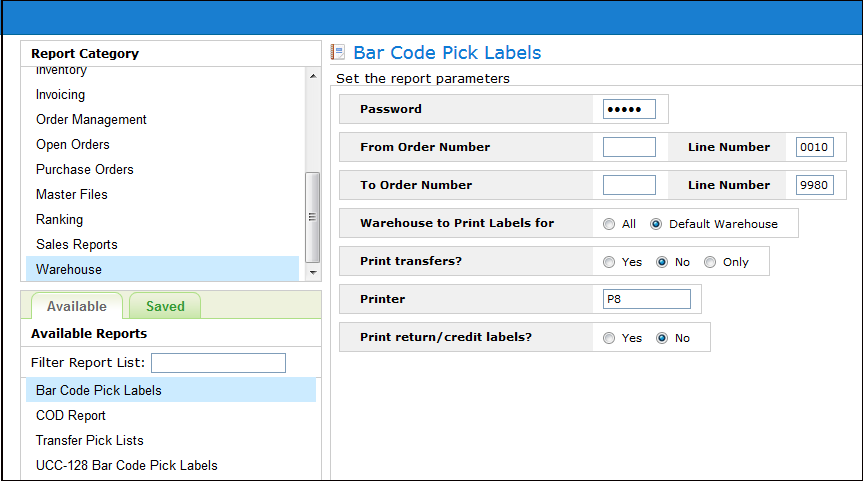
This option allows you to print Bar Code Pick Labels on demand.
When printing labels on demand, you have the option to print return/credit labels and you can select the printer where you want your label to print.
This option checks for the actual printing of a label before issuing the message that the job is complete. If, for any reason, no lines were found that could or should be printed as labels, then a message is issued.
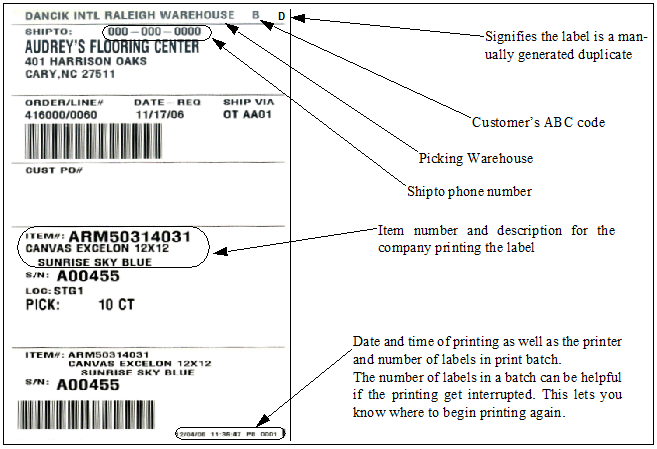
Bar coded pick labels display the customer ABC rating code on the top right corner of the label. The customer ABC code is displayed on most warehouse documents including load sheets, picking lists, and packing lists.
At a minimum, enter an order and line number.
Printer - Enter the 2-character printer identifier where the labels will print. This printer overrides the printer normally associated with a warehouse. If this parameter is not entered, the bar code printer normally associated with this function is used.
Print Return/Credit Labels - Return/credit labels can be given to truck drivers or counter personnel and then attached to returned goods. They can be used like regular pick labels and scanned to update the specified status codes.
Warehouse File - Use the Designated Bar Code Printer ID setting to assign a default printer for bar code labels.
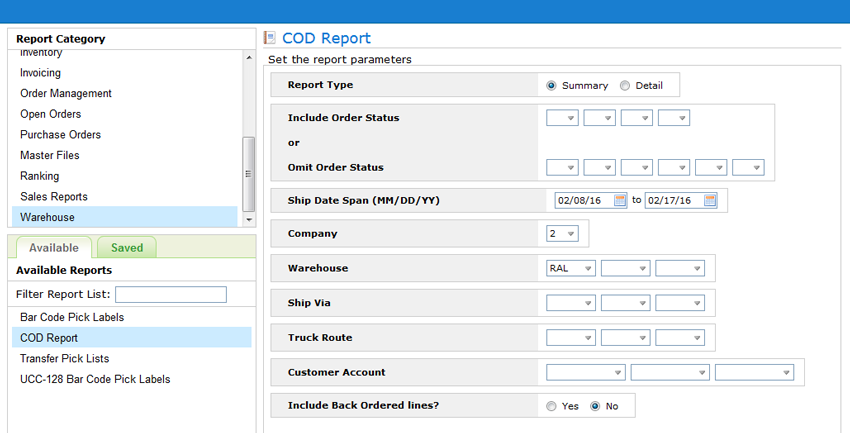
This program allows you to print COD orders by customer/stop, with complete totals. The totals account for delivery charges and minimum order charges. This program eliminates the need for drivers or traffic managers to determine any COD charges. The COD reports can be used to notify customers in advance of exact COD check requirements. This program also provides an alternative to the Company Settings option which offers the choice of applying delivery charges to every COD order as taken, or to wait for invoicing in order to determine the delivery charge. If you use this program, set the Company Settings option to not charge delivery on COD orders. Then, using this program, you can provide drivers with either COD invoices or reports, which determine exactly what the total charges, including delivery, should be. This program groups COD orders for a customer together, exactly like the invoicing programs do.
The Summary COD report prints on regular pick list/packing list forms. One document is created per customer, which includes a line for each order, plus information regarding delivery charges and minimum order charges when applicable.
Note: If any charges emanate from the Minimum Order Charges File, a message appears at the bottom of the report that describes exactly what the charges are for. For example, Fuel Surcharge. This matches the message/charge that appears on the invoice.
The Detailed COD report. This report prints on regular pick list/packing list forms. One document is created per order.
These documents have the same information as an invoice, but are labelled COD report. If multiple orders are included for a customer, only one document includes applicable delivery and minimum order charges. After choosing an option, the following screen is displayed.
Parameter |
Description |
Status Codes |
You can request to include up to four status codes or to omit up to six status codes. If you are running the COD reports or invoices in real-time (as you prepare the shipments) then we recommend to include only status = S for shipped. If you are running these reports before items are prepared for shipment, then you need to include or omit status codes based on your method of operations. |
Ship Date Span |
This is mandatory. Normally you run these reports for a single ship date, such as today or tomorrow. |
Company# |
This is prefilled with your default company number. It can be changed if you are authorized. |
Header Warehouses |
This is prefilled with your default warehouse if applicable. This is the warehouse which is shipping the COD orders. |
Ship Via Codes |
Enter the ship via codes to include, or leave blank for all ship via code. |
Truck Routes |
Enter the truck route codes to include, or leave blank for all truck routes. |
Account#s |
Enter the customer account codes to include, or leave blank for all customer accounts. |
Include Back Ordered Lines |
Enter N to keep lines currently on back order from being included in the COD reports. Enter Y to include back ordered lines. Only enter Y if you expect the back orders to be filled prior to the actual shipment, or if your policy is to collect for back orders even if not delivered with other goods. The default is N. |
When the report is run, the following reports are generated and added to the Spoolfile portion of ODS:
COD Report (Summary or Detail)
COD Report By Status Code
Order Price Variance Report
QTY Break Groups Pricing Update
Delivery Charges by Unit
At any point during the day or following morning, master transfer pick lists are printed at each warehouse that needs to transfer material. Each warehouse can request their own transfer pick lists, or they can be requested at one central location. These transfer pick lists print on the printers designated in the Warehouse File for each warehouse. Each warehouse can be assigned a printer on which to print transfer pick lists. Use the field labelled Designated Transfer Printer ID in the Warehouse File. If they are run during the day, these documents list all items requested for transfer during the day. If they are run on the following morning, they list all items requested for transfer during the previous day. They print on regular pick list forms. You can run transfers multiple times daily, including only the transfers created since the last transfers were printed.
These transfer pick lists include both stock-to-stock transfers, which are designated by using account number 2, and customer transfers, which are designated in Order Entry when a customer order uses stock from another warehouse. This means the master transfer pick lists include all types of transfers.
Transfer pick lists are split based on the destination warehouse. For example, if warehouse AAA needs to transfer ten items to warehouse BBB, and five items to warehouse CCC, two pick lists will print at warehouse AAA; one for items to ship to warehouse BBB and one for the items to ship to warehouse CCC. Each pick list can include items from multiple transfer orders. The transfer orders can be entered by all users, as needed. All the orders are sorted by warehouse and put on these master transfer pick lists. The transfer pick list shows each item, packaging information, the order number to which each item relates, the initials of the person who entered the order, F6 comments, the customer purchase order number and job name, and the warehouse to which it will be transferred. The warehouse uses the transfer pick list like any other pick list, and it should additionally be used as a packing list and sent with the material to the receiving warehouse. All bar coding, order pooling, and other advanced warehouse functions are available for transfer processing.
Transfer pick lists can show up to five lines of special instructions per item as entered into the Special Instructions and Product Knowledge Screens if they are coded Y to print on pick lists. Transfer pick lists work exactly as regular pick lists with regards to how special instructions print. This feature is most important with regards to Department of Transportation regulations that require all shipping documents to contain certain information for all potentially hazardous materials. You should ensure that special instructions are entered, and coded to print on pick lists for all potentially hazardous goods. Use the Special Instructions screen of the Item, Product Line, or Manufacturer files.
Regular pick lists can print an unlimited amount of special instruction lines, but transfer pick lists print a maximum of five special instruction lines per line item.
Transfer pick lists print up to eight lines of message text per line item from the original pick list. These are the message lines entered directly underneath a detail line. Previously, a maximum of four message lines per line item would be shown on the transfer pick list. Regular pick lists show an unlimited number of message lines.
Transfer pick lists that are printed using sort option 6 (by customer, with new page per order) show weight for each order, as well as total weight for each transfer destination.
Note: Transfer Pick List can be set-up to automatically generate. Foe more information refer to Automatic Printing of Transfer Orders.
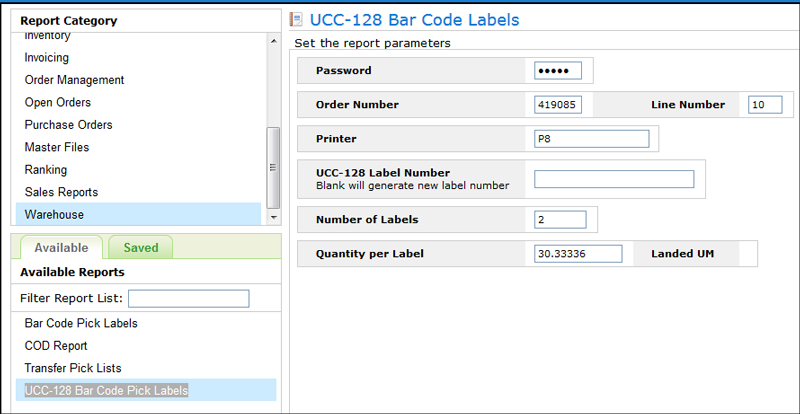
The Number of Labels and Quantity per Label is automatically calculated from information in the Packaging File. For line number 0010, the Packaging File, based on the UM and quantity is informing us we need two UCC shipping labels with 30.3 SF in each carton.
Note: Each label is assigned a unique UCC-128 number if no UCC-128 number is entered.
Since the order was for 77 SF of the item on line 0010, we know that we have to override the 2 labels to 3 (30.3 x 2 = 60.6 SF). This gives us two full cartons and a partially full carton.