|
Need more info or you couldn't find what you were looking for, let us know by sending an email to: support@dancik.com.
Create Excel Sales File for Manufacturers - SYS 313
This option allows you to use the data in your Dancik files to create a Sales Data spreadsheet, to inform manufacturer’s about the sales you have made of their products.
This Excel Sales Data File is a standard file, which can be offered to any supplier asking for such data. However, it is not meant to follow any particular manufacturer’s preferred layout. This file can also include manufacturer-specific information, as stored in your Billto File.
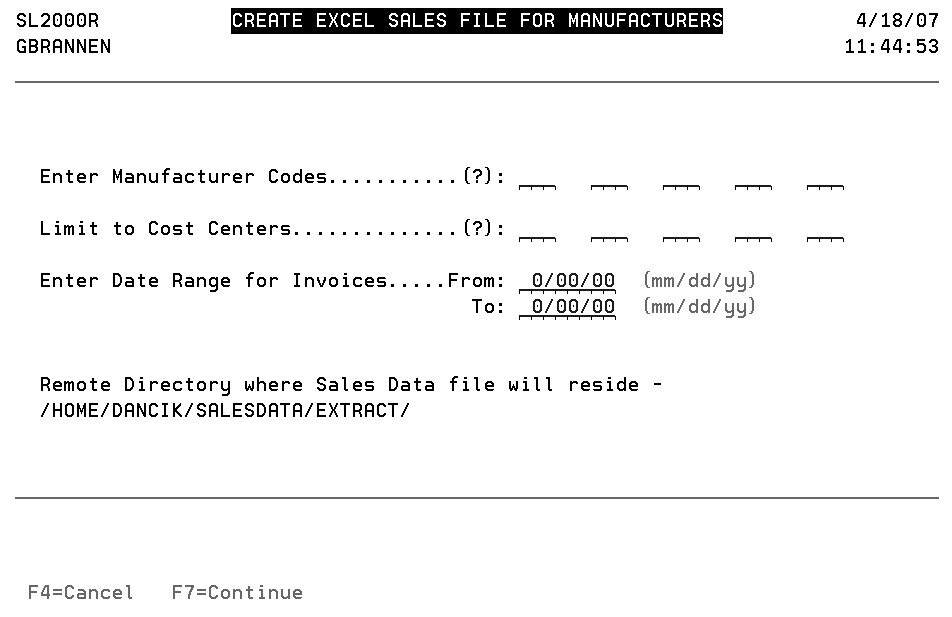
1. When this option is selected, the Create Excel Sales File For Manufacturers screen appears.
|
2. If applicable, enter the manufacturer codes (3 alpha characters), cost centers (3 alpha characters), and date range that you want to limit the report to.
Note: Entries are required in the Manufacturer and Date Range fields.
3. As noted on the bottom of the screen, the sales file is inserted into the directory: /HOME/DANCIK/SALESDATA/EXTRACT/.
4. The spreadsheet contains a row for each requested invoice/line number, and includes columns for the following information.
Column on Spreadsheet |
Dancik Data imported to Spreadsheet |
A |
Your Company Name |
B |
Customer Name (from Billto File) |
C |
Mfgr Affiliation (from the Mfgr-Specific Codes screen within the Billto File). |
D |
Customer Acct# (from Billto / BCO# + BACCT#) |
E |
Mfgr's Dealer Acct# (from the Mfgr-Specific Codes screen within the Billto File). |
F |
Customer Address Line 1 (from Billto File) |
G |
Customer Address Line 2 (from Billto File) |
H |
Customer City (from Billto File) |
I |
Customer State (from Billto File) |
J |
Customer Zip Code 5 + 4 (from Billto File) |
Columns L through P comprise the Shipto address that appears on the invoice |
|
K |
Shipto Name (from Shipto File) |
L |
Shipto Address Line 1(from Shipto File) |
M |
Shipto Address Line 2 (from Shipto File) |
N |
Shipto City (from Shipto File) |
O |
Shipto State (from Shipto File) |
P |
Shipto Zip Code 5 + 4 (from Shipto File) |
Q |
Invoice Date (from Invoice file) |
R |
Item# (from Invoice file) |
S |
Cost Center |
T |
Invoice# (from Invoice file) |
U |
Quantity Shipped (from Invoice file) |
V |
Unit Price (from Invoice file) |
W |
UOM Code (from Invoice file) |
X |
Extended Price (from Invoice file) |
Y |
Extended Cost (from Invoice file) |
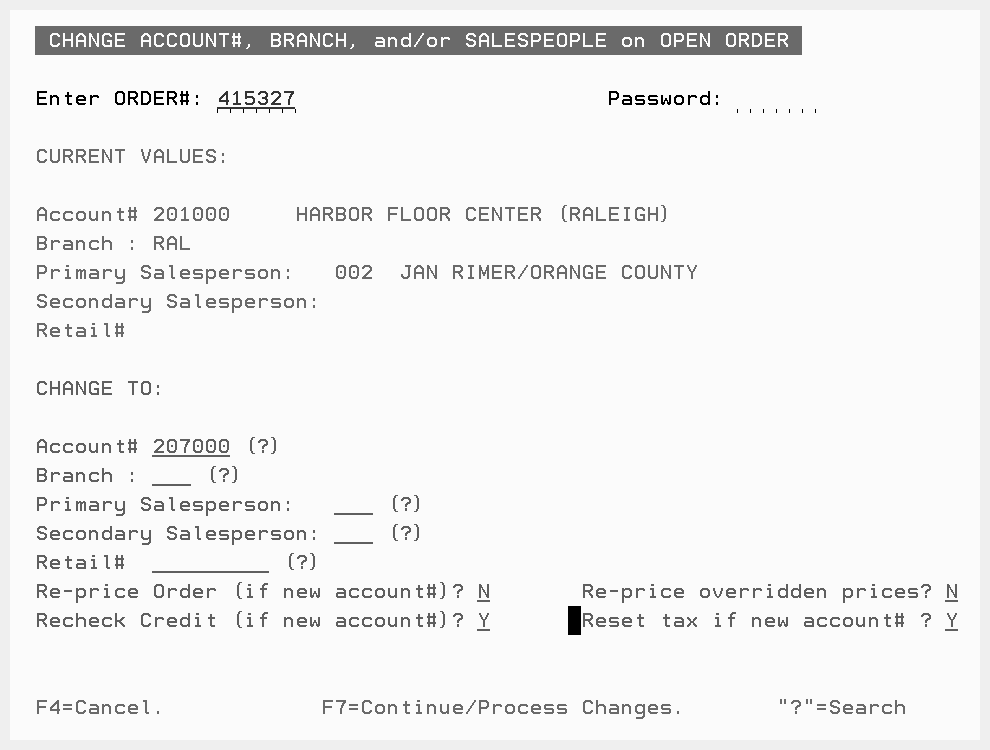
Change Account /Branch/Slmn# Of An Order (CHGACT) - SYS 401
This program enables you to change the customer account number of an order without having to cancel it. We advise caution before using this program, as many pricing issues may need to be considered. It was created primarily for job quotes that are entered to a generic account number until the job is awarded. This would happen if your company had the specification, but didn't know who would get the job. This works effectively if the prices assigned to the quote are to be used regardless of which customer gets the job. Otherwise, prices should be updated after this program is used.
Note: If the account is switched, you need to manually check and update (e.g. update the status) any labels for the order in the Warehouse Label Pool.
The Recheck Credit (if new account#) setting directs the system to recheck credit on the new account if the account number changes. A message is displayed on the screen indicating if the order fails the credit check. Orders are routed to the appropriate credit manager's screen.
The Reset tax if new account# setting enables taxes to be reassessed based on the new account number.
These settings enable you to effectively change any order from one account to another, (i.e. a consumer places an order, but wants contractor pricing) and optionally rework/recheck key aspects of the order, including pricing, credit, and taxes. An audit trail of all changes is automatically placed in the order notepad.
The Reset Slmn# if = default slmn# setting can automatically change the primary salesperson to the default set up in the Billto file for the new account. If the salesperson was manually overridden (i.e. during order entry), this option will not change the salesperson code regardless of how this setting is configured.
Note: If a new salesperson is entered in the Primary Salesperson field, that entry overrides the Reset Slmn# if = default slmn# option.
The Reset Shpvia/TrkRte if = defaults setting can automatically change the shipvia and truck route codes to those in the Billto File of the new account number. If the ship via code or the truck route code were manually changed on the order header, this option will not change the overridden code regardless of how this setting is configured.
Note: Ship dates are not automatically recalculated based on the new truck routes.
1. Access the Change Account#, Branch, And/or Salespeople On Open Order program via option 401 on the Special System Maintenance Functions Menu (SYS). The following screen appears.

2. Change the order information as needed. Only orders that have not had any lines invoiced can be changed. If you enter an order number that has invoiced lines, you will receive an error message.
Note: Be aware that when you change the order date on an order there is the possibility that the data accumulated during night jobs and stored on F4 statistics screens will no longer be accurate with regards to the changed date. It should be expected that date changes could introduce inconsistencies in this type of analysis. The date change appears on the Order Header screen.
3. Do not confuse the Order Date with the Date Required/Ship Date. The order date normally defaults to "today's date" but can be changed when an order is originally entered. The order date is important for certain features related to Holds.
4. Activating the Recheck Credit (if new account#) field directs the system to perform a credit check using the new account. The default is to recheck credit.
Note: Only orders with a Balance Due greater than 0.00 are rechecked for credit. This is because the balance due represents the net affect that the order will have on the customer's credit position.
Account changes are retested for credit hold if an account has a hold qualifier code of A (second character of the Hold Acct field in the Billto File (FIL 1)...
|
...and the order has a balance due.
6. If the new account fails the credit check, the message **ENTRY ACCEPTED ** BUT ACCOUNT FAILED CREDIT CHECK! displays.
7. The order is updated, and the account number is changed, but the order is sent to credit hold. If the credit check fails for the new account, the order appears on the Orders On Credit Hold screen (AR 15).
|
The Orders On Credit Hold screen displays all of the orders that are currently on credit hold and lets you selectively release them.
Example - Bypassing the Tax Changes
1. The following order does not have any taxes assessed.
|
2. Press F24 (Shift + F12) to display the Order Inquiry menu bar.
3. Scroll down the Order Inquiries & Utilities menu, and select Change Account# and/or Branch/Slmn# of Open Order.
|
4. On the screen that appears, enter an order number and a password. Press Enter to see the order information and make changes. In this example, a new account number is entered and the Reset tax if new account# field is activated. The default is to reset tax.
|
5. Going back to the order after the change, we can see that the order now has tax assessed. The program assigns tax to the order as if the order was originally entered for the new account.
|
6. The notepad displays the changes to the order. Press F5 to access the notepad.
Example - Bypassing the Tax Changes
1. In this example, the Reset tax if new account# field is not activated.
|
2. The changes and settings are noted in the notepad.
|
Billto File (FIL 1)
Defaults for the Primary Salesman, Ship Via, and Truck Routes codes are established in the Billto File. If an account is changed on an order, and the new settings are activated, these default values are used...unless the values have been manually overridden.
|
Order Header
If the Ship Via code and the Salesperson code are manually changed here, they will not be automatically updated via the new settings on SYS 401.
|
Shipto Screen
If the Truck Route is manually changed here, it will not be automatically updated via the new settings on SYS 401.
|
Change Header Warehouse of an Order - SYS 415
This program:
Enables an entire order to be picked up or shipped from a different warehouse than was originally entered.
Changes the “Header Warehouse”.
Allows changes to Ship Via, FOB, and Truck Routes.
Reworks all detail lines so that the appropriate transfers are created, and previously scheduled transfers are eliminated if no longer needed, or changed to the new warehouse.
Checks that all lines on the order are at a status that indicates “not already being worked on in the warehouse” before the change is made.
Adds order notepad entries for each change that is made.
Updates all of the appropriate files for both IWMS and traditional warehouse systems.
Restrictions:
Status L,X,A,S, 0-9, etc indicate lines that are already being worked on in the warehouse, and therefore can not be changed, since changing the header warehouse redirects the transfer of items.
Can't change to or from warehouse DIR, or on POs or Acct# 00002 transfers.
Can't change if an IWMS operator is assigned to any line on the order, in a task queue.
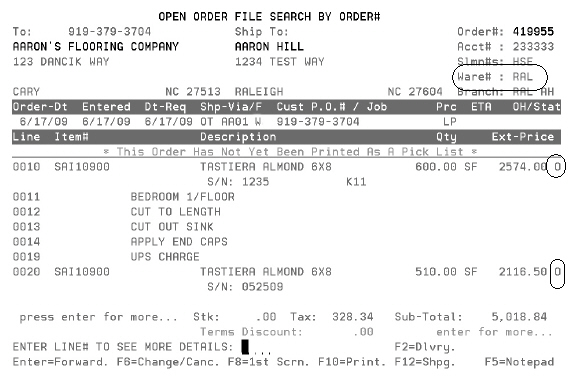
Example 2 - Changing an Order that has Transfer Lines
1. To illustrate this new feature, the following screens highlight how the program is used to update an order.
The header warehouse, shipvia code and line statuses are circled below.
|
2. To access any of these fields for update, press F6. Then enter the line number, description and password to access the Order Header.
|
Note: The Header Warehouse can not be changed from the screen above. You must use the utility program.
3. Press Enter on the Order Header to access the Shipto Screen where the Truck Route is displayed.
|
1. Access the Change Header Warehouse of an Order program off the Special System Maintenance Functions Menu (SET 415).
Note: It is also accessible under Order Inquiries & Utilities on the menu bar. Menu bars, if assigned to users, can be accessed by pressing F24 (Shift + F12) from within the Order Inquiry application.
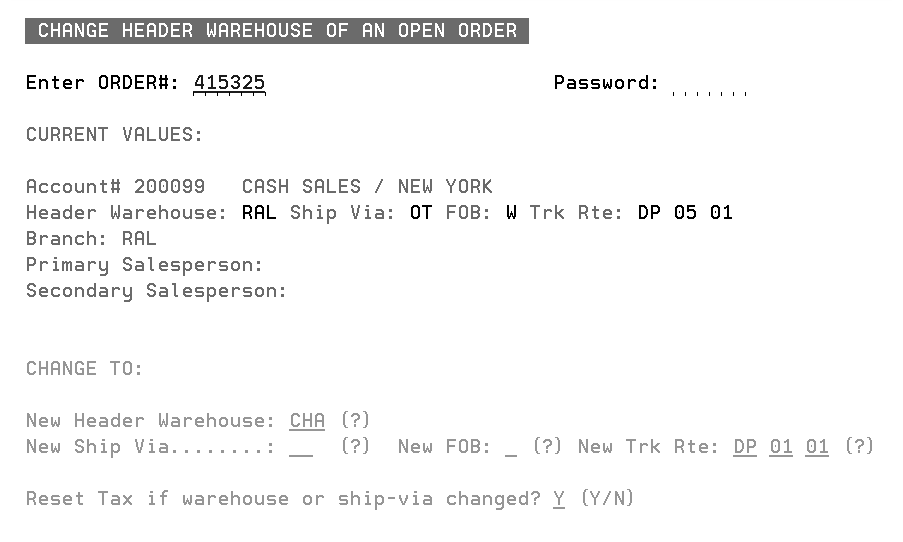
2. Enter the order number and password.
Note: The password keyword that controls this application is CHGACT.
3. Press Enter to access information about the order. The input capable fields are at the bottom of the screen.
|
4. Make the necessary changes. If the Reset Tax if warehouse or ship-via field is activated, the taxes assessed on the order are recalculated based on the new warehouse or ship-via code.
|
5. Press Enter and then F7 to change the order. Notice the changes.
|
6. When the program changes the header warehouse, it also changes all lines on the order as follows:
the line item warehouse stays the same (because that is where the inventory was selected from, or where the back order will be received to), but if the line item warehouse is now different from the new header warehouse, the line status will be changed to T - for transfer (as shown above) and the transfer request will be added to the transfer queues. To display the line details, enter the line number in the Enter Line# To See More Details field.
|
If a line was a transfer, but now the line item warehouse = the new header warehouse, the line will no longer be a transfer, and the status is changed from T to O.
If Pick Pool or IWMS has lines from the order, the pick pool is updated.
Back orders are not affected, although when they are received, whatever the new header warehouse is at that time will be respected, and if needed, the back order fill process will issue a transfer (as usual).
7. The notepad for the order is also updated.
|
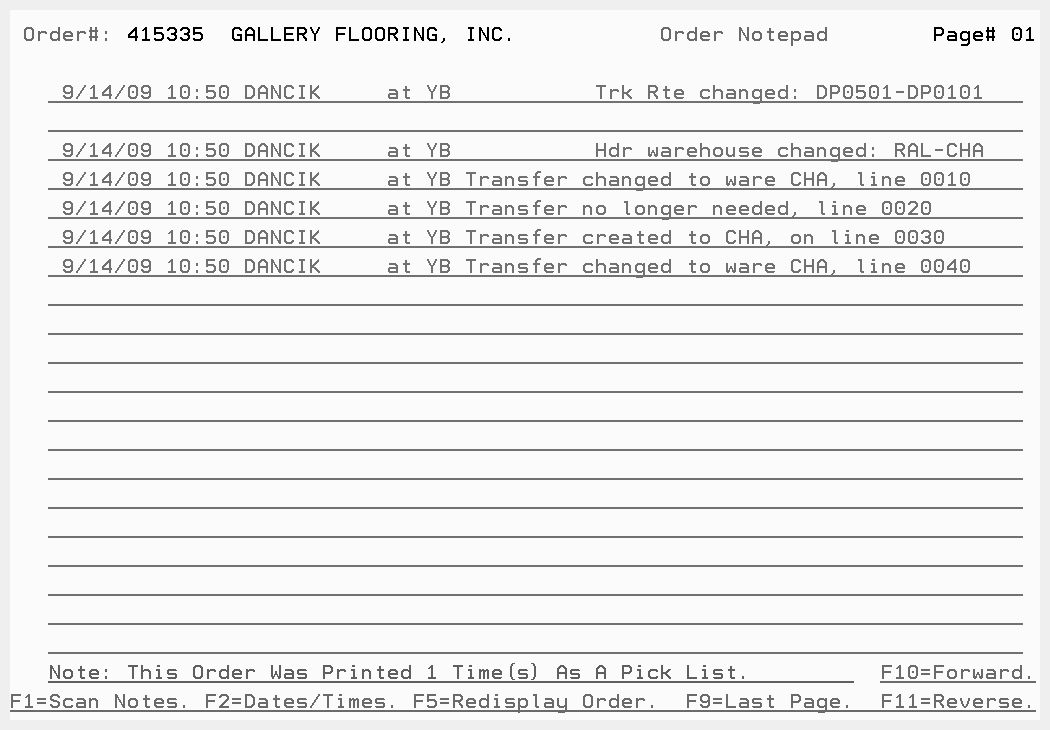
Example 2 - Changing an Order that has Transfer Lines
1. In this example, we are going to change an order that already has transfer lines.
|
2. Press F24 to access the Order Inquiry menu bar.
3. Click the Order Inquiries & Utilities heading and enter “W”, or scroll down to select Change Header Warehouse on Open Order.
4. On the screen that appears, enter the order number and a password.
5. Press Enter to access the order details.
|
6. After making the necessary changes, in this example the header warehouse and truck route were changed, press Enter. If the order conforms to the rules (i.e. not at a status of L,X,A,S, 0-9), the ** Entry Accepted ** Press F7 to Update this Order *** message appears at the bottom of the screen.
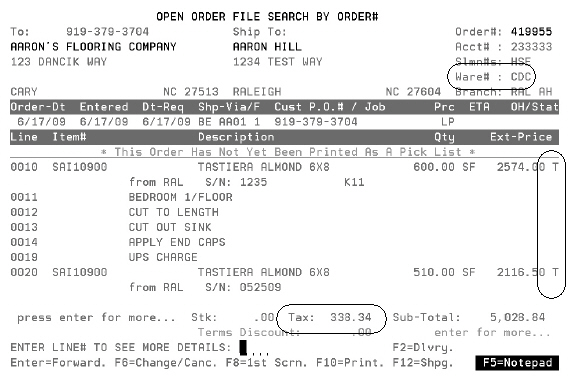
7. Going back into the order, we can see the header warehouse change.
|
8. If we check the notepad, by pressing F5, the changes are noted.
Line 0010 changed the transfer to arrive in warehouse CHA instead of the original warehouse RAL.
Line 0020 was originally a transfer from CHA. Since the header warehouse changed to CHA the transfer is no longer needed.
Line 0030 became a transfer from the RAL warehouse.
Line 0040 changed the transfer to arrive in warehouse CHA instead of the original warehouse RAL.
|
Extracting Sales Information into Spreadsheet and XML Files - SYS 813
This feature enables you to select the fields you want and output to CSV or XML files, thereby enabling you to import sales data into spreadsheets and other third party tools.
Note: The results for the two formats will vary (i.e. some invoices might be on the .CSV report and not on the XML report). The .CSV version is tied into the ROLLS file whereas the XML version is not.
You can select to extract from the following files/fields:
Invoice Header
Invoice Detail
Item File
Customer File
Pricing Method
Price List#
Pricing Promo#
Rebate Promo#
Fund Promo#
and fields from the Inventory File
1. From the Special System Maintenance Functions Menu enter option 813 - Sales Data Extraction (XML,CSV).
2. The Invoice Detail with Item File screen appears.This screen includes the basic extraction criteria. Once you have loaded the data into a spreadsheet or other program, you may further refine the data. You can press F11 to view and select from your previous data extractions, or you may enter a new set of parameters.
|
3. Choose either an Invoice# Range or an Invoice Date Range to run the data extraction for.
4. Enter a Company number. Select the Branch(es) and Salesperson(s) to include in the report. By leaving them all blank, all branches and salespeople on your system will be included on your report.
Note: Enter a “?” in the fields to display a listing of available values.
5. Choose whether you want the file to be extracted as comma separated values (CSV) or XML.
6. Assign the extracted information a file name in the Destination Filename field. Do not include a suffix on the file name.
7. Specify the folder and the path to it in Destination Folder.
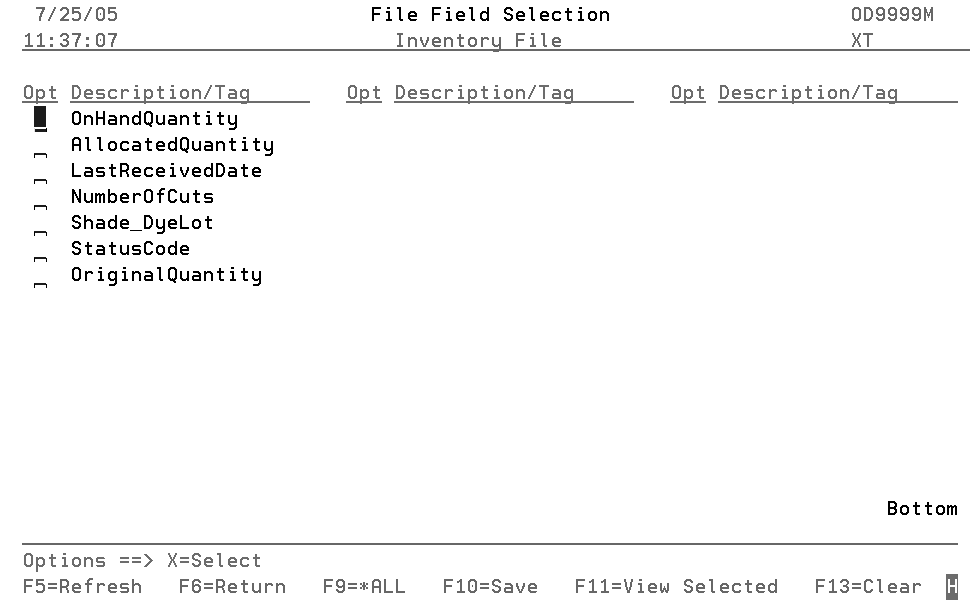
8. The actual fields displayed on the report are listed under Fields Used During Extraction. To update or add fields, press F10. A field selection screen appears.Your data file can include fields from one or more of the files shown.
9. Select an area from which to add fields from (area is synonymous with a file or section of a file). The figure below displays the screen that appears if Inventory Fields is selected.
|
10. Select the fields you want to include in the Sales Extraction. The system extracts the information selected into either a .CSV spreadsheet, that can be opened with a spreadsheet program, or in an XML format that can be opened in various programs.
Note: Also note, some fields may be included on your systems’ selection screens that are not included on the sample screens in this chapter.
11. Follow this process to select fields for all the available areas. To select all the fields in an area press F9. If there are no fields selected for an area, the message NO fields selected appears next to the field.
|
12. Make your selections and press Enter to generate the report. The report is sent to the destination folder.
13. Since the following fields are essential keys that link the underlying files, they are always part of the extraction, regardless of the fields you selected.
Company number
Invoice number
Branch
Account number
Salesperson number
Item number
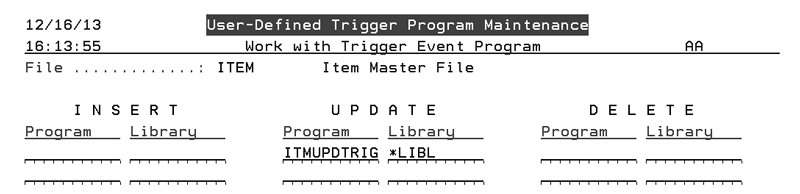
User-Defined Trigger Programs - SYS 820
This trigger system was introduced in 2013 to facilitate real-time data gathering and reporting. The DESTRIGGER engine was built to react to certain database changes, inserts, and/or updates and execute specific APIs based on the file that was altered.
Note: Click here to open up a pdf file that helps explain how triggers work.
To manually stop and start the DESTRIGGER job, use these commands:
ENDTRGJOB
STRTRGJOB
How it works - An Example

Menu Option SYS 820
This menu option lets you apply your own custom triggers to the Dancik DESTRIGGER engine. You can apply trigger programs to gather data when an Insert. Update, or Delete action is performed.
Select a trigger to work with.

In the example shown below, whenever a record in the Item File is updated the system automatically starts program ITMUPDTRG.
Purging Quotes From the Quote Management System - SYS 906
This option allows you to delete old or unwanted quotes from your system. You can delete quotes based on several parameters such as quote numbers, dates, departments, or cost center.
Field |
Descriptions |
Delete Quotes from Quote/Job# |
Enter a range of quote numbers to delete. If you only want to delete one enter its number in both fields. |
Delete Quotes created from |
Enter a date range in MMDDYY format. Any quotes that fall within the entered date range are deleted. This is the only mandatory field on the screen. |
Limit deletion to the following Cost Centers: |
Enter the cost center codes you want to delete quotes for. If you enter cost center codes, only quotes related to those cost center codes are purged. If you leave the field blank, all cost centers are considered. Enter a ? in this field to display a listing of all available cost centers. |
Limit deletion to the following Departments: |
Enter the department codes you want to delete quotes for. If you enter department codes, only quotes related to those departments are purged. If you leave the field blank, all departments are considered. Enter a ? in this field to display a listing of all available departments. |
Delete Open Quotes Too? |
Flagging this field to Y directs the system to delete any open quotes that fall within the parameters set. The default is N. |
Update File or Test Only? |
Running this utility in test mode produces the same report as if you actually updated the file. This enables you to review the information that will be purged. Running a test (T) is the default. Running an update purges the quotes contained within the parameters. A report is generated detailing the quotes that were deleted. |
After entering the purging parameters, press Enter then F7 to produce a Purge Report. If you entered a U in the Update File or Test Only? field, the quotes are purged from the system.
It is recommended that this report be run in “T” test mode before attempting to update the file. This enables you to review the report and make any needed adjustments to your selection parameters. Once all selection parameters are correct and you are satisfied with the results, continue the purge process in “U” update mode.
Auto Update Item Rating - SYS 908
This utility allows you to rank your item numbers. It provides a better management tool and saves manual entry time in updating Item File to user’s discretion.
For example, you can rank your items from the best sellers to the worst sellers and then make decisions based on that information.
The first screen in this process lets you select items to rank. For example, if you only wanted to rank items from one manufacturer, enter that manufacturer’s code in the MFGR field.
Note: To include all items, leave all the fields blank.
Press Enter and then F7 to proceed to the next screen. This screen lets you narrow the ranking to certain warehouses.
Enter an X in the appropriate Opt column to include the warehouse in the report.
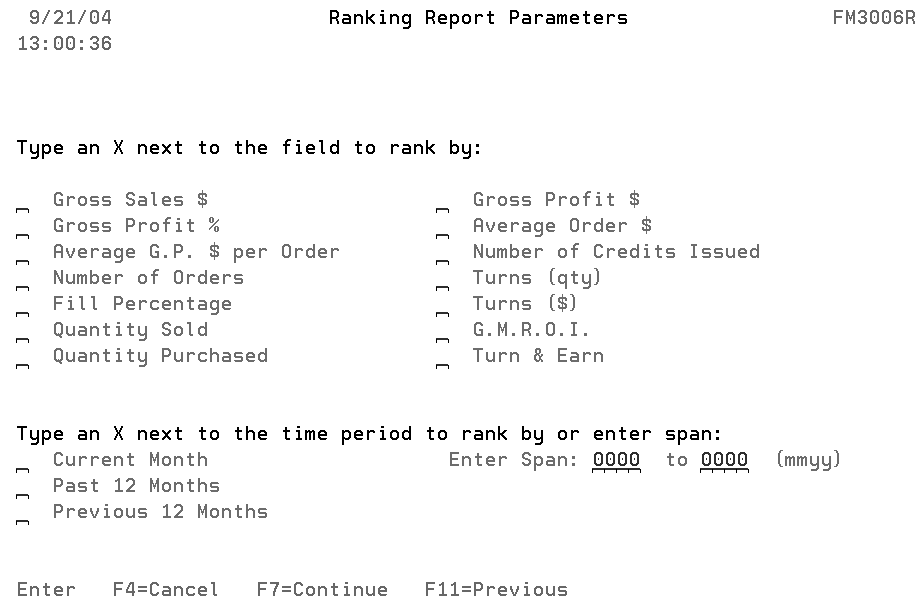
Press Enter then F7 to proceed to the next screen. The top part of the screen allows you to choose the statistic you want to base your rankings on. The bottom part of the screen lets you choose a time period to base the ranking on.
|
Make the necessary selections and press Enter.
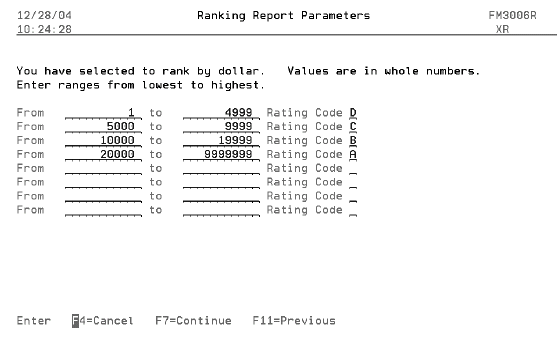
If you choose a ranking option that ranks by a dollar amount (Gross Sales $, Gross Profit $, Average Order $, Turns $), the Ranking by Dollar screen appears. This screen allows you to enter a from and to dollar amount range and the corresponding ABC rating code they would like to enter in the item rating.
|
Notes about this screen:
Enter the dollar amounts from lowest to highest
The dollar amount is rounded to nearest whole dollar with 10 digits limit.
You can enter negative dollar to positive dollars.
Enter only whole dollars. The lowest number allowed is $9,999,999,999- and highest number allowed is $9,999,999,999.
As an example, consider the following entries (also shown in the following screen):
Items to be ranked as D items will fall in between the 1 to 4999 dollar range
Items to be ranked as C items fall in between the 5000 and 9999 dollar range.
Items to be ranked as B items fall in between the 10,000 and 19999 dollar amounts.
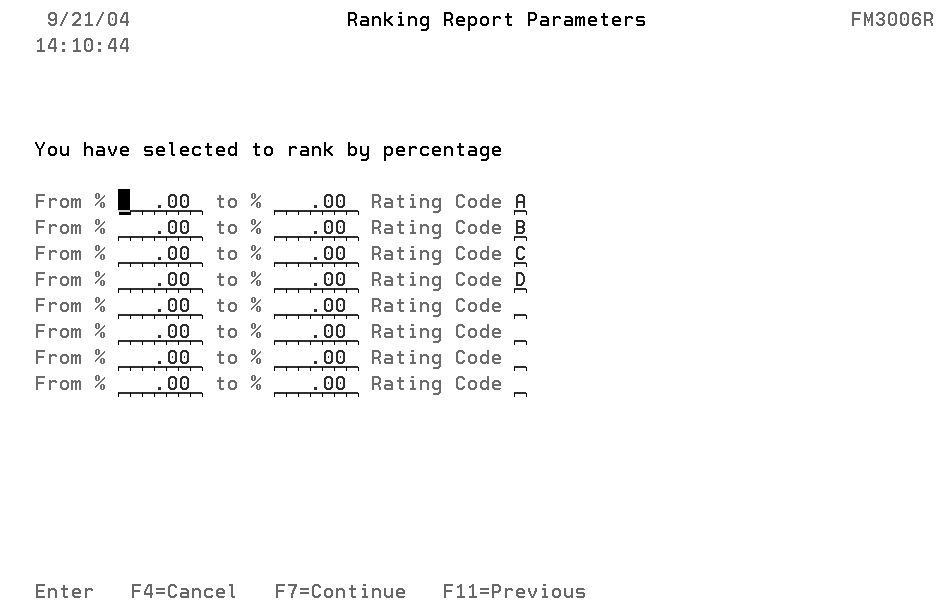
Items ranked as A items fall in between the 20,000 and 30,000 dollar amounts. If one of the options that ranks items by percentages is selected, the screen shown below appears.
|
Note: This screen uses the same functionality as the Ranking by Dollar Screen described above.
Notes about the Ranking By Percentages Screen
allows you to enter percentages to include two digits after decimal (000.00%).
uses a percentage range from -999.99% to 999.99%.
If you choose one of the options that ranks items by quantity, the same screen that is used for ranking by dollars appears. If you have already entered information into the screen previously, that data is displayed. Review it for accuracy.
After selecting your ranking criteria, press Enter and then F7. A series of screens allow you to make the following selections/decisions:
Include or omit consignment items
Note: Consignment items are identified in the Product Line File. These are items that you don’t own, but are selling for a manufacturer or supplier.
Decide if you want to run the report for all the items in your inventory, or only stocked items, or non-stock items only.
Include or exclude discontinued items.
Designate up to five ABC rating codes that will not be affected by the utility. These codes will not be updated. For example, if you have ABC rating codes such as N=New and S=Support and Trim then you may not want these codes updated based on ranking by sales, etc.
The last screen in the process asks if you want to update the item master with the results. If you enter a Y the system automatically updates the item master of any items within the ranges and parameters you set. Entering an N, directs the system to produce a report but no changes are made. The report generated can be used to see what items are affected by your entries.
Regardless if you enter a Y or an N a reports is created. The top part shows your parameter settings and the bottom area shows the parts that were affected.
Tax Audit Inquiry by Invoice Number - SYS 909
This program displays the breakdown of taxable versus non-taxable amounts on an invoice. The taxable and non-taxable amounts are shown as originally calculated. This keeps the historical information accurate and not based on tax rates, which may have changed since the invoice was generated.
1. Enter the invoice that you want to display the historical tax information for and press Enter.
|
This first part of the screen shows the tax codes applicable to the invoice and system related settings for charging tax. These fields are the tax codes assigned to the invoice, but do not necessarily represent the description or settings that were in the Tax file at the time the invoice was generated. They are simply the values currently in the Tax file.
Note: Press F9 to access the Tax File. Use this file to update or edit the tax codes. These changes do not effect invoices that are already created.
The second part of the screen breaks down the taxable and non-taxable charges pertaining to this invoice, regardless of current tax rates.
2. The screen below describes the tax breakdown for this invoice.

Note: This screen is meant to be used for research, in anticipation of a tax audit. It enables you to see how your system tax options are set, as well a what taxes were actually charged on any invoice.
3. To view the actual invoice, press F23. This accesses the Invoice File as shown below.
|
4. Press Enter to see the rest of the invoice, which for this example shows the F6 Misc charges.
|
Import Customer Item Cross Reference Table - SYS 912
This option enables you to maintain your customer-specific item numbers and descriptions in an Excel file (.CSV spreadsheet format), and then to use that file to upload to and update the Customer Item file.
When building the spreadsheet that is going to be imported, it has to be built to an exact format. It must include the following columns in the following order.
Column 1 - Customer Record Type - A=Account#, or C=Chain - 1 character allowed
Column 2 - If column A is customer account number - 6 digit account number
If column A is customer chain code - 3 character chain code
Column 3 - Dancik Item Number - 16 characters (3-char Mfgr Code + up to 13 additional characters)
Column 4 - Customer’s Item Number - Max of 20 characters
Column 5 - Customer’s Item Description 1 - max of 30 characters (this information is optional)
Column 6 - Customer’s Item Description 2 - max of 30 characters (this information is optional)
Note: When the report is run, any of the columns that exceed the maximum amount of characters are noted. The fields in the .CSV spreadsheet cannot contain any commas. Commas are picked up by the file parser as a field separator.
An example spreadsheet is shown below.

The first row, in this example contains the headings, which are not imported.
Using an Excel spreadsheet to upload item information
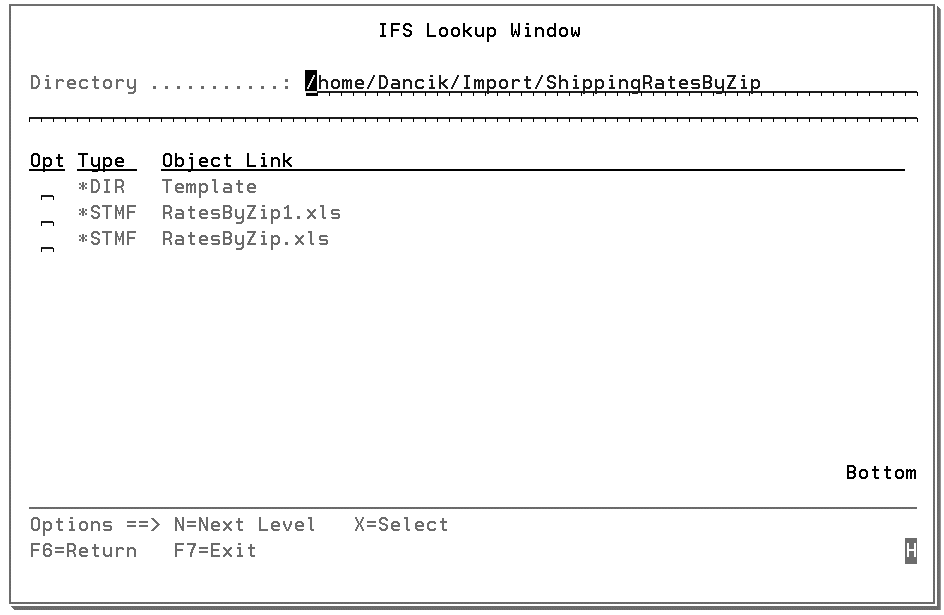
1. This option is accessed on the Special System Maintenance Functions Menu (SYS) option 912 - Import Customer Itm X-Ref Table. The first screen in the process asks for the location of the spreadsheet file.
2. Enter the file location. If you are not sure of the location, use F9=Prompt IFS to drill down to where the file is located and to automatically insert the path into the File Location field.
3. The Mode field lets you determine whether you want to only run an edit report (T) or to actually update the Customer Preferences File (U). In either case, an edit list is created that lists the records, and any error conditions encountered.
4. After entering the File Location and Mode, press Enter. If the update option is selected, the following happens:
If a match is found (same record type, same account or chain, and same Dancik item number), then the other fields in the Customer Item File are replaced by corresponding fields from the spreadsheet file.
If a match is not found, then it is considered a new record, and it is added to the Customer Item File.
Records with ANY errors are NOT updated or added.
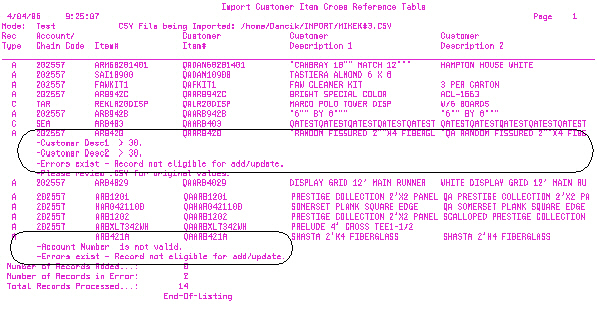
Note: Records are never deleted using this process. To delete records, the user must still use the Customer Preferences File F13 screen.
5. When the program is finished processing the information, the message Edit Completed. Please see report for details appears.
6. An audit report is automatically generated and placed into your spool file. This report shows you the files that were updated, if you were in Update mode, and any problems that occurred.
7. Notice in the first example report, the blank account number in the last entry is not valid. This record cannot be added to the Customer Item File until the account number is corrected. Another entry has descriptions that are to long. All the other records have been updated.
At the bottom of the report is a summary that displays the number of records added, how many records had errors, and the total amount processed (which should be the total of the records added and records in error).
The following figures present two examples of the report. The first example has errors (column descriptions exceeded maximum length and invalid account number). The second example is the same report with the errors corrected.
Report With Errors
Corrected Report

Test Automatic Back Order Fill - SYS 914
This function allows you to test your back order fills. It fills the back orders based on your settings, but does not actually post the receipts. This allows you to review the back order reports and then use INB 4 - Fill Back Orders to proceed or make changes as needed.
1. It uses a screen that is nearly identical to the INB 5 Post Receipts screen.
|
2. Enter at a specific warehouse or the whole company to run the posting for.
3. If the warehouse setting is set to require a manifest number when posting receipts, the user must enter a WARE + MANIFEST#, RECEIPT#, PO# or EDI#.
4. You must enter one the following: manifest number, receipt number, EDI number, manufacturer, or purchase order number.
5. If you choose to post by receipt, you can post a span of line numbers instead of the whole receipt. Enter the receipt number in the Enter A Rcpt# Span Or Leave Blank To Include All field then enter the line numbers in the Enter A Line# Span Or Leave Blank To Include All field.
6. After entering the necessary information, press F7 and then Enter to continue. An Automatic Back Order Fill Report is generated and held on the spool file. You can use this report to review the filled back orders and if needed make corrections to your automatic back order fill process.
Shipping Charges by Zip - Import - SYS 919
This option allows you to import an Excel spreadsheet containing shipping charges information directly into the Shipping Charges By Zip Cd Table. Most freight companies will supply you with rates as a spreadsheet. Although each freight company will have its own format, you can cut and paste the columns and rows that you need from each freight company into the Dancik-supplied spreadsheet format.
Importing Information from an Excel Spreadsheet into the Shipping Charges By Zip Code Table
Downloading the Excel template to your PC.
Creating a Shortcut to The IFS folder where the Excel Spreadsheets are stored
Moving a spreadsheet from the PC back to the IFS
Downloading the Excel template to your PC.
When this option is distributed, an Excel template file is placed on your IFS.
Note: The IFS (integrated file system) is a part of the iSERIES storage system that supports PC files. It is essentially a file server that stores and shares files between a PC and an iSERIES computer.
Find the IFS Directory path to the Excel template. If you don’t know it, contact your system administrator. An example directory is: home/Dancik/import/ShippingRatesByZip/Template.
You should copy this template to your PC. You can do this through the following steps:
1. Right click on the Start button in the lower left-hand corner of the screen.
2. Select Explore.
3. Find your IFS directory and drill down through the folders to get to the template. The Excel template file should appear in the right hand portion of the window.
4. From here, you can simply drag and drop it onto your desktop and then move it as needed.
Once you have the template downloaded to your PC, you can use it to build your shipping data spreadsheets.
Note: When you enter data onto the spreadsheet, save it using the SAVE AS option and not the Save option. Saving the template with data entered can corrupt it, and a clean template is necessary to import information.
When you are in the Dancik-supplied spreadsheet, you can click any of the cells to see the form in which the data should be entered.
|
Troubleshooting Tips:
If you are having trouble with information not importing correctly, ensure the spreadsheet fields are using the correct alignment and formatting. The first five “key” fields (Ship Via, Service, Warehouse, FromZip, and ToZip are all left-justified and alpha-numeric.
Note: Cutting and pasting information into the spreadsheet, can change the formatting of the cells.
Creating a Shortcut to The IFS folder where the Excel Spreadsheets are stored
Create a short cut on your PC for easy access to the IFS directory/folder. This IFS directory/folder is where option SYS 919 is going to look for the spreadsheets to import.
1. Right click on your PC desktop.
2. Select New and then Shortcut.
3. Enter the location for the IFS directory where the Shipping Charge spreadsheets are stored.
4. Press Next to name the shortcut and place the shortcut’s icon on your desktop.
Moving a spreadsheet from the PC back to the IFS
After shipping charges have been added to the spreadsheet, it needs to be moved back to the IFS. Simply click the shortcut icon created in the steps above and move or copy the spreadsheet into the folder that appears.
Importing Information from an Excel Spreadsheet into the Shipping Charges By Zip Code Table
1. On the Special System Maintenance Functions Menu (SYS), select option 919 - Shipping Charges by Zip - Import.
An IFS Lookup Screen appears; defaulted to the directory where the spreadsheets are stored.
|
2. Select a spreadsheet to import and press Enter.
3. The system automatically imports the data into the Shipping Charges By Zip Cd Table. A Shipping Rate Upload Edit report is also created and placed in the Spool File. This report shows the shipping rates that were successfully imported into the Shipping Charges By Zip Cd Table. It also displays those shipping rates that were not imported and the reasons why. This allows you to go back into the spreadsheet and make the necessary corrections.
4. When spreadsheets are imported, any exact matches are overridden and the new rates supersede the previous rates. The system uses the following five fields as the keys to determining if an imported shipping rate is an exact match for an existing one:
• Ship Via
• Service
• From Whse
• From Zip Code
• To Zip Code
5. If all these fields match an entry already in the table, the existing entry is overridden to include the information included in the new/imported shipping rate record.
6. If any of these five key fields differ (i.e. the ship via might be different or the zip code range might be one digit off), a new shipping rate is inserted into the table.
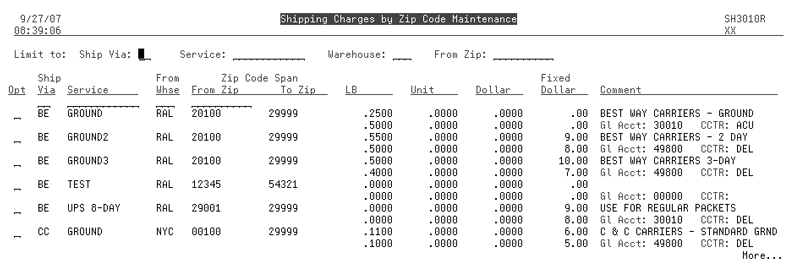
An example Shipping Charges by Zip Code table is shown below.
Note: For information on how to build and maintain this table, refer to .Shipping charges by Zip Code
7. Old or unused shipping rates, may be manually deleted by entering a D in the Opt column.
8. Each of your freight suppliers has their own format for their rates, which can be changed at any time. Therefore, you may sometimes need to delete old rates, due to a change in the structure of their tables.
Product Knowledge Mass Update - SYS 920
This option allows you to mass update the special instructions entered via the F12 key in the Item, Manufacturer, and Product Line Files.
|
The process for adding and deleting instructions is essentially the same. Keep in mind, that when you are deleting a message/instruction your entry has to match the existing message exactly. That includes capitalization and print settings.
Press Enter to proceed to the next screen which allows you to set inclusion parameters. You can make the update very broad (i.e. by entering just a Manufacturer and leaving all the other fields blank) or very narrow by entering information in several of the fields.
The entries on the following screen will affect all item class 1 items identified as WT (wall tile) for the manufacturer SAI.

Press Enter to access the messaging screen. In the example shown below, two instructions are being mass applied.
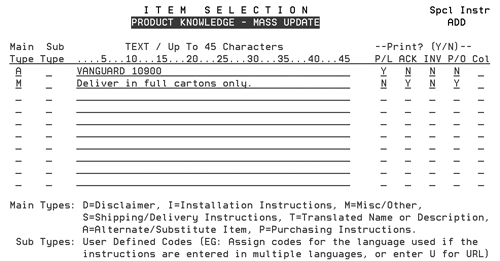
Enter a Main type and an optional Sub Type. The Sub Type codes are user defined. One possible use of a Sub type code could be to identify the language in which the instructions are written, or can have user defined meanings. These codes can also be used to store a URL for web-pages related to an item. When the product knowledge screen is displayed in Order Entry, Order Change, Inventory Inquiry, or via the Décor 24 application (on a web-connected PC), the URL may be clicked to open the web page.
Choose the documents you want to have the special instructions printed on. The following documents are available PL (picklist), ACK (acknowledgement), INV (invoice to customer), P/O (purchase order to supplier).
Use the COL field to specify the color for of these messages. We recommend that you develop a company-wide system for color-coding information. For example, substitute items could appear in pink, important product disclaimers in red, or installation instructions in white. Valid entries are:
— R - red
— B - blue
— G - green
— W - white
— P - pink
— T - turquoise (displays underlined)
— Y - yellow (displays underlined)
— I - Invisible (does not display)