Need more info or you couldn't find what you were looking for, let us know by sending an email to: support@dancik.com.
Navigator Billto File
Sending Emails While in the Billto File of Navigator
The Billto File, also known as the Customer Master File, is where you enter information about customers including information about their physical location, credit terms, and rules that determine how their orders are processed. You can use the Billto File to review information about sales, accounts receivable, special instructions, and marketing programs. You can use the notepad to record information about customers.
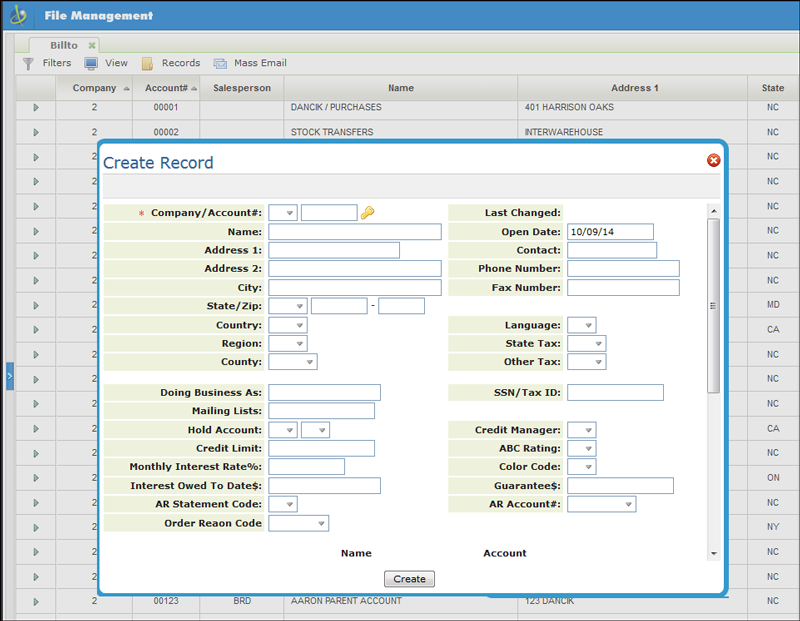
Access the Billto File and click Create under Records to create a new Billto File.
Many of these fields are displayed as default values on the Order Entry Header screen when you place orders for customers. However, they can be overridden for a particular order. For example, the Billto File could have a tax code and 2.00% 30 day terms, but can be overridden on an order to be non-taxable and have COD terms.
Field Name |
Description/Instructions |
Name |
Customer’s name. |
Addr1 |
Customer’s billing address. |
Addr2 |
An additional line for customer address information. If the address entered here is a post office box or is different from the shipping address, you can also enter a Shipto file record and a corresponding Default Shipto# on this screen. |
City |
Customer’s city. Also enter the six-character postal code for Canadian customers in this field. |
State |
Customer’s state. Canadian customers can enter a two-character province code here. |
Zip |
The customer’s five- or nine-digit postal code. This field is for US addresses only. |
Country |
The two-character country code for customers outside the US only. A list of country codes is on the Master File Listings Menu. |
Cust Region Code |
Use this code to group customers geographically. Similar to the Customer Type field, it is useful in reporting and designating pricing exceptions. It is not mandatory and can be established any time. When creating region codes, remember that the system already provides fields for city, state, province, zip, country, and county. Use this field to create geographic categories having unique meanings to your company, for example, sales zones or demographic areas. Define these codes using the Classification Codes File Maintenance program. |
County |
A three-digit number assigned to each county within each state. This field is a selection parameter for many reports. It can be useful when comparing your company’s performance by county to published marketing and sales surveys, which are usually listed by county. The county number is also essential if you intend to use the recurring invoice programs, which can invoice sales tax to customers who are not normally taxable. The system uses the county number to find the normal tax rates for the county. You must establish county numbers in the County File. The County File can be used to tax customers normally not taxed. |
If you enter CN, for Canada, in the Ctry field in the Company File the Billto File shows you where to enter the Canadian postal code in the City field by inserting ZZZ ZZZ. Because Canadian postal codes contain alpha characters, you cannot enter them in the Zip field on this screen. |
|
Last Changed |
The system enters the date on which this record was last changed. |
Open Date |
The date on which the account is opened. Once this date is entered it cannot be changed except with a high-level password. Enter in MMDDYY format. |
Contact |
Primary customer contact name. You can search this field via Customer Search. Be sure to enter names carefully and consistently. For example, always enter the last name first or first name first. Use this field to enter a key name that could be useful in searching for this account. For example, John Smith is the primary contact for ABC Contracting Company. Use the Notepad to enter complete contact information. You can also use this field when converting from another computer system. In that case, you can enter your old system’s account numbers here to use for searches within this system. |
Phone number |
Customer’s business telephone number (up to ten digits). |
Fax |
Customer’s fax number (up to ten digits). |
Language |
You define this code and enter it if the customer speaks a language other than English. Information, such as product information, disclaimers, and installation instructions, that have been entered in this language, automatically appear on the appropriate documents for this customer. If a customer record is coded S for Spanish, product information coded S appear on the customer’s invoices, pick lists, and so on. All language codes should be defined using the Classification Codes File Maintenance program. Choices regarding French and English for Canadian users are controlled by this field. Enter F for French. Leave blank for English. These codes must be programmed and the corresponding translations entered into the system. This field is rarely used. |
Tax codes establish a default tax rate for the customer. Notice you can set a State tax code and an Other code. These are two-character fields that correspond to records you should have already entered in the Tax File. If the customer is tax-exempt, then do not enter any tax codes; leave these two fields blank. |
|
State Tax |
The two-character tax code representing the state or provincial tax, if taxable. These codes must be defined in the Tax File. |
Other Tax |
Tax rates are stored in the Tax File. You can define State and Other tax codes and the rates in the Tax File program, if applicable. Tax codes can be overridden for specific orders and invoices. The State and Other tax codes cause an account to be taxable. The Tax/SS number field does not control whether or not the account is taxed. If you leave these tax fields blank, the account is considered tax exempt. However, you can also enter these codes on the Order Entry and Invoice screens to make individual invoices and orders taxable. Canadian Users: Enter the code representing GST in this field for all customers to which GST applies. Use the State Tax field for codes representing tax per province. |
Doing Business As |
If the customer or business is known by another name, enter that name in this field. You can also use this field to enter the customer’s name in other ways. For example, if a customer name is The Tile Outlet, you can enter it as Tile Outlet, The in this field. The Customer Search finds it if you search for “The” or “Tile.” If a customer name is a person’s name, enter last name first in this field and first name first in the Name field. For chain stores, you can enter the store number in this field followed by an abbreviation of the name. For example, 1023JCP for JC Penny store 1023, or 358HOM for Home Depot store 358. Then, you can search by store number. To help customer service switch from using old to new account numbers, you can enter old account numbers in the Doing Business as (DBA) field. You can search this number during order processing to help ease the transition for users who have memorized old codes that can not be used in the new system. You can use this field to differentiate among national account stores for whom you enter orders that are invoiced to multiple manufacturers. Because you need to create the same account for the different manufacturers, you can use the DBA field to separate the accounts. For example, Home Depot #515 (HAR) and Home Depot #515 (SHA). |
Mailing Lists |
Use this ten-character field to assign a customer up to ten mailing lists. Enter a series of one-character codes, each of which represents a mailing lists for this customer. You can enter the codes in any sequence. For example, A19 and 9A1 indicate the customer belongs mailing lists A, 1, and 9. Mailing lists can contain Billto File records as well as records entered directly into the Mailing List File. You do not have to set up these codes in a maintenance table, but can input them only in the Billto File. You can enter names of companies or people that do not have an account with you in the Mailing List file. |
Hold Acct (1st character) |
This two-position field controls how orders for customers who are over the credit limit, or have past due accounts, are handled by the order entry process. Hold Acct codes control credit functions in conjunction with the account’s credit limit and A/R balances. Enter the appropriate code as follows: There are two System Wide Settings that affect the credit hold codes:
Some examples are:
If X code is entered, all online credit checking uses the statistics for the central A/R account. Open order totals are added to the central A/R account and not to the individual store account. However, the actual orders are still registered to the store accounts and can be searched and viewed using the store’s account number. The Credit Release screen displays the credit data for the central A/R account when an order for the store account is held. We recommend that if the X code isused, you enter X in all of the store accounts that relate to a single A/R account number. When an account is first changed to an X, the next Night Jobs run automatically, switching the credit information to the master account. In order to put a group of X accounts on hold, do not simply change the central account hold code to H. You must change the individual store accounts to H. Note: If the first credit hold code is a letter (open orders are not included) then you should enter A as the second code. |
Hold Acct (2nd character) |
Some Examples: X - Hold account according to the Hold Acct codes in the parent account. This code is used only for accounts that use the A/R Acct # field. The A/R Acct # field is used to divert invoicing and accounts receivable to another account number. This is usually done for chain stores to consolidate billing and A/R statements for all stores into a single corporate account. Code X bases all credit checking on the information in the central account as designated in the A/R account number. All open orders are tabulated against the central account and not the individual store or location. The X code can be entered on store accounts only, not on the central account. If X code is entered, all online credit checking uses the statistics for the central A/R account. Open order totals are added to the central A/R account and not to the individual store account. However, the actual orders are still registered to the store accounts and can be searched and viewed using the store’s account number. The Credit Release screen displays the credit data for the central A/R account when an order for the store account is held. We recommend that if the X code is used, you enter X in all of the store accounts that relate to a single A/R account number. When an account is first changed to an X, the next Night Jobs run automatically, switching the credit information to the master account. In order to put a group of X accounts on hold, do not simply change the central account hold code to H. You must change the individual store accounts to H. Note: If the first credit hold code is a letter (open orders are not included) then you should enter A as the second code. A - Causes credit holds to be performed after an order is entered. The order entry operator can fully process all orders, but orders with credit problems are automatically diverted to the credit manager’s attention and put into a credit hold status. Once in credit hold status, the credit department reviews the orders and releases them, if approved. Alternately, the credit department can cancel an order and notify the customer or customer service representative. Credit held orders can be viewed and released from the Held Orders/Credit Release screen. B - Causes credit holds to be performed before an order is entered. The order entry operator cannot process orders if a credit hold takes effect. Use this code if you do not have a credit department or manager, or if you prefer to have the order entry operator interrupted to resolve the credit issue before entering the order. |
Credit Limit |
Assume two decimal places. We recommend entering 9s in the last two positions to make this number easier to read during quick reviews. For example, if you enter $100 as $100.99, it doesn’t look like $10,000. The credit limit and the two hold-account codes control whether an order can be taken. A in the second position of the Hold Account field designates the order can be entered and a credit check is performed after. B designates that a credit check is to be performed before an order is processed. If your company assigns groups of customers to specific credit managers, then using the Credit Manager field establishes this link. Note: Special messages, such as HELD, COD, or CASH can be displayed beside this field. These messages are consistent with those shown on the Customer Search screens. |
Monthly Interest % |
Tells the system what rate to charge for past due accounts. Interest Owed To Date is informational and is updated by the system each month. The system can generate finance charge invoices for past due invoices. Leave this field blank if you do not want the system to automatically assess interest or service charges. Although you can charge a different interest rate for each customer, different rates might not be legal in your country or state. |
Interest Owed To Date |
The interest owed to date accumulates and appears here, if you use Interest Method A. It can be changed or removed by users with the required high-level password. Interest is assessed during end-of-month close or during a mid-month interest charge update in the Accounts Receivable system. |
AR Statement Code |
Controls how the customer’s monthly statements are formatted. You can choose between open item or balance forward styles. You can also choose not to print statements for customers.
|
Reason Code |
Order Reason Codes give you the ability to further classify your orders. The default for this field is for it to be optional during Order Entry. However, it can be made mandatory through the System Wide Setting - Order Reason Code Settings for Order Entry and Order Change. Making the Order Reason Codes mandatory can provide more details in order reporting. Order reason codes are created via the System Table ORDERREAS (SET 29). Note: For more information on making Order Reason Codes mandatory during Order Entry or Order Change click here |
Credit Manager |
Enter the one-character code to represent the person, manager, or department responsible for the credit limit of the account. Do not complete this field if only one person in your company is responsible for credit. The credit manager code appears on the Credit Held Orders screen. It is also used for sorting and selecting numerous reports, including the AR Aging Report. |
ABC Rating |
Assigned by you when the customer records are entered, automatically, or updated after you have been up and running on Dancik Distribution. This field helps you keep track of your best customers in sales analysis. You can either assign customers rating codes yourself or let the software assign them based on factors, such as sales, gross profit, or quantity sold. The system-assigned customer rating is based on the 80/20 rule. Recommended customer ratings are:
Define these codes in the ABC Code File. The system can automatically assign ratings A through D by using the Customer Sales Ranking Update Report to automatically rate customers according to the following criteria. This is accessed from the Special System Maintenance Menus: |
Color Code |
You can use colors to quickly and easily identify specific customer situations such as when a customer goes on credit hold. Note: Credit code colors can be mass updated. Associated Files
|
Guarantee $ |
If a customer provides a guarantee or letter of credit, enter the amount in this field. Assume two decimal places. You can also enter a special number instead of an actual amount, such as all sevens or all nines, to indicate a certain type of guarantee from the customer. |
AR Account# |
Lets you enter orders for a customer that are invoiced on another account. This is helpful when a customer has several purchasing branches but central billing. Don’t confuse this feature with “multiple shipping addresses for a single customer,” which is for material and delivery. This is for billing and receivables. Remember, using the A/R account number causes sales analysis to shift to the customer account that is invoiced, not necessarily the customer who placed the order. If you want to cross-reference another account number in the system, enter that account number here. Address invoices to this account number instead of the normal Billto address. Updates this account’s A/R instead of updating the normal Billto account number. For example, if you deal with a chain on a store by store bases, but want to consolidate billing, enter the account number of the billing office in the A/R Acct# field of each store’s Billto File. All invoices, regardless of the actual account number, are addressed to the main billing office, and all A/R is combined into that single account. Invoices show both the store and the billing office account number. A single statement consolidating all stores is printed for the A/R account number. This field lets you use the X Hold Account code for central account credit checking. |
Bank Account 1 Bank Name 1 |
Enter the customer’s bank name and bank account number. |
Bank Account 2 Bank Name 2 |
Second bank and account number, if applicable. You can also use this space for other credit related information. |
Payment Terms |
Generally, you either assign terms by product (depending on what the customer buys) or by customer. You should have already set up your Terms Codes File, so you can enter an established code, or M to indicate that the terms have been set up on the products you sell. Rarely should you establish a Payment Terms percentage directly on the customer’s Billto File. The Days field is generally used to indicate whether a customer is a COD (003) or cash customer (005). These codes cause the system to print the dollar amount to collect for COD and cash customers. Assume two decimal places for the terms percentage. For example, for “2% 15 days” enter 00200 in the Terms Discount field, and 015 in the Days field. These fields may not be necessary if you use the Terms Code field. Use the Terms Code field if multi-level terms discounts or complex terms are required. Examples of Payment Terms Entries • 00000% Disc, 30 days = Net 30 days • 2.0% Disc, 15 days = 2.00% 15 days Special Terms (represented by 0 - 5 days) • 00000% Disc, 0 days = Net Immediate • 00000% Disc, 1 days = Paid in Advance • 00000% Disc, 2 days = P/A Balance Due • 00000% Disc, 3 days = COD • 00000% Disc, 4 days = Letter of Credit • 00000% Disc, 5 days = Cash You can combine special terms with percentage discounts as follows: • 2.0% Disc, 3 days = 2.00% COD • 1.00% Disc, 5 days = 1.00% Cash |
Terms Code |
User- and system-defined codes for special terms. Three terms codes are reserved by the system for special purposes. M indicates that the customer’s terms are based on the manufacturer’s terms for each product. When terms code M is used, the system looks at the Product Line File for each line item ordered or invoiced. It then uses the terms code from the Product Line File (ACT 105). 1 and 2 are also reserved. Terms codes can be used instead of, or in addition to, the other terms fields and are defined in the Payment Terms File. Refer to your customized Terms Table for a complete listing of terms codes. The terms code can also be combined with the Terms Days field for special combination terms. For example, enter terms days 003, and terms code M, to indicate that the account is COD but gets the terms discounts for each product, as coded in the Product Line File. |
Branch # |
The three-character branch number or code assigned to the customer. The customer can still buy from other branches, but this is the customer’s home branch. Branches must be set up in the Branch File before customer records can be created. |
Chain |
Another code for grouping customers, useful for reporting and establishing eligibility for pricing specials. Use this field only for customers who are formal members of a buying group or franchise such as Color Tile or Home Depot. We also recommend that customers with multiple account numbers create a chain code to link them for sales analysis. This three-character code defines the account as being part of a chain store or account group and is for sales analysis. Separate account numbers that are part of the same chain should all be assigned the same chain number. For example, all Lowes stores should be assigned chain number LOW. You can display and print sales information for a chain. Each chain should be defined using the Classification Codes File Maintenance program. |
Warehouse |
The three-character warehouse number or code assigned to the customer. The customer can still buy from other warehouses, but this is the customer’s home warehouse from which they usually pick up or have inventory delivered. This warehouse is automatically used by the Order Entry program as the default warehouse, though it can be overridden. This field is not mandatory. If it is left blank, Order Entry defaults to the warehouse normally associated with the branch or operator entering the order. Warehouses are added to the system through the Warehouse File. |
Salesperson |
A three-character number or code for the salesperson responsible for this account. Using the Customer Codes screen (F14), you can assign different salespeople to each manufacturer or class of item that the customer buys. If only one salesperson is assigned to each account, enter that salesperson’s number here. If multiple salespeople are assigned per account, leave this field blank and use the Customer Codes screen (F14) instead. All salespersons’ numbers should be defined in the Salesperson File. If you assign customers to a salesperson without regards to products purchased, (customer level), then enter that salesperson code here. If you assign salesperson by product, leave the Salesperson field blank. |
Customer Type |
Used to sort customers into groups, such as, architects, contractors, or retail stores. Helpful for grouping customers in reports or in determining eligibility for sales or promotional pricing. These codes can be used for sales analysis, mailing lists, assigning of promotional prices, and other functions. Not to be confused with the Customer Price List field. Some examples of two-character codes are:
Define these codes using the Classification Codes File Maintenance program before entering them in this field. For consistency, we request that you set up the following codes:
All other customer type codes can be defined according to your own requirements. |
Default Shipto # |
Used only if the account has a permanent shipping address that is different from the billing address entered on this screen, for example a post office box. Enter the shipto number, assigned to that shipping address. Also, enter the shipto number and address in the Shipto File. The default shipto number is used in Order Entry, but can be overridden. If this account has various shipto addresses, you should leave this field blank or enter the shipto number most frequently used. Enter 999999 in this field to indicate a mandatory shipto override. Y is displayed in the Shipto Override field on the Order Entry screen for all orders for this customer. This code prompts you to enter a shipto address for each order that the customer places. Use this option for accounts that usually require job site information or information used in notice to owner or property liens. We recommend using separate shipto records only to differentiate a billing address from a shipping address. Set up separate accounts for each store or location when you sell to multiple stores or branches. You can then link those separate accounts using the Chain and A/R Acct# fields. Having separate accounts makes it easier for customer service to select the right store and location and allows greater flexibility for pricing, customer analysis, and salesperson assignment. The Ship Via field establishes the default carrier for this customer. It can be overridden during order entry. If you establish truck routes in the system, assign customers to their specific routes. You can even use runs and stops if you have very elaborate routing. The FOB (freight on board) code establishes the default FOB code on the customer’s order. |
Truck Route |
Use this alphanumeric field, to assign customers to delivery routes. Enter three two-character codes. The first two-character field represents the truck route, which is defined in the Classification Codes File, and optionally in the Truck Route File (DEL 1). The second two-character field is the customer’s stop on the route. The third two-character field is for a secondary run number. The customer’s stop is a relative, rather than an absolute, stop number. On some delivery runs, all stops might not be serviced. You can even assign the same stop number to more than one account, indicating that multiple stops are in the same relative location along the route. For example, stop 01 is at the beginning of the route, stop 50 is the middle, and stop 99 is at the end. You can also use the stop number to store the approximate hour of delivery. For example, 10 = 10:00 AM, and 14 = 2:00 PM. Or you can simply enter AM or PM as the stop number. Using these types of stop numbers lets you sort reports, such as warehouse load sheets, in a relative stop number sequence. |
Minimum Charge |
Exempts customers from minimum order charges if you have established them in your system. You can activate or deactivate automatic below minimum quantity and below minimum order dollar charges. This field is relevant only if you have set up minimum charges for some or all items or if you are using the Minimum Order Charges. These charges can be entered in the Item File separately for each item. For example, charge $2.50 handling charge for orders below 10 PC.
One exception overrides an N in this field. If in the Item File, a minimum quantity charge is entered with a minimum quantity of 99999, it is interpreted as a fixed handling charge that applies to all customers, regardless of this field. |
Price List |
A two-character field for the customer’s default pricing level. You can create multiple pricing levels in your system and assign each customer a default level. For example, you might have a builder’s price (B1) and a list price (LP) for each item. You would use LP pricing for cash (over the counter) sales and B1 pricing for builders. You can establish exceptions to the default pricing levels for customers for particular items. This field only establishes a default price level that customers receive when they aren’t eligible for any special deals. For this reason, you should use only codes that have an entry in all price classes in the system. This code relates to codes set up in the Classification Codes File. You can also use the following system-provided codes:
— intercompany sales — sales to an affiliate or other distributors — employee sales AC can also be used for serialized items, and considered actual cost. Each serial number/bin location carries its own cost, which is rarely averaged. When the AC code is used, order entry retrieves the average/actual cost as the basis for the price. Note: This is the same cost retrieved for the cost of an order. Then, any additional handling charges, discounts, and promotions are considered.
The price list number entered in this field is the default price list number used for this account. You can override this price list number for specific products by pressing F9 to access the Price Exceptions screen. If basing a customer’s prices on costs, you can use the BC or SC codes as shown above in conjunction with the Extra Charge field described below. For example, you could charge standard cost plus 10%. |
Extra Charge/Discount |
Use this field to set up a permanent discount or handling charge for a particular customer. It should only be used in rare cases where you always give the customer a discount/handling charge no matter what they buy. Where the Discount Shows controls whether the customer sees this amount in the line (using L causes the amount to be netted into each extend price for a line on an order) or in the subtotal (S causes the extended line prices to show without the discount or handling charge in effect and pushes this amount into the subtotal of the order). We recommend using L, because it gives you an accurate gross profit margin for that product. This field assumes two decimal places. Use Field Minus for discount. This extra charge or discount applies to all products, but can be overridden for specific orders. Entries in this field appear as defaults on the Order Entry Header screen. This amount applies over and above all other pricing for this customer. For example, 500 means 5.00% handling charge added to prices for this customer. 200- means 2.00% discount on prices for this customer. |
Show Charge / Discounts |
Enter: L - Includes extra charge or discount in the line item unit price. S - Shows extra charge or discount separately at the bottom of invoices as handling charge or discount. This field is required only if an extra charge or discount is entered for a customer. This code affects the gross profit percent calculation. L affects the gross profit of each line item. S causes the handling charge or discount to be a separate amount, which affects the overall gross profit of an order or invoice, but does not affect the gross profit of the individual line items. We recommend that you use L, when possible, to ensure line-level G.P. Analysis is as accurate as possible. |
Message Code |
Used to link a customer accounts with special messages you have established in the Messages File. Note: You can create COD messages in the Messages File to print on important billing and picking documents for all COD accounts. These messages print on pick lists, order acknowledgements, and invoices. They usually emphasize the payment terms such as COD / No Company Check Accepted, but can be used for other purposes. First create the text of the message using the Messages File program. Next, assign the message code to all customers who should receive the message. Use the Billto File Special Instructions Screen for messages that are unique to a customer. Use these message codes for messages shared by many customers. |
Order Handling |
The default Order Handling Code. This one-character field controls what happens to the open lines on orders that have been partially shipped. So, you can invoice customers for materials they have received and keep the unshipped items open in the system. Another option is to cancel unshipped lines on orders when you invoice customers for what they have received. The Dancik Distribution System lets you enter one order with many lines items. You can ship some items immediately, back order others, and invoice a single order many times. Enter 1 to cancel a line at invoice, or 2 to keep the lines open in the system. Enter “?” to search for the available order handling codes. Although this code shows as the default order handling code in Order Entry, you can override it on an order-by-order basis. You can also use this code to determine how orders are handled, primarily with respect to back orders and incomplete shipments. |
Ship Via |
Default Ship Via code that appears on the Order Entry Header screen; can represent “will call/pickup” or can represent a specific carrier. If you enter a default Ship Via code in the control panel, it overrides the customer’s default. Leave the control panel Ship Via field blank if you want to use the customer’s ship via code. For terminals at Will Call counters, you can enter a control panel Ship Via code to override the customer Ship Via code, since those orders are probably picked up at the warehouse where the terminal is located. The control panel is a set of parameters and restrictions that affects how orders are processed, based on the terminal/workstation. |
FOB Code |
You can use this code as the default FOB code that appears on the Order Entry Header screen. The default FOB code in the control panel overrides the customer’s default. Leave the control panel FOB blank if you want to use the customer FOB code. For terminals located at Will Call counters, you can enter a control panel FOB to override the customer FOB, as those orders are probably FOB the warehouse where the terminal is located. If you place an asterisk (*) in this field, the order entry operator is forced to select an FOB code on all orders for this customer. This feature is primarily for retail accounts and generic cash sale accounts. These accounts can use FOB to mean “From or By” for recording how a retail account was referred. |
Delivery Charge |
Exempts customers from delivery charges if you have built those records in your system. If you plan to use these charges, be sure to enter Y. Use this field to activate or deactivate automatic delivery charges. This field is relevant only if you have activated automatic delivery charges in your Invoicing system. Y - normal delivery charges are billed. N - exempts the customer from being automatically billed delivery charges. You can set up delivery charges up using the Delivery Charges File. |
Comments |
Brief lines of information to be displayed in the Order Entry screen. Enter any additional important information about this account. This field appears on Order Entry and Invoicing screens, and should be reserved for information that can assist the Order Entry staff. |
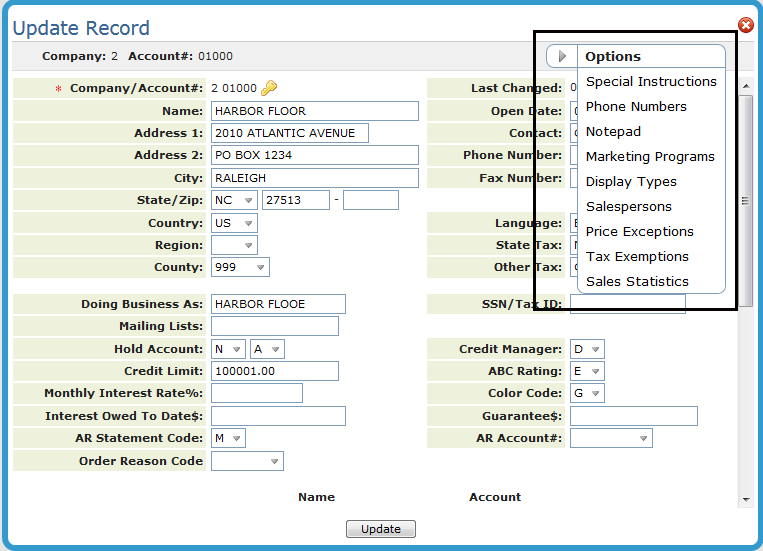
These options are available on the Update Record window.
You can use this screen to enter special instructions for a customer and to note instructions that should be printed on an invoice, pick list, purchase order, order acknowledgement, or quotation.
|
Enter general instructions that pertain to an item, an entire product line, or the entire manufacturer in the applicable file.
Special instructions print under the headings at the beginning of a document. Any special instructions with no sub-type for language are printed regardless of the language type for the customer, as coded in Language field. Special instructions coded as a specific sub-type code, such as language, print only for customers with the same code. Enter language codes on the Billto File Profile screen.
Printing special instructions and product information can greatly enhance your service to your customers and help your staff to be more responsive. You can use the Special Instructions system to:
Print a customer’s packing or delivery requirements on their pick lists.
Print a special greeting or message on a customer's invoice. The message can be specific to that customer.
Print information such as special codes and numbers on customer orders and invoices. Some examples are DUNS numbers, accounting codes used by the customer’s accounts payable department, and blanket POs for government accounts.
Special instructions can be printed on a separate listing. You can use these listings to proofread the instructions or as references. The listing can include all or specified types and sub-types of instructions. For example, you can print shipping and delivery instructions or only the French entries. You can generate this list, for example, for specific customers, items, or product lines. Generate this listing page 2 of the Master File Listings Menu.
The following table describes the fields on this screen.
Field Name |
Description/Instructions |
Main Type |
Indicates what kind of message it is. In the Billto File, type codes M and S are normally the only codes used. |
Sub Type |
Sub-type options. Indicate the language of the text, for example F = French, and S = Spanish. |
Text |
Special instruction text; 45 characters per line. |
P/L |
Enter Y to print special instructions on the pick list. |
ACK |
Enter Y to print special instructions on customer acknowledgements and quotations. |
INV |
Enter Y to print special instructions on invoices. |
P/O |
Enter Y to print special instructions on purchase orders. |
Col |
Pick a color for the message text |
You can use this file to store different types of phone numbers and Internet connections.
|
Field Name |
Description/Instructions |
(Number) Type |
Note: The System Wide Setting - Options for Back Order Fill contains an option that allows you to send an email to an email contact when a back order is filled.
— Automatically populate the Order Contact field on the Order Header; if there is only one record flagged as an order contact. — Limits the search done from within the Order Contact field (by entering a “?” in the field) to only those records designated as order contacts. |
Area Code |
Specify area codes for number types F and T. |
Phone#/ |
Alphanumeric field that accommodates different types of numbers. Note: This field can also be used to record data such as a user number or membership ID. It should not be used in conjunction with the Description field to add more characters to the description. This causes the Description to appear before the Phone# information on reports. |
Description |
A description of what the number represents (optional). |
The Billto File Notepad Screen screen allows you to enter additional information regarding the customer.
|
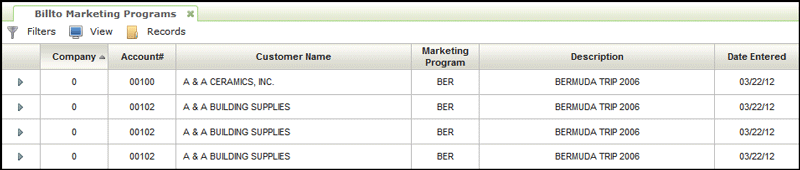
You can assign each customer up to 999 marketing programs. These can consist of company trip programs, co-op advertising programs, or can be codes that designate that the customer is part of a group of customers that you need to track in a special way. For example, you could assign a marketing program code that identifies all customers that belong to a certain trade association. The system then automatically tracks composite sales of all members of each marketing program.
Note: Marketing programs must be established in the Classification Codes File.
|
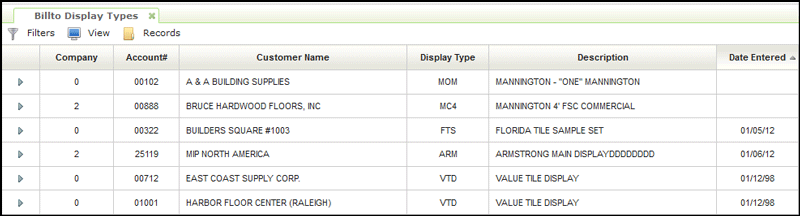
You can show up to 999 displays in each customer file. This is pertinent information for your sales force to have. The system automatically tracks composite sales of all customers that have each display. You can also use this field for sample tracking, creating a display code for each major sample category. You can use marketing programs and displays for assigning promotional prices and for generating reports, mailing lists, and recurring invoices.
Note: Displays must be established in the Classification Codes File.
|
You can use this option to assign a salesperson for each item class, manufacturer and cost center. Use this option to enter salesperson assignments only if you assign multiple salespeople to a single account depending on product. If not, assign a single overall account salesperson in the Salesperson field on the Billto Profile screen.
|
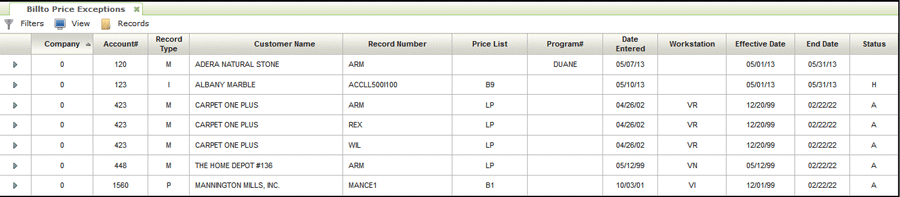
Use this screen to review and update promotional and exception pricing. You can change a customer’s default price list for specific items or groups of items. You can also display promotional pricing that the customer is eligible for and the effective dates of those prices. A pricing exception is a price list number or promotional program other than the customer’s regular price list number assigned on the Billto Profile screen.
|
The following table describes the fields on the Pricing Exceptions screen:
Field Name |
Description/Instructions |
Record Type |
Type of exceptions: C - Exceptions for an item class H - Partial Item M - Manufacturer L - Product line P - Price class I - Item Price list number exceptions are processed in the order shown above, with each more specific category overriding a more general category. Therefore, if a customer had exceptions on all levels that could affect the same products, the system resolves the price list number exceptions as follows:
|
Record Number |
The record related to the type code. For example, if type = M, enter a manufacturer code, or if type = I, enter an item number. |
Price List |
The price list to override. |
Program # |
The promotional program to override. Enter a price list number or a promotional program number, but not both on the same entry line. |
Effective Date |
Effective date; the date the exception becomes active. |
Status |
Current status of the exception: active, future, or expired. |
Associated Files
Purge Expired Price Exceptions/PROMOS - SYS 926
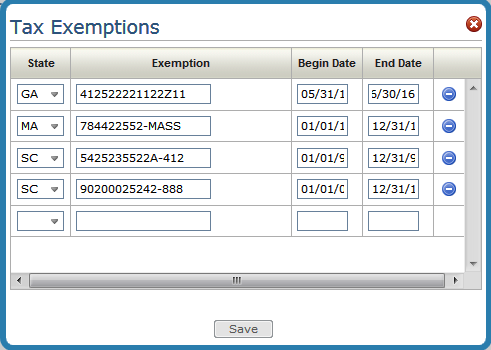
This functionality maintains exemptions by customer, by state or province, with start and expiration dates. If this file is activated, tax exemptions for each order will be checked, based upon the customer account# and the state into which the material is being shipped, or the state assigned to the warehouse from which a will-call is made. If an exemption record is found for that account and state, and the current date is within the start/expiration date span of the exemption, then the order will be considered non-taxable (tax exempt).
Associated Files:
Tax Exemptions by State/Province File Listing - SYS 606 - This option allows you to print a list of customer tax exemption numbers.
Sending Emails While in the Billto File of Navigator
Composing the email happens within the GUI. These emails could be saved as templates to be used for future mailings.
Sending out a Mass Email
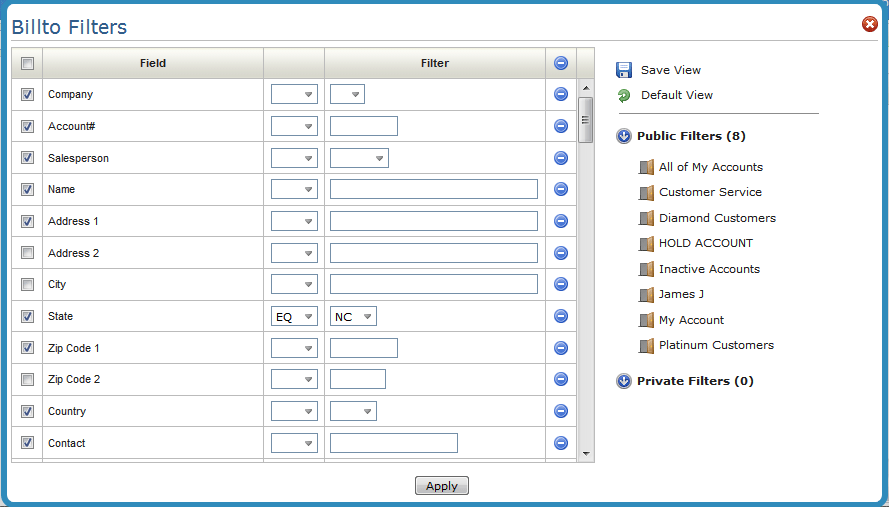
1. Access the Navigator Billto File. Use the initial filters window to display only the records you want to include in the table. In this example, we are only including records from the state of NC.
2. The new Mass Email option is in the top menu bar.
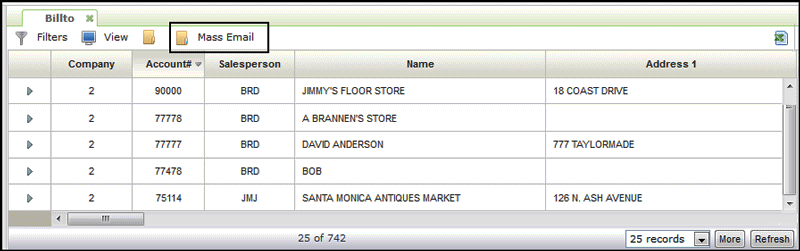
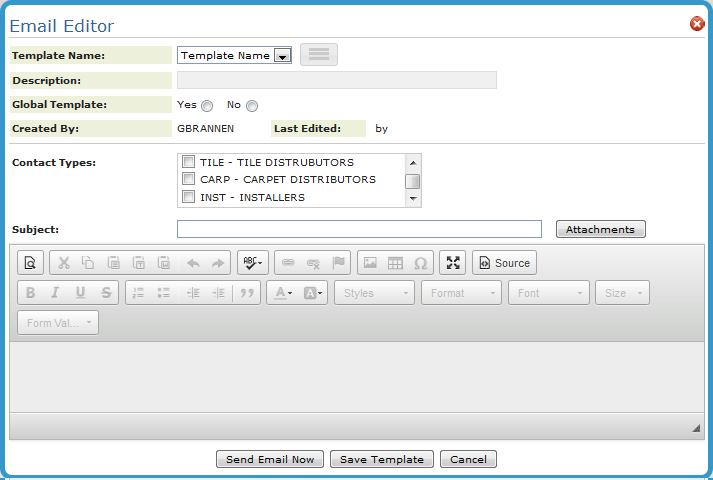
3. Click Mass Email to display the Email Editor. This is where you select the email recipients and compose the email.
Use the Contact Types to further narrow the email recipients.
Note: The options that are available on the Email Editor are based on the level of access granted via the Navigator menu and/or the F10=Email Restrictions function.
4. Select a template from the Template Name drop down menu.
5. Enter the Contact Types you want to send the email to. In this example, a mass email is being sent to the contact group INST - installers. Remember that in order for the email to be sent the contacts have to be identified as INST in the DancikContactType column in MicroSoft Outlook.
6. If you elected to make the email a Global Template, it will be available to all users and will be displayed in the Template Name drop down list.
7. Attachments size is limited to 15 mb. However, you can send multiple attachments if needed.
8. The Form Values button can be used to insert data fields from the Exchange Contact record.
The WYSIWYG email editor plugin is a 3rd party open source software called TinyMCE. It is a platform independent web based Javascript HTML editor. We cannot ensure that any specific formatting option will be rendered by email readers as desired.
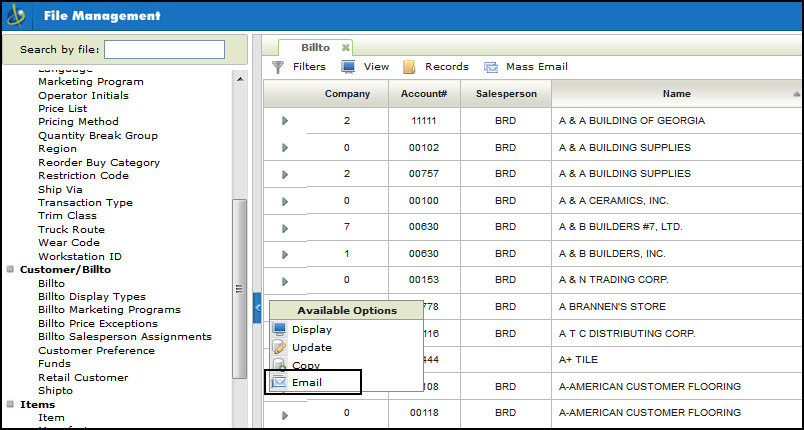
Sending an Email to an Individual Account
Use the Available Options arrow to to the left of the accounts send an email to an individual account.
Files Associated with Sending Emails
Customized Emails in Navigator (this file describes all the steps needed for sending emails in Navigator)
A spreadsheet can be created as an IFS file that contains changes or additions made to Billto files. If any Billto files are added or changed manually, via mass update, or by Dancik upload.
1. The database file can be created by use of the following calls on the green screen:
BILL05SBM - submits the job to QBATCH to be run during night jobs.
BILL05C - runs the program interactively.
Note: Anytime either of the commands are run, the current file on the IFS is replaced by the new file.
2 If you have the Roadnet software installed the BILLTOCHG.CSV file that is generated is placed in the IFS Directory: /home/Dancik/UPS/Roadnet.
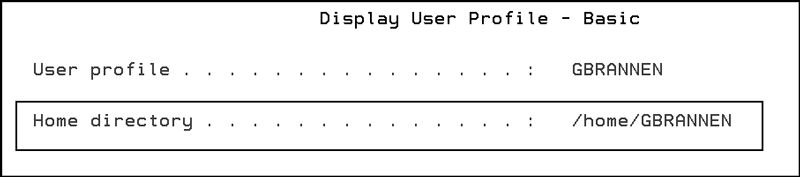
If you do not have Roadnet installed, the directory where the BILLTOCHG.CSV file is placed is defined within the User’s profile.
Access the User Profile by entering the command WRKUSRPRF (XXXX) where XXXX is the user’s profile name.
Page down to the last screen of the user profile which is where the user’s Home Directory is established.
|
An example of the CSV file is shown below.

Notes
Accounts less than 00099 and/or equal to 99999 are not included BILLTOCHG.CSVfile.
Deleted records and records flagged for deletion will not be included.
Records flagged for deletion will not be included.