Need more info or you couldn't find what you were looking for, let us know by sending an email to: support@dancik.com.
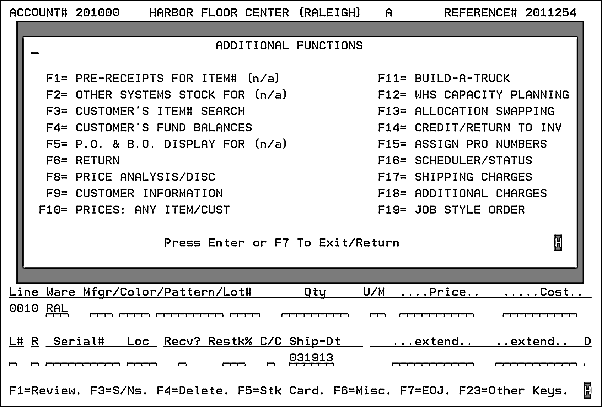
The Additional Functions Menu, displayed by pressing F24 on the Order Detail screen, displays more functions that vary from giving you the ability to check other systems for inventory to running a price analysis.
Purchase Order and Back Order Display
Assign Carrier PRO#s in Order Entry
Installation Scheduling & Order Status Update in Order Entry
Pre-receipts are receipts that have been entered or transmitted by EDI, but not yet posted. They may be in the process of being updated with locations, or filling back orders, or are simply not ready to be posted. This feature enables you to see these entries from Order Entry. This can be extremely important when specific shades, dye lots, and exact quantities are required. If the purchase order has been received, but not yet posted, you can now see the pre-receipts. This screen displays the actual shades, serial numbers, dye lots, and quantities received. If any of the pre-receipts are already allocated in the Back Order Fill Program, then the message FILLED appears on the screen. You can enter an X next to that receipt to display the customers whose orders are being filled with that receipt.
The Pre-Receipts window is accessed by pressing F1 on the Additional Functions Menu.
The figure below shows a sample Pre-Receipts Window with multiple serial numbers for item number SAI10900 in the Pre-Receipts File. The second serial number shows a status of FILLED, indicating that the serial number has been partially or fully allocated in the Back Order Fill Programs, though not yet posted.
|
Note: Using the Ware? field in the top right corner, you can limit the pre-receipts shown to one warehouse or leave the field blank to include all warehouses.
Options for Inter-Company Receipts
Inventory Receipts (pre-receive and back order fill) Menu - INB
This window can give your customer service personnel the power, within the Order Entry program, to view inventory throughout an entire supply chain. For example, with some simple EDI and the cooperation of your trading partners, you could view inventory of a ceramic tile item at other distributors who are non-competing, a master importers warehouse, and view factory inventory and production schedules from the manufacturer in Italy.
Note: Before loading another system’s inventory location into your system you need to ensure the UMs are in YOUR native UMs. If not, the UM conversions from the Packaging File will not work and/or display wrong information. The UMs can be confirmed/converted by the organization sending you the file, or it can be done on your system prior to actually loading the other systems stock information during night jobs.
The following sample window displays serial numbers from warehouses outside the system. This information was transmitted from other systems overnight, such as your suppliers or affiliates. You may convert this information to any other unit of measure by overriding the unit of measure in the upper right corner.
|
This feature is accessed by pressing F3 from the Additional Functions window( from within Order Entry). It enables you to search through a customer’s item numbers and to view your corresponding item numbers. This search is applicable only if your have set up the customer’s item numbers in the Customer Preferences File.
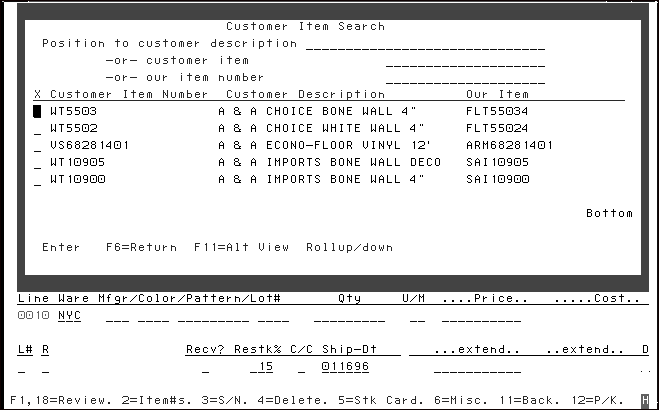
The above screen displays a customer’s item number and your corresponding item number. Select an item number by entering an X next to your choice. Following is an explanation of the fields on this screen.
Field Name |
Description/Instructions |
Position to Customer Description |
Enter all or the beginning characters of the customer’s item description (as opposed to your description) in order to start searching from that point. The search displays in the customer item description sequence. |
-or- customer item |
Enter all or the beginning characters of the customer’s item number in order to start searching from that point. The search displays in the customer item number sequence. |
-or- our item number |
Enter all or part of your company’s item number in order to start searching from that point. The search displays in the item number sequence, but will only display items for which you also maintain the customer’s corresponding item number. |
Customer Item Number |
This column displays the customer’s item numbers. |
Customer Description |
This column displays the customer’s item description unless the customer does not have a different description than your company uses. |
Our Item |
This column displays your company’s item number. |
The cross reference for a customer’s version of your item numbers is maintained in the Customer Preferences File. Once established, you can enter the customer’s item number in Order Entry and it will immediately translate to your item number.
System Wide Setting - Options to Enable Keyword Search
This feature, accessed by pressing F4 on the Additional Functions screen, displays balances, and optionally detail, for funds your company maintains for each customer. Funds contain dollars and/or points which are being accumulated for special use, such as toward a trip or promotional event. Funds are very much like bank accounts, where your company is the bank and the customer is the depositor. This screen can display the total of all funds for a customer, individual funds, sub-groups of funds by fund type, and month-by-month deposit and withdrawal history. When the screen is initially displayed from Order Entry it displays the accumulated totals of all funds for that customer. You can specify marketing programs or fund types to show more specific fund balance information.
|
This screen displays the amounts accrued for each fund based on the invoices generated. This screen does not consider whether or not invoices have been paid.
Following is an explanation of the fields on this screen.
Field Name |
Description/Instructions |
Co#/Account |
The customer’s company and account number. |
Mktg/Pgm |
You can specify a marketing program to display balances for that specific marketing program and customer. Enter a question mark (?) to display a list of marketing programs. |
Fund Type |
Enter between one and five fund types to show a composite total for funds with these types. |
Year |
Enter the year to be displayed. This default is the current year. |
Opt |
Enter one of the available option codes in this field. M indicates to display the marketing programs included on that monthly figure. Other options are available depending on the screen being displayed. |
Month |
The balance forward from a prior year or a specific month. |
Dollars |
The total dollar amounts credited or debited to the fund(s). |
Balance |
The running dollar balance of the fund or group of funds. |
Points |
The total points credited or debited to the fund(s). |
Balance |
The running points balance of the fund or group of funds. |
Totals |
The current totals and comparison to goals of the funds. |
Opt |
This area shows the options currently available for entering into the OPT column. |
The F9 key displays the paid versus unpaid fund contributions. It also shows the total funds and the total fund points split into paid and unpaid.
|
The example above shows that $20.05 of the total accrued funds on the previous screen remain unpaid by the customer.
You can press F9 again to display the unpaid invoices that contain these accrued but unpaid funds.
|
This screen can help answer customer inquiries about paid and unpaid invoices. The purpose of this display is to see if any funds are accrued on unpaid invoices, so that collections are made before allowing the fund to be utilized by the customer.
This feature gives your customer service personnel a tool to answer questions from customers about funds. They can also see how much of the fund is unpaid (meaning how much is included on invoices that the customer has not paid).
Note: The amount of the invoices does not relate to the funds. The invoice amounts include the funds, but also include the entire invoiced amounts & materials. In the example above, the three unpaid invoices displayed include a total of $20.05 in unpaid funds, plus a total of 25 points on unpaid invoices.
These screens agree with the Fund Analysis Report, as long as the report is run for a date span that relates to the fund balances shown on these screens.
From this screen, you can enter option I in the appropriate Opt field to view the invoices.
Promotional Pricing File - FIL 30
How to Add / Deduct to Fund Balances/Marketing Programs (Points)
How to reduce Point Fund Balance
How to manually enter a fund to an order
How to research pricing situations - promos, rebates, funds, etc
Funds from invoice not moving into fund file for a specific account
Purchase Order and Back Order Display
This screen displays a unique view of purchase orders and back orders for the requested item. The screen displays alphabetically by warehouse code with the option to go directly to any warehouse. For each warehouse, the screen shows all purchase orders for the item, followed by all back orders, and a net quantity available. The net quantity available is the difference between the purchase orders and the back orders. This is also referred to as the “future available”.
This screen is unlike the Order Entry Stock Card Screen because the Stock Card Screen shows one warehouse at a time and shows both current and back orders. Both screens show different, but important information. You can enter a warehouse into the Position To Ware field to go directly to that specific warehouse. Grand totals are displayed after all warehouses have been displayed.
This screen also accepts crossover items. These are items that display their parent item inventory.
Press F5 from the Additional Functions Window to access the Open Purchase Orders and Back Orders Screen.
|
The following notes apply to this screen:
All purchase orders are shown with a two-character status code beginning with P. All customers back orders are shown with a two-character status code beginning with C.
The Ord/PO# column shows purchase order and customer order numbers.
The column Customer/ETA displays as follows:
— If the line is a customer order, the customer’s name is displayed.
— If the line is a purchase order, the ETA is displayed.
Navigator - Additional Item Information
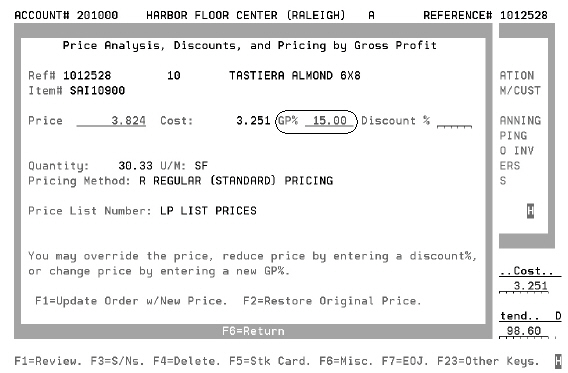
By pressing F8, from the Additional Functions Window, you can access the Price Analysis Discount Screen.
Note: You have to be on a line that has already been entered. If not you will get the error message “ Update Invalid. Reference/line does not exist”. On the Order Detail screen, use the F11 function to move backward through order lines.
|
The screen allows you to:
Apply a discount percentage to a specific line item.
Calculate a price based on a targeted gross profit percentage.
View the description of the price lists, restriction codes, promotions, and funds that make up a given price.
View GP% of a line item when a price is discounted or overridden.
Update a line item’s price based on these options.
Override the price of a line item by reducing or increasing price or by entering in a discount or new GP percentage (%).
When the Price Analysis, Discounts and Pricing By Gross Profit Screen is first displayed, the screen appears as shown above. If the user is not permitted to see cost in Order Entry, then the GP% and Cost fields are not displayed. The input fields and functions keys are described in the tables below.
Field |
Description |
Price |
The price is displayed here. You can override it, or you can restore the original price, after it is overridden, by pressing F2. You can alter it by manipulating the other input fields. |
GP% |
The GP% is displayed here. You can override it, which recalculates the price. |
Discount% |
The discount% is always set to zero when the screen is first displayed. Note: This field is completely separate from the header discount% field. You can enter a discount%, which recalculates the price and GP%. |
The following example displays the effect of a 15% discount on the figures shown in the previous screen.
|
The 15% discount caused the Price and the GP% fields to be recalculated. The discount is applied against the price, and then the GP% is recalculated based on the cost and the new lowered price.
The following example displays the effect of changing the GP% field to 15%.
|
Changing the GP% causes the program to calculate the price that would result in a 15% GP, based on the cost of 3.251 per SF.
The Customer Information Window enables customer service to view customer information from within the Order Entry program. The window displays the customer’s salesperson or salespeople, default ship via, truck route, county, tax codes, comments, phone number, and special instructions.
From any Detail Line Item Screen in Order Entry, press F24 followed by F9 to display the Customer Information Window.
The screen below displays an example of the first page of the Customer Information Window.
|
This example shows a customer who has multiple salespeople based on item class and manufacturer. This screen also displays the customer’s name and city, Billto File comments, the customer’s special instructions, and other information from the customer’s file.
Navigator - Customer Information
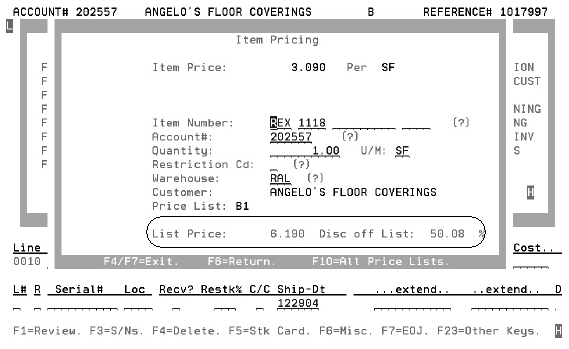
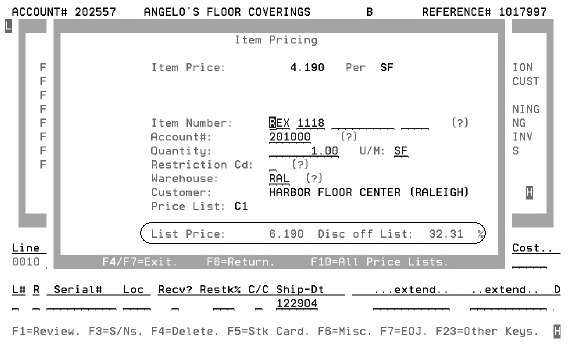
The Item Pricing screen enables you to view prices for any item or customer from within the Order Entry program. This feature can be helpful if working with contractors or builders who refer retail customers to your showroom. Often, while placing their orders at contractor or builder prices, they ask for the retail price quoted to their customer. This program is also useful whenever a customer wants you to compare their price to your list prices.
1. Press F10 on the Additional Functions menu to access the Item Pricing screen for the item entered. The Item Pricing screen for the active account and item appears. You may change the item, account, or other parameters, or just press Enter to calculate prices for that customer and item.
|
2. Press Enter to display the price, plus the fields, List Price and Discount off List Price (customer’s discount).
|
3. Change the item number, account number, quantity, and/or other fields as needed, and press Enter again to recalculate the customer’s price, the List Price and Discount off List Price fields with the new item pricing information.
On the following screen, the item number was changed.
|
The next example shows how the screen updates when the account number changes. Compare the List Price and Disc off List fields to the ones shown earlier.
|
The Item Price, shown at the top of the screen, is the price for the selected customer and quantity.
The bottom of the screen shows the item’s overall List Price and discount off the customer’s price list. If the customer’s price list is the same as the list price, the discount is 0.00%. If the customer’s price is half of the list price, the discount is 50.00%.
Note: If a price is affected by a fund contribution, the fund information (fund contribution, total price with fund contribution, and promotion program number) is also displayed.
The All Prices Inquiry program enables you to view all available prices for an item, and depending upon user authority, all costs, and gross profit percentages. The “All Prices” Inquiry is available within Order Entry, via the “Prices: Any Item /Cust” Program and within Quick Quoter, via the F10 function.
1. Press F10 on the Item Pricing screen to access the All Price Lists screen.
|
The All Price Lists screen shows the price for the requested item, quantity, restriction code and warehouse, in every available price list.
Note: This screen may be disabled for certain users, by options in the CTRLUSER screen.
In the example above, the price is shown for 1 SF of SAI10900 in each of the price lists available on the system. Because the user has the authority to see cost, the costs and GP% are also shown. Users not authorized to see costs will not see cost or GP% on these screens.
2. Press F10 again to display the All Prices display:
|
The All Prices screen shows every regular price within the system, including all transaction types, restrictions, quantity breaks, and price lists.
In the example above, some price lists contain multiple prices. The Architectural Price List (A1) has one price up to 99, and another price over 99. Price List A2 has only one price. Price List B1 has several prices based upon inventory versus direct ship, and quantity breaks.
3. Press F10 again, if you are authorized to view costs, to display the All Costs Screen as shown below:
|
Note: The All Costs screen is only available if you are authorized to see costs in Order Entry.
The All Costs display shows all costs as stored in the Cost or Item files.
4. Press F6 to return back through each pricing screen.
When issuing a credit to a customer, you can credit the customer for the item that was invoiced, and adjust inventory for another item, as when the problem was the shipment of an incorrect item. Which provides much more control of inventory restocking when processing a credit. For example, you can flag inventory as damaged or assign it a different serial number before putting it back into inventory. Additionally, you can instantly update inventory from within Order Entry, allowing for immediate resale of returned goods.
1. From the Order Change program, access a credit memo that was entered using your company’s normal procedures.
2. From any detail line within the Order Entry program, press F24 to display additional functions.
3. Press F14. The system issues a warning if your return to stock code is set to Y.
If you choose to continue, the Quantity to Return to Stock screen appears. The order number and line number are passed from the order program to the new Inventory Return screen. This helps to prevent you from double receiving the inventory.
|
4. Complete the Enter receiving warehouse (required), Returning item (required), Serial # (required), Shade, Loc, Status (serial status) and Qty returned fields, and press Enter.
5. When you see the Adjustments Validated message, press F7 to Continue. You return to the Order Change Additional Functions screen. The inventory is now updated, and appears on all inventory screens.
|
6. To verify the transaction took place, look for an inventory adjustment with an N code.
|
Note: To run the report to reconcile all credits returned via this process, you can run an Inventory Register for all N adjustment transactions.
Examples of Usage
You can use this program to return stock to a different warehouse than the credit billing is booked to.
You can receive to specific bin locations, and multiple bin locations.
You can receive to an altered serial number, shade, or status, and set status to I for “inspection.”
These returned serial numbers are immediately available for sale, even from your current Order Entry session.
Assign Carrier PRO#s in Order Entry
This function, accessed via F15=Assign Pro Numbers on the Additional Functions menu, enables you to record a Common Carrier's Pro# while in the Order Change program.
Note: The Pro#s updated in this program are visible in the Order Inquiry program, by pressing F12 twice, or from the Manifest/ Bill of Lading Inquiry screens.
|
To view or add pro numbers to order items from the Manifest & Bill of Lading window
1. On the main menu, enter option 4 - Customer Service.
2. From the Customer Service menu, enter option 13 - Update Order Status & Shipping Data.
3. On the Order/Shipping Status Update screen, enter the Order #, and press Enter.
4. On the Open Order File/Status Update screen, press F12.The Manifest & Bill of Lading Data window appears.
|
5. Press F1 to add a Pro Number.
6. Enter a Pro Number, and press Enter to assign this pro number to the line. Enter the Pro# on the first line and then press F13 to assign the number to all of the line items in the order.
7. Press Enter to confirm the assignment of pro numbers, or F4 to cancel the assignment and return to the previous screen.
8. To view the Pro Numbers press F11 - Alternate View.
To view, add, or change pro numbers to order items from the Bill of Lading/Manifest/Drop Inquiry
1. On the main menu, enter option 10 - Warehouse & Delivery.
2. On the Warehouse Functions Menu, enter option 19 - Bill Of Lading/Manifest/Drop Inquiry.
3. Enter the Order Number and press Enter. If any manifest, bill of lading, or pro number information exists for the order, the inquiry screen displays. If not, a window appears stating that no manifest records were found.
Note: Manifest records are created automatically by the system whenever a shipping program issues any type of tracking number, including a Bill of Lading number, a Manifest number, or a Pro#.
4. If you want to add Pro#s, you may proceed by entering Y and pressing Enter. The Assign Pro Number to Item window appears showing the order lines.
|
5. Enter a Pro Number for the appropriate line. Press Enter to assign the pro number to one line only, or enter the Pro# on the first line and press F13 to assign the pro number to all of the lines. A message appears saying “Pro Numbers Assigned.”
Installation Scheduling and Order Status Update in Order Entry
The Additional Functions menu in Order Entry and Order Change (accessible from any detail line via F24) includes the function: F16=Scheduler/Status. This function enables you to perform three distinct functions:
Access and update Installation Scheduler data, including setting dates, status, teams, etc., for installation & measurements.
Update order status codes of specific lines, in order to indicate special statuses such as “ready to pick” or “already taken at counter”.
Print pick/ship labels for items, primarily intended to label items being taken from counter.
1. From an order entry detail line, press F24 (Shift and F12). The additional functions window appears.
2. From the Additional Functions screen, press F16 to update status codes and/or installation information. The Installation Scheduler & Shipping Status Update screen appears.
|
This screen displays and updates data that is linked to the Installation Scheduler program. The Installation Scheduler enables you to communicate with measurement and installation crews to schedule work and update installation information.
Note: Refer to the Installation Scheduler for information on how to set up and use the web based portion of the Installation Scheduler.
3. For the sake of this example, we will assume that the customer needs measurements and installation. Enter a Y in the Measure and Install fields.
4. Enter the measurement team and installation crew in their respective fields. If you are unsure what the codes are, place a ? in the field and press Enter. A listing of all the measurement and installation teams will appear.
Note: Depending on your system configuration, when you enter the Installer most of the other fields will populate with default information.
5. Assign a Measurement status. Status codes used by the system are:
U - Unmeasured
S - Scheduled
M - Measured
R - Ready to Install
6. If the customer requests an measurement date, enter it into Requested measure date. This date will be relayed to the measuring crew for coordination purposes.
7. You can update the status code of lines on the order to certain statuses that are allowed to be updated within Order Entry.
You can request a “cash and carry” ship label for any lines by entering Y for a label. These are bar-coded labels that may be attached to the cash and carry items.You must first configure your label styles and printer(s). The following hardware and software settings must be in place to utilize the cash and carry labels:
Zebra bar-code label printer at counter
Control panel must have an entry indicating the printer ID for the Zebra printer
Label style must be selected by your system administrator
8. If you want to add notes or update information about a specific line item for installers, enter X beside the line item, and press Enter. The Areas and Notes for Detail Line screen appears.
|
9. The following table describes the fields on the Areas and Notes for Detail Line screen.
Field |
Description |
Install Status |
Installation status; possible codes are: U - Uninstalled, S - scheduled, or I - installed. |
Closet |
Indicates whether a closet is included in the installation. |
Install Group |
Identifies the group performing the installation. |
Install Team |
Identifies the team performing the installation. |
Areas |
Identifies where the installation or measurement is to occur, for example living room or kitchen. Enter ? to see a list of areas. |
Notes |
Information specific to the item or product being installed. For example, “sub-floor may need repair”. |
10. Press Enter to submit your entries.
|
11. To add notes about the installation or measurement for the order, press F9. These notes only apply to the measurement or installation.
The F16=Scheduler/Status within the Additional Functions screen of order entry supports the updating of certain status codes on detailed line items. The two main business cases for this are as follows:
Change specific lines to status “L” (Released for Picking) or to a status code with similar meaning in your operation, so that when the picking list is released or printed, the “L” lines are notated. This may be used in conjunction with the Partial Pick list feature, or with the system-wide setting “Options for Pick Lists”.
Change specific lines to status “Z” (taken at counter) or to status codes with similar meaning in your operation. When an item is taken by a customer right from the counter, you may want to change that line item to a status that will automatically be invoiced by the “Invoice by Status Code” system. Most Dancik system users invoice lines at “S” because “S”=shipped. It is recommended that you do not use status “S” for “taken at counter”, although this is still an option. If you create a new code, such as “Z = taken at counter” then you should amend your invoicing procedure to also pick up lines at status Z (as well S).
The next three screens show the process of updating a status code.
The first screen displays the order. In this example, the customer will take a trowel from the counter.
|
Press F24 to access the Additional Functions Menu.
Select option F16 - Scheduler/Status and the next screen appears.
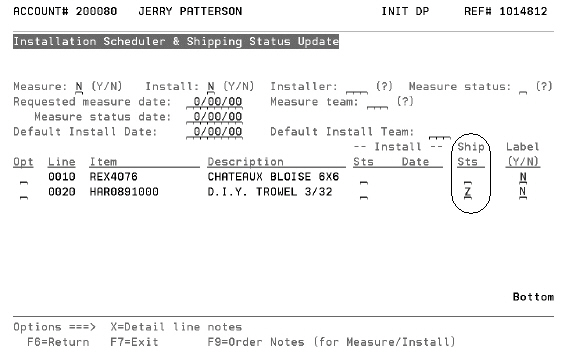
|
The Installation Scheduler and Shipping Status Update Screen allows you to change status codes via the Ship Sts field.
In this example, the customer is taking line 0020 (the trowel) from the counter. The user updates the status of that line to “Z” which means “taken at the counter”.
“Z” is user-defined. You can use “Z” or another status code for this purpose. This feature may be further enhanced by using the “Options for Pick Lists” in the System-Wide Settings. You can set the pick lists so that the warehouse knows to not pick lines at status “Z”.
If you use the “Z” code for “taken at counter”, remember to invoice lines at “Z” status, just as you would invoice lines at “S” status. User-defined Order Status codes (such as “Z”) are defined using the Order Status Codes program on the System Settings menu.The program only allows users to enter status codes that are approved, based upon entries in the System-Wide Settings for “Order Status Code Changes in Order Entry”.
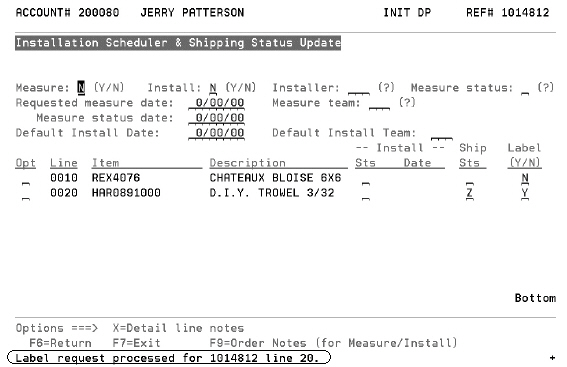
The F16 - Scheduler/Status can issue cash and carry labels. These are bar-coded labels that may be attached to the cash and carry items.
|
The following hardware and software settings must be in place to utilize the cash and carry labels:
Zebra bar-code label printer at counter
Control panel must have an entry indicating the printer ID for the Zebra printer
Label style must be selected by your system administrator
The customer is taking line 0020 (the trowel) from the counter. The entry above updates the status code to “Z” (taken at counter) and requests that a cash and carry label is printed.
Shipping Charges by Zip Code Table
This function (F17) on the Additional Functions (F24) menu within Order Entry and Order Change accesses the Shipping Charges table. You can use this table to quickly and easily inquire into and select freight or shipping charges. When the shipping charges table is accessed via F17 on the Additional Functions menu, and a shipping charge is selected, it is then added as an F6 miscellaneous line on the order.
1. Press F17 to access the Shipping Charges By Zip Code Table.
|
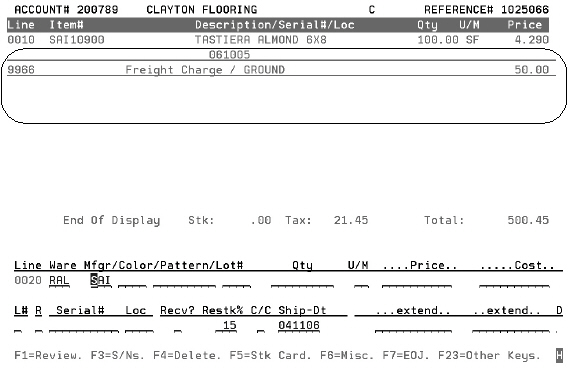
2. Notice that the shipping information (weight, units, price, etc.) for the order is included. The weight shown is the total weight of the order. The units shown are the total SF, SY, or M2 of the order, and the dollars shown are the total prices of the line items of the order. Select a shipping service and press Enter. The shipping charge is added to the order as a 9966 (freight) charge, or on a line number that you can specify.
Note: You can change the weight, units, and dollars as needed. For example, if the weight displayed is for the entire order, but you need to find a shipping charge for only a single line on the order, you can change the weight to the weight of the single line.
3. After selecting a shipping charge, it is added to the order as shown below.
|
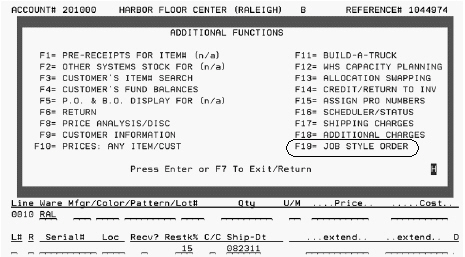
A “job style” order only lists a single job and omits the underlying line-item details. For example, a job can include several products, plus various services, freight, labor etc. On regular orders, all line items are listed, followed by a total. A “job style” order lists just a description of the job (to whatever level of detail you want to include) and an overall job total. Job style orders are controlled by the special J* F6 Miscellaneous prefixes.
1. On the order detail line in order entry, press F24 to access the Additional Functions screen. Select option F19=Job Style Order.
|
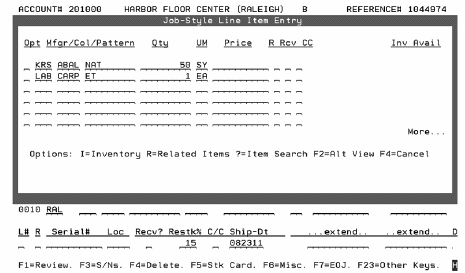
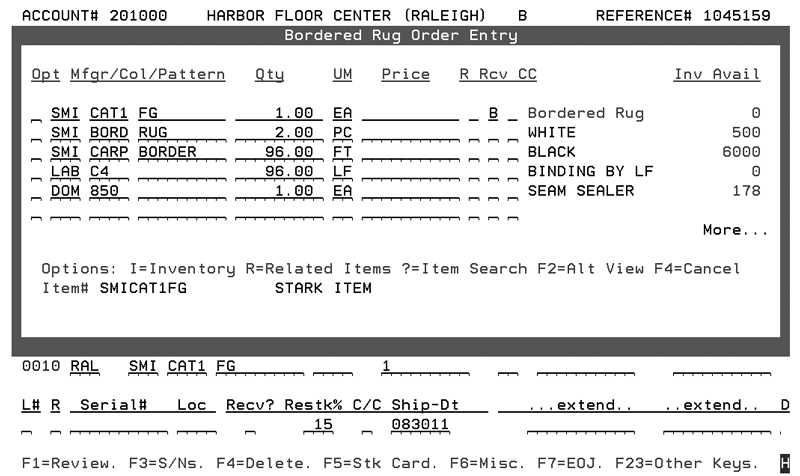
2. The Job Style order entry screen works very similar to multi-line order entry allowing you to enter items, quantity, etc.
|
3. The following options are available:
I - Check inventory details about a specific item. The inventory window displays availability by serial number within each warehouse. Inventory Available (Inv Avail) is defined as: onhand inventory - (allocated + held inventory), excluding back orders. It is displayed using the native UM.
R - Shows material that is related to an item. This option can be used to replace items that do not have any inventory on hand.
? - To search for and add items enter a “?” next to any empty line. The Item Search is displayed. Search for and select an item to include it in the job style order.
F2 - If you want to display the items differently (expand the description), press F2. The screen shows the full item descriptions.
4. The R field indicates a restriction and is used primarily for rolled goods. Some codes include:
C = cut
M = mid price
R = roll
B = roll balance
This field relates only to the price required, except for B which also automatically changes the quantity to be equal to the balance of the serial number selected. A B provides the roll price and takes full remaining quantity of the selected serial number. An R gives the roll price even if the quantity is for a cut. A C gives the cut price. An M gives the mid price.
5. The Rcv setting provides information about how the item is received or handled. Valid codes in this field include:
Y - Add the quantity back into inventory. Can be used for credits or returns.
N - Do not adjust inventory
B - Used for back ordering an item that is not in stock at this time.
T - Transfer a T in this field. This option prevents warehouse personnel from attempting to pull from stock at your warehouse. They will know to expect a transfer. The T also causes this item to appear on the Transfer List at the warehouse that has this material whose warehouse number you should have entered on this line.
6. CC indicates the credit or commission code. This field is primarily used for credits. Each code represents the reason or category of the credit. These codes are user-defined in the Classification Codes File. You may also use this code to identify unusual sales for the sake of adjusting commissions, and for sales analysis. For example, you could define code Z as the blow out price indicator for low or negative gross profit sales. These sales are highlighted on daily registers and can be separately analyzed on many reports and screens. This field is also a Commission Exception File field, which means that the commission system can be set to adjust commission for these lines accordingly. Some example codes are:
P - Pricing Error
S - Shipping Error
Y - Blow Out 3%
7. After entering all the items, press Enter. If you have ISO activated, the next screen presents ISO inventory selections.
8. Press Enter to accept ISO’s selection and proceed to the Job Style Order Variance screen.
|
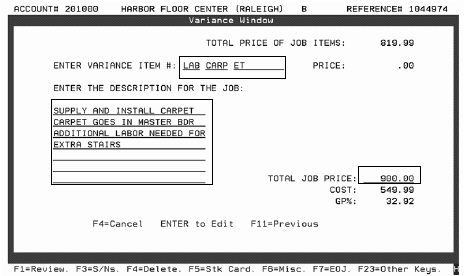
9. This screen allows you to override the price (on labor items only) and to provide a description for the job. The description lines are created as J* (job style) messages which means the messages will print on related documents.
Note: Only the J* comment lines will print on documents. Detail lines will not print.
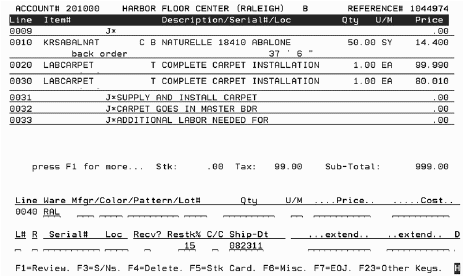
10. Press Enter to refresh the screen into edit mode and make the necessary changes. In the following example, a Variance Item number (only labor items can be entered as variance items) was entered, the Total Job Price was increased to 900.00 and a few comments were made.
|
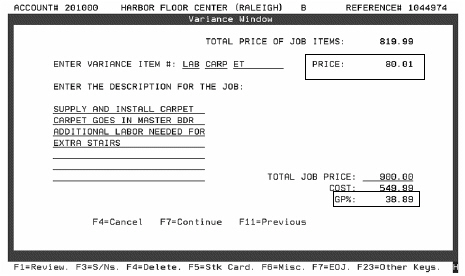
11. Press Enter. The system calculates the variance price and recalculates the GP%.
|
12. Press F7 to generate the Job Style order lines group and return to the order detail.
|
Note: When an order grouping gets to this point it cannot be changed. If changes are required, the grouping has to be deleted and reentered. Additional order groupings can be entered.
Inventory lines are automatically entered as if multi-line order entry was used.
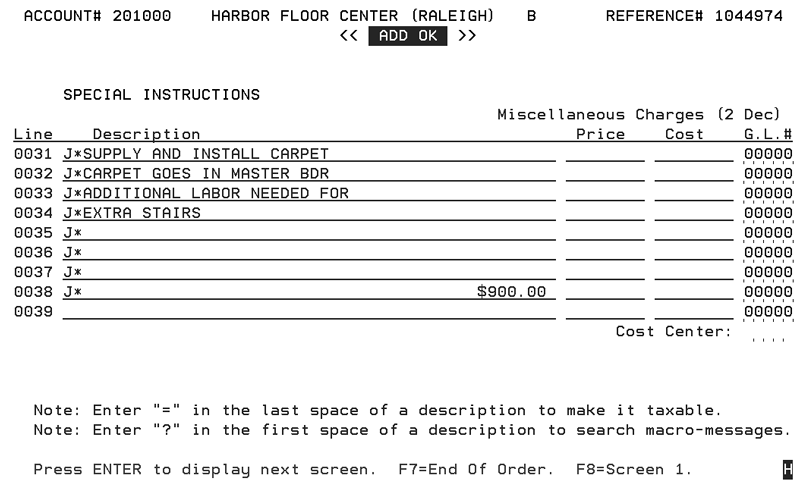
13. After the last inventory line, the job style order entry feature automatically enters the job descriptions and the job price supplied on the Variance screen. The total price of the job group is placed on the eighth line of the groups F6 Miscellaneous Comments screen. This leaves the ninth line free to start another group if needed.
|
14. Multiple order line groupings can be entered on one Job Style order. Try to avoid starting a new order grouping in the middle of a series of already used order lines. This can result in the over typing of order lines.
The price shown in the example above ($900.00 on line 38) will appear in the Price column on printed order acknowledgments.
Order Acknowledgements and Invoices
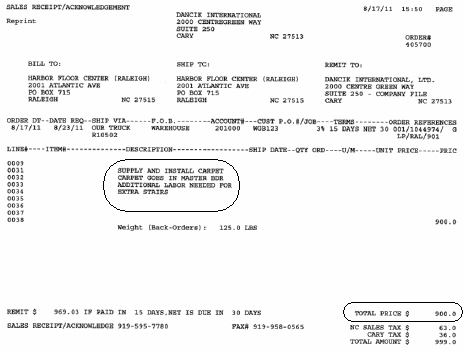
These documents reflect the printing of the price from the comment lines and include the message lines, but no inventory lines. An example order acknowledgement is shown below.
|
As displayed above, the J* messaging convention prevents any comment lines on orders that are not proceeded with J* from printing on customer facing documents. Detail order lines will not print on orders that use the J* convention.