|
Need more info or you couldn't find what you were looking for, let us know by sending an email to: support@dancik.com.
Installation Scheduler
Configuring the Installation Scheduler
Installation Scheduler Set-up Options
Installation_Scheduler_Order_Maintenance_-_INS_20
Master_Installation_Schedule_-_INS_31
Available Install Dates and Teams_-_INS_32
Web_Installation_Schedule_Calendar_-_INS_30
Other Parts of the System that interact with Installation Scheduler
The Installation Scheduler consists of a web-based calendar program and a core system based set of entry screens integrated with Order Management and Customer Service.
Installers can enter sub-contractor data and use this information to determine the next available installation date for each line on order. The daily work schedule can then be reviewed and manually updated, if necessary. Information from FLOOR VISION for measurement and installation orders and the Installation Scheduler automatically update each other. Because this is a web-based application, it can be accessed through any Internet connection.
The Installation Scheduler works with your process as follows:
When a customer service representative takes an order, and enters a Y in the Measure and/or Install fields, the order information automatically goes into the Installation Scheduler. The installation company (or installation employees) can see and make changes to the schedule from either the web-portal or the core-system screens.
An order can consist of more than one product. One measurement crew can measure for several products, but separate crews can install the different products for the order.
For Install Only orders, when the measurements are already known the measurement step may be skipped.
For Measure Only orders, the installation step can occur in the future or not at all.
Configuring the Installation Scheduler
To set up the Installation Scheduler, you need to do the following, in this order:
Set up a presentation scheme
Set up installers
Set up installation teams
Setting up users for the web portion of the Installation Scheduler.
Note: Contact Dancik support for requirements regarding the web portion of the Installation Scheduler.
TCP/IP networking
iSeries Web (HTTP) server
Net.Data access
Presentation settings for web pages
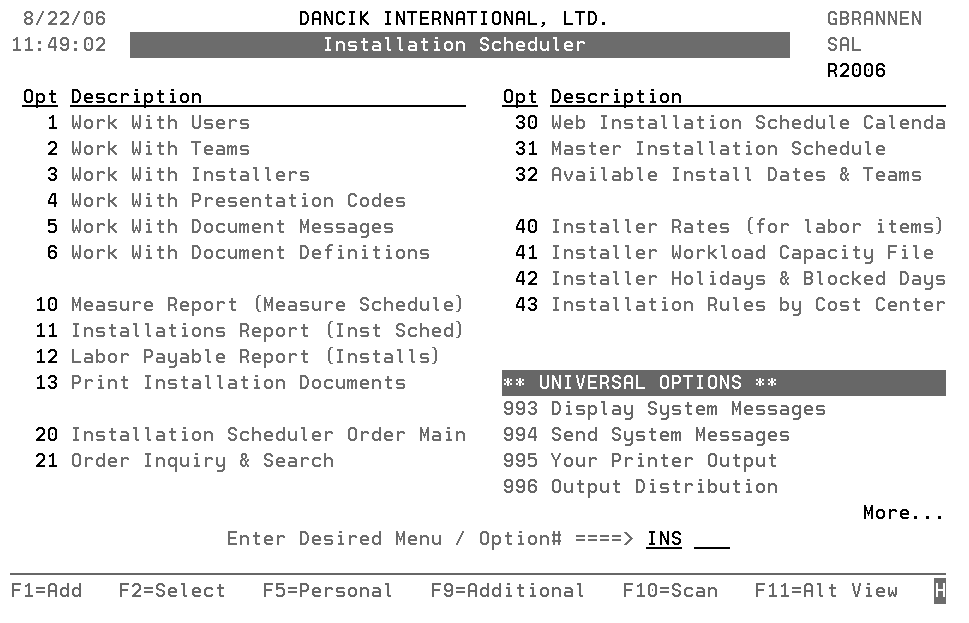
Access the INS menu by entering INS on the Option line in the Dancik menu system.
|
Installation Scheduler Set-up Options
Working_with_Installers_-_INS_3
Working_with_Presentation_Codes_-_INS_4
Work_With_Document_Messages_-_INS_5
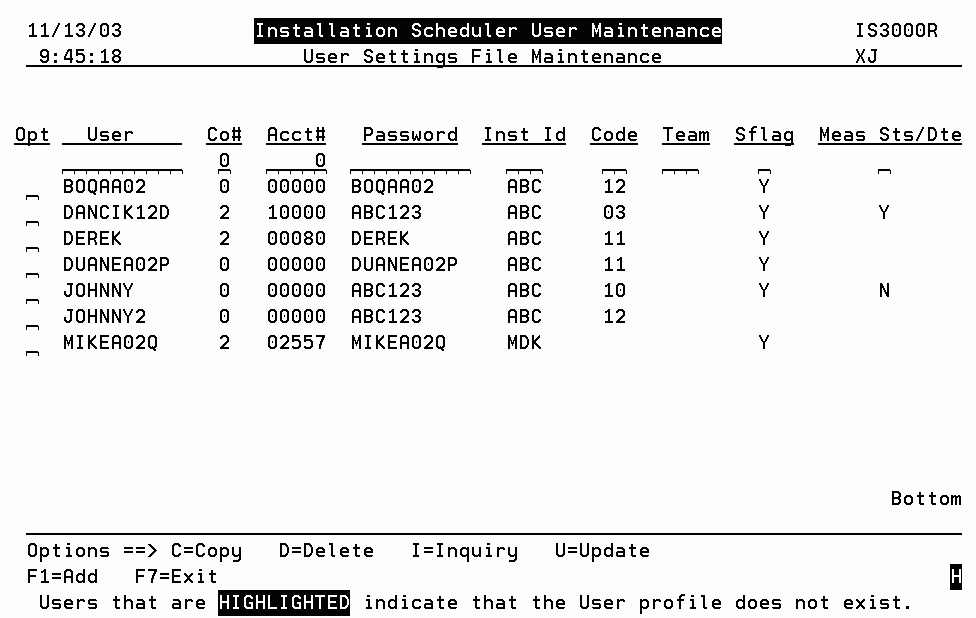
1. The first step is to establish the people who are going to be entering information into the web based Installation Scheduler. These are the main users of the system. To set them up, select option 1 - Work With Users. The User Settings File Maintenance screen appears.
|
2. From this screen, new user information can be added, inquired on, updated, or deleted. Since adding a new user encompasses almost all of the functionality of this screen, let’s add a new user. Press F1 to access the Create New User Settings Record.
3. Enter the new user’s name and press Enter.
Note: The name entered has to be already established in your core system. If you enter a user name that is not on your core system, you will receive an error message.
4. The system refreshes to display the User Settings File Maintenance screen with the new user added.
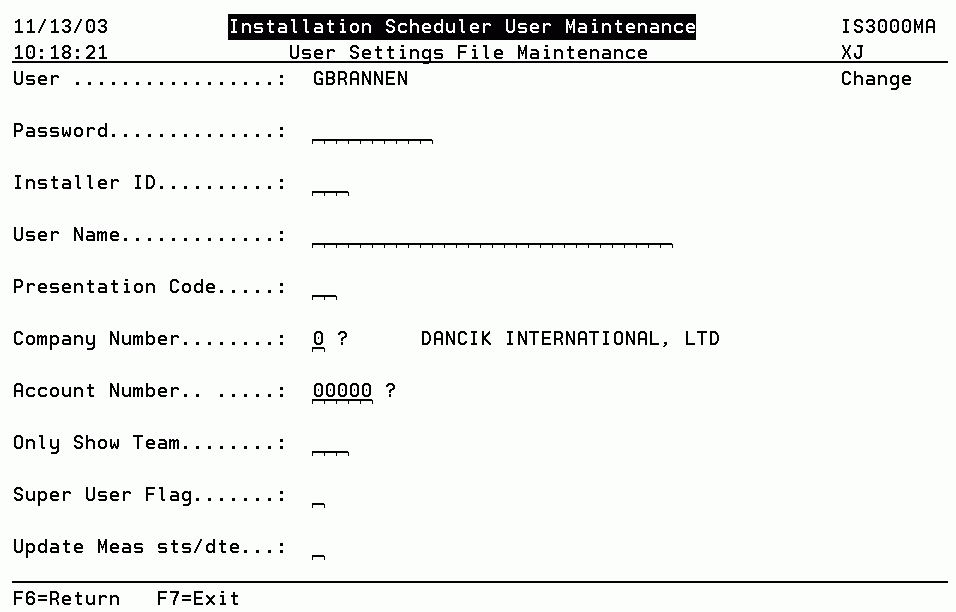
5. At this point, the new user does not have any settings entered. To establish the settings, enter a U in the Opt column to the right of the new user and press Enter. The screen that appears contains all the applicable settings.
|
Setting |
Description |
Password |
Establishes the password for this user. This is the password the user enters to access the web-based Installation. Note: Passwords cannot contain special characters such as #, $, &,@, etc. |
Installer ID |
Enter an ID to limit this user to one installer. If you enter an installer ID, do not enter a company or account number. You have to set up the User Settings by entering either an Installer ID or company and account number. |
User Name |
The full name of the user. |
Presentation Code |
You can enter a Presentation Code. If you do, it overrides the default or the one specified on the Presentation Scheme screen. |
You have to set up the User Settings by either Installer ID or company and account number, but not both. If you are setting up your users to access the Installation Scheduler by company and account number, entries are required in both the Company Number and Account Number fields. However, you should not enter an Installer ID. |
|
Company Number |
This is the company that the user works for or is assigned to. The user is limited to only working with the company enter here. To access a listing of all the available companies enter a “?” in the field and press Enter. |
Account Number |
If you enter an account, the user is limited to working only with that account. |
Only Show Team |
If you only want this user to access information concerning one installation team, enter that team code here. For example, you can limit a user if he/she is a member of an installation team to only view information concerning his team. If this field is left blank, the user has access to all the installation teams on your system. |
Super User Flag |
Enter Y to give the user, such as a customer service representative, full updating and scheduling capability. Enter N or leave blank if you only want the user, such as an installer, to schedule installations and change the status of unscheduled installations. |
Update Meas sts/dte |
Enter Y or N to grant or deny the user the ability to perform status or date updates. |
Installation Scheduler lets you configure teams within an installation company based on expertise. For example, you can create a carpet team or tile team composed of personnel skilled in installing those products.
1. On the INS menu enter option 02 - Work With Teams.
The Team Settings File Maintenance screen appears. These installation teams are set-up and maintained through the Team Settings File Maintenance screen. Installation teams are organized by Installation Companies. Each installation company can have several teams.
2. From this screen, you can create, update, inquire on, or delete a team.
3. To add a full team name, assign a company to the team, and to automatically change the measure status to S (scheduled) when this installer and team is used, enter a U in the Opt column and press Enter. The Team Settings File Maintenance screen appears.
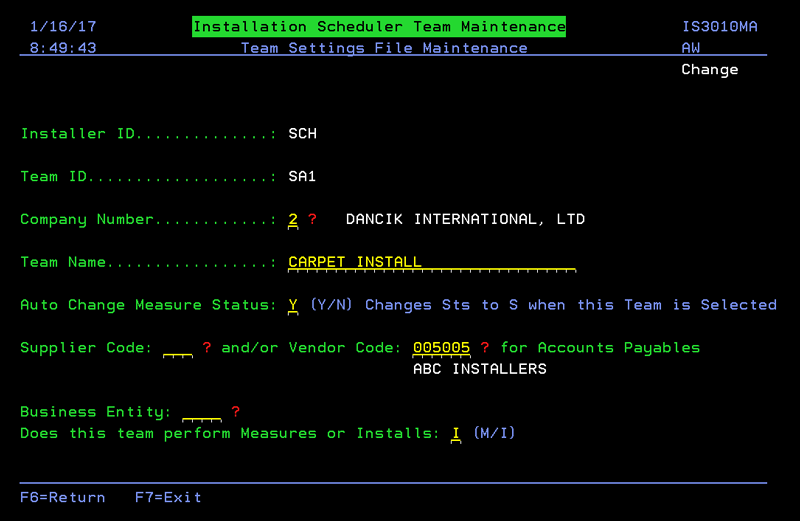
4. The fields on the bottom of the screen allow you to cross-reference this team to a supplier, vendor, or Business Entity.
Supplier Code ____ and/or Vendor Code ___ for Accounts Payables - You can cross reference each installation team to the supplier and/or vendor codes that represent these teams within accounts payable. These codes help you to reconcile the cost of labor to AP. When you enter the invoice from the installer into accounts payable, the system matches the AP supplier or vendor to the cross-referenced installation team. You can use one or both fields.
Business Entity - Business Entities are groupings of companies, branches, and/or cost centers. Use this setting to assign installation teams to a particular business entity. In this example, the installation team has been assigned to the New York City branch only. This installation team will not be considered for jobs in other branches.
Does this team perform Measures or Installs - M = The team only appears in the list of Measure Teams found in the Measure workflow. I = The team only appears in the list of Install Teams found in the Install workflow. This value determines the list of teams available in the Install Team to Measure Team list on the Measure Report.
Working with Installers - INS 3
The Work With Installers option lets you build a database of installers. You can assign default measurement and installation teams as well as other installation settings.
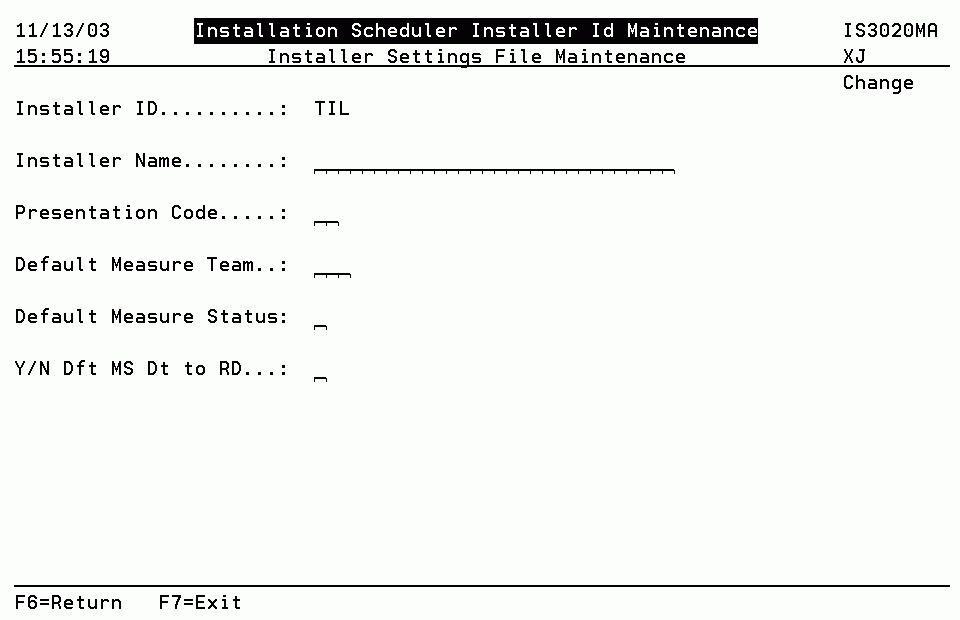
1. On the INS menu, enter option 03 - Work With Installers. The Installer Settings File Maintenance screen appears.
2. From this screen you can create, update, inquire on, or delete installers. Press F1 to add a new installer.
3. Press Enter to activate the new installer into the system, and then F6 to return back to the Installer Settings File Maintenance Screen. The new installer is displayed.
4. To configure the new installer, enter a U in the Opt column and press Enter.
|
Field |
Description |
Installer Name |
The full name of the installer. |
Presentation Code |
This is the code that establishes the background, text, and other elements of the web based site. Note: Presentation Codes are established via the setting Working with Presentation Codes - INS 4. |
Default Measure Team |
Unless changed the team entered is the default team assigned to this installer. |
Default Measure Status |
If this installer is used, the measurement status automatically starts at this value. Some examples are:
|
Y/N Dft MS Dt to RD |
Default Measure status date to request measure date. Flagging this field with Y ensures that the customer’s request date automatically schedules the measurement for the same date via the Measurement Date field. |
5. Make the necessary entries and press Enter to return to the Installer Settings File Maintenance Screen.
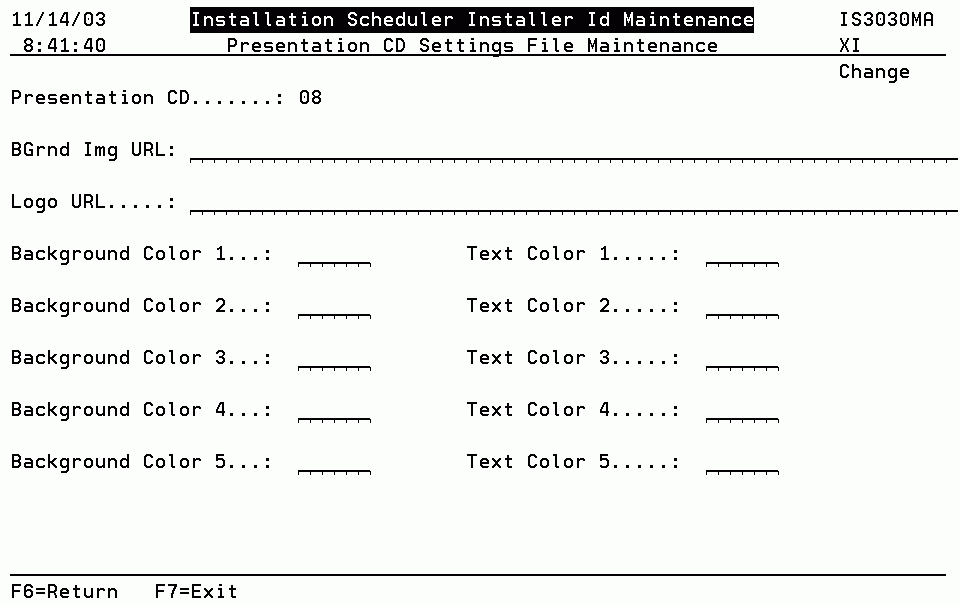
Working with Presentation Codes - INS 4
This part of the set-up process lets you create customized web settings to assign your customers. For example, you can use specialized graphics (logos), set up customized backgrounds using a customer’s URL, and define the type of text the web based Installation Scheduler uses.
1. On the INS menu, select option 4 - Work With Presentation Codes. A listing of the existing presentation codes appears.
2. To update a code, enter a U in the appropriate Opt column. The presentation setting screen appears.
|
The fields on this screen are described in the table below.
Field |
Description |
BGrnd Img URL |
This is the background image displayed when the Installation Scheduler is opened on the web. An example entry is: http://www3.dancik.com/images/backgrnd/DI2.jpg |
Logo URL |
The URL path to your logo image. |
Background Color 1-5 Text Color 1 -5 |
Specify at least three pairs of text and background colors. The first pair is used for the base page colors, the second pair is used for table heading colors, and the third pair is used for table body colors. Specify the colors in the standard HTML RRGGBB color values. |
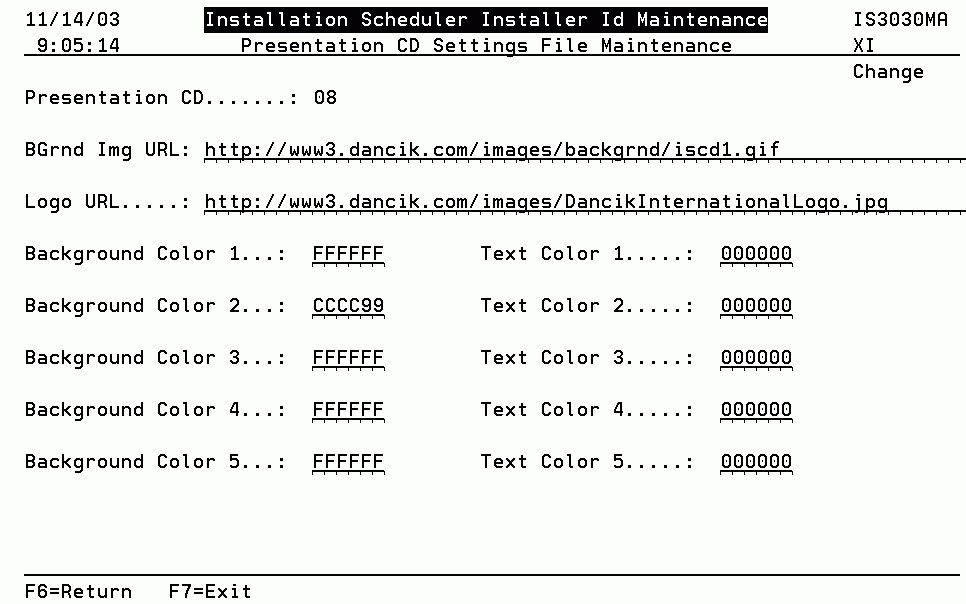
The following screen shows the setting screen with the information entered.
|
If you leave the background and text color settings blank the default colors revert to the defaults which are black, white, and gray. Press Enter to add the scheme or save your changes.
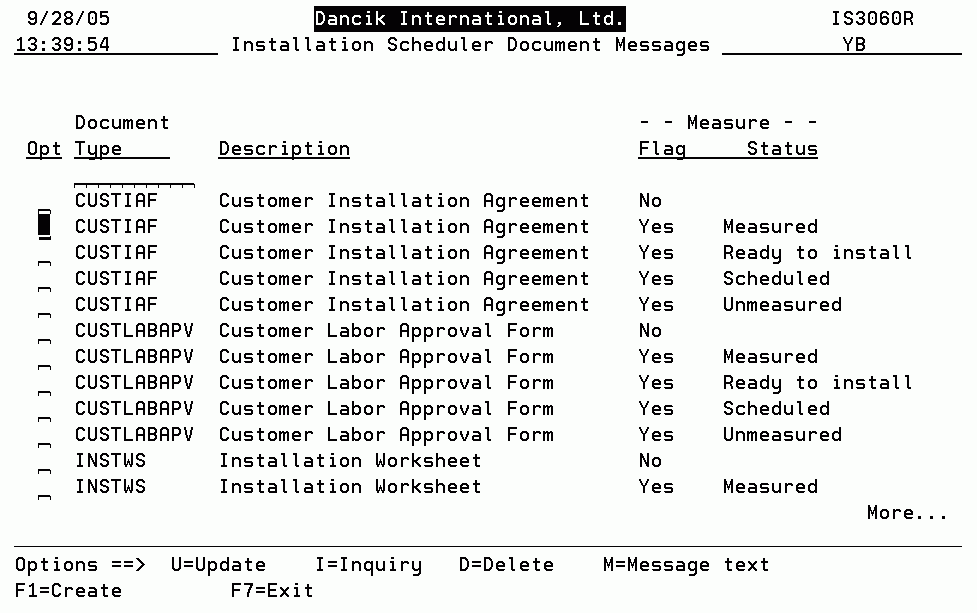
Work With Document Messages - INS 5
Option 5 - Work With Document Messages provides you with several default messages that you can include on your documents (Customer Installation Agreement, Customer Labor Approval Form, and Installation Worksheet). Each stage of a document has a specific message. For example, the message for an unmeasured Customer Installation Agreement is “This Installation Agreement is a preliminary estimate, based upon information you have provided to us. After measurements have been completed by our estimator, we will provide a final estimate”. Whereas the message for a installation job that has already been measured is “This Installation Agreement reflects all charges required based upon our recent measurements. There may be unforeseen circumstances that result in additional charges to complete your installation”.
When this option is selected, all the message options display.
|
Notice that each document type has five possible comments based on the status of the measuring portion of the job. These statuses match up to the codes entered in Measure Status field of the Installation Scheduler as follows:
Measure Status on Message Screen |
Code Used in the Measure Status Field on the Installation Scheduler & Shipping Status Update Screen |
Blank (No) |
Blank |
Measured |
M |
Ready to Install |
R |
Unmeasured |
U |
Note: If an order is not flagged for measurement, use the comments under the NO status. This signifies that measurement is not needed, but installation is still an option.
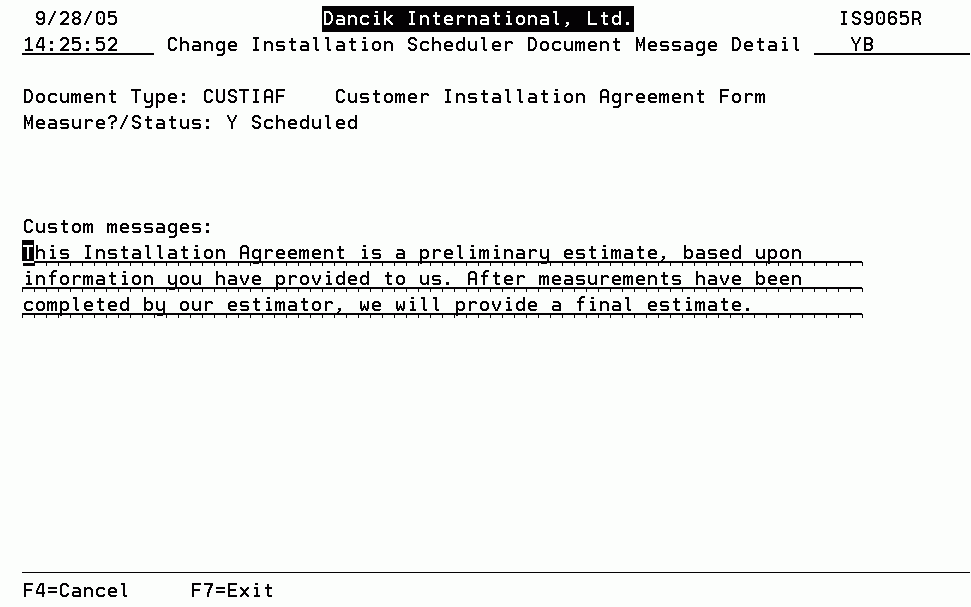
To see a comment, enter an M in it Opt field and press Enter.
|
In this example, you can change the message text. In some cases, the messages cannot be edited.
Note: The ability to edit messages is controlled through the Allow text customization field under option 6 - Work With Document Definitions (Dancik Use Only) on the main Installation Scheduler menu.
Whenever a Customer Installation Agreement, Customer Labor Approval Form, or Installation Worksheet is printed the appropriate comment is inserted at the bottom of the document.
The path to print Installation Scheduler documents is as follows:
Option 20 - Installation Scheduler Order Maintenance.
Enter the order or reference number.
The Installation Scheduler & Shipping Status Update screen appears. Fill in the fields as needed.
Press F10 and select a document from the screen that appears.
Identify your report selection criteria.
Installation_Scheduler_Report_-_INS_11
Installation_Scheduler_Documents_-_INS_13
Option 10 - Measure Report (Measure Schedule) lets you run a report to check the status of your installation and measuring jobs. The report can be tailored to specific dates for a particular company or it can be generated using all the available parameters.
This report lists all the information available on the web calendar of the Installation Scheduler and in each F16 Screen. Because it is part of the core system, you can access it during those times when the internet is not available, or you just want to study the information using various sort options.
1. The first screen to appear, shown below, lets you broaden or narrow the report by selecting request and/or measurement status date spans, running the report for unprocessed orders, and including (I) or omitting (O) parameters.
|
2. If you want to limit the report to a particular dates, enter the date spans in the Measure Request Dates and Measure Status Dates fields. For example, if you want to see how many measurement jobs were requested for a three month span you can enter the dates here to limit the report to that time frame.
Note: If you do not enter a date span in these fields, all the dates are included.
3. You can run the report for processed and unprocessed orders by flagging both fields with a Y. You have to flag at least one of these fields with a Y.
4. The next step is to decide the information you want on the report. Do this by entering an I to include parameters or an O to omit them. For example, if you only wanted to run the report for a couple of salespeople, you can enter an I in the I/O field and then enter the appropriate codes in the fields to the right of the Salesprsns field.
If you include parameters, the report only runs for the codes entered. If you omit parameters, the report runs for all codes except the ones you enter.
5. After making your selections, press Enter then F7 to proceed to the following screen.
|
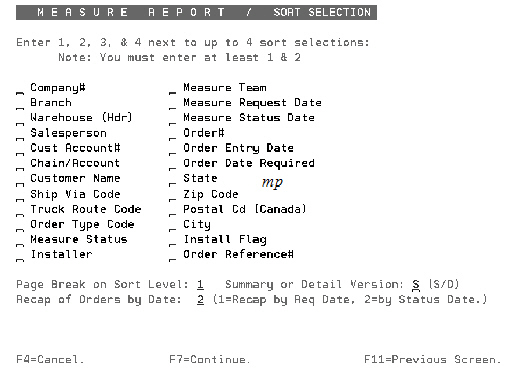
6. Enter up to four sort selections. You must enter at least two. The information on the report is displayed in accordance with the selections you make here.
7. At the end of the report, there is a section where the measurements orders are recapped by either the day the measurement was requested (option 1) or by the date the measurement status changed (option 2).
8. There are three versions of the report.
Summary Version - Presents a clear and concise view of the information.
Detailed Version - Expands each entry to provide more information (i.e. customer address).
Detail + Products - Combines the features of the detailed version with a listing of the items on the order, and the names (if any) entered on the detail lines of the Installation Scheduler screen.
Installation Scheduler Report - INS 11
This report lists orders scheduled for Installation. It gives you the option to print a paper version of the information displayed on the Installation Scheduler screens.
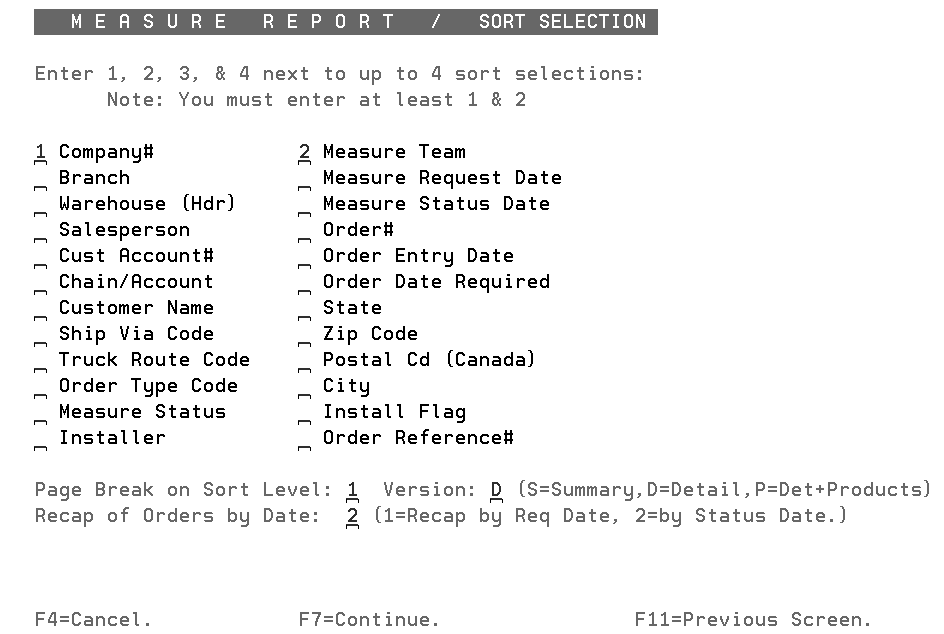
1. When option 11 - Installations Report is selected, you are presented with four report versions.
2. Select a report version and press Enter. The following parameter selection screen appears.
|
3. Enter the dates you want to run the report for. Then select the parameters you want to include in the report. Use the I/O (Include or Omit) feature to narrow or broaden the report as needed. For example, you can run the report only for selected branches by entering an I and then entering the branch codes. The report only includes installation information for those branches. Whereas, if you omit those branches the report runs for all the branches except the ones you want omitted.
Note: If you do not make any entries, all the information for each parameter is included in the report.
4. After making your selections, press Enter to proceed to a sorting screen.
5. Select up to four sorting options. This allows you to format the report to display the information that is the most useful and important to you.
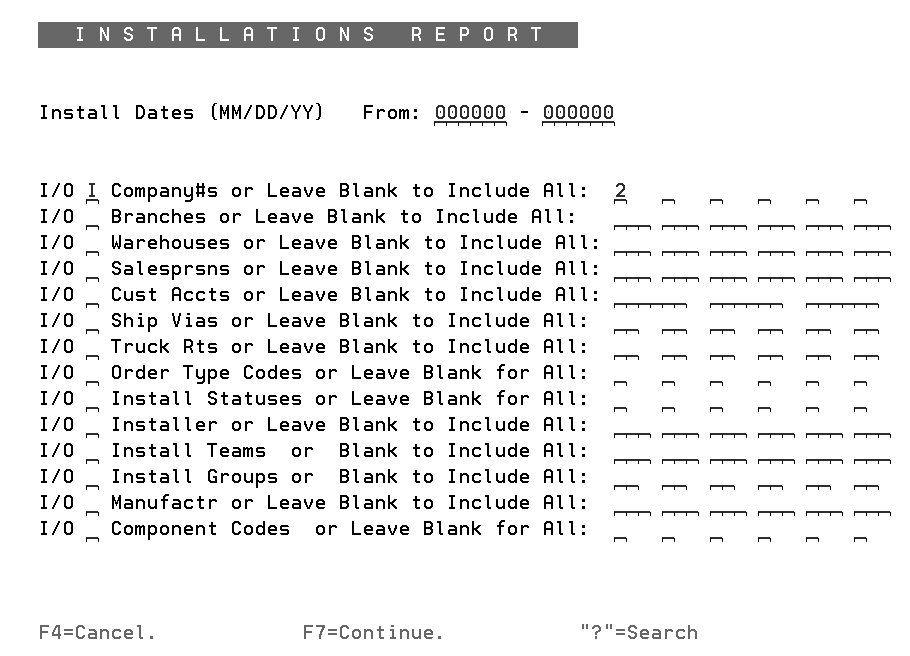
This report, accessed via option 12 on the INS menu, lets you list invoices for installation orders. The purpose of this report is to match incoming bills against AP. It can be used like a receiving report for matching an invoice for inventory from a supplier. Except that in this case you can compare the “expected labor costs” against the “actual labor billed”.
1. On the INS menu, select option 12 - Labor Payable Report. The following parameter selection screen appears. Notice the last field, Component Codes or Leave Blank for All, is defaulted to only include labor items (I in the I/O field and a component code of L).
|
2. Use the I/O (Include or Omit) feature to narrow or broaden the report as needed. For example, you can run the report only for selected branches by entering an I and then entering the branch codes. Or in the case of cost centers, you can make a clean separation by cost center (carpet, ceramic, etc.). The report only includes installation information for those branches. Whereas, if you omit (O) those branches the report runs for all the branches except the ones you want omitted.
3. Enter the invoice dates, install dates or a range of invoice numbers to run the report for. You can make entries into all three fields, or only one. After making your selections, press Enter then F7 to continue.
4. Select up to four sorting options. This allows you to format the report to display the information that is the most useful and important to you.
After the report is run, you can match the labor charges reported against incoming bills in the AP system.
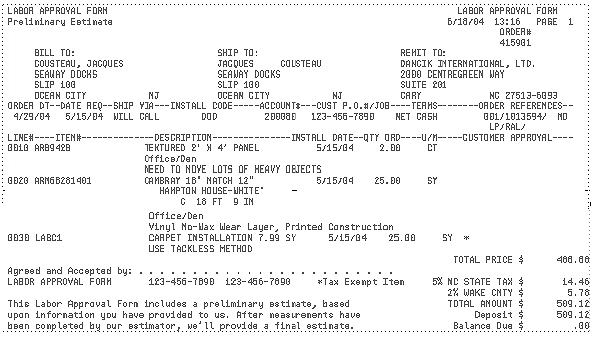
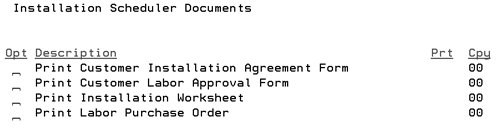
Installation Scheduler Documents - INS 13
The following installation documents are available on the Installation Scheduler:
Customer Installation Agreement
Each report can be tailored to meet your specific needs. Refer to Configuring Installation Reports.
Customer Installation Agreement
Provides a preliminary agreement form that can be discussed and agreed upon with the customer.
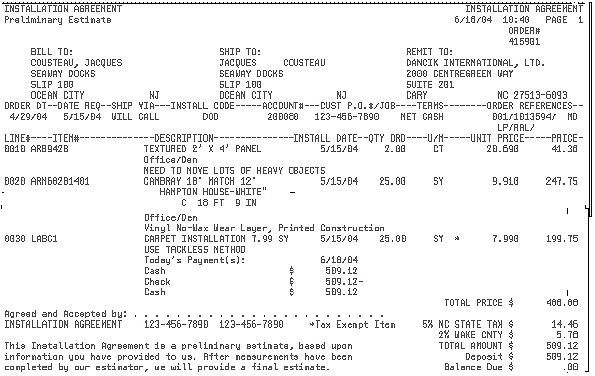
Provides a copy of the materials being installed and the quantity needed.
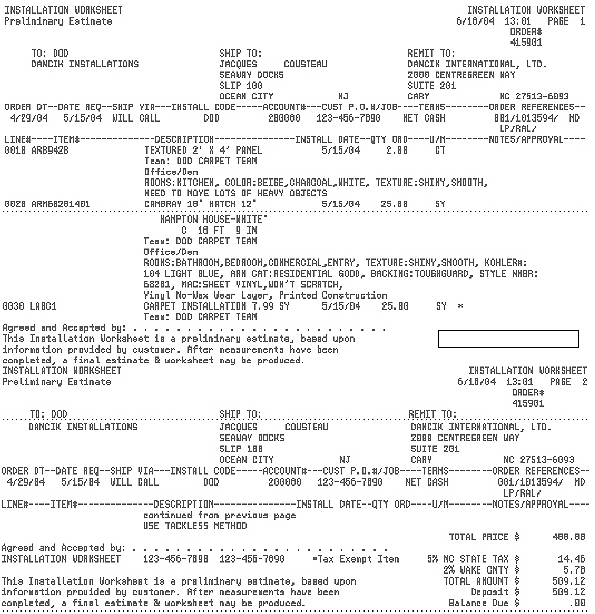
Produces a purchase order for the labor charges and shows which Installation Team is responsible for each line. A summary of labor dollars for each installation team is included.
Provides an approval form for the customer to sign.
Configuring Installation Reports
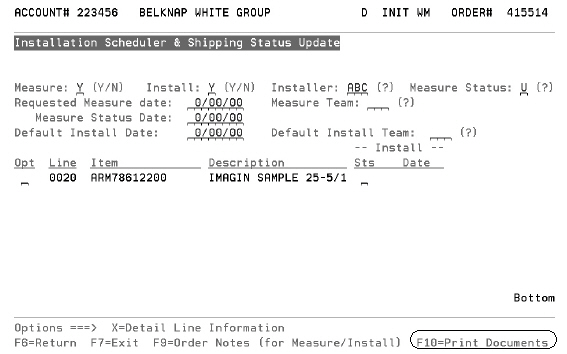
1. On the Installation Scheduler menu (INS), select option 20 - Installation Scheduler Order Maintenance.
2. On the screen that appears, enter the Order or Reference number and press Enter. The Installation Scheduler & Shipping Status Update screen appears. Press F10 to select, configure, and print the installation reports.
|
3. Select a report to run.
Note: The Prt field shows the default printer for the report and the Cpy column shows the default number of copies that are going to print. Both settings can be changed via the Report Selection Criteria screen.
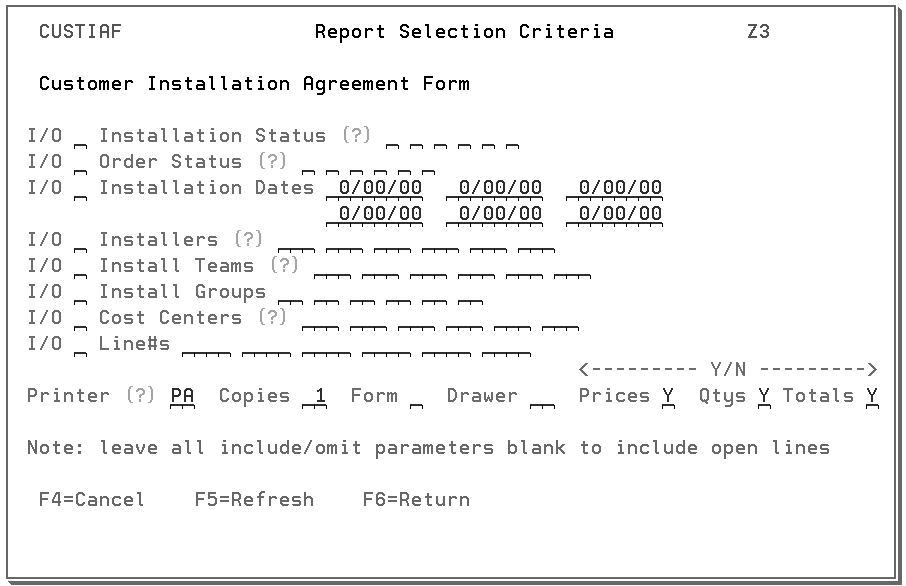
4. When a report is selected, its Report Selection Criteria screen appears.
|
5. The top part of the screen lets you omit (O) or include (I) parameters. If you include parameters the report only runs for the parameters entered. For example, if you only wanted to see the scheduled jobs, enter an S in the Installation Status field and an I in the I/O field.
If you omit parameters, the report runs for all the parameters except the ones you enter.
6. The bottom of the screen lets you perform the following:
set the default Printer
establish the number of Copies that print when this report is selected
pick a Form code. The form codes are set-up and maintained via the system tables maintenance program (SET 29). The agreements currently print only on line printers. Other form codes will be announced at a later date.
designate a specific Drawer of the printer where the report is generated. For example, you might use one drawer of the printer to store letterhead.
Elect to show Prices, Qtys, or Totals on the report.
7. After making your entries, press Enter. The system automatically generates the report.
Installation Scheduler Order Maintenance - INS 20
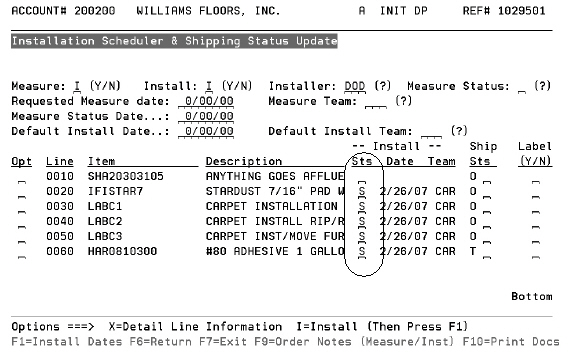
This utility allows you to quickly and easily maintain the status of Installation Scheduler entries.
1. The Installation Scheduler Order Maintenance program is accessed via option 20 - Installation Scheduler Order Maintenance on the Installation Scheduler menu.
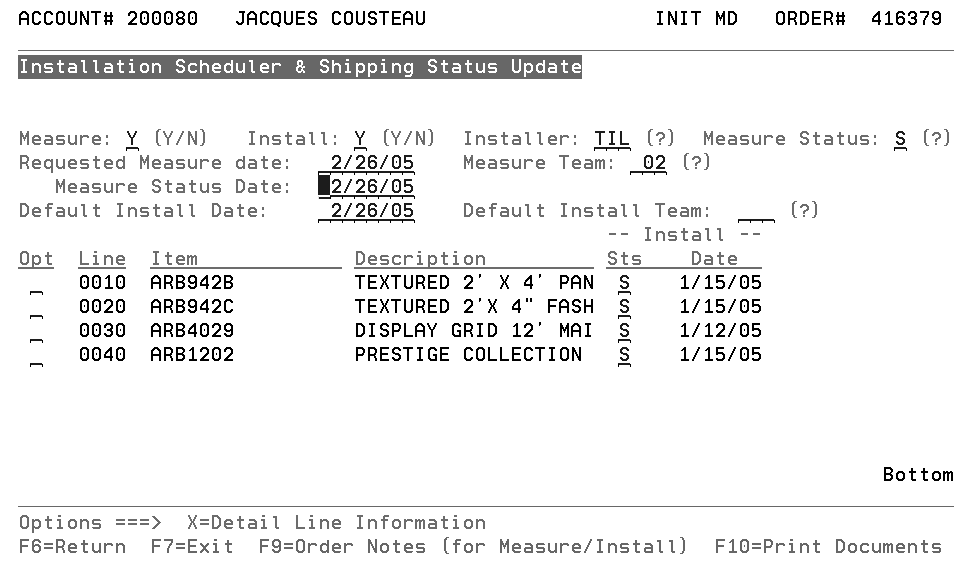
2. When this option is selected, you are prompted to enter either an order number or reference number. Press Enter to access the following installation/measurement information about the order.
|
All the underlined fields can be updated.
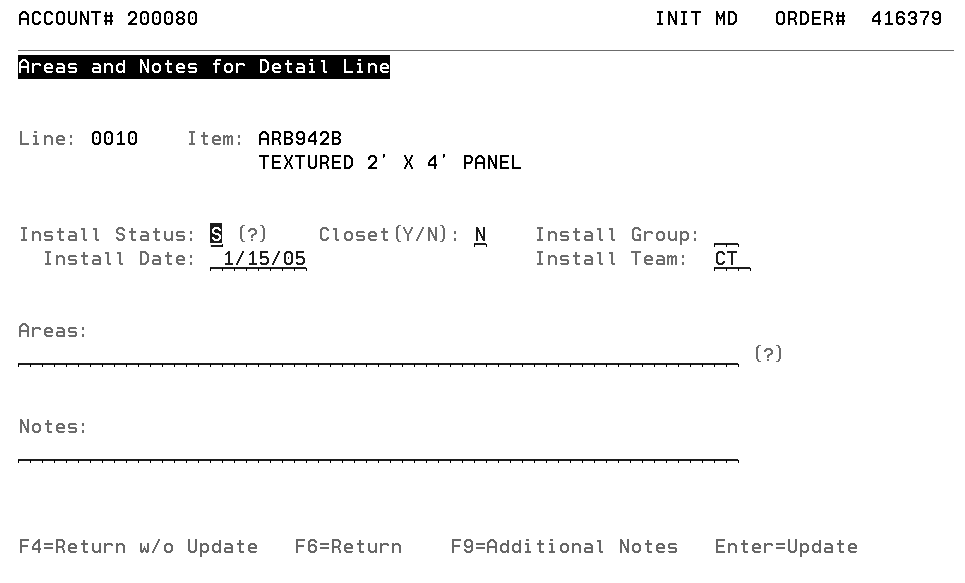
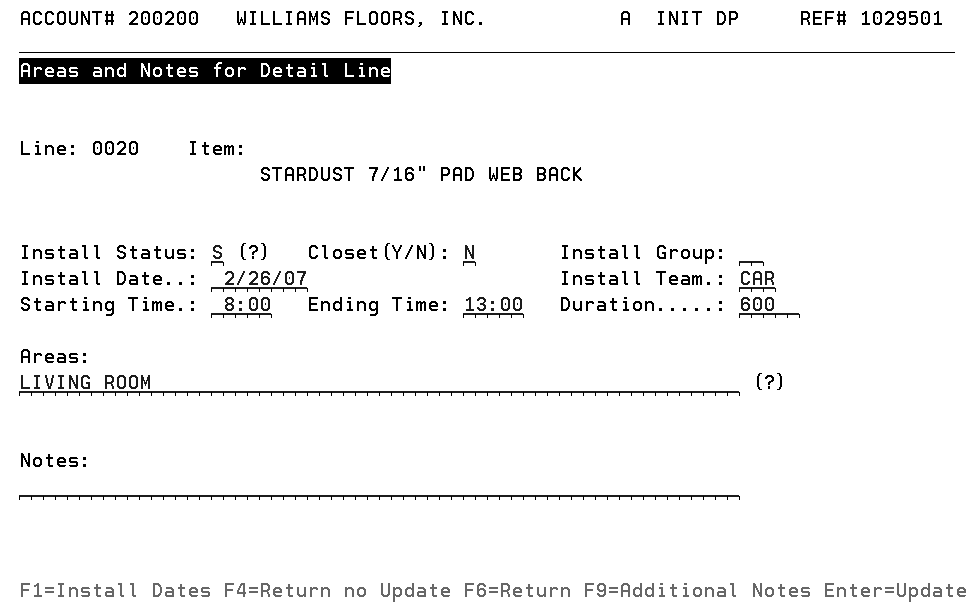
3. To update detail line information, place an X in the appropriate Opt column and press Enter. The Areas and Notes for Detail Lines screen appears.
|
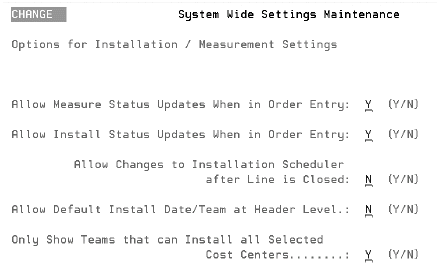
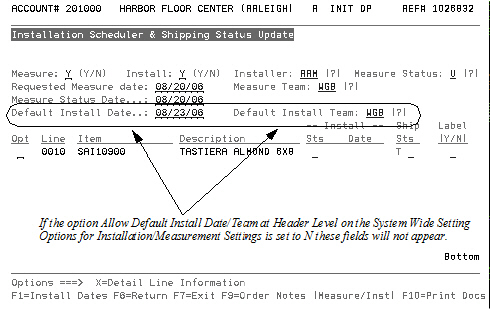
Note: When the option, Allow Changes to Installation Scheduler after Line is Closed, on the system wide setting Options for Installation / Measurement Settings is flagged to N, Installation Scheduler cannot update or edit a closed order line. The fields on the Areas and Notes for Detail Lines screen do not support edits or new entries.
Note: Refer to System-Wide Setting -Installation/Measurement Settings for more information on the System Wide Settings.
4. Add or change information as needed. You can also use this screen to note the area of the house where the product is going to be used and to record any notes about this specific line.
5. Press Enter to return to the Installation Scheduler & Shipping Status Update screen.
6. To add notes about the complete order, press F9.
7. Press F10 and choose to generate one of the following reports:
Customer Installation Agreement Form
Customer Labor Approval Form
Installation Worksheet
Labor Purchase Order
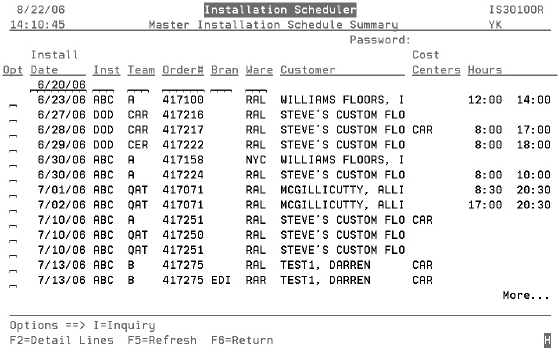
Master Installation Schedule - INS 31
Typical use cases for the Master Installation Schedule Screen
The Master Installation Schedule displays all of the scheduled installations with extensive sorting and filtering capabilities. You may drill down from summary, to detail, to an individual order, including the ability to re-assign installation teams and dates.
Typical use cases for the Master Installation Schedule Screen
If you typically key your orders in a way where “Wood is on one order” and “Carpet is on another order”, even for the same customer, then you will be able to make most (if not all) of your changes from the main (summary) screen. You will be able to make most changes at the summary level because you will not have individual lines that are scheduled on different days or using different installation teams.
If you typically key your orders in a way where multiple installation teams and multiple install dates are required for a single order, then you will likely use both the summary and detail screens in the Master Installation Scheduler.
A typical inquiry using the Master Installation Scheduler would be as follows:
Enter date to start with.
View the jobs scheduled that day, sorted by Installation Company and Team.
Make changes as needed.
- or if looking for a specific Installation Company or Team:
Enter date to start with.
Limit to a specific Installation Company and/or Team.
View the jobs scheduled on that day for that Installation Company and/or Team.
Make changes as needed.
1. On the Installation Scheduler menu, select option 31 - Master Installation Scheduler. The screen that appears summarizes the scheduled installations by date, installation team, and then order number. Today’s date is automatically inserted into the Install Date field.
2. After entering the password (if applicable) for allowing updates, certain fields appear underlined. Updates to the underlined fields (Install Date, Inst (Installation Company), and Team) can be made right from this screen. Updating any field on this screen updates all of the lines on the order that are associated with that field.
3. Remember that an order can be split between more than one install date and/or installation team. Therefore, any changes to the summary screen will only change the lines that have the date, installation company, and team that is showing on the screen.
The following example displays the Master Installation Screen in the Update Mode, after the password is entered.
|
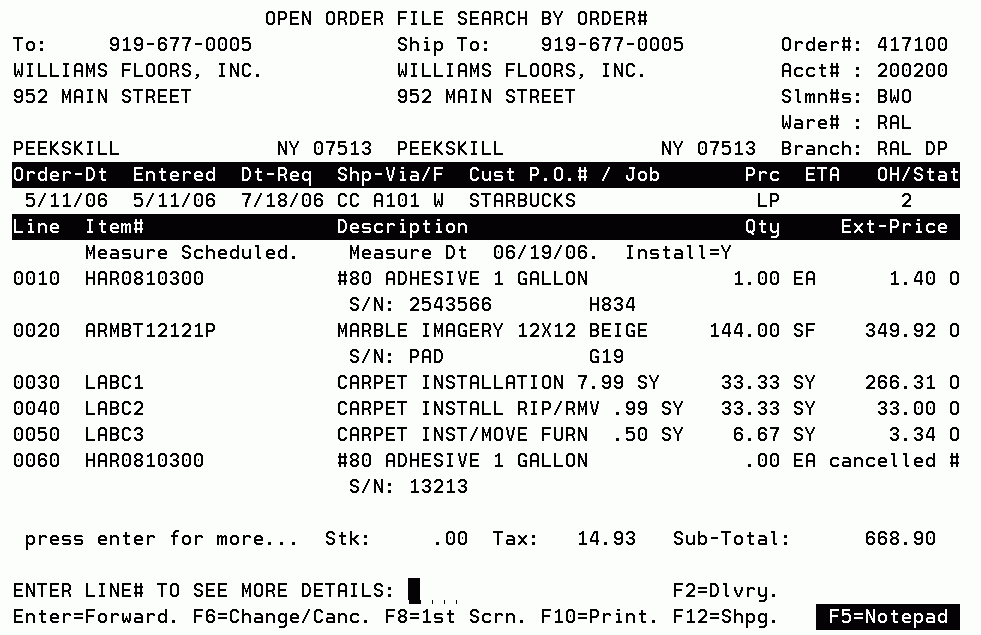
4. To inquire into an order, enter an I into its Opt field.
|
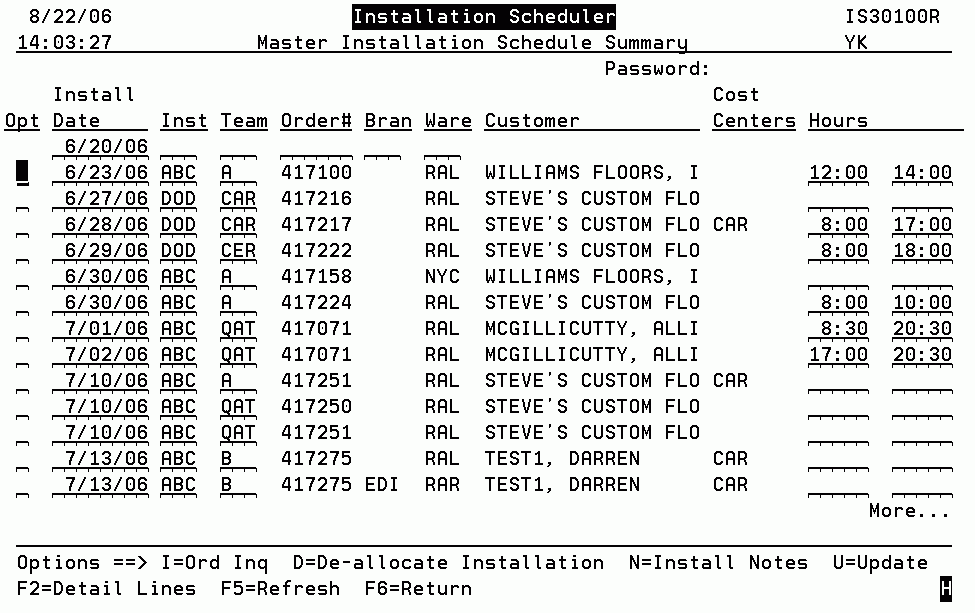
5. Return to the Master Installation Schedule Summary screen. Enter a password to view the detail screen in update mode.
|
6. You can update the hours field, indicating (in military time) when the job will begin and end. These lines are found on one or more of the detail lines. If the hours are changed, the detail lines will also be changed to the new hours.
Note: The times are validated to prevent accidental over-booking of installation teams.
7. To remove the installation date, installer and team, and change the status of all lines (that are related to that line) from “S” scheduled to “U” unscheduled, use the D - De-allocate installation.
8. The N option displays the header-level installation notepad.
Note: Anytime you update or de-allocate an installation, a line is written to the Order Notepad.
9. When option U=Update, appears at the bottom of the screen, you can use this option to display the Installation Scheduler and Shipping Status Update screen.
|
Available Install Dates & Teams - INS 32
Once your Installation Scheduler is configured, Installation Scheduler allows you to search for available installation teams, based on date and cost centers, from Order Entry, Order Change, and Order Inquiry. This gives you the ability to quickly and easily check installation team availability, assign an available installation team, and inform the customer of the installation date.
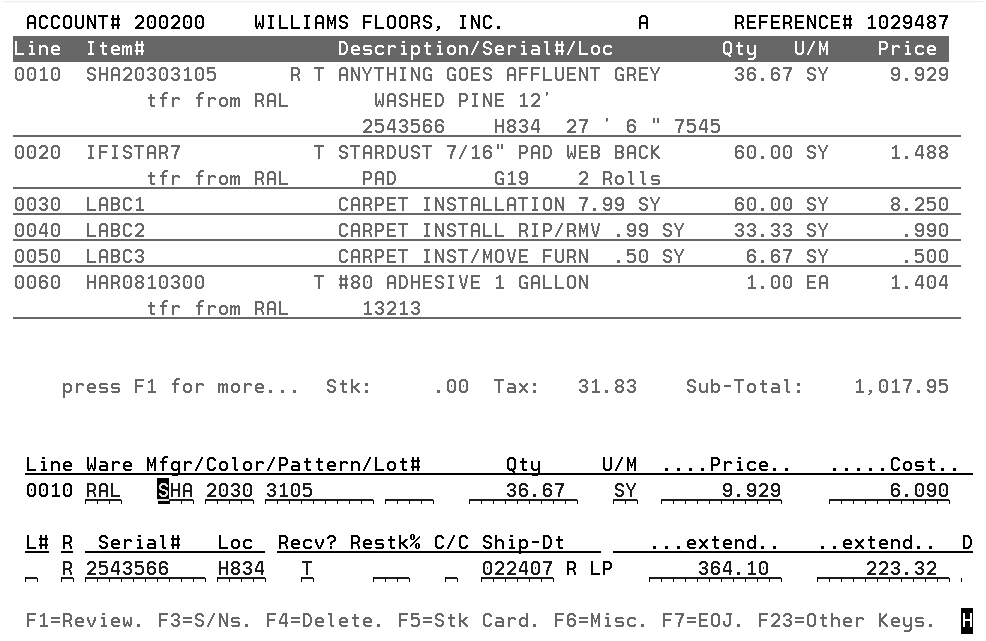
1. Proceed through the normal order entry process. The order used in this example is shown below.
|
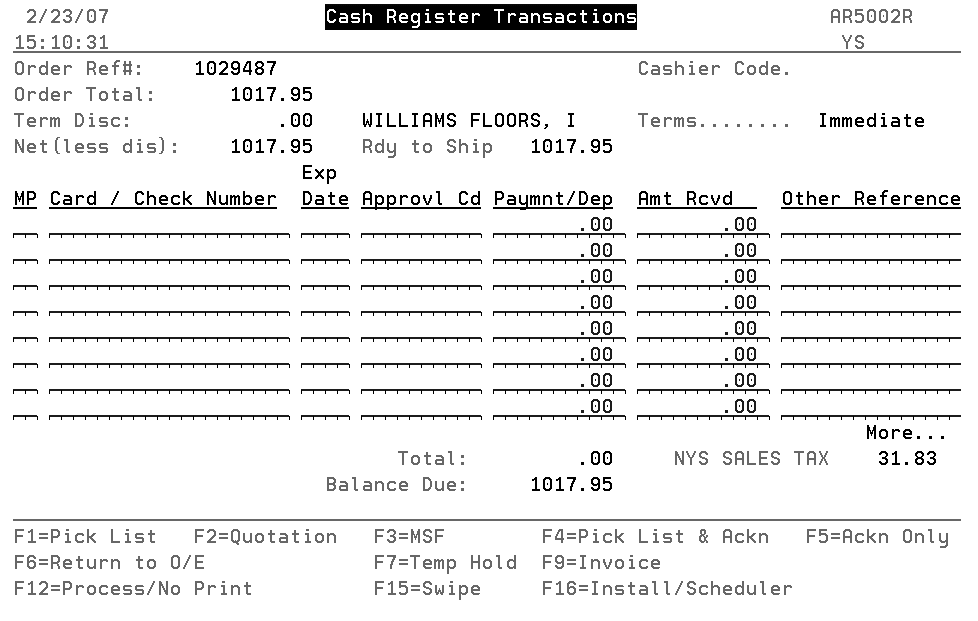
2. This order includes products from several cost centers (wood, ceramic tile, and carpet). Press F7 to access the Cash Register screen.
|
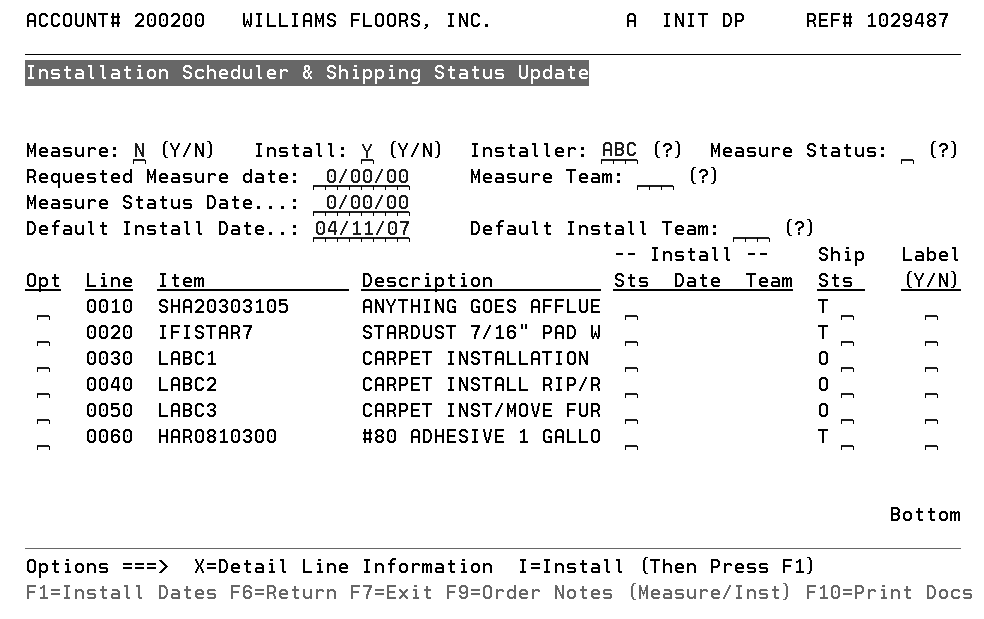
3. Press F16 (Shift F4) to access the Installation Scheduler and Shipping Status Update screen.
|
4. If this is an installation job, the Install field must be flagged to Y.
5. If you want to assign installation dates to every line on the order, disregarding cost centers, enter the date in the Default Install Date field and enter the team in the Default Install Team field. If you want to schedule installations for particular lines on an order, or using the automated installer selection logic, use the I - Install option.
6. Enter an I in the appropriate Opt field, next to each line you want to schedule for installation.
|
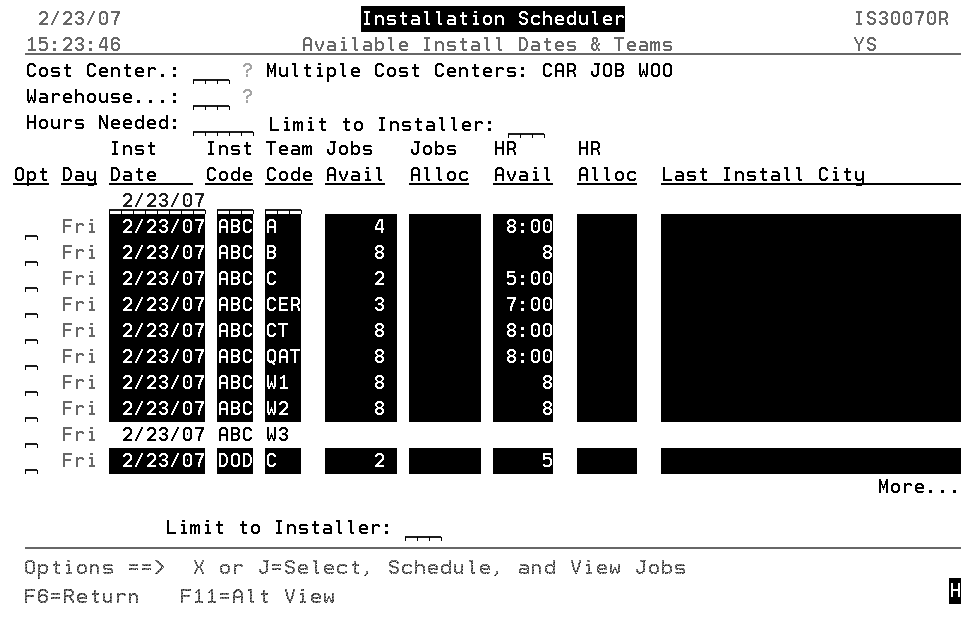
7. Press F1. The Available Install Dates & Teams screen appears.
Note: If the option Only Show Teams that can Install all Selected Cost Centers on the System Wide Setting - Options for Installation / Measurement Settings is activated, only installers set up in the Installer Workload Capacity File (INS 42) for the selected cost centers are shown. If it is set to N, all installers are shown.
|
The Available Install Dates and Teams screen displays, in date sequence, showing all of the possible install teams. It highlights the days and teams that have available hours to perform an installation.
If you have selected items for installation that have different cost centers, i.e. wood and carpet, all the cost center codes appear at the top of the screen. All the installation teams shown can install all of the cost centers displayed. Enter a specific cost center code to narrow the installation teams.
Furthermore, you can use the Hours Needed field to show only those installers who have enough time available for the job. For example, if you enter 8 in this field, only the teams with 8 available hours will display.
8. The available installation teams are backlit in white. The dates start at today’s date. Find a suitable installation team and enter a J into their Opt field. If this team already has jobs allocated to it, they are displayed here. Since this is new installation the screen is empty.
|
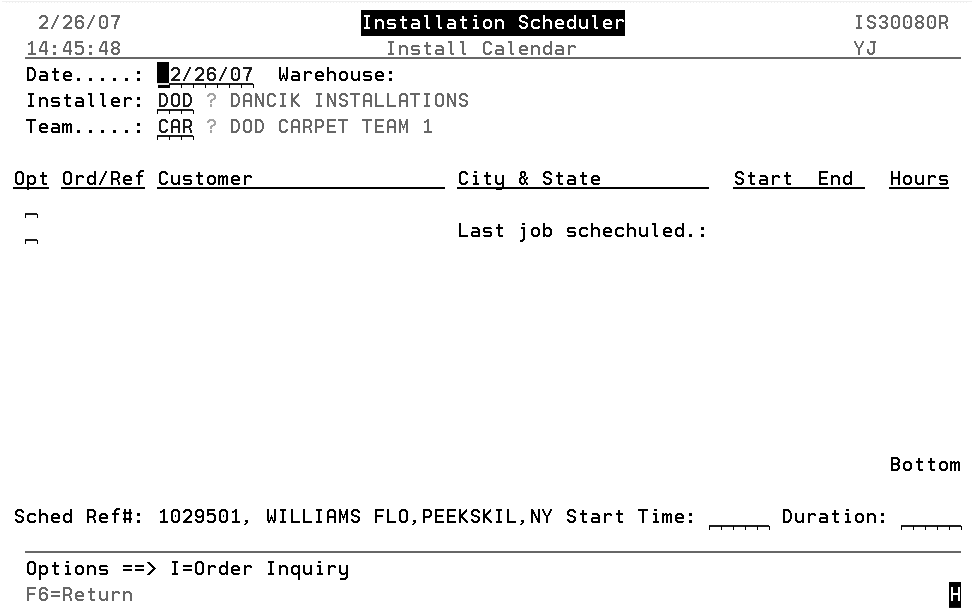
9. Enter a start time and duration. The start time must be in a military format (HHMM) and the duration time needs to have three or four digits (900 for 9 hours or 930 for 9 hours 30 minutes). Press Enter to assign this job to this installation team and return to the Installation Scheduler & Shipping Status Update screen where these items are now shown as scheduled for installation. Only the lines selected with the I option are scheduled.
|
10. To make notes about installing a specific item, enter an X in its Opt field and press Enter.
|
Installer_Rates__for_labor_items__-_INS_40
Installer_Workload_Capacity_File_-_INS_41
Installer_Holidays_and_Blocked_Days_-_INS_42
Installation_Rules_by_Cost_Center_-_INS_43
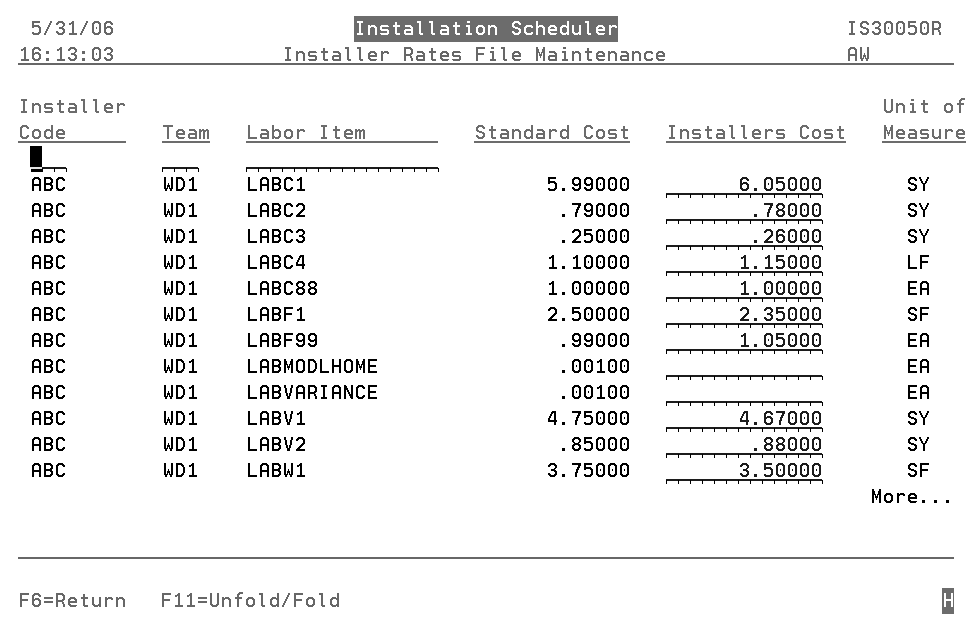
Installer Rates (for labor items) - INS 40
This file allows you to input labor rates for each installation team. Whenever an installation team is assigned to an order (or changed), the labor costs are automatically updated.
1. On the Installation Scheduler menu, select option 40 - Installer Rates (for labor Items).The following screen appears.
|
2. The Standard Cost comes from the Item File. To check or update them, go into the Item File (FIL 2), and then use the F9=Prices/Costs function key.
3. The Installers Cost is what this particular installation team charges for this labor item. This cost is applied to an order whenever this installation team is assigned. Leave the Installers Cost blank, if the standard cost applies to that installation team. Only enter costs that are different than the standard.
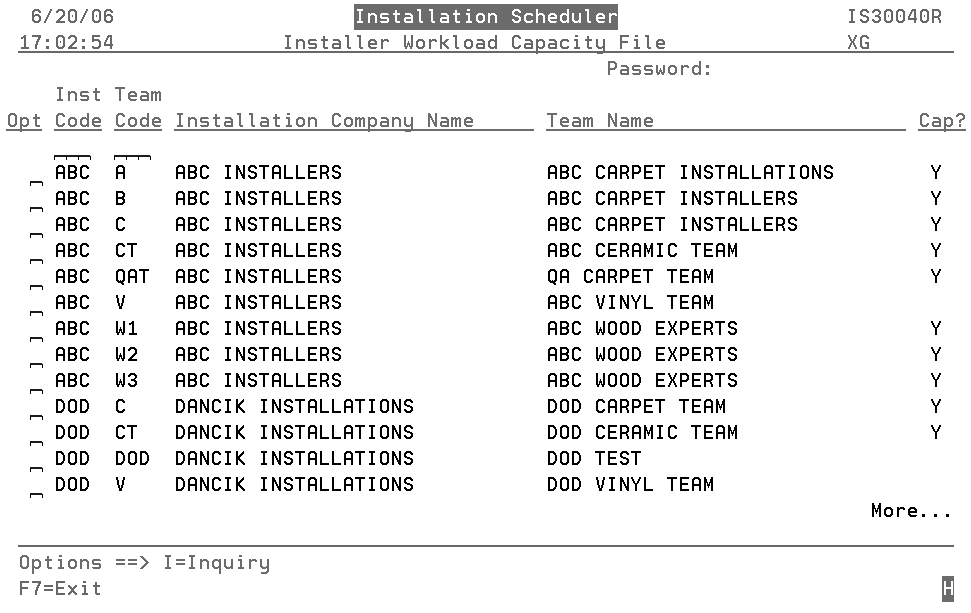
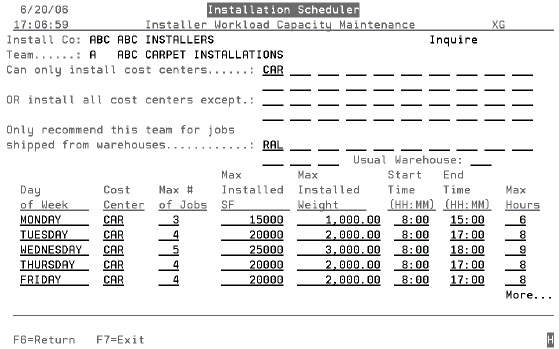
Installer Workload Capacity File - INS 41
Use this option to enter restrictions that can limit an installer. For example, you can limit installers to particular cost centers (tile or carpet), days of the week that the installer is normally unavailable, maximum number of hours per day that the installer can work. This should be one of the first options you work with.
1. A screen similar to the following appears when option 41 - Installer Workload Capacity File is selected off the Installation Scheduler menu.
|
2. Enter either an “I” to inquire into or a “U” to update an installation team’s settings.
Note: You must enter a password to be able to update settings.
The Installer Workload Capacity Maintenance screen appears.
|
Use this screen to set limits/restrictions for the installation teams.
Field |
Description |
Can only install cost centers....
.... OR install all cost centers except |
The first two fields work together. The first setting limits the installation team to specific cost centers. This example is for a carpet team so the cost center has been set to CAR. The second setting allows you to exclude specific cost centers. For example, there could be a general purpose installation team that can install everything but carpet. In that case, this installation team will not be an option when scheduling a carpet installation during order entry. If the fields are left blank, the system assumes that this installer can handle all cost centers. |
Only recommend installer or jobs shipped from warehouses....... |
Enter the warehouse codes that this installation team can work from. If you enter warehouse codes, the installation team is only assigned jobs from those warehouses. These warehouses are compared to the header warehouse of each order. Leave the fields blank to allow this installation team for all your warehouses. |
Usual Warehouse |
This is the warehouse that assigns most of the work to the team. If an installer/team is assigned to a job that has a header warehouse different from the usual warehouse, but is not restricted, the following message appears: Warehouse is different than this team’s usual warehouse. The installation will be allowed. |
Day of Week |
Enter the full name of the day that the installer is usually available. |
If a day is entered, entries are requited in all the fields, except Cost Center. Leaving the cost center field blank directs the system to include all allowed cost centers. You can have multiple entries for the same day, if the cost centers are different. |
|
Cost Center |
Enter the cost center(s) code that the installation team normally installs on this day. This code must match the restrictions, if any, entered at the top of the screen. If a cost center is entered that the installation team is not configured to work with, the following message appears: Error: Cost Center not valid per the criteria entered above. Leave the field blank to allow for ALL the cost centers that the installer/team is capable to install. |
Max # of Jobs |
The maximum number of jobs this installation team can perform on a given day. Note: This field is informational only. |
Max Installed SF Max Installed Weight |
Enter the maximum SF or Weight the team can install on this day. Note: This field is informational only. |
Start Time (HH:MM) End Time (HH:MM) |
The normal working hours for the installation team. The team is not available before or after these hours. Note: This field is not enforced. However, the Max Hours field, described below, is enforced. |
Max Hours |
This is the maximum number of hours this team is available on this particular day. The installation scheduling program looks at the assigned hours on each scheduled line item of an order, plus the assigned hours of orders already scheduled, and compares that to the number of Max Hours allowed. |
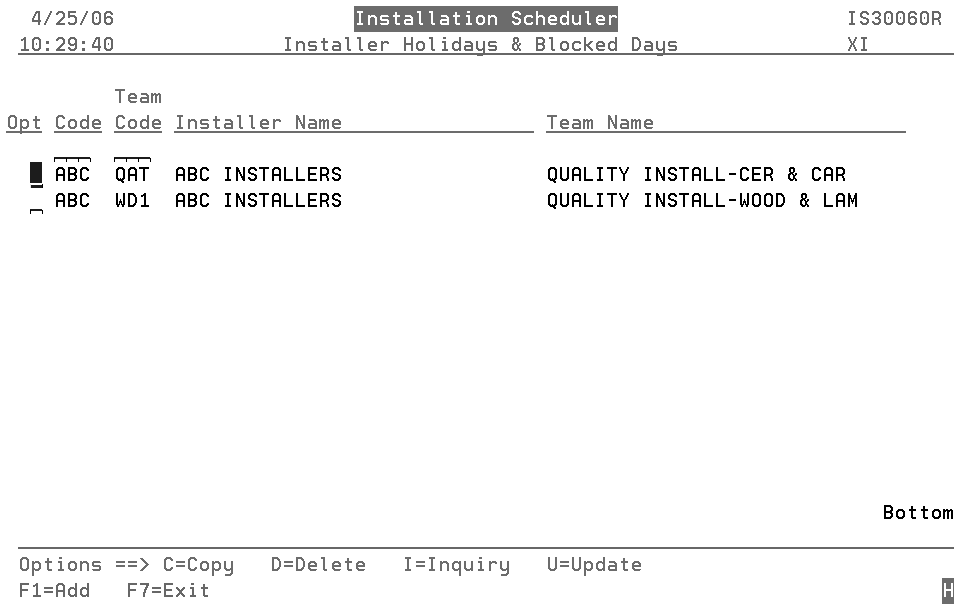
Installer Holidays and Blocked Days - INS 42
This option allows you to block unavailable days for specific installation teams, or you can block particular days, like Christmas, for all of the installation teams. You can also use this option to block days if a installation is going to take multiple days.
Think of this as an exception screen. For example, if one of your installation teams lets you know that they will not be available to work on certain days, you can block those days using this option.
1. When Option 42 - Installer Holidays & Blocked Days is selected, a screen appears that lists the available installers.
|
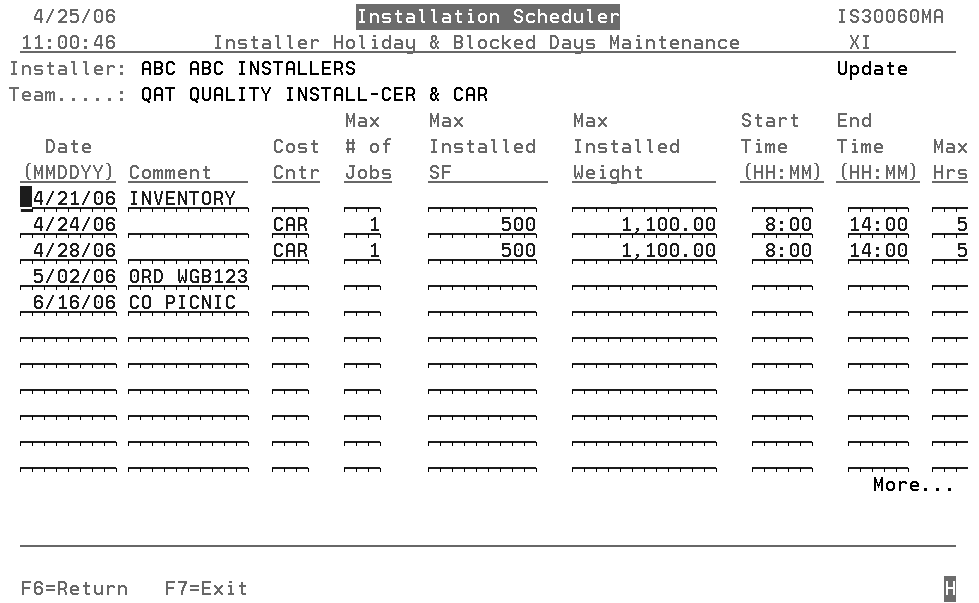
2. Enter a U to update the blocked days/time frames for an installer.
|
3. In the example shown above, the installer is not available to work the following days/time frames
04/21/06 - The installer is performing an inventory.
04/24/06 and 04/28/06 - The installer is only available for 5 hours.
05/02/06 - Is the second day of a two day installation, for a single line item (such as 500 SY of carpet).
06/16/06 - The installer’s company is having a company picnic.
Note: If Measurements and Installations are scheduled by SF. the Max Installed SF field is used in place of the Start Time, End Time, and Max Hours fields to drive installer availability and scheduling. The functionality to schedule Installations and Measurements by SF is activated via the System Wide Setting - Installation/Measurement Settings.
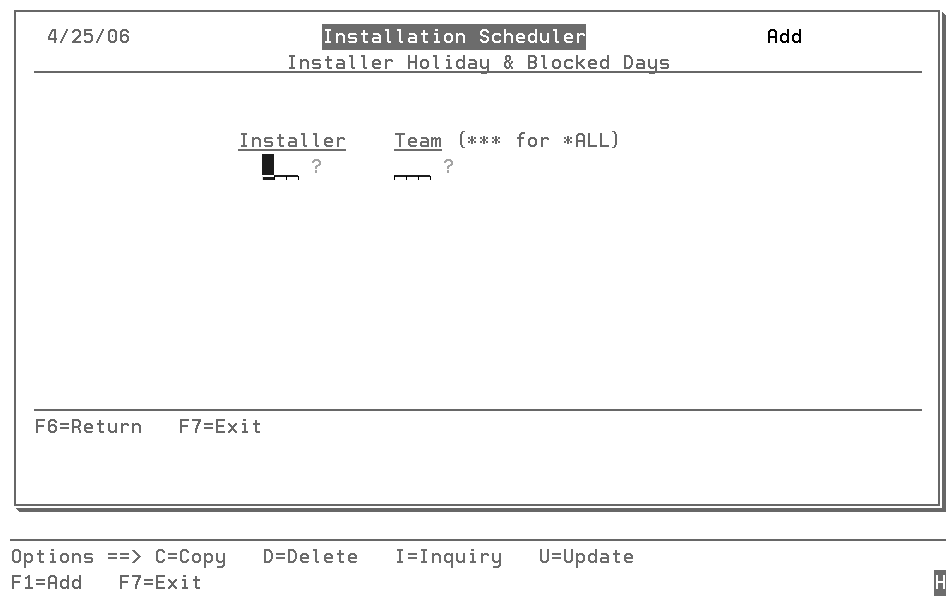
4. Press F6 to return to the Installer Holidays & Blocked Days screen. To add block out dates for a new installer, or block out dates, such as Christmas, across all your installers press F1. The following screen appears.
|
5. To apply the blocked date to all your installation companies and teams, enter *** in both of the fields. To apply the block dates to a specific Installer/Team, enter the applicable code.
Note: Enter a “?” to display a list of the available Installers/Teams.
6. After entering the Installation Company and Team or ***, press Enter, an empty maintenance screen appears. Enter the days/time frames that are not available (i.e. 05/29/13 Memorial Day).
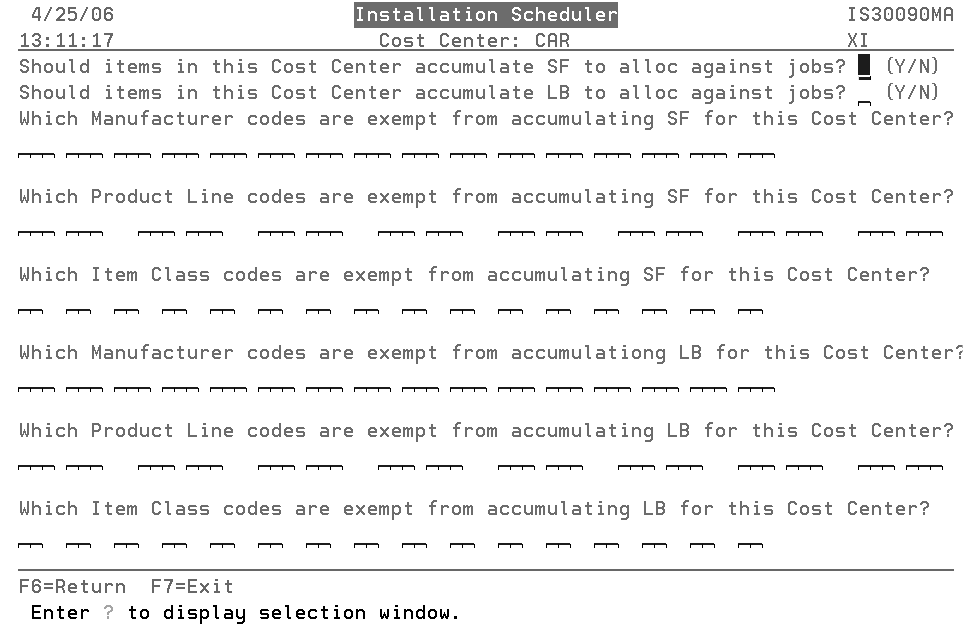
Installation Rules by Cost Center - INS 43
This file is used to determine which items within a cost center are counted toward the total installed SF/LB of a job. This then ties into the restriction settings for each installer. For example, you may not want the SF of PAD to be added to the SF of CARPET. If the PAD SF is included, this can reduce the amount of time your carpet installer is available. You will also want to exempt some or all labor lines from the Installed SF totals. If a job has 200 SF of carpet, 200 SF of pad, and 200 SF of labor, it is assumed that the pad and labor should not be counted against the maximum SF that the installer/team can install in a day.
1. When option 43 - Installation Rules by Cost Center is selected, a listing of all the available cost centers appears.
2. Select one and press Enter. The following screen appears.
|
The following table describes the fields that comprise the Rules and Parameters screen.
Field |
Description |
Should items in this Cost Center accumulate SF to alloc against jobs?
Should items in this Cost Center accumulate LB to alloc against jobs? |
Use these settings to exclude cost centers from being included in the accumulated quantity for an installation. Some examples of cost centers that you may want to exclude are: accessories, labor, delivery services, and freight. If you enter an N in both of these fields, the system ignores the rest of the fields. |
Which Manufacturer codes are exempt from accumulating SF for this Cost Center?
Which Product Line codes are exempt from accumulating SF for this Cost Center?
Which Item Class codes are exempt from accumulating SF for this Cost Center?
Which Manufacturer codes are exempt from accumulating LB for this Cost Center?
Which Product Line codes are exempt from accumulating LB for this Cost Center?
Which Item Class codes are exempt from accumulating LB for this Cost Center? |
Enter the codes for the manufacturer, product lines, and/or item class that should not be included in the amount of product an installation team can install in a specific time frame. For example, if you are setting up the rules and parameters for the cost center carpet, you can enter manufacturers that make the carpet padding. This excludes products from this manufacturer (i.e. carpet padding) from being considered in the total SF/LB that the team can install. You can also use these fields to exclude labor items if labor items are included in your product cost centers. If you have your labor charges assigned to their own manufacturer and product line, they can be excluded from the SF/LB totals of the cost center. For example, for carpet installation the settings could be LAB (manufacturer), and CAR (product line), within the CAR cost center. |
Web Installation Schedule Calendar - INS 30
Option 30 - Web Installation Schedule Calendar provides access to the web version of the Installation Scheduler. When this option is selected and the necessary passwords are entered, the Installation Scheduler opens.
|
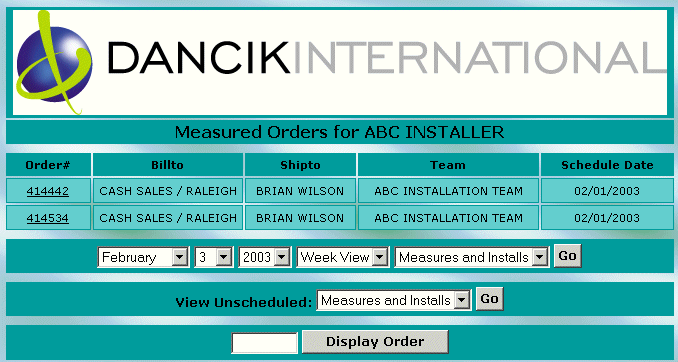
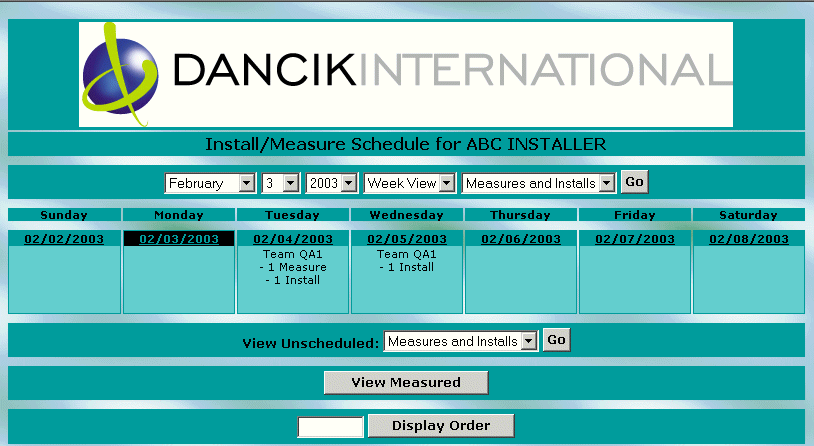
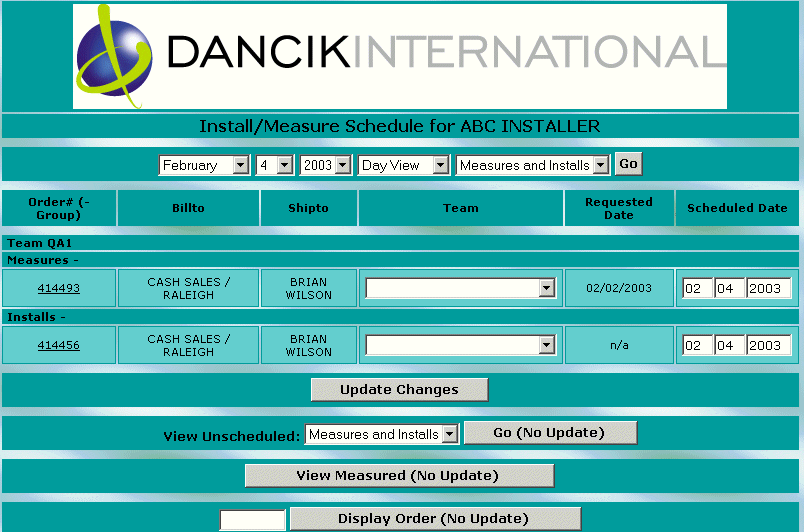
1. Enter a valid User ID and Password. The Install/Measure Schedule for the current week appears.
|
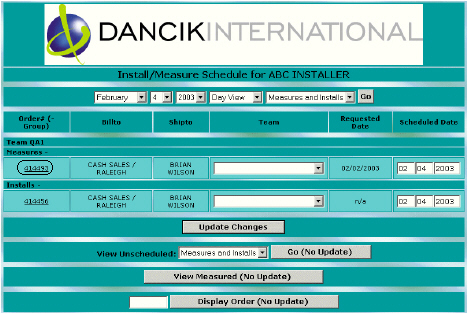
2. Click the underlined date under a day to see the schedule for that day.
|
3. To return to the week view, click the view drop down arrow and select Week View, then click Go.
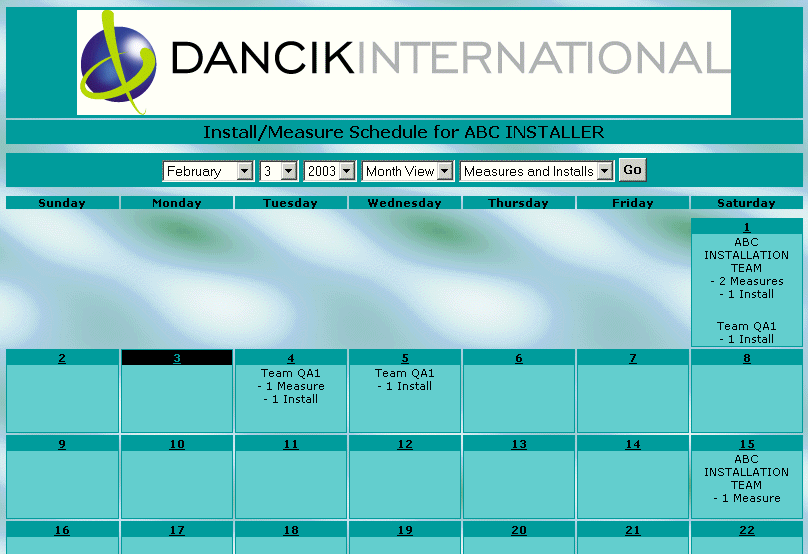
4. To see the schedule by month or day, select an option from View the drop-down list, and click Go.
The following figure shows the Month View.
|
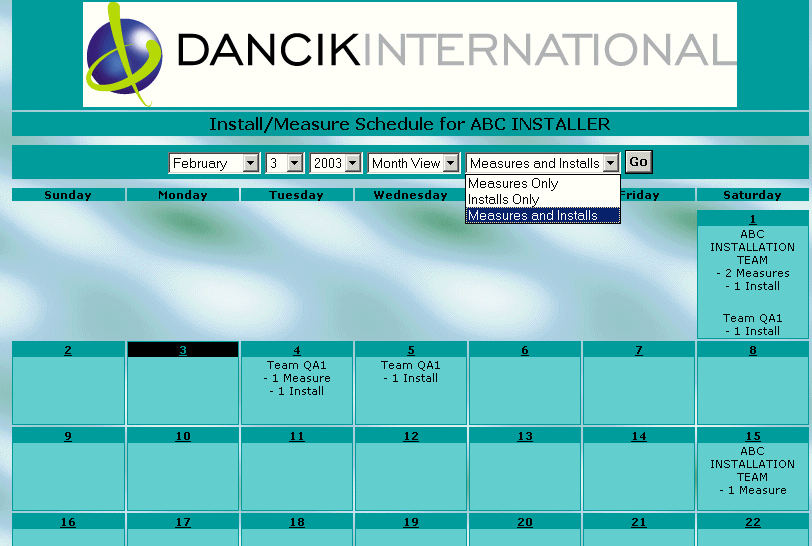
5. To see Measures only, Installs only, or Measures and Installs, select an option from the drop-down list, and click Go.
|
6. Click View Measured to see the jobs that have already been measured.
|
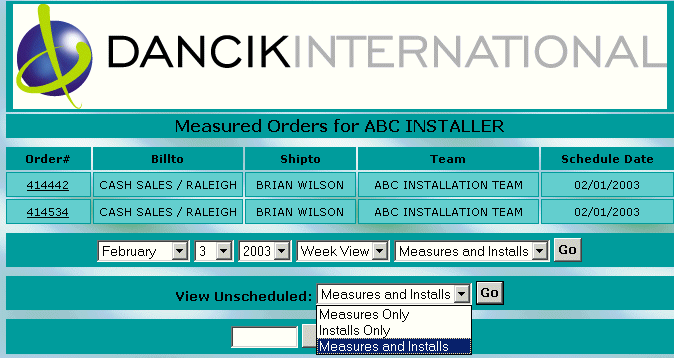
7. To view unscheduled jobs, click on the View Unscheduled drop down arrow and select an option and click Go.
|
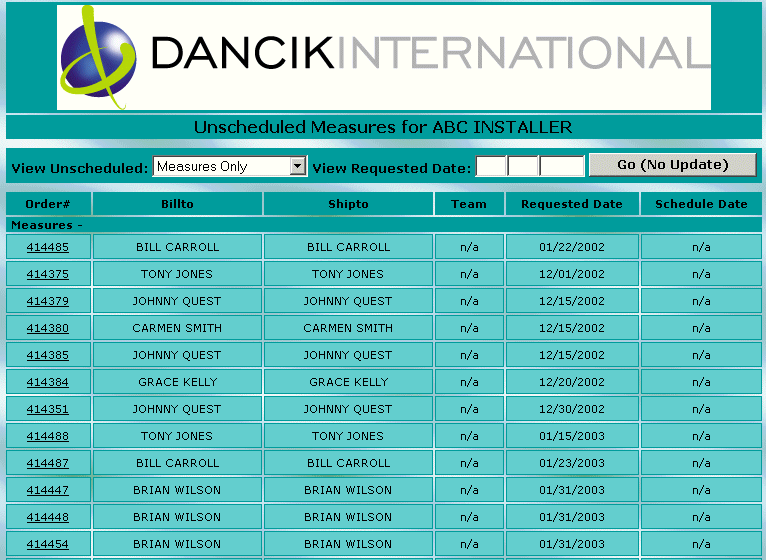
8. As an example, select Measures Only from the View Unscheduled drop down list. A listing of all the unscheduled measuring jobs appears.
|
9. To narrow the list down, enter a date in MMDDYYYY format in the View Requested Date field.
To view the details of an order
1. On the Install Measure Schedule day view for the scheduled install, click the underlined order number for the order you want to change.
|
The Order Detail screen appears.
2. Change the information in the user input fields (white background) as necessary, selecting new options from the drop-down lists or entering new information in the fields.
The order detail fields are described below.
Line# - the line number of the order.
Order Status - the order status of the line
Item/Product Type/Color/Pattern - the item number, item description, product type description, and color and pattern descriptions
Qty/Width/Length - the order quantity and U/M, and if rolled goods, the roll width and quantity length
Item Attributes - all available item attributes for the item
Areas/Closet - the areas to be installed, and whether or not closet areas are to be installed
Install Group - a user-defined code for associating multiple order lines as a single installation. This code can only be used for installations.
Notes - detail line notes.
Note: Once a note is entered it cannot be removed. Furthermore, it is stamped with date, time, and user information.
Install Status/Date/Team - the install status, date to be (or was) installed, and the assigned installation team. This code can only be used for installations.
3. Click Save Changes, or select another view and press Go (No Update).
Parts of the System that interact with Installation Scheduler
System-Wide Setting -Installation/Measurement Settings
Master Control User File (SET 32) - Web Access Settings
System-Wide Setting -Installation/Measurement Settings
This is a series of settings that control the activation and use of the Installation Scheduler module. To use the Installation Scheduler, you must activate features via the System Wide Setting, Installation/Measurement Settings, and then configure the optional web access to the Installation Scheduler.
1. The System Wide Settings menu is accessed via option 4 on menu SET (SET 4).
2. Use the Page Down key to navigate to the option Installation/Measurement Settings.
These settings allow you to:
make scheduling updates within Order Entry and Order Change.
decide to let Installation Scheduler modify a closed line.
include the option to assign default team or install date on the Installation Scheduler Order Header accessed from Order Entry.
to only show teams that can install a selected cost center. This setting comes into play when using the Available Install Dates and Teams screen which is accessed through option INS 32 or by pressing F1 when using the Installation Scheduler from Order Entry. For an example, refer to Available Install Dates and Teams.
|
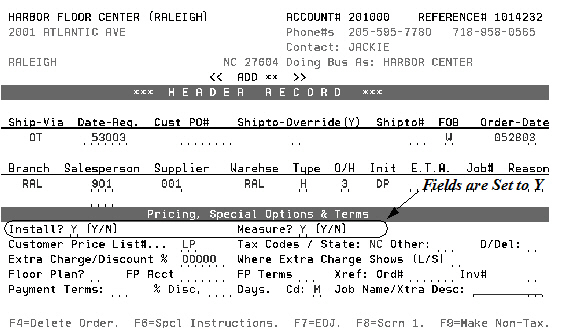
Order Entry (CUS 1) supports several fields and functions related to the Installation Scheduler.
Order Header
|
The Install and Measure fields indicate if the order requires installation or measurement services.
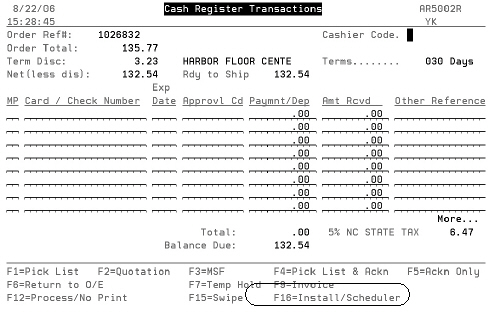
Cash Register Screen
On the Order Entry Cash Register screen, you can press F16 to access the Installation Scheduler & Shipping Status Update screen.
|
|
Master Control User File (SET 32) - Web Access Settings
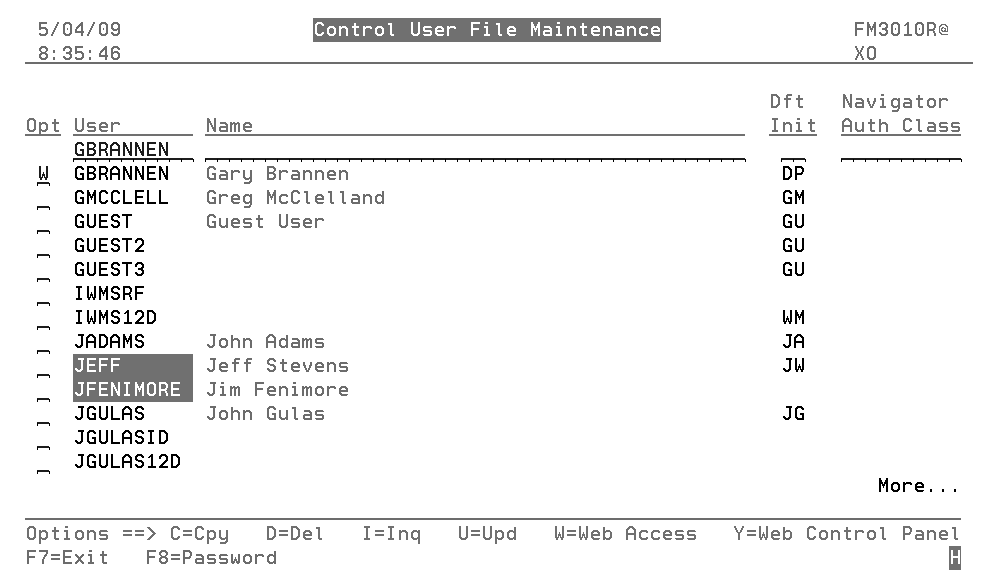
These settings establish the people who are going to be entering information into the web based Installation Scheduler. These are the main users of the system.
1. To access these seeting, go into SET 32 and use option W.
|
The following screen appears.
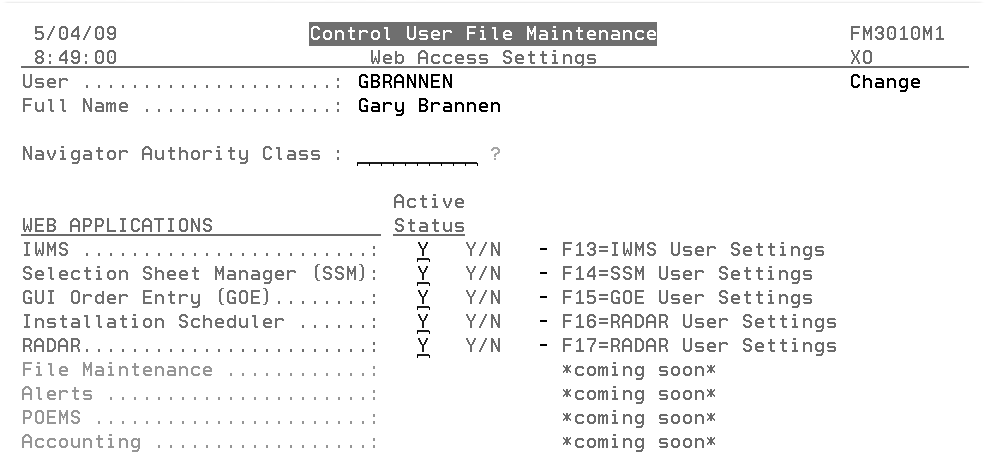
|
2. Press F16 (Shift + F4) to access the following settings.
Note: For information on these settings, refer to Working with Users - INS 1.
|
Installation Scheduler Web Services
Best Practices - Installation Scheduler
Navigator Installation Scheduler
Installation Scheduling and Order Status Update in Order Entry
How to tell what environment Installation Scheduler is running under


 o
o