Need more info or you couldn't find what you were looking for, let us know by sending an email to: support@dancik.com.
Menu Bars
Each AS/400 user can be assigned to a customized pull-down menu bar similar to those used in many PC-style programs. You can also customize menu bars to specific users or groups of users. These menu bars automatically adjust their features to the terminal or PC interface you are utilizing. These features include the ability to use a mouse, pointing device, or keyboard to scroll through options and to point and click, or position and enter. Menu bars can be configured to appear when you press the ATTN/ESC (attention/Escape) key. In effect, these menu bar programs replace the Operational Assistant Program, which is the IBM supplied default program for every user’s Attention key.
How To Assign Menu Bars To Users
Change Default Printer from Menu Bar
Customer and Item Cross References Searches
Menu Bar |
Description |
MNUB01CL |
For basic users. Offers very limited operational control. |
MNUB02CL |
For users who have system operator responsibilities. |
MNUB03CL |
For users with both operational and file maintenance responsibilities. |
MNUB04CL |
For users with both operational and file maintenance responsibilities. |
MNUB05CL |
This menu bar is designed for accounting personnel and should be used only from accounting programs. It contains files and inquiries commonly used by accounting personnel. |
MNUB06CL |
This menu bar is intended for customer service personnel who require a few limited operations and file options, event management, and some utility programs. |
MNUB07CL |
For Purchasing users. |
MNUBWHCL |
For Warehouse personnel |
If your company has a CL programmer on staff, they should refer to the IBM programming documentation regarding menu bar features. You can utilize the source code for the three menu bar programs we have provided as examples. You can then develop your own customized menu bars for each user or department. Note that Dancik International assumes no responsibility for the programs you create or for changes made to the menu bar programs we supply in this release.
How To Assign Menu Bars To Users
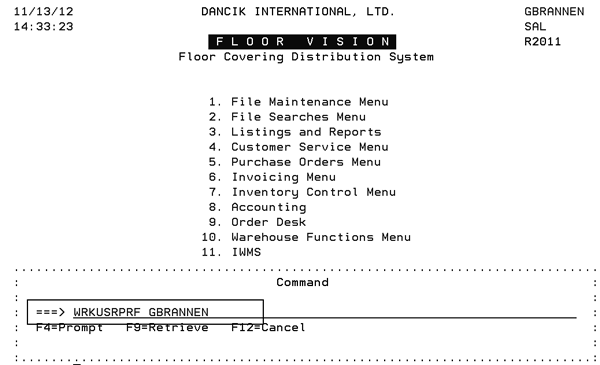
1. Enter the User Profile by entering the command WRKUSRPRF_XXXX (where XXXX is the user name) on a command line.
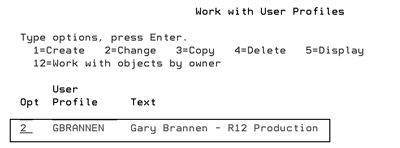
2. Use option 2 to change the User Profile.
3. Press Enter to access the User Profile.
4. Press F10 to display more parameters.
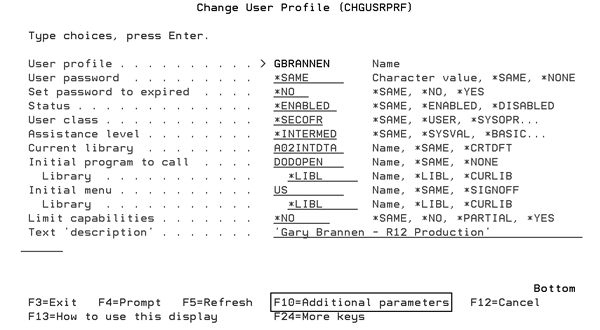
5. Page down until you get to the parameter screen that includes the setting Attention Program.
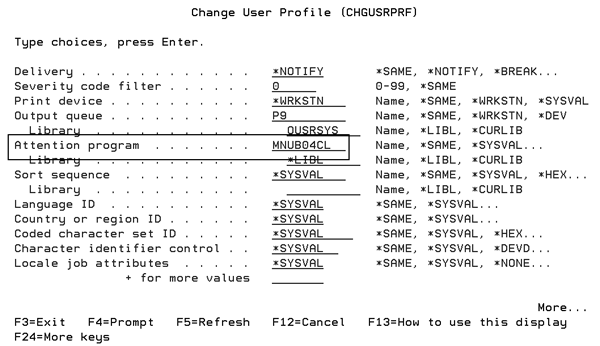
6. Enter the menu bar program name in the Attention program field.
Once a user profile is assigned a menu bar program as shown above, the user can press ATTN or Esc from nearly any screen and access the menu bar functions.
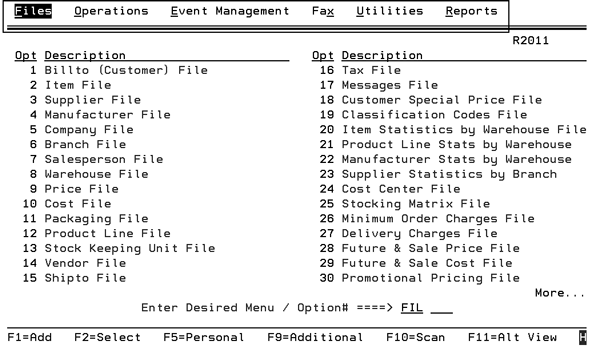
Exit the menu bar using F3. Use the arrow keys to move across and down through the menu bar options.
Note: The menu bar titles and options vary depending on the menu bar assigned.
Change Default Printer from Menu Bar
You can change the default printer for your session quickly and easily from the command (Change Your Default Printer) on the Menu Bar. Your default printer is used for all reports unless specifically overridden.
1. Press the Esc key. The menu bar appears at the top of the screen.
Note: Your menu bar may not appear as shown, there are several types of menu bars that can be assigned. Your user profile must have the menu bar assigned.
2. Navigate to Operations and press Enter; a drop down menu appears.
3. Select the command Change Your Default Printer. The Default Printer ID Selection screen appears.
4. Enter the printer ID to be used as the default. To perform a search of the available printers, enter “?” in the field. A selection box appears.
5. Make your selection and press Enter. The Default Printer ID Selection screen will reappear with your default printer displayed.
Note: F6 will return you to the Default Printer ID Selection screen without accepting your selection.
This feature overrides the default printer for regular reports and screen prints, but does not affect forms that have specific printer assignments, such as checks, invoices, pick lists, etc.
This feature changes the default printer for your session. When you sign off, your default settings will be re-instated.
If you want to return to your previous printer, then change your default printer again.
Customer and Item Cross References Searches
Two utility programs, Customer Cross Reference Tables Search and Item Cross Reference Tables Search, are available on the Utilities Section of the pull down menu bars. These programs allow you to identify item numbers and customer account numbers, by searching through the various cross reference tables on the system. For example, you have an item number, but you do not know what item it relates to. Is is a supplier’s item? A customer’s item number? An item number used by EDI only? These utilities attempt to find an item or customer account number in every possible cross reference table on the system.
Customer Cross Reference Tables Search
Enter the item number you are attempting to identify. The item number does not have to be an item number within your Item Master File. The program searches the following files and fields for the item number:
The Item Master File
The Supplier’s Item number field
All Customer Item numbers, as entered within the Customer Preferences File
All EDI cross reference tables that have a “From Item” and “To Item” column.
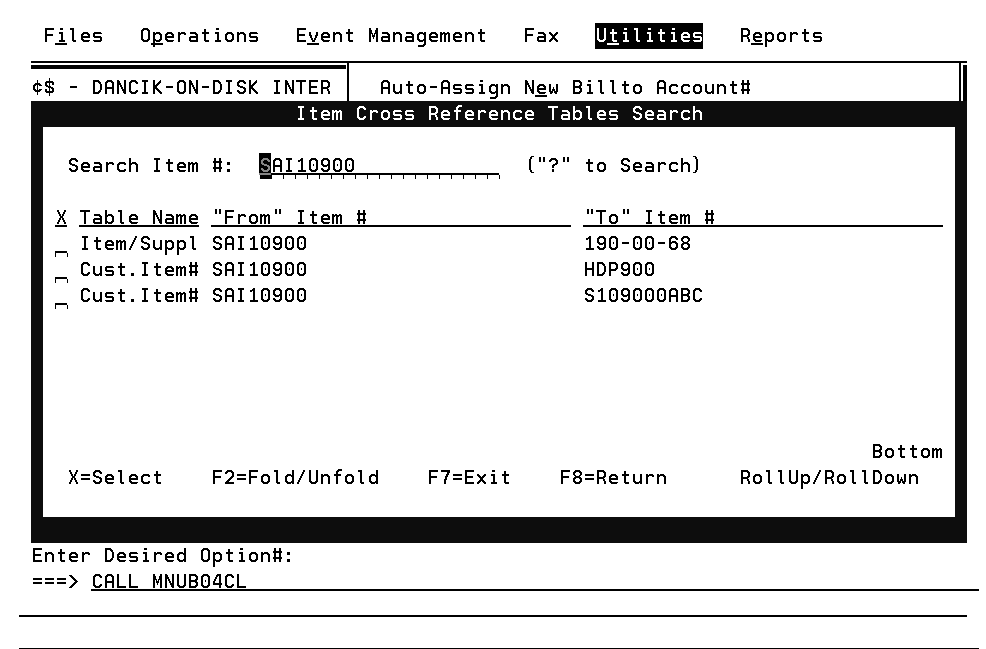
The results of the Item Cross Reference Search are shown below:
|
In the above example, the item number is found to be an Item Master File item. Therefore, the screen is showing all of the entries to which that item translates. Press F2 in order to display further details.
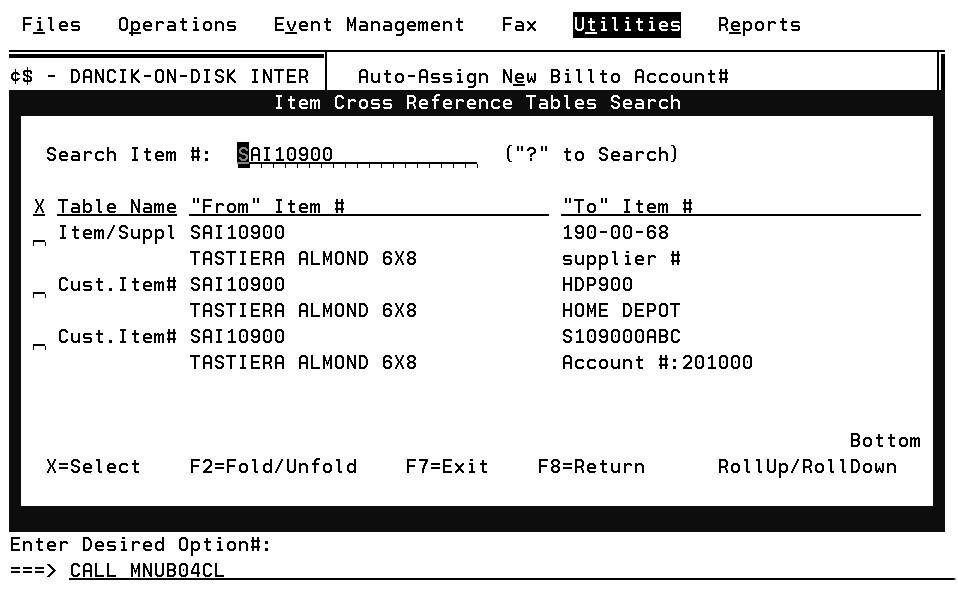
|
The F2 (unfold) option, displays the item description and a description of what each cross reference relates to. In the example above, the first cross reference is the supplier’s item number for that item, followed by Home Depot’s item number, followed by account number 201000’s item number. All of the item numbers relate to the same product.
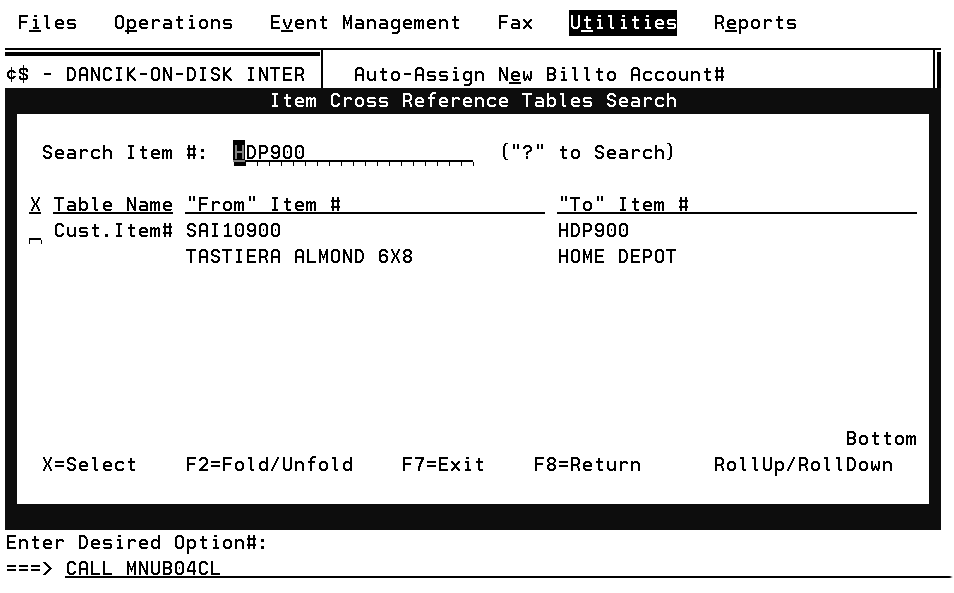
In the following example, the item number HDP900, which is not in the Item File Master File is searched.
|
The program returns the answer that Item# HDP900 is actually Home Depot’s item number for TASTIERA ALMOND 6X8, which relates to the Item Master Item number SAI10900.
Customer Cross References Search
Enter the account number you would like to identify, or the account number you would like to see all cross references for. The account number can be one of your Billto File account numbers or an account number from any EDI cross reference table that has “From Account” and “To Account” columns.
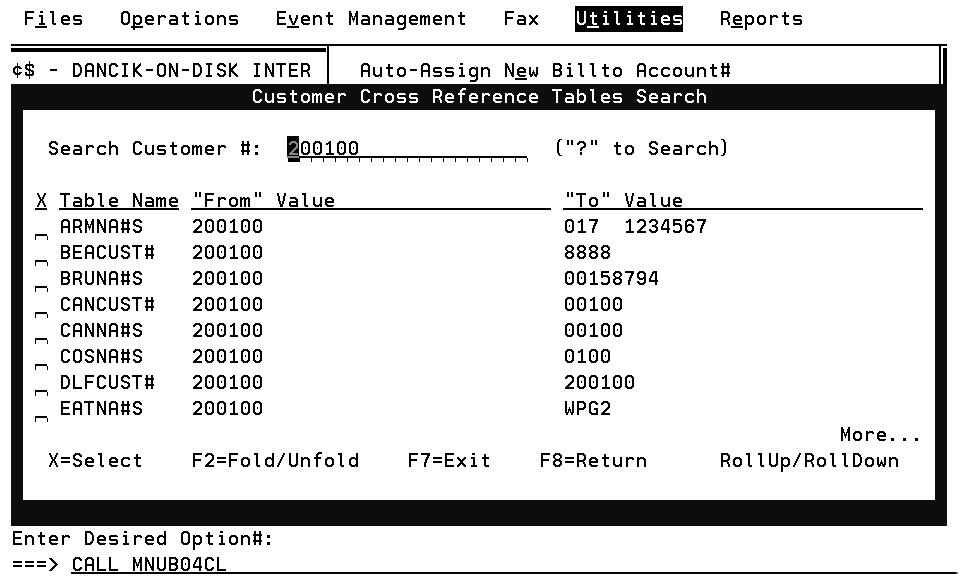
The results of a Customer Cross Reference Search are shown below.
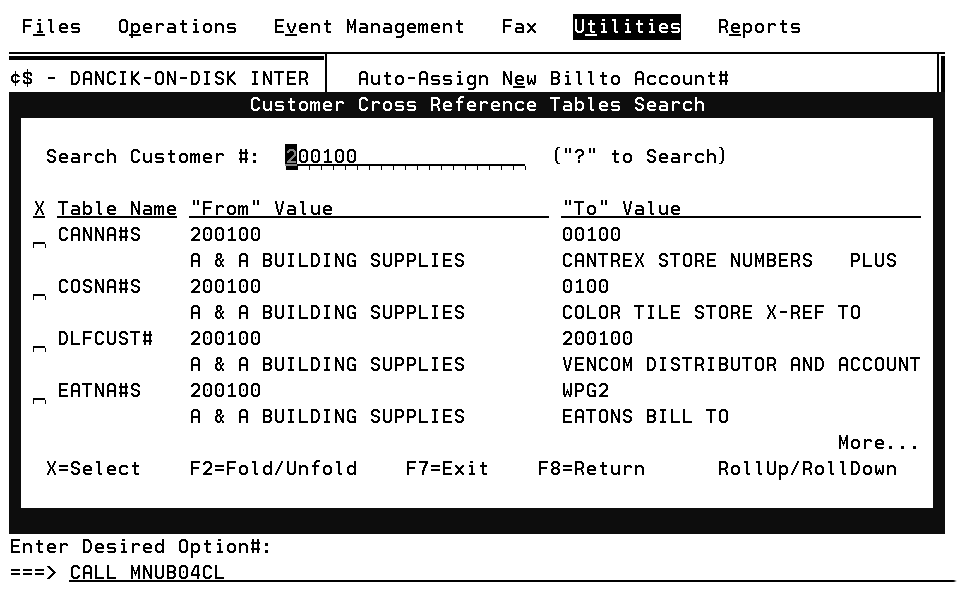
|
In the above example, account number 200100 is found in several EDI cross reference tables. Press F2 to display descriptions of each value shown.
|
The F2 (unfold) option displays the customer name from the Billto File and the description of the EDI table in which each cross reference was found. In the example above, there was a cross reference for Billto account number 200100 for several EDI trading partners, including Cantrex, Color Tile, Vencom, and Eatons.
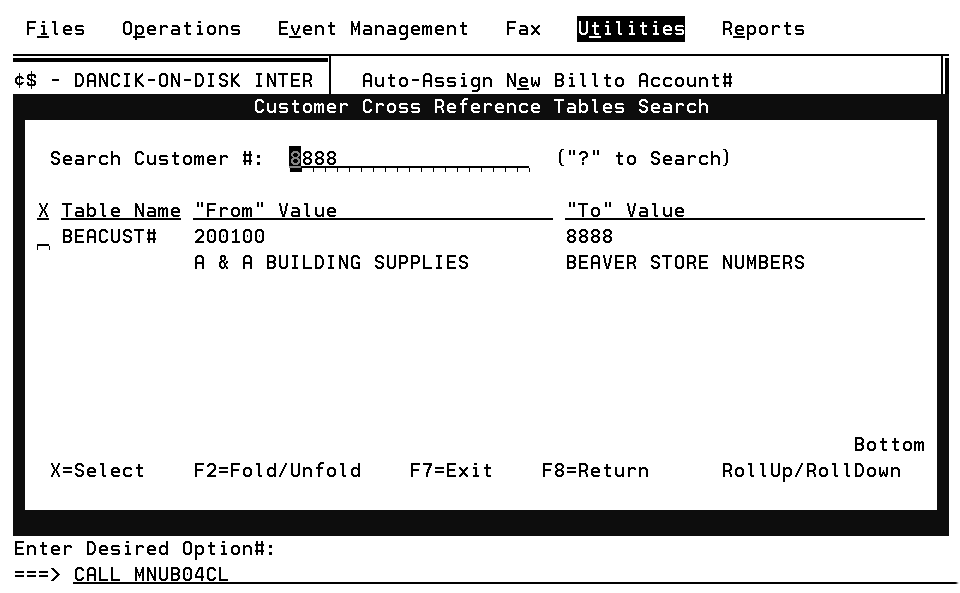
In the following example, account number 8888, which is not in the Billto File, is searched:
|
The program displays that account number 8888 is a Beaver Store that relates to Billto File account number 200100.
Menu Bar Does Not Have *ALL All users enrolled on system or *ALLACT All signed-on (active) users.