|
Need more info or you couldn't find what you were looking for, let us know by sending an email to: support@dancik.com.
This program, accessed via SET 3, contains company level system settings on four screens labeled record type 1, 2, 3, and 4. When accessing this program, you are prompted to select a company number and then a record type. The first screen displays all the companies on the system and allows you to update settings by entering an option next to the company you want to update.
Option 1 - System / Miscellaneous Options
Option 2 - A/R and Credit Options
Option 3 - Order / Invoice Print Options
Option 4 - Tax, G/L & Delivery/Route Options
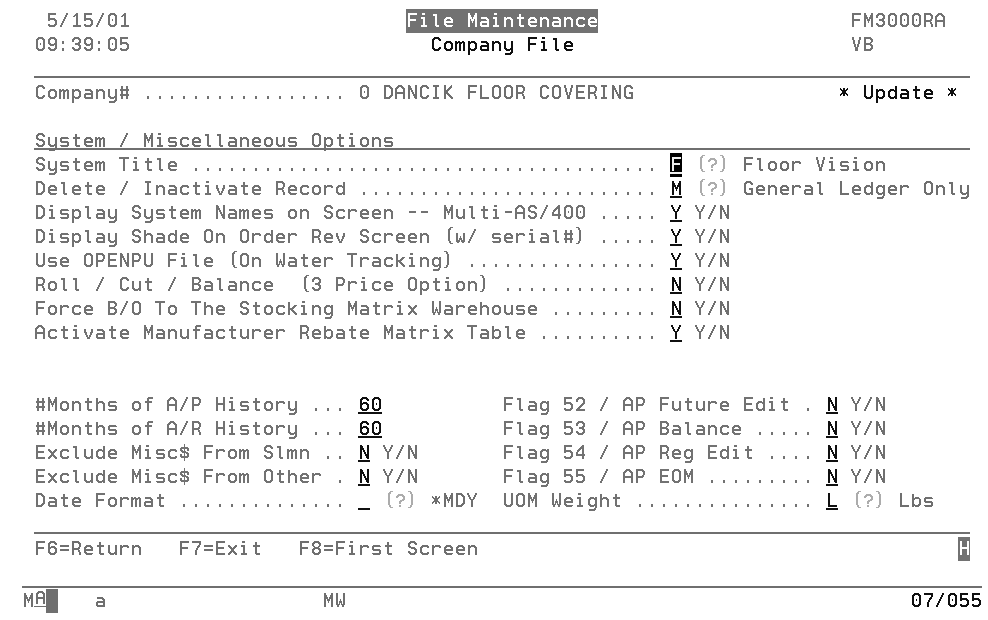
Company Settings - Option 1 - System and Miscellaneous Options
|
Field Name |
Description/Instructions |
Enter T to use Tile Vision as the system title. Enter F for Floor Vision, and M for Marble Vision. Enter V for VISION Distribution. |
|
Enter D to mark this company as deleted. Enter I to mark this company as inactive. Marking a company as inactive primarily applies to the AP System. An inactive company can be omitted from all AP closing procedures. Enter M to mark this company as using the General Ledger System only. |
|
Enter Y only if you are in an environment in which multiple AS/400s are being accessed and you want greater visibility of the system name. The system name is normally shown on most menus. This option causes the system name to display throughout the Order Entry and Order Change processes. |
|
Enter Y to display shades for serial numbered items when reviewing the order in order entry. Otherwise, enter N. This option pertains to the Shade field and not the Serial Number field. Set this option to N if you do not use the Shade field. |
|
Enter Y if this company will utilize the on water tracking fields, including vessels names, letters of credits, port dates, and container numbers. Enter N if you will not use these fields, which are designed primarily for importing. |
|
Enter a Y in this field if you want the system to consider three price options for rolled goods, instead of the usual two. Leave this option set to N to default to the normal two price setting. This option applies only to companies who offer roll, cut, and balance pricing. The usual pricing for rolled goods is as follows:
You can specify R, C, or M to require that the system prices the order using those restriction codes. The three price systems primarily affect the use of the B code, which retrieves the quantity of the remaining balance, as well as a price. Do not set this option to Y unless you have updated the Price File and the Promotional File for all rolled goods to include C, M, and R prices. The Roll Selection Screen displays C and M prices, rather than C and R. The system displays an error message if it cannot find an M price. |
|
Enter Y to force all back orders to check the Stocking Matrix File and confirm that they are back ordered out of the valid stocking warehouse for the customer. For example, if warehouse XYZ is the stocking warehouse for a product and customer, Order Entry automatically changes back orders for that product and customer to warehouse XYZ. Refer to Stocking Matrix File for more information. |
|
You can use the Manufacturer’s Rebate Matrix Table to establish standard rebates for a manufacturer based on the selling price. The table lets you proactively establish a rebate system with manufacturers who do not currently offer one, and simplify cumbersome account-by-account rebate programs. To participate in a rebate system, a manufacturer need only support your efforts to increase their market share. The Rebate Matrix Table contains the range of prices that trigger the rebates and the rebate amounts. This file can work in conjunction with rebates entered in the Promotional Pricing File. Any applicable rebate found in the Promotional Pricing File overrides any applicable rebate found in this file. You can also use the X by Y Rebate Analysis Report to report or claim these rebates from the manufacturer. |
|
Enter the number of months of AP history for the system to automatically maintain. We recommend that you keep at least 18 months. Every month, the system automatically purges AP history records older than the number of months entered in this field. This option affects history only and does not affect open AP records. Note A minimum of 12 months of AP history is kept even if less than 12 months is entered. |
|
Enter the number of months of AR history for the system to automatically maintain. We recommend that you keep at least 18 months. Every month, the system automatically purges AR history records older than the number of months entered in this field. This option affects history only and does not affect open AR. |
|
Enter Y to exclude miscellaneous (F6) sales lines from the (F4) sales analysis screens in the Salesperson, Sales Manager, and Sales Territory Files. Enter N if you do not want to exclude miscellaneous sales. Y is recommended. Miscellaneous (F6) sales lines are used primarily for freight and non-product charges. |
|
Enter Y to exclude miscellaneous (F6) sales lines from the F4 Sales Statistics Screens. Enter N if you do not want to exclude miscellaneous sales. Y is recommended. This option controls all files other than the Salesperson Files as defined in the option above. |
|
Enter 1 for the date format to appear in a day/month/year style. Enter 2 for the date format to appear in the month/day/year style. 1 is recommended for Australia. For companies that have the date format set to DD/MM/YY, all credit memos print the words “ADJUSTMENT NOTE”. This meets the Australian government standards for credit memos. 2 is recommended for Canada, although many date formats are acceptable. 2 is required for United States. This option affects only dates that appear on documents to customers, such as invoices, pick lists, and statements. |
|
This flag is used by Dancik International in diagnosing AP inbalances. |
|
The default is N. The flag is set to Y if your AP Balance Report is out of balance or you have not updated AP for end of month. This flag is maintained by the system. |
|
This flag is used by Dancik International in diagnosing AP inbalances. |
|
The default is N. The flag is set to Y only if you are running end of month AP activities. It prevents the posting of AP. This flag is maintained by the system. |
|
Enter L for the system to convert to LB on the pick list and other documents. Enter K if you are using KG (kilograms). L is the default. |
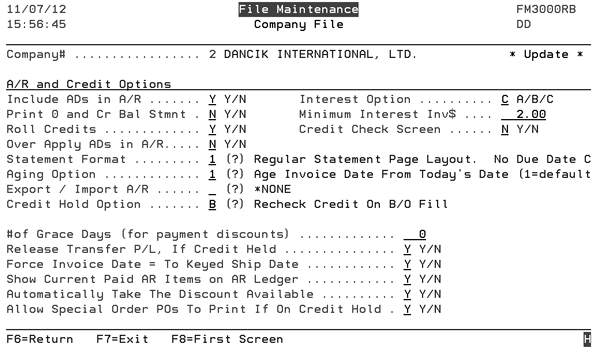
Company Settings - Option 2 - AR and Credit Options
Field Name |
Description/Instructions |
Enter Y to include the effect of advance deposits on all AR ledgers and reports. Enter N to not include the effect of advance deposits on the balances shown on all AR ledgers and reports. Unless advance deposits are tracked separately it is recommend that you enter Y. |
|
Enter Y to print zero or credit balances when requesting AR statements. Otherwise, enter N. |
|
Enter Y to roll credits and apply to the oldest invoices. Enter N to allow to age like debits. Y is recommended. |
|
Over Apply ADs in A/R |
This setting allows overpayments to be applied against invoices, as part of the “Auto-Match” feature. If you specify Y in this field, a $100.00 advance deposit may be applied to a $90.00 invoice, showing a $10.00 overpayment. If you specify N for this option, then a $100.00 advance deposit will apply only $90.00 to a $90.00 invoice and leave the remaining $10.00 as an open unapplied deposit. The recommended option is N. |
This option controls how interest charges are processed in the A/R system. Enter A, B, or C.
Method C interest must also be activated within the Accounts Receivable options of the system wide settings and also in the Payment Terms File. |
|
Enter the amount under which you do not want an invoice to generate when interest or service charges are calculated on past due invoices. |
|
This option controls the format of your accounts receivable customer statements. There are several formats to choose from. Format 1 - Regular statement page layout. Separate debit and credit columns. No due date column. Format 2 - Statement page layout with due date. Debit and credit columns are combined into a single “AMOUNT” column, with credits shown as negatives. Separate due date column. Format 3 is identical to Format 2 except that is shows the total of all outstanding invoices through the end of the next month as being due now rather than simply showing the entire account balance. This code also causes the Detailed Aging Report to show the total through the end of next month as a separate figure. Format 4 - Same page layout as AR Statement Code 1. Advance deposits are omitted from details and totals. A total of open advance deposits is shown separately on bottom of statement. Format 5 - Same page layout as AR Statement Code 2. Advance deposits are omitted from details and totals. A total of open advance deposits is shown separately on bottom of statement. Formats 6 and 7 are designed primarily for companies that sell to builders and contractors. These two formats can be used to show what job each invoice relates to. They are described below.
|
|
This option controls the default method of accounts receivable aging for this company.
Note Aging options work in conjunction with the Statement Format. |
|
Export / Import A/R |
|
Credit Hold Option |
Enter B if you want the system to recheck credit limits when back orders are filled or you can type a “?” to search for more options. Note The tables that are displayed when a “?” is entered, are maintained via System Tables Maintenance - SET 29. |
Enter the number of grace days to allow when determining if a discount is earned verses unearned on the Cash Application Screen. This field is also added in when determining if interest and service charges should be applied. Five days allows the customer five extra days of time. |
|
Enter Y to allow the system to release transfer paperwork for all orders, even if on credit hold. Enter N to hold back transfer paperwork until released from credit hold. |
|
Enter Y to force the invoice date to equal the ship date, regardless of the billing date. Enter N to use the current date as the invoice date. N is the default. This option pertains to batch invoice processing. When an invoice batch is run, the ship date of each invoice is assigned as the invoice date. This option can be overridden by specifying an invoice date when running a batch of invoices. |
|
Enter Y to enable AR transactions that have been paid or cleared in the current month to still appear on the AR ledger. Enter N to eliminate all paid or cleared AR transactions from the open AR ledger. This option does not affect history, which always stores all transactions. This option can be overridden from the AR Ledger Screen when inquiring on open AR transactions. |
|
Enter Y to cause the AR Cash Entry program to automatically take the available discount amounts when cash is applied to invoices. Enter N to have discounts entered by the user. Entering Y still allows you to override or clear the available discount amount. Discounts are taken only if they are still available based on the due date and grace days. |
|
If you enter Y for this parameter, special order purchase orders will print even if the related customer order is on credit hold. This option will not affect the release of the customer order. It only affects the purchase order. If you enter Y in this parameter, make sure your credit managers are aware of the change. If they ever want to cancel a special order while it is on credit hold, they also must cancel the purchase order if it was already printed. |
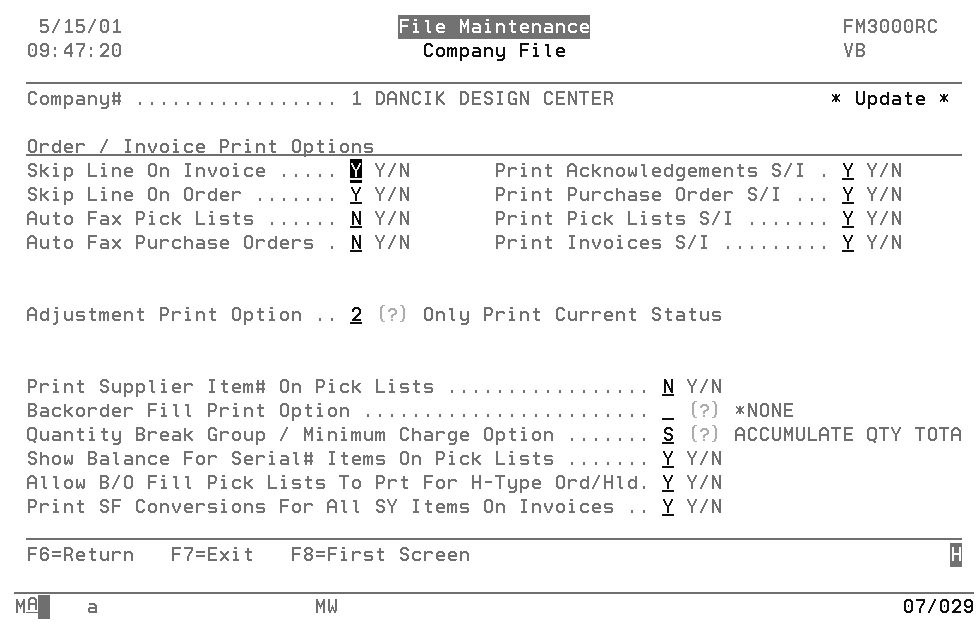
Company Settings - Option 3 - Order and Invoice Print Options
|
Field Name |
Description/Instructions |
Enter Y to skip a line in between each item on an invoice. Otherwise, enter N. |
|
Enter Y to skip one line between items on a pick list. Otherwise, enter N. |
|
Enter Y to use the AS/400 fax support to fax pick lists rather than printing them. The system checks the Auto-Fax field of the Warehouse File. It transmits the fax if a valid fax number is found. If you do not use this feature, enter N. This option is available only if you use an integrated fax system, such as Facsimile/400. |
|
Enter Y to use the AS/400 fax support to fax purchase orders rather than printing them. The system checks the Supplier File before faxing. A supplier must be coded with policy AF (for auto-fax) and a valid fax number. If you do not use this feature, enter N. This option is available only if you use an integrated fax system, such as Facsimile/400. |
|
|
S/I |
Enter Y to enable the printing of product knowledge from the Manufacturer File, Product Line File and Item File, and Billto File Special Instructions on order acknowledgements. Otherwise, enter N. |
Enter Y to enable the printing of product knowledge from the Manufacturer File, Product Line File, and Item File, as well as special instructions from the Billto File on purchase orders. Otherwise, enter N. |
|
Enter Y to enable the printing of product knowledge from the Manufacturer, Product Line, and Item Files as well as Billto File special instructions on lists. Otherwise, enter N. |
|
Enter Y to enable the printing of product knowledge on manufacturer, product line, and Item File as well as customers special instructions on invoices, Otherwise, enter N. |
|
Enter option 2 to enable the recommended method for adjusted pick lists and orders to print, which is to always print the current open status of each order. Enter 1 to always print the original status of the order. 1 is not recommended. |
|
Enter Y to print suppliers statement number on pick lists. Enter Y only if you need the suppliers item number to print in addition to the actual item number. Otherwise, enter N. |
|
There are four back order print options. These options control which type of lines will print on a back order fill pick list. Back order fill pick lists automatically print when receipts are processed. Enter one of the following options:
If options 2 or 3 are used, transfer lines print on the Back Order Fill Pick List if it is the first time a regular pick list has printed, regardless of whether or not the transfer pick list was yet run. Also transfers will always show “TFR from.....” rather than “See Original” even if the pick ticket already printed. If back orders are sent to credit hold, they do not print until released. When an order uses order handling code 5 (must ship complete), the system only prints the back order pick list when all back orders on the order have been filled. |
|
This option controls how orders are grouped together during invoicing for the purpose of assigning quantity break group discounts and minimum order charges.
Refer to Minimum Order Charges File and Quantity Break Pricing for more information. |
|
Enter Y to have pick lists show the balance that should remain in stock for all serial number items. For example, an order of 5 EA of a serial number item could show “PICK 5, REMAINING BALANCE SHOULD BE 126”. This enables warehouse personnel to perform a cycle count while picking. This feature is always activated for rolled goods regardless of this option. |
|
This field is applicable to companies that use the Permanent Hold feature. Permanent holds are orders that are entered with Type H on their Header Screen, and then processed like regular orders. When Type H is used, pick lists, bar coded labels, and other documents are printed if requested, but pick lists show “HOLD/CONFIRM BEFORE SHIPPING”. Permanent holds are meant for situations in which the inventory needs to be held, the order needs to be staged (often in a “pack and hold” area), but shipping or pickup cannot be done without specific final approval or instructions. When you only require the allocation of stock, but not the pre-staging of material, use the temporary hold feature. Entering an N in this field enables you to enter orders for which all paperwork is withheld until released by customer service or shipping personnel. After setting this parameter to N, follow these procedures:
|
|
Enter Y to print square foot (SF) conversions for all square yard items on invoices. When you enter Y, square yard items show quantity and unit price in SY followed by quantity and unit price in SF. |
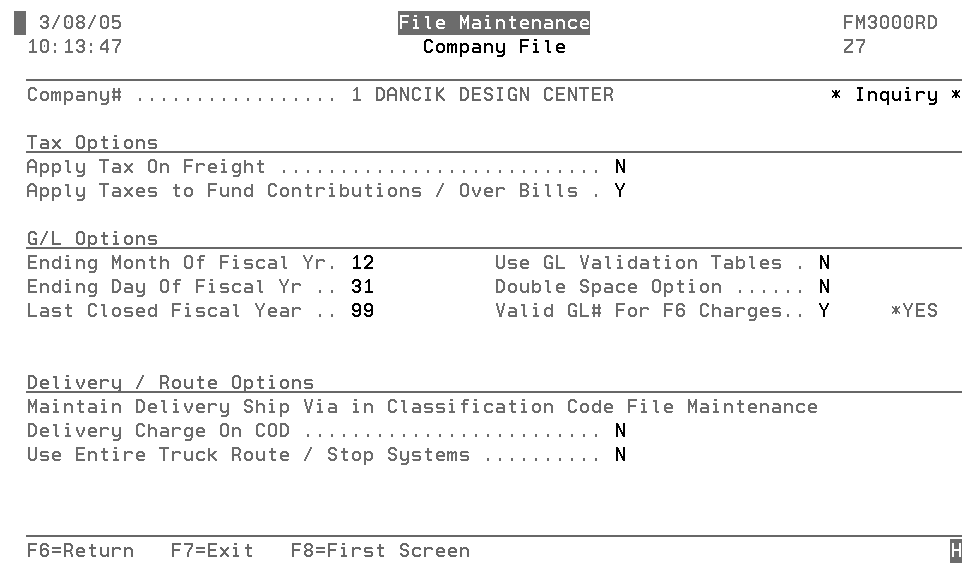
Company Settings - Option 4 - Tax, GL, Delivery and Route Options
|
Field Name |
Description/Instructions |
This field is currently not used. It has been superseded by options in the Tax File. |
|
Enter Y to apply taxes to overbills (funds) when an order is placed. Otherwise, enter N. Although fund contributions are technically a liability rather than a sale, we recommend setting this option to Y to prevent needing to explain funds and overbills in the event of a tax audit. |
|
Enter the month your fiscal year ends. For example, if your fiscal year ends June 30, enter 06 in this field. |
|
Enter the day of the date of your fiscal year end. For example, if your year ends on April 30, enter 30 in this field. |
|
Enter the last closed fiscal year of your GL. This field is manually set only when first establishing the GL system. Do not reset this field once the system is activated. |
|
Entering a Y in this field activates the GL Validation Table functions, which are entered and listed via page two of the Accounting File Maintenance Menu. If this field is left blank, the system assumes a value N. The GL Validation tables enable you to define the combinations of account number, branch, and cost center that are valid or invalid. Once a GL Validation Table is created, the accounts payable and general ledger edits will test for and report any invalid combinations that are found. |
|
Enter Y to skip a line between entries on the GL report and other condensed print on GL Reports. N is the recommended option for this field. |
|
Enter Y in this field in order to require and validate the GL account on Order Entry F6 (miscellaneous sales) lines, but not the cost center. Enter B to require and validate both the GL account number and the cost center on Order Entry F6 lines. Entries are required only when dollar amounts are entered on the F6 lines. Enter N or leave the field blank if you do not require GL accounts or cost centers to be entered or validated on Order Entry F6 lines. |
|
Enter Y to charge delivery charges on all COD orders prior to invoicing. Otherwise, enter N. Refer to Delivery Charges File in the File Maintenance Reference for detailed information regarding delivery charges and COD orders. |
|
Enter Y to use the truck routing features. If you do not use these features, we recommend that you set this option to N. Refer to the Delivery System Reference for more information regarding truck routes. |