Need more info or you couldn't find what you were looking for, let us know by sending an email to: support@dancik.com.
Item File - FIL 2
Item File Inventory Status and Fiscal Year Statistics Screen
Item File Sales Analysis Screen
Item File Production Statistics Screen
Item File Auto-Duplication Capability
Item File Special Instructions Screen
Auto UPC Code Generation in Item File
Setting up Labor and Expense Items File Records
The Item File is used extensively throughout the system to describe and classify products. Before adding an item to the Item File, you must first enter data in the Supplier File - FIL 3, Manufacturer File - FIL 4, Product Line File - FIL 12, and optionally, the Price File - FIL 9, Cost File - FIL 10, and Packaging File - FIL 11. The Item File also includes many optional codes and categories that must first be established in the Classification Codes File - FIL 19.
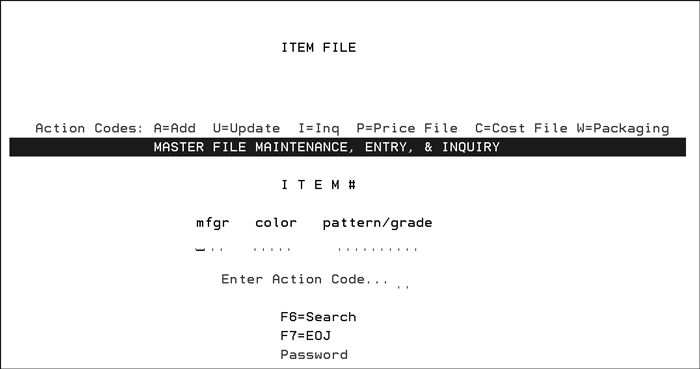
1. On the main menu, enter option 1 - File Maintenance & Inquiry.
2. On the File Maintenance & Inquiry screen, enter option 2 - Item File. The Item File Entry screen appears.
3. Enter a 16-character Item #, including manufacturer code, color code, and pattern/grade code. These codes are described as follows:
The four-character manufacturer code represents a manufacturer previously entered in the Manufacturer File. For some natural products such as marble or slate, you can use a code representing the type of product, or the country of origin or both, such as MAR for Marble, CHI for Chinese, or ISL for Indian Slate.
The color code is alphanumeric code representing the color, product line, or both. The color code can contain up to four characters.
The pattern/grade code represents the items pattern, grade, or both. The pattern number code can contain up to nine characters.
Note: The Item File adheres to the Business Entity logic. This means that if you try to access an item from a Manufacturer not in the your assigned Business Entity you will receive the following error message: MANUFACTURER NOT VALID FOR THIS USER! THIS MANUFACTURER IS NOT IN USER'S BUSINESS ENTITY! For more information on Business Entities, click here.
4. Enter one of the following Action Codes:
A to add a new record
U to update a record
I, or leave blank, to inquire about or view a record
P to access the related Price File record. The related Price File record is the record represented by the item’s price class.
C to access the related Cost File record. The related Cost File record is the record represented by the item’s cost class.
W to access the related Packaging File (weights and measures) record. The related Packaging File record is represented by the item’s packaging class.
Note: See Action Codes P, C, W for more information about these codes.
5. Enter the Password, if required.
6. Press Enter. The Item Profile Screen appears.
The item number can be similar to the manufacturer’s number to simplify processes such as identifying items and ordering. However, you can also store manufacturers’ and suppliers’ item numbers in a separate file in the Item File.
You don’t need to use the color code and pattern code mentioned in the above procedure. You can use these fields together as a single 13-character field, and enter the item number however you want. But, the three-character manufacturer code is mandatory. You should standardize your item numbers using the Mfgr/Color/Pattern format, or using another consistent scheme, making it easier for users to find an item number, even if they only know one or two characteristics of the item. If the manufacturer uses color, pattern, grade, or product numbers that are widely used and recognized, you should incorporate them into your item numbers.
Using these codes is similar to using hot keys. They take you from the Item File Maintenance Program to either the Price, Cost, or Packaging File Maintenance Programs. Once in these target programs, you can return to the Item File Maintenance Program by pressing F16, which is the Item File hot key. The item number and password, and mode of operation, is retained while you mover throughout these programs.
Note: Having identical passwords within these programs prevents you from having to enter several passwords as you transfer among programs.
The following example shows how to navigate and update an item and its related Price, Cost, and Packaging File records using the new action codes.
1. In the Item File Maintenance Program, enter an Item #, Action Code U, and a Password. Press Enter.
2. Update the Item File as needed.
3. Press F8 to return to the Item File Entry Screen.
4. Change the action code to P, and press Enter. The related Price File record appears in Update mode.
5. Update the Price File record as needed. The program remembers your original action code of U.
6. Press F16 to return to the Item File. The previous Item File record appears.
7. Press F8 to return to the Item File Entry Screen.
8. Change the action code to C, and press Enter. The related Cost File record displays in Update mode.
9. Update the Cost File as needed.
10. Press F16 to return to the Item File. The previous Item File record appears.
11. Press F8 to return to the Item File Entry Screen.
12. Change the action code to W, and press Enter. The related Packaging File record appears in Update mode.
13. Update the Packaging File record as needed.
In the above example, if high-level passwords in all related programs are the same, the program does not prompt you to enter passwords each time you transfer between programs.
These action codes are also available for the Item File Search Screen and are use as follows within the Item Search:
P - displays the related Price File record for the item if the item contains a price class code. If the item does not contain a price class code, and pricing is at item level, then the Item File record displays.
C - displays the related Cost File record for the item if the item contains a cost class code. If the item does not contain a cost class code, and costs are stored at item level, then the Item File record displays.
W - displays the related Packaging File record for the item if the item contains a packaging class code. If the item does not contain a packaging class code, and packaging data is stored at the item level, then the Item File record displays.
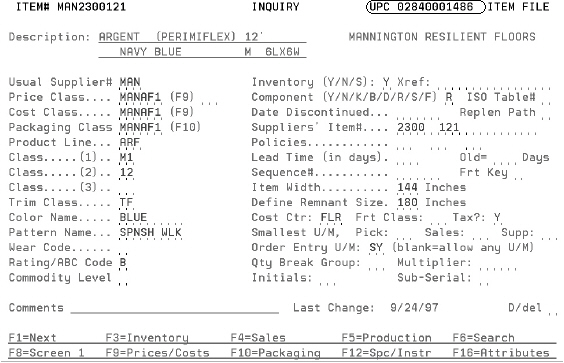
The item profile describes an item by linking to the codes on the Item File Profile screen. You need to specify the supplier you usually purchase the item from as well as the associated price, cost, packaging, item and trim classes. You can press F9 and F10 keys to specify price, cost, and packaging information if you do not want to build a class for an item. For example, you might not want to build a class for a item that is unique in price, cost, and packing information.
When you complete the necessary fields on the Item File Entry Screen screen, and press Enter, the Item Profile screen is displayed.
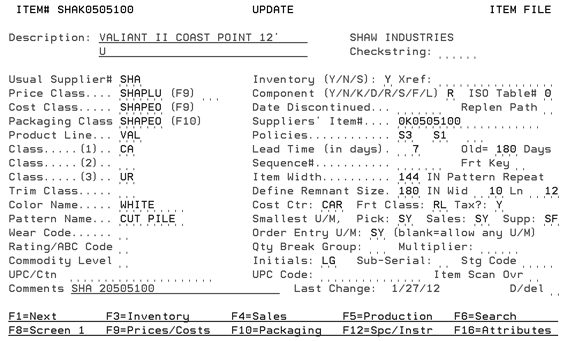
Note: Values for the Class 1, 2, and 3, Trim Class, Wear Code, Commodity Level, Frt Class, and Qty Break Group are maintained in the Classification Codes File.
The following table describes the fields on the Item Profile Screen.
Field Name |
Description/Instructions |
Item Number |
The first three characters need to match the Mfgr code. The 13 characters after the Mfgr code can be anything you choose. We recommend that if you use the Mfgr code, use it as your item number. Ignore the color and pattern title. If you do not have a Mfgr code, and must create your own code, the key to finding the item number easily is consistency. For ceramic tile the color field should be the first two character of the product line and the next two characters could be the color. Enter the size in the pattern field. You could enter 4 x 4 44 or just 4. For example, from AOT Bright and Matte Blue 4x4 you could create item number AOT BMBL 44. |
Description |
A description of the item consisting of up to two lines of 30 characters each. Descriptions should be entered in a consistent manner. We recommend the following format: Enter the product line or series name followed by the color and pattern. For example, enter Tuscany Bone 6x6 where Tuscany is the product line, bone is the color, and 6x6 is the pattern. Enter Superhold Regular 20 LB, where Superhold is the product line, regular is the type, and 20 LB is the pattern or size. If you use the second line of the description, we recommend that you indent by three spaces so that screens and reports are easier to read. We also recommend that you only use the second line of the description when absolutely necessary. Leaving the second description line blank allows twice the number of items to display on many screens, documents, and reports. Note: To automatically indent the second line of the description, refer to the Special System Setting - Automatically Indent 2nd Line of Item Descriptions - SYS 702. |
Usual Supplier # |
The three-character code of the usual supplier of this item. This supplier is used when special orders are processed and when automatically generating purchase orders from the Reorder Reports program. You can override this supplier number on purchase orders. Any item number can be ordered from any applicable supplier number. Using the Cost File, you can define multiple suppliers for a single item. |
Enter the price class of the item if the item is part of a price class that has already been set up in the Price File. If you try to change the price class to one with a different unit of measure, an error message appears. The system protects you from inadvertently changing the unit of measure for an active item by changing it to another price or cost class with a different unit of measure. Changing the unit of measure for an item that is active—having any open orders, purchase orders or inventory—causes many problems, as all transactions and statistics are assumed to be in the items’ native unit of measure. In order to further protect the integrity of statistics, we recommend that you create a new item number, rather than changing the unit of measure, unless the item has not been used significantly. |
|
The cost class of the item if the item is part of a cost class that has been set up in the Cost File. If you try to change the price class to one with a different unit of measure, an error message appears. The system protects you from inadvertently changing the unit of measure for an active item by changing it to another price or cost class with a different unit of measure. Changing the unit of measure for an item that is active—having any open orders, purchase orders or inventory—causes many problems, as all transactions and statistics are assumed to be in the items’ native unit of measure. In order to further protect the integrity of statistics, we recommend that you create a new item number, rather than changing the unit of measure, unless the item has not been used significantly. |
|
Enter the packaging class of the item if the item is part of a packaging class that has been set up in the Packaging File. Note: To access a listing and description of the available Packaging codes enter “?” and press Enter. |
|
Note: Price, Cost, and Packaging Class codes should have been previously set up by creating records in the Price, Cost and Packaging Files. If you choose to enter prices, costs, and packaging information separately for each item, you can leave these fields blank and press F9 and F10 to enter the information. However, we highly recommend that you use Price, Cost, and Packaging Classes. If you use class codes, you can use many advanced functions on the system, and save time and effort when more than one item share the same pricing and packaging information. |
|
Product Line |
The three-character code of the product line to which this item belongs. Product lines must first be set up in the Product Line File. |
Class (1) |
A user-defined two-character code for classifying the item. You have up to three Class fields in which to classify the item. Class 1 is the most general of the three item classes. It is also the most important because it is used in the pricing and salesperson assignment programs. Price lists and promotional pricing can be assigned to a customer for specific item Class 1 entries. A customer can also be assigned multiple salespeople based upon Item Class 1. Following are examples of codes. Define your codes and set them up in the Classification Codes File - FIL 19.
|
Class (2) |
A user-defined two-character code to further classify an item. This should be a more specific classification than Item Class 1. For example, an Item Class 1 entry should be broken down into Item Class 2 entries. You must define these entries in the Classification Codes File - FIL 19. |
Class (3) |
A user-defined two-character code to further classify the item. Use this field only if other meaningful classification is needed for your entries in the Item Class 1 and 2 fields. These codes are defined and entered in the Classification Codes File - FIL 19. |
User-defined two-character code. If the item is a trim piece, enter a code to identify the class of trim piece. If you do not categorize trim, enter TR if the item is a trim piece. For ceramic tile, you can use codes such as BN for bullnose and AN for angles. For wood, you can assign trim classes for items such as reducer strips and stair nosings. Trim class can also be used to identify items that are not core items, but support the sales of core items. Many reports allow you to omit trim or analyze it separately. You can consider samples as trim. Note: To see a listing and description of the available Trim Class, codes enter “?” and press Enter. |
|
The color name of the item. To make searching by color easier, enter the actual color instead of the manufacturer’s designation. For example, if a manufacturer calls an item “snow” that is actually white, the color name should be “white.” If color is not important or applicable to an item, you can use this field for another category such as style, texture, type, or finish. For example, tools can be categorized by type, such as trowel or saw. Color Name is a required field and should be used to help you search for items, rather than for organizing inventory. For this information to be useful to the customer service personnel, color names should be somewhat general and used consistently. For example, use “white” for the various shades of white, so that customer service can quickly search for inventory with that color name without having to search for every shade of white. For items with a color name of MISC, ignore the setting to always fill in the O/E UM. Miscellaneous items must have a blank in this field to work in some settings. For example, when you enter a miscellaneous item code in order entry, you might want to order the item in any unit of measure. Note: To see a listing and description of the available Color Names, enter “?” and press Enter. |
|
Enter the pattern name of the item. You should standardize pattern names to make searching easier. Following are suggested pattern names:
We strongly recommend that you use a consistent system for color and pattern name fields. You can use the item search function to search by color or pattern or both. So, for example, you can find products by entering Blue 4 x 4, White Berber, or Thinset 20LB. Note: To see a listing and description of the available Pattern Names, enter “?” and press Enter. |
|
This is not a required field. However, you can use the rating code used to help identify items sales ranking or it can be completed later by the system. Commodity level can be helpful in sales analysis. Use industry standard codes when possible, such as 1, 2, or 3. Otherwise, assign codes that indicate whether the product is suited for uses such as residential, commercial, or industrial. Note: To see a listing and description of the available wear codes, enter “?” and press Enter. |
|
You can use this field to rank and classify products for integration with reorder and ranking reports. You should use it to classify items from best (A) to worst (D). Use code S to identify support items, which are items that support the sales of other (hopefully A rated) items. Support items need special reorder parameters, because their sales statistics often do not justify their stocking requirements. Also, consider using N for new items. New items need special considerations until sales patterns are established. ABC codes are created through the ABC Code File -FIL 34. Note: To see a listing and description of the available ABC codes, enter “?” and press Enter. |
|
A user-defined, one-character code describing an item’s the level of relative value. Establish a code for each commodity level, such as H for high-level or luxury items, M for medium-level items, and L for low-value or commodity items. You should establish all commodity level codes in the Classification Codes File - FIL 19. All strategic management statistics are available by commodity level. Note: To see a listing and description of the available Commodity Level codes, enter “?” and press Enter. |
|
A required field that denotes whether the inventory is stocked, not stocked, or special ordered. Enter S to create automatic purchase orders for these products. You should use the special order code in specific cases, and not for inventory you do not stock in your warehouse. Enter:
You can generate a special order to a supplier even if you enter Y or N. Enter S only when you want a special order to be mandatory every time the item is entered on a customer order. Make sure that you are familiar with how the special order system functions before setting this field to S for any items. Note: To see a listing and description of the available Inventory codes enter “?” and press Enter. |
|
Xref |
Used to cross-reference one or more item numbers to another item’s inventory. Used primarily for private labeling programs in which multiple item numbers have the same physical inventory. |
The component code denotes whether the inventory is a type such as serial, or rolled goods. If you plan to use ISO tables for different types of products, enter the ISO rule table number. The system uses the ISO rule table number system when this item is entered on an order. Only enter an ISO table number if it overrides the default Enter:
The system treats an “L” coded item similar to an “F” (Fund) item, which is mainly that all inventory files are bypassed. A typical “L” item is “Labor To Install Carpet” at $1.99 SF or “UPS Sample Charge”. These items are used like any other item - in Order Entry, ISO, and Bills Of Material, except that all inventory files & updates are bypassed. Companies that use these “L” items may also set up a special Cost Center (or multiple special cost centers), so that the GL Interfaces can differentiate between inventory items and Labor/Expense items. Do not confuse labor/expense items with non-stock items. Non-stock items are not normally stocked, but they still flow through inventory once purchased. This option enables your system to work as efficiently for selling services and labor as for selling materials. It also enables companies that do installations or fabrication to use all of the powerful sales analysis reports & screens to analyze labor as well as materials. Note: For more information on creating labor/expense items, refer to Setting up Labor/Expense Item File Records. |
|
The one-character entry relating this item to an ISO (Inventory Selection Optimizer) table, which includes instructions about how inventory should be processed for this item. Note: For more information, refer to ISO. |
|
Date Discontinued |
The date on which the item is discontinued or the date your supplier stops carrying the item. Items with a date entered here appear on the Discontinued Items List. If you enter a past date, including today, the item appears in reverse image. If the item is out of stock, on order, or allocated, the Order Entry system does not allow further orders. When the item has been discontinued for more than one year and is out of stock onhand, on order, or allocated, the item drops off the inventory screens entirely, unless the Item Master or Stock Card Screen is specifically requested. If you enter a future date, the item appears in reverse image on Inventory Search until that date is reached. The item can be ordered or sold as usual. If you are discontinuing an item, but still have some in stock, enter DI in one of the three Policy fields. DI indicates the item has been discontinued, but can you can still take orders for it. When you deplete your stock, you can enter the date on which the item was discontinued in this field. You can also enter a future discontinue date at any time, which indicates that no purchase orders or back orders for this item are allowed after that date. |
Replen Path |
The replenishment path indicates the method in which the item is reordered.
|
Supplier’s Item # |
The item number as defined by the supplier, if different from the item number you have established. This item number appears on all purchase orders to your supplier for this item. You can search by the supplier’s item number using the Item Search function. |
Three two-character fields, which can be both system and user-defined. A policy code is used to trigger special processing or to identify special items. A policy code can be entered in any of the three policy fields, in any order. If you want to create user-defined policy codes, we recommend that you use only numeric codes from 01 - 99. This method prevents possible conflicts with system-defined policy codes, which are alphabetic and contain at least one alpha character. Many item and inventory reports allow the use of policy codes as selection criteria. Following is an explanation of the system-defined policy codes:
Note: In order inquiry the quantity in pick u/m will override the bin location field. To convert quantities to the pick unit of measure. This policy makes management easier for certain types of products that are priced and analyzed in an area or volume unit of measure, such as SF or GL, yet always sold and handled by the piece or each (PC or EA). Products that you might want to consider for policy PU are: - counter top or solid surface materials, such as Wilsonart Gibraltar and Dupont Corian - setting materials and chemicals that are priced by a volume unit that is inconsistent with how they are sold and handled. For example, a five gallon drum that is only sold as a full unit, yet priced by the gallon.
Note: The RD policy code on an item does not work when that item is part of a BOM/KIT.
The promotion can be entered against a broad category, such as item class or manufacturer, as well as against narrow categories, such as price class or product line. The important thing is to limit the promotion to policy code RI in the Limit to Policy field, of the Promotion File. This technique is the most efficient way of locking out all unauthorized customers from a defined list of items. If you are simply locking customers out of a single manufacturer or product line, you can point the promotion to that manufacturer or product line, without the use of policy codes. For more information, refer to Restricted Items.
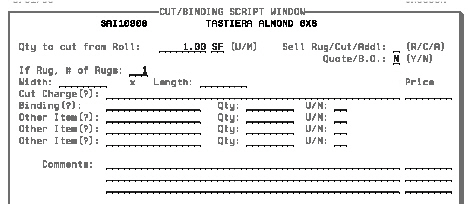
Qty to Cut From Roll - Enter the length to cut from a roll. This length should accommodate all rugs that are to be created from this cut. Only leave this field blank if you are using this screen to order additional rugs from a previously ordered cut. U/M - Enter the UM that relates to the quantity to cut. Sell Rug/Cut/ Addl - This entry controls whether you are selling the cut as is, or creating rugs. — R - Creating rugs. R causes some of the fields below to become mandatory. — C - Sell the cut as is, without creating a rug. — A - Create additional rugs from material previously ordered. When A is entered, the quantity to cut field is left blank. Quote/B.O. - N indicates this is a regular order and stock will be allocated by ISO. Y means this is a quote or back order. No stock will be allocated by ISO. If Rug, # of Rugs - If you are creating rugs (as indicated by an R or A entry in the Sell Rug Field) then enter the number of rugs being created. Width/ Length - If you are creating rugs, enter the width and length in FT (feet plus inches). For example, enter 6 for six foot. Enter 6.06 for six foot plus six inches. Cut Charge - Enter a description of a cut charge if applicable. Enter a question mark (?) to display the macro message manager, and select a cut charge. Price - Enter the extended price of the cut charge if applicable. Binding - If creating rugs, enter the item number for the binding. You can enter a question mark (?) to search for item numbers. The quantity of the binding is automatically calculated in LF (lineal feet) as the sum of the width and length multiplied by two. In the example above, the binding quantity is 2x(6+10). Other Items - You can optionally order additional items from this screen. Comments - Enter comments if applicable. These will appear as F6 lines on the order. The space to the right of each comment is for a miscellaneous charge.
Note: To see listing and description of the available Policy codes enter “?” and press Enter. |
|
Lead Time (in days) |
The number of days from the time a purchase order is placed until the item is received. This field overrides the Lead Time entry in the Product Line File. If left blank, it is assumed that the related Product Line File entry applies to this item. Since all items in a product line usually have the same lead time, this field is usually left blank. |
Days Old |
The number of days after receipt of this item. This field is used in the Inventory Search and Stock Selection programs. |
Sequence # |
Alphanumeric field for optional special sorting. Within a product line, manufacturer, or color number, this number can be used to put items in a specific order regardless of other codes, such as item number and pattern. You can usually achieve optimum sorting, even if you leave this field blank. |
Frt Key |
Determines how freight rates should be calculated in applications that involve looking up freight rates in a table. This field can be left blank to assume the default value of W for weight, or set to one of the following values:
|
Item Width |
For rolled goods; the roll width in inches. This entry must be correct for conversions between square yards and feet or inches to be accurate. For other items, this field is for information only and can be used for thickness or for width. It can represent any unit of measure. |
Define Remnant Size |
Determines whether a remaining quantity of a shade, lot number, or roll is too small to be counted as saleable. For example, if you entered 12 and the item unit of measure is in square feet, the system considers any quantity equal to or below 12 square feet in a single serial or lot number to be obsolete or a remnant. For rolled goods, this field is always entered in inches. This field is most applicable to serial numbered or rolled good items. |
Pattern Repeat |
Enter the pattern repeat width and length in inches. These dimensions are currently used only by the Bordered Rug Script window. The Bordered Rug Script window provides cut and binding functionality to facilitate orders for manufactured bordered rugs. The item policy code, S3, for bordered rug items causes the bordered rug script window to appear during the order entry process. The Bordered Rug Script Window allows you to add all the items needed to enter an order for a bordered rug in a few easy steps. |
Cost Ctr |
Use this field to categorize item. It is required if you want a direct interface with the General Ledger system. It should represent the major divisions of products and services in your company, such as ceramic tile vs. vinyl or. wood. Cost centers are then further subdivided by your item class entries. Cost centers are defined using the Cost Center File. |
Use this field to classify items for bills of lading. It is used to scan bar coded labels as shipments are loaded. Data collected at the point of shipment is used to produce bills of lading, when applicable. This field is also used if you download shipping data into an automated truck loading, shipping, or freight system. Freight class codes must first be set up in the Classification Codes File. |
|
Tax? |
The tax codes that are available are:
This option affects all the programs that calculate tax including: — Order Entry and Order Change — All cash register screens — Order Acknowledgements — Pick Lists (if they show a total due) — Order Inquiry — Invoices — Totals that appear on the Retail File History screen Tax Exempt items appear with an (*) asterisk in front of them on order acknowledgements. The tax code for customer or order still determines whether or not each invoice is taxed. |
Smallest U/M - Pick |
Enter the smallest unit of measure in which the item can be picked. The default smallest unit of measure is PC (piece). For ceramic mosaics, enter SH if sheet is the smallest unit of measure in which the item can be picked. For rolled goods, you can leave this field blank. The system automatically converts rolled goods to lineal feet. Picking lists (except for rolled goods) break the quantity ordered into cartons and pieces unless something other than PC is entered here. Note that for all goods that are sold or packaged in cartons, this field should represent the unit of measure contained within the carton, even if you never break cartons. There are two codes for cartons; CN and CT.
|
Smallest U/M - Sales |
Enter the smallest unit of measure in which the item should be sold. Your entry here will cause the Order Entry program to suggest order quantities that equal an unbroken multiple of this unit of measure. For example, entering CT (carton) in this field causes the system to check that the quantity ordered for this item does not break a carton. If it does break a carton, the system suggests a lower quantity and a higher quantity, each representing the nearest full carton. You may also enter the policy code NB (no breaks) in one of the three policy fields, which are described above. Policy NB enforces the smallest sales unit of measure. If CT is entered and a quantity ordered breaks a carton, the system will change the quantity to the next full carton quantity. It will also alert the operator that the quantity was changed and that there is a “no broken units” policy. This field can be used for many units of measure. For example, enter PC if a quantity ordered should not include a fraction of a piece. Enter SH or ST if sheets or strips are not to be broken. We recommend that an entry is made in this field for all items, except rolled goods, unless fractions of any unit of measure are acceptable. There are two codes for cartons; CN and CT.
|
Smallest U/M - Supp. |
Used for EDI transmissions to a supplier and for receiving and reorder reports. This is the U/M to which the EDI transmission will convert and use. If this field is left blank, the system uses the unit of measure found on the transaction to be transmitted. The Reorder Reports also have an option to print quantities in the supplier’s unit of measure. If you enter a unit of measure in this field that is different from the item’s native unit of measure, you must ensure a the Packaging or Item Files includes a valid conversion factor. On the receiving screens, various quantity fields are shown in the supplier’s unit of measure as well as in the native unit of measure. There are two codes for cartons; CN and CT.
|
Order Entry U/M |
Must contain zeros or an item’s native unit of measure, and should not be left blank. Complete this field if you want the Order Entry program to always convert quantities and price in this unit of measure. For example, if you enter SF in this field and then enter 2 CT in Order Entry, the system converts the quantity to SF and displays price per SF. If you leave this field blank, the Order Entry program continues to accept any unit of measure and prices the sale in that unit of measure. Miscellaneous items (items with a color number of MISC) ignore this setting. Miscellaneous items must have a blank in this field to work in some settings. For example, when you enter a miscellaneous item code in order entry, you may want to order the item in any unit of measure. This field can be controlled by a setting within the System Wide Settings. We recommend all items, except MISC items, contain an Order Entry UM. There are two codes for cartons; CN and CT.
|
Represents a group of items that are accumulated for quantity breaks on pricing. You can use quantity break group pricing to group products in order to achieve a quantity break based on a combined total quantity instead of each line item quantity. The option to activate this feature is made in the Option field in the Company Settings File, and should only be set by a system administrator. The options in the Company Settings File include:
Any other entry does not activate quantity break group pricing. Once activated, quantity break group pricing is automatically performed during Batch Invoice Processing. It does not occur during the Order Entry process. This field should contain breaks if the item is not a member of a quantity break group, or a two-character quantity break group code. Quantity break group codes must first be set up in the Classification Codes File. Note: To see a listing and description of the available Quantity Break Group codes enter “?” and press Enter. |
|
A numeric field that is only entered if a quantity break group code has been entered for this item. This field tells the system how many units to contribute to the total quantity break for every native unit sold. A native unit is the unit of measure used for sales analysis and pricing. For example:
These two items are included in the same quantity break group, but their native units of measure are different. Therefore, the Multiplier field is used to achieve a common unit conversion for both items. In this example, the quantity break is in total quarts. Item 2 requires a multiplier of 4, so that every gallon counts as 2 units toward the total price break. If both items have the same unit of measure, you would probably enter a multiplier of 1 for both. However, you do not have to base the multiplier on an actual unit of measure conversion. You could say that buying in gallon containers is more cost-effective, and therefore use a multiplier of 5. This does not mean that one gallon equals five quarts. It means that one gallon counts as five quarts toward the quantity break. Multiplier is meant to achieve a marketing objective, and not to be an accurate conversion factor. |
|
Init |
Your initials, entered when you finish updating or adding the record. |
Sub-Serial |
Indicates if and how the item uses the sub-serial number feature. Sub-serial numbers are used for items for which each piece or unit needs to be tracked separately. This field is for appliances and power tools having unique serial numbers on each unit, and adds another level to the inventory hierarchy. Sub-serial numbers are tracked within regular serial numbers or locations. They are not displayed or selected within the order entry process. They are optionally scanned or entered into the system during receiving, or as the products are shipped.
|
Item Scan Ovr |
This field can be set to override IWMS control panel settings for specific items. You can use this field to force item verification on individual items. This can be useful for expensive items, or items with a history of being picked incorrectly. |
Last Change |
You cannot edit this field. The date on which the last changes were made to this record. This date is maintained automatically by the system. It is updated with today’s date whenever the Item File record is updated in the File Maintenance or the Mass Update programs. |
Comments |
Enter any important comments you have for this item. These comments appear along with the item description on the Order Entry and Invoicing screens when the item is ordered or sold. If you enter an asterisk (*) in front of the first character in the comment, the comment flashes on the Order Entry, Inventory Inquiry, and Quick Quoter screens. |
D/Del |
D in this field indicates that this record will be deleted. Do edit this field. Let the system’s purging program control the deletion of any item records. |
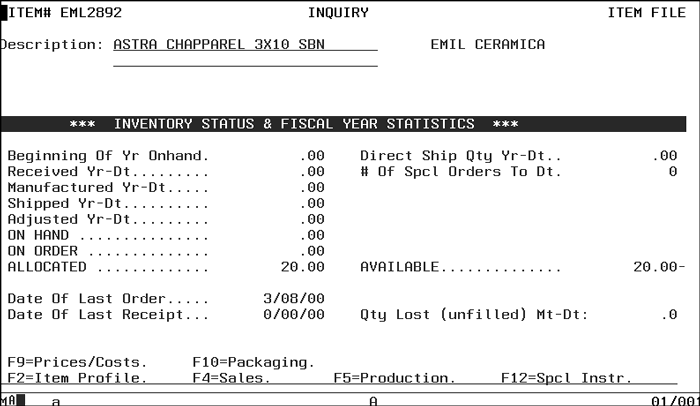
Item File Inventory Status & Fiscal Year Statistics Screen
Access the Item Inventory Status & Fiscal Year Statistics Screen by pressing F3 on the Item File Profile Screen. This screen has no input fields. All fields shown are at total item level, and include statistics combining all warehouses on the system. Use Inventory Inquiry for breakdowns by warehouse.
Field |
Description |
Beginning of Yr Onhand |
The quantity on hand at the beginning of this fiscal year; the quantity that is actually in the warehouse. |
Received Yr-Dt |
The quantity of goods received into stock year-to-date. |
Manufact-ured Yr-Dt |
The quantity of goods manufactured year-to-date. This field is applicable only if your system is interfaced with a manufacturing system. |
Shipped Yr-Dt |
The quantity of goods shipped and invoiced year-to-date. |
Adjusted Yr-Dt |
The total quantity of adjustments made to this item this year-to-date. |
ON HAND |
The current quantity on hand, or actually in the warehouse. |
ON ORDER |
The current quantity on order (purchase orders) for stock. |
ALLOCATED |
The current quantity allocated to customer orders. |
Date of Last Order |
The date of the most recent order placed. |
Date of Last Receipt |
The date of the most recent receipt of this item. |
Direct Ship Qty Yr-Dt |
The total number of orders that were shipped directly from the manufacturer or supplier in the current fiscal year, based on direct ship invoices. |
# Of Spcl Orders To Dt |
The total number of special orders issued for this item since it was set up on the system. Special orders are orders entered with the S code (for special orders) in Order Entry. |
AVAILABLE |
The current quantity available for sale; on hand minus allocated. |
Qty Lost (unfilled) Mt. - Dt. |
The total month-to-date quantity for lost orders. Lost orders are calculated during invoicing when all or part of a quantity is not invoiced. This does not include back orders. |
Item File Sales Analysis Screen
On the Item File Entry Screen, press F4 to go to the Item File Sales Analysis Screen. This screen has no input fields.
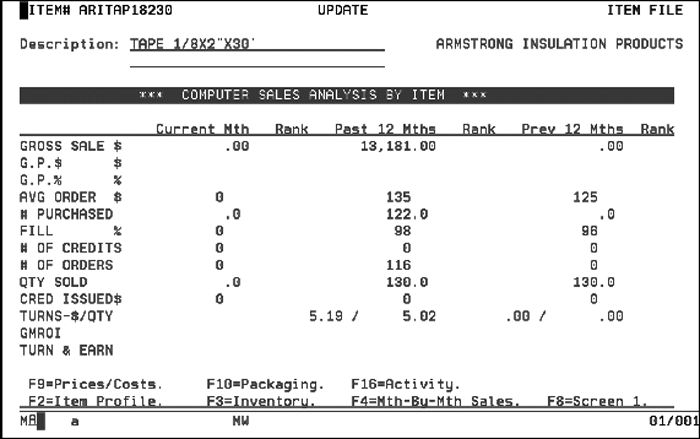
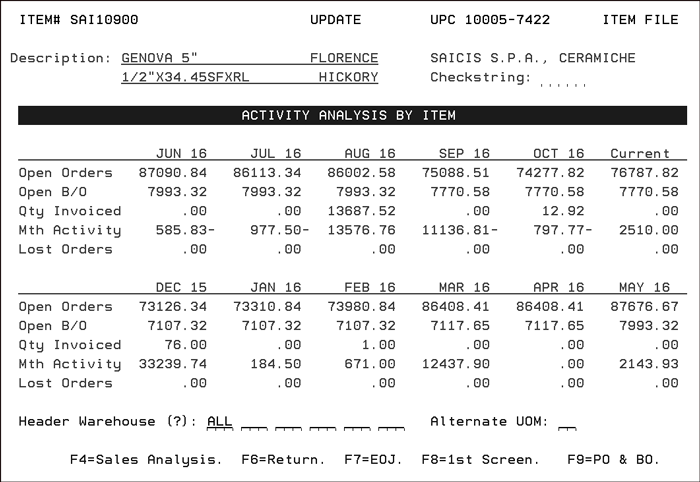
On the Item File Sales Analysis Screen, press F16 to go to the Order Activity screen. This screen gives you a month-by-month breakdown of activity for a selected item.
Note: The F9 function key shows the Purchase Orders and Back Orders for the item. Back orders with special order lot #'s do not display in the F9 PO BO screen.
Field Name |
Description/Instructions |
Open Orders |
The quantity, in native unit of measure, of open customer orders that are allocated against stock. Each figure represents the quantity open at the end of each month. |
Open B/O |
The quantity, in native unit of measure of back orders. Back orders are customer orders that are not allocated against stock. Each figure represents the quantity open at the end of each month. |
Qty Invoiced |
The quantity, in native unit of measure, sold or invoiced in the respective months. |
Mth Activity |
The monthly order activity derived by performing the following calculations:
|
Header Warehouse |
Order activity uses the header warehouse as its statistical anchor. The header warehouse is the warehouse that ultimately services the customer, regardless of where the stock was originally picked and transferred from. You can specify any header warehouse to display activity for that header warehouse. You can also enter up to six header warehouse codes to retrieve sub-totals of a group of warehouses. Enter ALL to include all warehouses. Direct ships are bypassed unless warehouse DIR is specified. |
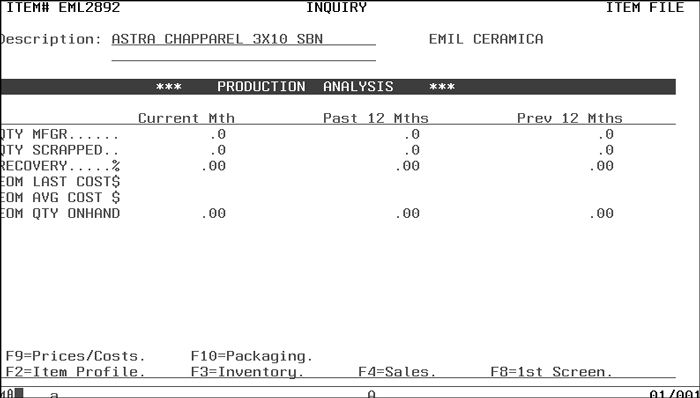
On the Item File Profile Screen, press F5, to go to the Item File Production Statistics screen. This screen includes historical cost information and manufacturing statistics. The manufacturing statistics are available only if your system is interfaced with manufacturing software that provides this information.
Field Name |
Description/Instructions |
Qty Mfgr |
Quantity manufactured, including scrap. |
Qty Scrapped |
Quantity that was scrapped. Scrapped inventory is not entered into the finished goods inventory. |
Recovery% |
Ratio of non-scrapped quantity to total quantity manufactured. |
Unit cost of the last receipt of this item at of the end of the month. The last cost is the landed cost, which includes the cost of freight. |
|
Average unit cost at of the end of the month for this item. This is an overall average, including all serial numbers, lots, warehouses, and so on, for this item. |
|
Quantity on hand at of the end of the month for this item. |
|
Current Mth |
Figures as of today. |
Past 12 months |
The quantity manufactured, scrapped, and recovery percentage are the totals for the 12 months prior to the current month. The cost and onhand figures are the costs and onhand balances as of the end of the month, 12 months ago. |
Prev 12 months |
The quantity manufactured, scrapped, and recovery percentage are the totals for the 12 months prior to the past 12 months. The cost and onhand figures are the costs and onhand balances as of the end of the month 24 months ago. |
You can use the Item File Search Screen to find and scroll through items in many different ways, as shown in the following sample Item File Search screen.
1. On the Item File Entry Screen, press F6. Complete one of the nine optional search fields. The first three fields are the three parts of the item number.
2. Complete only one of the search fields at a time, except for the following allowed combinations:
any combination of manufacturer number, color number, and pattern number.
any combination of manufacturer number, color name, pattern name, description, and product line
manufacturer number plus supplier’s item number
Note: The Item File Search adheres to the Business Entity logic. This means items that appear in the search results from a Manufacturer not in the your assigned Business Entity will display the message Not in your Business Entity and will not be available for selection. For more information on Business Entities, click here.
The price list number and quantity fields control the prices that are displayed on the next screens. You can enter “?” in the Mfgr#, Product Line, Price Class, and Price List# fields to see a list of those fields.
The following screen shows the results of a search for labor items.
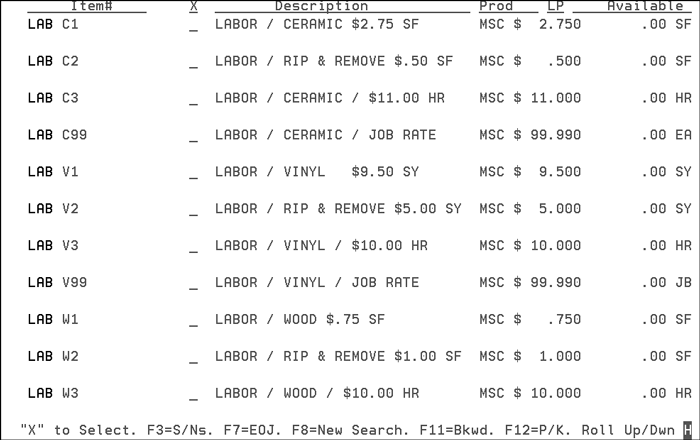
The example above displays a series of items created for the billing of labor charges related to the installation of ceramic tile, vinyl, and wood. Similar schemes can be used for the sale of other products and services such as:
tool rentals
samples that are expensed, but not inventoried
standard freight charges
tile cutting
packing charges
billing adjustments and credits for non-material-related issues
fabrication charges (for natural stone)
Each of these items is coded with a cost center, which in turn may be linked to special General Ledger accounts within the “Invoicing to GL Interface”.
Enter X beside an item to select it. Press Enter or an applicable function key to go to that function for the selected item. You can also enter an S beside an item number to display serial numbers, or K to display product knowledge.
Certain special information about products is highlighted on the search screen.
The screen displays if the item is non stock or special order.
Discontinued items display in reverse image.
The Available column displays the total quantity available combining all warehouses on the system for the item.
The price displayed, if any, relates to the price list shown on the column heading. The price list can be specified from the first screen.
To view an 18-month history on the item, press F9.
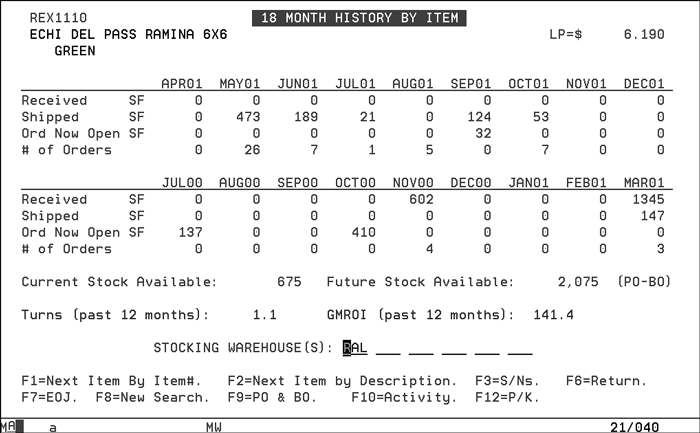
This screen shows the following:
A snapshot of the month-to-month history of the item, including the last 18 months of receipts, shipments, and orders.
The current and future stock levels.
Number of times the inventory of an item “turned over.” Turns is calculated by dividing the cost of sales by the average amount on hand.
The Gross Margin Return on Inventory Investment (GMROI) for the past 12 months.
The fields for this screen are described in the following table.
Field |
Description |
Received |
The quantity received in each of the last 18 months. |
Shipped |
The quantity invoiced in each of the last 18 months. |
Ord Now Open |
The quantity in orders still open, shown in the months the orders were taken. Open orders entered more than 18 months ago are included in the earliest month shown. |
# of Orders |
The number of orders taken in each of the last 18 months. |
Current Stock Available |
Stock on hand minus allocations against inventory. |
Future Stock Available |
Open purchase orders less open back orders. |
Turns |
Annual Cost of Sales divided by Average On-hand Inventory Value. |
GMROI |
Gross Margin Return On Investment. Annual Gross Profit divided by Average On-hand Inventory Value. |
Stock Warehouses |
Enter ALL to show combined figures, including all warehouse. Enter up to six warehouses to show figures for those warehouses. |
When adding multiple records to the Item File the system can auto-duplicate most fields, copying them from a previous item. The system can duplicate the Item Description, Policies, Initials, Units of Measure, as well as other fields. There are two ways to activate the auto-duplicate capability. When adding multiple item records, each entry auto-duplicates fields from the previous entry. You can also activate auto-duplicating when adding a single item record that is similar to an existing item record.
1. In Update mode, go to the item you want to duplicate on the Item File Profile Screen and press Enter.
2. Press F8.
3. Enter the new Item Number.
4. Enter an A to Add.
The program auto-duplicates the existing record. You can only duplicate fields in the Add mode. You can always override the auto-duplicate values.
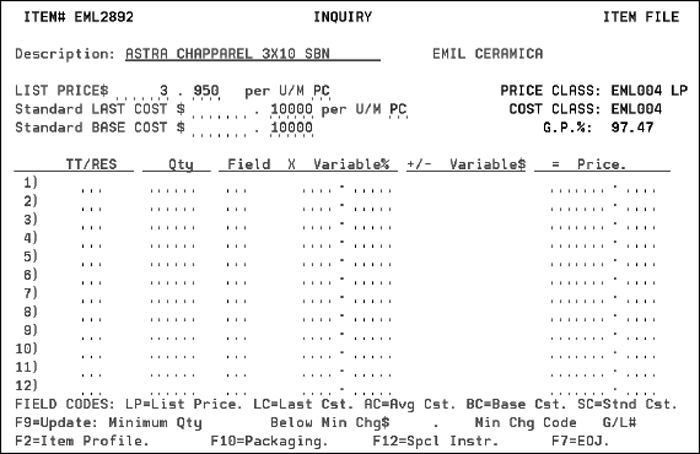
Pricing at Item Level Using Price Cost Classes
On the Item File Profile Screen, press F9 to go to the Price/Cost screen. This screen functions differently depending on whether or not price class and cost classes are entered on the Item File Profile screen. If you enter a price class or cost class on the Item File Profile screen, the information from the respective price and/or cost class appears on this screen. If you do not enter a price class or cost class on the Item File Profile Screen, you need to enter certain price and/or cost information on this screen. Using a price class to group items that are priced alike, is referred to as “maintaining prices at the price class level”. When you do not use a price class, you must price each item record individually. This is referred to as “pricing at the item level.” These concepts apply to the use of cost classes. When you maintain prices at the price class level, the actual pricing entries are made in the Price File. When you maintain costs at the cost class level, the actual cost entries are made in the Cost File.

The Price/Cost file screen is completed automatically, if price class and cost class codes were assigned on screen 2. If price class and cost class codes were not entered on screen 2, you can input prices and costs on this screen. For maximum pricing flexibility, you should use the price and cost class feature. A single price class or cost class can apply to many items, reducing the time it takes to enter and maintain prices and costs. The Price and Cost Files also contain more functions and options than the Price/Cost Screen in the Item File. Updating the fields on this screen may require a high-level password.
The following table describes the fields on this screen.
Field Name |
Description/Instructions |
Description |
Item description as you entered it on the Item File Profile screen. |
List Price |
Price from which all other prices can be derived, by adding or subtracting an amount or a percentage. You can assign whatever meaning you want to List Price, for example, retail price or your contractor price. Customers can be assigned LP in the Billto File as a price list number, and charged the list price for all items. |
Same as standard landed cost; current replacement or market cost of this item, including freight and handling. The system also figures the actual Last Costs and Average Costs based on receipts. This field is user-controlled, and is never automatically updated by the system. As your suppliers update their prices and as freight rates change, you should update this field. |
|
Current replacement or market cost for this item from your supplier excluding all freight and handling costs. The system also figures the actual base cost, based on receipts. This field is user-controlled and should be updated when your suppliers change your prices for this item. The system never automatically updates this field. This is the default cost used on all purchase orders to suppliers for this item, unless the Cost File is used. You can use the Cost File to enter multiple costs based on supplier, quantity, and type of purchase. It can be overridden on the purchase order. |
|
The two characters shown directly to the right of the price class. This code relates to the Billto File in which each customer is assigned a price list number. Each price list number represents a price list that has been established. All customers are assigned a basic price list number, and, in some cases, alternate price list numbers for certain products. The examples use price list numbers such as A1, B1, and C1, as shown. You can assign your own meaning for each code. Every item should have a price for every price list number on which the item could appear. That way, the system has a price for every item to any customer. Price list numbers are defined using the Classification Codes File. When price classes are used, the price list number shows to the right of the price class at the top of the screen. When price classes are not used, this screen includes a price list number column. |
|
Qty |
Use this field only if you have different unit prices based on quantity. Enter the quantity through which the price applies. If you specify quantity breaks, the last quantity listed should be 99999 as shown in the above figure. If the Item File minimum quantity is set to all nines (99999), it is interpreted to mean to minimum quantity, and therefore, all customers are subject to the charge, regardless of the entry in the Billto File Minimum Charge field. Any other quantity (less than 99999) in the minimum quantity field applies only to customers whose Billto File is set to Min Chg = Y. You can use this option to enter minimum charges on certain products that override normally exempt customers. For example, you might want to apply a fixed handling charge when a certain item is sold, regardless of quantity. This option can apply to items that always require special paperwork or packing when sold. For rolled goods, minimum charges were applied only to cuts until Version 6, Release 2. With Version 6, Release 2, any minimum charge for rolled goods identified by codes H (handling charge) or P (packing charge) apply to any open (unsealed) roll, regardless of whether it is a cut or balance. Minimum charges for rolled goods with codes other than H or P still apply only to cuts. |
Field |
If you want to calculate the price as a percentage of something else, enter one of the following field codes:
For example, enter LC x 1.25 to charge Last Cost + 25%. |
Variable% |
If you want the system to calculate the price as a percentage of something else, and you have entered a field code (LP, LC, SC, AC, or BC), enter the amount by which to multiply the field. Observe the decimal point as displayed. This field is shown only if price classes are used. |
Variable $ |
A dollar variable, preceded by a plus (+) or minus (-) sign indicating that the variable is added or subtracted. |
List Price |
List price from the Price Class. |
per U/M |
The native unit of measure. All prices relate to the unit of measure. |
Price Class |
The price class you assigned on the Item File Profile screen. It is followed by the two-character price list number being displayed. The default is LP (list price), although you can specify any price list number on the Item Profile screen before pressing F9. |
Cost Class |
The Cost Class you assigned on the Item Profile screen. |
Transaction Type/Restriction Code. The transaction types and restriction codes are defined in the Classification Codes File. For example, I - Inventory, D - Direct, Restr R - Roll, C - Cut. These fields are shown only when price classes are used. |
|
Price |
Price as calculated by the Field X Variable%. |
Minimum Qty |
Minimum quantity you will sell, below which an extra charge is billed to the customer. Only enter a minimum quantity, if applicable. Press F9 again to update these minimum charge fields. See the examples in Minimum Quantity Charges. |
Below Min Chg$ |
Dollar amount to be charged each time a customer orders less than the minimum quantity. Observe the decimal point, as shown. The Order Entry program automatically creates a miscellaneous charge line whenever a line item quantity is below the minimum quantity. |
Min Chg Code |
Minimum charge code that represents the description of the charge. Codes are:
The code you enter causes its corresponding description to appear on the order and invoice. See Minimum_Quantity_Charges for more examples. |
G/L# |
Enter the general ledger account number to which the minimum charge should be booked. This G/L number is entered on the order and invoice, and is shown on applicable reports. |
The following fields are displayed on the Price/Cost File Screen. Press F9 to update this screen.
Minimum Qty
Below Min Chg$
Min Chg Code
G/L number
When you press F9, the cursor is positioned at the Minimum Qty field. You can update any of these fields if you want to bill an extra charge for this item when ordered below the minimum quantity.
Whenever a minimum charge is incurred, the system automatically creates a miscellaneous charge line on the order. This happens during the order entry process. The miscellaneous line is inserted below the line item containing the “below minimum” quantity. The line contains the description, the charge, and the G/L number that you have specified here.
You can make a customer exempt from these minimum quantity charges by entering N in the Min Chg field of the Billto File Profile screen. However, you can designate a special charge from which no customers are exempt. These special handling charges are identified by entering 99999 in the Minimum Qty field. This type of charge is useful for products that require special handling regardless of the quantity ordered, a fixed fee is charged for each order in addition to the normal price per unit. Only a minimum order quantity of 99999 disregards the Billto File Min Chg Code field setting.
You can apply minimum quantity charges to rolled goods in a unique way. If you specify a large minimum quantity (such as 9998 or 99999, which is greater than any roll could ever be), and you specify Min Chg Code H (handling charge) or P (packing charge), the system assumes you are applying a charge for any roll that is not still factory wrapped. The system charges the minimum charge on any cut or the balance of an opened roll. If codes other than H or P are used on rolled goods, only cuts are charged the minimum charge.
Here are three examples to illustrate minimum charges:
Example 1
In this example, you charge $1.50 each time an order for less than 24 native units of this product is taken. The charge is booked to general ledger account number 30010 and to the cost center of the item. Because of the B code, the invoice shows “Broken Unit Charge” as a description.
Minimum quantity |
24 |
Below minimum charge |
$1.50 |
Minimum charge code |
B |
General ledger number |
30010 (handling charge income) |
Example 2
In this example, you charge $3.50 each time an order is taken that is less than ten native units of this product. For rolled goods, only a cut would be charged $3.50. No charge is given for full rolls or balances. The C code causes the invoice to show “Minimum Cut Charge.”
Minimum quantity |
10 |
Below minimum charge |
$3.50 |
Minimum charge code |
C |
General ledger number |
30010 |
Example 3
This example works differently for rolled goods than for any other goods. For non-rolled goods, this entry would simply charge $10.00 if the quantity ordered is less than 9998. For rolled goods, the system charges the $10.00 for all orders except factory wrapped rolls, which are designated by the U status code. Factory wrapped rolls contain their full original quantity. Therefore, this charge applies to any cut or a roll balance of an opened roll.
Minimum quantity |
9998 |
Below minimum charge |
$10.00 |
Minimum charge code |
H |
General ledger number |
30010 (handling charge income) |
Pricing at Item Level (Using Price & Cost Classes)
If no price and cost class entries are made on the Item File Profile Screen, you can update the price and cost fields on the Price/Cost Screen. This is referred to as “pricing at the item level.” Otherwise, you must update the Price and Cost Files. The screen is shown without a price or cost class indicated. This screen is displayed if the Price and Cost Class fields are left blank, and you press F9 from the Item Profile Screen.
On the Item File Profile Screen, press F10 to go to the Item File Packaging screen.
The Item File Packaging screen is completed automatically if a packaging class code was entered on the Item File Profile Screen. If a packaging class code was not entered on the Item File Profile Screen, you can use this screen to input the packaging information for this item. You can enter up to six different conversion factors per item. The list price for each unit of measure is calculated and shown on the right side of the screen.
You can use the unit of measure codes shown above or define your own two-character codes. Once you define the code and enter a factor for it, you can buy, sell, quote, or inquire in that unit of measure. We recommend that, if you use any of the units of measure listed on the screen, you use the codes as shown. The system recognizes and uses certain units of measure for special circumstances.
For weight:
LB - pounds
KG - kilograms
For rolled goods, if you enter the item width on the Item File Profile Screen and SY (square yards) as the native unit of measure, the system automatically converts to and from the following units of measure:
SF - square feet
M2 - square meters
LF - decimal lineal feet
FT - feet plus inches
IN - lineal inches
SY - square yards
Notice the difference between LF and FT. 10.09 FT = 10 feet, 9 inches. 10.75 LF = 10 feet, 9 inches.
We recommend that all products have a conversion to either LB or KG, or both. We also recommend that certain products have conversions that facilitate their management on the system.
For material picked in cartons but sold by SF, enter conversions for:
SF per CT
PC per CT
CT per PA
LB per EA
For material picked in cartons but sold by the EA, enter conversions for:
EA per CT
CT per PA
LB per EA
For material picked in sheets within cartons, yet sold by SF, enter conversions for:
SH per SF
SH per CT
CT per PA
LB per SF
For rolled goods enter conversions for:
SY per RL (average roll size)
LB per SY
Do not enter conversions for LF, FT, SF, IN, or M2 which are calculated automatically based on width.
If you want the first two packaging entries to print on invoices, type Y in response to the question. Otherwise, leave blank or type N. Entering Y allows the first two entries to print on the invoice under the item description. The option is separate for each item and/or each packaging record.
The following table describes the fields on this screen.
Field Name |
Description/Instructions |
Description |
Description of the item, as entered on the Item File Profile screen. |
Packaging Code |
The packaging code as assigned on the Item File Profile screen. |
Amount |
The quantity that converts the unit of measure (the factor for converting). |
U/M |
The unit of measure code corresponding to the amount described above. |
U/M |
The unit of measure to which you are converting. |
Note: The Item File Maintenance program contains enhanced validation of the Unit of Measure field. The system protects you from inadvertently changing the unit of measure for an active item by changing it to another price or cost class with a different unit of measure. Changing the unit of measure for an item that is active (has open orders, purchase orders, or inventory) causes many problems, as all transactions and statistics are assumed to be in the items’ native unit of measure. These enhancements ensure that no open orders or inventory are affected by a unit of measure change. In order to further protect the integrity of statistics, we recommend that you create a new item number, rather than changing the unit of measure, unless the item has not been used significantly. |
|
List Price per U/M |
A breakdown of the list price per unit of measure. |
Print 1st 2 Entries on Invoices (Y/N) |
This field provides an option to print the first two lines of the packaging breakdown on the customer invoice. Enter Y to print. |
Item File Special Instructions Screen
Linking Items to Web Pages via URLS
Using a Spreadsheet to Upload Product Knowledge Information
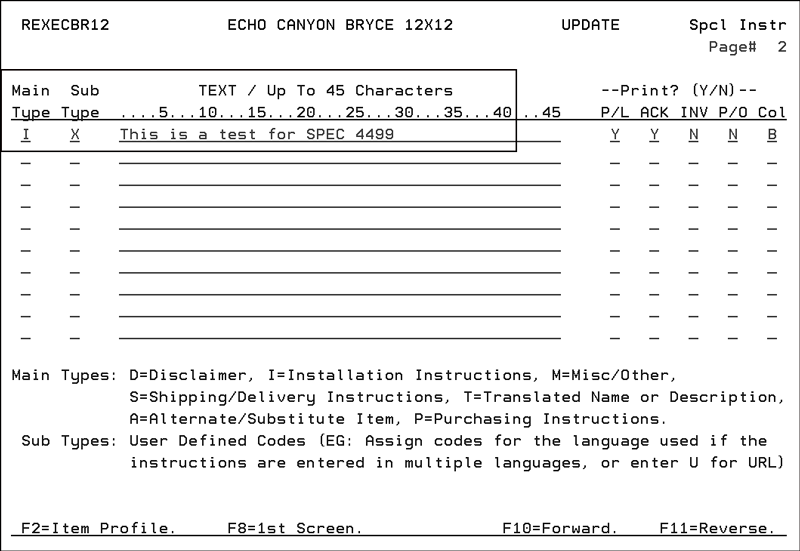
To go to the Item File Special Instructions screen, press F12 on the Item File Profile Screen.
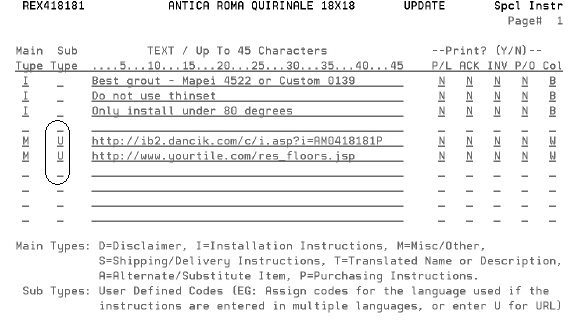
Use this screen to enter special instructions for this item and to note instructions that should be printed on an invoice, pick list, purchase order, order acknowledgement, or quotation. You can enter up to ten lines of text per page, and 45 characters per line. You can enter up to 20 pages per item by pressing F10.
The Main Type field codes are described on the lower part of the screen. Use this field to categorize each line of text. Main type code P has the special attribute of automatically appearing on reorder reports. Use P to enter pertinent buying instructions.
Use the Sub Type field to specify that the text is written in a specific language, such as F for French or I for Italian. The Sub-Type field is optional, and should be left blank unless the line is meant only for customers coded with that language code. Customers can be coded for a language on screen 2 of the Billto File.The information on this screen is also displayed in the Product Knowledge window, which is available from Order Entry and many other programs.
This screen is also available in the Manufacturer File and the Product Line File. A slightly different version of this screen is available in the Billto File. Therefore, general instructions that pertain to an entire product line, or the entire manufacturer, should be entered in those files. This prevents you from having to enter the same information in multiple items.
If coded to print, the item special instructions print below any order line for that item. Special instructions entered in the Product Line File print under the last consecutive item number ordered in that product line. Special instructions entered in the Manufacturer File print under the last consecutive item number ordered for that manufacturer. This prevents special instructions from being needlessly repeated when many items on a single order are from the same product line or manufacturer. Any special instructions with no sub-type for language are printed regardless of the language type for the customer, as coded in the Billto File, Language field. Special instructions coded as a specific sub-type code, such as language, only print for customers with the same language code.
Printing special instructions and product information can greatly enhance the service provided to your customers and help your staff to be more responsive. The following list is a sample of how you can use this Special Instructions system:
Print toxic spill instructions on pick lists below the required items. This is mandated by the Department of Transportation for many chemicals commonly sold in your industry.
Print special picking, handling, and installation instructions below items on pick lists or invoices. These can be entered in any language, and specified for individual customers.
Print legal disclaimers below items that are subject to complaints and claims, such as “Extreme shade variation from samples is possible. Inspect before installation.”
Show the supplier’s item description, in addition to your description, on purchase orders. For importers, this can be a language translation. You can also enter foreign currency unit pricing, which prints on purchase orders.
Show general instructions on all purchase orders, such as “Please include our purchase order number on all correspondence.”
Show general information about items on quotations or order acknowledgements. This can include information such as suggested installation materials and methods, and lead times for special orders.
Print directions for items that can be used as substitutes when you are out of stock. These would be coded not to print, but can be very useful when inquiring.
All special instructions entered via F12 in either the Billto, Item, Manufacturer, or Product Line Files can be printed in a separate listing. You can use the listing to proofread the instructions or as a reference. The listing can include all or specified types and syb-types of instructions. For example, “Installation Instructions” can be printed separately, or only the French entries. You can run the list for specific items or product lines. This listing is run from page 2 of 2 on the Master File Listings Menu.
Because the system adds processing overhead to the print programs that access special instructions, it is an option on the system. You can turn the feature on separately for pick lists, purchase orders, invoices, and order acknowledgements or quotations. You can activate this feature using the Company Settings File on the System Settings Menu.
The following table describes the fields on the Item File Special Instructions screen.
Field Name |
Description/Instructions |
Main Type |
Main type options are:
|
Sub Type |
Sub type codes are used to identify the language in which the instructions are written, or can have user defined meanings. If used to identify by language, it should relate to the language codes that you create in the Classification Codes File. Product Knowledge screens support sub-type “U” for URL, for the purpose of storing the URL for web-pages related to an item. When the product knowledge screen is displayed in Order Entry, Order Change, Inventory Inquiry, or via the Décor 24 application (on a web-connected PC), the URL may be clicked to open the web page. For more information on this refer to Linking Products to Web Pages via URLS. Refer to Linking Products to Web Pages via URLS for more information. |
Text |
Type information here. |
Print? |
To specify where this information prints; on the picklist, acknowledgement, invoice, purchase orders. Enter Y to print or N not to print. |
PL |
Pick list. |
ACK |
acknowledgement or quotations. |
INV |
Invoice to customer. |
P/O |
Purchase order to supplier. |
Col |
Color. You can specify the color for displaying this line on the Order Entry Product Knowledge screen. The color codes control each line on the Order Entry Product Knowledge screen. We recommend that you develop a company-wide system for color-coding information. For example, substitute items could appear in pink, important product disclaimers in red, or installation instructions in white. Valid entries are: R - red B - blue G - green W - white P - pink T - turquoise (displays underlined) Y - yellow (displays underlined) I - Invisible (does not display on Order Entry) |
Linking Items to Web Pages via URLS
Product Knowledge screens can support sub-type “U” for URL, for the purpose of storing the URL for web-pages related to an item. When the product knowledge screen is displayed in Order Entry, Order Change, Inventory Inquiry, or via the Décor 24 application (on a web-connected PC), the URL may be clicked to open the web page.
1. Enter a U in the Sub-Type column and then enter the URL in the text field.
|
Note: In the example above, the URL contains a website address, plus a parameter that passes an item number to the website. You may store generic URLs that simply link to a website, or you can store specific URLs that link to web pages on your web server specifically for displaying product images and/or specifications. Keep your naming conventions simple and concise so they can fit into the 45 character fields of the F12 screens
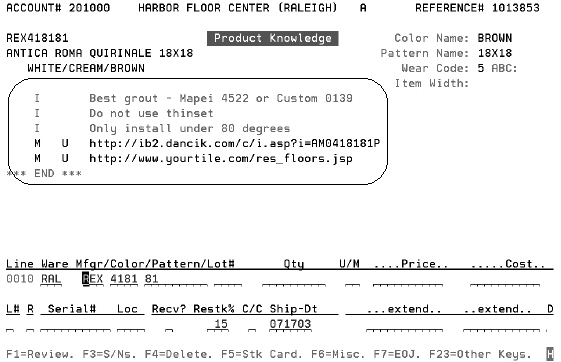
2. Click on the URL addresses to access the links.
3. When the item is accessed via order entry, order change, or inventory inquiry the comments and URL addresses are also displayed on the Product Knowledge screen (F12 from Order Detail screen).
|
Note: When you access the product knowledge screen from within Order Entry or other programs, and you are on a personal computer (PC) with the appropriate internet or network connections you can click on these URLS to immediately access these web pages.
Note: URLs may be stored in the F12 (Product Knowledge) screens of the Product Line and Manufacturer Files, as well as the Item File.
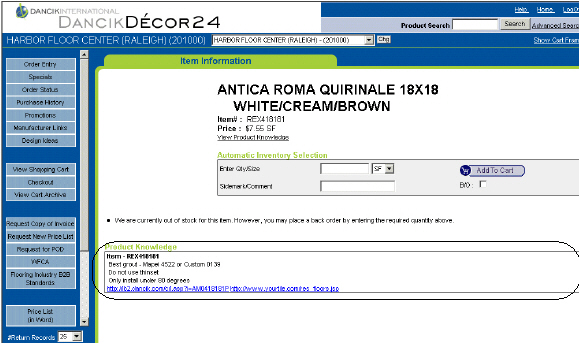
4. When the item is accessed in Decor 24, the comments/product knowledge information and the URL links are displayed.
|
Note: These URLs within the Product Knowledge screen also serve a links within the Decor 24 system.
Using a Spreadsheet to Upload Product Knowledge Information
A spreadsheet template has been created that can be placed on the IFS and then retrieved to automatically upload an item’s Product Knowledge/Special Instructions.
Uploading a Product Knowledge Spreadsheet
1. The first step is to build the item knowledge spreadsheet. There is a specific template that has to be used.

Note: If you do not use Page and Line the spreadsheet uploads to first available line and page and proceed from there. If you do use line and page it uploads to that location and replace any data already present.
2. Once the spreadsheet has been built using the Dancik supplied template, save it to the IFS as a CSV file, with or without the headings.
3. On the green screen, enter the command JJH0002C.
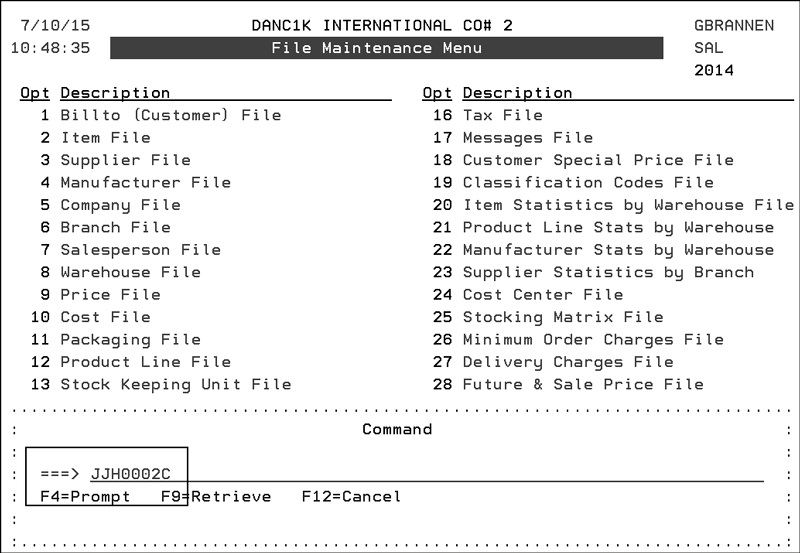
4. Press Enter and on the lines provided enter the IFS address where the spreadsheet is located.
5. The next screen asks if the spreadsheet has headings.
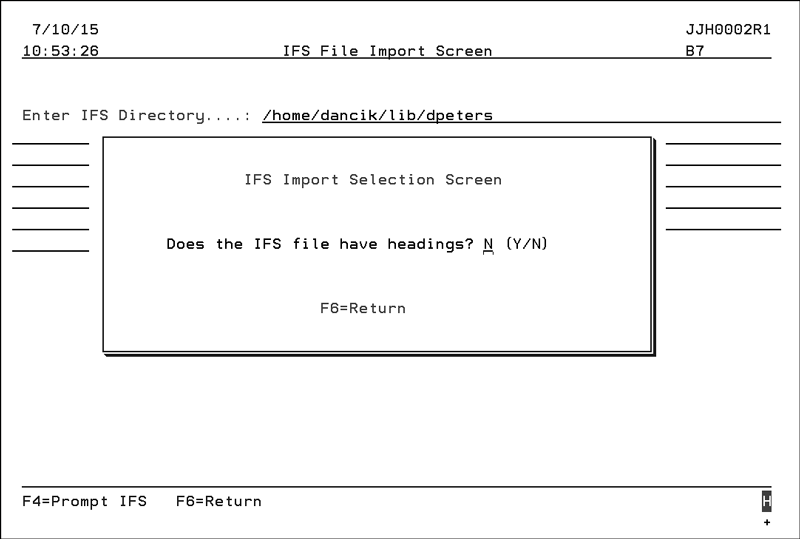
This lets the download program know where the item information starts. The headings are not imported in.
6. Enter a “N” or “Y” and press Enter. Find the spreadsheet and select it.
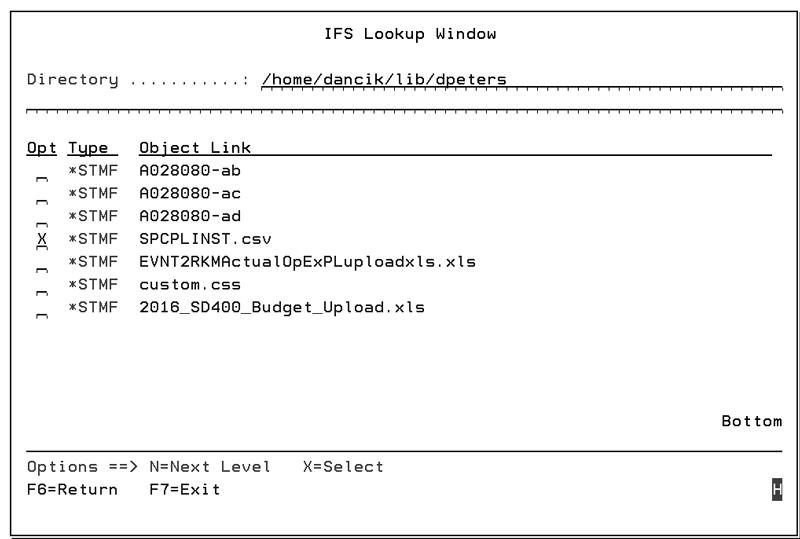
7. Press Enter to upload the spreadsheet.
8. To see the results of the spreadsheet upload, enter a WRKSPLF (work spool file) command.
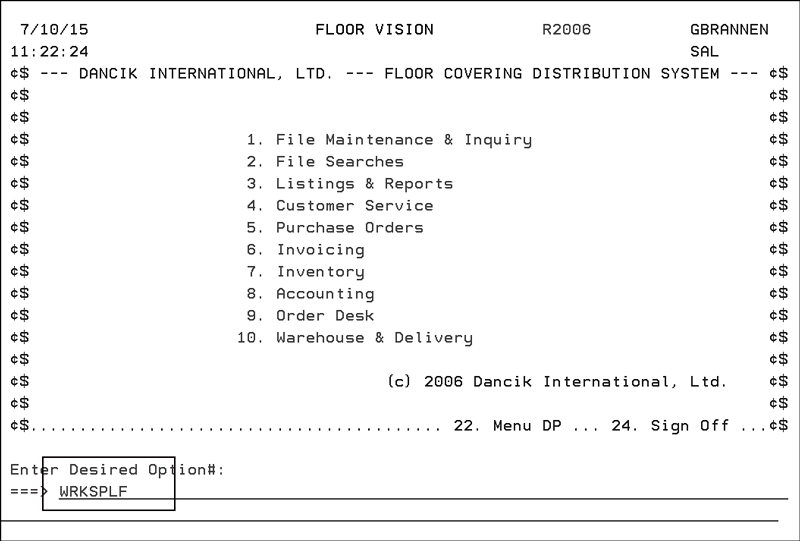
9. Find the spreadsheet and select it.
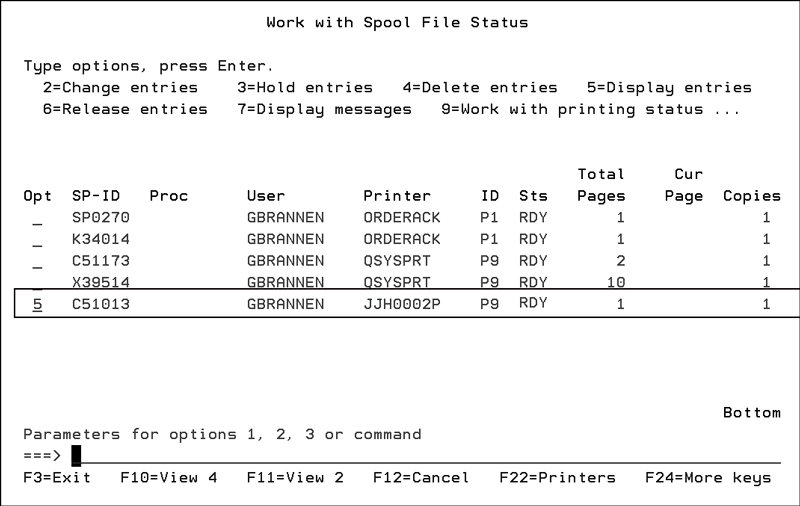
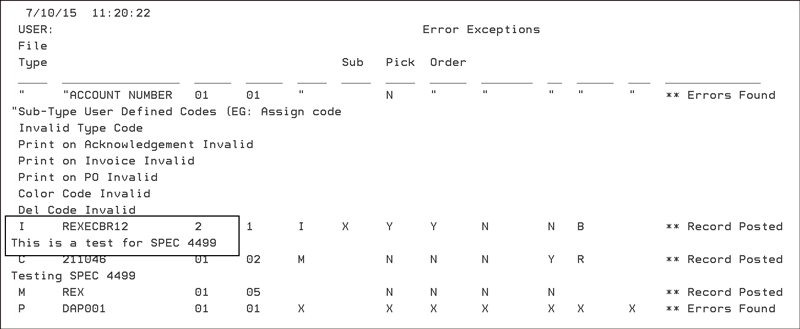
10. The spool file report gives you an update as to what items were updated and any errors that occurred.
11. To check that the upload was successful, go into the Item File Product Knowledge screen.
Note: If the message does not display on the first page of instructions, press F10 to move to the next screen.
Using the Item Attribute Mass Update Utility_(menu_option_SYS_903)
Use the Item Attributes screen to enter or select the item attributes that are applicable to each item. To go to the Item Attributes screen, press F16 on the Item File Profile Screen.
|
Item attributes are assigned to items by using the Enter New Values field. You can enter values or select from a list of values, by entering “?” You select one or more item attribute values from this selection window by entering X beside each applicable value. Unlike most fields within the Item File, attribute fields can be assigned multiple values.
F13 (Duplicate) allows you to duplicate the attribute values you have assigned to this item, for other items.You can position to the items you want to update (by item# or description) and then enter X next to each of the items to duplicate for. Press Enter and the attribute values of the current item is duplicated for the selected items.
Item attributes are user defined. You can use the four listed above or you can customize them to match your business.
1. Go to menu SET 31.
2. Enter an IT in the Reference Type field. This displays your current item attributes.
|
3. To create a new attribute, press F1. To update an existing one, enter a U in its Opt field.
|
To use the item attribute mass update, your attribute description and display sequence have to be the same on this screen and on the spreadsheet used for the update. For example, using the information on the screen above, the spreadsheet that contains your update information has to have a column entitled Style Number and it has to be the first column.
To check an item’s attributes follow this path:
On the File Maintenance menu (FIL), select option 2 - Item File.
Enter a item number and the applicable action code (U-update, I-inquiry).
On the Item Detail screen, press F16 - Attributes. The screen that appears displays the item’s attributes.
Note: Item attributes are unique to your system, and must be set up using the Item Attributes system.
|
If you entered the Item Attributes screen in update mode, as shown above, you could manually enter any new information. As shown above for the attributes such as Color Name, if an attribute already has a value assigned to it, the value is shown directly under the attribute.
Using the Item Attribute Mass Update Utility (menu option SYS 903)
1. The first thing to do is build the item update spreadsheet. The figure below displays a sample item attributes update spreadsheet.
|
2. Place the spreadsheet into a folder that is shared on the i-SERIES.
3. To access the spreadsheet and make the changes to the item attributes, use option SYS 903 on the Dancik Menu system.
4. Select option 3 - Import Item attribute records from the IFS to use the item attribute mass update feature. The next screen to appear presents you with three usage options.
Note: IFS stands for Integrated File Server. Essentially it is an AS400 shared drive.
The three options available are:
Generate Report from Item IFS file with no updates/writes - This option acts as an “inquiry”. A report is generated that shows the differences between the item attributes already in the Dancik software, and those from the IFS file.
Write new records from an IFS file without updating old data - Acts as an “add” function. This option adds the affected item attributes (style number, style name, color name, and color number) if they are not currently defined for an established item. Any existing attributes will not be changed.
Write new records from an IFS file and update old data - This option “updates” existing item attributes and adds any new attributes it encounters.
5. Enter an option and press Enter. The next screen to appear lets you enter the address where the update spreadsheet is located.
6. Enter the directory and press Enter.
7. The system accepts the directory and responds back with the question “Does this IFS File have a heading?”.
8. If the spreadsheet has a heading (i.e., Distributor Item, Style Name, Style Name, Color Name, Color Number), enter a Y. If not, enter an N.
9. Press Enter. The system performs the function directed in step 4 (inquire about changes, update existing attributes, update existing attributes and add new ones).
10. A report is generated that shows which item attributes were changed and what the changes were.
Ceramic trim is usually picked, sold, purchased, and priced by the piece.
|
This ceramic item is sold and priced by the square foot. The pick unit of measure indicates picking by piece, although the system always tries to convert to cartons and shows pieces only if the order breaks a carton. If an order breaks a carton, the pick ticket and bar coded pick labels print the number of cartons and the number of additional pieces. In the above example, policy NB prevents orders from being taken in quantities that would break a full carton.
|
Pre-finished wood is usually set up to price by the square foot, but to pick and purchase in full cartons only.
|
A vinyl sheet goods item must have an R component code and an item width. We also recommend that you enter a remnant size. Rolled goods do not need a pick or sales unit of measure, because all conversions are automatic based on the width.
|
A carpet item follows the same rules as the vinyl sheet goods item shown previously, although the class codes, pattern name, and so on, are unique to carpet.
|
Adhesives are usually sold by each (EA) with Packaging File conversions to quarts, gallons, and so on. The NB policy is often imported for adhesives so that full units are sold, even when you enter other units of measure when checking stock.
|
A marble slab item must have S in the component code and P# in the first policy field.
Marble and natural stone slabs are unique, because each piece must contain data about its own size. The P# policy causes the receiving, order entry, and other programs to capture and display the individual sizes per slab.
|
You can use the Crossover System to assign two or more item numbers to the same inventory item. The two items have the same inventory, but can have different item numbers and different descriptions. The item containing the inventory is known as the parent item. The dependent items are known as crossover items. You can use this system to market the same product under multiple numbers and names. For example, two different customers can have exclusive sales rights to the same item. Both customers can place orders under their own assigned item numbers and descriptions, and receive all documents (pick lists, invoices, bar code labels) with their assigned item numbers and descriptions, even though the actual inventory is the same. Of course, you control the physical packaging of the product to reflect the correct information for each customer.
You need to consider other important issues to best use the Crossover System:
Crossover items do not need to have the same manufacturer prefix as their parent item numbers. However, they must share certain data, such as item classes, packaging classes, and units of measure. The Item File Maintenance Program ensures that crossover items are set up correctly, and automatically pull certain information from their parent items.
Crossover items do not need to have the same item master policies as their parent items. This is particularly useful for the following situations:
— The NB policy (no break on cartons or other units of measure) can be applied to one crossover item, but not another. It can be applied to the crossover item, but not to the parent item, and vice versa.
— Promotional prices can be applied based on item master policy codes. These policy codes can be system-defined (such as DI or SP) or user-defined. Using policy codes to identify certain crossover items can simplify pricing schemes that are unique to either the parent or crossover item.
Crossover items can be assigned to different price classes than their parent items, but they don’t have to be. However, if you use different price classes, you can be more flexible when creating price lists. You should consider using the End User Category Code in the Price File as means of separating parent from crossover products. The End User Category Code is specifically designed as selection criteria for the Price List by Price Class function and for the customer dial-in self-service systems. If the parent and crossover items are assigned to different price classes, and those price classes are assigned to different end user categories, then you can easily keep them from appearing on the same price list.
You should develop an effective strategy for enabling and disabling (locking out) customers from using the crossover items. This prevents an accidental sale under the inappropriate item number. Use price list 99 to lock customers out of specific products, by item class, manufacturer, product line, price class, or item number, in the Billto File. Use the Promotional Pricing File to enable or disable groups of customers from buying certain products. See the Promotional Pricing and Price Files for further information.
Sales analysis is always performed at the parent item level. This is because statistics such as turns and GMROI would be meaningless if the sales were not matched to the actual inventory item. The crossover items do not show any online sales. The parent item includes the sales and inventory statistics for itself and all of its crossover items.
A single parent item can have an unlimited number of crossover items cross-referenced to it.
Order Entry and Order Changes perform all pricing functions using the manufacturer, product line, and price class codes of the crossover item number, not the parent item. The item classes are always the same for a crossover and its parent item. This is enforced by Item File Maintenance. However, the manufacturer code, product line code, and price class codes can be different for the parent vs. crossover items. Price lists and Order Entry adhere to these differences for all pricing mechanisms. Price lists are consistent with Order Entry in the handling of crossover item prices and restrictions.
Special orders can also be entered for the crossover or the parent item numbers.
Several of the fields from the parent item are copied over to the crossover item. Among them are
— freight class
— price class
— cost class
— color name
— pattern name
When you enter orders, review order, and check inventory, the system recognizes when a crossover item file is entered and does the following:
— Order Entry shows the crossover item description and uses its pricing and item policies, but the inventory for the parent item is shown and used.
— Item Search shows Crossover Item rather than the quantity in the Quantity Available field.
— Inventory Search shows Crossover Item rather than quantity in the Quantity Available field, but if the serial number display is requested, it shows the parent item’s serial numbers and inventory.
— Order review, order change, and all documents show the crossover item number and description, but all inventory is allocated from the parent item number.
— Special orders for crossover items automatically show and print the crossover item number and name for the customer, and the actual item number and name for the supplier and purchase order.
1. Enter the Item Number and other fields as usual in the Item File Maintenance program.
2. Enter the Item Number of the parent item in the XREF field.
3. Press Enter. The program displays certain fields from the parent item, which cannot be overridden in the crossover item.
The following screen shows the Item File Profile screen for a crossover item. The crossover item number in the example is KINV050V100, and the parent item number is SHAK0505100.
|
Auto UPC Code Generation in Item File
Based upon the manufacturer codes of your items, you may automatically trigger the creation of a UPC Code when a new item is created. This is meant primarily for manufacturers or importers that private label their products and have registered UPC codes.
Note: The Automatically Generate UPC field in the file Maintain Manufacturers UCC and RN has to be activated for this feature to work.
If the Automatically Generate UPC setting is active, whenever an item from this manufacturer is created via the Item File, a UPC number is automatically generated and inserted into the top right hand corner of the screen.
|
Notice that the first six digits are the Company’s UCC code. The remainder of the number is assigned by the system and is sequential (if the example above was the newest item, then the next UPC number for this manufacturer will be 02840001487).
Item policy, RI, indicates a restricted item. This means that the item is sold on an exclusive basis. This policy does not cause the system to take any action, but it can be used to fine-tune promotions that apply only to restricted items. For example, you can lock out all but the authorized customers of a restricted item.
1. Enter policy code RI in the Item File of the restricted items. You can use the Item File Maintenance Program or Item File Mass Update program to do this.
2. Create a marketing program or display type that represents the group of customers who are authorized to purchase the restricted item. Use the Classification Codes File to create the marketing program.
3. Assign the new marketing program or display type code to the authorized customers. These are assigned in the Billto File Codes screen.
4. Create a lock-out promotion in the Promotion File to lock out unauthorized customers from purchasing the items that have policy code RI. The promotion must be coded as type F (a fixed promotion), with a price of $99999.99 (which means lock out), and assigned to OMIT the designated marketing program or display type. This means the lock out applies to everyone except the customers assigned to that marketing program or display type. The promotion can be entered against a broad category, such as item class or manufacturer, as well as against narrow categories, such as price class or product line. The important thing is to limit the promotion to policy code RI in the Limit to Policy field, of the Promotion File.
This technique is the most efficient way of locking out unauthorized customers from a defined list of items. If you are simply locking customers out of a single manufacturer, or single product line, you can point the promotion to that manufacturer or product line, without the use of policy codes. Policy code RI provides the flexibility to include only certain items from a multitude of product lines and manufacturers. Policy RI can be entered into any of the three policy fields on the Item Profile Screen.
Setting up Labor and Expense Items File Records
Recommended Accounting Techniques for Labor Expense Items
The following example is an item used for selling with a single combined rate for any type of service, under the generic banner of “JOB RATE”. This type of item may be used for installations, projects, and for natural stone fabrication. When this item is used, the price, and cost if applicable, is overridden to be whatever rate or fee needs to be billed.
|
The following rules apply to the Labor/Expense item shown above:
The Inventory field is left blank, and the Component field is L (for Labor/Expense).
The supplier is 001 (which means your company). Because this item will never be purchased (only sold), the supplier does not really matter.
The Product Line, Classes, Color Name, and Pattern Name are up to you. These should simply fit into the classes and coding scheme you use.
The Price Class, Cost Class, and Packaging Class fields can be used. However, these items are simple enough that you can key the price, costs, and packaging in the Item File F9 and F10 screens.
The Cost Center field should represent the cost center applicable for reporting and for General Ledger entries. You may want to update your “Invoicing to GL Interface” for these labor/expense items and their costs centers.
The Order Entry U/M is EA, as this item is usually used for sales such as 1 job for $1000.00.
|
If you decide to key pricing for labor/expense items in the Item File, instead of using price classes, you should fill in the F9 Pricing screen as shown above. Simply include any of the price list numbers you would sell this item under, and link them to the list the price as shown.
The price shown (99.99) is irrelevant, as this item’s price will always be overridden with the price of the job. The cost should be keyed as .001 if no cost is needed for this item. If a cost is needed, it should be overridden on each order. In that respect, the cost entered here is irrelevant.
In a job price/job cost situation, you may either enter the cost against this item, once the cost is known, or you can have a price and no cost (by keying a unit cost of .001) and then use other labor/expense items to add costs without prices to the same order.
|
The packaging information may be keyed directly into the F10 screen of the Item File, or by using a Packaging Class. In the example above, the conversions allow this item to be used for EA, JB (Job), HR (Hour), or SF.
For example, this item can be used to create order lines as follows:
1 EA @ 5000.00 = 5000.00
1000 SF @ 5.00 = 5000.00
100 HR @ 50.00 = 5000.00
500 EA @ 10.00 = 5000.00
The following example is an item that is used for a specific service, in this case “Edge Work for Fabrication” sold by the lineal foot (LF). This service item includes the price you charge for this service, as well as the cost you incur for supplying this service.
|
The following rules apply to the Labor/Expense item shown above:
The Inventory field is left blank, and the Component field is L (for Labor/Expense).
The supplier is 001 (which means your company). Because this item will never be purchased (only sold), the supplier does not really matter.
The Product Line, Classes, Color Name, and Pattern Name are up to you. These should simply fit into the classes and coding scheme you use.
The Price Class, Cost Class, and Packaging Class fields can be used. However, these items are simple enough that you can key the price, costs, and packaging in the Item File F9 and F10 screens.
The Cost Center field should represent the cost center applicable for reporting and for General Ledger entries. You may want to update your “Invoicing to GL Interface” for these labor/expense items and their costs centers.
The Order Entry U/M is LF, because this item is used to sell a service that is billed by the LF.
|
If you decide to key pricing for labor/expense items in the Item File, instead of using price classes, you should fill in the F9 Pricing screen as shown above. Simply include any of the price list numbers you would sell this item under, and link them to the list the price as shown.
The price shown is the actual price that you charge for this service. In this example, you charge the same rate regardless of the price list number. However, you may assign different prices for different price lists.
The cost shown ($4.00) is the actual cost paid by your company for this service. This could be the rate of an outside contractor, or an internal rate that you accrue to be matched against salaries.
You can use this item with these standard prices and costs, and override the prices and costs on specific orders when applicable.
IMPORTANT - You must consider the accounting ramifications of using Labor/Expense items:
The sales portion of the accounting is just like an inventory item. You debit accounts receivable and credit sales, using the branch of the sale and cost center of the item.
The cost portion of the accounting is different than for an inventory item. For inventory items you debit cost of sales and credit inventory. For labor/expense items you debit cost of sales, but credit a clearing account such as “Labor Accrued” which is then matched to the actual labor billed to you through accounts payable.
|
The packaging conversions for this item work very much like conversions for inventory items. You can enter the conversions for “edge work” done in LF, IN, or LY.
Recommended Accounting Techniques for Labor/Expense Items
Try to have pre-set prices, costs, and profit margins for each labor/expense item.
Use cost centers for Labor/Expense items as follows:
— Use a separate set of cost centers for the labor/expense items than those that are used for your inventory items. This enables you to direct the “Invoicing to GL Interface” to use special GL accounts whenever these special labor/expense cost centers are used. For example, Cost Center LAB could map to GL accounts for “Accrued Labor”.
— If you add the price of labor into inventory items, such as charging 15.99 SF for an inventory item instead of 10.99 for inventory and 5.00 for labor, then you may need to use the cost centers that relate to each product, and not create separate new labor cost centers. For example, labor items that relate to carpet should be coded to the carpet cost center, wood labor to the wood cost center, etc. This will keep the statistics by cost center accurate, because both the prices and costs are in the same cost center (carpet product plus carpet labor, etc.).
Note: This approach is not recommended unless you absolutely must include the price of labor within the price of the product. It is also not recommend because it does not allow for accurate GP analysis at the item and line item level. It is recommended that your labor/service items are marked up in a similar way to marking up inventory.
Create separate labor items for each type of labor related to each product cost center (ceramic, carpet, etc.)
Carefully plan how the Invoicing to GL Interface should work for these items.
In order to analyze the “fabrication” or “installation” side of your business, try to identify all the items associated with fabrication and installation, so that reports can zero in on those items.
How Quantity Break Pricing Works
How Quantity Break Group Pricing is Calculated
Example of Quantity Break Group Pricing
Quantity Break Group Recommendations
How Quantity Break Pricing Works
The quantity break pricing feature is activated by the system administrator in the Company Settings File.
Items that should be included in the same quantity break must be coded with the same quantity break group code and a multiplier. However, the multipliers are often different. These items must have prices based on quantity breaks. The quantity break group codes and multipliers are entered into the Item File.
Before coding items, define your quantity break group codes in the Classification Codes File - FIL 19. Following are examples of quantity break group codes:
A1 - Accessories Group 1
T1 - Tile Group 1
T2 - Tile Group 2
How Quantity Break Group Pricing is Calculated
Quantity break group pricing is calculated only during the batch invoicing process. Batch invoicing is run from the Invoicing Menu via the Print Invoices option. This is not a point-of-sale function. Therefore, prices will not be affected by quantity break groups at the Order Entry screen, nor on quotations, acknowledgements, point-of-sale invoices, or COD pick lists.
The batch invoicing program groups all invoiced lines by customer, ship date, and order number. It also checks for achieved quantity breaks and reprices accordingly. A report is printed listing all price changes. The report includes the customer, invoice number, old price, new price, and shows how the quantity breaks were figured. Quantity break group pricing is also figured when running invoice edits via the All Workstation option from the Invoicing Menu.
Example of Quantity Break Group Pricing
Item 1 is sold by QT (quart) and has a multiplier of 1. It is sold at $3.00 a QT for up to 11 QTs, and at $2.75 a QT for over 11 QTs. This item is in quantity break group A1.
Item 2 is sold by GL (gallon) and has a multiplier of 4. It is sold at $10.00 for up to 2 GLs, and at $8.75 for over 2 GLs. This item is also in quantity break group A1.
A customer orders 10 QTs of item 1 and 1 GL of item 2. Both items have a quantity break group code of A1.
The invoicing program groups all lines for the customer with the same quantity break group code and calculates as follows:
— Item 1 contributes 10 X 1 = 10 units toward quantity break group A1.
— Item 2 contributes 1 X 4 = 4 units toward quantity break group A1.
— Total of 14 units are contributed to quantity break group 1.
Pricing is retested as follows:
— Item 1 is tested with quantity - 14/1 = 14 and is repriced at $2.75 per QT.
— Item 2 is tested with quantity - 14/4 = 3.5 and is repriced at $8.75 per GL.
Note: Each item in the quantity break group A1 is repriced using the total quantity. The total quantity is always divided by the multiplier of the item to convert to a quantity representing each particular item. In this case, the individual line item quantities were not enough for the quantity break, but the total quantity was enough for the quantity break in both items. To fully understand these concepts, you should create examples using your own products and the formulas listed above.
Quantity break group pricing also works in conjunction with promotions. For example, a promotional price requires a minimum quantity, it can be used if the total quantity fulfills the minimum required. The quantity break pricing program checks all of the same pricing files that the Order Entry screen checks, except that it now prices based on the total quantity instead of on the line item quantity. The following is an example of special promotions using quantity price break pricing:
Item 1 is sold by the SY (square yard) and has a multiplier of 1. It is sold at $4.00 per SY regardless of quantity. This item in is the quantity break group Z1.
Item 2 is sold by the SY and has a multiplier of 1. It is sold at $3.00 per SY regardless of quantity. This item is in the quantity break group Z1.
Item 3 is a TV set sold by EA (each). It has a multiplier of 0 and does not contribute toward the quantity break. It is in the quantity break group Z1. A promotion is advertised offering a free TV if a customer orders 1000 SY of item 1 or 1000 SY of item 2, or both items for a total quantity of 1000 SY.
A promotion is entered offering a 100% discount for the promotional TV if over 1000 TVs are ordered.
A customer orders 600 SY of item 1 and 600 SY of item 2, asks for the free TV. The order entry operator enters three line items: one for item 1, one for item 2, and one for the TV. Note that the original order prices both SY items and the TV at regular prices, since neither achieve the quantity break on a per-line basis.
The invoicing program calculates as follows:
Item 1 contributes 600 X 1 = 600 units toward the quantity break group Z1.
Item 2 contributes 600 X 1 = 600 units toward the quantity break group Z1.
Item 3 (the TV) contributes 1 X 0 = 0 units toward the quantity break group Z1.
A total of 1200 units is counted toward quantity break group Z1.
Pricing is retested as follows:
Item 1 is tested with quantity - 1200/1 = 1200, and the price remains the same.
Item 2 is tested with quantity - 1200/1 = 1200, and the price remains the same.
Item 3 (the TV) is tested with quantity = 1200/1 - 1200 and a promotion is found for 1000 and over. The promotion is a 100% discount. The TV is now free. Note that 0 is always replaced by 1 if the multiplier equals 0.
Since this price break was in the Promotional File, the promotional number is recorded on each invoice that uses it. You can monitor all of the free TVs by using the Promotional Sales Report and selecting this promotional number. The TV promotion is also highlighted on various registers and exception reports as a negative margin sale.
Quantity Break Group Recommendations
When designing quantity break groups, always try to base quantities on multiples of the smallest unit of measure, which is the lowest common denominator. For example, if three types of items are in a single quantity break group - carton items, piece items, and pallet items, then base the quantities and multipliers on pieces. If 30 PC = 1 CT and 100 CT = 1 PA, the PC items would have a multiplier of 1. The CT items would have a multiplier of 30 and the PA items would have a multiplier of 3000.
Carefully plan all quantity break groups and promotions. You can manage many creative incentive programs such as:
10% off all wood accessories with a purchase of a full pallet or more of a mix of wood items.
50 cents off any trim piece of 1000 SF of ceramic tile purchased.
Import Item attribute records from the IFS - SYS 903
Master Attributes File Maintenance - SET 31
System Wide Setting - Item Policy NB Options (Control the NB Quantities Policy)
System Wide Setting - Options for Item Number Changes
System Wide Setting - Options for Labor and Fund Items (Items with Comp. Codes L & F)
System Wide Setting - Options for Order Entry U/M in Item File
System Wide Setting - Options for Purchasing Discontinued Items
System Wide Setting - Validate Classification Codes & Cost Center in Item File
Extract Item Records For Export to Other System - SYS 207
Merge Item Records Exported From Other System - SYS 208
List Duplicate Item#s - SYS 412
Purge Stray Special Instructions - SYS 121
Product Knowledge Mass Update - SYS 920
Where Item Classes and Other Item File Fields are Used
How can I Change an item number?
Changing an item number that is also a crossover item
Labor and Non-stock items being selected by ISO to be transferred - why?
How do I maintain the “item file color names” table?
Can I Restrict items by company?
How to find serialized items without a serial number
How to correct the average cost for an item
How can I print a report to find all the items that are not serialized?
Inventory Reorder Reports and New Items
Reports by Item Policy Code - DI (discontinued)
How can I Remove Item Attributes?
How do discontinued items affect reorder reports?
Can I delete or change Policy Codes via an Item Mass Update?
Master file logging of the Item files Special Instructions (F12)