|
Need more info or you couldn't find what you were looking for, let us know by sending an email to: support@dancik.com.
Sending and Receiving Advance Ship Notices in CMS
Sending Advance Ship Notices in CMS
Special Considerations for Outbound ASNs
ASNs (856s) are automatically sent to trading partners who send purchase orders (856) on a scheduled basis through CMS.
Note: ASNs can also be sent manually via option CMS 43 - Extract and Export Advanced Shipping Notices regardless of whether close a truck has been executed.
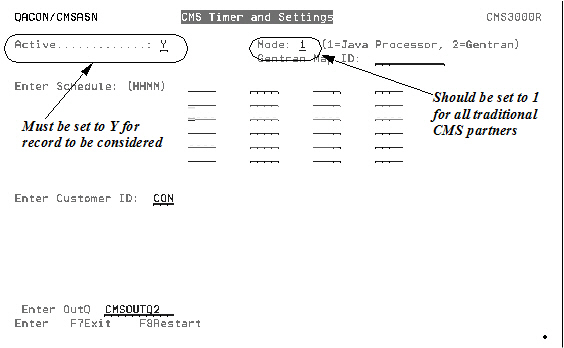
1. To set-up CMS to automatically send advance ship notices, go to the CMS menu and select option 20 - Schedule Automatic Processing. The CMS Timer and Settings Screen appears. Entries are required in all four fields.
Exchange Partner - Enter the name of the company you are going to be sending and receiving purchase orders with.
Transaction Type - Enter CMSASN
Direction - Enter O to indicate outbound ASNs.
Action Code - There are three action codes available: A = add, I = inquiry, and U = update.
2. Enter the information and press Enter. The Timer Settings screen appears.
|
3. The timer settings work in conjunction with a CMSSTART command that checks for transactions every 5 minutes. The CMSSTART command is initiated by Night Jobs. If you set your timer settings to begin at 0800, or whenever your business day begins, to 1800, or the close of your business day, the system automatically checks for and processes any applicable transactions.
4. Enter a transmission mode. You can choose between Java Processor or Gentran. The standard mode for a traditional CMS partner is 1 - Java Processor. However, if you need to use Gentran, enter IBM or ONET3 as the Gentran Map ID.
5. If an OUTQ is specified, in the Enter OutQ field, then the reports generated by the processing of the outbound purchase orders will go to this output queue. This gives you the ability to redirect reports to specific out queues based on the partner and the transaction. For example, you can direct outbound CMS purchase order edits to a specific outq and the inbound ASN edits for to a different out queue.
Note: Gentran EDI reports cannot be directed to a specific output queue.
If there is not an outQ specified, the information is directed to the path given when setting up a CMS partner profile.
Special Considerations for Outbound ASNs
Activating ASNs for an existing Trading Partner
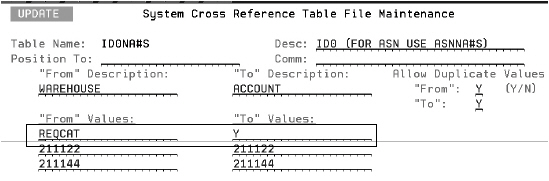
REQCAT entry in the NA#s table
Activating ASNs for an existing Trading Partner
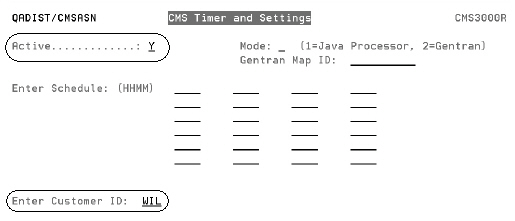
If you are activating ASN transmission for a trading partner you have been exchanging purchase orders with, you need to tag old orders as having already sent an ASN. This way ASNs will not be sent for old orders.
To tag old ASNs as already being sent:
Activate the automatic transmission of ASNs on the Timer Settings Screen. Enter a customer ID for the trading partner.
|
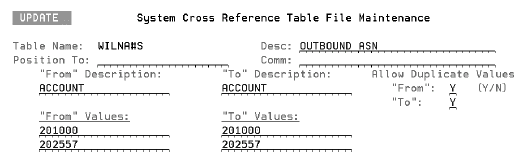
Set-up the xxxNA#s (where xxx is the assigned Customer ID) table for the customer account. The xxxNA#s uses the Customer ID to cross reference account numbers.
|
When ASNs are generated, either automatically or manually, for the first time for this trading partner, an ASN is created for every customer order, regardless of age, in the manifest file.
Since you probably do not want ASNs sent for old orders, you can go into the FTP site you created for this trading partner during the CMS set-up and delete the ASN (856) file.
The two fields on the Partner set-up screen that direct where outbound ASNs are sent are:
— Host - The domain name or IP address of the FTP server where the partner mailboxes are located.
— Outbound - Specifies a location for depositing outbound transactions. This location acts like a mailbox for transactions coming into your system.
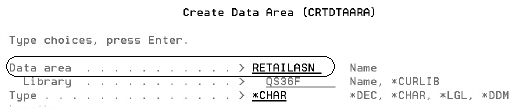
CMS outbound 856 programs can be used to extract ASN data into workfiles in a format that supports the retail hierarchy of Shipment - Order - Item.
This feature is controlled through the use of the RETAILASN data area.
Enter CRTDTAARA on a command line and press Enter to access the following screen.
|
Through a menu driven option you can send advance shipping notices orders as needed.
1. From CMS menu, select option 43 - Extract and Export Advanced Shipping Notices.
2. Enter the Partner, Order(s), and Manifest(s) that you want to send manually send ASNs for.
3. If you want to send ASNs that have already been transmitted, enter a Y in the Resend ASN field. If an N is entered, ASNs that have already been transmitted are not resent. The default is to not resend ASNs.
As an example of how these settings work together, consider these situations:
If you do not enter any order or manifest numbers, and you leave the Resend ASN field blank all orders and manifests that relate to the specified partner that have not already been sent will be submitted.
If you enter orders and/or manifests, and set the Resend ASN field to Y only those orders and/or manifests are sent even if they have already been sent.
4. Press Enter then F2 to submit the outbound ASNs. You should receive the message Outbound ASNs Have Been Submitted.
REQCAT entry in the NA#s table
No REQCAT entry in the NA#S table is the same as saying REQCAT = N which means that an 856(ASN) issent for an order regardless if it went through close or truck, manifest or BOL in WAR 8.
A setting of REQCAT = Y means that the order has to go through WAR 8 option C7 which is Close-a-Truck. Otherwise no ASN is sent.
|
Receiving ASNs in CMS
Special Considerations for Inbound ASNs
1. On the CMS menu, select option 20 - Schedule Automatic Processing. The CMS Timer and Settings screen appears. Entries are required in all four fields.
Exchange Partner - Enter the name of the company you are going to be sending and receiving purchase orders with.
Transaction Type - Enter CMSASN
Direction - Enter I for inbound ASNs.
Action Code - There are three action codes available: A = add, I = inquiry, and U = update.
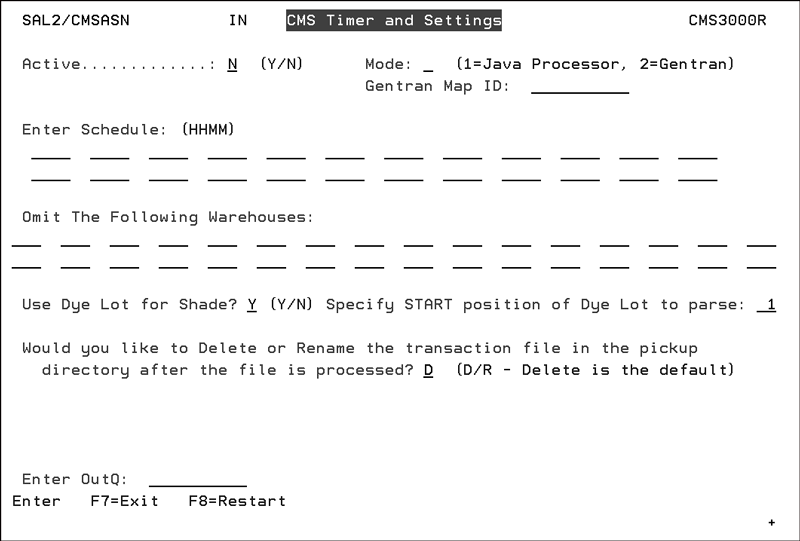
2. The next screen to appear lets you set several parameters related to inbound ASNs.
3. The timer settings work in conjunction with a CMSSTART command that checks for transactions every 5 minutes. The CMSSTART command is initiated by Night Jobs. If you set your timer settings to begin at 0800, or whenever your business day begins, to 1800, or the close of your business day, the system automatically checks for and processes any applicable transactions.
4. Enter a transmission mode. You can choose between Java Processor or Gentran. The standard mode for a traditional CMS partner is 1 - Java Processor. However, if you need to use Gentran, enter IBM or ONET3 as the Gentran Map ID.
5. The field Omit The Following Warehouses allows you to enter up to 32 warehouse codes for which ASNs are not processed. ASNs will not create pre-receipt records for the warehouses entered.
You can use the Omit The Following Warehouses to prevent ASN processes from creating pre-receipts for sample inventory. If your supplier sends inventory purchased on order using a unique code to denote a “sample” warehouse, you can prevent the ASN from creating pre-receipt records in this warehouse by entering the sample warehouse code in these fields.
Note: ASNs sent for DIR shipments are automatically excluded from generating pre-receipt records.
6. If an OUTQ is specified, then CMS reports go to this output queue. This gives you the ability to redirect reports to specific out queues based on the partner and the transaction. For example, you can direct outbound CMS purchase order edits to a specific outq and the inbound ASN edits for to a different out queue.
If there is not an output queue specified, the information is directed to the path given when setting up a CMS partner profile.
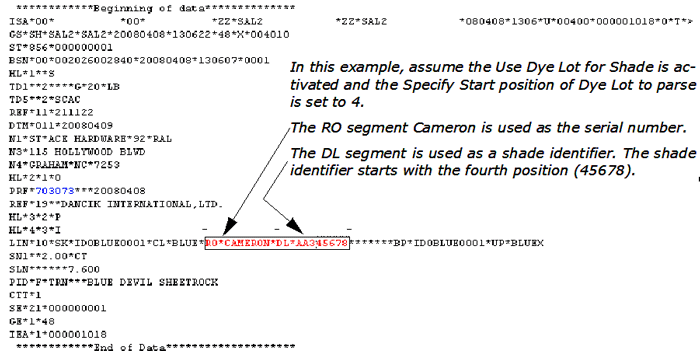
7. The field Use Dye Lot for Shade? allows you to use the DL (Dye Lot) qualifier of the LIN segment to represent shade. For ASNs that contain both RO (roll number) and DL qualifiers in the LIN segment, this feature allows for the use of the RO value to be used as a serial number and the DL segment as a shade.
If Use Dye Lot for Shade? is activated, the field Specify START position of Dye Lot to parse appears. Use this field to designate which character within the DL qualifier where the shade identifier begins.
Note: Only four characters are mapped to shade.
The value with a RO qualifier is used in the Serial# field when present. The value with a DL qualifier is used in the Serial# field when no RO value is present. Otherwise, it may be used in the Shade field based on this new setting.
8. The setting Would you like to Delete or Rename the transaction file in the pickup directory after the file is processed directs the system to rename or delete the invoice after it has been picked up or transferred (FTP) to an iSeries server. The options are:
D - to continue the current process of deleting the invoice or ASN after it is picked up.
R - to rename the file by placing an “X” in front of the file name. Entering an “R” also directs the system to keep the file.
Special Considerations for Inbound ASNs
Creating Additional Locations for an ASN Receipt
Through a menu driven option you can send Advanced Shipping Notices as needed.
1. On the CMS menu, select option 30 - Import and Process Advanced Shipping Notices. The ASN Import and Process screen appears.
2. Enter a Partner, press Enter, then press F2. You should receive the message Inbound ASNs Have Been Submitted. The system grabs all the ASNs from the specified partner and processes them into your system.
Each supplier you do business with may populate what you think of as a serial number in different fields of the X12 B2B document. For example, manufacturers of PC/CT goods may use the DL element of the 856 while manufacturers of rolled goods may use the RO elements for 856 documents.
To allow the greatest flexibility, Dancik CMS uses the following logic:
1. If your supplier sends just a dye lot (no roll number), then this information ends up in the serial number field.
2. If your supplier sends a roll number and dyelot, and they’re equal, then this information ends up in the serial number field.
Creating Additional Locations for an ASN Receipt
1. Adjust the quantity on the original receipt line appropriately
2. Use the F6 function to review the PO and select the corresponding line for the receipt with an “X” on this review screen and press Enter.
3. Once the receipt screen is accessed in this manner, you can add additional shade caliber/quantity/location information.
Adding Partners - Click Add/Modify Transactions, at the bottom of the Add Partner window. From this screen you can add, update, or delete transaction types to include ASNs.
View CMS Transaction Status Log (Inbound 850, Outbound 855 & 856) CMS 54 - This option displays the status of transactions that are generated after the receipt of a purchase order. These transactions include: purchase order acknowledgements, advance shipping notices, and invoices.
View Transaction Audit Log for All Inbound and Outbound Documents (CMS 58) - Use this option to display all the transactions sent out from and received into your system.
Re-process Inbound ASNs, Inbound Invoices, and Inbound POs (CMS 55)
View Status Of Outbound Transactions (CMS 59
Sending and Receiving Purchase Orders in CMS
Sending and Receiving Invoices in CMS