|
Need more info or you couldn't find what you were looking for, let us know by sending an email to: support@dancik.com.
Navigator Branch File
Use the Branch File to designate separate branches within each company. Branches are usually selling organizations and are distinguished from warehouses on the system. Although often there is a one-to-one relationship between branches and warehouses, warehouses are entered in a separate file.
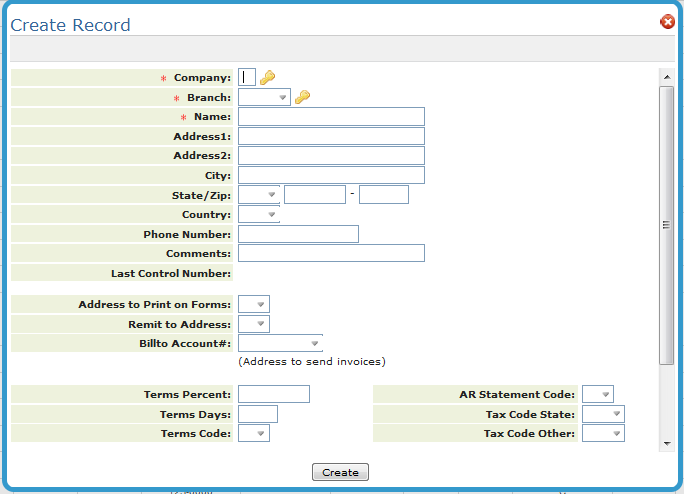
To create a new branch, click Records and then select Create.
|
The fields are this screen are described below. Keep in mind that depending on your filter settings some of these fields might not be displayed.
Field Name |
Description/Instructions |
Company |
The company that the branch is assigned to. |
Branch |
The three character branch identifier. |
Addr1 Addr2 |
Address of the branch. |
The branch address can be used as the Remit To address that appears on invoices and statements. |
|
City |
City in which the branch is located. |
State |
State in which the branch is located. |
Zip |
Zip code in which the branch is located. |
Country |
If the branch is located outside your country, enter the two-character country code here. |
Comments |
Enter any additional information or comments for this branch. These specific comments are only for this branch. The Comments field does not appear in any of the reporting format for this branch. |
Phone # |
Telephone number of the branch. |
Last Control Number |
A branch control number is assigned to each invoice. Each branch has its own unbroken string of control numbers. Invoice numbers are assigned on a company-wide basis. Invoice registers can be sorted by invoice number or branch control number. Its main function is to help with branch audits. |
Address to Print of Forms |
Enter:
Normally, N is entered, because statements and invoices are usually on pre-printed forms or electronic form overlays that contain your corporate logo and address. Enter B or C if you print on plain paper without pre-printed forms or overlaid addresses. |
Remit to Address |
Determines if the Remit To address shows on invoices. Enter:
|
Billto Account# |
Use this option to specify a Billto address per branch that should appear on purchase orders for supplies. This address can be separate from the Remit To address to which your customers send payment. This option is important for companies that use lock box addresses for remittance, or addresses other than their usual company or branch address. Continue to use the company or branch Remit To address options. Use this feature to establish the address that appears in the Billto column of your purchase orders. |
Terms Percent Terms Days |
Enter the default payment terms percentage and days, if any, such as 2.00% 15 days. |
Terms Code |
Enter the default payment terms, if any, that are represented by a terms code. Payment terms codes are defined in the Payment Terms File. |
AR Statement Code |
Enter the default AR statement code, if any. Enter B if the default is a balance forward style statement. Enter O if the default is an open item style statement. Enter H if the default is to hold and not print statements. |
Tax Code State Tax Code Other |
Complete one or both of these fields, if by default your customers are taxable. Otherwise, leave them blank. Enter tax codes that have been set up in the Tax File. |
Print Salesperson |
This option causes your the salesperson’s name to appear on invoices. The salesperson’s name appears above the first line item credited to that salesperson on the invoice. If different lines on a single invoice are credited to different salespeople, then a salesperson’s name is printed each time the salesperson changes. The salesperson’s name always appears above the lines for which that salesperson is credited. |
Hold/Post Next Month |
Enter H if you want all further invoices and orders for this branch to be deferred to the following month. Use H only when the system includes multiple branches and they can not be cut off for the month end close at the same time. Enter H the morning after the last orders and invoices for the current month have been processed. Use H only for branches that are ready to cut off for month end close. The system then stores all further orders and invoices until the end-of-month processing is complete. Users are unaware that the branch is on hold. Orders print, inventory is allocated, and invoices print. However, A/R statistics and physical (onhand) inventory are not updated until the month end processing completes. The system then posts stored orders and invoices into the new month and removes the H. This feature keeps all branches operating, even if they are unable to coordinate a simultaneous end-of-month cut off. Once H is entered to hold a branch, DO NOT remove it. Let the system remove it during the month end close, after the held transactions are properly updated. Removing the H can cause unpredictable results. Note: This setting causes invoices to be removed from INPRINT file by night jobs - but not added to INVOICE file. The INVOICE REGISTER from night jobs will be empty. The "Invoices Held / To be Posted Next Month" report is produced by Night Jobs and lists the invoices which were not updated. |
Green Screen Branch File - FIL 6
Managing Branch Locations
Chart of Accounts by Branch and Cost Center - ACT 8 and ACT 9
GL Cross Reference by Branch or by Warehouse - ACT 13
Cash Receipts by Salesperson or Branch Reports - RAR 101
Insert Total Of Branch Budgets Into Company Budget's File - SYS 205
Change Account /Branch/Slmn# Of An Order (CHGACT) - SYS 401
Problems caused by Warehouse Codes Not Equaling Branch Codes for GL Interface
Why can't I access the order date, branch, supplier, or job # in the header of an order?
Block Branch From Updating Budget Analysis Screen
What does C* in the Default Branch # field of the control panel mean?