Need more info or you couldn't find what you were looking for, let us know by sending an email to: support@dancik.com.
EDI and Bar Code Functions Menu - Menu EB
Working_with_Label_Styles_-_EB_3
Working with Serial Tag Label Styles
Using Label Cross References - EB 5
EDIPRT Table - Selecting a Printer for EDI Inbound Process - EB 6
Setting External Program Name Data Areas - EB 7
Editing Outbound EDI Data - EB 10
Creating a Product Activity (852) Report - EB 14
Working with Item Cross References - EB 15
EDI_Plant-to-Whse_XRef_Maint_-_EB_16
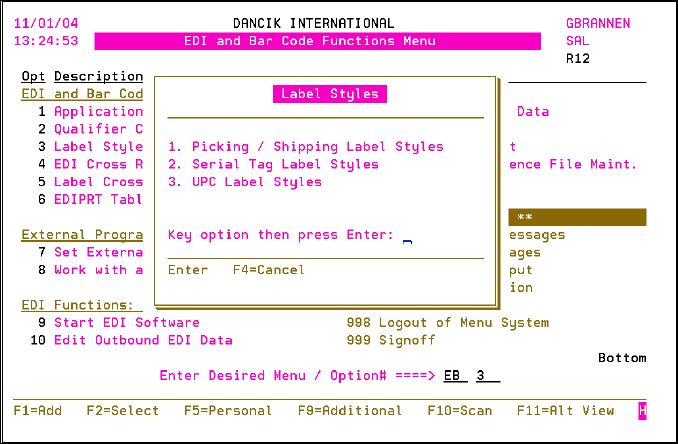
Working with Label Styles - EB 3
This option allows you to review, update, or enter data about labels. All new labels have to be established in this file.
This option allows you to review, update, or enter data about picking labels.
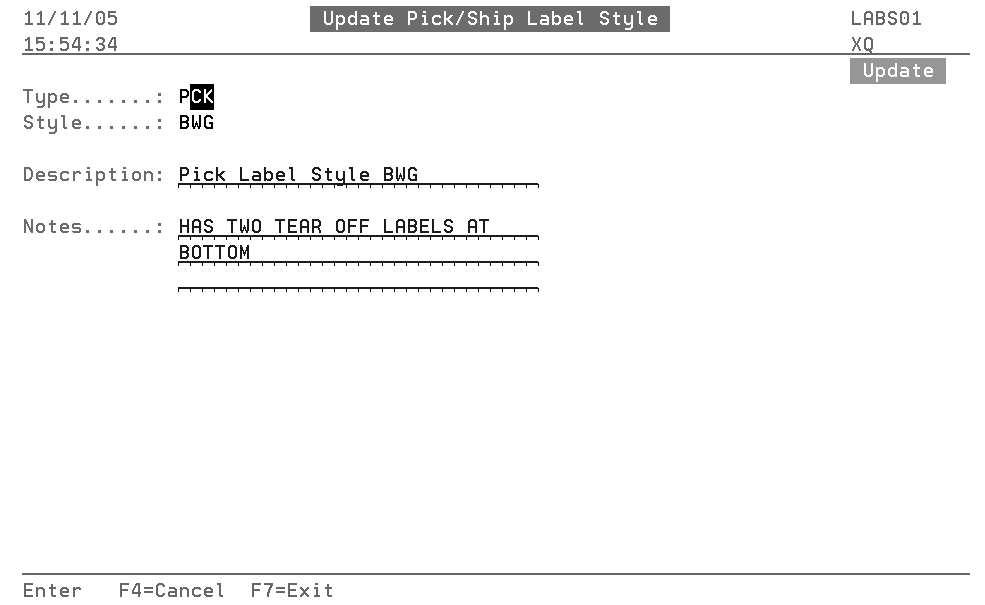
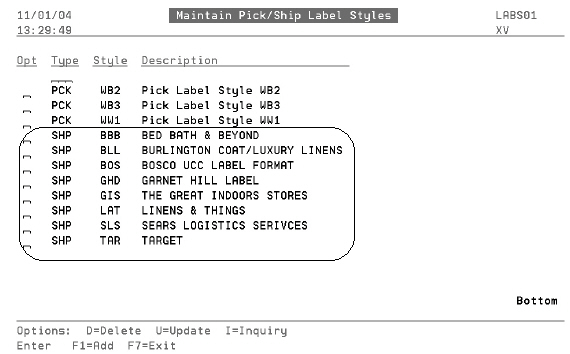
1. On the Label Styles window, enter option 1 - Picking /Shipping Label Styles, and press Enter. All the available label styles appear.
2. To enter or update information about the label, enter a U in its Opt field and press Enter.
|
Note: The labels are actually printed using option 2 - To print UCC-128 bar code labels on WAR 9.
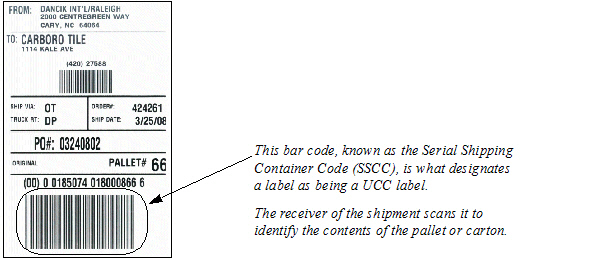
The UCC bar code shipping label can be used to capture the contents of a shipment. Dancik provides several UCC label formats. If a customized UCC label style is not associated with a customer (through the Billto File or Customer Preference File), the default label, shown below, is used when a label is printed.
Configuring UCC label Formats for Specific customers
Configuring UCC label Formats for Specific customers
Labels are assigned to customers via the following fields and files:
• The Chain field of the Billto file (FIL10- This three-character code defines the account as being part of a chain store or account group. Separate account numbers that are part of the same chain should all be assigned the same chain code. For example, all Target stores should be assigned chain code TAR.
• Preferred UCC/EAN-128 Label Format field of the Customer Preferences File (FIL 38)- This field identifies the actual shipping label to use. The label code entered in this field should be one established in the Label Styles File.
Note: To see all the available UCC formats, enter a “?” in the field and press Enter.
If a label format is not assigned to a customer, the default UCC label is used.
There are several “customer specific” shipping labels in the Label Styles File. These UCC labels present the information on a shipping label in a format required by the customer. These label styles are created on a special project basis, usually for large national accounts.
For example, when an order is shipped to a Target distribution center, it may require a shipping label designed especially for your particular business with Target.
Note: These labels are available for general use, but they are not meant to be fit for any purpose, other than the purpose of the parties that contracted with Dancik on the design of the particular label.
All of the available UCC formats are shown below.
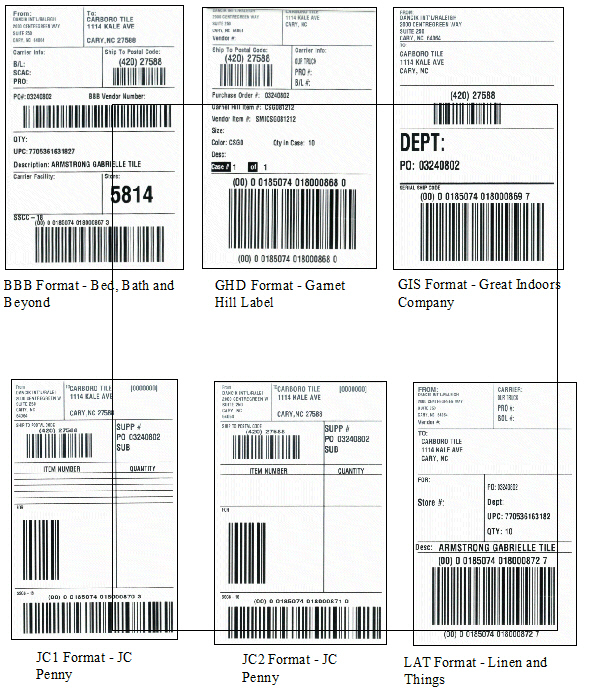
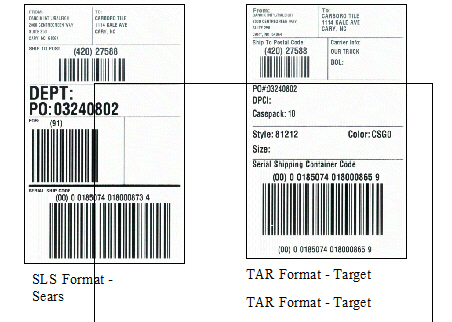
UCC labels are created by Dancik and for the most part cannot be changed. However, you can change the description of the label and add notes about it. Keep in mind if you change the title of an existing label, you need to ensure the Billto File and Customer Preferences File for any accounts that use the changed label are also updated.
1. Go to the EDI and Bar Code Functions Menu (menu EB) and select option 3 - Label Styles File.
2. Select option 1 - Picking / Shipping Label Styles.
|
UCC Labels can be printed from the following areas of the system.
Warehouse Menu (WAR)
• Option 5 - Update Order Status
• Press F20 - UCC-128 Label Maintenance
• Enter the Order Number and then place a P in the Opt field for the lines you want to print labels for.
• Option 9- Print Warehouse Labels
• Option 2 - To print UCC-128 bar code labels
Working with Serial Tag Label Styles
This program includes three distinct serial number tag formats that you can customize for the inventory tag. These labels are typically used to identify rolled goods or carton items on the racks in the warehouse. The serial number tag format can be established at a global manufacturer- or product-specific level, for rolled goods and serialized items.
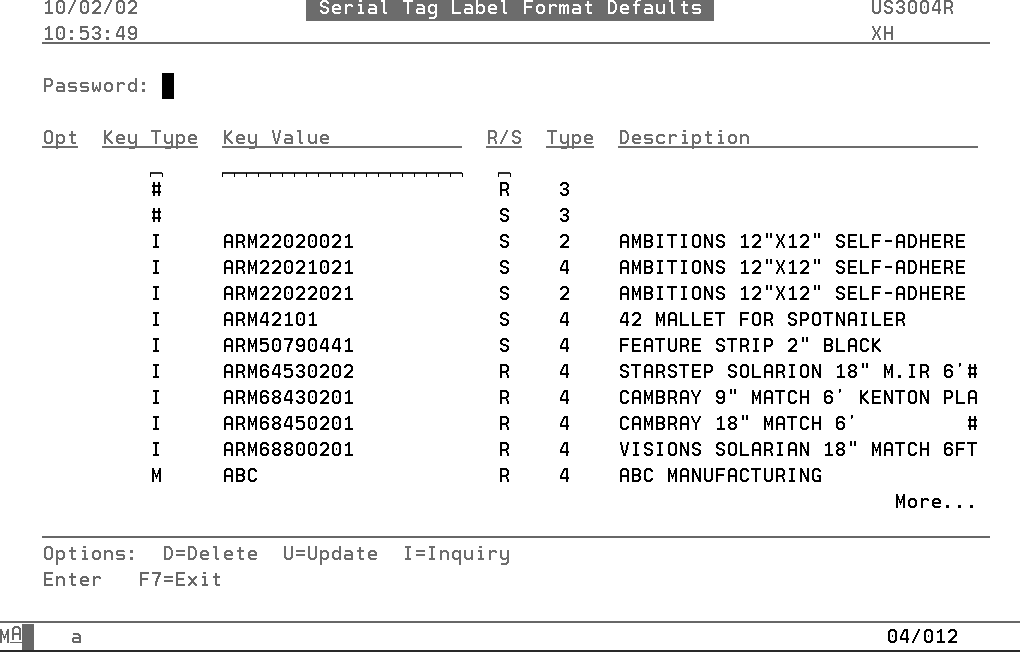
1. On the EDI and Bar Code Functions Menu, select option 3 - Label Styles File.
2. On the Label Styles window, enter option 2 - Serial Label Styles, and press Enter.
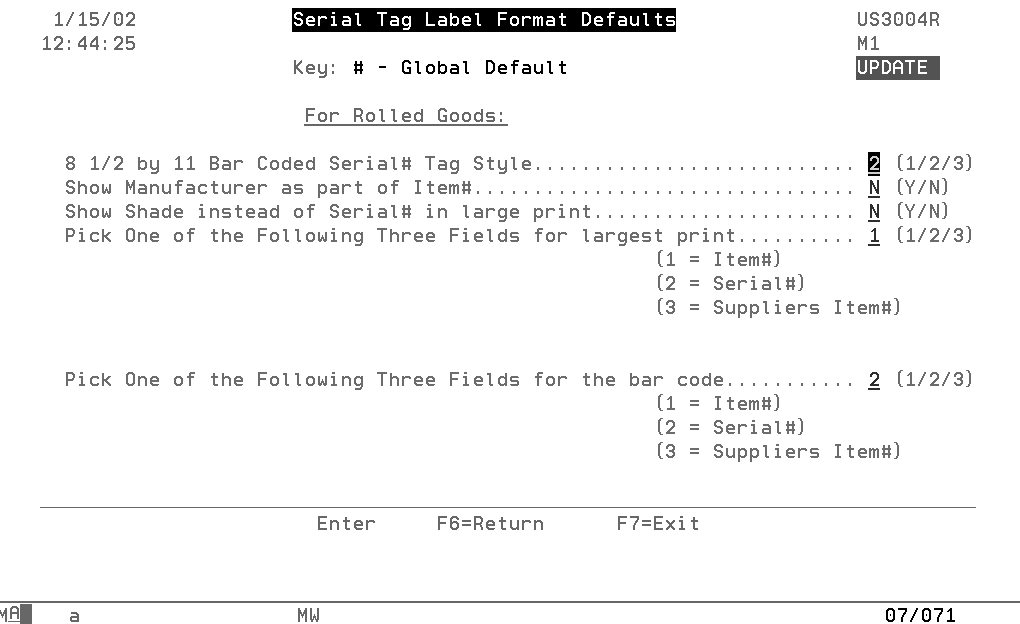
The following screen appears.
|
3. On the Serial Tag Label Format Defaults screen, accessed by updating a label style. review, update, or add data to the fields.
|
Field |
Description |
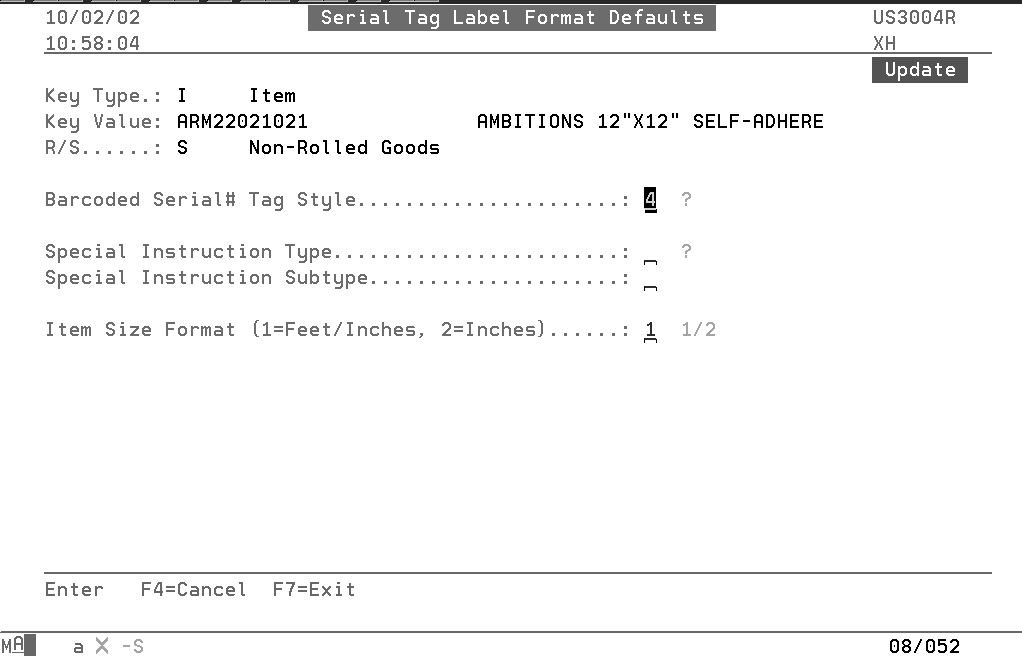
Key Type |
Key types for serial tag label format screen defaults are defined as: # = global M = manufacturer P = product line |
Key Value |
Key values (user-specified) for the serial tag label format screen defaults are defined as: P - Manufacturer and Product line M - Manufacturer |
R/S |
R/S values for the serial tag label format screen defaults are defined as: R = roll S = serial (non-rolled) goods |
Barcoded Serial# Tag Style |
Enter ? to select from a list of valid entries. |
Special Instruction Type |
Enter ? to select from a list of valid entries. |
Special Instruction Subtype |
Select from user-defined instructions, as specified in the Item File (F12). |
Item Size Format |
Size format for label, 1= feel/inches, 2 = inches. |
The following figure is an example of the format default screen for rolled goods.
|
The fields on this screen for options 1 and 3 are described in the table below.
Field |
Description |
8 1/2 by 11 Bar Coded Serial# Tag Style |
Enter one of the following: 1 - For original format 2 - Format is based on the item type (See chart below) 3 - Format is designed to be folded |
The following table describes the additional fields, if you select option 2.
Field |
Description |
Show Manufacturer as part of Item# |
Includes the manufacturer’s three character designator as part of the Item number. |
Show Shade instead of Serial# in large print: |
Enlarges the shade number instead of the serial number. |
Pick One of the Following Three Fields for largest print |
Enter: 1 - To enlarge the item number 2 - To enlarge the serial number 3 - To enlarge the supplier’s item number |
Pick One of the Following Three Fields for the bar code: |
Enter: 1 - To display a bar coded item number 2 - To display a bar coded serial number 3 - To display a bar coded supplier’s item number |
A UPC is a 12-digit product code that is regulated by the Uniform Codes Commission (UCC). You can now generate UPC product labels in Dancik Distribution when you receive a product or on demand in two versions. One version, for a certain type of product, prints a serial number in the bar code. The other version, for collection or stock items, prints the UPC code.
Existing UPCs are in the system, and you’ll create new UPC codes when you set up a new item. When you create a new item code, you can ”auto create” a UPC code, based on a specific formula.
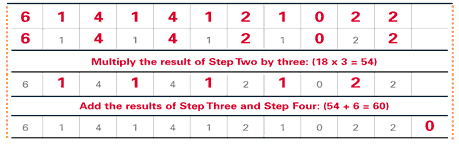
For example, in the UPC code, 757618852667, 757618 is the UCC registered code for a certain product. 85266 is a unique number for the company, which cannot be reused for 5 years. The system automatically pulls the next number, and checks to make sure the number is not already in the system.
The final digit, 7, is a check digit which is calculated as follows:
|
|
|
|
|
|
Step One: |
If you want to find the check digit for the UCC-12 (UPC) number 61414121022. Set up a table with 12 columns, and put the number 61414121022 into Positions 1 through 11. Position 12 is blank, because it is reserved for the check digit. |
Step Two: |
Add the numbers in positions 1, 3, 5, 7, 9, and 11: (6 + 4 + 4 + 2 + 0 + 2 = 18). |
Step Three: |
Multiply the result of Step Two by 3: (18 x 3 = 54). |
Step Four: |
Add the numbers in positions 2, 4, 6, 8, and 10: (1 + 1 + 1 + 1 + 2 = 6). |
Step Five: |
Add the results of Step Three and Step Four: (54 + 6 = 60). |
Step Six: |
The check digit is the smallest number needed to round the result of Step Five up to a multiple of 10. In this example, the Check Digit is 0. |
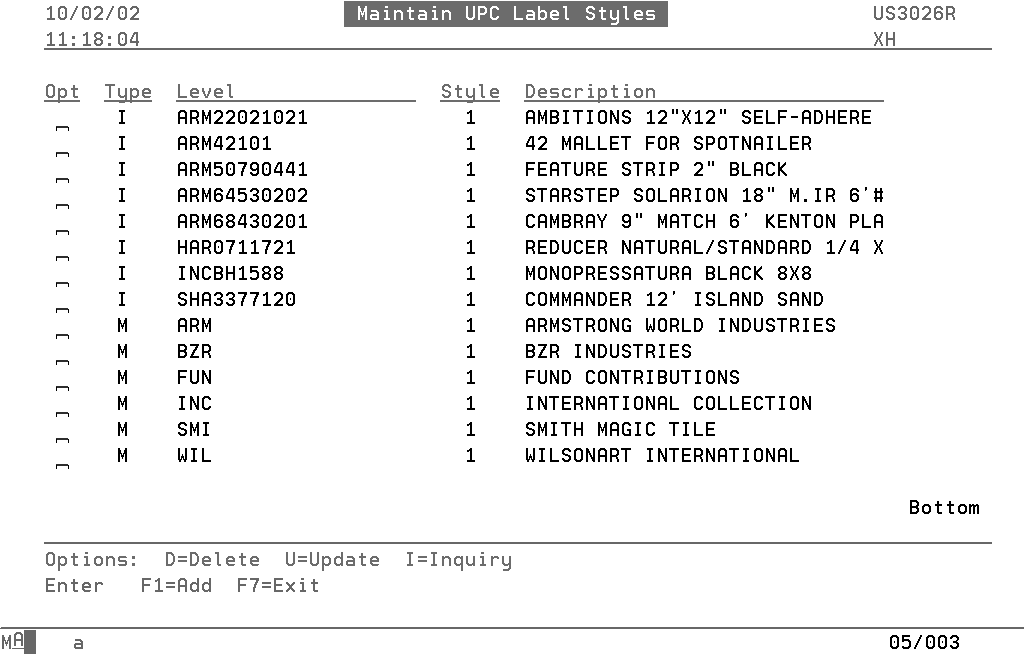
1. On the EDI and Bar Code Functions Menu, select option 3 - Label Styles File.
2. On the Label Styles window, enter option 3 - UPC Label Styles, and press Enter.
3. A screen similar to the following appears.
|
4. On the Add UPC Label Style screen, accessed by entering a U, review, update, or add data to the fields, as necessary.
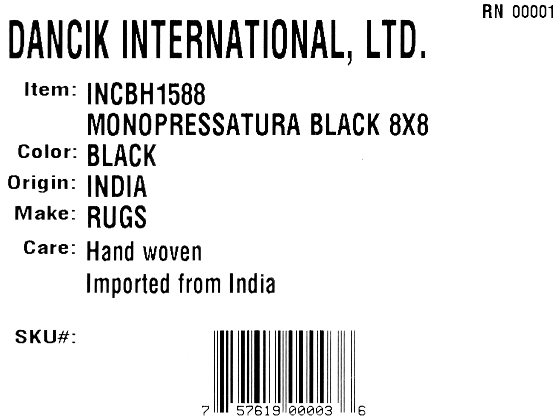
The following figure is an example of a UPC label.
|
This UPC label is generated based upon a special label style code (which was designed primarily for area rugs). The information is included in the Item File screens. For example on the above label, the color information came straight from the Item File, the origin and make are from the Item Class one and two description fields, and the care information is from the Special Instructions option.
Note: Many label styles originate as special enhancements that are contracted by specific Dancik customers. Therefore, some label formats are dependant upon how information is keyed into the Item Files, which varies for different companies.
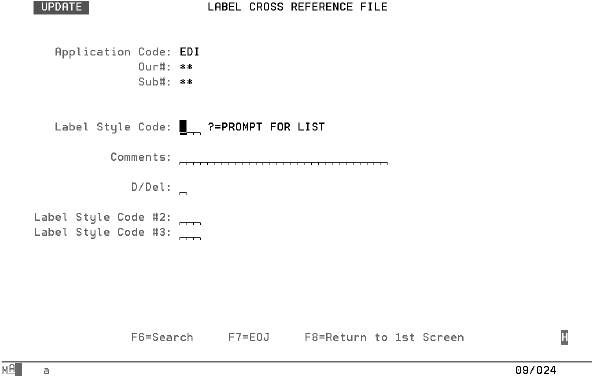
Using Label Cross References - EB 5
Picking Label Style Override by Warehouse
Before using a new or existing label, you need to define an application for the label. For example, you can assign a label to be used for pick labels.
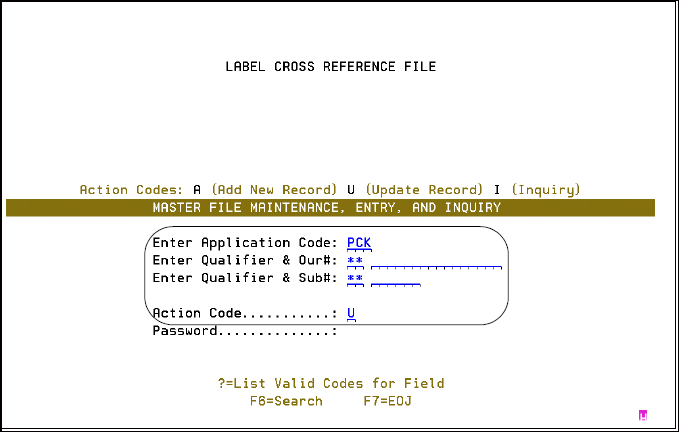
1. On the EDI and Bar Code Functions Menu, select option 5 - Label Cross Reference File.
2. On the Label Cross Reference Entry screen, enter an action code, password, if necessary, and an Application Code, Qualifier & Our#, or Qualifier & Sub#.
Note: Press F6 to see a list of valid cross references.
3. On the Label Cross Reference File Maintenance screen, review, update, or enter data into the fields, as necessary.
|
Field |
Description |
Application Code |
3-character application code (i.e., pck). This code defines the label style to used for specific applications (i.e., pick lists). |
Comments |
30-character field for comments. |
Our# |
This field should always be set to **. The ** designates a wildcard entry that includes all qualifiers. Examples of qualifiers are branch, company number, and invoice number. |
Sub# |
This field should always be set to **. The ** designates a wildcard entry that includes all qualifiers. Examples of qualifiers are branch, company number, and invoice number. |
Label Style Code |
This field ties a label style to an application. For example, if you entered PCK (pick labels) as the application and SH2 as the label style that SH2 labels are used when running pick labels. Enter “?” to select from a list of label styles for bar coding. |
D/Del |
Enter D to delete the label cross reference. |
Label Style Code #2 Label Style Code #3 |
These settings allow you to use multiple labels. For example when people print a pick label, they can have multiple labels, each being styled differently, printed at one time, connected together so they can be used at different stages within the workflow. Label Style Code # 2 is used for label styles BY2 and JJ4. |
Picking Label Style Override by Warehouse
The F2 function on the Label Cross Reference File (EB 5) allows you to override the picking label style. Each warehouse may now select a pick label style that best suits their needs. For example, if a warehouse primarily stores slabs, they can select a pick label, that is most suitable for slabs.
1. On the EDI and Bar Code Functions Menu (EB), select option 5 - Label Cross Reference File.
2. On the Label Cross Reference File entry screen, make the following entries.
3. The PCK in the Enter Application Code field signifies that you are working with a Pick Label.
The ** in the Enter Qualifier & Our# and Enter Qualifier & Sub# fields designates a wildcard entry that includes all qualifiers.
4. Press Enter to proceed to the next screen where a system wide pick label default is established.
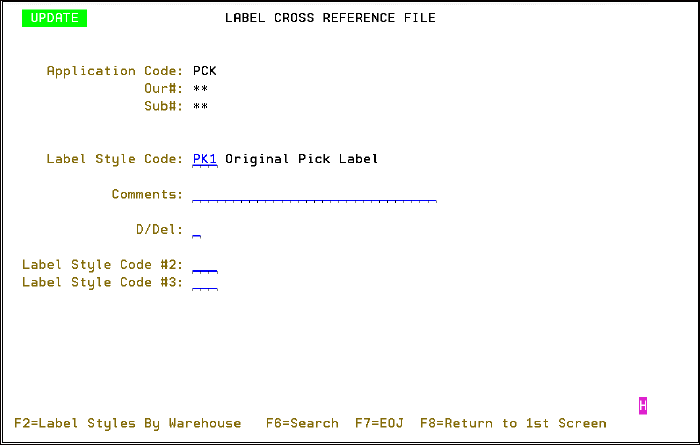
The settings Label Style Code #2 and Label Style Code #3 allow you to use multiple labels. For example when people print a pick label, they can have multiple labels, each being styled differently, printed at one time, connected together so they can be used at different stages within the workflow.
5. In this example, the PK1 label style is the system wide label default. Press F2 = Select Pick Label Style to assign pick labels by warehouse.
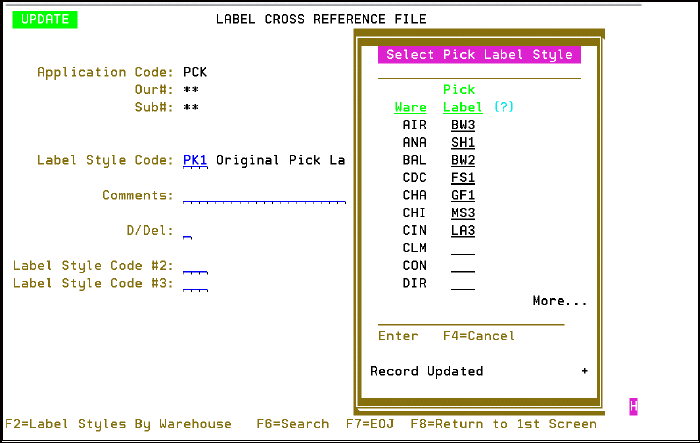
6. Enter a Pick Label style for a warehouse. The label style entered will be the default pick label for that warehouse.
Note: If a warehouse is not assigned a pick label override, the system wide pick label is used.
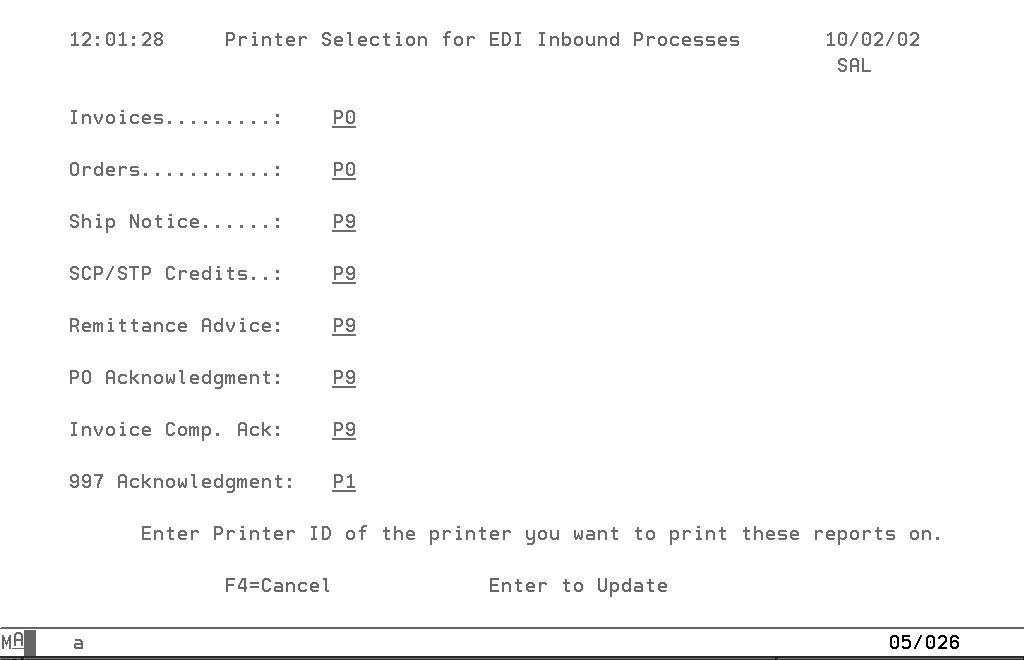
EDIPRT Table - Selecting a Printer for EDI Inbound Process - EB 6
This screen controls where your inbound EDI transmissions are printed. If you enter a printer ID that doesn’t conform to established conventions or specify a device that doesn’t exist, you receive an error message.
1. On the EDI and Bar Code Functions Menu, select option 6 - EDIPRT Table.
2. On the Printer Selection for EDI Inbound Processes screen, enter the appropriate printer ID.
|
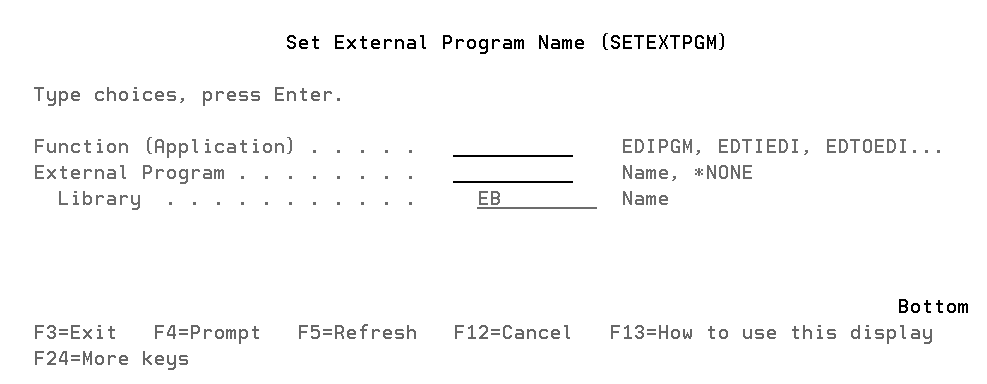
Setting External Program Name Data Areas - EB 7
1. On the EDI and Bar Code Functions Menu, select option 7 - Set External Program Name Data Areas.
2. On the Set External Program Name screen, enter the Function and External Program, and press Enter.
|
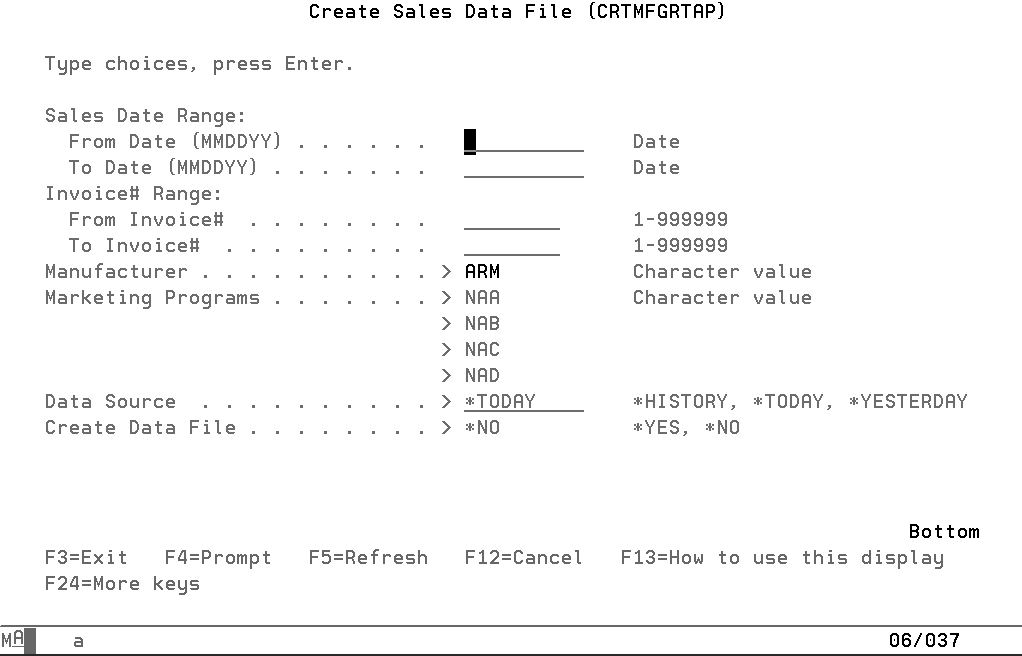
Editing Outbound EDI Data - EB 10
1. On the EDI and Bar Code Functions Menu, select option 10 - Edit Outbound EDI Data.
2. On the Edit Outbound EDI Data screen, enter the appropriate option and press Enter.
If you enter option 1 or 2, continue with this procedure. If you enter option 3, you return to the previous menu.
3. On the Create Sales Data File screen, enter a Sales Date Range and an Invoice# Range.
|
4. Change the values in the Data Source, Create Data Files, and Submit Job fields, if necessary.
5. Press Enter to submit the report. A message confirms that your data has been sent.
1. On the EDI and Bar Code Functions screen, enter option 11 - Export EDI Data.
2. On the Export EDI Data screen, enter the appropriate option and press Enter.
If you enter option 1 or 2, continue with this procedure. If you enter option 3, you return to the previous menu.
3. On the Create Sales Data File screen, enter a Sales Date Range and an Invoice# Range.
|
4. Change the values in the Data Source and Create Data Files, if necessary.
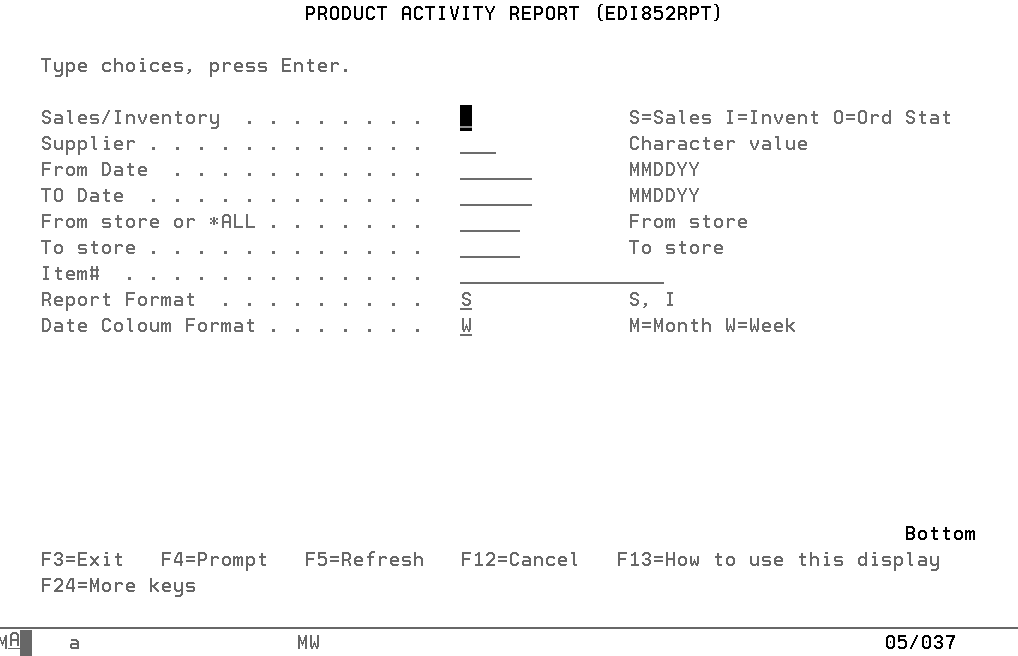
Creating a Product Activity (852) Report - EB 14
1. On the EDI and Bar Code Functions Menu, select option 14 - Create 852 Report.
2. On the Product Activity Report screen, complete the fields as necessary.
|
Field |
Description |
Sales/Inventory |
Sales/Inventory status. Enter S for Sales, I for Inventory, or O for Order status |
Supplier |
3-character supplier code |
From Date |
Beginning date of range for report |
TO Date |
Ending date of range for report |
Date Column Format |
Enter M for monthly or W for weekly format |
3. Press Enter to submit the report. A message confirms that your data has been sent.
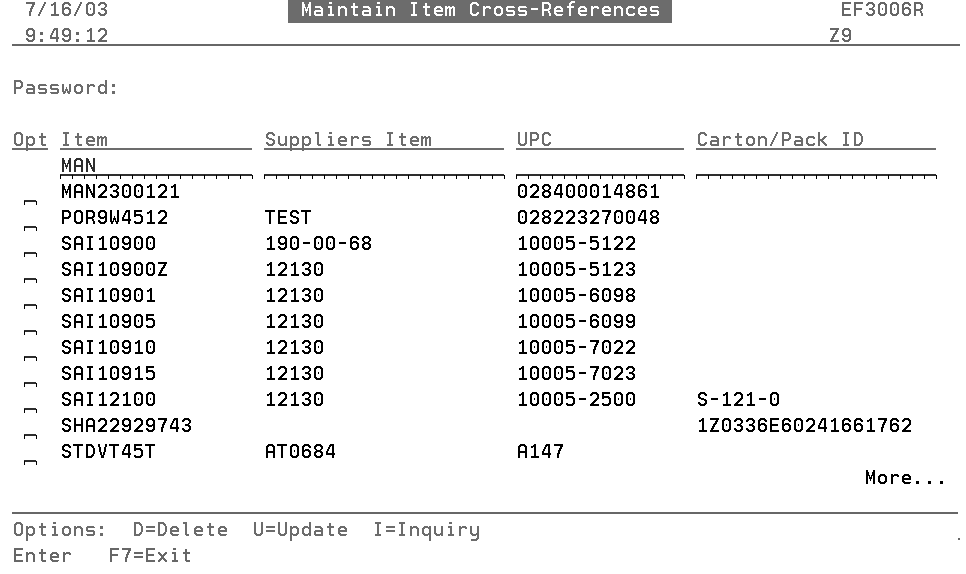
Working with Item Cross References - EB 15
The EDI and Bar Code File Maintenance menu provides a quick and easy way to cross reference UPC and item numbers. You do not have to have the system generate UPC numbers in order to store them. You can store UPC numbers for any manufacturer.
Note: UPC codes can be assigned to an item number here or on the via the UPC Code field at the bottom of the Item File Profile screen (FIL 2).
1. On the EDI and Bar Code Functions Menu, select option 15 - Item X-Ref File Maintenance.
2. On the Maintain Item Cross-References screen, enter a Password.
3. Do one of the following:
Enter D to delete, U to update, or I to inquire about an item in the Opt field beside the appropriate item.
Press F1 to add an item. Complete the fields, as necessary and press Enter.
Note: You can enter “?” in the designated fields to select from lists of valid entries.
4. The Maintain Item Cross-Reference screen appears that shows an items assigned UPC numbers.
|
5. In some cases, another digit is added to the end of the UPC code. This is a system assigned check digit. When you see this number it means the system has validated the UPC number. If for some reason there isn’t a check digit, you need to go back and confirm your entries (UCC code and RN number).
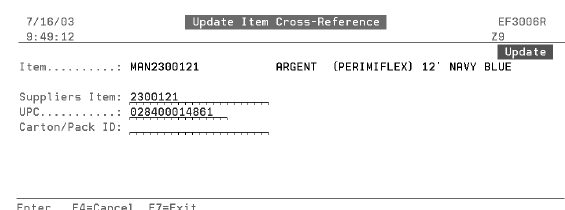
6. To manually change an item’s information, enter a U in the appropriate Opt column and press Enter.
|
7. Change the information as needed. The Carton/Pack ID field is another way to cross reference an item. This field is not restricted so you can enter it in any format that your supplier uses. Generally, if a manufacturer uses UPC codes, the UPC codes are printed on each carton and the Carton/Pack ID field is not needed. However, the Carton/Pack ID field is useful for items that have no UPC codes.
Note: Be careful when manually changing UPC information. If the system cannot validate the new information, you will receive an Invalid Check Digit message at the bottom of the screen.
8. If a cross reference between a UPC code and a Dancik item number exists, whenever the UPC code is scanned using an RF device, the Dancik item number appears.
9. If a cross reference hasn’t been established between a UPC code and a Dancik item number, an error message appears.
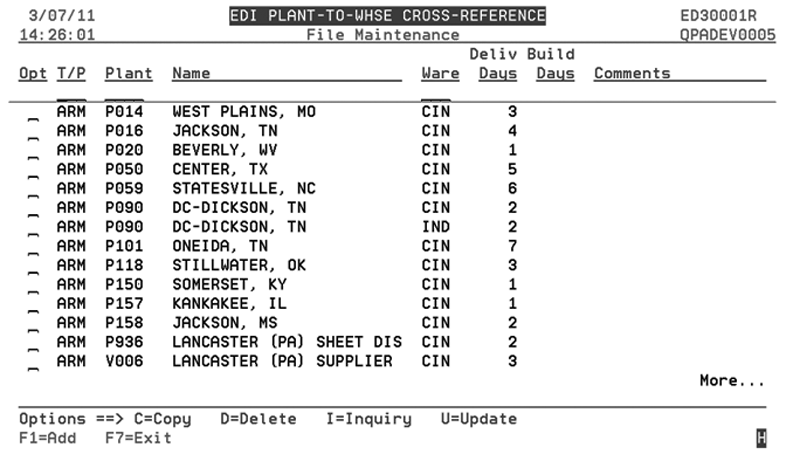
EDI Plant-to-Whse XRef Maint - EB 16
This table is part of the EDI Available To Promise (ATP) Update process. This process can provide for faster updates and more accurate delivery dates on back ordered items. it is designed to benefit those distributors who receive PO status updates (EDI transaction 855) from their suppliers via EDI.
Backorder ETA Update (PUR 19) is an existing Dancik feature that lines up all customer back order lines against all incoming purchase orders, and reassigns line item back order dates (Ship Dt field) automatically based on priorities and order dates.
This process automatically runs a modified version of PUR 19 for back-ordered lines for products when an EDI PO status update (855) is sent to distributors. In addition, when a new customer order is sent via EDI (850) and a line goes on backorder, like manually entered orders, ISO back order logic will be executed to find the best estimated back order date. Before this enhancement the backordered lines from inbound EDI orders bypassed the ISO logic.
Manually Entered Orders/Order Lines
1. Distributors send Armstrong purchase orders.
2. Armstrong acknowledges these orders with an 855 PO Acknowledgement that includes
the estimated delivery date
a status code. Armstrong sends 6 different statuses - 4 with a date and 2 with no date.
Sent |
Dancik Code |
Means |
DR |
F |
= future date, planned future production date is sent |
IA |
K |
= product available, availability date is sent |
AR |
A |
= product is scheduled to be shipped, scheduled ship date is sent |
AC |
T |
= product shipped, ship date is sent |
IB |
D |
= product is back-ordered, no date is sent |
IR |
J |
= product is rejected, no date is sent |
The manufacturing Plant (i.e. P157)
Ship Date
Updates are sent throughout the life of the PO.
3. To ensure the most accurate ETA and Ship Dates the ATP process uses the following tables/files on the distributors system in conjunction with the Armstrong statuses to determine ETA and ship dates on Armstrong Purchase Orders.
Note: The ETA and ship date calculation process skips weekends, so the days entered in the tables are to be Monday through Friday business days only.
These tables are intended to apply a lead time for a product when a PO line item has been placed with the manufacturer but no date has been provided from the manufacturer.
Usage: When no material availability date is provided (IB, IR), ETA date = current date + lead time.
Where Product Lead Times are established, from most specific to least specific:
— Item Lead Time (FIL 2)
— Product/Warehouse Lead Time (FIL 12/F10)
— Product Line Lead Time (FIL 12)
These tables apply a transit (travel) time when the manufacturer has provided a date status for a PO line item and a plant code, but it has not yet been delivered.
Usage: Always added to the date provided by Armstrong (IA, DR, AR, AC) as part of ETA date calculation.
Transit times are established in the following files, from most specific to least specific:
— Plant/Warehouse Lead Time (EB 16). This new table represents a relationship between Armstrong’s manufacturing facilities and the RDC warehouses. It includes the delivery and build days for Armstrong’s manufacturing plants in relation to your location.
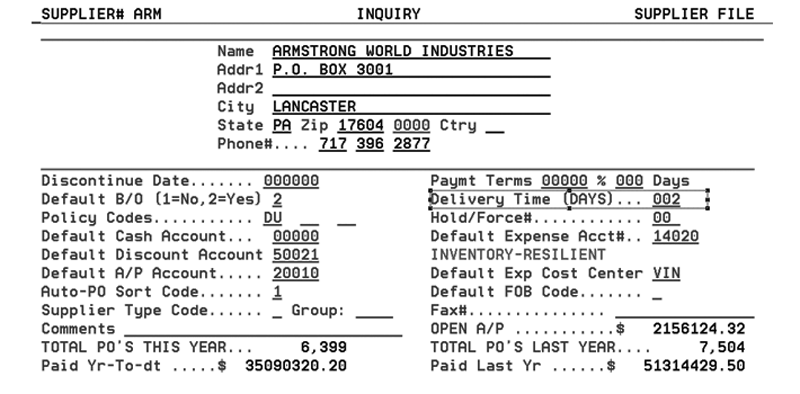
— Supplier Lead Time (FIL 3)
This information specifies, by plant, the average amount of time required to build weight to ship from the time material becomes available at the manufacturer. This factor can also be used to apply any additional time assessed to work a shipment from the time material becomes available. Days are added to Armstrong's date based on lead times and transit times set on the Distributor's system. This causes the ETA date on the Purchase Order to be as accurate as possible.
Usage: Added to the date provided by Armstrong when the status is IA or DR as part of the ETA date and Dancik system estimated ship date calculations.
Build Weight Time is entered in the Plant/Warehouse Build Weight Time (EB 16).
Settings/Files that affect PO_Status Update_(Inbound_855_from_Armstrong)
Settings/Files_affecting_Inbound_850
Settings/Files that affect PO Status Update (Inbound 855 from Armstrong)
Data Area ATPXPUR19 (Dancik) - A Data Area Flag controls the execution of the automated ATP process. If set to “Y” then an ATP date is be calculated and a message displayed.
System Table (SET 5) ARMMISCSET
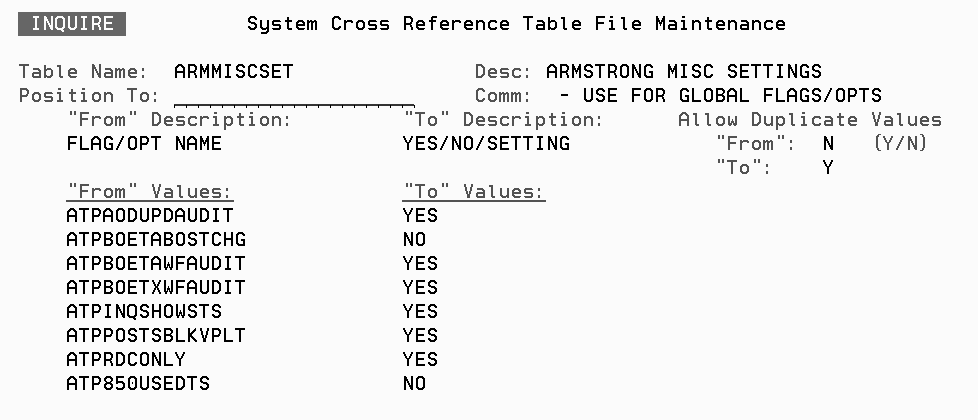
— option ATPBOETABOSTCHG - If this flag is Yes the Armstrong PUR 19 process updates the regular line status code as well as the ATP status. If this flag is No then only the ATP status is updated.
— option ATPINQSHOWSTS - Flag this option to Yes if you want to see the ATP status’s shown during Order Inquiry or Order Change.
— option ATPRDCONLY - This flag is checked for lines that are created as backorders. If YES, and the customer is an RDC/SSC customer, then we continue to use the Back order date returned from ISO. If the customer is not an RDC/SSC customer, the back order date from ISO is skipped and the detail line ship date will be the standard ship date. If NO, then we use the back order date from ISO.
Note: Accounts are designated as RDC/SSCs by entering an S* in the Cust Type Code of the Billto File.
— option ATPPOSTSBLKVPLT - If this flag is Yes then lines filled from Vplants will be treated like a backorder with no date sent so the PO line will get a status of D in addition, the ETA date will be 022222. Currently Armstrong doesn't have accurate dates for product filled from these plants. When that changes, then the recommendation is to change this flag to No so that these lines will be part of the ATP process.
— option ATP850USEDTS - If this flag is Yes, the customer routing days (days to ship) are added to the Ship Date for the line. If this flag is No, then the customer routing days are not added. Inter warehouse transfer times are always added. NOTE: This flag will not affect orders that are backorders or will call. Back orders and will call orders will never include the customer routing days to ship, but will always include the transfer times.
Troubleshooting Switches
— ATPAODUPDAUDIT
Function: ARMORDDTA File update on manually entered order lines.
Purpose: To control audit spoolfile printing. Order that was just processed. Shows you what lines were added to ARMORDDTA. Controls the audit report being produced. This is mostly for troubleshooting efforts.
— ATPBOETAWFAUDIT
Function: Armstrong PUR 19 update of back order lines.
Purpose: To control audit spoolfile printing. Workfile that drives Armstrong PUR 19 process. Shows the order lines that were just brought in on a po status update eligible for ATP. Controls the audit report being produced. This is mostly for troubleshooting efforts.
— ATPBOETXWFAUDIT
Function: Armstrong PUR 19 update of back order lines - during Night Jobs.
Purpose: To control audit spoolfile printing. Workfile that drives Armstrong PUR 19 process - extract built for NightJobs processing. Shows all open Purchase order lines that are eligible for ATP. Controls the audit report being produced.
Settings/Files affecting Inbound 850
ISO setting- Use PO ETA date if > lead time
— Prior to this setting the date returned would automatically be the lesser of the ETA date and lead time date. This setting allows you to decide which you want.
— Orders will use the back order date that is passed from ISO as the ATP date if ATP is turned on, otherwise ship date will be used.
Table ARMMISCSET (SET 5) - option ATPRDCONLY - This flag is checked for lines that are created as backorders. If YES, and the customer is an RDC/SSC customer, then we continue to use the Back order date returned from ISO. If the customer is not an RDC/SSC customer, the back order date from ISO is skipped and the detail line ship date will be the standard ship date. If NO, then we use the back order date from ISO.
Interwarehouse Transfer Times (DEL 4)- The number of days from this file are added if the line is affected by an interwarehouse transfer.
Routes File - The number of days from the routes file are not added to the detail line Ship Date for back orders.
Order Inquiry now displays ATP status information at the line level for each back order.
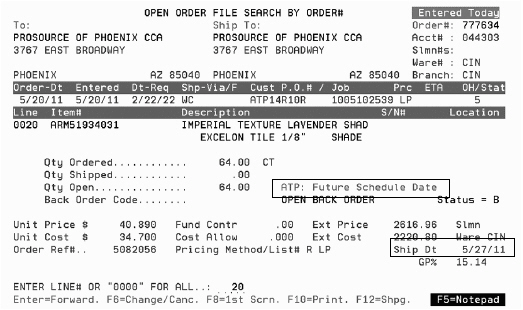
1. Use menu option CUS 10 to access the Order File Search & Inquiry screen. Enter the order number and press Enter.
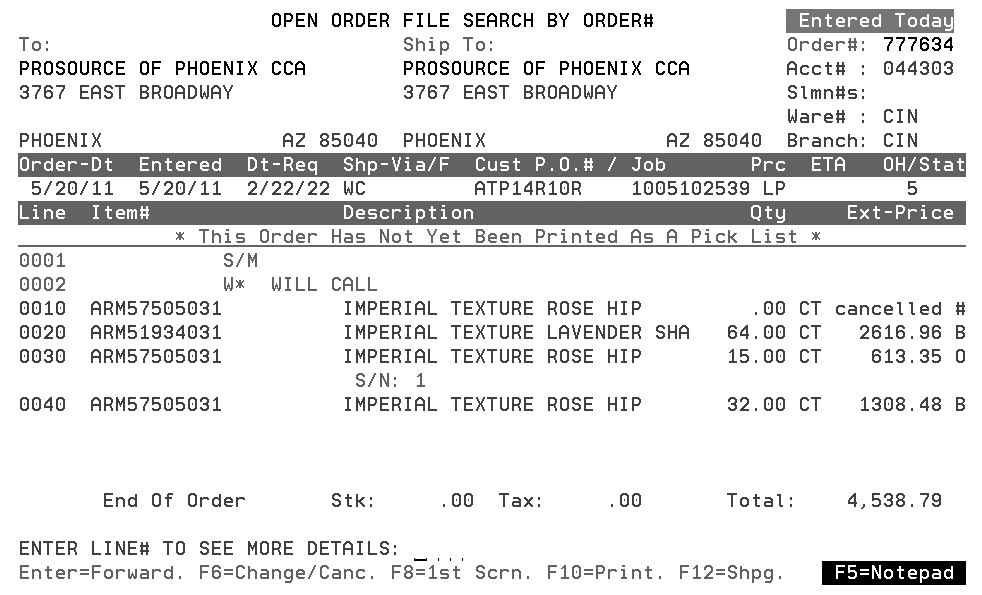
2. Enter a line item in field in at the bottom of the screen to display the line details. The ATP status and ship date are circled.
|
The Ship Date reflects the most updated information provided by the supplier and is the date you should reasonably expect the material to be received into to your warehouse.
Note: The option ATPINQSHOWSTS on Table ARMMISCSET has to be activated for the ATP message, usually pink in color, to display on the order.
The ATP Status messages are based on the line item status of the Purchase Order line that could potentially fill the back order. The ATP codes/messages are:
— A ATP: Available, In Shipment
— D ATP: PO placed, No Date Provided
— F ATP: Future Schedule Date
— K ATP: Available, Not in Shipment
— L ATP: Date based on Lead Time
— O ATP: PO placed, No Date Provided
— T ATP: Available, Shipped
— J ATP: PO placed, Pending update
Manually Entered Orders/Order Lines
The ISO setting (Use PO ETA date if > lead time) and options on table ARMMISCSET also apply to manually entered orders/order lines.
ISO Rules - Use PO ETA date if > lead time - Without this setting the date returned would be the lesser of the ETA date and lead time date. This flag allows you to decide which you want. However, it was determined that for the Armstrong process it should always be the PO ETA date and therefore for Armstrong this is always assumed Yes
Option ATPRDCONLY on table ARMMISCSET - The Print order job will write manually entered orders to the acknowledgment table (ARMORDDTA) so that an ATP date from a PO being acknowledged can be recorded. The status in this table controls the verbiage for the ATP date in order inquiry. If this flag is Yes and the sales order is not for an RDC/SSC customer then the sales order is skipped and processing ends. If this flag is NO, then the order is processed for lines missing from the file.
Summary for ATPRDCONLY switch:
_Update00001.bmp)
Note: ATP statuses do not display on manually entered orders until an 855 is received that has the updated status. The ship date is valid there just isn’t an ATP status. In the near future, ATP statuses can also be updated by night jobs.
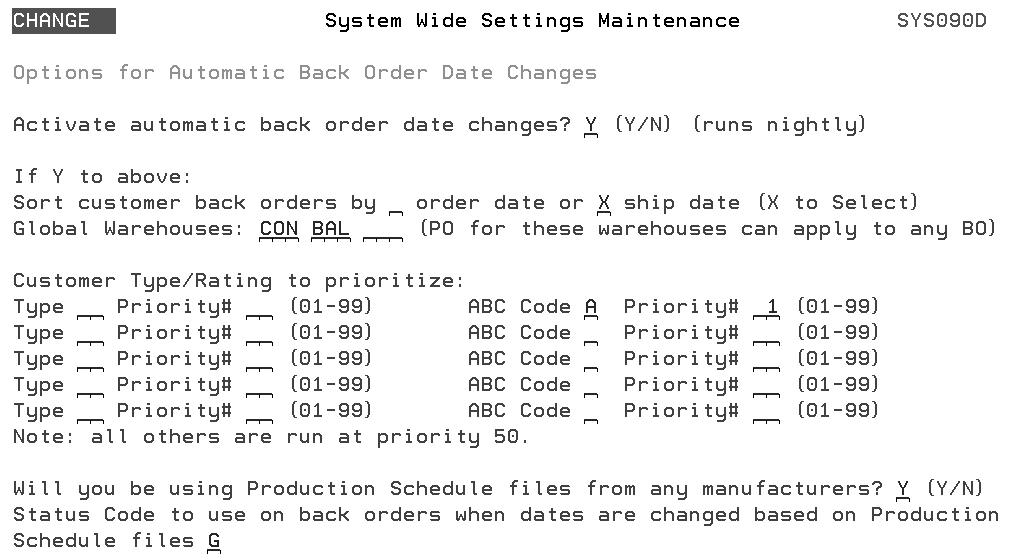
If you allow backorders to be filled from a warehouse other than the header warehouse on the customer back order then it is important that you either have System Setting (SET 4) Options for Automatic Back Order Date Changes for EDI set up OR you have the Stocking Matrix (FIL 25) setup to reflect Global Warehouses.
SET 4 System Setting - Options for Automatic Back Order Date Changes for EDI
— Enter Global Warehouses: - Purchase orders for these warehouses can be used to fill back orders for any other warehouse. For example, you can enter the code for a warehouse that acts as a distribution center. Purchase orders and production schedules for all other warehouses only apply to back orders for the same warehouse.
— Activate automatic back order date changes via Night Jobs? - If this option is set to Y, the Back Order ETA Update (Armstrong PUR19) will run once at the end of Night Jobs to evaluate ALL open Purchase Orders against open back order lines.
This ensures that the most current ATP information is updated on all back order lines, especially ones that may have been entered manually and have not yet received a PO Status update.
Which back order lines are updated is dependent on the ATPRDCONLY table setting.
|
Stocking Matrix File (FIL 25)
— The Stocking Matrix is used only in Order creation/change processes that call ISO.
— ISO retrieves the replenishment warehouse from the Stocking Matrix, if active, and passes it to the Back Order Date program. If no Stocking Matrix is found for the back ordered item, it uses the detail warehouse.
— The Back Order Date program returns the ETA date and PO status of the Purchase Order that may be used to fill the back order.
If standard PUR19 is run, changes were made to ensure that updates outside of the Armstrong process do not affect the dates and statuses set by the Armstrong process.
Changes are centered on the RDC Only flag and the Performance Measure Manufacturer system xref table (PERFMEAMFG).
The following bullets the relationship between ATP settings, standard PUR19 and Armstrong PUR19.
If the Armstrong PUR19 master switch is off,
— Then PUR19 can run for all orders with Armstrong product.
— Armstrong PUR19 is not updating anything.
If the Armstrong PUR19 master switch is on and the RDC Only switch is on,
— Then PUR19 can update all orders with Armstrong product except those for RDC/S* customers.
— Armstrong PUR19 is updating RDC/S* customer orders.
If the Armstrong PUR19 master switch is on and the RDC Only switch is off,
— Then PUR19 should not update any orders with Armstrong product.
— Armstrong PUR19 is updating all backorders for Armstrong product.
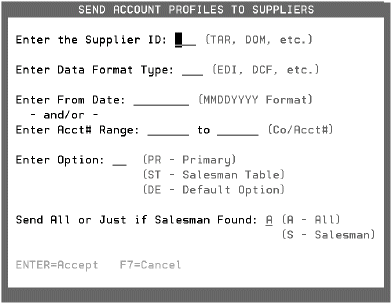
Some distributors send account information to specific suppliers via traditional EDI. These programs convert the account information to “flat file” format, so distributors can email the information to suppliers.
When you send files to a supplier, you select the traditional EDI format or DCF, as shown in the following procedure.
1. On the command line, enter EXP838TD. The Send Account Profiles to Suppliers screen appears.
|
2. Enter the three-character Supplier ID for the supplier you are sending the data to. For example, example, TAR for Tarkett, or DOM for Domco (Harris/Tarkett).
3. Select a format option as follows:
EDI – traditional ANSI X12 document, known as the 838. Previous users of this command must select this format.
DCF – the flat file format. Suppliers who want to receive data in flat file format vs. the traditional EDI format should contact Dancik International. This format could become the future standard.
4. Do one or both of the following:
Enter the From Date for which the account data is to be extracted. This is the date the account was opened.
Enter the Acct# Range that includes all of the accounts you want to send to the supplier.
5. Select the option that applies to the data you are sending:
PR - primary data extracted from the Billto file
ST - salesman file
DE - default (also salesman)
6. Select whether you want to send All of the data, or send the data Just if Salesman Found.
7. When you have finished completing the fields on this screen, press Enter to accept the entries.
8. Press Enter again to process the request.
If you selected the EDI option, the job goes to the GENTRAN job queue, and an EDI transaction is created and submitted the next time an EDI communication session is executed.
If you selected the flat file format, the job goes to the QBATCH job queue. The flat file goes into an AS400 directory, also called a link, named DCFSales within a directory called Home. So the path to the data is IFS/Home/DCFSales. You need a mapped drive on a PC so that you can attach the file to an email. Contact Dancik User Support or Dancik Technical Services for information about creating this link and mapping a drive to a PC.