|
Need more info or you couldn't find what you were looking for, let us know by sending an email to: support@dancik.com.
Cancelling and Changing Open Orders and POs - PUR 11
The Cancel and/or Change Open Order program is used to cancel or make changes and additions to processed purchase orders. Processed orders are orders that have been printed via function F12, which processes orders without printing them.
Note: This program should be used when a batch of orders need to be updated or cancelled. If only one order is being changed or cancelled, it may be faster to enter the order number in the Order Search and Inquiry program and press F6. Both methods lead to the Cancel/Change program.
This program automatically allocates or de-allocates inventory. It also changes all dates, status codes, and so on, according to the changes you make. All changes occur at the time the program is run. All search and inventory screens are immediately updated.
Cancelled orders create a print spool entry with the forms number CANC, but are held there instead of automatically printing. To print an order cancellation, release the print spool. Otherwise, cancel the print spool. It is advisable to replace file copies of orders with the most recent adjusted version. There is also an option not to print the adjusted order.
Orders that were processed but not printed as a purchase order can be released for printing using this program.
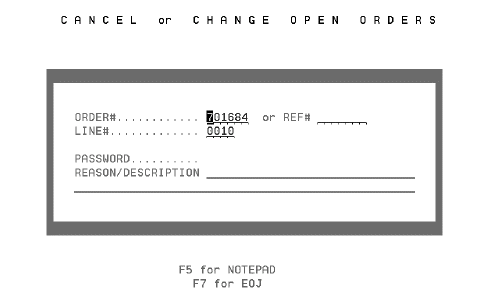
1. To access this program, select option 11 Cancel &/or Change Open Orders and press Enter.
Note: A password is necessary only if your system has been set to require passwords for this function.
2. Enter the order numbers to update or cancel. You have up to 30 fields in which to enter purchase order numbers.
3. Enter C next to those order numbers you want to completely cancel. Enter U next to those order numbers you want to update. Use U if you are cancelling only part of an order or if you are adding to an order.
4. Your default printer is displayed at the lower right section of the screen. You can override it to another valid printer ID. If you choose to print the orders you changed, they print on the printer specified here.
5. Press Enter. The message entry accepted or an error message appears. The most common error is an order number that is not in the Open Order File.
Note: Old orders may have been purged from your system.
If an error message appears, correct your entries and press Enter again. When the entry accepted message appears, press F7 to continue with the next part of the program. At any time while this screen is displayed, you can press F4 to cancel the program and return to the menu.
6. If you are cancelling orders using only code C, no further prompts require a response. When the menu reappears, all selected orders will have been cancelled.
7. If you included any requests to update or add to an order using code U, the first screen of the Change and/or Cancel Orders program displays.
|
Note: This screen can also be accessed directly from the Go to Order Inquiry and Search Option, by entering an order number and press F6 to change and cancel an order.
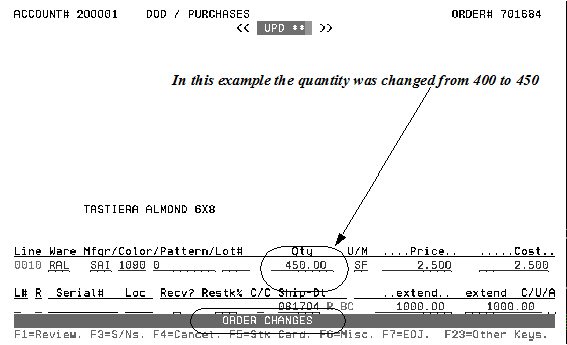
Use this program as you would the Purchase Order Entry program. In this case, the order has already been entered, so you are making changes in update mode by entering the order number and line number you want to change. Certain fields are protected from change. Otherwise, the program functions nearly the same as the regular Purchase Order Entry program. You can add lines just as you would there. You can utilize all of the Purchase Order Entry function keys.
8. Enter a reason or explanation for tracking purposes. This information is automatically inserted in the Order Notepad.
In addition to changes, cancellations, or even if you make no entry, the program inserts the date and time of your access as well as your user and workstation ID. This enables other users to see that the Notepad option is highlighted alerting them that this order has notes. They can then check the notepad to see when and by whom changes were made.
The Order Detail screen is shown below.
Note: Keep in mind that before you get to the Order Detail screen, you will see the Order Header, Shipto and possibly the Credit Check screens.
In this example, we are updating the quantity of an item. Notice the Order Changes message at the bottom of the screen.
|
9. Continue processing the order just as you would a new order. You will come to the Print Selection screen. All changed orders can be printed. Press one of the following function keys:
F1 - Prints the changed order as a purchase order.
F4 - Prints the changed order as a pick list and order acknowledgement.
F5 - Prints the changed order as an acknowledgement.
F6 - Returns to the Order Change program for additional changes.
F12 - Processes the changes or cancellations without printing any documents.
10. To see all the changes or updates made to this order, access the order again in the Open Order file. Then press F5 to show the Notepad screen.
Allowing Suppliers to Update their Own Purchase Orders
System Wide Setting - Options for Purchasing Discontinued Items
System Wide Setting - Options for Purchase Orders
System Wide Setting - Serial# Status Codes to be omitted by Reorder Reports
Supplier/Product/Warehouse Table - FIL 45
Supplier Reorder Parameters Table - FIL 46
Purchasing Rules File - FIL 47
Purchasing Reports
Distribution of Purchase Orders via ODS
Print Inventory Reorder Reports - PUR 7
Search Unprocessed POs, Holds and Quotes - PUR 8
Purchase Order Inquiry - PUR 10
Splitting Lines on Purchase Orders
Updating Purchase Order Status - PUR 13
Update Direct Ship & Special Order Status - PUR 14
Update Shipping Data By Vessel Name - PUR 15
Purchase Order Files and Utilities - PUR 16
Purchase Order Drill Down Inquiry - PUR 17
Vessel/Container Search & Inquiry - PUR 18
Back Order ETA Date Report and Update - PUR 19
Suggested Reorder Quantity Screen - PUR 20
Purchase Order Approval System
Why do unusual sales show up on Activity Format version of purchasing reports
Order Analysis - Purchases for a Supplier
S* Lines on Special Orders and related POs
How are totals on an order calculated - OPENPO
How does the CHECKED-IN flag on the Review Purchase Order screen get there?