Need more info or you couldn't find what you were looking for, let us know by sending an email to: support@dancik.com.
These settings control the appearance and functionality of the DECOR 24 web pages. Some of the things you can do with these settings are:
Customize the logo that appears on the page
Direct your users to the correct help and home links
Change and customize the entries on the left side of the page
Change the title of almost every link
Change the titles on the search boxes
Customize the error and warning messages that appear during Decor 24 operation.
Each presentation screen addresses different areas of the Decor 24 web pages.
1. Access the presentation settings by entering an 03 in the Enter Desired Menu / Option# line on the Decor/24 Setup Menu.
2. The first screen to appear presents you with all the codes on your system.
Note: Press F1 to add a new presentation code.
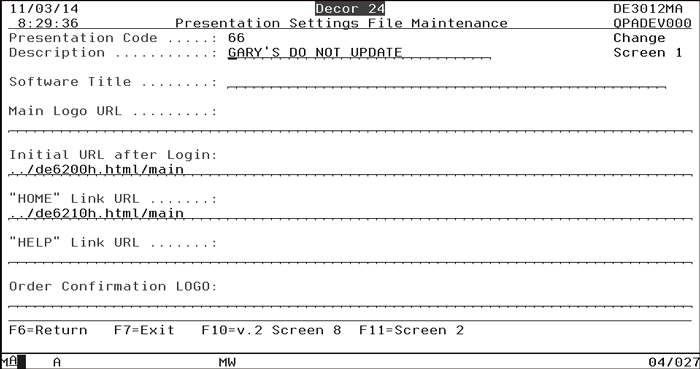
3. Enter a U in Opt column to the right of the presentation code you want to work with and press Enter. The first screen of the settings appear.
Field |
Description |
The number assigned to the code. This number cannot be changed. Once a presentation code is established the only way to change this number is to copy the settings and assign the new code a different number. |
|
The name of the presentation code. Appears to the right of the code number on the initial code listing. |
|
This field contains the title value that will be seen within web-browsers, in the upper row. In HTML, this value is put inside the <TITLE> tags. This field enables you to rename or rebrand the software. For example, if you want to call the program “Anytime Online Access”, enter that title here. It will appear in the title section of the main Decor 24 web page. |
|
This field contains the URL of the Logo that will appear in the upper left side of the browser. The height of the Logo cannot be larger than 50 pixels. The width will vary, due to the various sizes computers allow. If no value is entered, Decor 24 will use the default logo. Your logo and title do not necessarily have to be the same. You can use your company logo and Decor 24 as the title. |
|
This field contains the URL that controls the look of Decor 24 immediately after it is accessed. It also controls what appears in the control panel. If no value is entered, Decor/24 will use its default URL, which includes two application windows. One window is promotions, and the other is the advanced search window. Dashboard The Dashboard allows you to quickly and easily check: Processed Orders, Unprocessed Orders, Scheduled Deliveries, Recently Viewed Items, and Open Invoices. The make the dashboard appear on initial login enter ../de6200h.html/main in this field. Open Invoices Window The Open Invoices window is similar to the one displayed in the Decor 24 Dashboard. However, this Open Invoices inquiry provides more information such as aging and balance due. You can make the Open Invoices appear upon login by defining the initial URL after login to ../de6210h.html/main. Keywords Entering one of these keywords will take the user to that portion of D24 when the Initial link is clicked:
|
|
This field contains the URL accessed when users click Home (found in the upper-right corner) while in Decor 24. The complete URL must be entered. If no value is entered, Decor/24 will use its Default URL, which is http://www.dancik.com (Dancik International's Home Page). It is recommended that you enter the URL of your overall website’s home page. If you do not have any web pages other than Decor 24, you may specify the same URL as for Initial URL after Login. Keywords Entering one of these keywords will take the user to that portion of D24 when the Initial link is clicked:
|
|
This field contains the URL accessed when users click Help (found in the upper-right corner) while in Decor 24. If no value is entered, Decor/24 will use its Default URL, which is loads the Help contexts, from Menu D24 Option 11. |
|
Order Confirmation LOGO: |
This field contains the URL of the Logo that will appear in the center of the final screen of Checkout. Unlike the main logo URL, there is no size limit on this Logo. If no value is entered, Decor/24 will use its Default Logo. The checkout screen can be printed via the Print button at the bottom of the order list. |
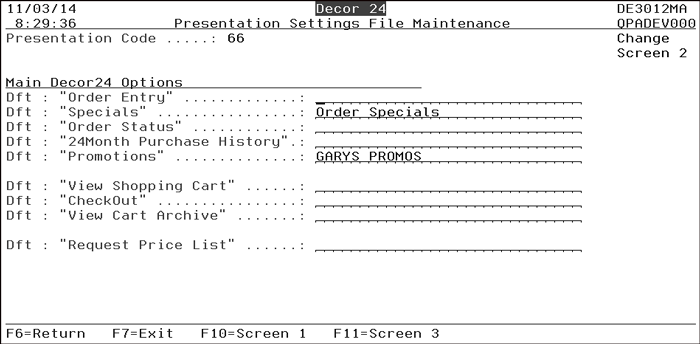
As delivered, Decor 24 gives you five function buttons on the left-hand side of the web page. Screen 2 lets you change the titles of these buttons to fit your business model or internal language.
Note: You can remove many of these functions through the global or user settings.
The settings on this screen allow you to change the titles for different areas of Decor 24.
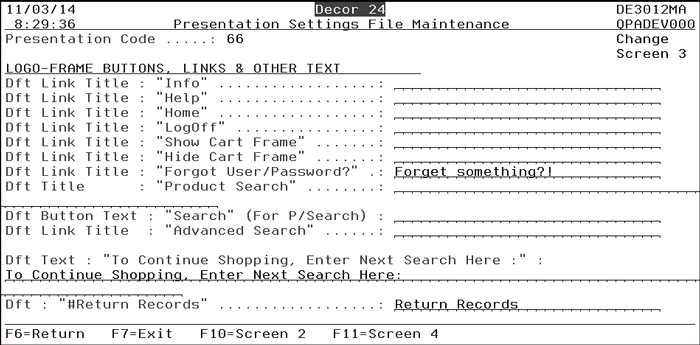
Some of the affected areas are shown below.

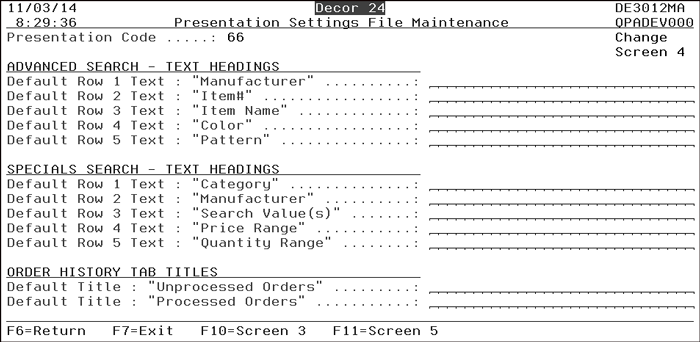
The top group of settings allow you to change the titles in the advanced search dialog box. With the middle group you can change the specials search box which is accessed by clicking Specials. The last grouping lets you control the two headings that orders are grouped under to signify if they are complete or not. This information is displayed when Order Status is clicked. Unprocessed orders are orders that have not been processed into the open order file. Holds and quotes are examples of unprocessed orders.
Note: In order to more fully understand where all the variable text is used, have Decor 24 running while you make these changes. After a change, press the “Refresh” button for either the frame (by clicking in the frame) or the entire page (by clicking Refresh on the browser header.)
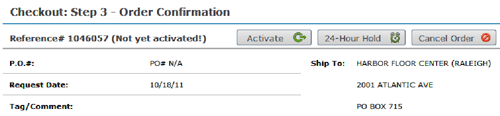
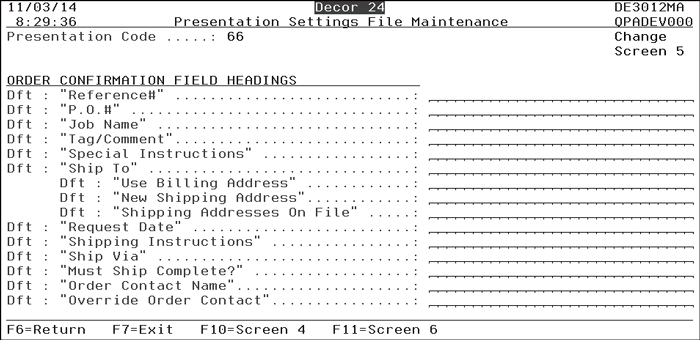
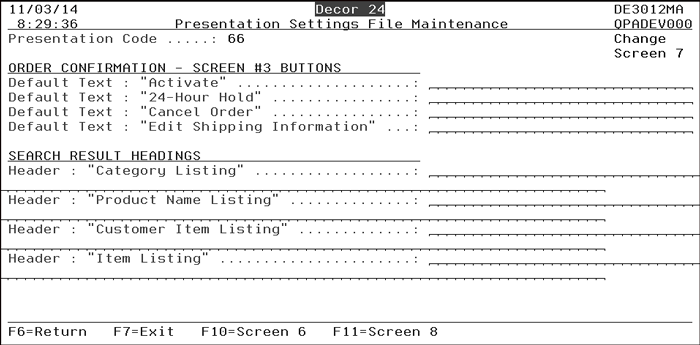
These settings give you control over the order headings used on the final step (step 3) of order confirmation.
Order Heading Field |
Description |
Reference # |
This is the reference number assigned by your core system. |
P.O # |
The customer’s purchase order number. |
Job Name |
The customer’s job name. It appears in the Job Name field of the core system header. |
Tag/Comment |
Appears as line 1 of the core system. This setting functions as an overall sidemark for the order. |
Special Instructions |
Appears as miscellaneous lines in the core system order. |
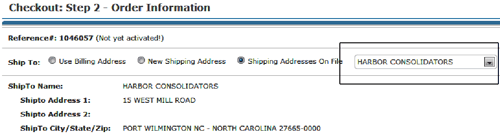
Shipto |
There are three ShipTo options that display during step 2 of the check out process:
Note: You can change the titles of the shipto options to reflect your business terminology. Changing the shipto address can also change the Request Date. This is due to a variety of factors including the difference in location, different shipping routes and runs. |
Ship Via |
Determine the ship via code that is used. When Ship Vias are created via the Classification Codes File (FIL 19), the field Is This Ship Via a Valid Choice for Remote-Access Accounts? controls whether or not a ship via is displayed on applications such as Decor 24. If a Ship Via code has this field set to N, it will not be an option in the Ship Via drop down box. HOWEVER, the default Ship Via of the account you are working with in Decor 24 overrides the Is This Ship Via a Valid Choice for Remote-Access Accounts? setting. For example, if the Ship Via WC (usually will call), is set-up to not be used for remote access accounts (such as Decor 24), it will not display when you are searching for a Ship Via.UNLESS it is the default Ship Via assigned to the account you are placing an order for as assigned in the Billto File (FIL 1). |
Request Date |
Appears as Request Date on the core system. |
Shipping Instructions |
Appears as miscellaneous lines in the core system order. |
Order Confirmation - Screen #3 Buttons |
|
Activate 24-Hour Hold Cancel Order Edit Shipping Information |
These settings allow you to change the Order Confirmation buttons at the top of the third page of the check out process.
|
Setting |
Description |
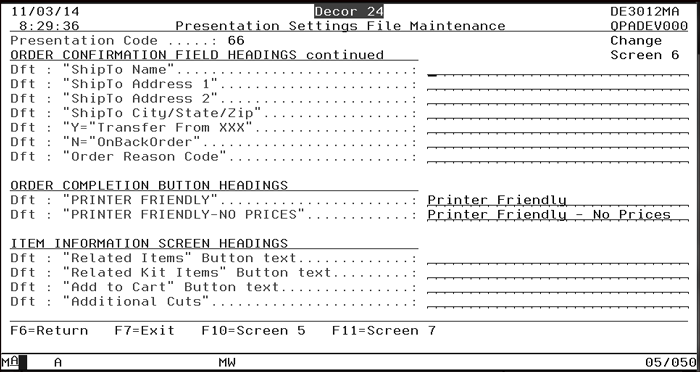
Order Confirmation Field Headings |
|
ShipTo Name ShipTo Address 1 ShipTo Address 2 ShipTo City/State/Zip Y= Transfer From XXX N = OnBackOrder |
Use these fields to retitle the fields on the Order Status - Details screen which is accessed by clicking on an order listed on the Order Status screen. |
Order Completion Button Headings |
|
Printer Friendly Printer Friendly-no Prices |
These two buttons produce an easy to read, easy to print version of the Order Summary. 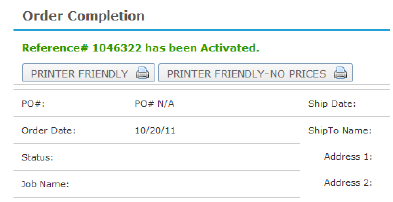
|
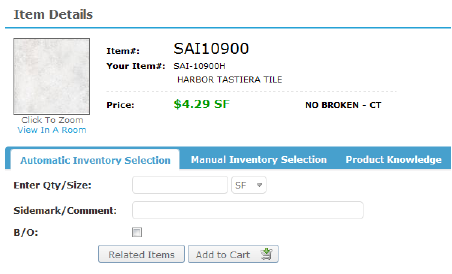
Item Information Screen Headings |
|
Related Items Button text Related Kit Items Button text Add to Cart Button text Additional Cuts |
These buttons are on the Item Information screen. 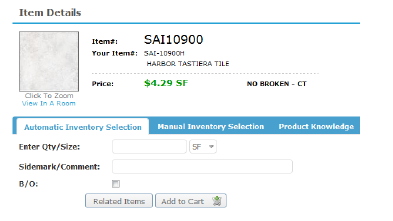
|
These settings allow you to change the components associated with search results. You can change the headings and/or the Load to Order Entry button at the top of the results.
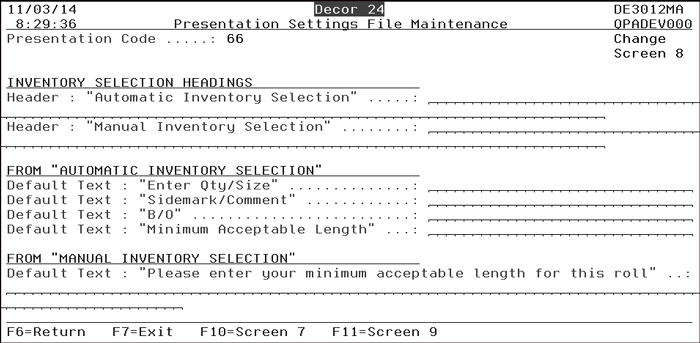
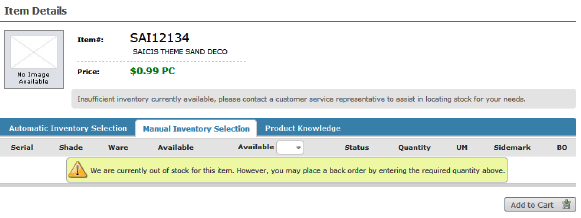
The automatic and manual inventory selection titles are displayed on the Item Detail Screen as shown below.
|
You can let the system automatically select inventory via ISO, or you can make manual selections.
Note: If the Manual Inventory Selection box does not appear, ensure the fields Allow Display of Available Inventory/Serial# for Rolled Goods and Allow Display of Available Inventory/Serial# for NonRolled on screen 3 of the user settings have been activated.
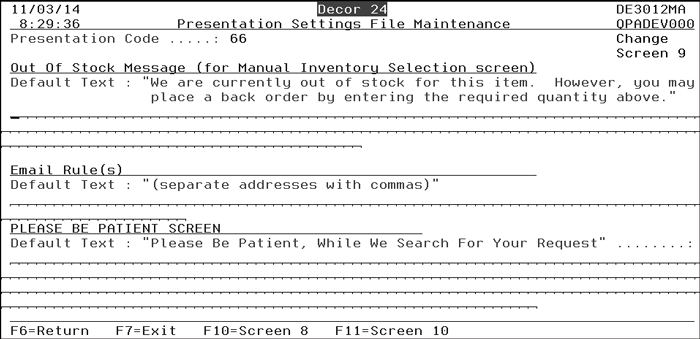
This screen lets you change two of the messages that are associated with order entry. The first message appears when there is not enough inventory to cover an order. This message should only appear on the Item Information screen if:
the setting to show the manual inventory selection area is on, and
there are no manual inventory selections to show, and
the user is allowed Order Entry access.
The next three screens pertain to notes and error messages that appear via the shopping cart. Error messages appear in red and notes are blue.
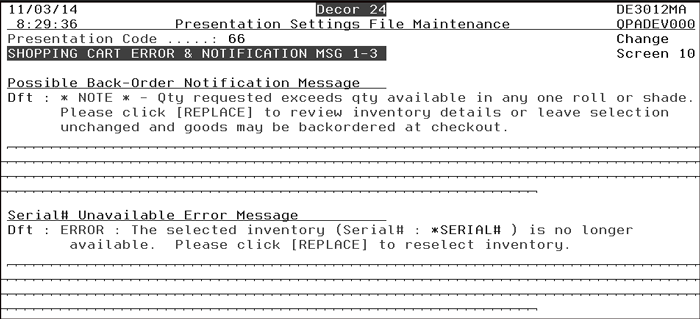
This screen contains a notification and an error message that pertain to order entry. To change these messages, simply enter in the new one underneath the default text and press Enter.
Note: Words shown prefixed with an (*) such as *SERIAL# are variables that you can insert anywhere in your message. The variable is replaced dynamically with the current value.
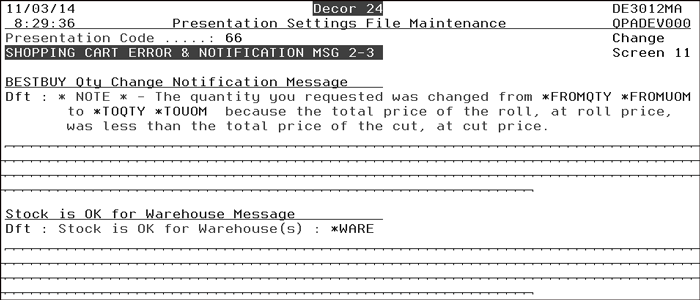
The first message alerts your users that there is a better, less expensive way to order a rolled good item than how it was entered. The functionality behind this message uses ISO and its “Best Buy” philosophy. If there is a best buy for the quantity selected, a single line for the best buy roll is displayed showing the roll and cut price.
The second message lets the operator know that the displayed warehouse has enough inventory to satisfy the order.
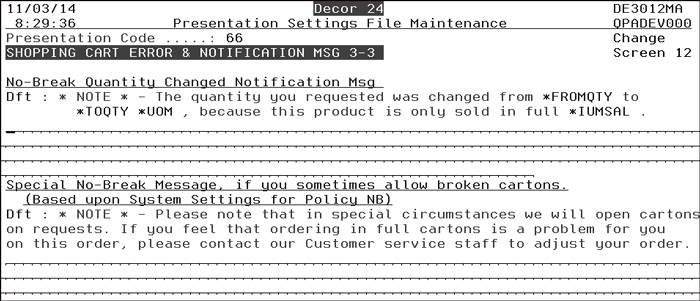
Both of these messages pertain to an item’s No Break policy. This control is established in the Item File (Option 2 on the File Maintenance menu) under the Policies field. If NB is entered into this field, then the item has a no break policy.
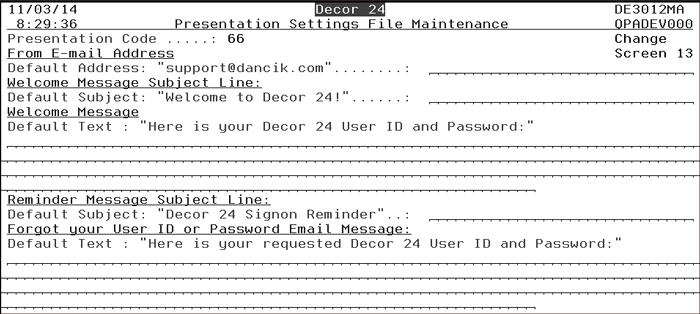
These settings control the message sent via the “S” = Send Msg Option at the bottom of the User Settings File Maintenance screen and the Password Reminder.
Some of the titles that this screen affects are shown below.
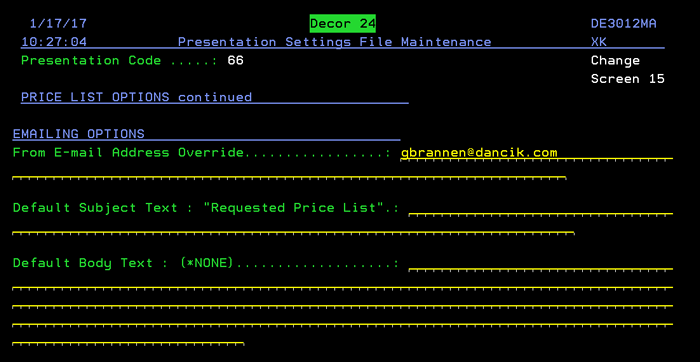
An email entered into the From E-mail Address Override setting overrides the default email address set-up in menu option ODS 100 -Email Defaults. This provides the ability to control and override the default “FROM” address when a price list is emailed to D24 users. If an email address was entered in the Presentation Settings, it is automatically inserted in as the “From” email address.
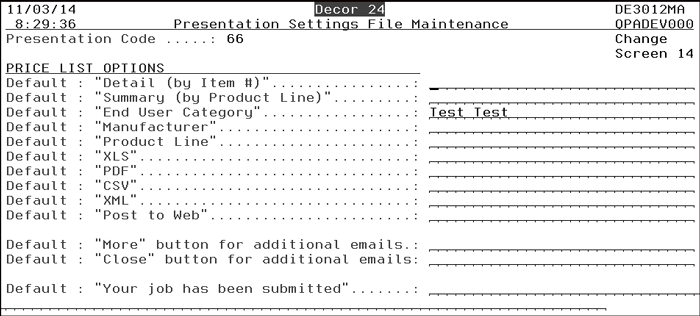
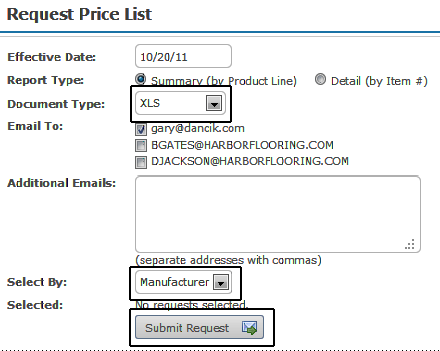
Anytime a Price List is requested, regardless of the format (e.g., spreadsheet, posted to web, PDF), an email is generated and sent to the requestor.
The options on this screen allow you to change the subject text of the email and add body text (the default is no body text).
These settings allow you to customize the format of the Price List PDF. Unless another IFS path is entered into these fields the Dancik default format is used.
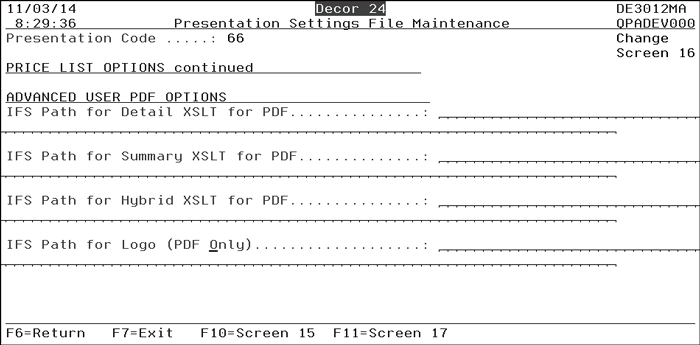
Note: The PDF default is installed into your IFS when Décor 24 is updated. If this file becomes damaged or corrupted, this functionality will not work properly.
These three settings are for ADVANCED USERS who have knowledge of the following:
FOP - Apache FOP (Formatting Objects Processor) is a print formatter driven by XSL formatting objects (XSL-FO) and an output independent formatter. It is a Java application that reads a formatting object (FO) tree and renders the resulting pages to PDF output.
XML - Extensible Markup Language is a general-purpose specification for creating custom markup languages. It is essentially a data dump until formatted into a readable document by XSLT.
XSLT - Extensible Stylesheet Language is used as a “stylesheet” to format the XML. If you are going to run the Hybrid Price List as a .PDF file or if you are going to post it to the web, you need to use the Dancik created default .XSLT file. This file takes what is essentially a data dump and formats it (i.e. adding headings). If you are running the price list as a .CSV or .XML file, a XSLT file is not required.
Note: Dancik can develop a custom .XSLT file for a fee.
IFS - The IFS (integrated file system) is a part of OS/400 that supports stream input/output and storage management, similar to personal computer and UNIX operating systems, while providing an integrating structure over all information stored in your IBM server. It is very much like a directory on a PC.
Note: If you do not receive data after working with the advanced settings, check to ensure that the entry os400.awt.native=true is set-up in your System Properties Defaults.
If you are not familiar/comfortable with all of the above applications, it is recommended that you do not try to change the PDF format.
Note: To customize your PDF price list, contact Dancik’s Professional Services (profserv@dancik.com).
The setting, IFS Path for Logo (PDF Only), defines where your logo is stored. You need to know how to navigate the IFS. Enter the directory path to the logo in this field. If no path is entered, no logo is displayed.
These options deal with the “Post to Web” option when requesting a price catalog. Unless another IFS path is entered into these fields the Dancik default format is used.
Note: The Post to Web default is installed into your IFS when Décor 24 is updated. If this file becomes damaged or corrupted, this functionality will not work properly.
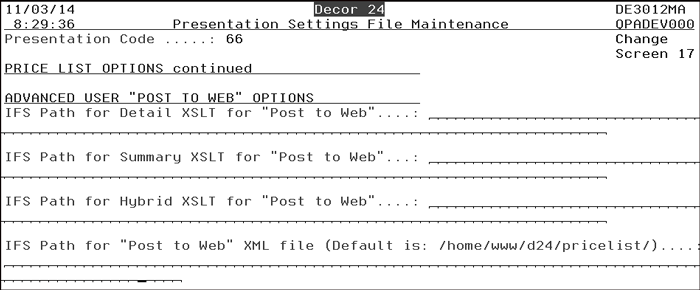
All four of these settings are for ADVANCED USERS who have knowledge of the following:
XML - Extensible Markup Language is a general-purpose specification for creating custom markup languages. It is essentially a data dump until formatted into a readable document by XSLT.
XSLT - Extensible Stylesheet Language is used as a “stylesheet” to format the XML.
IFS - The IFS (integrated file system) is a part of OS/400 that supports stream input/output and storage management, similar to personal computer and UNIX operating systems, while providing an integrating structure over all information stored in your IBM server. It is very much like a directory on a PC.
HTML - Hyper Text Mark-up Language - the underlying code behind most webpages.
If you are not familiar/comfortable with all of the above applications, it is recommended that you do not try to change the Post to Web Format format.
Note: To customize your “Post to Web” price list, contact Dancik.
The last two options direct the system where to place the unformatted XML files. The first setting: IFS Path for “Post to Web” XML file (Default is: /home/www/d24/pricelist/) is for internal use, and the second URL Prefix for Post to Web XML Link. Default value will be a combination of “Your Systems URL” from WEB menu option 100 appended with “/d24/pricelist/” is the URL link that is emailed to your customers containing the Price List.
These directories act as a holding place for the XML data. Whenever a user clicks on an XML file, it automatically gets formatted to a readable document via the XSLT stylesheet.
Note: You can also use a third party application to convert the XML data.
Screen 19 contains settings pertaining to Item Inventory.
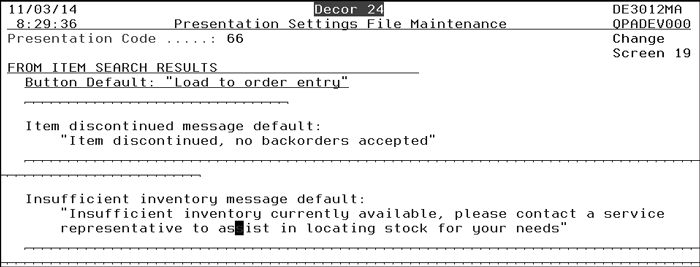
The Item discontinued message appears on the Product Search and Item Information windows. The Item Discontinued functionality has to be activated by the Global or User setting Enable warning message for discontinued items on screen 4 of the settings.
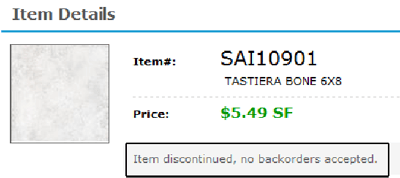
The Insufficient Inventory message also appears on the Item Information window.
Note: The Insufficient Inventory functionality has to be activated via the Global or User setting Enable insufficient inventory message on screen 4 of the settings.
These screens allow you to change the titles of the Dashboard widgets and the column headings for the displayed information.

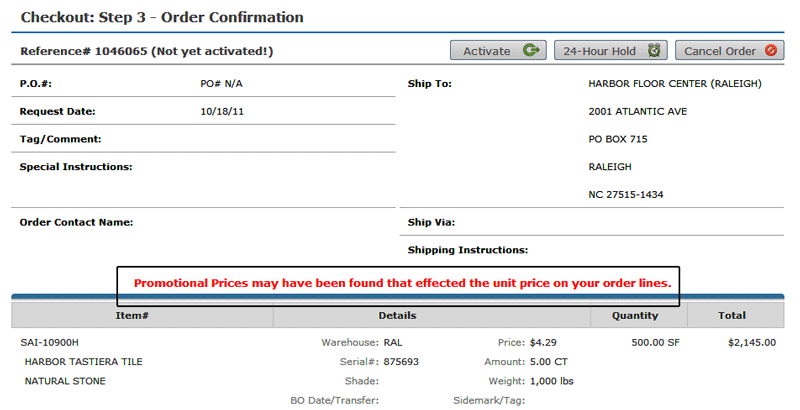
This screen contains settings that relate to the message displayed if Promotional Pricing is used to reprice an order.
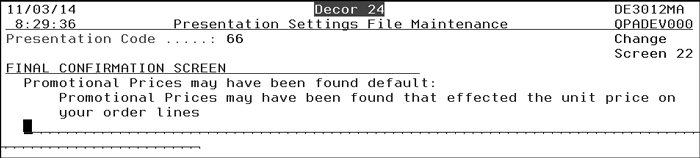
If activated by the Global/User setting Allow Job Name/Customer PO# Promo re-pricing, Decor 24 checks the Promotional Pricing File to see if a promotion has been created for either the Job Name or the PO#. If an entry does exist in the Promotion File for either the Job Name or the PO#, the pricing on the order may be changed to reflect the promotion.
Note: If the Promotional Pricing feature is activated via the Global or User setting, the promotional pricing message will always appear when using Decor 24. If you want to activate this feature but do not want the message to appear, enter <b> as a custom Promotional Pricing message. This overrides the default message with a blank message.
The message “Promotional prices may have been found that affected unit price on your order lines.” is displayed during Step 3 of the check out process.
|
This screen allows you to customize the disclaimer message that appears when a special item is ordered.
This functionality has to be activated via the global/user setting Display Special Order Disclaimer on screen 5 of the global/user settings.
Note: Special order items are designated with an “S” in the Inventory Code field of the Item File.
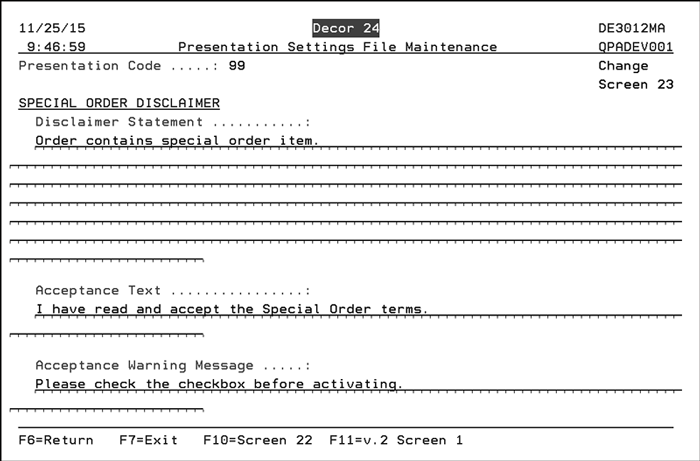
Disclaimer Statement - this is the main disclaimer text on checkout screen 3.
Acceptance Text - this is the text that appears next to the check box that must be selected in order to continue processing the order.
Acceptance Warning Message - this is the text for the warning message that appears if the user did not select the acceptance check box.
Note: If Special Order Disclaimer text does not exists, but the processes is enabled, nothing is displayed (no default will be used). The text “I have read and accept the Special Order terms.” and the checkbox are also not to be displayed.
Displaying the Disclaimer
The disclaimer appears on the Order Confirmation window (screen 3) of the order process.
Notice also that the item along with an “S” denoting it as special appears in red.
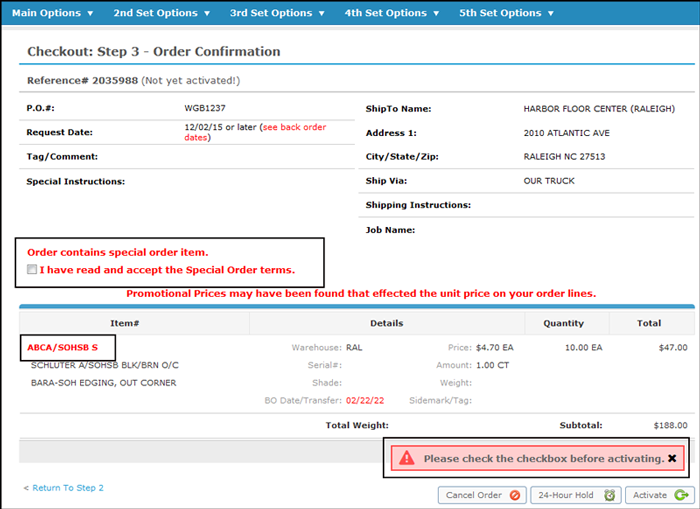
The user must check the check box in order for the Reference to be Activated or put on 24 Hour Hold.
Options for Decor 24 Order Release “Duplicate Order Warnings”
Decor 24 User Settings Report
F13 Function Key - Submitting Price Catalogs
Super User Settings
Company/Branch Settings (D24 4)
Displaying Decor 24 Usage Stats
Decor 24 Web Services