Need more info or you couldn't find what you were looking for, let us know by sending an email to: support@dancik.com.
The order entry process involves many of the features included within Decor 24. With that in mind, let’s order some products.
There are two ways to start.
Using the Order Entry Link Under the Main Topics Heading
Using the Order Entry Link Under the Main Topics Heading
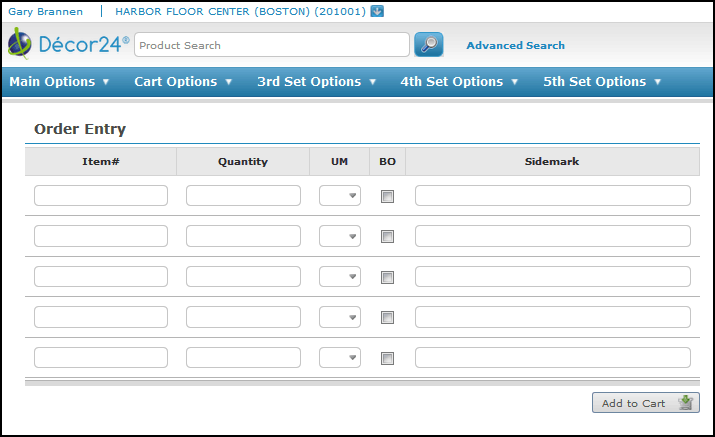
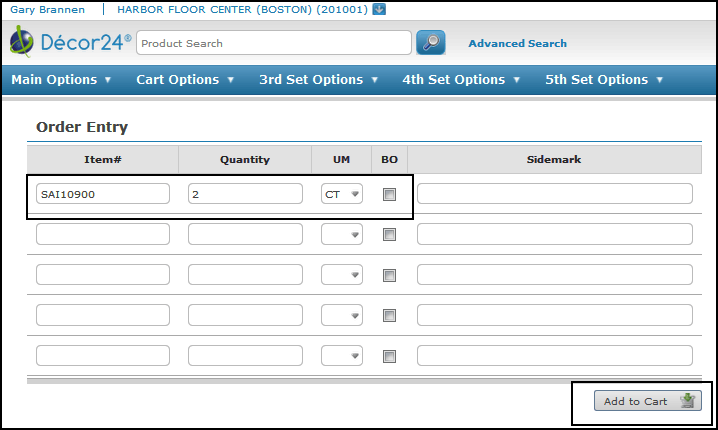
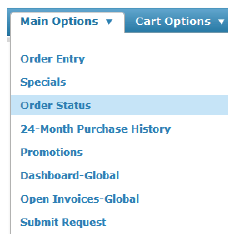
1. If you know the item number, click Main Options and select Order Entry. An order entry box appears.
Note: To switch accounts, simply click on the account at the top of the screen (in the example above the account is Harbor Floor Center (Raleigh) 201000) and select another account from the box that appears. The accounts that appear depend on what accounts the user has access to. If the user is a super user they have access to all the accounts. If the user is not a super user, the accounts they have access to can be assigned with the "Y" option on the User Settings (D24 2). For more information on super users and assigning accounts refer to Super User Settings.
2. Enter the item number, the quantity, the unit of measure, then click Add to Cart.
You can also add an item to the shopping cart by using Decor 24’s search capabilities.
If you do not know the complete number, click Search to use the advanced search feature. Decor 24’s search can be customized to “hide” items classified as samples or promotions from appearing. For more information, refer to Item Include/Omit (D24 27).
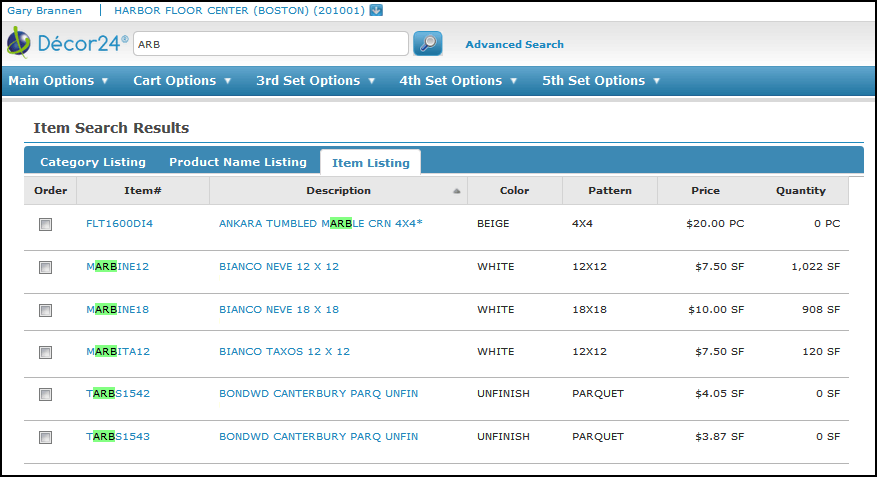
1. Decor 24 searches by several parameters including item number, product name, color, and pattern. Just enter a few characters of the product name in the Product Search box and press Search. The figure below shows the results of a search for products that have arb.
Note: If the Category or Product Listing does not display, the global setting Suppress Category & Product Listings if no record matches found is activated.
Note: To conduct a query on the items that your customers are searching on, go into the iSeries (green screen) and 1) execute a STRSQL query. 2), to go into interactive SQL editor. 3) Execute the query :SELECT * FROM DE0010F ORDER BY D0DATE DESC, D0BTIME DESC. 4) Your query should be displayed in the very top record.
2. To order an individual item or multiple items, click the appropriate Order boxes and then click Load to Order Entry. This brings up the Order Entry box with the selected item(s) displayed.
Note: The maximum number of lines for an order is 99
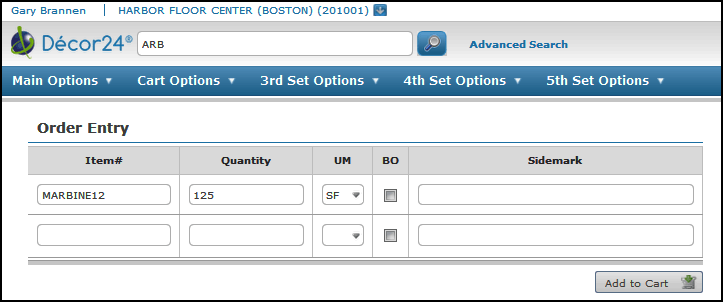
3. Enter a quantity and click Add to Cart.
Note: When an item is selected, the quantity shown is in the item’s native unit of measure. If an item has more than one unit of measure, a drill down list appears beside U/M.
4. After adding all the items for the order to the shopping cart, click View Shopping Cart in the top right hand corner. The screen refreshes to show the contents of your shopping cart.
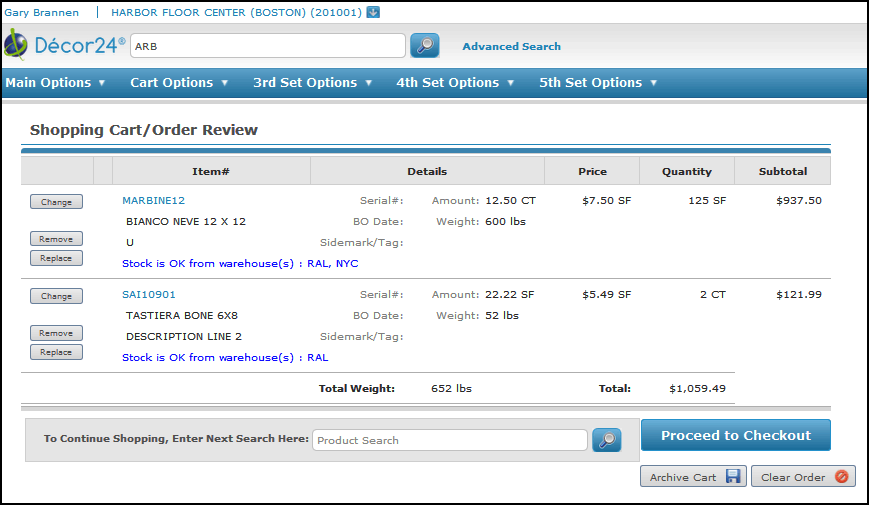
5. On the Order Review window you can remove or replace items or proceed to checkout.
Note: If the customer wants to wait before processing the order, click the Archive Cart button at the bottom of the Order Review. This allows you to save the order for later access and processing via the View Cart Archive option. Archived orders do not hold inventory and remained archived until the order is processed or deleted. This feature is activated by a global/user settings.
6. To finish the order, click Proceed to Checkout. Checkout is a three phase process. The first phase lets you review and confirm your order.
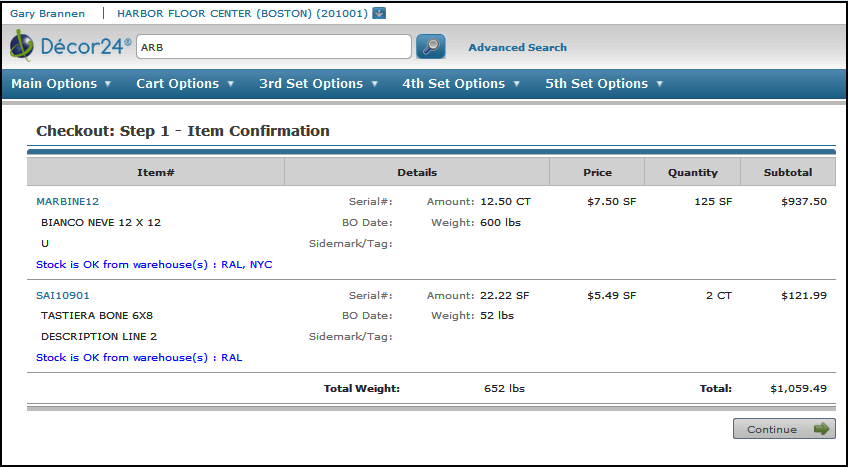
In the figure above, notice the message Stock is OK from warehouse(s): RAL, NYC. Decor 24 checks the inventory of your primary warehouse first to see if the order can be filled. If so, it stops searching and displays this message. If not, it searches the inventory of your secondary warehouses to find enough of the item to fill the order. If Decor 24 cannot find sufficient stock to fill the order, you will see a message similar to this: “We are currently out of stock for this item. However, you may place a back order by entering the required quantity above.”
The second phase lets you check the ship to address and actually order the items. You have three ship to options. This is also where you enter your purchase order and request date. If you do not know the purchase order number, enter a name or other information that will be easy for you to remember. Reason being is that this is a searchable field and it might make it easier for you to access when the orders start adding up.
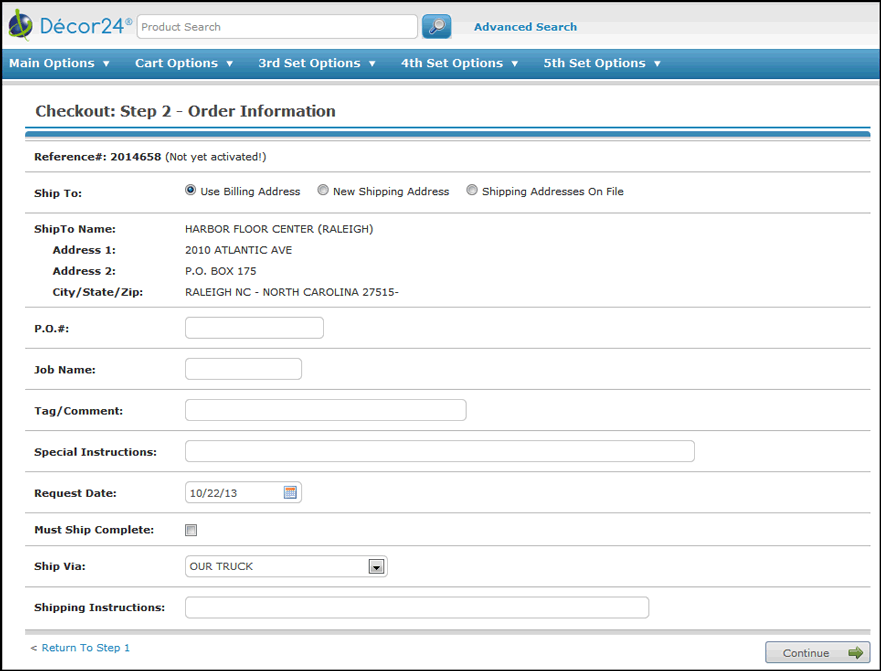
Note: Changing the shipto address can also change the request date. This is due to a variety of factors including the difference in location and different shipping routes and runs.
If the Shipping Addresses on File shipping option is used, a drop down box appears that list all the addresses associated with the account number. These addresses are added to the system via the Shipto File (FIL 15).
The entry of an Order Reason Code can be made mandatory via the System Wide Setting - Order Reason Code Settings for Order Entry and Order Change.
7. You may not want the material delivered right away, if so enter the new ship date in the Request Date box. If the global setting Allow Manual Override of Request Date During Checkout is set to "S" you can select from a calendar of ship dates. Their normal truck route run days are highlighted as well as any other days that they can pick up the material at the warehouse. If the Ship Via is changed, the normal truck route delivery days are still highlighted and can be selected as the Request Date. Any days that deliveries or pick-ups cannot be made are not selectable.
The Request Date setting might read Estimated Date Required; depending on if the Global setting Estimated_Date_Required_in_place_of_Ship_Date_Requested is activated. For more information click refer to .Making the Estimated Required Date Mandatory.
Note: No Run Dates are assigned via menu option DEL 5 - “No-Run-Date” File Maintenance.
8. You can also let the distributor know in the Shipping Instructions box of your date required.
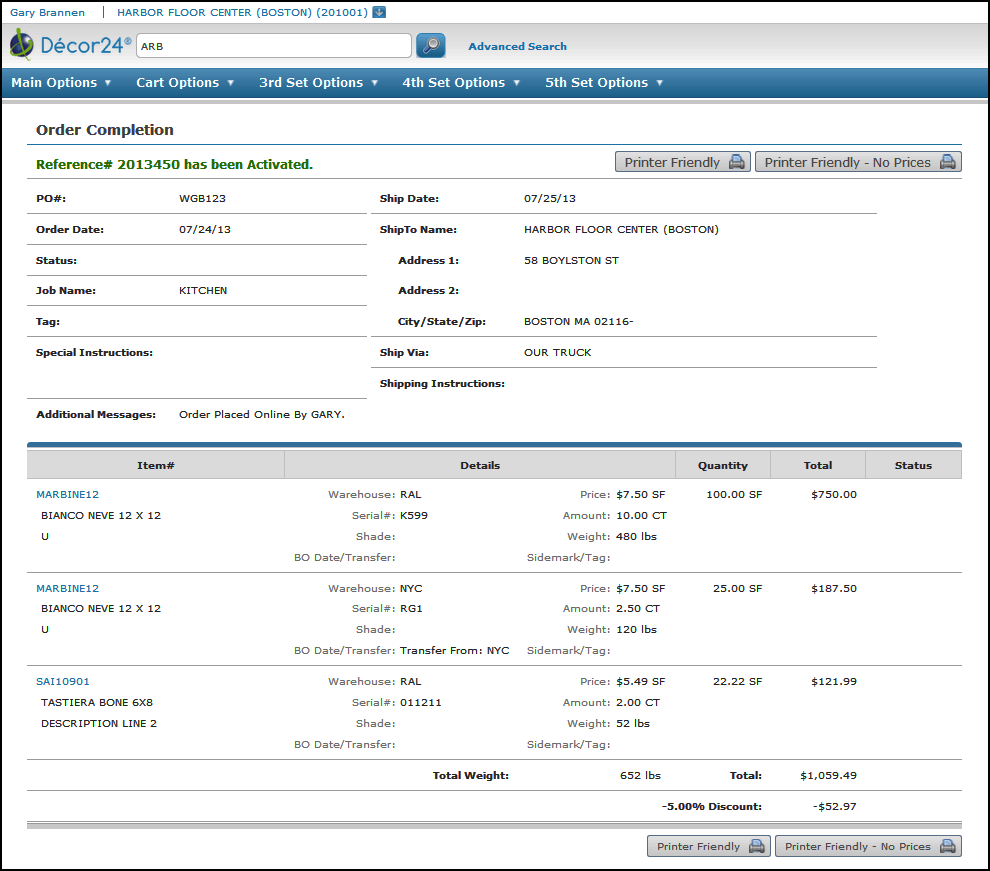
9. Notice that a Reference number has been assigned to the order. This helps you track the order. Furthermore, when a reference number is assigned, an “Order Placed” note is added to the order’s notepad.
Note: This is kind of a behind the scenes thing about Ship Vias, but it does have an effect on the Ship Via types that show up in the Ship Via drop down box. When Ship Vias are created via the Classification Codes File (FIL 19), the field Is This Ship Via a Valid Choice for Remote-Access Accounts? controls whether or not a ship via is displayed on applications such as Decor 24. If a Ship Via code has this field set to N, it will not be an option in the Ship Via drop down box. HOWEVER, the default Ship Via of the account you are working with in Decor 24 overrides the Is This Ship Via a Valid Choice for Remote-Access Accounts? setting. For example, if the Ship Via WC (usually will call), is set-up to not be used for remote access accounts (such as Decor 24), it will not display when you are searching for a Ship Via.UNLESS it is the default Ship Via assigned to the account you are placing an order for as assigned in the Billto File (FIL 1). Furthermore, the setting Prevent changes by Remote-Access Accounts in the Classification Codes File can prevent users from changing the default ship via code.
10. If your system is set-up for it, the Request Date can automatically be recalculated for orders that contain transfers and/or back orders. Extra days can be added based on settings in the following files:
System Wide Setting - Ship Date Options in D24/CMS for Customer Orders - This system setting calculates the arrival of transfer and back orders.
Interwarehouse Transfer Times (DEL 4) - This file defines the schedule of interwarehouse transfer trucks from each warehouse to every other warehouse. It includes the time and day that each transfer leaves and the number of days between deliveries between warehouses. This file is used to calculate total delivery time to customers for items that require transfer.
Truck Route File Maintenance (DEL 1) - The Route File defines the departure time, cutoff time, and call after times for each day of the week for each warehouse and route. The information in the Days From Warehouse field is used when calculating the ship date.
11. If either the entered PO# or the Job Name is associated with a Promotional Pricing File, Decor 24 reprices the order based on the promotion. If an entry does exist in the Promotion File for either the Job Name or the PO#, the pricing on the order may be changed to reflect the promotion. Also, the message “Promotional prices may have been found that affected unit price on your order lines.” is displayed during Step 3 of the check out process. The message can be changed as needed on screen 22 of the Presentation Settings.
Note: Repricing an order based on Promotions has to be activated via the Global/User setting Allow Job Name/Customer PO# Promo re-pricing on screen 4 of the settings.
12. The third and last phase displays all the information connected with the order.
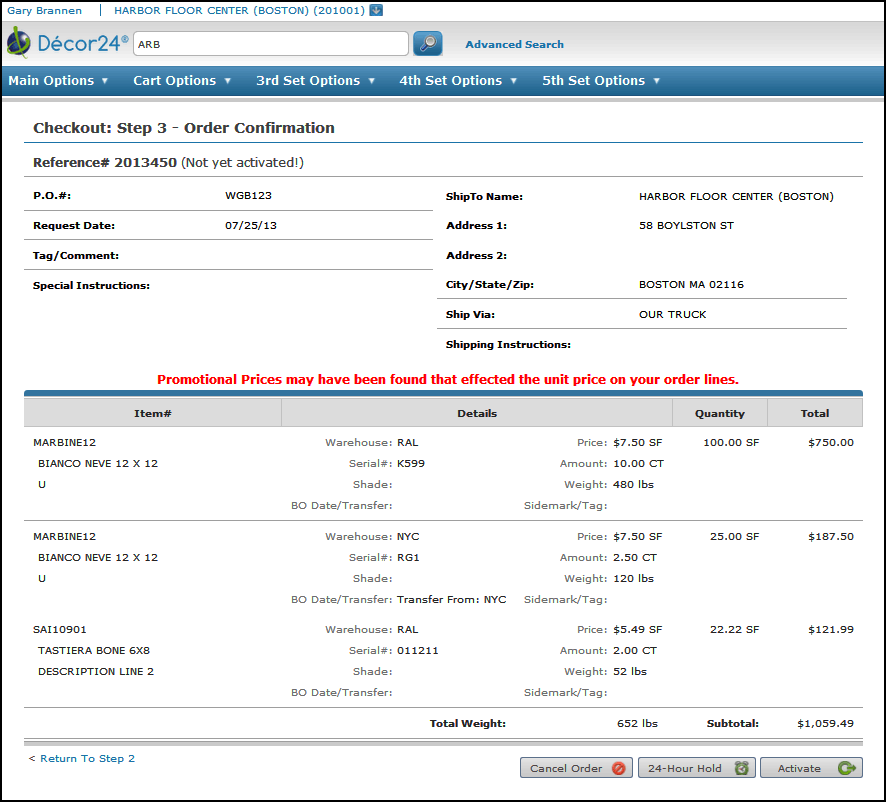
Note: A disclaimer message can be added to the screen above to let users know that an item they are ordering has specific return policies and pricing. Special order items are designated with an “S” in the Inventory Code field of the Item File. For more information on this feature, click here.
13. At this point, you can cancel the order, put it on a 24 hour hold, which puts the order in the unprocessed order listing, or you can activate it. To finish the order process, click Activate. The details of the order appear.
Note: When you click Activate, an entry is made on the order notepad.
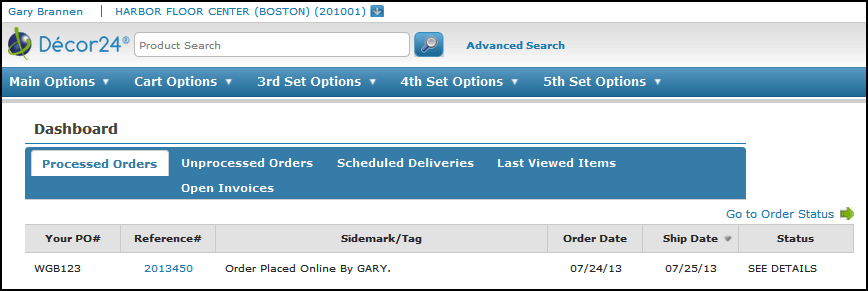
14. After the order is activated, it can be accessed by going to Order Status....
... and looking at the processed orders.
Note: The setting Split Unprocessed into two tabs (Held and Activated) on screen 8 of the Global/User settings allows you to split the Unprocessed Orders tab into two tabs. One for orders that are activated and one for orders in a hold status.
Note: The setting Display Enhanced Order Status Screen on screen 8 of the Global/User settings gives you the option to display charge/pricing information when reviewing processed Decor 24 orders.
15. Orders can be processed on the core system either manually or automatically.
Manually
Use menu option CUS 15 - Manage Unconfirmed Dial-In Orders to display all the unprocessed orders entered by Decor 24 and other web application users.
Use the reference number to locate orders and then use option “5” to go to Order Entry.
Once in Order Entry process the order normally
Automatically
Using the Company/Branch Settings (menu option D24 4) you can allow specific branches to automatically process Decor 24 orders and generate pick lists.
On the Decor 24, select option 4 - Company/Branch Settings.
Enter a company and branch.
Enter a “1” in the setting Document to Print & Printer. This directs the system to automatically process the order and generate a pick list.
Note: There is an area at the top of the screen which offers an advanced search capability for locating your order(s).The three options available allow you to refine your search by either P.O#, Reference#, or by Tag line. Even if you have used the same purchase order more than once, Decor 24 will source and display all of the reference numbers applied.
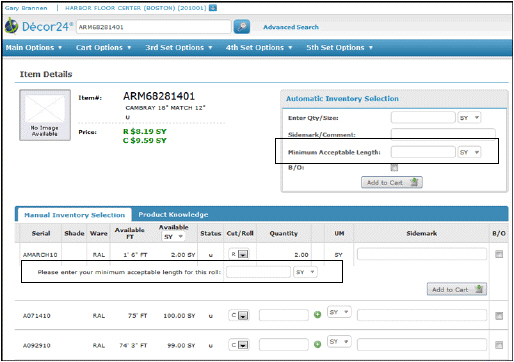
1. Search on a rolled item and then click the magnifying glass to display information about it and its available inventory.
2. This functionality effects both ISO and manually entered orders.
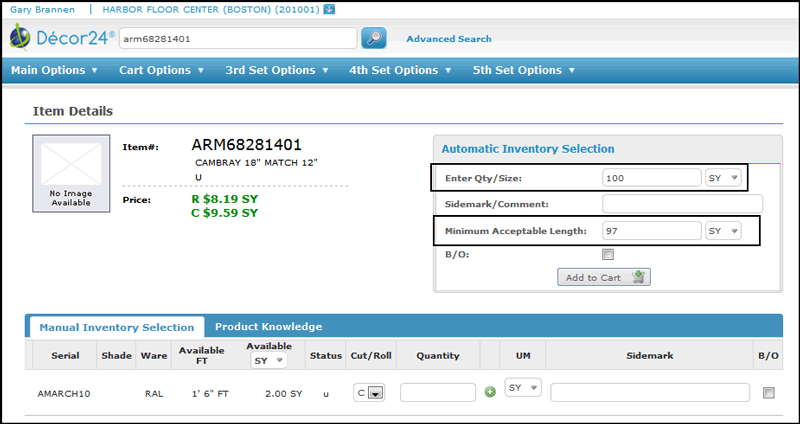
As circled in the figure below, the Minimum Acceptable Length field includes a unit of measure drop down capability.
|
3. Enter the order quantity and a Minimum Acceptable Length.
|
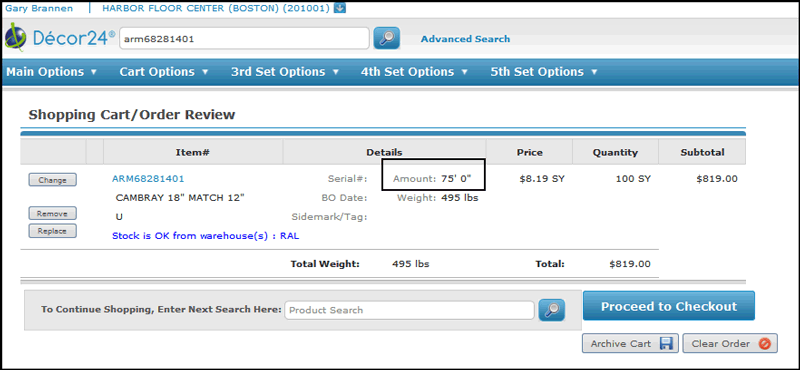
4. Click Add to Cart. Decor 24 automatically converts the Minimum Acceptable Length, which is in SY, over to feet and inches.
|
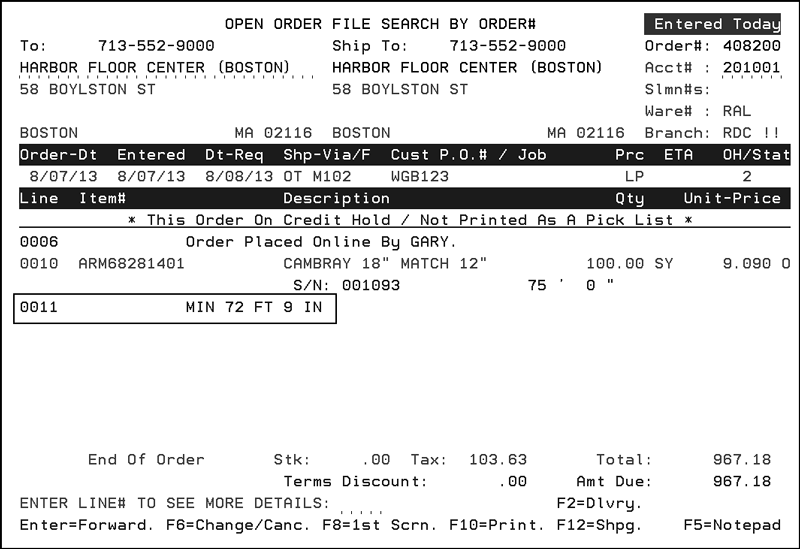
5. The unit of measure conversion is transferred over to the iSeries (green screen) in the form of a message line which gets printed on a pick list for use by the warehouse.
|
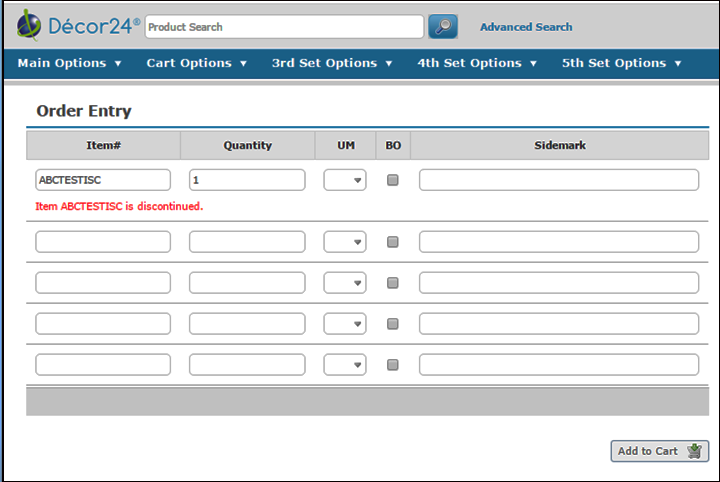
When discontinued items are ordered in Decor 24, the system performs the following checks to determine if orders are allowed for discontinued items:
Allowed Orders - Users will be able to enter an order line for item with a DI policy and discontinue date in the future when there is enough available inventory to fill the request.
Not Allowed Order - Users will not be able to enter an order line for item with a DI policy and discontinue date in the past when there is not enough available inventory to fill the request.
If an order is not allowed for a discontinued item, the system displays an error message.
Associated Files
Global/User Settings - The setting Enable warning message for discontinued items on screen 4 activates the warning for ordering of discontinued items.
Company/Branch Settings (menu option D24 4) - The setting Incl. Discontinued Items determines whether discontinued items are included in search results.
Item File - Discontinued items are given a Policy code of “DI”.
SKU File - The setting Block Back Orders disables back orders from being placed.