Need more info or you couldn't find what you were looking for, let us know by sending an email to: support@dancik.com.
Invoice Inquiry in Navigator
Printing Invoices in Navigator
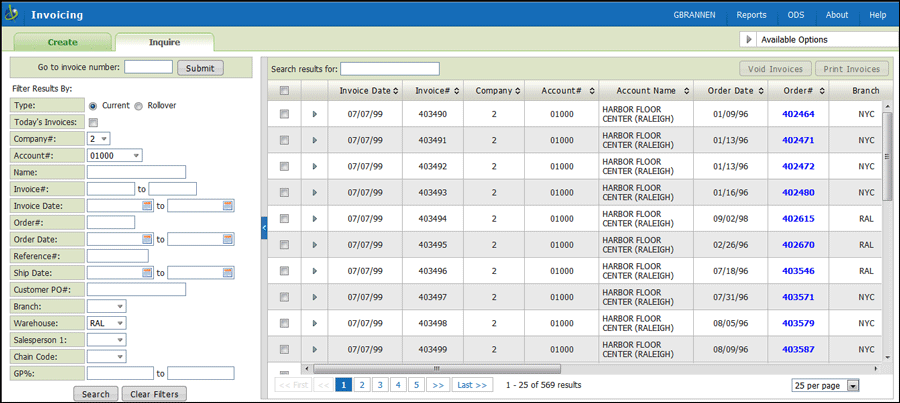
Use the filters on the left-hand side to search for invoices.
Note: Some of the filters such as company and warehouse are pre-populated with the defaults. from the user's control panel.
Or if you just want to inquire on a specific invoice and know the invoice number, enter it into the Invoice# box.

Use the Search results for box at the top of the invoice listing to conduct a search only on the invoices listed in the table. Kind of like a search in a search.
Only invoices created today can be voided. Furthermore, once night jobs run the invoices cannot be voided.
Note: After night jobs has run, credits have to be issued to reverse invoices that needed to be voided.
1. Select Today's Invoices to display only invoices created today.

2. Select the invoices you want to void. The Void Invoices button becomes active if all the selected invoices are today's invoices.
3. Click Void Invoices to display the confirmation window.

Void - removes the selected invoices from the pending invoices table. ou will need to wait until after NJ’s are run before you can pull the orders again.
Note: Voided invoices can be recovered using the Available Option - Reinstate Today's Voided Invoices.
Void and Reinstate - directs the system to void the invoice as if it was never assigned an invoice number and then reinstate back into the pending invoices table. This means you can access it via the order number and make changes (using the Create tab) and then create a new invoice.
Start Over - voids the invoices and removes the selected orders from the pending invoices table and allows you to start over.
To distribute today's invoices select today's invoices and select the invoices you want to print and then click Print Invoices button in the upper right-hand corner of the Inquire tab.
To print previous invoices, search for your invoices using the filters then select the invoices and click Print Invoices.
Click it to display the Output Distribution window.
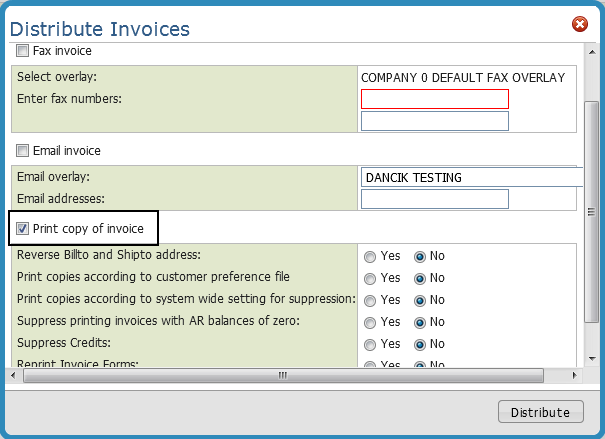
Activate the setting Print copy of Invoice.
Invoices can be printed or sent to an Outqueue. If you have an actual printer identified in the User Web Control Panel File, a hard-copy of the invoice will be printed.
At the bottom of the window are the following options.
Setting |
Description |
Reverse Billto and Shipto address |
Enter Y to reverse the position of the billto and shipto addresses on the invoice so that the shipto address appears in the window of the envelope. Use this option for chain accounts when a store requires an invoice copy. |
Print copies according to customer preference file |
Enter Y to run invoices according to the invoice parameters as entered in the Customer Preferences File. The Customer Preferences File contains the number of invoice copies to send to the billto address and the number of invoice copies to send to the shipto address, if required. If no Customer Preference record is found for the account or chain, then one copy will print to the billto address and no copies will print for the shipto address. The same is true if a record is found but these parameters are left blank. These parameters can contain zero to five for the number of copies. The Customer Preferences File can also contain a default split code for an account or chain. The split code can affect sorting of invoices and in effect splits the batch based on the split code. |
Print copies according to system wide setting for Suppress printing invoices with AR balances of zero |
Certain types of invoices, such as zero value invoices and invoices for EDI customers, may not require printed versions, even though they need to be processed by the invoicing system. Eliminating certain invoices from printing saves you money by reducing postage, paper usage, and the costs associated with handling these invoices. This setting suppresses unnecessary invoices form printing. This field allows you to reprint (or not reprint) invoices based on the system wide setting Options to Suppress Printing of Invoices. Some of the non-printing parameters that can be set are age of the invoice, company and branch, and if the invoice has a zero balance. |
Suppress Credits |
If the customer receives a credit (i.e., a refund or rebate was applied to the invoice) on the invoice, you can suppress the printing of credit invoices. Note: If you enter “Y” to suppress credits, the program also suppresses any overpaid invoices - EG: invoice for $100 and customer paid $101 leaving a credit balance of $1.00. (Credit memos or overpaid invoices are suppressed.) Eliminating credit invoices from printing saves you money by reducing postage, paper usage, and the costs associated with handling these invoices. |
Notes:
Five reports are generated when Print Invoices is selected.
— Invoicing Minimum Order Charges Applied
— Invoicing / Quantity Break Group Pricing Update
— Delivery Charges by Unit
— Salesperson Assignment for Invoicing
— Invoice Register
Behind the scenes, the following steps are happening to process today's invoices:
— The invoices are removed out of the Pending Invoices table. An invoice number is assigned.
— They are inserted into an “inprint” file.
— Night jobs then processes and batch prints them if necessary.
If you have an actual printer identified in the User Web Control Panel File (Menu NAV 5 option “Y”), a hard-copy of the invoice will be printed.
If you have an Outqueue specified, the invoice is placed under the ODS heading in the upper right-hand corner. It can then be opened as a PDF or text file.
Note: Invoices that use an overlay cannot be opened via ODS. The best way to open these invoices is to use the Distribute button to email the file to yourself and then open it.
To retrieve your generated invoices:
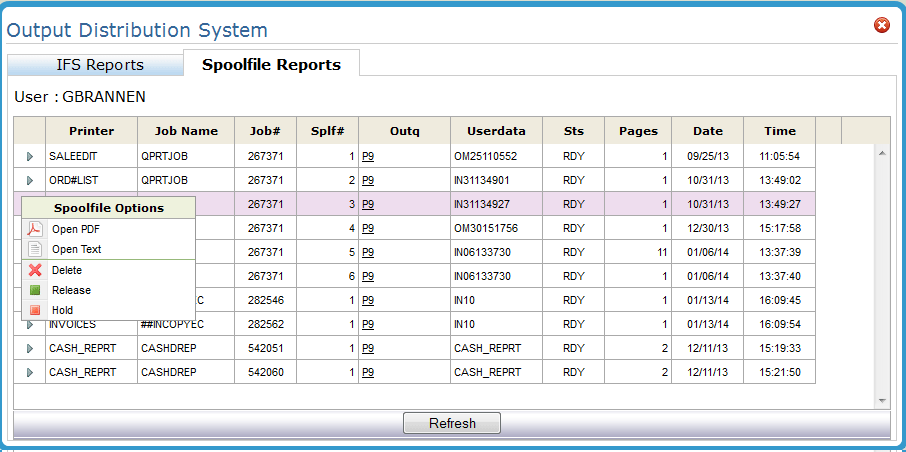
Click on the ODS link in the upper right hand corner
Click the Spoolfile Reports tab.
Find the invoice(s) and click the option arrow to the left of it.
Update Salesperson Assignments
Click the Option arrow to the left of an invoice to display the Invoice Options box.
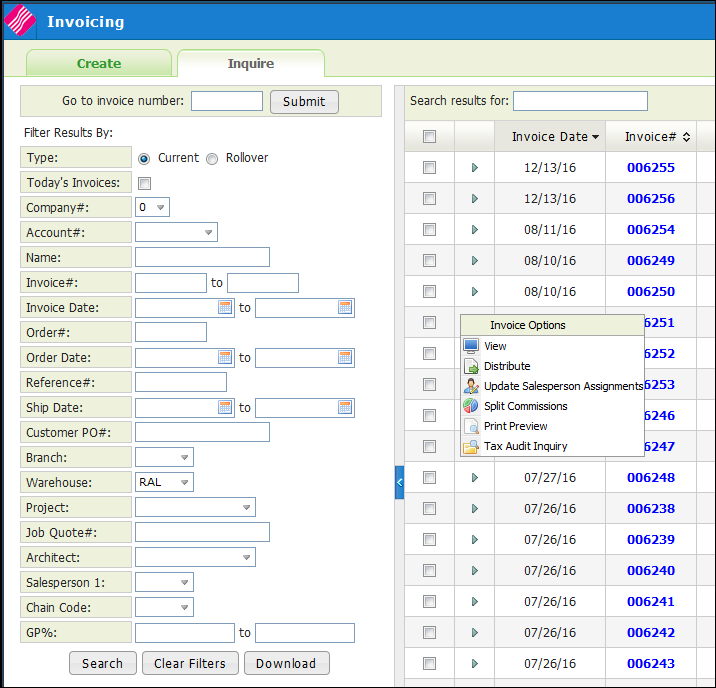
Displays the details behind the invoice.
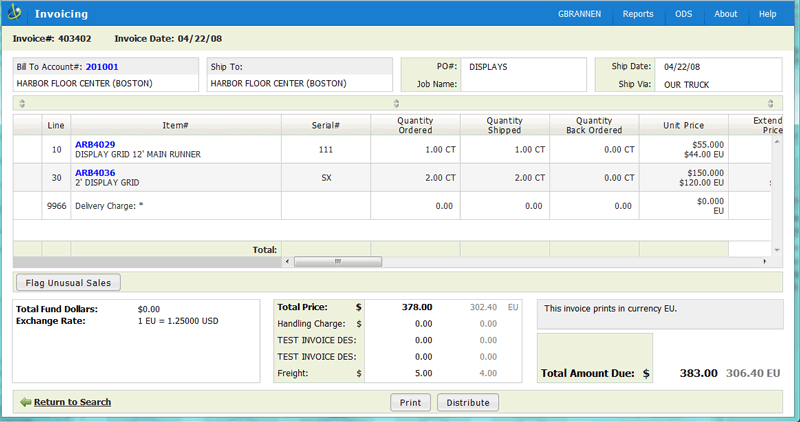
Notes:
Rolled good UMs (i.e. SY) are also display in feet and inches.
The ability to view cost information is controlled by the setting Allow Costs To Show On Orders on the Control User File Maintenance screen (NAV 5 option “U”).
Use the scroll bar in the lower right-hand corner to access additional information.
Information |
Description |
Unit Price Extended Price |
Unit Price is calculated based on customer price level and/or promotions. Extended price is equal to quantity multiplied by the unit price. Monetary amounts can be converted and displayed in foreign currency. All transactions in the system are recorded in the home currency. However, if you want to convert and display foreign currency under the home currency the following files are involved: Currency Code Exchange Rate (SET 11), Customer Preference (FIL 38) - enter the currency code. |
Price List |
This two-character codes represent different price lists you maintain on the system. The Price List code is defaulted onto the Order Header from the Billto File. Some examples are:
|
Price Method |
These one-character codes represent the method used to determine pricing of a line of an order. Every line entered and priced in order entry is assigned a pricing method code to show how the pricing was calculated. Example pricing methods are:
A pricing method code is assigned automatically to every line of each order and invoice. The system tracks the overall profitability of each of these methods of pricing. Note: Pricing Method codes are created through the Classifications Code File. |
Price Allowance Price Program Fund Dollars Points Fund Program |
This information comes from the Promotion File. |
Unit Cost Extended Cost |
This information comes from the serial number record. |
GP$ GP% |
The GP$ and GP% is calculated using the following four steps:
|
Marketing Program |
This three-character code groups or categorizes customers for a variety of purposes. Usually, marketing program are used to identify a customer as belonging to a group of customers for promotional or marketing purposes. For example, marketing program H10 could be assigned to all customers participating in the Hawaii 2010 Promotional Contest. Marketing programs are assigned from the Billto File. You can assign up to 20 different marketing programs to each customer. Special pricing can be assigned to a marketing program. |
Cost Allowance Cost Program |
Cost allowance is usually a negative amount which reduces cost for the purpose of computing gross profit and for accruing rebates due from manufacturers. Cost allowances are commonly used when a promotional price given to your customer automatically earns a rebate from the manufacturers. |
Weight Cubes |
This information is calculated from packaging conversions. |
Salesperson |
This setting tracks if the salesperson was overridden during Order Entry. |
Warehouse |
The warehouse where the material was shipped from. |
Location |
The location comes from the item’s serial number record. |
Received |
If the invoice is for a credit, a Y/N entry is used to show the credits (inventory) were received into stock. If the invoice line is for a transfer order, Transfer is displayed in this field. |
Credit Code |
Reason for issuing the credit (i.e. over purchased, wrong color...) These one-character codes represent types of credits or reasons for credits that are used by Order Entry and Invoicing. A credit code must be entered a credit is entered. Some examples Credit Codes are:
Some codes can also be reserved for identifying special types of sales in Order Entry. For example, code Z could indicate low margin “blow out” sale or code X could indicate special “spiff” sale. |
Restocking Percentage Restocking Charge |
If you are entering a credit or return, enter a percentage from 00 through 99 to charge back the customer, if applicable. For example, if the extended price of the returned material is $100.00 and you enter 05 as the restocking charge, the credit memo is issued for $100.00 less $5.00. A default restocking charge percentage may be established in your Control Panel. |
Adding an Additional Document when Invoices are Emailed
Click the Distribute option to print or to use Dancik’s Output Distribution System (ODS) to fax and/or email the invoice.
Note: At the current time , invoice distribution only allows emailing one invoice at a time. Multiple invoices can not be sent in one email.
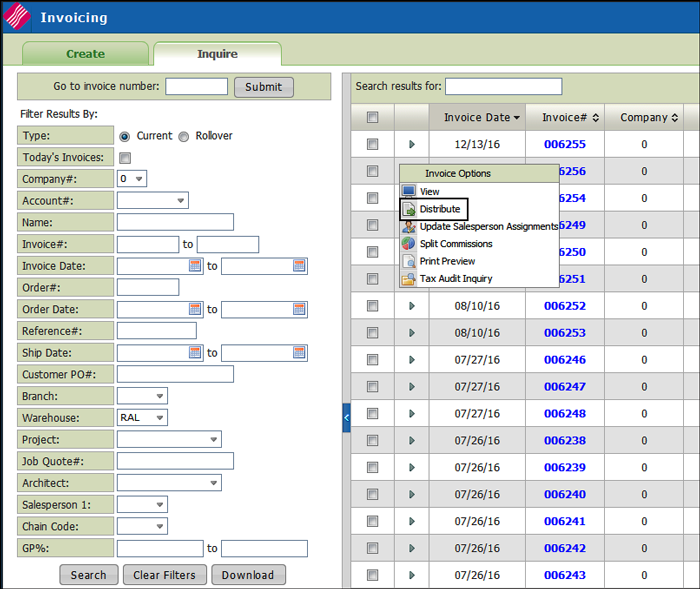
The Output Distribution window appears.
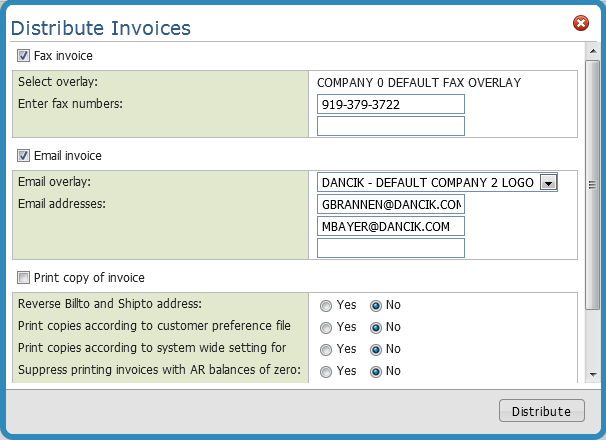
Notice there are entries for a fax and an email distribution of the invoice. These default distribution options are pulled from the phone number file for this customer. They are the entries which have been designated as the auto-fax or auto-email options for invoices.
From this screen you can decide whether to print a copy of the invoice, review, and change the distribution options as needed.
Deleting or changing a fax number or email address on this screen only affects the distribution for this invoice. It will not have an impact on the phone number file or any other setup for this customer.
Note: For the email option, ODS converts the invoice to a .pdf file.
Fax and email overlays allow you to present a consistent format without using pre-printed forms. For more information about creating and assigning fax and email overlays click here.
At the bottom of the window are the following options.
Setting |
Description |
Reverse Billto and Shipto address |
Enter Y to reverse the position of the billto and shipto addresses on the invoice so that the shipto address appears in the window of the envelope. Use this option for chain accounts when a store requires an invoice copy. |
Print copies according to customer preference file |
Enter Y to run invoices according to the invoice parameters as entered in the Customer Preferences File. The Customer Preferences File contains the number of invoice copies to send to the billto address and the number of invoice copies to send to the shipto address, if required. If no Customer Preference record is found for the account or chain, then one copy will print to the billto address and no copies will print for the shipto address. The same is true if a record is found but these parameters are left blank. These parameters can contain zero to five for the number of copies. The Customer Preferences File can also contain a default split code for an account or chain. The split code can affect sorting of invoices and in effect splits the batch based on the split code. |
Print copies according to system wide setting for Suppress printing invoices with AR balances of zero |
Certain types of invoices, such as zero value invoices and invoices for EDI. customers, may not require printed versions, even though they need to be processed by the invoicing system. Eliminating certain invoices from printing saves you money by reducing postage, paper usage, and the costs associated with handling these invoices. This setting suppresses unnecessary invoices form printing. This field allows you to reprint (or not reprint) invoices based on the system wide setting Options to Suppress Printing of Invoices. Some of the non-printing parameters that can be set are age of the invoice, company and branch, and if the invoice has a zero balance. |
Suppress Credits |
If the customer receives a credit (i.e., a refund or rebate was applied to the invoice) on the invoice, you can suppress the printing of credit invoices. Note: If you enter “Y” to suppress credits, the program also suppresses any overpaid invoices - EG: invoice for $100 and customer paid $101 leaving a credit balance of $1.00. (Credit memos or overpaid invoices are suppressed.) Eliminating credit invoices from printing saves you money by reducing postage, paper usage, and the costs associated with handling these invoices. |
Associated Files
If you have the System Wide Setting - Options for Rollover Files activated you might see multiple invoices with the same number.
User Web Control Panel File Maintenance (NAV 5 option “Y”) - Ensure there is an “O” in the FormCode for the setting Print Invoices on.
ODS - Settings and Layout Overrides - Lets you establish default templates when e-mailing or faxing invoices. Unless you change the default template the standard Dancik templates are used. The “X” option allows you to establish a default fax or email overlay.
Note: Custom “Invoice Forms Overlay” be created by Dancik International with your company logo.
Adding an Additional Document when Invoices are Emailed
This functionality was developed to include a Terms and Condition document, in PDF format, with every invoice. However, any pdf document can be saved to the IFS and sent with an invoice.
Set-up and Associated Files
Integrated File System (IFS)
The IFS is where the PDF document that is sent with the invoice is housed.
Output Distribution Setup Menu - Option ODS 10
1. Select option ODS 10 - Settings and Layout Overrides.
2. Select Printing of Invoices.
|
3. “U”pdate an invoice email option.
4. Press F11 to access screen 2.
Note: If the Uses Stylesheet setting is set to “N” the option is found on screen 5.
5. The option Additional Document To Include With Distribution is located toward the bottom of the window.
|
Note: Use the “?” function to build the IFS directory.
Update Salesperson Assignments
This option enables you to update both the secondary and primary salespersons on an order or invoice, even after it is invoiced.
This option displays the primary (header) salesperson and secondary salesperson assigned to the selected invoice. These fields will be blank if no salespeople are currently assigned to the invoice, or if the salespeople are assigned to detail lines, but not at “header level”.
You may change the primary (header) salesperson, but you cannot use the program to remove the primary salesperson. You can change or remove the secondary salesperson and/or their commission percentage.
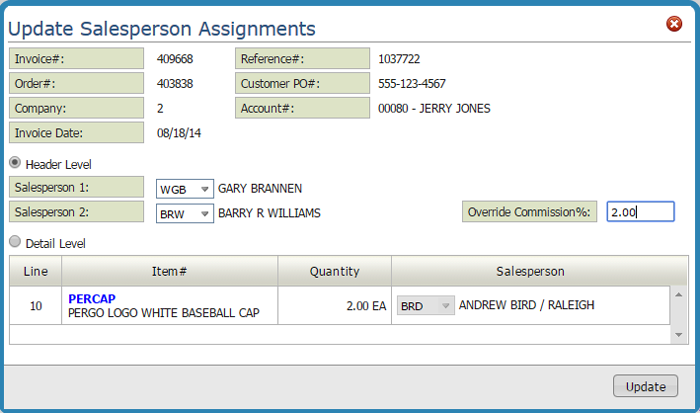
You can not alter the commission percentage of the primary salesperson from this screen. The commission for primary salespeople is maintained using the Base Commissions and Commission Exceptions files.
All changes on this screen are documented automatically on the Invoice Notepad. The notepad shows the previous and new salespeople. If a commission override % is keyed or changed, the notepad indicates that a commission % was changed, but does not show the %, as that is not public information.
There are a couple of ways to access the Print Preview functionality.
Click the option arrow to the left of the invoice you want to preview and select Print Preview from the options.
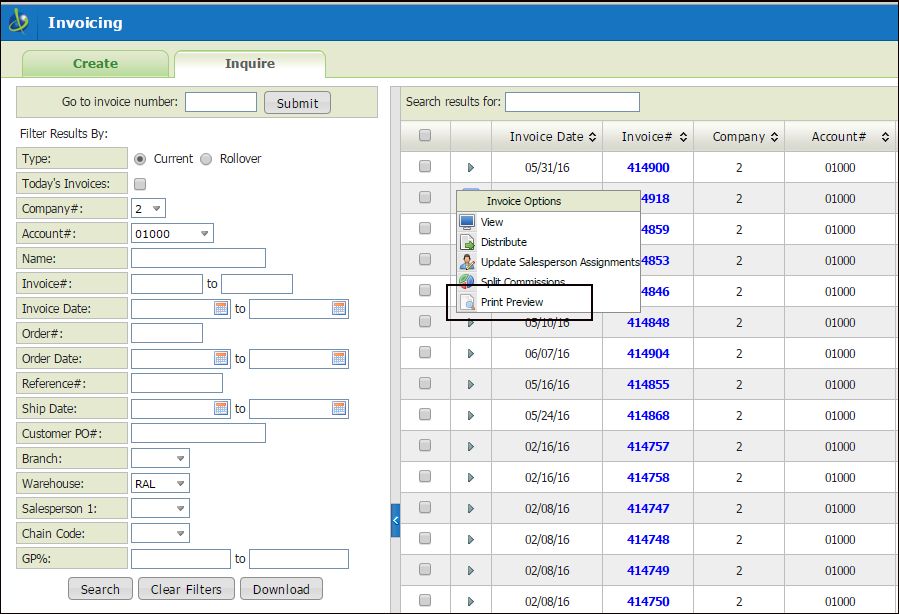
Open an invoice by selecting the View option in the drop down shown above or by simply clicking on an invoice. A Print Preview button is located at the bottom of the window.

The next window allows you to format the invoice using an invoice overlay.
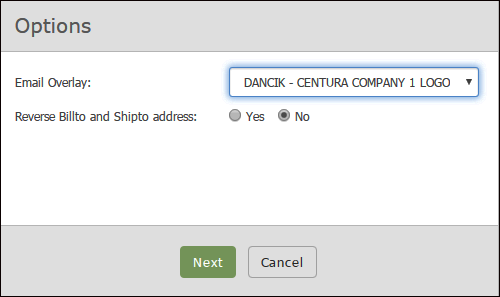
Note: The overlays are created by Dancik and are stored and maintained in Dancik’s Output Distribution System (green screen menu option ODS 10).
Click Next to generate a PDF of the invoice.
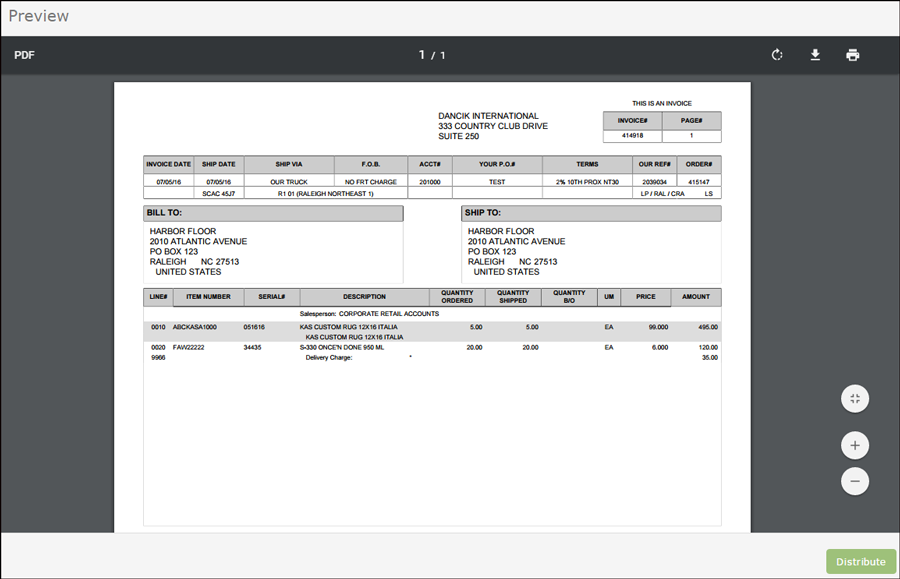
Use the options in the upper right hand corner to rotate, download, and/or print the PDF invoice.
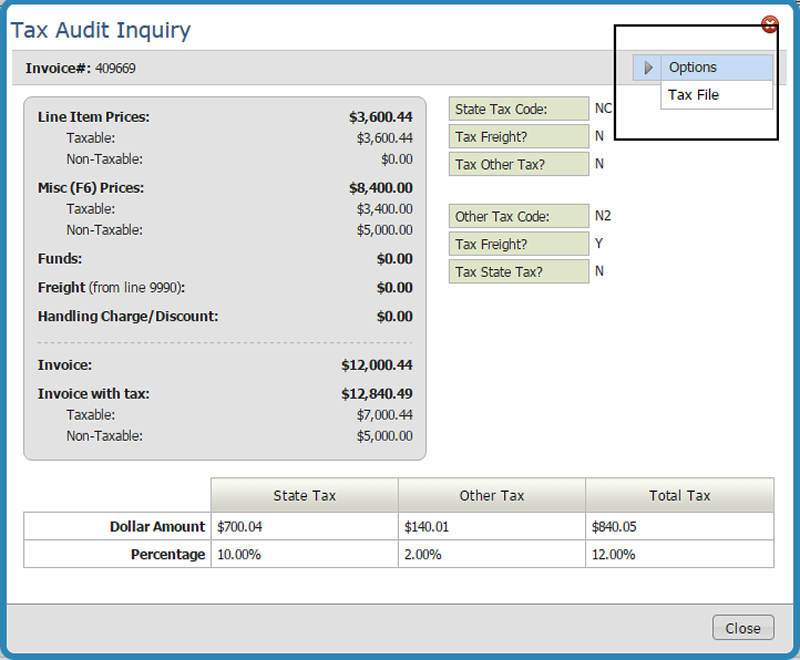
This functionality, available in the green screen via menu option SYS 909, displays the breakdown of taxable versus non-taxable amounts on an invoice. The taxable and non-taxable amounts are shown as originally calculated. This keeps the historical information accurate and not based on tax rates, which may have changed since the invoice was generated.
This window is meant to be used for research, in anticipation of a tax audit. It enables you to see how your system tax options are set, as well a what taxes were actually charged on any invoice.
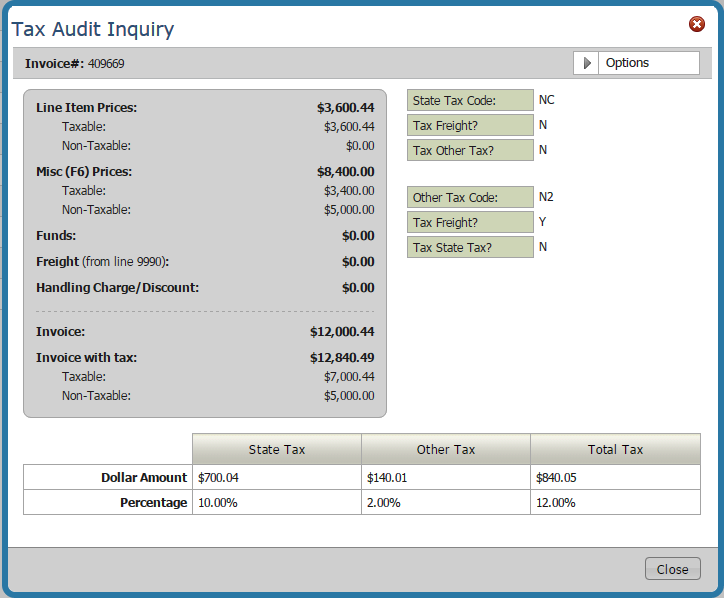
This first part of the screen shows the tax codes applicable to the invoice and system related settings for charging tax. These fields are the tax codes assigned to the invoice, but do not necessarily represent the description or settings that were in the Tax file at the time the invoice was generated. They are simply the values currently in the Tax file.
The second part of the screen breaks down the taxable and non-taxable charges pertaining to this invoice, regardless of current tax rates.
Note: The Tax Audit Inquiry window can also be accessed when working with an individual invoice via the Available Options menu in the upper right hand corner of the window.
Access the Tax File from the Tax Audit Inquiry window
The File Management Tax File can be accessed from within the Tax Audit window. Use the Tax File to update or edit the tax codes. These changes do not effect invoices that are already created.
