Purchase Orders
Creating a purchase order is nearly identical to entering a customer order. POs can be canceled, deleted, and edited the same as customer orders.
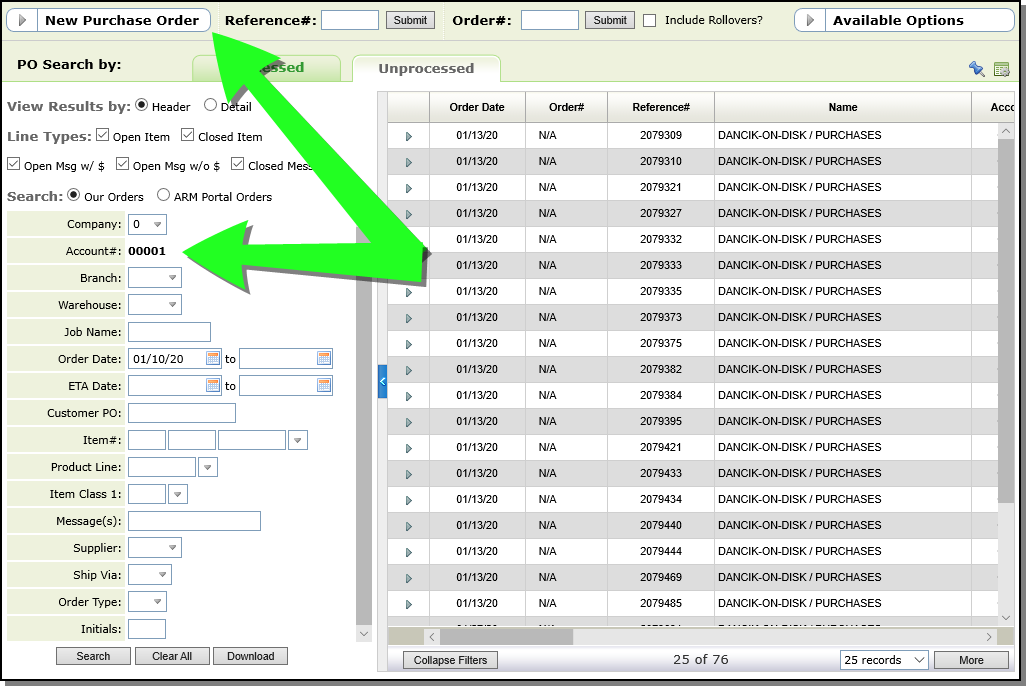
- On the initial purchasing screen, choose to enter a New Purchase Order or access an existing one. Note that the purchasing account 00001 is already entered into the search filters. This is the system defined account number for purchasing in the Kerridge system.
-
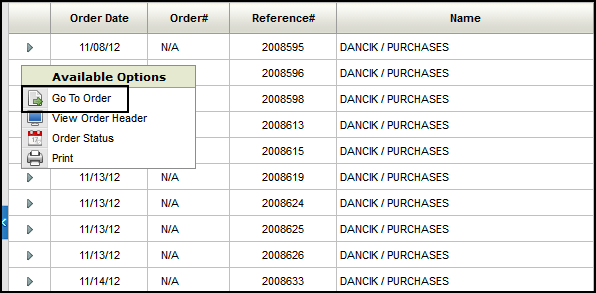
To edit an existing purchase order, click the arrow to the left of it then select Go to Order.
-
To start a new purchase order, click New Purchase Order in the upper left hand corner of the screen.
-
If a user is not restricted to only one company, they must select a company.
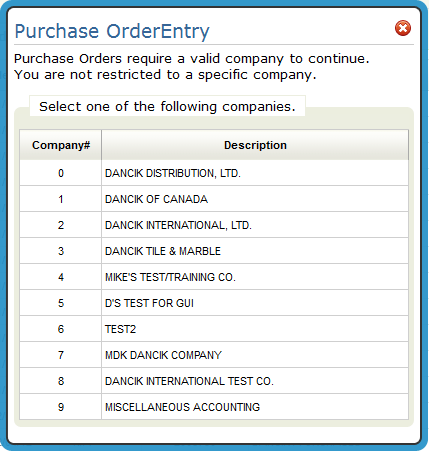
Users are restricted to one company via the Restrict This Work Station To setting on the Navigator User Web Control Panel or the Work Station Control Panel File on the iSeries (menu option SET 1).
-
Select a company. The next window to appear is the Order Header. The Order Header window lets you enter general information about the purchase order. The Order Header screen is also used when you process orders from your customers (Order Entry). Because of that, there are a lot of fields that do not pertain to purchase orders. In the following figure, the fields required to enter a purchase order are circled.
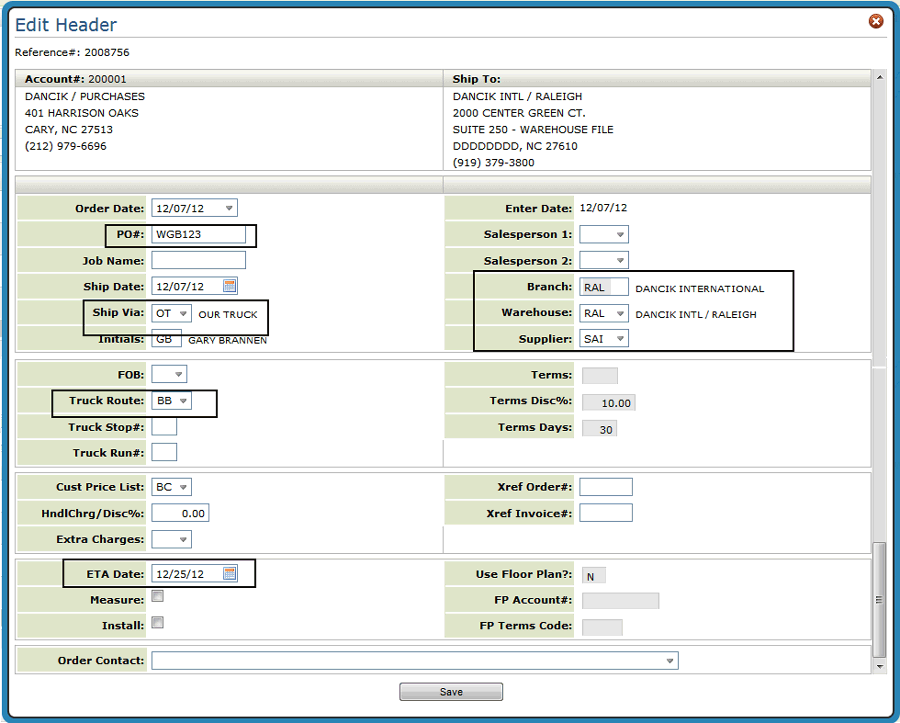
Field Description PO# This number, code, or name can be useful in tracking the purchase order. Enter numbers or letters, or both. You can search for purchase orders by this field after the PO is processed. If you have multiple references, use this field for the reference that is most important or most frequently referred to. Then, use the Job Name field to enter other references. Ship via Enter the code representing the method of shipping for the order. Ship via codes are defined and maintained through the Categories/Classification section of the File Management Navigator application. Your company can define and maintain its own set of ship via codes.
The Ship Via setting automatically populates if a default ship via code is entered in your Control Panel.
In Navigator, the control panel is accessed via the User Web Control Panel in the User/Security section of the File Management application. On the iSeries, it is accessed via menu option SET 1.
Branch The branch code determines which branch gets sales credit for the order. Do not confuse the branch number with the warehouse number, which determines the location of the stock, or the point of shipment. The two codes do not have to be the same.
The default branch is determined by the entry in the Control Panel for your workstation. In Navigator, the control panel is accessed via the User Web Control Panel in the User/Security section of the File Management application. On the iSeries, it is accessed via menu option SET 1.
Supplier The code for the company or vendor you are placing the order with.
When entering special orders, the program warns you whenever you attempt to purchase an item from a supplier that is not listed as a supplier of that item. In these cases, the special order supplier is compared to the suppliers in the Item and Cost files. If a match is not found, a warning is issued. You can continue with the order, but at least you know that the supplier is not a regular supplier.
Warehouse Enter the warehouse code where you want the order shipped to. This warehouse address prints as the Shipto address on the purchase order. The default for this field is the warehouse assigned workstation control panel. You can override this default.
In Navigator, the control panel is accessed via the User Web Control Panel in the User/Security section of the File Management application. On the iSeries, it is accessed via menu option SET 1.
Truck Route The Truck Route defines the departure time, cutoff time, and call after times for each day of the week for each warehouse and route. In addition, this file enables you to assign and calculate the number of days for a delivery to be made to your customers prior to and after the cut off time for each truck route by warehouse.
Truck Routes are created in the Routes File (DEL 1).
ETA Date This field is used for purchases, direct shipments and special orders. Otherwise, enter the estimated time of arrival to the warehouse or shipto destination for this order. This date is entered in MMDDYY format. This date is shown on Inventory Inquiry Stock Card Screen as the scheduled date. After the order is processed, this date can be updated using the Update Order Status and Shipping Data program. -
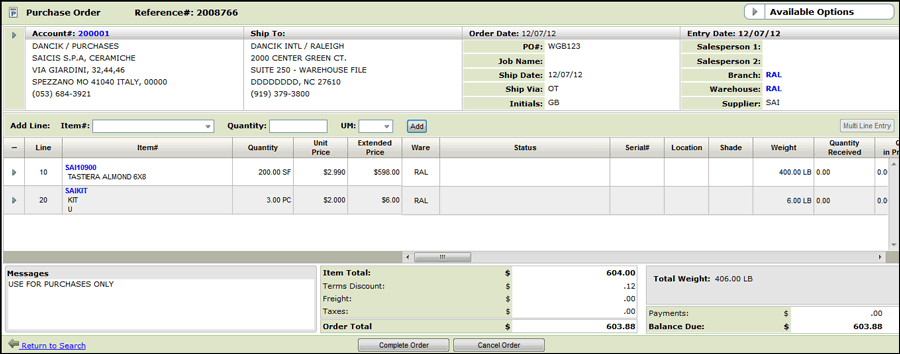
Enter the Order Header information and click Save. The window that appears is where you start entering the items you want to order.
-
Enter the items and their respective quantity and UM.
-
After entering all the items, click Complete Order. The End-of-Order window appears.
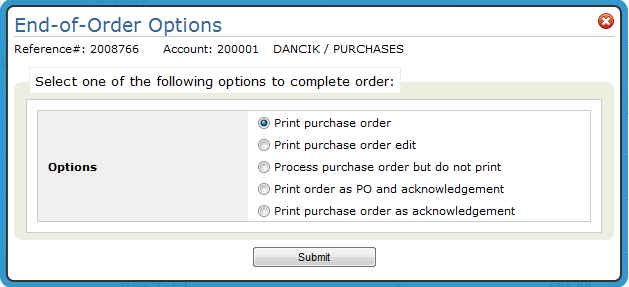
- Print purchase order - Processes the order and creates a PDF file that can be accessed via the ODS heading in the upper right-hand corner. You can then send the PO to the supplier via email, fax, mail, or by several other methods. This option enters the ordered inventory into the system. It shows up in an inventory inquiry as being scheduled for arrival with the delivery date based on the ETA date set on the Order Header screen.
- Print purchase order edit - An order edit contains the same information included on the actual purchase order, but it does not get processed by the system. The purchase order edit is a good document to send to a supplier to ensure they have the quantity you need and all the information (i.e., cost) is correct. This can save you from having to update or delete a purchase order. This option does not process the order or allocate inventory.
- Process purchase order but do not print - This option enters the ordered inventory into the system. It shows up in an inventory inquiry as being scheduled for arrival with the delivery date based on the ETA date set on the Order Header screen. The order can be accessed and changed through the Processed tab.
-
If your Control User File (menu option NAV 5 "U" option) is configured to send order acknowledgements via ODS, when either Print order as PO and acknowledgment or Print purchase order as acknowledgment is selected you are presented with options for sending out the PO and order acknowledgment.
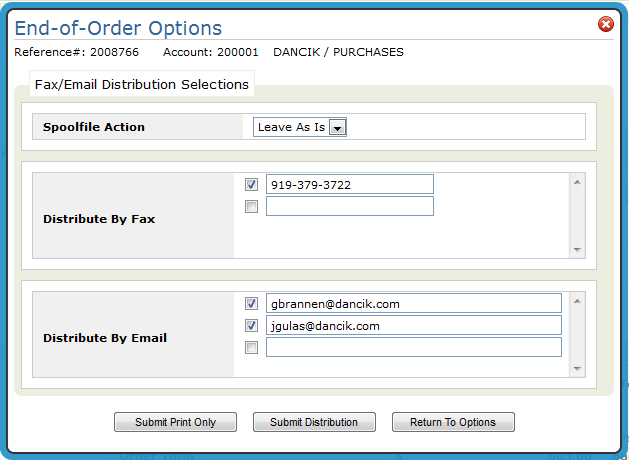
- Spoolfile Action - This field determines what happens to the spoolfile after the PO is distributed. The valid options are:
- LEAVE - This leaves the spooled file in the output queue as though it had been manually printed
- RELEASE - This sends the spooled file to the output queue in a *RELEASE status
- HOLD - This sends the spooled file to the output queue in a *HOLD status
- DELETE - This deletes the spooled file after it has been distributed
- Distribute by Fax and Distribute by Email -Fax numbers and email addresses set-up in the Phone Number file for the supplier are automatically imported. You can change existing entries or add to new ones.
- Click:
- Submit Print Only - Sends the document(s) to the printer designated in the Workstation Control Panel for printing POs
- Submit Distribution - Distributes the documents by either fax or email to the selected recipients.
- Return to Options - Returns to the End-of Order options window.
- Spoolfile Action - This field determines what happens to the spoolfile after the PO is distributed. The valid options are:
This option provides real time reorder and usage information on items you specify.
The Reorder Calculator is accessed from the Available Options on the first window of Navigator Purchasing.
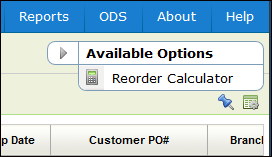
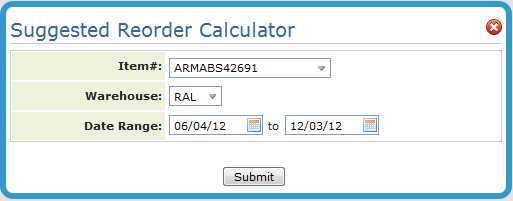
- Select Reorder Calculator from the Purchasing Available Options drop down list in the upper right-hand corner.
- Enter an item number. The default warehouse established in the Control Panel is automatically inserted.. The default Date Range is set at 6 months.
-
Click Submit.
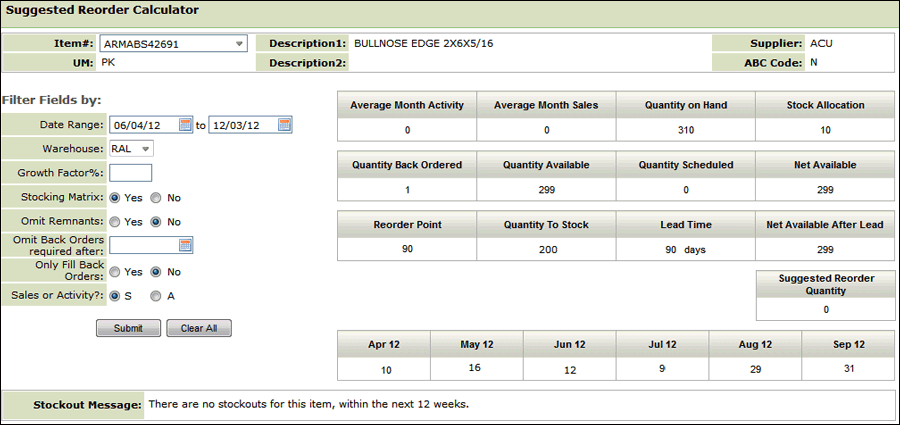
Filters
Filter Description Growth Factor % This field enables you to apply a simple global growth factor to your usage figures. For example, if you expect 10% growth over the historical usage averages, then enter 10.00 in this field. If you expect a 10% decline, enter 10.00- . The average usage figure (and average activity figure) will be adjusted by this percentage, up or down. It is recommended that this field be used to adjust for upcoming promotions, seasonality, and other instances where you expect a change the system cannot predict. You can also use this concept after a promotion. For example, if you are basing the forecast on the past three months usage, and there was a promotion during those months, you may want to apply a negative growth factor when the promotion ends. Stocking Matrix? The Stocking Matrix File provides powerful features you can use to control purchasing and back orders in a multi-warehouse environment. You should enter data into the Stocking Matrix File if you have multiple stocking warehouses and need the features described in this chapter.
A stocking matrix is a set of rules that govern where stock is carried to meet the demands of each geographic grouping of customers. If you do not use the Stocking Matrix File, the system assumes that stock should be replenished to the warehouse where it was stocked. For example, if the stock was picked from warehouse NYC, then without a stocking matrix, the system assumes that stock in NYC should be replenished. If this replenishment method is satisfactory for your operation, or if you have a single stocking warehouse, you do not need to use this file. With a single central stocking warehouse, you should run the reorder reports for all warehouses combined.
Omit Remnants? You can include or omit remnants from the availability calculations. Remnants are available quantities of a single serial number or lot number that are less than or equal to the remnant quantity/size as entered individually for each item in the Item Master File. This concept only applies to material that usually must be sold from the same or matching serial numbers, lots, or rolls. This parameter is ignored for items that are not stocked by serial or lot number. If you choose to omit remnants, the reorder report ignores the available quantity of any serial or lot number that is less than the remnant quantity in the item master record. For example, let's say the total quantity available = 1000, consisting of three serial numbers of 900, 25, and 75. If the remnant size is 80, then the Reorder Report only considers that you have 900 available. Omit Back Orders required after Enter a date that beyond which back orders are not included in the suggested reorder calculations. Only Fill Back Orders? This option only covers open back orders, as opposed to ordering for stock replenishment. An example of how this option can be helpful, is if you need to order on an emergency basis, and don't have time to fill your next truck. You are filling on an LTL (less than truckload) basis, and just want what is absolutely needed to fill the back orders in house. Sales or Activity? Allows you to base the report on sales or activity.
Sales information is based on items that have invoiced.
Activity is defined as sales plus the change in open order quantities for the selected date span.
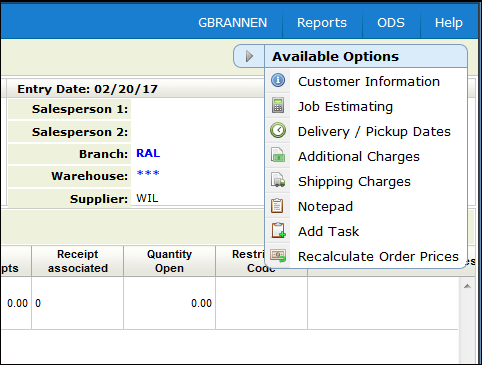
The Purchase Order Management Available Options are accessed via the drop down menu in the upper right hand corner.
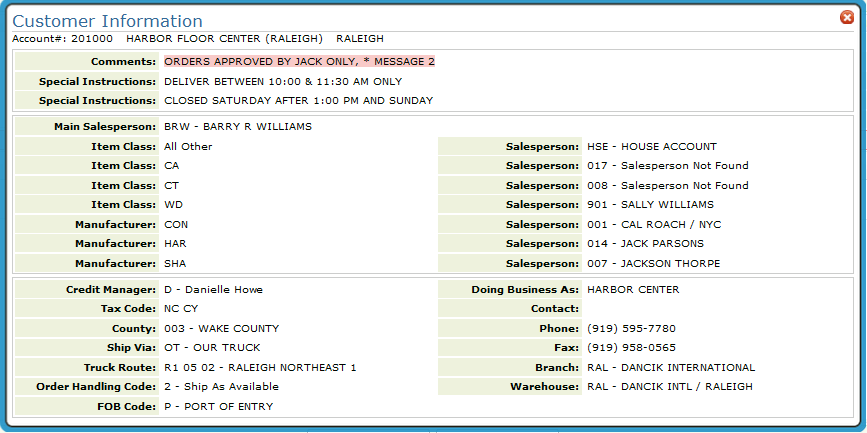
The Customer Information Window enables customer service to view customer information pulled from the Billto File. The window displays the customer's salesperson or salespeople, default ship via, truck route, county, tax codes, comments, phone number, and special instructions.
Job estimating has to be turned on via System Wide Setting - Options for Job Estimates & WIP Reporting.
This feature allows you to track estimated job totals and estimated job costs against actual billing and costs. This is primarily for commercial projects in which Work In Progress (WIP) reporting and accounting is required. You can enter, update, or inquire on costs and estimates.
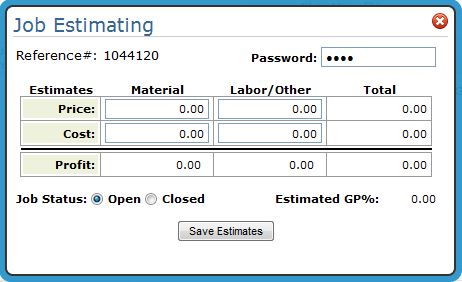
Enter the information as follows:
- Price Estimate - Enter an estimate for the material and/or labor. This is an estimate for what you are going to charge your customer for the material and/or the labor. After entering material and/or labor prices, the system automatically totals them.
- Cost Estimate - Enter your material and/or labor costs. After entering material and/or labor costs, the system automatically totals them.
- Profit Estimate - After entering both price and cost information, the system automatically calculates the profit estimates.
- The Estimated Gross Profit percentage is automatically calculated.
- Flag the order as open or closed. This information is used as a parameter of the Work in Progress report, but has no effect on the order itself.
This window provides delivery information for the items on the order.
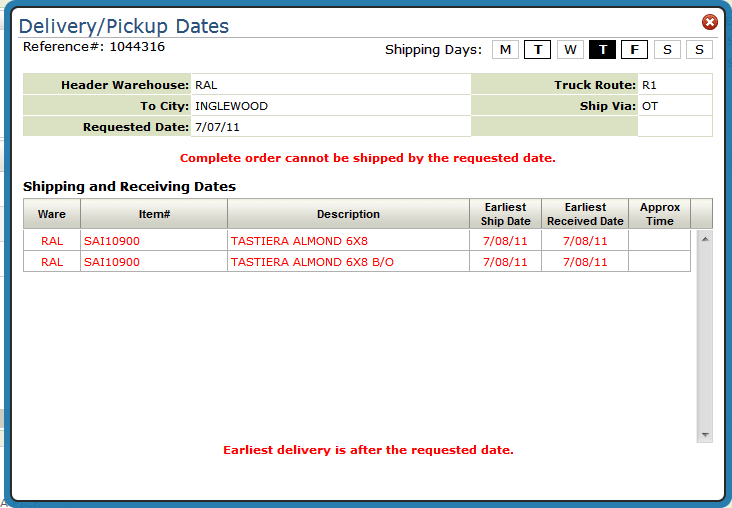
The system consults other parts of the system to calculate the best ship dates:
- Routes file for the number of days that are added based on the Customers specific truck route. If back ordered items are received and available by a certain day of the week (and cutoff time), the program adds that number of days to the expected delivery. If items need to be transferred, the program adds the transfer time.
- The Interwarehouse Transfer File to consider how long it takes the inventory to move from one warehouse to the warehouse it will ship from.
- Order Handling Codes - Some order handling codes such as code 5 for "MUST SHIP COMPLETE" automatically prevents shipment of orders until the last back order has been received.
- Order handling codes are assigned to an order on the order header.
- A default order handling code can be assigned to a customer through the Customer Preference File.
- Order handling codes are created and maintained in the ORDERHAND table accessed via menu option SET 29.
This option directs the system to search for additional charges that can be applied to the order. Additional charges can be defined in several parts of the system and can be assessed according to branch, state, marketing program, and other criteria. For example, additional charges for "Fuel Surcharges" can be different in each of your branches, different based upon marketing programs, customer account number, etc.
Other examples of additional charges are: carpet freight, estimating charge, installation service fee, will call service fee, and minimum order charge.
When the Additional Charges option is selected a window similar to the following appears.
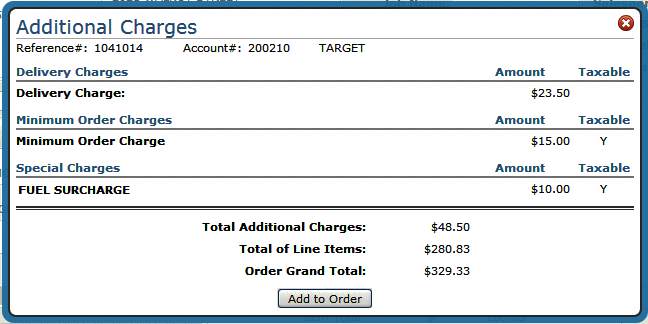
If the Add to Order button is not displaying, you have not been granted permission to add additional charges via Navigator (NAV) menu option 5 - Control User File Maintenance. To access the Allow To Apply Additional Charges During Order Entry setting, enter a "U" to update a user's setting and then press F11 to access the second page of settings.
Associated Files
- The Taxable information can be changed via the respective charge table (i.e. the Minimum Order Charges table).
- The Special Charge Codes Table is designed to assess additional charges on your invoices, mainly for the purpose of freight and fuel cost recovery.
- Special Charges Formulas Table - enables you to define which customers are affected by each special charge, and how that charge is calculated. The Special Charges Formulas can vary for the same special charge code, based on branch, state, marketing program, and other criteria. For example, special charges for "Fuel Surcharges" can be different in each of your branches, different based upon marketing programs, customer account number, etc.
- Minimum Order Charges File - You can use this file to automatically charge customers a minimum order charge when a single order or a group of orders is less than a specified dollar amount.
- Delivery Charges File - Use this file for assigning and assessing delivery charges. You can use this program to control delivery charges by warehouse, truck route, account number, and state. You can enter varying delivery charges on each of these levels.
- System Wide Setting - Options for Shipping Charges Within Order Entry - This setting includes options to activate the Order Entry Shipping Charge Table, establish rounding options, establish surcharges percentages which can allow you to recover costs such as rising fuel prices.
Shipping charges can be added to an order using one of two methods:
- Via the Additional Options drop down box located in the upper-right hand corner. This option bases the charges across all lines of the order.
- By clicking the arrow to the left of an item. This option bases the shipping charges on this line only.
Both options deliver the Shipping Charges screen.
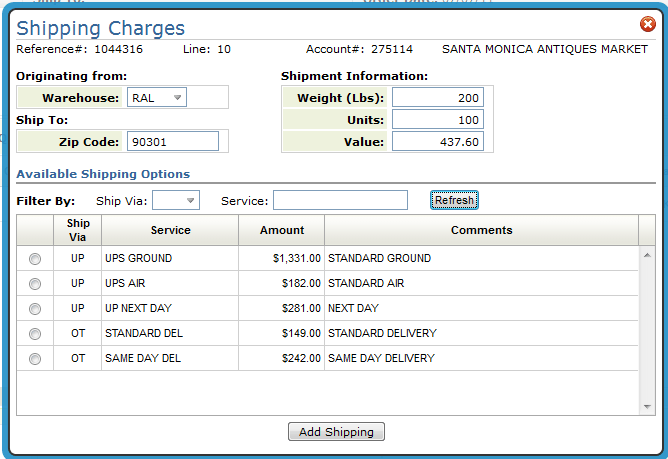
- The Ship Via assigned on the Order Header is automatically populated in the Ship Via field. To see all the valid shipping charges, clear out the Ship Via code and click Refresh.
- The shipping charges are pulled in from the Shipping Charges By Zip Code table (CUS 20). Shipping charges are created and maintained via Shipping Charges By Zip Cd Table (FIL 44).
- Use the settings, Weight, Units, and Value to base the shipping rates on. Use them separately or in combination to get a shipping quote. For example, if you have a six line order, but only three lines were ready to ship, you could enter the information (i.e. weight, units or value) from those lines and get a shipping rate just for those three lines.
- The other fields, From Warehouse, Zip/Postal Code, Ship Via, and Service, are "limit to" fields. Use these fields to narrow your inquiry down as needed.
- Ship via codes represent the method of shipping for the order. Some examples are: UP - UPS, CC (Common Carrier), and OT (Our Truck). If left blank, all Ship Via codes are considered.
- The Service field further defines the method of shipping. For example, for ship via code UP (UPS) there could be several different services such as same day, standard delivery, etc.
- Select a shipping charge and then click Add Shipping. You are asked where you want to apply the shipping charge.
- The charges can get added as a miscellaneous line under a specific line number. Or, they can be added as a 9966 line after the last line of the order.
Once order lines get invoiced they cannot be invoiced again. If you choose to add the shipping charges across the entire order (as a 9966 line) and the order gets invoiced, you cannot update or add to the 9966 shipping charge line. However, you can still add shipping charges against individual lines (i.e. line 11 for order line 10) as long as the line being changed has not been invoiced.
The notepad is where you can enter notes about an order. The system also automatically records events such as line status updates,, quantity changes, and price changes.
This option resets pricing to the "default" pricing at the order level.
Default Pricing takes in account pricing and fund promotions, points, terms and other pricing strategies.
Notes:
- Available regardless of user authority based on the setting; Allow Price Overrides.
- Only works for open lines
- Not available for canceled or closed lines (lines in # status).
- A notepad entry is made indicating a line/order price recalculation was performed.
This option allows you to add a task to Microsoft Outlook.
Activating
This functionality is activated via the ODS application code ODS. This functionality can be activated at the Global, Authority Class, or User level. The activation process is essentially the same for all three levels. For the purposes of this example, we are going to activate this functionality at the Authority Class level.
- Access menu option NAV 2 - Work with Authority Classes.
- Enter a "W" in the Opt field of the Navigator Authority Class you want to work with.
- Press Enter to display the available web apps.
- Enter an "A" into the Opt field for ODS.
- Enter a "Y" to activate the setting "Allow the ability for creating scheduler tasks, in 3rd party email serv".
Set-up
Settings within menu option ODS 21 contain a user's Exchange credentials. Tasks are created at the user level on the Exchange server based on these credentials. The newly created task will update to the user's Outlook client during the next sync.
- Access menu option ODS 21 - Work w/ Spooled Files - O/D off the Output Distribution System (ODS) menu.
- On the screen that appears, press F24 (Shift + F12) to access more function keys.
- Press F24 again to access more functions. The F21=User Default Options function appears.
- Press F21 (Shift + F9) to access the User Operational Defaults screen. The two settings are located at the bottom of the screen.
- Enter the user's Microsoft Exchange user name and password.
Scheduling Outlook Tasks
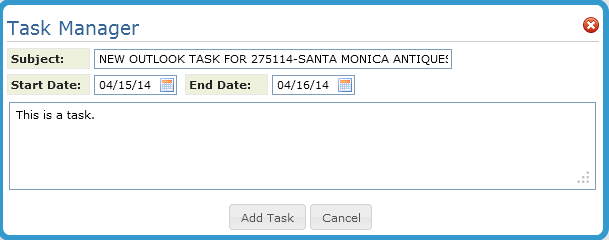
- Select Add Task to access the following window.
- Enter a Subject, a Start and End Date and any comments related to the task.
- Click Add Task.
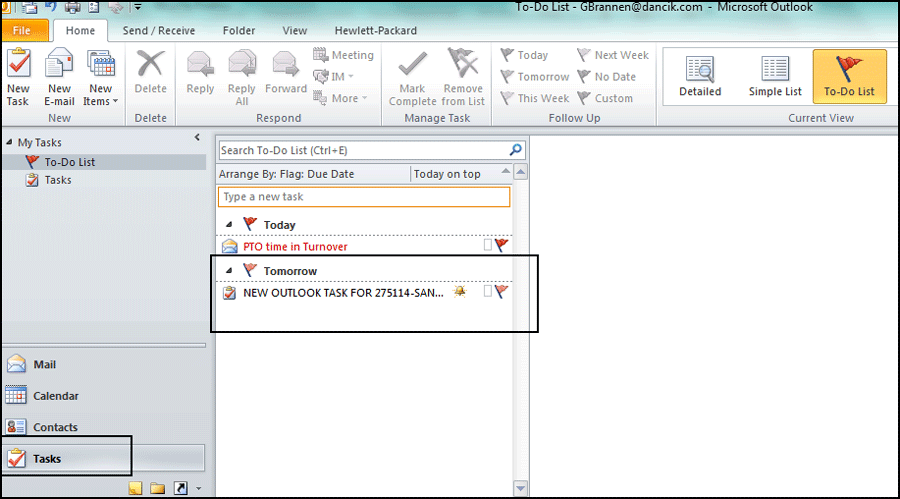
- The new task can be accessed via the Task section of Outlook.
- Options for Purchasing Discontinued Items - This series of settings allow you to prevent purchasing of discontinued items for regular POs, special orders, and direct shipments. Discontinued items are identified by a past date in the Discontinued Date field and/or a policy code of DI in the Policies field of the Item File Profile screen (FIL 2).
- Options for Purchase Orders - This option allows you to choose the default file used to populate the payment terms and FOB code during purchase order entry. You can also activate the Purchase Order Approval System.
- Supplier File - If you send POs electronically via the Output Distribution System (ODS), the suppliers fax number and/or email address are picked up in the Supplier File.
- Serial# Status Codes to be omitted by Reorder Reports- Omits certain inventory serial numbers from being counted in reorder reports, based on status codes.
- Item File - Item Policy code LC directs the system to use the last cost entered for that item/warehouse or the last cost from the SKU file as the default purchase order cost. This provides an auto-updating method to keep up with fluctuating prices. It also provides an alternative method to having to manually update the Item File costs when a new price list is received.
- Master Control User Settings (NAV 5 option "U") - Grants or denies the ability to enter POs and to see prices on POs.
- Purchase Order Approval System - The Purchase Order Approval System ensures that only authorized POs for approved amounts are issued to your suppliers. A purchase order "escalation ladder" can be created for individual users and managers. Each user and manager can be assigned dollar limits for purchase orders they are allowed to issue without approval. The Purchase Order Approval System supports limits that vary based on supplier. When first entering a P.O., the total amount is tested against the entries in the P.O. escalation ladder and if it exceeds the user's limit, an email is sent to the designated manager for approval. The P.O. Approval System can be set to go through the approval process again when any increases are made to the value of the P.O. When a P.O. is approved, an email is automatically sent from the approving authority to the originator of the P.O.
SPEC 5521 - Option to Send Purchase Orders and Direct Orders Directly to Supplier
