Need more info or you couldn't find what you were looking for, let us know by sending an email to: support@dancik.com.
Dancik Menu and Security System
Working with Authority Classes
Assigning Users to the Dancik Menu System
Creating Your Own Personal Menu
Navigating the Dancik Menu System
Short Cuts and Additional Functions using the Dancik Menu System
Users that have command line access can switch from the default menu system to the Dancik Menu System by entering MNU on any command line, or by using option 13 on the DP menu.
The Dancik menu and security system includes several features including:
Quick and easy navigation
“Point and Click” functionality on most PCs, assuming IBMs client access or compatible 5250 program is utilized and configured for this functionality.
Users can create their own “personal menus”
Complete system map that lists all the menus
Scan Feature - search for all options by any subject or keyword
User History - tracks the last 100 options a user accessed
Menus only list the options a user is permitted to access.
The implementation of menu option security will enable system administrators to restrict access to the system at a lower level than what is currently available. With this feature, it is possible to restrict actual menu options by user without the need for most passwords. The feature also allows the system administrator to customize the menu system by user or user class. In addition, individual users, in accordance with access restraints managed by system administrators, may customize their menus based on job requirements.
The Menu and Security systems supersede the previous menu and security systems. However, the previous “default menu” systems will still be supported. Therefore you may choose to transition at your own pace. You will also be able to have some users in the “default menus”, and others in the Dancik menu system simultaneously.
Individual program passwords are not affected by the activation of the menu and security features. However, they may not be needed after activation of the features. Because only the users that are authorized to an option can access that option, the passwords will often be an unnecessary extra step. If this is the case, it is recommended that you set those program passwords to blanks. The only programs whose passwords may still be applicable are hotkey maintenance programs such as the Billto, Item, and Supplier Files.
The Dancik Menu and Security system can be used with a minimum of configuration. However, it is recommended that system administrators familiarize themselves will all aspects of the Dancik systems before making the features available to other users.
Note: Hotkeys and Menu Bars are accessible with the Dancik Menu System.
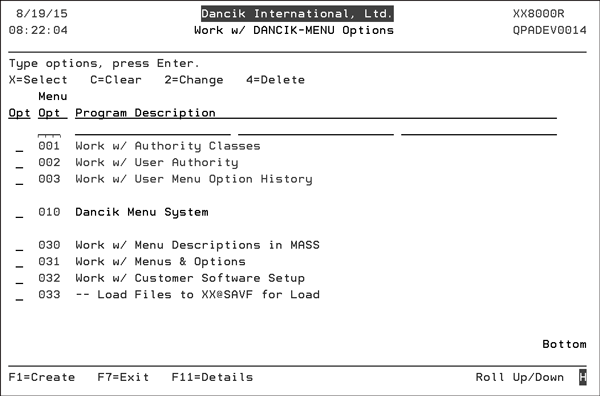
The Dancik menu system configuration option has been added to the DP menu option 13. The Work w/Dancik-Menu Options screen appears. These options are meant for system administrators only.
The Work with Dancik Menu Options program includes the following sections:
Option |
Description |
Work w/ Authority Classes |
This option enables you to create classes of authority (such as “Customer Service”, “Warehouse”, “A/R”. etc.) that relate to a list of menu options that are accessible by users in that class. Note: For more information, refer to Working with Authority Classes. |
Work w/ User Authority |
This option links specific users to an authority class, and can customize certain features by user. Note: For more information, refer to Work With User Authority. |
Work w/ User Menu Option History |
This option can display up to 100 of the last menu option accessed by each user. Note: For more information, refer to Work w/User Menu Option History. |
Dancik Menu |
This option loads the Dancik menu system for the current user. |
Working with Authority Classes
Creating a new authority class
Authority classes are ways to group users together, they can be created based on system access restrictions or based on user's functional areas such as accounting for instance. They may also represent a combination of both of these psychologies, (new accounting user) or Cash Application/ Accounts Receivable person. In essence, an Authority Class allows you to establish a Model Menu System by choosing options from any Dancik menu. Since you may build these templates at the level of menu option it allows you to restrict specific menu options for certain classes of users without restricting the entire menu. The Authority Class option allows you to pick and choose options which will be available to specific classes of users.
1. Place an “X” in the Opt field next to Work W/ Authority Classes. The Work w/Authority Classes screen appears.
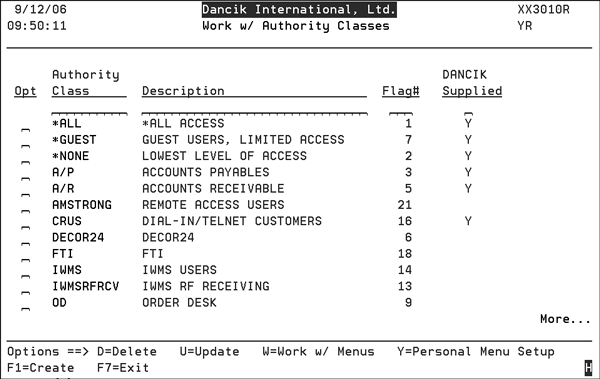
Dancik has supplied authority classes for some major user groups to be used primarily as examples of how authority classes can be used. Dancik-supplied authority classes can not be modified. However, you can copy them to new classes you can then build to suit specific requirements in your organization.
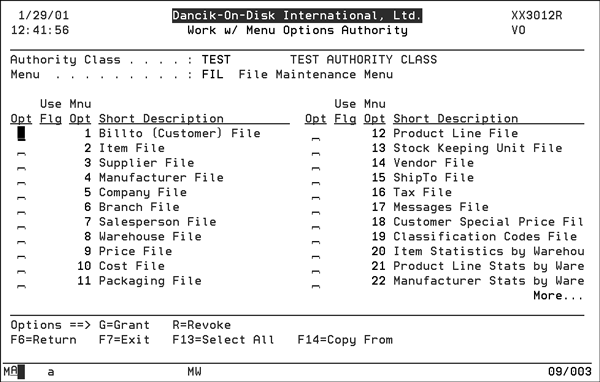
To review the Available Menu Options for an authority class, enter a “W” in the Opt field of a specific authority class and press Enter.The figure below displays the menus from which specific options can be made available if the Warehouse and Delivery Authority Class were selected. All Dancik-supplied menus are displayed so that you can choose from any menus and options for your authority classes.

2. To grant authority to a specific menu, place a “G” in the Opt field for the desired menu. To restrict an authority class from the specified menu, place a “R” (to revoke authority) in the Opt field.
3. To review the specific options within a Menu, place a “W” in the Opt field and press Enter. The figure below shows the results if a “W” was placed in the Accounting/File Maintenance Menu.
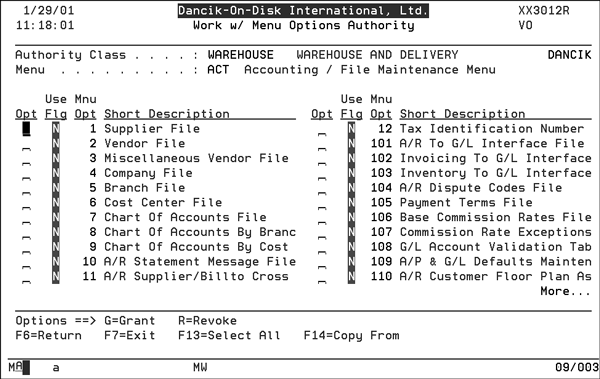
4. This screen lists all the menu options associated with a menu. You may use the “G” and the “R” code to grant or restrict access to specific menu options for this Authority Class. In the example above, the Use Flag of “N” indicates that none of the options on the menu are authorized for use by this authority class.
5. By working with all the menus and options, it is possible to alter the content of each Dancik menu based on the restrictions established in the authority classes.
Note: The alterations only apply to the way the menus appear to users in that Authority Class. The original menus are not altered
Creating a new authority class
1. Press F1-Create from the Work with Authority Classes option.

2. The next screen to appear, allows you to specify and describe the Authority Class you are creating.
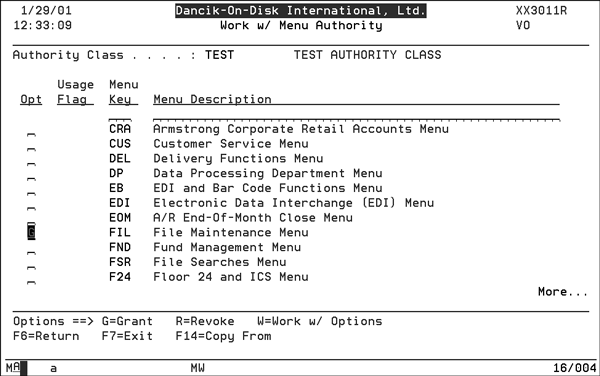
3. Enter the name in the Authority Class field and a more detailed description in the Description field. For the purposes of this example, a new authority class of Test was created. Its description is Test Authority Class.
4. Press Enter and the newly created authority class appears in the list of Authority Classes.
5. The “U” function allows you to alter the long description. The “D” function allows you to delete the authority. As discussed earlier, the “W” allows you to specify the menus and options to which users in that Authority Class are granted access.
Note: By default all menus are initially restricted.
6. Enter a “W” in the Opt field next to the new entry (Test Authority Class) and press Enter. The menus within the new class appear on the screen. Specify which menus the user is authorized to by placing a “G” by the desired menu and pressing Enter.
7. Next, use the “W” option to grant access to specific options within that menu group. Insert a “W” into the Opt field and press Enter.
8. Place a “G” by each File you want the user to have access to, or press F13 to select them all.
Note: It is possible to simply copy (using the F14 key) the configuration from an established authority class and make modifications to the groups or options as desired. Building authority classes from scratch can be time consuming though your special needs may require this activity.
The next dimension of establishing a new authority class is to establish the content of authority classes’ default menu. The real power of the Authority Class Default Menu is in its support for customizing the presentation of which menu options are grouped together on a single screen. By creating Authority Classes which are specific to job functions within your organization and then establishing the presentation of the menu options onto a single screen it is possible to “build” a custom screen for a class of users which displays only the most frequently used system features on one screen.
1. The content of the default personal menu can be established through the Personal Menu Setup function. Place a “Y” in the Opt field of the Authority Class.

2. Press Enter. The options for this Authority Class display. You may select the options to include on the default personal menu for the authority class.
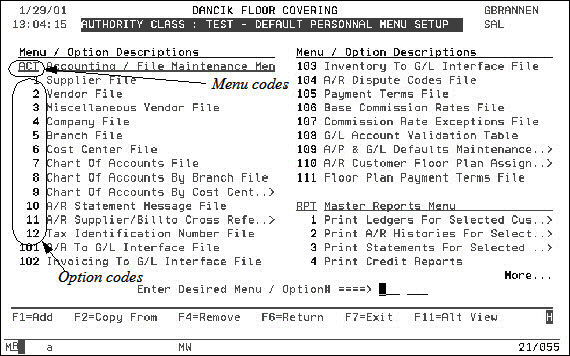
3. To add a menu option, enter the specific the menu and option in the Enter Desired Menu /Option# field. For example, if the user needs access to the A/R To G/L Interface File option included in the Accounting Menu you would enter ACT 101 in the option fields.
4. Press F1 to add the menu option to the personal menu setup.
Note: Only menu options that have been granted access may be added.
5. The menu option is added to the default menu. Continue building the default personal menu by using the F1 key to add options.
Once the Authority Classes have been established, the next step is to link specific users to the appropriate Authority Class.
1. On the Dancik Work w/Menu Options, select option 2 - Work w/User Authority. The Menu Options Configuration screen appears showing all of your AS/400 user profiles.
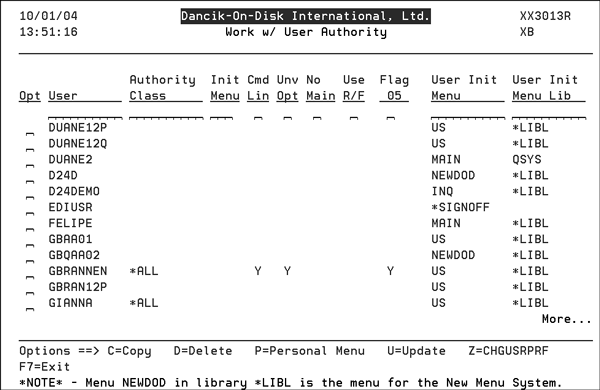
2. To work with a users’s authority record, place a “U” in the Opt field and press Enter. The user’s access information is displayed. Each of the columns is represented by a field in the update screen.

3. This screen allows you to “link” the user to an established authority class, to establish an initial menu, and to choose some special functions.
4. Enter an Authority Class. To search the available authority classes, enter a “?” in the field. After you press Enter, a selection box will appear that allows you to choose an Authority Class. Authority class *ALL means the user has access to all menu options.
5. Enter an initial menu. Enter a “?” to search the menus.
Note: A blank field causes the user's initial menu to be the default personal menu for that User's Authority Class.
6. Make the necessary entries (“Y” or “N”) in to the following fields:
Command Line Usage - Can be used to restrict users access to command line entries.
Load Universal Opt - Loads all of the universal options that are available within each menu. Universal options include things like “Display Printer Output” and “Send Messages”.
No Access to Main Menu - If a “Y” is entered, the user will not have access to the Main Menu.
Note: With proper configuration of the Dancik menu system, users will not need access to the “Main Menu”. However, at first the “Main Menu” concept may be more comfortable.
Note: Other flags are for later use only.
7. Press the Enter key to accept your entries. A message will appear on the bottom of the screen confirming your entries.
8. Press F6 to return to the Menu Options Configuration Screen.
9. You can copy the user authority records by selecting the template user and placing a “C” in the Opt field and press Enter. For example, you can copy John’s authority record to other users by entering a “C” next to John.
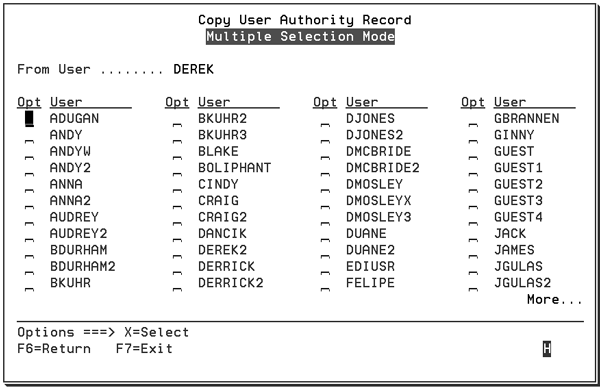
10. The pop up window allows you to select multiple users at once by placing “X” in the Opt field by each AS/400 profile for which you wish to copy the User Authority settings.
11. Press Enter. The Menu Options Configuration Screen reappears. The user’s profile that the records were copied to will be updated.
12. The following options are also available:
D - Allows you to delete the User Authority associated with a specific User Profile. The AS/400 user profile itself is not deleted, merely the configuration information for the Dancik Menu System is removed.
P - Allows a quick review the of user’s personal menu.
Z - Accesses the User Profile screen.
Assigning Users to the Dancik Menu System
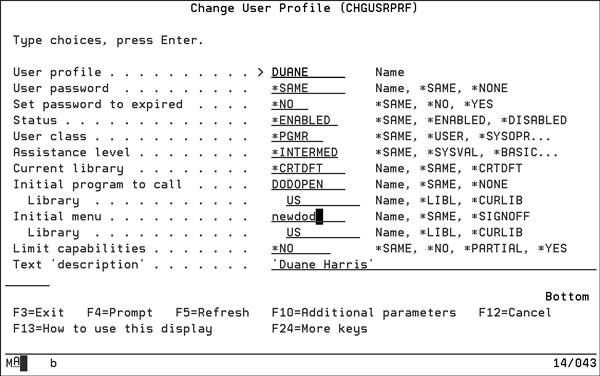
You may assign users to the Dancik Menu System on a user by user basis. Therefore it is possible to have some users using the default menu system, while others use the Dancik Menu System.
1. Set them up on the Work With User Authority program of the Dancik Menu System.
2. Change their IBM-Supplied WRKUSRPRF command as shown below.
Creating Your Own Personal Menu
1. You may create your own personal menu by entering any menu code and option from a menu, and then pressing F1 to add that option to your personal menu.
Note: You must be authorized to use an option before you can add it to your personal menu.
The system will display a message that lets you know the option has been added to your personal menu.
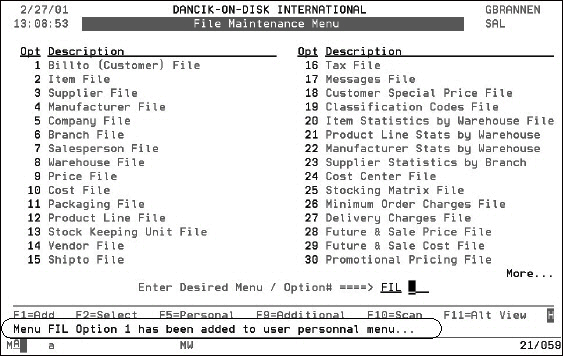
2. You can view your personal menu by pressing F5. Your personal menu displays only the options you have added using the F1 function.
This menu should contain those options that you need and use often. The function keys are described in the table below.
Function Key |
Description |
F1 - Add |
Adds a selected option to the user's personal menu. |
F2 - Select |
Displays a Menu Selection Window allowing the user to change Menus. This window can also be displayed when a “?” is entered into the Enter Menu field. You can also automatically change menus, simply by entering the menu code in the Enter Menu field, with no option #, and pressing Enter. |
F4 - Remove |
Removes a selected option from the user's personal menu. |
F5 - Default |
This command toggles between the user's personal menu and the default personal menu assigned the user is associated with. |
F6 - Return |
This command will take you directly to the main menu program. If the main menu was never displayed, the “Menu Selection Window” will display. |
F9 - Additional |
This command (seen by pressing F24) will display a command line window, only if the user has authority to use it. |
F10 - Scan |
This command (seen by pressing F24) accesses the Scan Menu System program, that allow users to scan the entire menu system database, by selecting words and/or phrases to search for. |
F11 - Alt View |
This command toggles the screen between each option's short and long descriptions. |
F12 - Alt Seq |
This command toggles between the having the menu displayed in alphabetical order and the sequence the user has created using the Change Menu Sequence function. |
F24 - More Keys |
Displays additional function keys. |
3. Do not confuse the concept of a personal menu with that of default personal menus. A user’s personal menu is created by the user. Default personal menus are created by the system administrator as a default for an authority class. Both menus are accessible by all users. (See F5 on the personal menu screen.)
Navigating the Dancik Menu System
The main method of navigation is to select an option on the current menu by entering the option number, or directly accessing another menu by keying the code for that menu. The only exception to this rule is the main menu, which is merely a list of other menus to select from.
The following table shows the menus and their codes.
Menu Code |
Menu Description |
ACT |
Accounting / File Maintenance Menu |
AP |
Accounts Payable Menu |
APF |
Accounts Payable Future Month Menu |
AR |
Accounts Receivable Menu |
ARC |
Archive & Purge Menu |
BCK |
Backup Menu |
BLD |
Build-A-Container System Menu |
BRC |
Branch Managers Menu |
CD |
Credit Department Menu |
CDR |
Cost Drivers Menu |
CKR |
Check Reconciliation |
CLM |
Claims Management System |
CMS |
Channel Management Solutions |
CNU |
Conversion Check Utility Menu |
CNV |
Conversion Menu |
COM |
Commissions (Files and Reports) |
COU |
THE COUNTER |
CRA |
Armstrong Corporate Retail Accounts Menu |
CRS |
Customer Remote User System (CRUS) |
CS |
Customer Support Menu |
CUS |
Customer Service Menu |
DEL |
Delivery Functions Menu |
DP |
Data Processing Menu |
D24 |
Decor 24 Setup Menu |
EB |
EDI and Bar Code Functions Menu |
EOM |
A/R End-Of-Month Close Menu |
FIL |
File Maintenance Menu |
FND |
Fund Management Menu |
FSR |
File Searches Menu |
F24 |
Floor 24 and ICS Menu |
GL |
General Ledger Menu |
GLF |
General Ledger Financial Statements & Custom Reports |
INB |
Inventory Receipts & Back Order Fill Menu |
INQ |
Inquiry Menu / Without Hotkeys (limited access) |
INS |
Installation Scheduler |
INV |
Inventory Control Menu |
IVC |
Invoicing Menu |
IVR |
Recurring Invoice System Menu |
LAM |
Laminates Menu |
LMF |
Light Manufacturing and Assembly Menu |
LOS |
Lost Orders Menu |
MNU |
Dancik International Performance Options |
ODS |
Output Distribution Setup Menu |
ORD |
Order Desk |
OTH |
Other Systems Inventory |
POL |
Barcode Label Pool Utility Menu |
PRG |
Purge Menu |
PUR |
Purchase Orders Menu |
RAR |
Accounts Receivable Reports Menu |
RDR |
Dancik Radar Menu |
RBD |
Budget & Sales Analysis Menu |
RDC |
Regional Distribution Center Menu |
RF |
Radio Frequency Menu |
RFO |
R/F Test Menu |
RGR |
Graphs Menu |
RIV |
Inventory Reports Menu |
RMF |
Master File Listings Menu |
RML |
Mailing Lists and Labels Menu |
ROC |
ROCS Menu |
ROO |
Open Order Reports Menu |
RPL |
Price Lists Menu |
RPO |
Purchasing & Receiving Reports Menu |
RPT |
Master Reports Menu |
RSA |
Sales Reports Menu |
RSM |
2-Year Month By Month Analysis Reports |
RSR |
Ranking Reports Menu |
SET |
System Settings Menu |
SHO |
THE SHOWROOM |
SLB |
Individual Slab Management System |
SSM |
Selection Sheet Manager Setup Menu |
STS |
Sample Tracking System |
SYS |
Special System Maintenance Functions Menu |
WAR |
Warehouse Functions Menu |
WA2 |
THE WAREHOUSE |
WEB |
THE WEB |
WMS |
Dancik Warehouse (IWMS) Master Menu |
WM1 |
IWMS Physical Warehouse Setup Files |
WM2 |
IWMS System Settings File |
WM3 |
IWMS Management Screens and Reports |
WM4 |
IWMS Warehouse Functions Menu |
WM5 |
IWMS RF Subsystem Menu |
WM6 |
IWMS Delivery System Menu |
WM7 |
IWMS Receiving System Menu |
WM8 |
IWMS System Utilities Menu |
WSI |
Warehouse Shipping & Routing Interfaces Menu |
For example, to get to the Branch Mgr Menu perform the following:
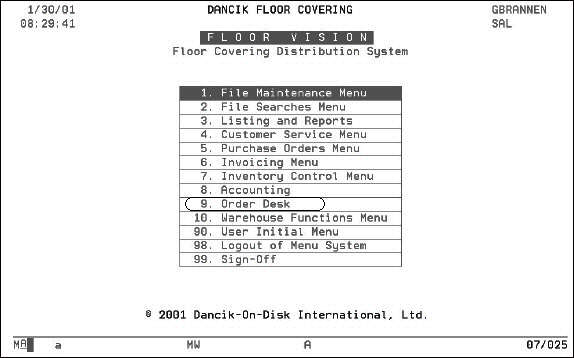
1. From the main screen, click any option. For example, select option 9- Order Desk.
2. The Order Desk Menu appears.
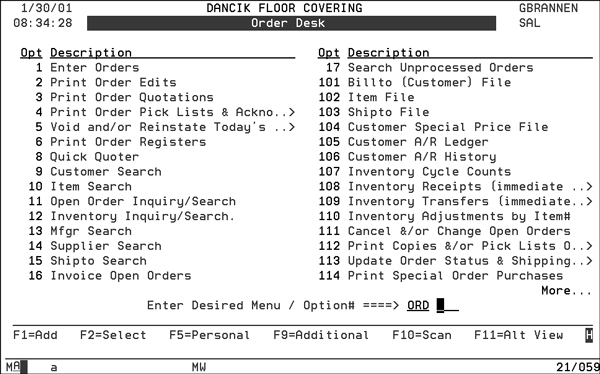
3. From the Order Desk menu, if you knew that the code for the Branch Manager’s Menu was BRC, you could enter option BRC and go directly to it.
4. From the Order Desk menu (and other menus) you may select an option by either positioning the cursor over the option and clicking the mouse, or entering the option number. Some menus, such as the Order Desk menu, combine multiple menus from the previous “default” menu system.
Using the F2 - Select Function (which lists all of the menu codes) and the F10 Scan function demonstrates how accessible menus and options are in the menu system.
5. Press the F10 Scan key. The Scan Descriptions box appears. Enter the information you want to access. In the figure below, Branch has been entered as the first scan.

6. Press Enter. The Scan Menu Results screen appears. This screen contains the search results, with items to which the user’s authority class grants them access.

In this example, a search for BRANCH return “hits” from the ACT, BRC, EOM, FIL, FSR, F24, GLF, RAR, etc. menus. Any occurrence of BRANCH within the description of any menu option was returned. You can narrow your search results by entering more scan options.
7. Press F10 again to access the Scan Descriptions box. Add the term FILE as Scan Option#2.
8. Press Enter to narrow the search for only menu options in which both terms appear as demonstrated in the results screen shown in the figure below.
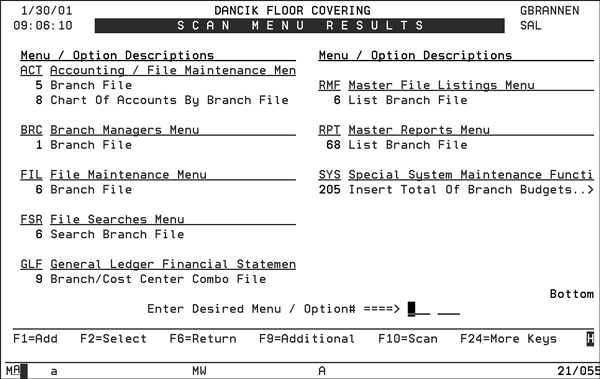
9. In the example above all options that include the words BRANCH and FILE are shown. Options that the user is not authorized access to are not shown.
Short Cuts and Additional Functions using the Dancik Menu System
The F9 key provides the user with the following “one-click short cuts”:
The ability to change Initial start-up menus, which is the menu that is displayed when a user first enters the menu system.
Access back to the main menu.
Command line access (if not restricted)
Display of the user’s last 100 menu options accessed.
Ability to resequence the order of the menus on their screen.
The F9 function is sensitive to the type of screen the user is accessing as well. For example, when employed on the Scan Menu Results screen it has the functions shown below.

However if accessed from a regular menu, or a default menu (either for authority class or for personal menus) it supports varying functionality.

The F9 Additional options include the ability to set the current menu as the Initial Menu. Initial menus configured at this level of the menu system assume the main menu option has been restricted from the User Authority record for a specific user. This is analogous to setting a user to a specific menu in the old menu features; Order Desk or Warehouse for example, bypassing the main menu.
The F9 Additional options support yet a different set of features when accessed from a users default menu (whether this is personal or authority class). Note that the Copy Personal Menu option is available while the Set Menu As Initial option is no longer available.
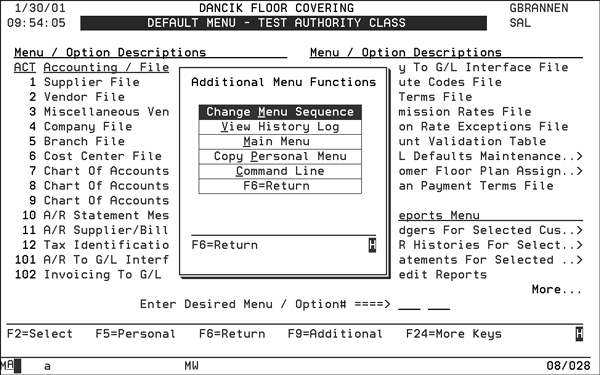
This allows a user to select a personal menu setup from a co-worker or manager who has customized their menu in an ideal fashion for a specific job function.
Note: The options copied are done so in accordance with the users authority classes and no security violations will occur by the sharing of personal menus among co-workers.
To review a list of all menus to which the user is authorized, press F2 Select. The Menu Selection window appears.
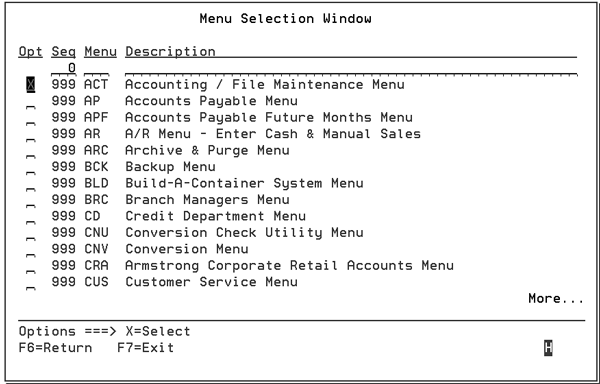
This screen displays all the menus in alphabetical order. Notice that the sequence number is the same for all menus. This sequence number may be customized by user, so that the menus can be listed on this screen in a different sequence. This is done using the Change Menu Sequence option on the F9 Additional Menu Functions screen.
Using the F2 function, a user may navigate from menu to menu. This includes going to and from initial menus, personal menus, etc.
By Pressing the F5 key from a menu, a user may return immediately to their personal menu (or to the default personal menu for the authority class to which they belong).
From the personal menu, the user may toggle between their Personal Menu and their Authority Class Default menu using the F5 key.
Note: The Universal options do not appear on personal or authority class default menu.
The user may return from default menus to the last menu selected via the F2 key.
The F11 function toggles between a two column and a single column display.
The Universal Options menu is available only from within regular menu views (not personal or authority class default menus) however, the options remain available even when they do not appear on the screen. For example, universal option 999 (Signoff) or 994 - (Send System Messages) may be keyed from any menu regardless of whether or not these options are displayed.
Getting around in the "Green Screen"
Setting up New Users on the Dancik System
New Menu System and giving access to Option INB
How do I add some items from the old menu system into the new menu system?
Is there a Command to quickly print a listing of all IBM User Profiles on the System?