|
Need more info or you couldn't find what you were looking for, let us know by sending an email to: support@dancik.com.
Slab Management
Slab Balance Maintenance Program
Inventory Adjustments for Slabs
Special Bar Code Labels for Natural Stone Slabs
The Slabs Management System is completely integrated into all program modules. Once you have defined an item as being a slab item, all functions for slabs are automatically activated.
Complete the following steps to set up an item as a slab item:
1. If the item record already exists in the Item File, you will need to temporarily adjust inventory to zero onhand, and cancel any open and purchase orders before activating the slab fields. You may want to consider creating all new item numbers for a clean start.
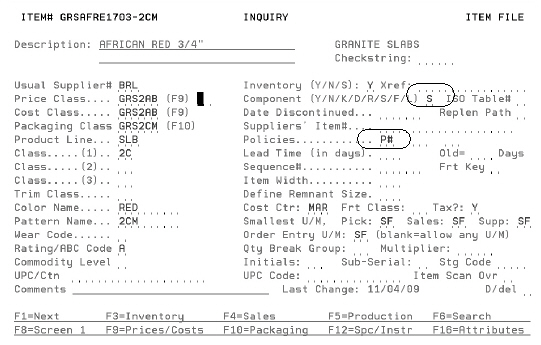
2. An item is designated as a slab item by its component code being equal to S (serial number item) and the first policy field being set to P#. Policy P# triggers all slab management functions.
The following screen displays the item file for a slab with the identifying components circled.
|
The following features are included for slabs management:
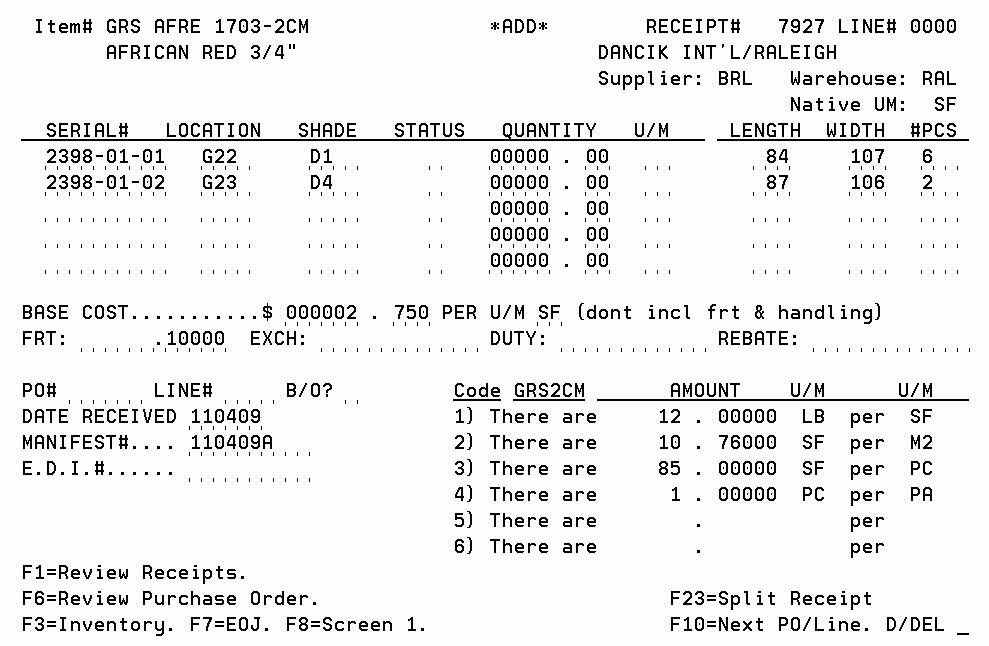
The Receipts Program, from the Pre-Receive and Back Order Fill Menu, automatically prompts for a serial number, number of pieces, and the length and width of each piece. The program calculates square footage based upon pieces multiplied by length multiplied by width. Length and width are entered in inches. We recommend that the serial number represents a shipment, crate, and size. For example, serial number 3989-01-1 indicates shipment or purchase order 3989, crate 1, and the first size in that crate. Serial number 3989-03-02 indicates shipment 3989, crate 3, and the second size in that crate.
The following screen in a sample Receipts Screen for slabs.
|
Order Entry and Inventory Inquiry display the Slabs Inquiry Screen instead of the regular Serial Number Inventory Screen, if a slab item is requested.
|
Order Entry allows slabs to only be ordered by the piece, so that fractions of a slab are not accidentally created in inventory. If a slab is to be sold at less than its full size due to cracks or imperfections, complete the following steps:
— Enter line item for full slab.
— Enter an additional line crediting the quantity being allowed, due to the imperfection. Enter N to NOT receive the credited quantity back to stock. Enter the reason code in the C/C field.
— This method preserves the integrity of inventory and also enables a variety of reports and screens for analyzing these size adjustments. For example, the X by Y Credit Analysis Report can list these types of credits by item, customers, salesperson, or branch.
The Stock Status Report also displays the sizes and number of pieces for slabs when the option to list serial numbers is requested.
The Serial Number Listing (option 101 on the menu RIV) has two new versions specifically designed for slabs. One is meant for internal management and shows cost.
When a natural stone slab is sold, it is often adjusted to usable dimensions, or to an agreed upon size after inspection by the customer. The slab Re-Sizer provides a consistent way of adjusting slab inventory. It operates much the same way as other inventory adjustments for other products, but optimized for the special aspects of slabs.
The Slab Re-Sizer provides the following:
A display of the current status of a slab item which includes:
— Number of pieces
— Length and width
Ability to resize one slab or all slabs in a bundle.
Ability to resize a selected slab before, during, or after Order Entry.
Automatic calculation and adjustment of available and onhand square footage based on new dimensions.
Search for any slab with particular dimensions.
Note: Since area rugs that are purchased and sold by specified set sizes can be managed like any other serialized item, with provision for shades, SF per PC, and so on. Inventory for area rugs can be managed almost identically to that for slabs. You can set up the item records like slabs, using the P# code. In fact, the P# code does not indicate slab; it refers to items that have random sizes per piece. Just like slabs, inventory will display the number of pieces for each size within each serial number. For area rugs you may want to consolidate the serial numbers more than in the slab serial number examples above. For example, if it is not important to separate by shipment or crates, the serial number could simply represent the size of the rug.
1. On the Inventory Control menu, select option, select option 11 -Slabs Search & Re-Sizer. The Work with Slabs screen appears.
|
Note: For more information on option "E" refer to Slab Exchange.
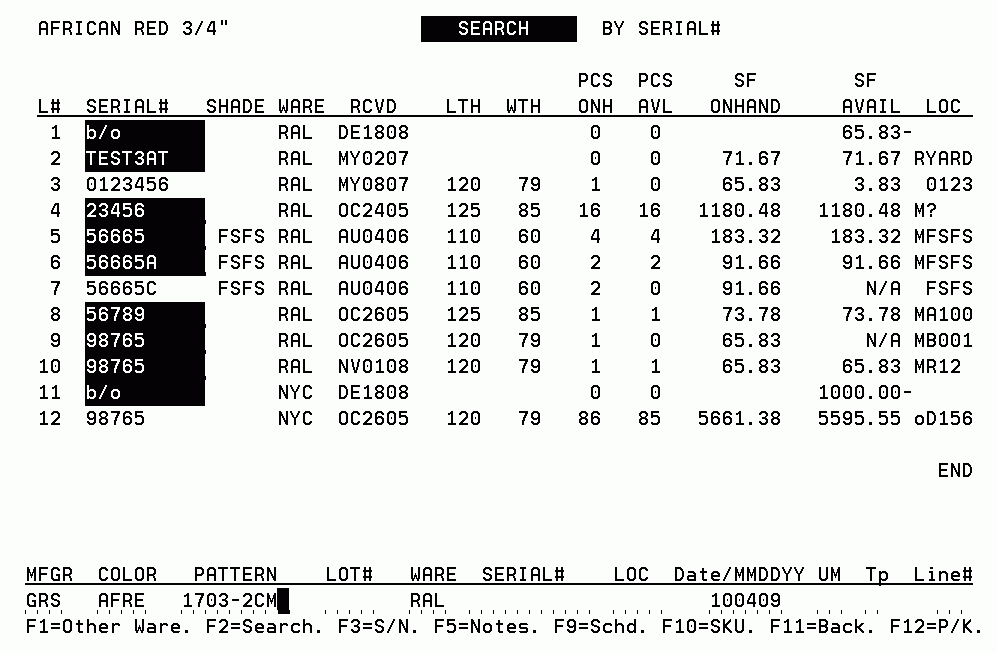
2. To conduct a slab inventory search, enter information into any of the fields (i.e., a partial/complete Item# or partial/complete serial#). The more information you enter the narrower your search will be. Press Enter to conduct a search for slabs that match the information you entered. A message box may appear informing you of the status of your search if the system reads a large number of inventory records without finding a match for your search criteria.
Note: The slabs search only displays records for items that are defined as slabs. The amount available for each slab record is shown in SF (under the Available Column) and in number of pieces (under the #PC column). Slabs may be maintained in inventory as individual slabs, in which case the #Pc field will equal 1, or slabs may be maintained in bundles, in which case the #Pc field will be a number between 2-99.
3. Select a slab for the Slab Re-Sizer program by entering an “S” in the Opt column to the right of the item number. Press Enter and the Slab Re-Sizer screen appears.
|
Notes about the initial Slab Re-Sizer Screen
This screen displays the current values of the slab record.
The PCs and length and width fields are editable. You can change the values.
The system automatically updates the square foot (SF) quantity based on the most current information.
Interacts with other parts of the software to:
— update the quantity and extended prices.
— updates any allocated quantities and costs of orders.
— holds for the adjusted slabs.
The entry in the PCs field cannot be below the amount shown in the Available field.
The Allocated field includes orders and holds.
Only users that are authorized to adjust quantities may use the update features of the Slab-Resizer.
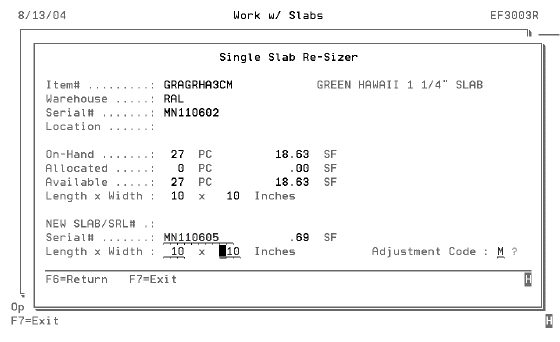
4. To adjust a single slab within a bundle, press F10. This function is only available if the number of pieces is greater than one. The Single Slab Re-Sizer screen appears. Enter a serial number for the slab you are creating.
|
5. As shown in the figure above, the input fields are bolded and are pre-filled with the current slab values. To make the necessary adjustments, enter a new serial number in the Serial # field under the heading NEW SLAB/SRL#. This causes a new record to be created. If you enter a serial number that already exists, you will receive the error message “Record Already Exists. Entry cannot be added”.
6. Enter an Adjustment Code. This provides an explanation for the change in inventory status. To display a listing of all the available adjustment codes on your system, enter a “?” in the field and press Enter. The M adjustment code in this example means the inventory change came about because of a change in measurements. Another example is to use the cycle count adjustment code C to correct an onhand balance.
Note: Any changes made are reflected throughout the rest of the system. You can run an inventory register by adjustment code to show the status and history of inventory changes.
7. After you give the slab a new serial number (MN110605), press Enter. The original slab record is adjusted to show the decrease in inventory from 27 pieces available, to 26 pieces available.
|
8. To work with the new slab, press F6 to return to the Work W/Slabs menu. Select the just created slab, by entering an S in is Opt field and pressing Enter.
9. You can change the On-Hand and Length x Width fields as needed to reflect current inventory.
10. No updates can be made if the Available field is zero. If the Available quantity does not match the Onhand quantity, then all orders and holds are updated with the new SF per slab quantity. Subsequently the extended prices and costs are also updated.
P=Print Serial Tag - Prints just one label regardless of the quantity of slabs as designated by the #PC column.
L=One Tag/PC - Allows you to print a label for every slab. This feature applies to companies that store slabs in bundles, which show as multiple PCs on the inventory screens. For every slab, as designated by the #PC column, a label is printed.
A Slab Exchange function is included in the “Slabs Re-Sizer” program. The Slab Exchange enables two slabs - one allocated and one unallocated, to be switched - so that a customer or warehouse operator can switch the slab taken in one easy step.
Note: You can also accomplish this by Allocation Swapping if the exchanged slabs were the same size, or by Order Change to change the allocations of the order(s). However, both of these methods have limitations and require multiple steps.
You can handle everything associated with selection, sizing, and exchanging of slabs within the Slab-Search and Re-sizer application. You can use the exchange feature to:
Exchange the slab on one order/line with the slab on another order/line.
Exchange the slab on one order/line with another unallocated slab.
1. On the Inventory Control menu, select option 11 - Slabs Search & Re-Sizer.
Note: If you are configured for the applicable menu bar - MNUBWHCL, MNUB04CL, MNUB06CL, or MNUB07CL, you can press Attention on a terminal keyboard or Esc on a PC keyboard and access the Slabs Resizer from the Utilities menu.
2. Enter E beside the two serial numbers for the slabs you want to exchange. The slabs you exchange must meet the following criteria:
Both slabs must have the same item number and be in the same warehouse.
At least one of the slabs must be allocated.
Both slabs must have 1 in the #Pc column, indicating one piece.
3. Press Enter.
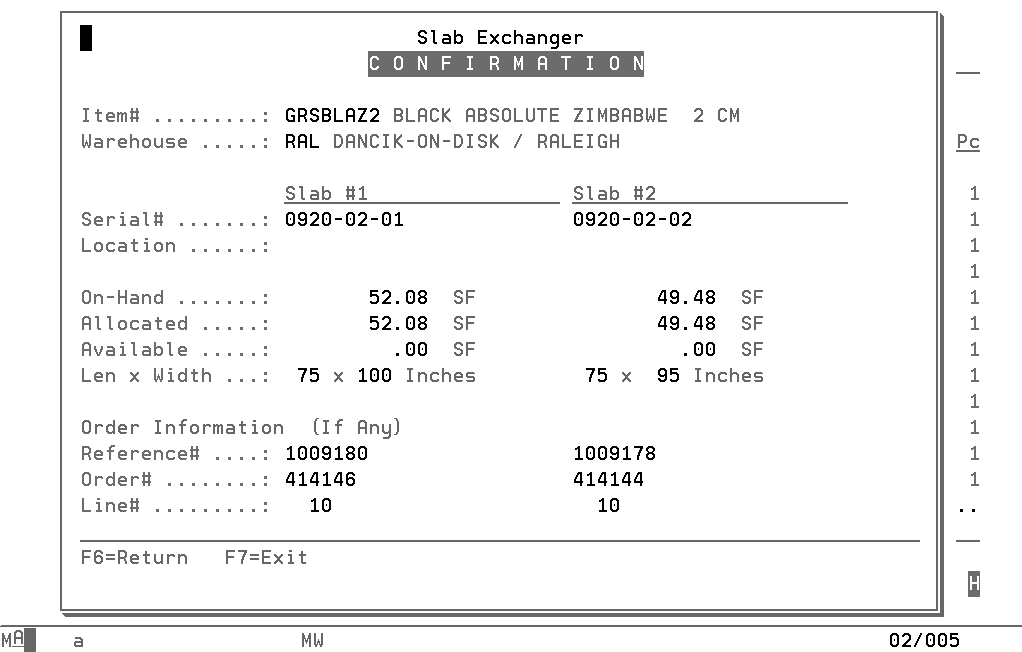
4. On the Slab Exchanger Confirmation screen, do one of the following:
Press Enter to confirm the exchange and return to the Work w/ Slabs screen. A message at the bottom confirms the successful completion of the exchange.
Press F6 to Return to the Work w/ Slabs screen.
|
5. If you enter E beside two allocated slabs, the program:
Exchanges the serial#/location on the two order/lines. In effect, the orders exchange slabs.
Recalculates the extended price of each order/line, because the slabs might have different sizes.
Updates the related inventory files and screens, so that the order allocations on the stock card screen match the updated orders.
Places a note in the order notepad of each order, such as:
6. If you enter E beside one allocated slab and one unallocated slab, the program:
Exchanges the serial#/location on the allocated order/line to the unallocated slab. The allocated order is changed to the other slab.
Recalculates the extended price of the order/line, because the new slab might have a different size than the original slab.
Updates the related inventory files and screens, so that the order allocations on the stock card screen match the updated order.
Places a note in the order notepad of the updated order, such as: 9/19/02 16:00 JSMITH @ ZE made a Serial#/Location Slab Exchange
This program looks at all slab items in inventory, and recalculates all square footage based upon current piece sizes, and optionally updates the square footage when an imbalance is determined. This program can reverse the results of any slab adjustments that were made incorrectly by SF, instead of by re-sizing pieces.
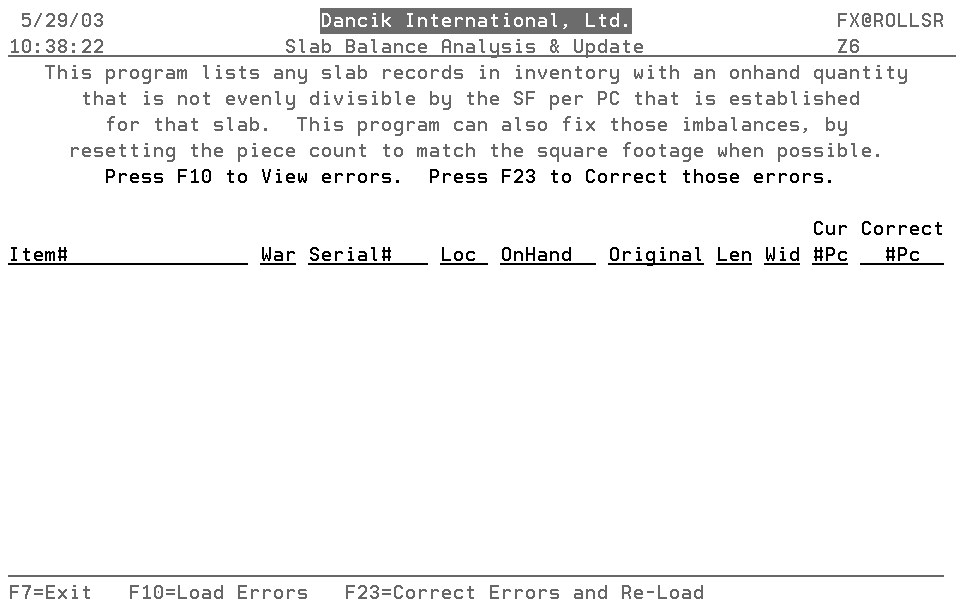
1. On the Special System Maintenance Functions Menus (SYS), select option 812 - Slab Balance Analysis & Update.
The Slab Balance Analysis & Update screen appears.
|
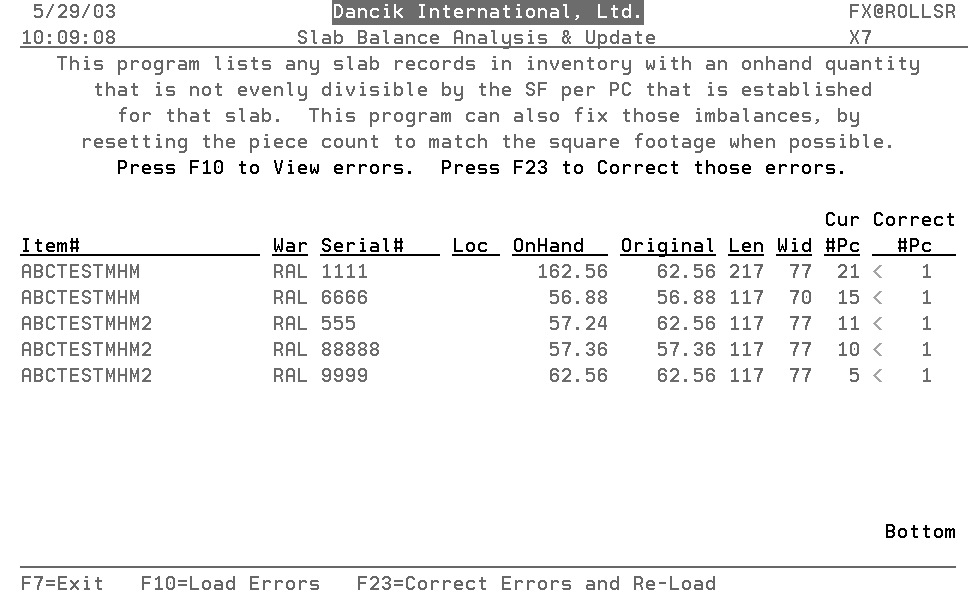
2. Press F10 to show all the slab records that are out of balance, if any exist.
|
3. This list shows slabs that the system is reporting as out of balance. A slab is considered out of balance when its piece count multiplied by its area per slab doesn’t match its square footage on-hand.
For example, the second item shown in the figure above, Item number ABCTESTMHM, is listed as currently having 15 pieces in inventory. If you calculate how many square feet are in one slab, (177 x 70)/144, you will see that one slab is 58.8 square feet. The 15 current slabs is wrong and when F23 is pressed the current piece count will change to 1.
4. Press F23 to correct slab imbalances. The system corrects the Cur #Pc field. When all the corrections are made, the screen refreshes and the out of balance slabs are now in balance.
Pressing F10 again results in the message No Errors found in SLABS file.
Inventory Adjustments for Slabs
The Inventory Adjustments by Item screen allows you to easily adjust and recalculate your slab inventory. By entering the length, width, and number of pieces of a bundle or slab, you can increase or decrease sizes and number of slabs (pieces).
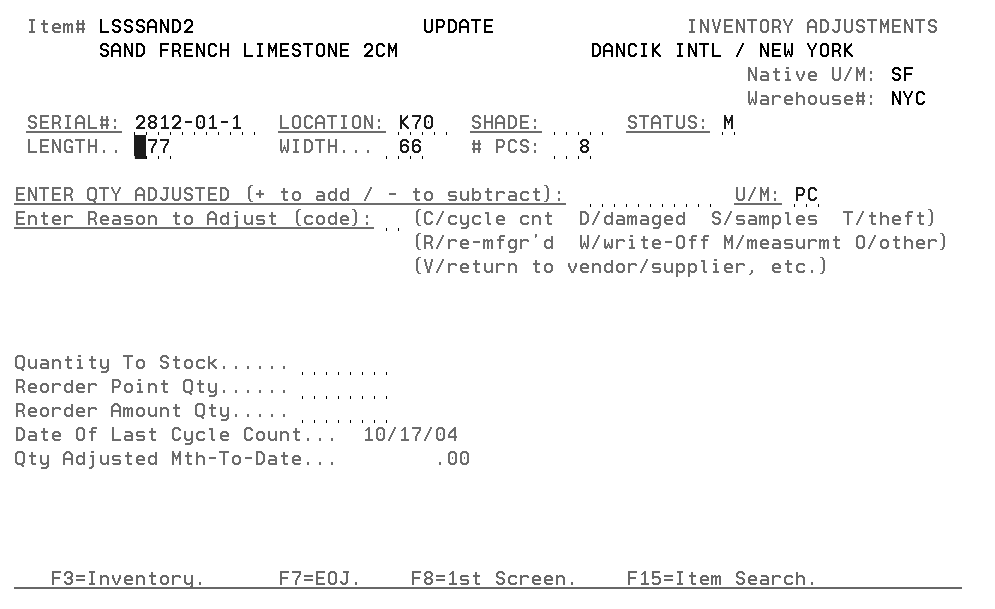
1. Access the Inventory Adjustments by Item Program (INV 2). An entry screen appears.Enter the following information:
The slab item number you want to make inventory adjustments to.
The warehouse code.
Your initials.
and a password. (Note: only the high level password allows access to costs)
2. To ensure you select an existing slab, with the right slab measurements, serial number, and location, press F15. The Item Search entry screen appears with your item number already entered.
3. Press F3 to display slabs by serial number. The screen that appears provides the details (size, pieces onhand, location, etc.) for the slabs of that item. Enter the line number of the slab you want to adjust in the Line field in the bottom right hand corner.
|
4. Press Enter to proceed to the Inventory Adjustments Screen. The slab’s information is already inserted onto the screen.
In this example, we are going to reduce our inventory of this bundle of slabs, from 8 slabs to 7.
|
5. To adjust the number of slabs you have in inventory, enter the number of PCS you want to adjust the inventory to. In this case it will be 7.
Note: In a situation where there is only one slab, you can remove all inventory by entering 0 as the number of pieces. This eliminates a slab or bundle. The program issues a warning, and you must press enter to approve the complete removal of inventory.
6. Enter an adjustment code in the Enter Reason to Adjust (code) field.
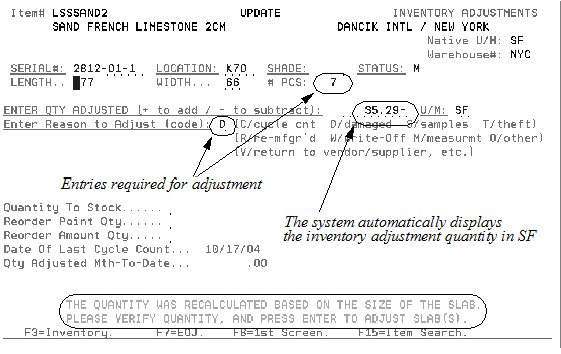
7. After making the necessary entries, press Enter. The system recalculates the (SF) amount of inventory based on your adjustment, and displays that quantity in the Qty Adjusted field. The quantity shows as a negative if the change in size and/or number of pieces causes an overall reduction in SF.
A message appears at the bottom of the screen confirming your decision to adjust inventory.
|
8. Confirm your entries and press Enter. An Entry Accepted message appears at the bottom of the screen.
Note: This program does not accept changes to slabs made by entering the SF to adjust. To adjust slabs, you must enter the new length, width, and/or number of pieces, and let the program calculate the change in SF. This method prevents you from creating slab records that are “out of balance”, where the Length x Width x Pieces does not equal the SF.
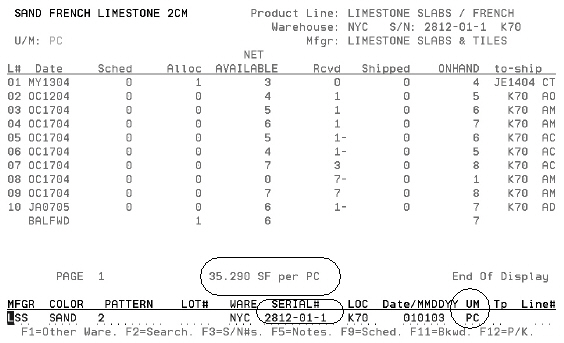
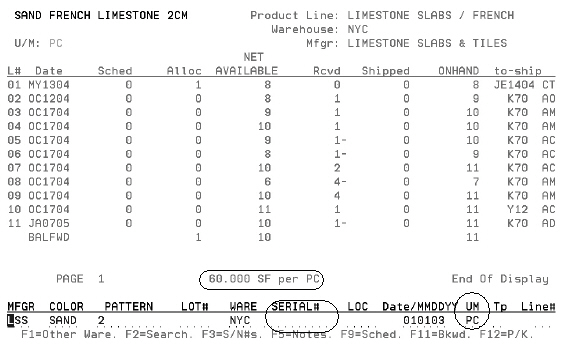
The stock card screen can show in multiple units of measures for slabs - including by piece, using the individual piece sizes of each slab.
The stock card screen for slabs works as follows:
If you enter a specific slab serial number, and U/M = PC, the stock card screen shows the conversion of SF per PC, for that specific slab, and shows all transactions expressed in PC.
If you do not enter a specific slab serial number, and you enter U/M = PC, the program uses the average SF per PC factor found in the Item or Packaging files. If there is no average SF per PC factor, the program displays a message that each slab has different conversions, and therefore the stock card screen cannot be converted to PC.
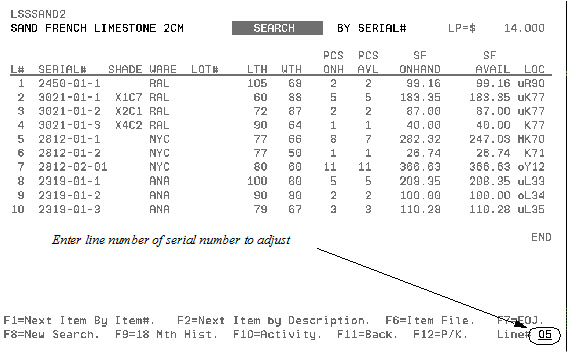
The screen below shows the serial numbers available for item LSSSAND2.
|
Enter a slab serial number, PC in the UM field and press Enter. In this situation, the system can display the exact unit of measure (SF to PC) conversion for the specified slab, and a history converted to PC.
|
As shown below, if no serial number is entered, but PC is still entered in the UM field, the system uses the unit of measure conversion factors from the Item File or the Packaging File. In this case, a factor of 60 SF or PC was found, which is merely an average slab/piece size. An average size can be useful when looking at history.
|
Natural stone slabs require special bar code labels due to their unique physical characteristics.
Set-up
The field, Designated Slab Printer ID, in the Warehouse File (FIL 8) designates the printer for the these bar code labels.
|
Note: The printer designated to print these labels, in this case P9, has to be able to print compact barcoded serial number tags.
Printing bar code labels for natural stone slabs
These labels can be printed from the following locations:
INV 11- Slabs Search & Re-Sizer has an option P = Print Serial Tag.
INB 2 - List Receipts (only receipts not yet posted) has an option under the serial number tags for the items in the pre-receipts file.
INB 3 - Print S/N Tags (for posted or unposted receipts) has an option to To Print Slab Serial# Tags On Bar Coded Labels.
On the Warehouse Menu (WAR), select option 9 - Print Warehouse Labels
— Select option 6. To print a Serial Number Label
— Select option 4 - To Print Slab Serial# Tags On Bar Coded Labels.
This “slab label” may be attached to the edge of each slab using an adhesive or special tack. The label includes four sections that may be removed separately using the perforated edges. The main (and largest) section remains on the slab even upon shipping. The other sections may be removed for scanning in an office, if you do not utilize Dancik’s Integrated Warehouse Management System (IWMS) or other RF features. The serial number of each slab is bar coded. This enables the label to be used for scanning the serial number into the Order Entry serial number field, after a particular slab is selected. The item number is also bar coded. Either bar code (item or serial number) may be scanned into any application.
Working with Slab Inventory in Navigator
Menu (WSM) for working with Slabs
Parameters for Working with Slabs in IWMS
Slab Balance Analysis & Update (WSM 20)
Slab Allocations on an RF Device
Slab inventory adjustment utilizing Inventory Adjustments By Item#
Inventory Adjustments for Slabs
Managing Slab Inventory - Individual vs. Bundles
How To Handle Slab Item Numbers
Pricing and packaging for slab orders - don't use PC in packaging file