Home > Output Distribution System (ODS)
Need more info or you couldn't find what you were looking for, let us know by sending an email to: support@dancik.com.
Output Distribution System Overview
Quick Reference - Setting up ODS Users
What you will need to post to web
What you will need for network folder address
How do I Set up ODS for sending Files to a PC
How to setup the Netserver with Client Access Express
Accessing ODS and the ODS menu
In a nutshell, Dancik’s Output Distribution System (ODS) takes any ordinary spooled file and lets you extract it from your AS/400 and distribute it in one of the following ways:
Fax
Network Folder
Internet
These methods allow for easy access to information by users who do not have access to your system, such as suppliers, outside salespeople or customers. It also gives you the ability to take a report and pull it into a text document so the data can be manipulated in a spreadsheet program such as Microsoft Excel.
ODS offers several time saving features and greater flexibility in information distribution. It helps to automate your communications with your customers and suppliers. The following are some of the things ODS can do for you:
You can automatically fax or email PO’s to your suppliers.
You can automatically fax or email Order Acknowledgements and Customer invoices to your customers.
You can generate customer price lists and automatically fax or email them to your customers.
You can run an “X by Y” sales report for all salespeople and parse out the applicable pages for each salesperson and post them to a website that only he or she can access.
You can manage the files in your output queues
You can split one report into multiple files based on page numbers
Quick Reference - Setting up ODS Users
Emailing
Set up the following:
WRKUSRPRF to create/copy new AS400 user profile
WRKDIRE table entry for new user profile
ODS 1 and ODS 4 access for the new user profile
SET 32 for the prompting of sending Order Acknowledgements
Faxing
In addition to the email set up, add the following:
GO FAX - options 2, then 1 to create new fax user profile
Optional
You may wish to review the following setup:
MNU 2 user profile setup
5769TBY - IBM Facsimile Support for AS/400 (or its equivalent)
4761 Integrated Analog Modem (or its equivalent)
Dedicated analog phone line
Note: Dancik International can configure your Fax support. Please contact Technical Services for a quote.
Server is included with OS/400
— SMTP
Dedicated internet connection (to distribute outside of LAN)
— DSL
— Frame Relay
— T1
Note: Dancik International offers consulting services for Internet support.
What you will need to post to Web
Server is included with OS/400
— HTTP
Dedicated internet connection (to distribute outside of LAN)
If you are posting to outside users, your ISP will need to add a DNS entry for your URL. Ex. www.yourcompany.com/ods
Note: Dancik International offers consulting services for Internet support.
What you will need for network folder access
5769XE1- AS/400 Client Access Express (or its equivalent)
AS/400 Operations Navigator
No license is required for Ops Navigator; it's free!
Netserver (Refer to How to setup the Netserver with Client Access Express)
How do I Set-up ODS for Sending Files to a PC
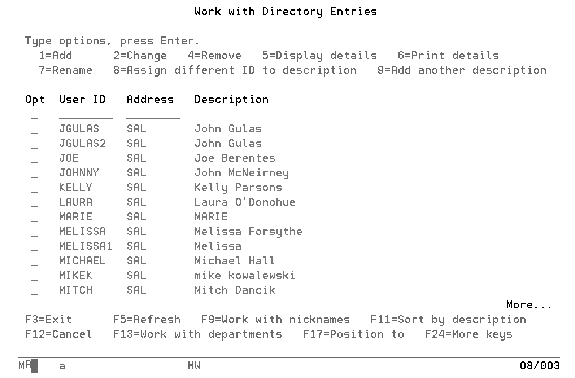
In order to use most ODS functions for distributing files outside of the AS/400, the user running the job must have an entry in the AS/400 Distribution Directory. To access this screen, type WRKDIRE at the command line.
Note: You must be signed on with a user profile that has *SECADM authority in order to access all directory entries.
To add an entry to the Distribution Directory, use option “1” to add and specify the user ID and system name then press Enter. Create the entry as shown below.

How to setup the Netserver with Client Access Express
Netserver is an AS/400 program that functions as a virtual file server. It allows you to manage your ODS files relatively easily. This is not a licensed program and is included with the purchase of your AS/400 system.
1. Start Operations Navigator
2. Click on the plus “+” sign beside your system name
3. Select Network
4. Select Servers
5. Double Click TCP/IP. The contents of the TCP/IP file are displayed in the left side of the screen.
6. Right click AS/400 Netserver and Select Properties from the dialog box that appears.
7. On the next dialog box that appears, click Next Start. The AS/400 NetServer General Next Start dialog box appears.
8. Make the following entries as shown above.
In the Server Name field, type NS<your system’s name>. For example, ours would be NSDOD400.
For Domain Name type the first three letters of your system's name, for example ours would be DOD.
In the Description field type Netserver.
9. Click OK twice to close the two open dialog boxes.
10. Right click AS/400 Netserver, and in the selection box that appears select Reset and Start.
11. The status should now say Started.
1. Start Operations Navigator.
2. Click on the “+” sign beside your system name.
3. Select Network.
4. Select Servers.
5. Double click TCP/IP.
6. Double click AS/400 Netserver
7. Click New.
8. Click File.
9. Enter a Share Name and Description.
10. Access should be Read/Write.
11. Maximum number of user should be “No Maximum”.
12. Beside Path name click the Browse button.
13. Select the folder you'd like to map and click OK.
This file, when configured, automatically provides communication information (phone numbers, fax numbers, e-mail address, etc.) into the sections of ODS where they are needed. Any accounts associated with invoices to be mailed or faxed must be properly set-up here.
1. Follow this path to get to the Phone Number File.
Access the Special System Maintenance Functions Menu (SYS) and select option 802.
Enter the password.
Note: The Phone Number file uses the same password as the Billto File.
2. Enter 802 in the selection line and press Enter to access the entry screen of the Phone Number File.
3. Enter either a customer account or supplier number.
Note: If you are unsure of the customer or supplier number enter a “?” and press Enter. A selection box appears that lists all the available numbers.
4. Enter an action code and press Enter. A Phone Number Maintenance screen for the customer appears.
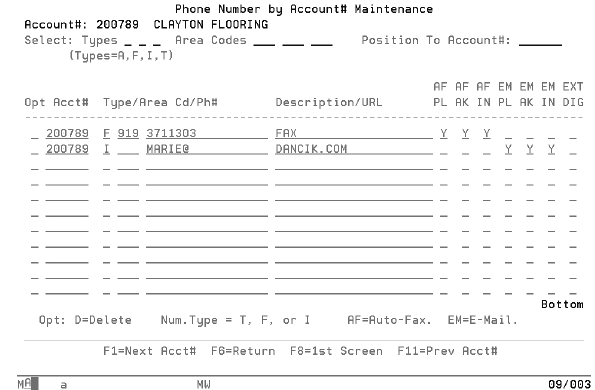
To grant auto-fax and auto-mail for price lists (PL), acknowledgements (AK), and invoices (IN) to an ODS user, enter a Y in the appropriate field.
The primary difference between the Customer and Supplier screens is that in the Customer version you can AutoFax (AF) or Email (EM) picklist, acknowledgements, and invoices, whereas on the supplier version you can send either a purchase order or acknowledgement by Autofax or Email.
Field Name |
Description/Instructions |
Opt |
The only option is D to delete a phone number. |
Account/Supplier Number |
Enter a valid account/supplier number. |
Number Type |
There are three communication types: T - telephone number F - fax number I - Internet/email address |
Area Code |
Specify area codes except for communication type T. |
Phone#/Email |
This is an alphanumeric field which accommodates different types of numbers. Do not insert spaces or punctuation in telephone or fax numbers. When entering email names, enter only prior to the URL. For example, joe@abc.com, enter joe@ in this field and abc.com in the URL field. |
Description/URL |
Optionally, you can enter a description of what the number represents. If it is an email address, then enter the URL here. |
Special Functions |
Enter Y to indicate that this phone number or e-mail address is the preferred recipient of the respective function. |
Extra Digit |
|
The next screen shows the relationship between the Phone Number File and ODS. It shows that when you choose to autofax or email the system retrieves the entries made in the Phone Number File. You can then decide whether or not to use them.
|
Note: For more information on how the Phone Number File interacts with ODS, refer to Distributing Documents.
The following are the two ways to access the ODS program.
Using the menu bars - If your user profile is configured to use the menu bars, press the Esc key to make them appear at the top of the screen.
Click on Operations to expose a pull down menu and then select Output Distribution.
|
From the ODS menu.
|
This ODS menu contains every option needed to run Output Distribution successfully. It is accessed via entering ODS on the selection line.
Note: Almost every option requires authorization to use in update or create mode.
Other Related ODS options - ODS 21, 22, 23
Why doesn't the ODS Email/Fax Screen appear in Order Entry when making a change via F6


