Need more info or you couldn't find what you were looking for, let us know by sending an email to: support@dancik.com.
Navigator AP Entry
Entering Invoices In Navigator Accounts Payable
Electronic Invoices in Navigator AP
Voiding an out of period Check
Manifest Reconciliation in Navigator Accounts Payable
Labor Reconciliation in Navigator Accounts Payable
Foreign Exchange in Navigator Accounts Payable
Future Payments in Navigator Accounts Payable
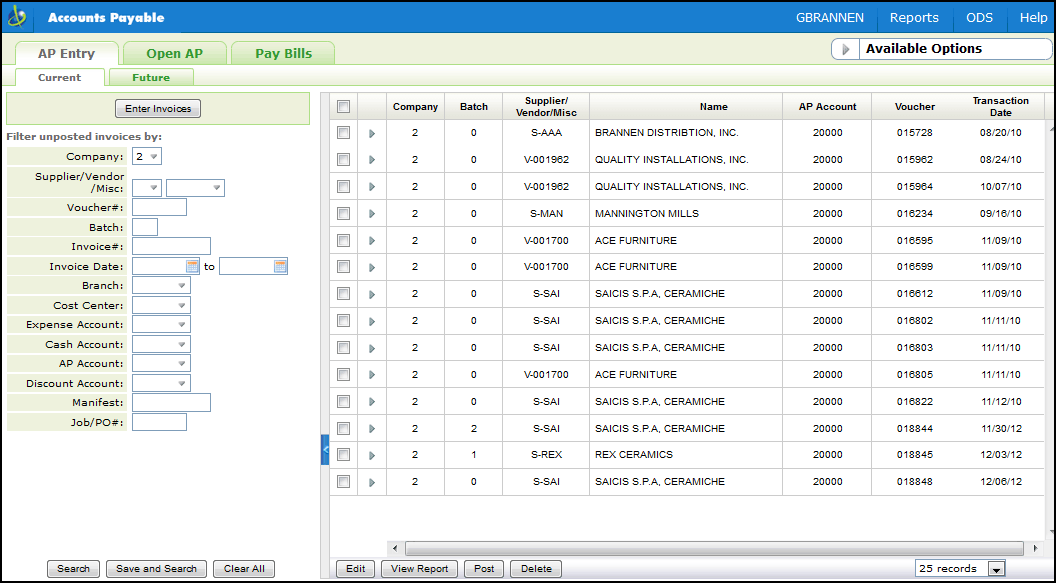
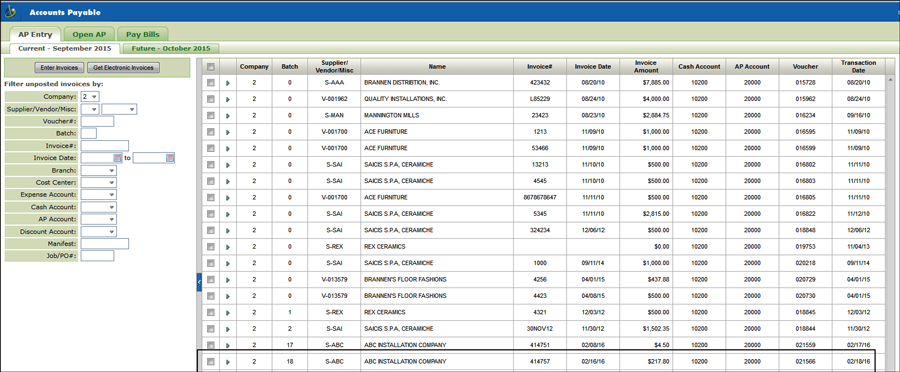
Use this tab to enter new invoices and inquiry on existing unposted invoices.
Use the filters on the left side of the window to narrow your search of unposted invoices.
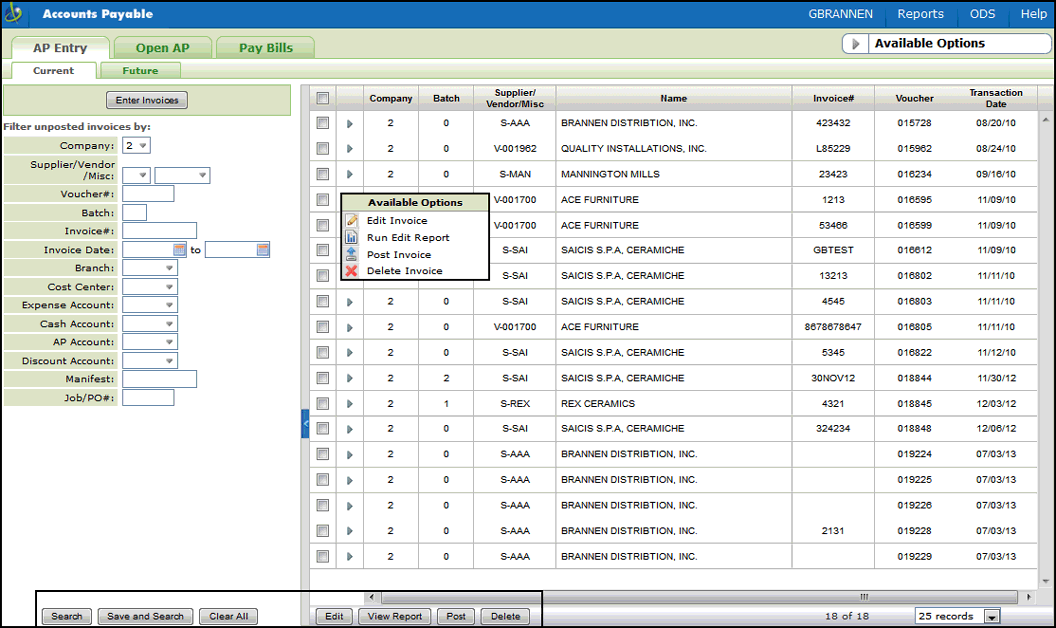
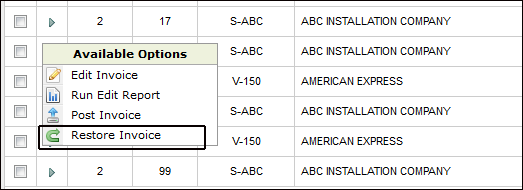
Available Options
The following functionality is available for individual invoices by clicking on the invoices's option arrow or for a selected group of invoices via the buttons at the bottom of the window.
Save and Search - This option allows you to save selected search results and then perform a second search. For example, you can search by a specific supplier and select invoices and save the results. You can then perform a second search by vendor and select invoices from that search. The action you perform next (Edit, Edit Report, Post, or Delete) affects all the selected invoices.
Note: The search results from the two searches are separated by a bar.
Edit - Accesses the AP Entry screen where the details of the invoices can be reviewed or changed.
View Report - Prints an edit listing of AP invoices. The edit will either issue a message, This Run Approved For Posting, or list the errors that prevent posting of the invoices. You need an approved edit before the system allows you to post.
An invoice is considered in balance if the amount debited to GL accounts is equal to the amount credited to GL accounts, and the full amount of each invoice was allocated to one or more expense accounts.
If all vouchered invoices on the edit are in balance, you can post the transactions. The message, This Run Approved For Posting, appears at the end of the edit.
Post - After running an approved edit, selecting this option adds the invoices to the Open AP Ledger File and to the Daily Transaction File and officially posts transactions to the AP ledger. After posting, you can access the invoices via option AP Ledger Inquiry.
Entering Invoices In Navigator Accounts Payable
1. From the AP Entry window, click Enter Invoices.
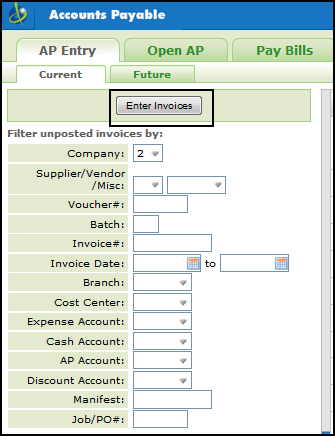
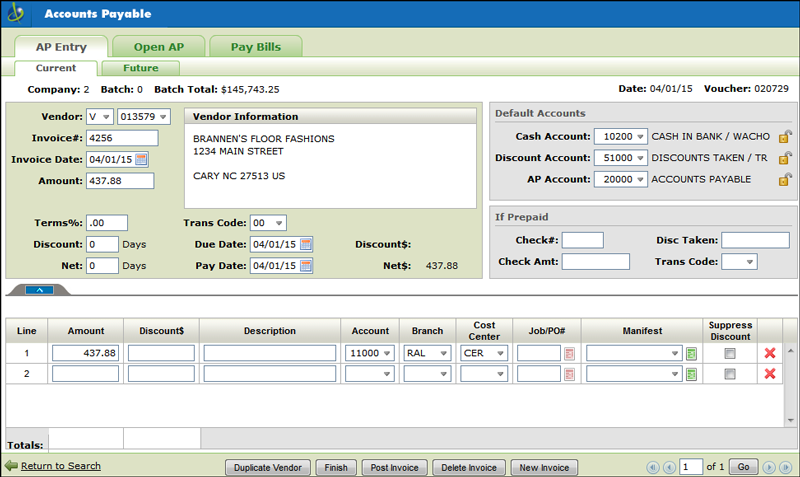
2. The Invoice Entry window appears. The only required fields are: Company, Vendor, Invoice# Invoice Date, Amount and one valid Line.
Note: The A/P & G/L Defaults Maintenance File (menu option ACT 109) contains the following settings that affect Navigator AP:
Default Branch & Cost Center in NAV AP Entry - directs the system to automatically import the default branch and cost center when entering AP transactions in Navigator.
Auto Fill Branch & Cost Center on invoice lines in NAV AP Entry - Activating this setting directs Navigator AP to insert the same cost center and branch entered on the previous line.
Enter the information as needed. For a detailed description of all the fields and setting in the Enter Invoices window, click here.
Use the fields at the bottom of the screen to enter the voucher payment information.
Note: For detailed descriptions of these payment settings click here.
3. After entering the invoice information, you have the following options:
Duplicate Vendor - Allows you to quickly start a new invoice for the same vendor or supplier by importing in the information such as vendor/supplier number, address, and default accounts.
Finish - This option returns you to the unposted invoices table where the invoice you just entered is displayed.
Post Invoice - This option moves the invoice(s) into open AP.
Delete Invoice - deletes the current voucher.
New Invoice - This option allows you to enter another invoice for a different vendor/supplier.
Electronic Invoices in Navigator AP
Electronic invoices can be received electronically, via CMS and EDI, in the Accounts Payable Navigator application.
Getting Electronic Invoices in Navigator
Inbound CMS Voucher Maintenance (menu option AP 12)
Prior to the introduction of this functionality in 2016, only invoices received via CMS were included in this file. Now invoices received via EDI are also included.
Since vouchers in Navigator are tied to a User (as opposed to a workstation on the green screen), the display was updated to include a User ID or a WS.
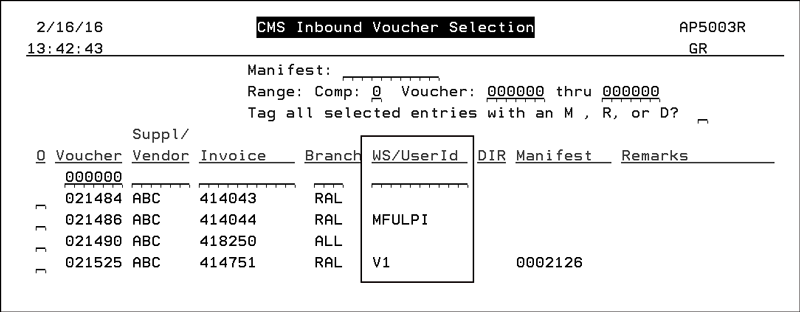
Note: There should never be a WS and User ID entry for the same invoice.
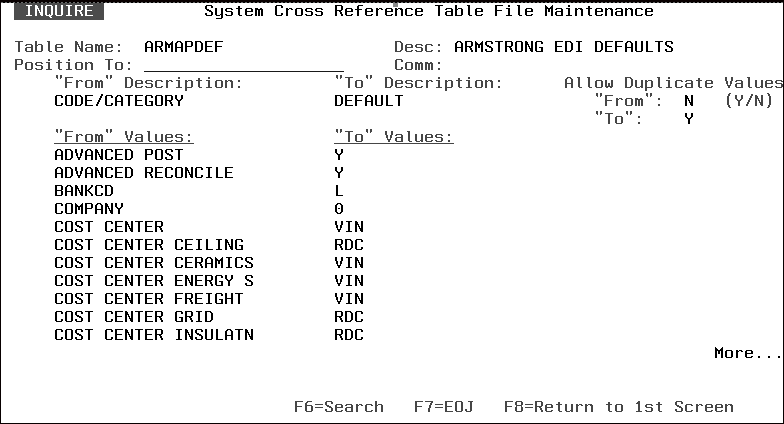
Armstrong EDI Defaults Tables (ARMAPDEF and ARMAPDEFDR)
Advanced Post - When set to “Y” EDI invoices (810s) are included in the Inbound CMS Voucher Maintenance (AP 12). If set to “N” the invoices are sent to the workstation identified in the table.
Advanced Reconcile - Set to “Y” to turn on reconciliation for inbound EDI (810) invoices
Getting Electronic Invoices in Navigator
1. Access Navigator Accounts Payable.
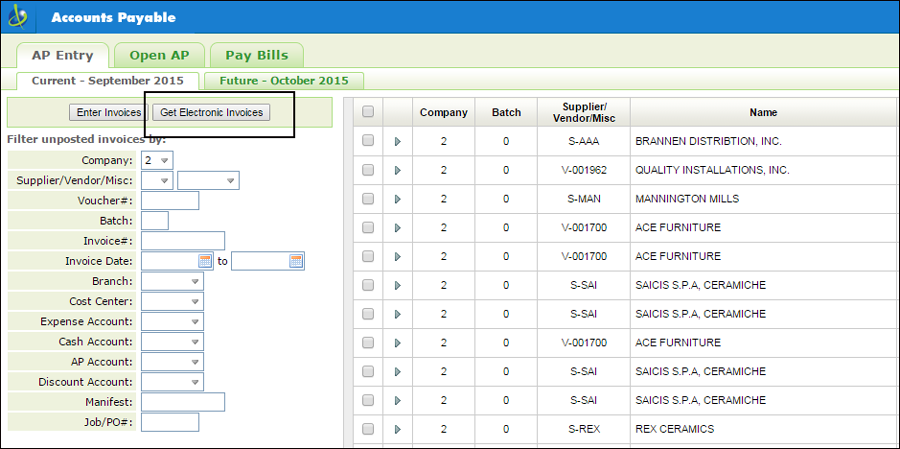
2. Click the button Get Electronic Invoices to open the Electronic Invoices window.
This screen contains vouchers that were created from an inbound Armstrong EDI 810 or a CMS 810 from any supplier.
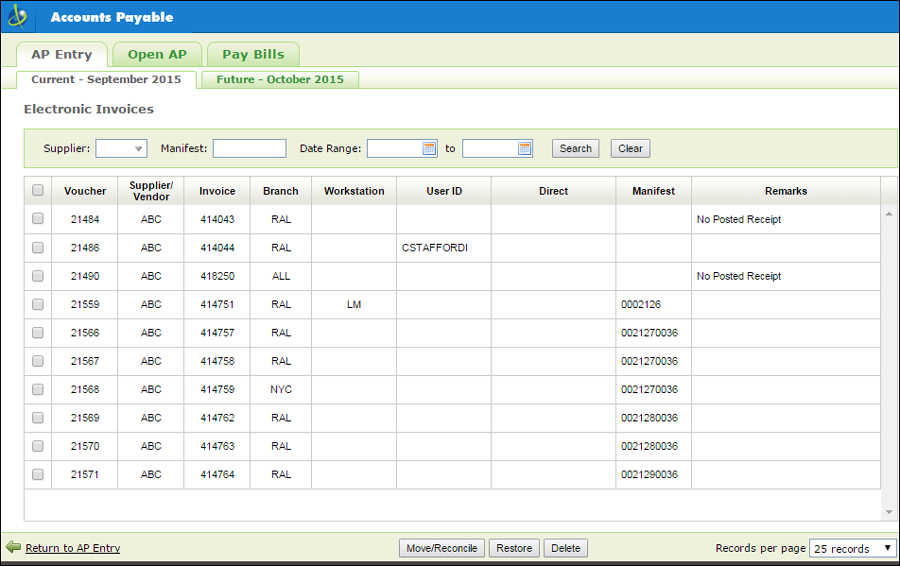
3. From the Electronic Invoices window a user can:
Move and Reconcile the selected vouchers to the user's AP invoice entry work area.
— Select an Invoice that is not already assigned to a user or workstation. The invoice gets assigned to the user or workstation selecting the invoice.
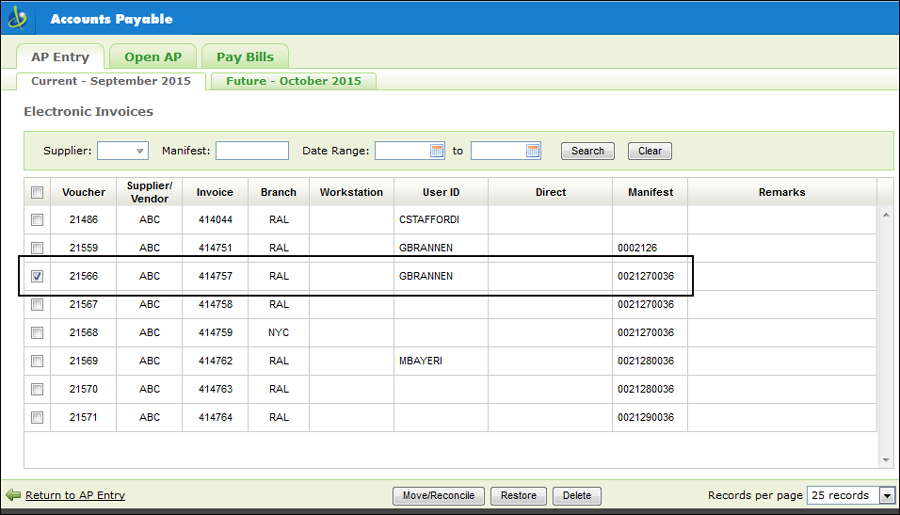
— When Move/Reconcile is clicked, the invoice gets moved over to the AP Entry area where it can be posted.
Note: Invoices cannot be moved if you have unposted entries in your workspace.
— It can also be restored via the Available Options; accessed via the option arrow to the left of the invoice.
— This moves the invoice back to the Electronic Invoices window; where the invoice can be held until it is ready for posting.
Restore - moves vouchers from a user or workstation AP Entry work area back into the Electronic Invoices window. This option can be used if the voucher/invoice needs to be looked at; for example it might not be reconciling.
Delete - If a voucher is assigned to either a User ID or Workstation it must be restored before it can be deleted.
When invoices come in a Reconciliation report is produced. The steps the system takes to produce the report are:
The system checks the CMS option Schedule Automatic Processing & Maintain Global Settings (menu option CMS 20) for the partner (supplier) to see if reconciliation is active.
If no partner is found in CMS 20, the system looks for the new settings in the Armstrong EDI Defaults Tables (SET 5 APDEF).
Invoices are reconciled to receipts.
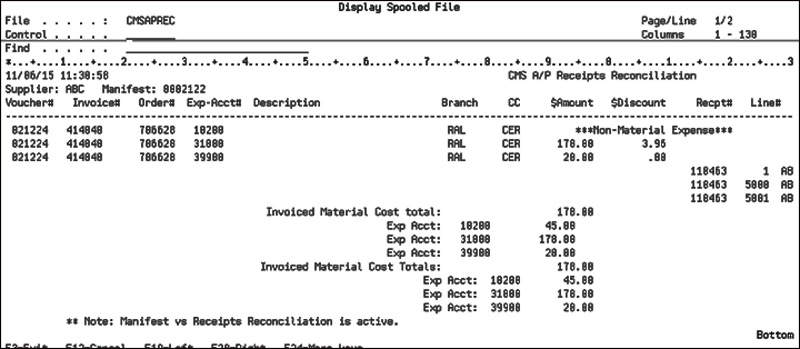
If the option Activate PO level reconciliation in the System Wide Setting - Options for Accounts Payable is active, the following information is added to the reconciliation report:
— Purchase Order Number
— Purchase Order Line Number
— Receipt Number
— Receipt Line Number
Voiding an out of period Check
1. Open an Enter Invoices screen and enter the vendor/supplier information for the check that needs to be voided. Make sure the amount of the invoice is entered as 0.00.
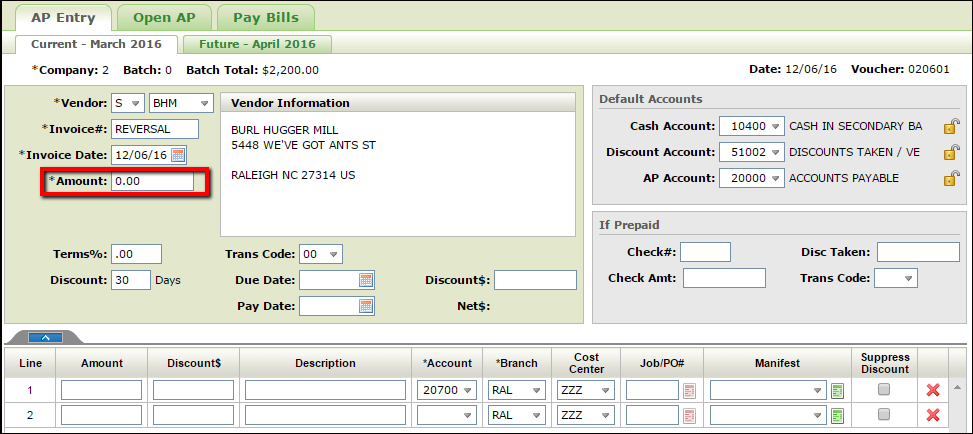
2 Once you tab out of the Amount field you will receive an error at the bottom of the screen telling you that the invoice amount and the line amount cannot both be zero. For the purposes of this process you can ignore the error completely.
3. In the If Prepaid portion of the window:
Enter the Check# that you want to void.
Enter the amount of the check as a negative in the Check Amt field.
Enter WN in the Trans Code field.
If a discount was taken on the original check, that discount amount will need to be put in as a negative in the Disc Taken field.
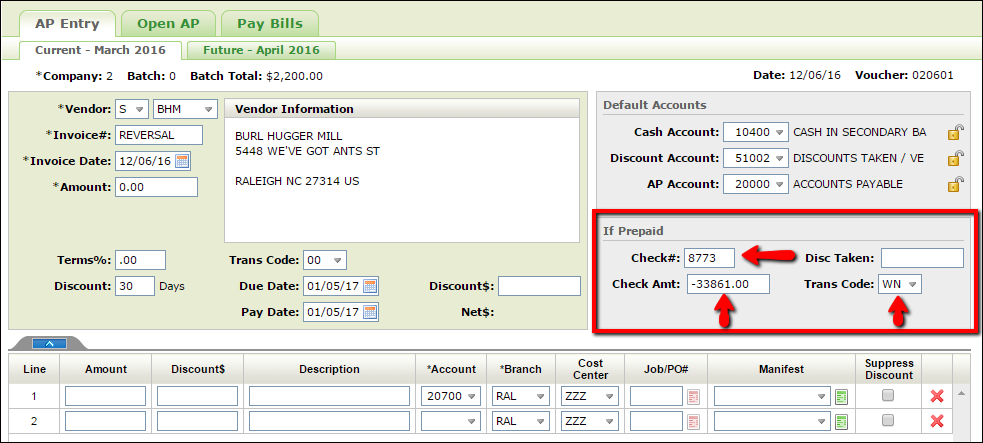
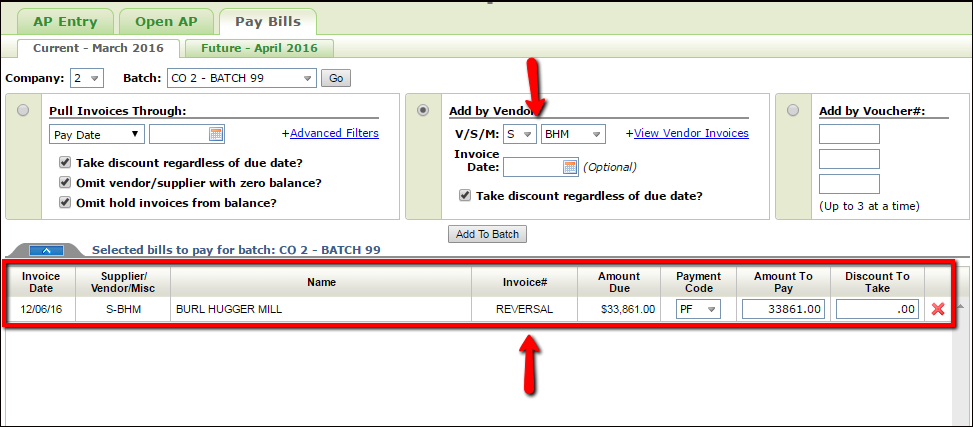
4 Tab out of the Trans Code field and the system will calculate. Now you can either click Finish so you can review the transaction or you can click Post Invoice. Once posted, the voucher used to void the check shows on the current month’s ledger and you can cut the check again. Note: that the invoice number you use when voiding the check will be the invoice number that is displayed when it is paid out again. Below is a screen shot of what appears when you go into Pay Bills for that vendor to re-cut the check.
5 Print Checks like you normally would and the system will take care of the rest.
Manifest Reconciliation in Navigator Accounts Payable
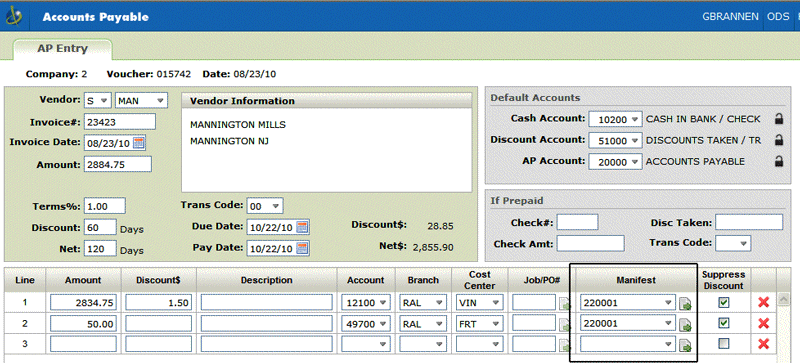
This functionality, accessed by clicking the icon next to the Manifest number when entering invoices, lets you compare the cost of inventory received against the amount you are being invoiced.
Note: Multiple manifests can be reconciled on one invoice.
Using Manifest Reconciliation to Reconcile AP and Receipts
ACT 7 - Chart Of Accounts File - Because only the material portion of the cost is reconciled, only GL accounts identified as purchasing accounts in Purchasing Account? field in the Chart of Accounts file (ACT 7) can be reconciled.
A/P & G/L Defaults Maintenance File - Allowable variance levels are set in the Accounts Payable & General Ledger Defaults (ACT 109) program.
1. Enter a manifest number or use the drop-down arrow to select one for the supplier.
2. Click the icon to the right of the Manifest number.
The AP Variance to Inventory Receipts window appears showing the variance between what was received on the manifest and what was billed to you.
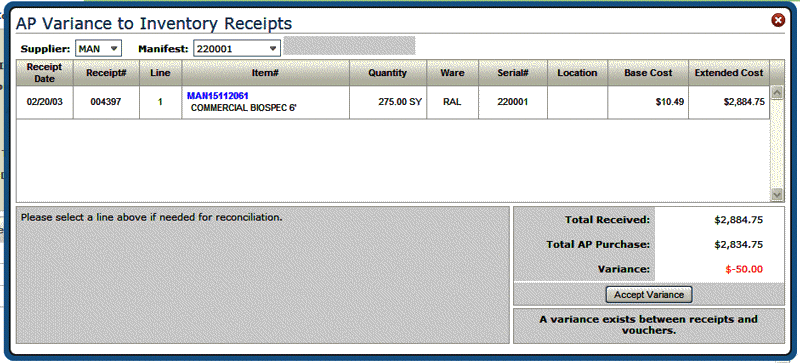
Use the Supplier box to select suppliers connected to the current supplier via the Supplier Cross Reference Table Maintenance (ACT 114). This allows you to check on manifests from suppliers who supplied the inventory and maybe not the invoice. (i.e. the invoice comes from a national headquarters, but the inventory and the manifest come from a regional distribution center.)
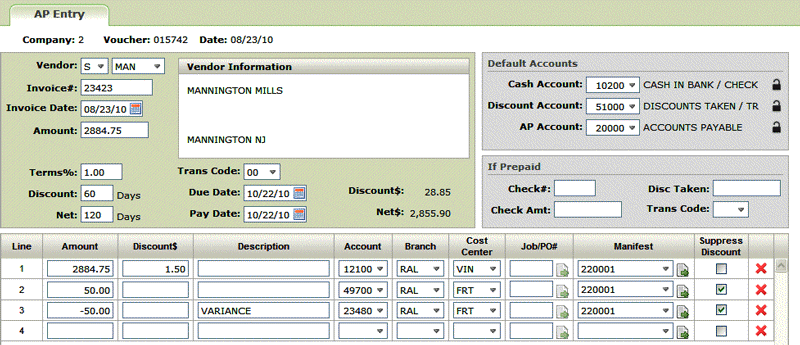
3. In this example, there is a 50 dollar variance that represents the freight cost. If this is acceptable, click Accept Variance. A new line is added to the invoice. The default GL account is 23480 for Inventory Clearing. This default can be changed as needed.
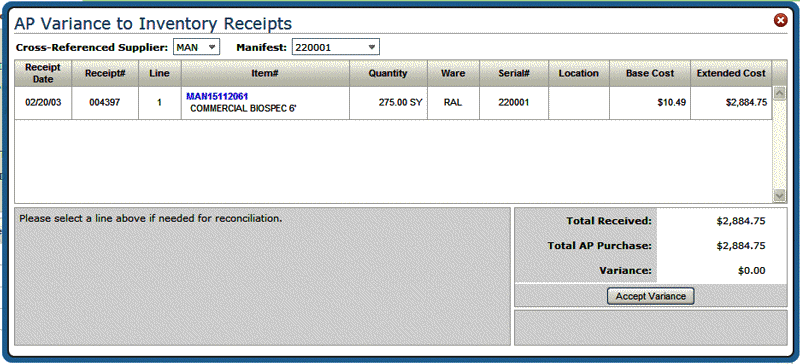
4. If you clicked on the Manifest Reconciliation icon now, the variance is zero.
If the variance is beyond the tolerable level, either the inventory was received at the incorrect cost or your supplier sent you an invoice for the wrong amount.
Using Manifest Reconciliation to Reconcile AP and Receipts
The AP Variance to Inventory Receipts window can also be used to make corrections to the Qty Received and the Base Cost. This can bring your invoices into balance with your receipts.
Note: Authorization to change quantities and cost is set in the User Control Panel.
Consider the following variance of $5.76.
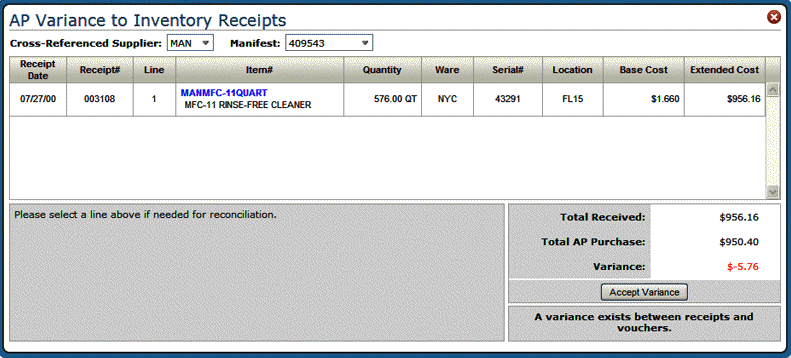
1. Click the item to display the following details.
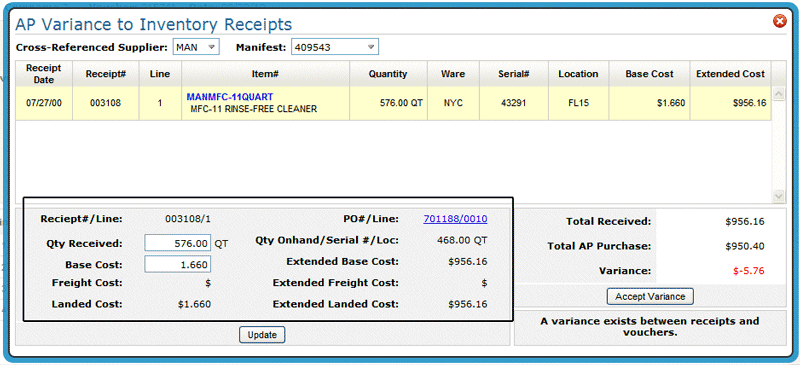
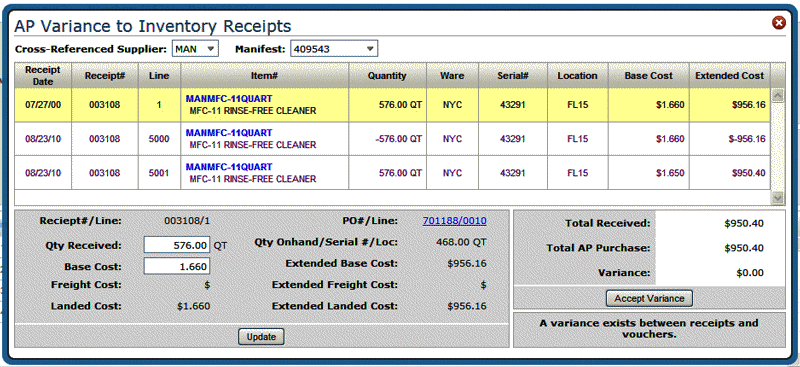
2. If the variance was due to a difference in the quantity received or a different base cost, enter the new quantity and/or base cost and click Update.
The window refreshes to show the new variance, if any, and two new lines. One deletes the old entry and the second adds the new information.
Labor Reconciliation in Navigator Accounts Payable
This functionality, accessed by clicking the icon next to the Job/PO# number when entering invoices, lets you compare the cost of labor entered on a purchase order against what is actually being billed.
Labor costs can be corrected directly from the AP Invoice entry screen. The customer order and labor lines on the purchase order are compared to what was billed to the labor costs on the order. If there is a variance, you can either accept the variance as an AP adjustment, or adjust the costs on the order.
Associated Files
Work With Teams (INS 2) - Installation teams have to be assigned to the company and vendor related to the invoice.
Reconciling Labor Costs
1. Take all the steps necessary to enter a new invoice (i.e., enter a vendor, invoice number, invoice amount, etc).
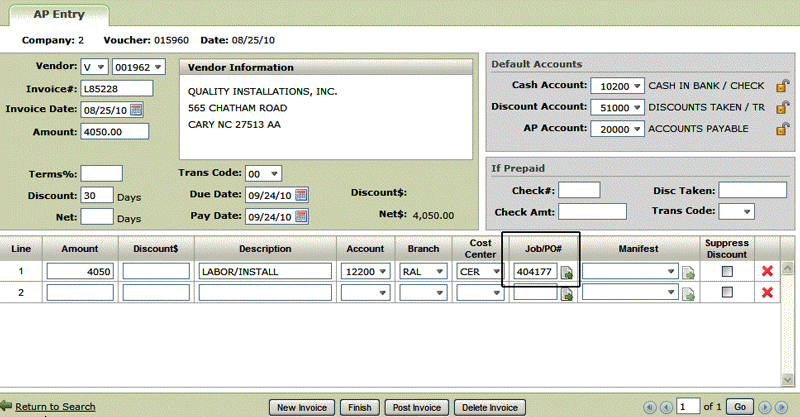
2 Enter a Job or PO number and click the icon to the right of the Job/PO# field.
The Labor Reconciliation and Order Inquiry window appears. In this example, there is a variance of $50 between what was purchased ($4,000) and what was billed ($4,050).
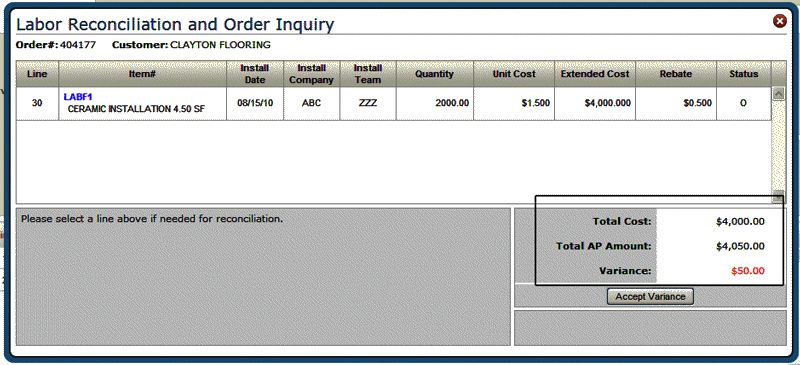
3. At this point you can:
Accept the variance which will add another line to the invoice.
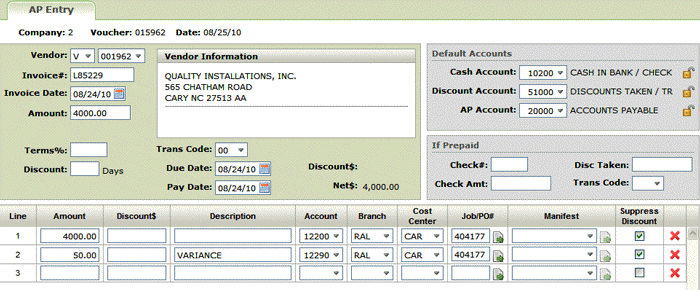
Change the labor costs to remove the variance
Click the labor item to display detail information.
Change the labor cost or rebate as needed to eliminate or reduce the variance.
Note: Changing the Rebate and the Unit Cost affects the total cost.
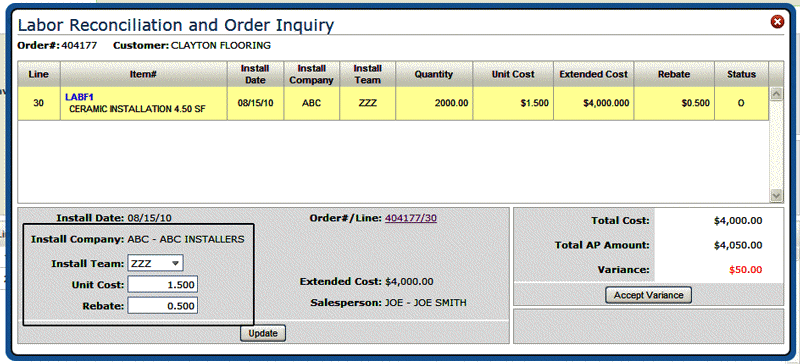
Using the example above, if the Unit Cost was changed to 1.525 the Total Cost would update to $4,000. Furthermore, changing the Rebate to .525 also reconciles the Total Cost to the Total AP Amount.
Change the Installation Team
Click the Install Team drop down arrow to access a listing of the available installation teams.
This option does not change any cost information. It allows you to change the installation team if needed.
Foreign Exchange in Navigator Accounts Payable
If the vendor or supplier is set up to use a foreign currency, A Foreign Exg button appears near the bottom of the window.
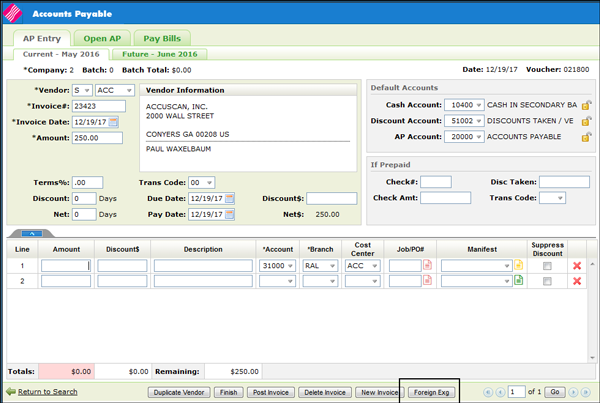
Click the Foreign Exg button to process invoices for this supplier in foreign currency.
When invoices are entered the foreign currency invoice amount, the exchange conversions and exchange account number are created automatically. The accounting entries are made to the correct accounts.
The exchange and account information appears at the bottom of the screen.
When you exit out of the payment line and the manifest reconciliation, the exchange is calculated and the differences are posted to the GL accounts set up in the Supplier or Vendor file for the Foreign Exchange Payable (FXP) and the Foreign Exchange Clearing (FXC).
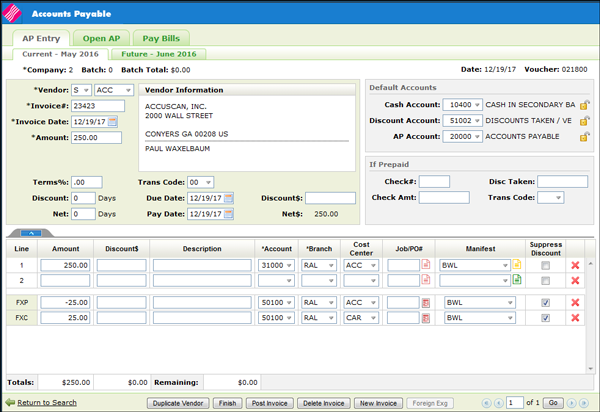
Notice that the Foreign Exg button is greyed out after it is clicked. It cannot be selected again.
Notes about the Foreign exchange calculations:
The lines that are for non-purchasing accounts have the amount on the line adjusted by the foreign exchange calculation.
The amounts on the lines that are for purchasing accounts are not changed.
FXP calculation – Sum amounts from all lines and multiply result by (1 - foreign exchange).
FXC calculation – Sum amounts from purchasing account lines and multiply result by (foreign exchange – 1).
Rounding - After the FXP/FXC lines have been written subtract the total from the invoice amount. If the result is within .05 tolerance add the result to the FXP amount resulting in total being equal to the invoice amount.
Currency Code Exchange Rate (Menu SET 11) - enter the foreign currency code and the exchange rate.
Supplier/Vendor Currency Code (Menu SET 12) - enter the supplier/vendor and their related currency code. This file is company specific so each supplier/vendor has to be set up for each company.
Supplier File and (Vendor File) - Make sure the country code is entered in the country field in order for the system to recognize that this is a foreign supplier/vendor. The following fields, located in the Template section, are also related to foreign exchange:
Invoice Amount in foreign currency
Default Exchange Payable Account
Default Exchange Clearing Account
AP & GL Default Maintenance (Menu ACT 109) - Enter a Y in the default description for the exchange payable entry. (System will automatically enter a description of exchange clearing. If “N” is entered, no description will be displayed.).
Future Payments in Navigator Accounts Payable
The Future tab allows you to view transactions one month into the future. Having a “futures” capability allows you to keep the current month open until all invoices have been received, instead of closing it immediately at the end of the month. As soon as you close the current month’s AP, the future transactions show as current. This functionality can help during End-of Month processes when one month is not completely closed out, but information is starting to be entered for the upcoming month.
Enter, Edit, and Post Future AP Transactions
The steps for posting Future transactions are the same as for posting current transactions. However future transactions do not post to the current month, but rather to the next month, as soon as End-of-Month Close is performed.
Future Open Payables Maintenance
Use the Open AP tab to perform various maintenance functions to future transactions. For example, you can: hold vendor invoices from being paid, release held vendor invoices, update/correct certain information for open payables items, record post manual checks issued against open payable items, void/Reverse checks, reverse open payable items.
Paying Future Bills
Use the Pay Bills tab to select invoices to pay from the current open payables and open future invoices, or select only future invoices.
If a current voucher was paid in the future month, this voucher would not be selected if you try to pay it in the current month through Select Bills to Pay By Company or Vendor Option. You can override this by going through the manual check option.
You can reverse or update checks written in future months only through option Future Open Payables Maintenance on the Accounts Payable Future Month Menu (menu option APF 8 on the green screen).