|
Need more info or you couldn't find what you were looking for, let us know by sending an email to: support@dancik.com.
Inventory Cycle Counts - INV 7
Recommended Cycle Count Procedures
Inventory Cycle Counts is a series of programs that enable you to perform complete physical inventory count by warehouse, and cycle counts on specific or random groups of items.
There are two methods for performing cycle counts.
Option 1 - The original method accessed from both the Warehouse and Inventory Control Menu.
Note: For more information, refer to Option 1 - Original Method.
Option 2 - Introduced in 2007 and is accessed via the Cycle Count menu (CYC). This is the recommended method of cycling counting for the following reasons:
— The programs on this menu are all warehouse specific. This means that you will not receive warning messages when multiple warehouse are accessing the same programs at the same time.
— This version always generates tickets and uses the “frozen file” concept. Therefore, there are no questions regarding tickets & frozen files.
— Two reports are included: Variance Report - sorted by variance, only showing variances and Print Tickets for Recount - based on Variance
— If the IWMS 8-character flag is on, both the 4 and 8 character locations show.
— This version issues warnings if you have started a count and not posted that count before you start a new count.
Recommended Cycle Count Procedures
The following information is provided as a guideline only. It outlines the recommended procedures for a cycle count or complete physical inventory.
Run Report and Freeze the File
Fixing Inventory In An Emergency
Handling Found Items (Items/Tickets that are found but are not on the listings)
Allow Added Tickets In Frozen File Cycle Count System To Retain Accurate Costs
Miscellaneous Cycle Count Advice
Run Report & “Freeze” the File
Note: The Cycle Count should be run as close to the actual count as possible, so the count sheets represent the inventory at the time the count was taken.
1. Option 7 - Cycle Counts on Inventory Control Menu.
2. Option E – Print Select Items To Count.
3. Sort Option 3 – By Location (or option #2 if bin locations are not used).
4. Versions 3 or 4 – Complete Versions.
5. All products – Press Enter.
6. Enter a warehouse – Run 1 warehouse at a time.
7. Enter ALL – All bins or locations, or specific locations.
8. Enter Y to omit items with zero onhand (keeps report shorter and cleaner).
9. Enter 3 to print in pick UM (Cartons plus Pieces) or 1 for native UM (SF).
10. Enter 2 to NOT OMIT discontinued items.
11. Enter 1 (for version that shows quantities), or 3 (for both versions).
12. Enter to skip 1, 2, or 3 lines between entries (leaves room for handwritten counts).
13. Answer question regarding skipping to new page for each location.
14. Enter Y to assign ticket numbers.
15. Enter Y to create a “Frozen File”.
Note: Not all of the available report options are listed above.
1. Option 7 on Inventory Control Menu.
2. Option A – enter tickets.
3. You can enter the ticket number only, and the item and count screen appears. You can also assign batch numbers, so reports are generated by batch number.
4. Enter the count – in any units of measure. Enter zero as 0.00 SF. A zero count is valid.
5. After you press Enter, press F1 to go to the next ticket number.
1. Option 7 on Inventory Control Menu.
2. Option B – List the count.
3. Enter your warehouse.
4. Enter option 1, 2, 3, or 4 (report selection). Option 4 runs all reports.
5. Enter Batch ALL, unless you are using the batch# feature.
6. Enter P (frozen file option).
7. If choice of A or B is displayed for the variance report, enter A.
Each warehouse is posted separately. Before posting, make sure you have run the variance report (report option 3 as described above), and accepted the figures. Continue to update tickets and rerun reports until satisfied. You should not key in ticket entries or perform other cycle count tasks on the system during the posting process.
1. Option 7 on Inventory Control Menu (only after you have approved the variance report).
2. Option C – post count.
3. Enter your warehouse.
4. Enter P (frozen file option).
5. Enter password (ALLOW, or the actual password, if set up).
6. Enter Y to proceed.
7. Counts are posted for the warehouse.
Fixing Inventory In An “Emergency
In case someone accidentally posts a cycle count before entries are made or reviewed, you can have incorrect inventory balances for the items included in the count. This potentially zeros out the warehouse for all items included in the count. The Cycle Count Reversal Program (SYS 801) deletes all adjustment records created by the cycle count, reversing the effect of the cycle count.
Handling “Found Items” (Items/Tickets that are found, but are not on the listings)
Enter “Found Items” on a separate list, and then key them as inventory receipts or adjustments after the counts are posted. This leaves the cycle count as a closed set. Alternately, you can add tickets to the count, by using any span of ticket numbers not currently assigned to the count. When you add a ticket, enter the item number, warehouse, and other applicable fields using option A – Enter Cycle Count Tickets. This method allows you to have a single posting and variance, including found items. This method does not allow you to assign new costs. The average cost for each “found” item at that warehouse is used.
Allow Added Tickets In “Frozen File” Cycle Count System To Retain Accurate Costs
When you add a new ticket to a “frozen file” cycle count, the program automatically checks for other tickets with the same item, warehouse and serial number. If another ticket is found matching this criteria, the cost from that ticket is utilized instead of the last cost. This allows “adds” without any loss of inventory value accuracy. This is often the case when a serial number is simply in the wrong location.
Based on the item number, serial number, and warehouse, the program accesses the cycle counted file and locates all matching records (location is ignored).
If no tickets with the same item number, serial number, and warehouse are found, the program will function as normal utilizing the last cost since no other cost had been found.
If only one ticket has been found, then the cost from that ticket is used on the manually entered ticket.
When multiple tickets are found with matching item number, serial number, and warehouse, the system will use the cost from the ticket with the largest quantity.
Note: The new cost will not appear on the entry screen. You will only see the new cost on the list of the physical inventory count report or if you go back in and review the entered ticket.
Miscellaneous Cycle Count Advice
Use Cycle Count Option G to clear cycle count files before you start a new cycle count, or run cycle count reports (option B) to see if any unposted tickets exist.
Use Cycle Count Option G to delete a range of cycle count tickets in an otherwise usable batch.
When cycle count “frozen files” are created, a unique range of ticket numbers is assigned to each warehouse. You can delete or manipulate a single warehouse via a range of ticket numbers.
Always use the “frozen file” option.
When cycle counts are “frozen”, do not allow other inventory adjustments or other cycle counts to take place until the frozen count is updated.
Your cycle count procedures need to be approved by your accounting department or an outside auditing company, and by your inventory managers.
Run a negative inventory report prior to a cycle count in order to clean up invalid records.
Run a negative inventory report after a cycle count in order to find count updates in which allocated inventory was not counted or found. If allocated inventory is not counted, inventory can go into negative numbers.
Make sure all personnel involved in the counting or reconciling processes understand all figures and options on the cycle count screens and reports.
When you enter the program from menu option INV 7, the following screen appears.
|
Note: You can use option C to update items that have been measured. This provides a concise quantity. Refer to Updating Serial Number Status for more information.
Note: Options D and E have an option for you to define and display four different units of measure of the cycle count sheets. Refer to Defining Units of Measure on a Cycle Count form for more information.
Enter or Change Physical Inventory Count Tickets
Post New Physical Inventory Count to Inventory Files
Assigning Batch Numbers to Ticket Number Spans
Delete All or Selected Cycle Count Tickets
Cycle counts/physical inventory records are stored by ticket numbers in a file that can be created using option A (user creates the ticket number individually) or created automatically with option E. Option E prints the report used for counting and can automatically create or add to a file of ticket numbers referred to as frozen file. The term frozen file is used because the quantities onhand are frozen at their current value when the file is created. Therefore, all regular processing invoices, receipts, and so on can resume while the count is reconciled. New activity does not affect the frozen file. When the cycle count is posted, the variance posted is the variance between the frozen quantities and the quantities counted. Even when using the frozen file, make sure that your physical count is done prior to starting new activity, or make sure that new activity is not reflected in your count entries.
The normal sequence of events when using the frozen file is:
1. Run option E report and create the frozen file.
2. Physically count inventory.
3. Resume normal activity.
4. Enter counted quantities.
5. Reconcile and post.
Complete physical inventory is performed by first using option E to print listing and assign ticket numbers. After physical count is done, use option A to enter the counts; option B to list and analyze counts; and option C to post completed and approved counts. You can return to option A to correct or add counts and rerun option B as often as necessary. Options B and C list all uncounted items, as well as counted items. Option C zeros all uncounted items and posts the new counts for items that were counted. Reports highlight missing tickets, compare to batch totals and show all variances between new counts and existing balances. Separate counts are maintained for each warehouse.
Cycle counts are performed by first using option E to list select item numbers, or option D to list random item numbers. Use option A to enter counts; use option B to list and analyze counts; and option C to post completed and approved counts. Before running option C, you can go back to options A and B as many times as necessary. Option C posts new counts only for the items entered in option A.
You can also perform cycle counts by using option E to list select items/warehouses and simply keying adjustments with code C for the items that have variances. You can enter adjustments via the Inventory Adjustments program or via the Inventory Inquiry update option. If you use this method, then do not have the system assign ticket numbers when running the report.
This is the Cycle Count Ticket File Entry Program. The ticket file is either entered completely, or created using the create frozen file option within option E. You should have already ran the report options D or E before requesting this option.
If you used option E to assign ticket numbers and created a frozen file, then you need to enter the assigned ticket numbers only. The item number, warehouse, and so on are retrieved automatically. You can organize counts by breaking up the report into batches such as 10 pages per batch. In that case, the batch number should be entered with the ticket number on this screen. If you have not created a frozen file, then you must enter the ticket number, item number, and warehouse on this screen.
1. Select Option A to display the following screen.
|
Following is a description of the fields on the above screen.
Field Name |
Description/Instructions |
Enter Ticket Number |
Enter the number of the inventory ticket for the item. You can assign ticket numbers, use pre-printed tickets, or use option E to have Cycle Count program assign the ticket numbers. If you have created a frozen file of ticket numbers using option E, then you need only enter the ticket number, and optionally a batch number and a hash total on this screen. If you did not create the frozen file, then you will need to enter the item number and warehouse. |
Enter Item Number |
Enter the item number you have counted. Enter the item number only if you did not create a frozen file of assigned ticket numbers. |
Enter Batch Number |
Enter the batch number that was cycle counted. This field is optional. You can assign batch numbers to groups of tickets or pages of the cycle count listings. These batches can then be entered and analyzed separately. |
Enter Warehouse# |
Enter the warehouse number from which the item was cycle counted. Enter the warehouse only if you did not create a frozen file of assign ticket numbers. |
Enter Hash Total/Qty |
This field is optional. However, for control purposes, if you enter the total units in the batch, the system compares the total units entered with this batch total. To compute the total units, simply add the quantities counted, regardless of what unit of measure they were counted in. For example, 10 SF plus 20 CT plus 30 EA equals a hash total quantity of 60. |
Prefill Quantities? |
This option applies to cycle counts performed using the frozen file option. When you enter Y for this option, the next screen of this program displays the quantity onhand from the frozen file as the default quantity counted. If the physical count agrees with this quantity, you can simply press Enter to accept this quantity and F1 to display the next ticket. Using this method, you need only enter quantities when there is a variance from the original quantity. |
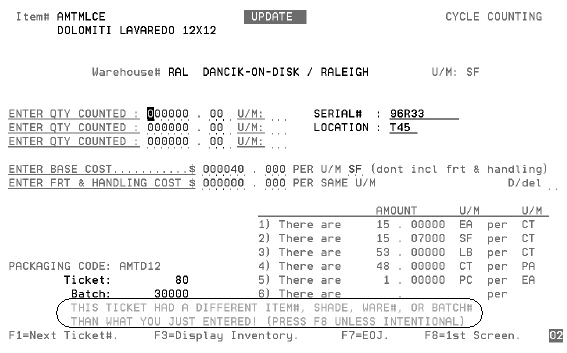
2. Enter the necessary information and press Enter. The next screen to appear enables you to enter the quantities counted.
|
Costs and conversion factors are also displayed.
3. Press F1 to display the next ticket number in the file. F1 is valid only if you have created a frozen file, or if you are reviewing or updating previously entered ticket numbers.
Following is a description of the fields on the Cycle Count Update screen.
Field Name |
Description/Instructions |
Enter Qty Counted |
Enter the exact quantity counted for the particular item number. There are three fields for you to enter the quantities for different unit of measure, if applicable. For example, you can enter 2 PA, 5 CT, 11 PC and the program converts to native unit of measure and total the three quantities. The cycle count listings reflect both the converted quantity and the quantities as originally entered. |
U/M |
Enter the unit of measure in which the item was counted. |
Base Cost |
This is the current base cost, not including freight and handling cost of the item. For display purposes only. |
Per U/M |
This is the native unit of measure in which the base cost is calculated. For display purposes only. |
Frt and Handling Costs |
This is the freight cost of the item. For display purposes only. |
Serial# |
This field displays and must be completed for serial number items. If frozen file was created, it is displayed automatically when you access the ticket number. If frozen file is used, do not change the serial number, even if different. In that case, enter quantity counted as zero and enter new ticket with the new serial number. |
Location |
This field displays for serial number items and should be completed with the location unless you do not track by location. For non-serial number items, three warehouse location fields display. Non-serial number items use these three fields to define the permanent or usual locations for the item. These may be changed by overriding them on this screen. Your data base administrator should define these items as serial numbers if you do not have permanent locations for an item and you need to track separate quantities per location. If you created a frozen file, the location fields display when you access a ticket number. For serial number items, do not change a location. If the serial number is not found at the location, you would simply leave the quantity counted as zero which would remove that quantity from that location. If you find the serial number at another location, add a new ticket number with the quantity, serial number, and new location. Normally, physical inventory is done by location. Use the report from option E to notate what was counted for each ticket number listed, and you would add items found at each location that were not listed on the report. This method has the effects of changing the locations of all items that were not counted in their expected location. |
4. Press Enter after completing all the relevant fields.
5. Press F7 to go back to the main cycle menu. Select Option B to list physical inventory counts. Listings can be by ticket number, by batch number, and by item number.
6. Enter the warehouse code you want to list, press Enter. The next screen lets you enter one of the four following options:
— Enter 1 to list physical inventory count by ticket number -
— Enter 2 to list physical inventory count by batch number/ticket number. - These reports are used to reconcile with the report used for counting.
— Enter 3, to list physical inventory count by mfgr/item number/serial number - This report groups all tickets for same item number/serial number together and shows variances between the counts and the computer's onhand quantities.
— Enter 4 to run all 3 of the above listings - Select this option the first time you use this program to view all available reports.
7. Select an option,. and press Enter. On the next screen to appear, enter a specific branch number or ALL to include all branches.
8. The next screen in the process lets you tell the system if a partial or complete inventory was done.
9. The default value is P, which lists all of the ticket numbers currently in the cycle count file. C prints a list of all items/serial numbers without ticket numbers. C should rarely be used since the recommended method of performing a complete physical inventory count is to create a frozen file. Enter C or P and press Enter.
10. The system processes inventory tickets.
Note: A Cycle Count Variance Report shows warning messages under any counts resulting in available inventory becoming negative. This commonly occurs when an allocated inventory record cannot be found, or has a short count. When the cycle count is posted, the onhand is reduced below the quantity allocated, causing negative availability. If the order is then invoiced, prior to the situation being rectified, it results in a negative onhand quantity. The warnings on the variance reports allow you to resolve these issues during or immediately after processing the cycle count.
Post New Physical Inventory Count to Inventory Files
Select option C only when a count for a warehouse has been completely reconciled. This option posts the quantity and value variances to inventory using the AC code adjustment for cycle count.
1. The first screen to appear when Option C is selected lets you enter a three character warehouse number that you want to post the files for. Enter a warehouse number and press Enter.
2. The next screen lets you choose between a partial or complete inventory. Enter C or P and press Enter.
Note: When a quantity is entered against an inventory record which is status L (lost), the L status is automatically removed when the count is posted.
The cycle count program can update serial number status codes with “M” for “measured”. This status enables the Inventory Selection Optimizer (ISO) and operators using the system to recognize a measured quantity when inquiring about or placing an order for material.
Answering the appropriate prompt during the cycle count posting process results in serial number status updates.
Note: Even if this option is activated, any user-defined inventory status codes that are already assigned to serial numbers are not changed to a status of M. Only serial numbers that have no status code or certain system defined status codes are updated.
1. This feature is accessed via cycle count option C - to post new physical inventory count to inventory files (This option is selected only after you have completed the cycle count entries and verified the cycle count reports).
2. A series of screens will allow you to do the following:
Enter the warehouse where the cycle count will post.
Select a partial or complete cycle count.
3. The following screen, Cycle Count Posting Options, allows you to choose whether or not you want to update the inventory status codes to show that inventory has been cycle counted.
|
4. To enable the system to automatically update serial numbered inventory, enter a Y in the applicable field (For Rolled Goods and/or For All Other Items).
As noted on the screen, only the following status codes are overridden by this program and updated to the measured status code of M:
blank (no status code assigned)
L - Lost (if successfully cycle counted, lost serial numbers are assumed to be no longer lost)
m - was measured, but one order has been allocated since the measurement
o - open roll or bundle (applies to rolls and slabs only)
u - unopened roll or bundle (applies to rolls and slabs only)
5. Press Enter to continue with the new cycle count posting.
6. When an inventory inquiry is run for serial numbered items, as shown below, the status code is updated to M.
|
7. Notice that the status code for serial number 91396412 did not update to status M. The present status code I is not one of the system defined codes that may be overridden by the M.
When any activity (i.e., some of the inventory gets ordered or shipped) affects a serial number that is updated to the M status, the status code automatically changes to a lower case “m”. This informs the system and everyone involved in inventory management that the inventory level has changed and may not be an exact measured quantity any more.
This option, accessed through option D, lets you generate a randomly developed list of items to cycle count. You can pinpoint a warehouse and choose to limit the list to one manufacturer or include them all.
Print Select Items to Count (Cycle count Option E)
Option E lets you customize the configuration of an item stock listing. When this option is selected, you are given the following report configuration options:
Item Stock Locations List and Count Sheets - Lets you decide what information displays on the listing.
Listing version - You can choose from four (regular, expanded, complete with POs, and complete without the POs) configuration options.
Item Selection - You can narrow your listing by any of 23 parameters that range from MFGR to QTY BRK GRP. You can also leave all the fields blank to include everything on the item listing.
Warehouse and Company
Location Codes - You can enter up to 5 four character location codes or enter ALL to include all the locations in the specified warehouse.
Omit inventory records - Saves time by skipping over inventory records if there is no inventory on hand.
Unit of Measure Display - You can choose to use the items native UM or the UM that shows in Order Entry or on Sales materials or on Pick list.
Discontinued Items - There are four options that range from not displaying discontinued items to only showing discontinued items.
Count Quantities - You can choose not to display inventory quantities. This allows you to use this listing as a count sheet.
Freeze File Creation - Frozen cycle count file means the onhand of all items in the system are saved. Any invoicing or adjustments that affect the onhand after this step will not affect this file. If you are taking the option to create a frozen file and also assign ticket numbers, then after your count, you can go to option K and enter just the ticket numbers and leaving all other information on the first screen blank.
If you do not create the Frozen Cycle Count File, then the onhand quantities for all items in the system are not saved. If you assign ticket numbers and not create the frozen file, then after your count, if you go to option A you must enter in the item number, warehouse and ticket number.
Defining Units of Measure on a Cycle Count form
This option on the cycle count reports allows you to define and display four different units of measure.
1. After selecting option E - to print select items to count, the system runs you through a series of screens that allow you to do the following:
Choose how the tickets are listed.
Choose a report format.
Decide the status codes to omit from the cycle count.
Select items to be counted.
Select a warehouse and locations for the count.
Omit or include items based on 0 quantity onhand.
Choose the unit of measure to use (native, shipping, sales, pick).
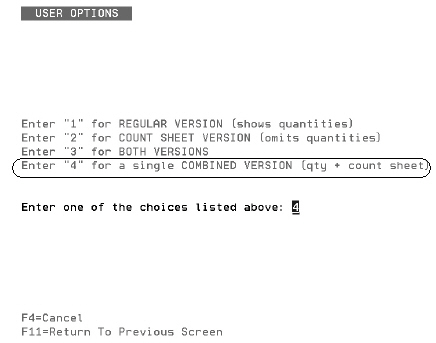
Include or omit discontinued items.
2. When you get to the following screen, select option 4 - for a single COMBINED VERSION (qty + count sheet). This version combines features of the regular version and the count sheet version, and offers a special option to define column headings for the people who will perform the counts.
|
3. When option 4 is entered, the following screen appears.
|
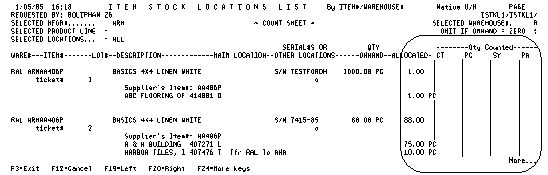
4. Enter the units of measure you want to appear as headings on the report, using up to five characters per U/M (such as CTNS, ROLLS, SF, etc.) and press Enter.
5. If you are using an option that includes working with locations, another screen appears that gives you five report configuration options. You may have the report skip to a new page based upon your coding scheme for bin locations.
|
The units of measure entered appear on the cycle count sheet.
|
Option F assigns batch numbers to tickets in a cycle count “frozen file”. Afterwards, cycle count reports can be printed by batch number for easier reconciliation. Update several spans of ticket numbers on a single screen.
1. Select option F. The following screen appears.
|
2. Enter the first and last ticket numbers within a range of tickets to be updated in the From Ticket# and To Ticket# fields.
3. Enter the batch number to be assigned to the range of ticket numbers in the Batch# to Assign. The tickets are updated with this batch number.
4. Enter Y in the Update If Batch# Not Zero field if you want to override batch numbers that may already be assigned to the selected ticket span. Enter N if you only want to update tickets without an assigned batch number.
5. After making the changes, press Enter. A message appears to the right of the Update Batch Not Zero field that lets you know the tickets were successfully transferred.
6. When you access the Cycle Count Ticket Entry Screen for any changed tickets (Option A), a message appears, alerting you to the changes.
|
Possible causes of this message include:
The ticket is in a different batch number. This can happen if you press F1 for “next ticket” when displaying or updating a specific batch number and the ticket is in a different batch number.
When you have entered a ticket number and other information on the first screen (such as a batch or item number), and the ticket is actually for a different batch or item number.
Delete All or Selected Cycle Count Tickets
Option G allows you to delete or select tickets from a single cycle count.
Enter 1 to delete a span of ticket numbers. You are prompted for a span of tickets. Use this option if you are only deleting a single warehouse’s tickets, or specific tickets in a warehouse.
Enter 2 to clear all currently open (unposted) cycle counts, for all warehouses.
Note: The Cycle Count Reversal Program (SYS 801) deletes all adjustment records created by the cycle count, reversing the effect of the cycle count. This program should be run only by system administrators.
A customized option is available for companies who utilize a third party to perform cycle counts. This is applicable only to small branches that carry products not requiring the following features:
Inventory by serial numbers or shades, other than default serial numbers.
Inventory by random bin locations (as opposed to fixed locations per item)
The process works as follows:
1. A “frozen” cycle count file is created on the system as usual, but the system’s count sheets are not used.
2. The third party cycle count company counts using only item numbers and quantities.
3. The third party cycle count data is stored in the devices the third party utilizes to gather the data.
4. The cycle count data is uploaded to your system and compared to the “frozen” file created for the cycle count.
5. The special upload program analyzes the data from the third-party system and determines what serial numbers and locations (if any are used on the host system) should be matched with the quantities counted. The logic used is based on the dates of the “frozen” cycle count serial numbers and locations, as well as the quantities.
6. At this point, the regular cycle count system is used, and the information can be edited, listed, reconciled, and posted as usual.
Note: If you are interested in this process, the third-party cycle count company must submit their file layouts to Dancik International for the customization of this process to their file structures and to be quoted and programmed.
System Wide Setting - Options for Cycle Counts
Performing a Cycle Count with an RF Device
Cycle Count Error Message - Conflicting Inventory Program is Running Now Error
Cycle Count_- Summary totals on List Physical Inventory Count - What do they mean?
Can we reprint the cycle count report? We lost the report, and don’t know what’s been frozen
How to cycle count and bin locate at the same time
Differences in Cycle Count Variance Report in Cycle Count Posting Report
Cycle Count created negative inventory
Credit/No Return on a Cycle Count Ticket
How to check for duplicate cycle count tickets
Cycle Count variance sheet - how to see the different in value and not quantity