
Need more info or you couldn't find what you were looking for, let us know by sending an email to: support@dancik.com.
Build-A-Container
Printing_Container_Worksheets_-_BLD_3
Converting_Container_Worksheets_Into_Purchase_Orders_-_BLD_4
Converting_Purchase_Orders_Into_Container_Worksheets_-_BLD_5
Updating_Standard_Costs_-_BLD_6
Changing_Container_Exchange_Rates_-_BLD_7
Performing_an_Open_Order_File_Search_-_BLD_8
Build-A-Container is a special purchasing and importing system for distributors who purchase material from their suppliers by the shipping container, train carload, or truckload. The term container is used generally to mean whatever shipping vehicle you use.
Interfaces with the Purchasing System to affect inventory and other statistics.
Can be used separately as an ordering, receiving, and costing spreadsheet.
A combination order entry/spreadsheet program.
Converts your ordering quantities into as many as four additional units of measure.
Calculates what portion of a container you have filled with your order.
The cost of your order (including freight and other importing and handling costs) is automatically calculated in dollars and another currency of your choice.
Prints a worksheet to verify entries or make changes.
Converts containers into purchase orders.
Turns existing open purchase orders into container spreadsheets.
Enables you to do product costing just prior to receipt.
Combines multiple purchase orders and multiple suppliers on a single spreadsheet.
You can use the Build-A-Container system in many different ways.
The most obvious is as a one-time purchase orders system, but another is to enter a container order to be used as a template for all repeated future orders.
You can also use its spreadsheet capabilities to compute precise landed costs per unit of each item on the order. As freight bills and other expenses related to the order are received, you can update the spreadsheet. When the shipment arrives, your receiving department can use the updated spreadsheet (referred to as Container Worksheet) to assign new landed costs, to verify the order in various units of measure, such as cartons, square feet, square meters, or pallets).
As you use it, you will learn how to apply this program to your own purchasing situation. The flexibility of the system lends itself to creative and unique solutions.
Before using the Build-A-Container system, make sure with your system administrator that your screen is set to 27 x 132.
Use menu option BLD to access the Build-A-Container Menu.
Conversions Additional Data Screen
Working with Purchase Orders and Worksheets in Build-A-Container
Entering a Container - An Example
1. On the Build-A-container Menu, type 1 and press Enter.
2. Enter the company and supplier number.
3. Press Enter. The program initializes the container, and displays the main entry screen.
Note: Leave the Reference# field blank. The program assigns a reference number.
4. To end the program and return to the menu, press F7.
To work with an existing container
1. Enter the reference number of the container.
2. Press Enter.
Note: Press F6 to conduct a Container Search.
3. The program retrieves your container, and displays the main entry screen where you can enter the details of your container order.

4. On the Build-A-Container Main Entry Screen, for each item you want to include, enter an item number, quantity, and unit of measure in the appropriate columns of each line. When you have filled in the necessary items, or all of the lines on the page, press Enter.
As you enter your container, the program calculates the total cost and optionally converts the quantity ordered on each line up to as many as four additional units measure. You can enter these optional units of measure in the five U/M fields in the column headings on the right side of the screen. You can enter any unit of measure for which the system has conversion factors.
Note: All items on the system can have up to six U/M conversions. They should have been entered into the Item Master file and/or Packaging file before using the Build-A-Container system.
The U/M field on the far right always contains CO for percent of whole containers. This column shows the percentage of a whole container you have filled. It is important to note that the term container is used generically to represent a weight, volume, or quantity limit. Therefore, you can use the CO column for any type of vehicle load, such as truckload or carload.
You can use the F1 – Conversion/Additional Data screen to see the conversion factors for each item and to enter additional conversion factors, such as Pounds per Container or Cubic Feet per Container. Each unit of measure code that you enter into a column heading will cause the program to convert each quantity into that unit of measure and to display it in that column. A total for each column is also shown. You can also enter any of the four special column codes, which define columns as follows:
B$ – Causes the Extended Base Cost to appear. (Qty x Unit Base Cost for each line item.)
L$ – Causes the Extended Landed Cost to appear (Qty x Unit Landed Cost for each line item.) Unit Landed Cost consists of Unit Base Cost and Unit Freight cost).
F$ – Causes the Extended Freight Cost to appear (Qty x Unit Freight for each line item).
LP$ – Causes a suggested new List Price to be calculated and displayed. (This entry is only valid if a Markup% or a target GP% is entered on the conversions/Additional Data Screen).
5. You can also enter freight, duty, and handling charges for the container in the fields on the lower left-hand side of the screen. The program calculates the new freight cost per unit for each item on the container and computes the new freight cost per unit by allocating the total freight and handling charges to each item. The allocation is performed as follows:
Duty%, Miscellaneous $, Broker fees, and Miscellaneous% are allocated according to the value of each item on the container(s).
All other charges (ocean freight, terminal charges, and inbound freight) are allocated according to the relative weight of each item.
All of the fields are entered in dollars, except Duty% and Miscellaneous%, which are entered as a percentage of total container costs. The program calculates the dollars.
6. The program converts all the total and freight amounts into the currency of your choice. To do this, you must first enter a currency conversion on the Conversions/Additional Data Screen. The currency conversion must be from the initials of the country to $$. For example, to convert from your currency to Italian lira at a conversion rate of 2,246 you would enter “1330.00000 LR per $$” in the conversions for this container on the Conversions/Additional Data Screen, and enter LR in the currency field on the main entry screen.
Note: For more information about entering conversions for this container, see Using Conversions/Additional Data Screen.
The fields that comprise the Build-A-Container, Main Entry Screen are described in the following table.
Field |
Description |
Line |
A program-generated number. Six lines are on each page. Use F10 and F11 to display additional pages. |
Item Number |
Entry field for the item number to be ordered. It consists of four sub-fields. The first three comprise the actual item number (MFG., Color, Pattern) and the fourth (four-character field) is the lot number. In general, lot numbers would not be specified when purchasing, but that option is provided. |
Quantity |
Entry field for the quantity ordered. It is required on the line if an item number has been entered. |
U/M |
Entry field for the unit of measure of the quantity ordered. It is required on the line if an item has been entered. |
Standard Base Cost & U/M |
The standard base cost and unit of measure for each item number, retrieved from the Item Master or Cost File. Not an entry field, but its value can be changed by using override base costs (For more information, see the section on Overriding Base Costs). Standard base cost is managed by the purchasing department. It is the cost of materials only. It does not include the freight and handling portion cost. Note: Although you can override standard costs on the Container Screen, it does not affect the standard cost in the Item Master File and/or Cost File. The standard cost in these files can only be changed by using the File Maintenance programs or by using option 6 on the Build-A-Container Menu (Update Container’s Items’ Standard Costs). |
Standard Freight Cost |
This field displays the standard freight cost per unit of measure for each item number. They are retrieved from the Item Master File or Cost File. It is not an entry field and its value cannot be changed in this program. However, the next field (New Freight Cost) displays the new freight cost as calculated by the program. Standard freight cost is managed by the purchasing department. It can only be updated by using the Item and/or Cost File Maintenance programs, or by using option 6 on the Build-A-Container Menu. Freight cost is the cost of freight and handling only. (Freight Cost + Base Cost = Total Landed cost) |
New Freight Cost |
Displays the new freight costs for each item based on the portion of total container weight and value allocated to each item. Note: The new freight cost does not update the Item Master or Cost file, unless you use option 6 on the Build-A-Container Menu. The allocation of total freight and handling charges is based on Duty%, Ocean Freight, Terminal Charges, Broker Fees, Inbound Fees, Inbound Freight, and Misc fees. |
Currency |
Option entry field where a duty rate can be specified. For example, enter LI to represent lira. If a country conversion is entered on the F1 screen, values can be shown in either currency. |
Duty% |
Optional entry field where a duty rate can be specified. The program computes the duty amount, by multiplying total value ordered by the duty percent. The System Wide Setting Options for Build-A-Container provides you with the following three options for accessing duty rates:
|
Ocean Freight Terminal Charges Broker Inbound Freight |
Optional entry field where the various freight charges can be entered. |
Miscellaneous $ |
Optional entry field where a miscellaneous charge can be specified. |
Miscellaneous% |
Optional entry field where a miscellaneous percentage can be specified. The program computes the miscellaneous amount by multiplying the total value ordered by the miscellaneous %. |
U/M to convert to, or L$, B$, F$ fir Ext Costs |
Optional entry fields in which you can specify as many as four units of measure. You can also enter any of the following special codes in this field:
|
Total Base Cost |
Total cost of all items entered in this container. |
Total Freight and Handling |
Total calculated freight and miscellaneous charges of all items entered in this container. |
Total Container Cost |
Total of the base and freight cost. This total should match your invoices from the supplier. This includes base cost, freight cost, etc. |
Note: Duty%, Miscellaneous$, Broker fees and Miscellaneous% are allocated according to the value of each item on the container(s). All other charges (Ocean Freight, Terminal Charges and Inbound Freight) are allocated according to the relative weight of each item. All of the freight/handling fields are entered in dollars, except Duty and Miscellaneous%, which are entered as a percentage of total container cost, and the program calculates the dollars. These fields are on the lower left of the Container Screen.
Build-A-Container - Conversions/Additional Data Screen
This screen is accessed from the main Build-A-Container by pressing the F1 key. The Conversions/Additional Data Screen is used to:
Display the packaging information for the lines on the current page
Enter any additional conversions you need for this container, for example conversions, such as pounds/kilos per container.
Enter comments and additional purchasing data such as letter of credit number, warehouse number, warehouse ETA, port and port ETA.
Enter a conversion amount, a unit of measure, and a per unit of measure and press Enter. For example, to enter a conversion that specifies 10,000 kilograms per full container, you would enter 10000.00000 KG per CO.

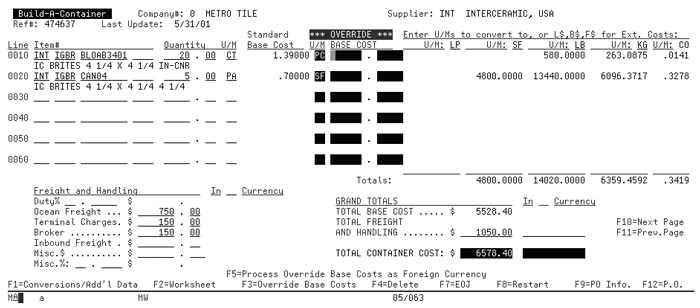
The screen shown above shows that on the current page of the container, line 0010 and line 0020 have been used and line 0030 – 0060 have not been used. The packaging information shown for lines 0010 and 0020 has been previously entered for those items, and any unit of measure shown can be used for the container worksheet. For example, quantities for line 0010 and 0020 can be expressed in PC, SF, LB, CT and PA.
On the bottom left of the screen, three addition conversions have been entered. The first entry 41000 LB per CO lets the program figure, by weight, the percentage of container filled, or the number of containers filled. The second entry 1330 LR per $$ gives the exchange rate between Italian lira and dollars. You must use $$ to indicate your home currency.
Note: In the US, $$ means US dollars; in Australia, $$ means Australian dollars.
The third entry 2.20459 LB per KG is the conversion between pounds per kilograms.
The fields on the Conversions/Additional Data screens are described in the following table.
Field |
Description |
Conversions For This Container |
If additional conversions are required to compute container costs and weight, enter that information here. To enter a conversion, enter a conversion amount, a unit of measure and a per unit of measure then press Enter. For example, to enter a conversion that specifies 10,000 kilograms per container, enter “10000.00000 KG per CO”. Another example, is to convert from your currency to another country’s currency. To convert to lira at a conversion rate of 1,350 you would enter 1350.00000IT per $$.). Note: If you enter a currency conversion here, then on Screen 1, you should enter the currency code (in this example, IT) in the Currency field. Then the costs you have entered for duty, freight, etc. and the total costs of materials are converted into IT currency. You can then compare your cost in IT currency against the supplier's invoice to see if amounts agree. Only by entering a currency percentage rate on this screen and the currency code in the In Currency field on the main screen can you enter costs in another country’s currency from one currency to another. When entering currency conversion rates use any two-character code to represent the country, but use only $$ to represent the currency. |
Comments |
Enter any comments you want to appear and to print on the Build-A-Container Worksheet. These comments are converted to F6 comment lines, if the worksheet is converted into a purchase order. |
Additional Purchasing Date |
|
Vessel |
If the container was built by converting purchase orders for a specific vessel, then that vessel name appears here. If lines from more than one vessel are used, then the message is VESSEL = MULTIPLE. Note: The vessel information is for reference purposes only. Manually updating the vessel from this screen does not affect purchase orders. |
L/C Number |
If you have a letter of credit number for this container, enter that number here. |
Warehouse |
Warehouse where the items on the container will be received. |
Warehouse ETA |
Enter the estimated date of arrival to the warehouse. You must enter it in YYMMDD format. For example, May 31, 1992 is entered as 920531. |
Port |
Enter the three-character code representing the port where the container will arrive. This is an optional entry. |
Port ETA |
Enter the estimated date of arrival of the container to the port of entry. You must enter it in YYMMDD format. For example, May 31, 1992 will be entered as 920531. This is an optional field. |
G.P.% |
Only applicable if you want the worksheet to calculate new list prices. Enter the gross profit % you want for each item. The program computes the list price that will deliver that G.P. % for each item. If you enter a percentage here, and you enter in LP on Screen 1 as a column heading U/M, the list price displays in that column. Note: Do not enter a markup % and a G.P. % if you enter both, the system accepts the G.P.% only. |
Markup% |
Only applicable if you want the worksheet to calculate new list prices. Enter the markup % you want to add to costs for computing new list prices for each item. If you enter a percentage here, and you enter in LP on Screen 1 as a column heading U/M, the list price will display in that column. Do not enter a markup % and a G.P.%. If you enter both, the system accepts the G.P.% only. Note: You must enter LP as a column heading U/M on the main screen in order for the system to use a G.P.% or markup%. |
Working with Purchase Orders and Worksheets in Build-A-Container
To create a worksheet for receiving or costing
To processing purchase orders and container worksheets for importing
1. On the Build-A-Container entry screen, complete the fields as necessary, such as item numbers, quantities, and costs.
2. Press F12 from Build-A-Container Screen and a purchase order edit is generated.
3. To edit the purchase order, enter option 1 – Enter Purchase Orders on the Purchase Orders menu (not the Build-A-Container menu). Use the reference number on the PO edit, instead of the reference number on the container.
4. To print actual purchase order, enter option 3 – Print Purchase Orders on the Purchase Orders Menu.
The purchase order is now independent of the container worksheet. You can update either the purchase order or the container worksheet without affecting the other. For example, you can update ETA dates and status of the purchase order. You can update the container entries if its spreadsheet is required to recost items because of changes, such as in freight charges or exchange rates.
When items are received, they can be costed using the costs from the purchase order or from the container worksheet—if the standard costs were updated using option 6 on the Build-A-Container menu— or overridden as you enter the receipt.
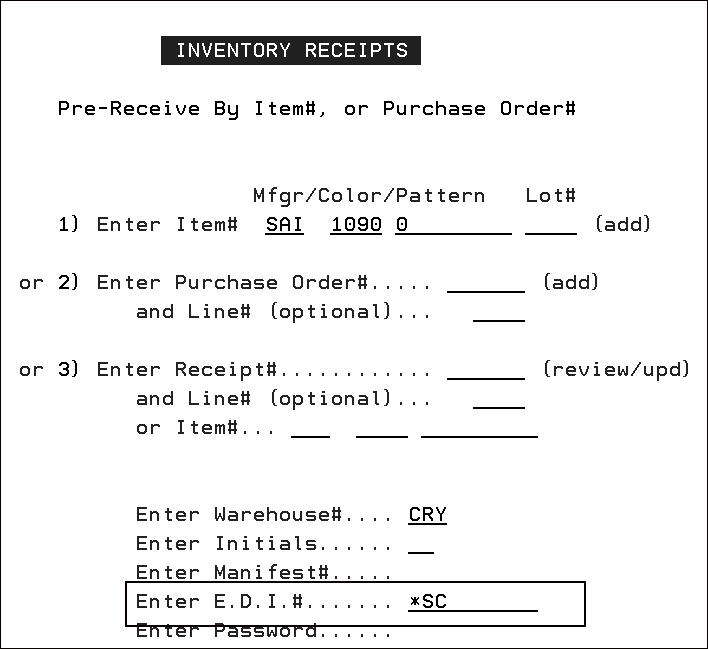
When receiving (using option 1 on the Pre-receipts menu):
Specifying *BC in the EDI# field uses the base cost from the purchase order and the standard freight cost from the Item Master File or Cost File.
Specifying *SC in the EDI# field uses the standard base cost and standard freight cost from the Item Master File of Cost File.
If you use option 6 to update the Item/Cost files with costs from the container, the SC code uses the latest container costs.
When receiving, the base cost, freight cost, or both, can be overridden on a line-by-line basis.
To create a worksheet for receiving or costing
1. On the Build-A-Container menu, enter option 5 – Convert POs into Containers to convert existing POs into a container worksheet.
2. Enter option 1 – Build-A-Container to add/delete/change information such as item numbers, costs, and quantities, until the container worksheet accurately reflects the incoming shipment. Entering information such as freight costs and duty, causes the program to calculate precise new landed costs per item.
3. On the Build-A-Container entry screen, press F2 – Worksheet to print a container worksheet. It will contain all the information you need for receiving, such as quantities and costs.
4. Enter option 6 – Update Container Items' Standard Costs to update your files with the new costs as calculated on the container worksheet. This can simplify the receiving process.
5. If costing information, such as freight, duty, and exchange rates, changes before receipt, you can use option 1 – Build-A-Container again to change and reprint worksheets, and use option 6 – Update Container Items' Standard Costs again to update the standard costs.
6. If you have used option 6 to update your files with the latest costs, then you can set the Receipts program to automatically use the new costs. Specifying *SC in the EDI# field uses the new standard base and freight costs. You can still override costs with receiving, if necessary.
To processing purchase orders and container worksheets for importing
This is the recommended procedure for processing purchase orders and container worksheets for importing.
1. Enter purchase orders as needed.
2. Update purchase orders with the latest status codes and ETA dates as soon as the information becomes available.
3. When your agent or supplier tells you which items are being shipped, update the status to T for only those items included on the container worksheets. You should also update the ETA at this time, and optionally update the vessel name.
4. Using option 5 – Convert PO's into Containers on the Build-A-Container Menu, convert only the items at the appropriate status or ETA date from the applicable purchase orders into container worksheets.
5. Use option 1 – Build-A-Container on the Build-A-Container Menu to adjust quantities, convert currency, and calculate landed costs for each item on the container.
6. Use option 7 – Change Container Exchange Rates on the Build-A-Container Menu to update landed costs if the exchange rate changes before arrival of the container.
7. Use option 6 – Update Container Items' Standard Costs on the Build-A-Container Menu to update standard costs based on the container spreadsheet.
8. Use the *SC in the EDI# field in the Pre-Receiving Program to receive at the new container costs.
When receiving by purchase order number, the Purchase Order Review/Selection Screen in the Receiving Entry Program now displays the status code. For example, the screen highlights purchase orders with a status of T, indicating in transit.
Entering a Container (example)
1. Select option 1 – BUILD-A-CONTAINER on the Build-A-Container menu.
2. On the next screen, enter a company, supplier and reference number. You do not need to enter a reference number, the system will automatically assigns one.
3. If you need to work with an existing container, you can enter its number. After entering the information press Enter to set up the worksheet. The following screen is the main Build-A-Container Worksheet Screen.

4. Press F1 and enter additional conversions as needed for this container. In the following example, three additional conversions functions were added.

Note: The third conversion (LB to KG) is automatically inserted. Leave this conversion as shown, even if you do not need to use it.
In the example shown above, 22000 LB per CO was entered. This lets the program compute, by weight, what percentage of a container has been filled, or how many containers have been filled.
Note: The top half of the screen does not display any information, because the item numbers have not yet been entered.
The 48% G.P. entered lets the program complete the list price (LP) column.
5. After entering the necessary information, press F1 to return to main entry screen.
6. Complete fields, such as item numbers, quantity, U/M, duty, freight, and broker fees. The total of the freight and handling charges is allocated among the items, and the new freight costs are calculated.
The following figure shows quantities expressed in LP, SF, LB, KG, and CO. Notice that the LP pricing for all items at a GP% of 48% as specified on the Additional Data/Conversions Screen.

In the example above, 34% of the container has been filled.
Note: The newly calculated freight costs appear under the existing (old) standard freight cost for each item.
7. You can press F1 to check conversion factors for all items on the main screen. Make sure that the packaging information for all the items on this container are correct. If you need to change the packaging information for any items, use option 11 – Packaging File on the File Maintenance Menu and/or option 2 – Item File on the File Maintenance Menu.

After you have entered item numbers on the main screen, the conversion factors from the Item and/or Packaging files appear. The conversions for each line item entered on the main entry screen appear.
8. Press F1 to return to main entry screen.
9. If you need to override any base costs, press F3. Enter the overridden cost in the highlighted area. You can enter the cost in any unit of measure. If you enter cost in a different U/M, also enter that U/M in the U/M field to the left of the cost overrides.
Note: If you enter the new costs in dollars, press Enter. If you enter the new costs in another currency, press F5.
The container search feature lets you to search through all of the container worksheets in the system by supplier number.
1. Select menu option 2 – Container Search from the Build-A-Container Menu.
2. When the selection screen appears, enter the supplier number you want to search for and press Enter. The system displays the container(s) on the system for that supplier.
If no containers for that supplier number are on the system, the program displays containers for the next supplier code on the system that has containers (alphabetically).
3. You can press Enter to see the next page of containers. To return to the previous page, press F11. To return to the selection screen, press F8.
4. When you have found the selected container reference number, press F6 to go directly to the Build-A-Container program, or press F7 to return to the menu.
Note: The Ref# field is the key to each container worksheet. The container ref number is used to access a container worksheet in all of the programs on the Build-A-Container Menu.
Printing Container Worksheets - BLD 3
You can use one of two ways to print a container worksheet. Printed container worksheets contain all of the information on the main container screen and additional information that cannot fit on the screen.
You can print the worksheet from the Build-A-Container screen or from the Build-A-Container menu.
1. On the Build-A-Container menu, select option 3 – Print Container Worksheets.
2. Enter the six-digit reference number and press Enter. Your worksheet request will be submitted to the job queue for processing.
Note: If you do not know the reference number, use the Container Search to search for it.
Build-A-Container worksheets show base costs in the currency for the country specified in the currency code. It also shows the converted base cost in the currency. This is particularly useful when you are entering another country’s currency unit costs into the Build-A-Container entry program. The worksheet shows both the foreign and domestic unit costs for each matching of the supplier invoices and foreign price lists.
Converting Container Worksheets Into Purchase Orders - BLD 4
You have two options for converting your container worksheets into purchase orders:
From the Build-A-Container entry screen
From the Build-A-Container menu.
To convert a container worksheet into a PO from the Build-A-Container entry screen
Press F12. You can then print the purchase order edit on regular stock paper.
Note: F12 converts the container worksheet into a purchase order edit, not a fully processed purchase order. Use the Purchase Orders Menu to modify and/or print actual purchase orders. After using F12, the container remains in the Build-A-Container file and can still be used to generate other purchase orders.
Important: The purchase order edit has a unique reference number, different from that of the container. Container worksheets always remain independent of purchase orders. Subsequent changes to a purchase order never affect the container worksheet, and subsequent changes to the container worksheet never affect the purchase order.
Note: After pressing F12, the container worksheet remains in the Build-A-Container File and can still be used to generate other purchase orders.
To convert a container worksheet into a PO from the Build-A-Container menu
1. On the Build-A-Container menu (BLD), Select option 4 - Convert Containers into POs.
2. Enter up to ten six-digit reference numbers, and press Enter. The container worksheets are converted into purchase orders, and each prints on stock paper.
3. You can then use the Enter Purchase Orders program to change or add to the purchase order, or you can use the Print Purchase Orders option to print actual purchase orders.
Concepts/Theory
Use the Purchase Orders Menu to modify and/or print actual purchase orders. The purchase order edit has its a unique reference number, which is different from that of the container worksheet. Container worksheets always remain independent of the purchase orders. Subsequent changes of a purchase order never affect the container worksheet and subsequent changes in the container worksheet never affect the purchase order.
Converting Purchase Orders Into Container Worksheets - BLD 5
Recommended Importing Procedures
The Build-A-Container system for importing includes the following features that make vessel information easier to convert to POs:
The ability to group purchase order lines with a common vessel name on a single container worksheet. You can create a container worksheet with all items on a vessel in one easy step.
The ability to see which vessel and purchase order each line on a container relates to.
1. On the Build-A-Container Menu, select option 5 – Convert POs into Containers. The Convert POs into Containers Screen appears.
|
2. Enter a vessel number to represent information that has been assigned to PO lines. You can use the PO status codes and ETA date restrictions in conjunction with a vessel name to narrow the data included in the container.
3. Press Enter to convert the lines matching these parameters into a container worksheet. All purchase order lines that meet the selection criteria are moved to the container file/worksheet.
4. When prompted, choose to run the container worksheet. The container worksheet now includes information on the PO and the vessel.
Note: All fields are optional. You can enter just a vessel or just a PO, or you can enter a vessel and a PO number to select only lines with both that vessel and PO. The Status codes and ETA Dates fields are always optional when entering a vessel name or purchase order number.
Recommended Importing Procedures
The recommended method for processing purchase orders and containers for importing is as follows:
1. Enter purchase orders as needed.
2. Update purchase orders with the latest status codes and ETA dates as soon as the information becomes available.
3. When your agent or supplier informs you of which items are being shipped, update the status to status code T for only those items included on the containers. You should also update the ETA at this time, and optionally update the vessel name.
4. Using option 5 on the Build-A-Container Menu, convert only the items at the desired status or ETA date from the applicable purchase orders into a container.
5. Use option 1 on the Build-A-Container Menu to adjust quantities, convert foreign currency, and calculate landed costs for each item on the container.
6. Use option 7 on the Build-A-Container Menu to update landed costs if the exchange rate changes prior to the arrival of the container.
7. Use option 6 on the Build-A-Container Menu to update standard costs based on the container spreadsheet.
8. Use the *SC option on the Receiving Program to receive at the new container costs.
Updating Standard Costs - BLD 6
This option updates the Item Master and cost files with the costs entered and/or computed by the Build-A-Container program.
1. On the main Build-A-Container menu (BLD), select option 6 – Update Container Items' Standard Costs.
2. For the Update the items’ Standard Base Costs also field, do one of the following:
To update Item Master and/or Cost files with new standard freight costs only, enter the container reference number and N. Only the standard freight cost (the freight portion of the costs) are updated. The Standard base cost is not updated.
To update Item Master and/or Cost Files with new standard freight costs and new standard base costs, enter the container reference number and Y. Both the standard base cost and standard freight costs are updated.
Note: Standard Last Cost (Synonymous with standard landed cost) = Standard Base Cost + Standard Freight Cost. The program checks to see if your standard costs are stored in the Cost File or Item File for each item and updated that file.
Using Standard Costs when Receiving Inventory
The *SC (standard cost) code can be used when receiving inventory via menu option INB 1. For example, to use standard costs instead of purchase order costs enter a *SC in the EDI field. Normally, the Inventory Receipts Program uses the cost that is contained in the purchase order as the default cost of the receipt. However, in certain cases, it may be preferable to use standard costs which are established in the Cost and Item File, instead of purchase order costs.
Changing Container Exchange Rates - BLD 7
Use this option to change your exchange rate for a particular container without going through the Container Entry Screen.
1. On the Build-A-Container menu, select option 7 – Change container Exchange Rates.
2. On the next screen, enter the container reference number and exchange rate.
|
You can also select options to update and/or print the container worksheet.
Performing an Open Order File Search - BLD 8
You can use this option to search on a variety of parameters to find open orders and purchase orders.
On the main Build-A-Container menu (BLD), select option 8 – Open Order & PO file Inquiry & Search.
The Order File Search and Inquiry screen appears.
Field |
Description |
Search by ORDER# |
Enter an order number to view entire order. |
Search by ORDER # REF# |
Enter an order reference number to view order with that reference number. |
Search by ACCOUNT # |
Enter an account number to view orders for that account. You can press F13 to find a customer; then enter X and F21 to return here. Enter a company number and account number 00001 for POs, or Acct# 0002 for transfers. |
Search by ITEM# |
Enter a complete item number to search all orders for that manufacturer or item. You can press F15 to find an item number. Enter X and F21 to return here. |
Search by CUST PO# |
Enter all or part of a customer purchase order number to list all orders with that customer purchase order number. |
Search by JOB NAME |
Enter all or part of a job name to list all orders with that job name. |
Search by MESSAGE |
Enter the beginning of an F6 message to list all F6 lines that begin with that message. |
Date |
Enter dates to limit the search to a date range. |
Ware# |
Enter a warehouse number or leave blank to see orders for all warehouses. |
Open Order Only |
Enter Y for “open orders only” to limit the search to orders/lines that are currently open. Enter N to see invoiced and cancelled orders. |
Order Type / Status |
Put cursor on Order Type/Status and press HELP to see list of types and status codes. |
View# |
This field controls the columns on the order review screen. Enter ? for a list of views. |
Note: Enter CTRLUSER on the command line to customize Date, Open Orders Only, and View# settings for each user.
To search for a customer press F13.
Build-A-Container and 2 of the same items at different costs

