File Maintenance Options
Work with Room Types and Room Areas (SSM 10 and SSM 11)
Selection Sheet Manager - Work with References (SSM 12)
Selection Sheet Manager - Work with Detail Information (SSM 13)
Selection Sheet Manager - Work With Dates (SSM 14)
Work with Room Types and Room Areas (SSM 10 and SSM 11)
Option 10 - Work with Room Types and Option 11- Work with Room Areas allow you to create new room types (living rooms, bathrooms, etc.) and room areas (walls, floors, etc.) and maintain existing ones.
Use these options to select and create the room types and areas displayed under the Items tab on the Selection Sheet Manager.
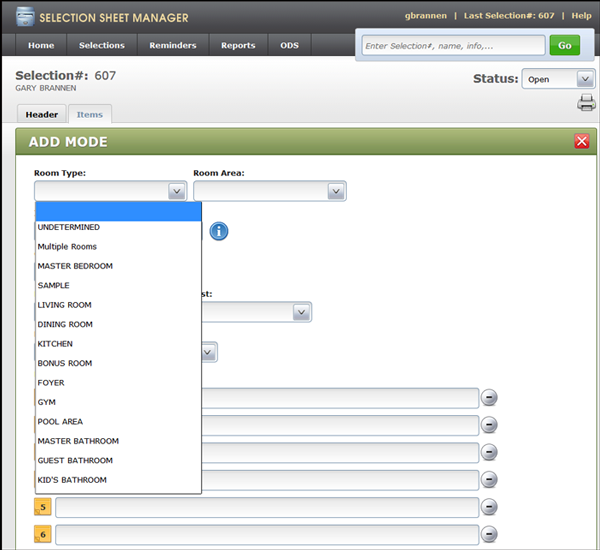
You can create as many room types and areas as needed.
The functionality for creating and updating entries for these options is virtually the same.
- Create a new room type or area by pressing F1.
- Assign a display and printing sequence
- To maintain or update an existing room type or area, enter a U in its Opt field and make updates as needed.
Example
For purposes of this example, we are going to work with option 10 - Work with Room Types.
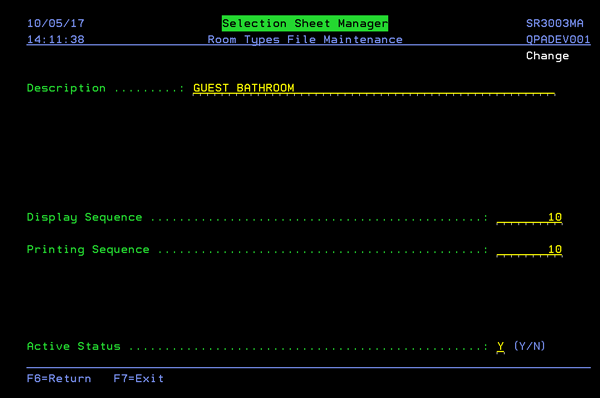
- When this option is selected, a screen similar to the one shown below appears.
- After you add the Description, press F6 to return you to the Room Types File Maintenance screen where your new room type is displayed.
- Enter a U in the new entries Opt field.
- Press Enter.
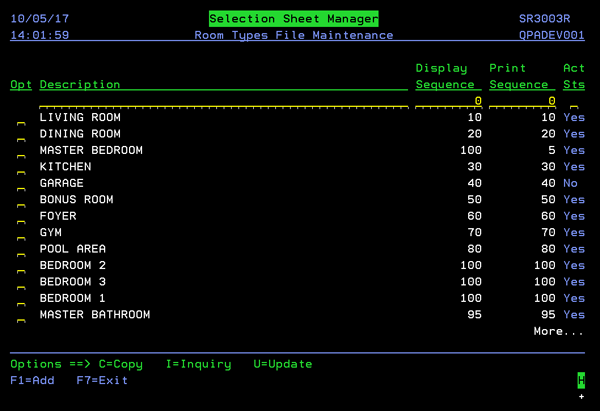
The rooms shown are the ones that appear on the web based portion of the Selection Sheet Manager under Room Types.
The Display Sequence controls the order of the room types, when the Room Type (or Room Area) drop down listing is accessed on Selection Sheet Manager. A lower display sequence means that room type is displayed toward the top of the drop down listing. If room types have the same display sequence, they will be grouped together. For example, you can use display sequences to group multiple bedroom types together.
The Print Sequence controls where the room type appears on a printed document. Room types with lower numbers appear first and room types with the same print sequence number are grouped together.
To add a new room type, press F1. Type in a room name and press Enter.
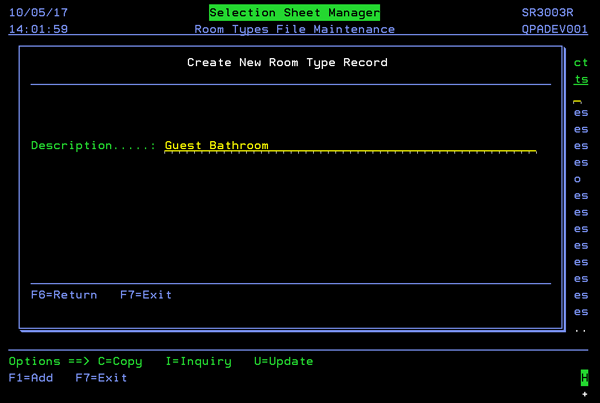
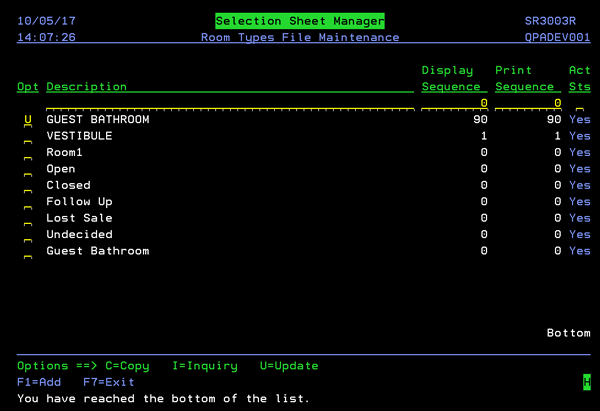
The screen that appears allows you to enter both a Display sequence and a Printing sequence. Both sequence fields automatically have a 0 inserted. Room types with a zero sequence number are placed at the top of their respective areas (room type drop down list or print document).
The Active Status field shows you if the room type is active (Y). If a room type is inactive an N appears in the Act Sts column on the Room Types File Maintenance Screen (accessed by updating a room on the Room Types File Maintenance screen).
Selection Sheet Manager - Work with References (SSM 12)
Maintaining References in Selection Sheet Manager
This selection lets you add or update information in the References Section, contained under the Header tab, in Selection Sheet Manager.
To view changes that are made in this option, you have to logout and then log back in.
When this option is selected, the Reference Header File Maintenance appears.
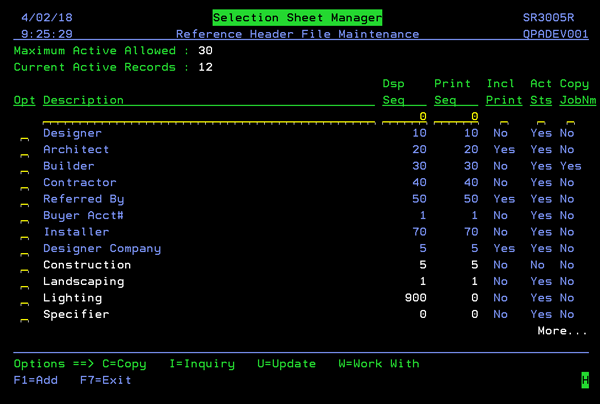
Reference groups in blue have been supplied by Kerridge.
- The Display Sequence controls the order the references display under the Header tab. If references have the same display sequence, they will be grouped together. For example, you can use display sequences to group multiple designers together.
- The Print Sequence controls where the references appear on a printed document. References with lower numbers appear first and those with the same print sequence number are grouped together.
- The Incl Print option provides control over what gets included on a printed selection sheet. This column, on the initial display, provides a quick glance into whether or not an entry is set to print on a selection sheet.
- Copy JobNm - directs the system to automatically copy the reference over when a selection sheet is made into an order. This eliminates the need to manually enter the Reference information. 5623
Options
"U"pdating a Reference Group
Use the "U"pdate option to update the Display Sequence, Printing Sequence, Include in Print Selection Output, Active Status and Copy to Job Name options.
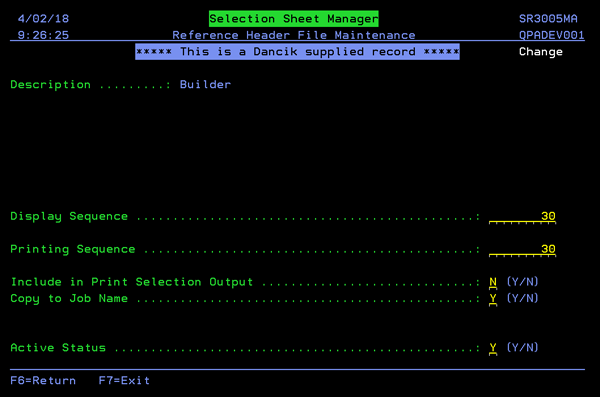
The Copy JobNm directs the system to automatically copy the reference over when a selection sheet is made into an order. This eliminates the need to manually enter the Reference information.
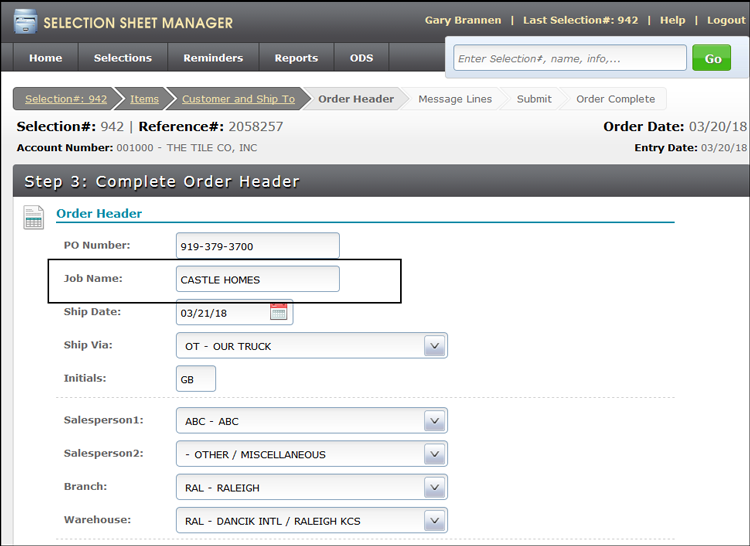
In the example below, a Builder was added in the References section when building a Selection Sheet.
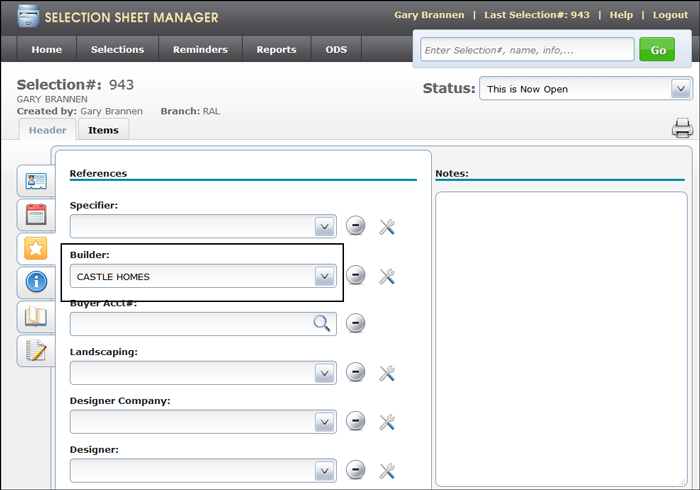
When the Selection Sheet is converted into an order, the reference, in this example a builder, automatically gets imported into the Job Name field on Step 3 of the order creation process.
"W"orking with Option
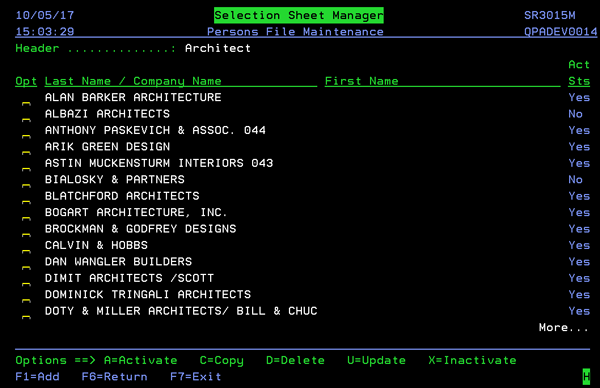
To see the companies or individuals that comprise a reference group, enter a W in its Opt field. The following figure shows the contents of the Architect reference group.
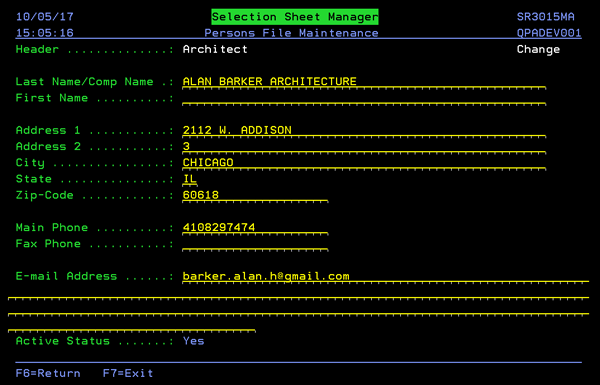
To update an entry, enter a U in its Opt field and press Enter.
Maintaining References in Selection Sheet Manager
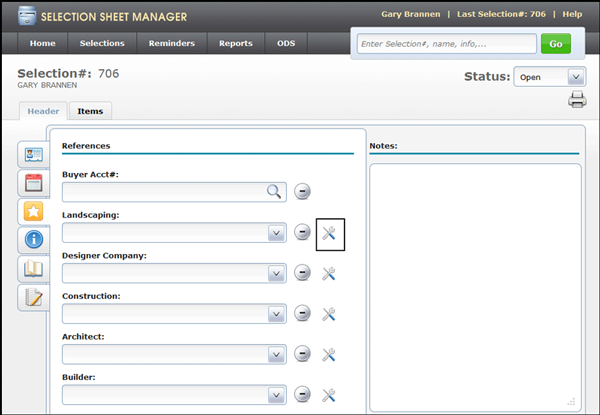
If the global/authority class/user setting Allow Web-Maintenance of References is activated, references can be edited and/or deleted from the web version of Selection Sheet Manager.
To get to the References tab follow these steps.
- Open up a Selection Sheet.
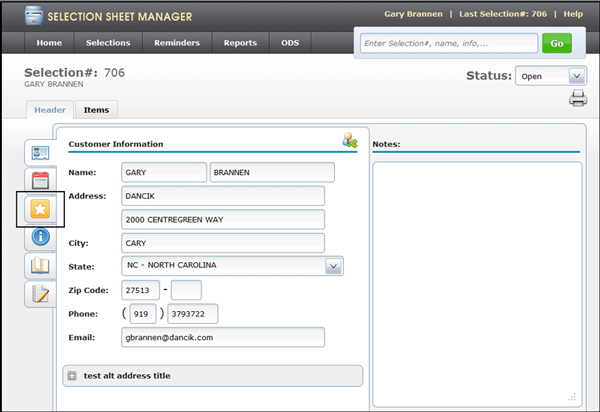
- Click the References icon.
- The References tab displays. If the setting Allow Web-Maintenance of References is activated the Toolkit icon appears to the right of the reference.
- Click the Toolkit icon to begin editing the Reference.
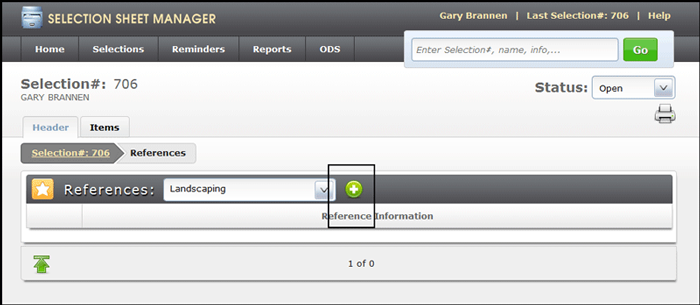
- To expand the Reference information, click the "+" icon.
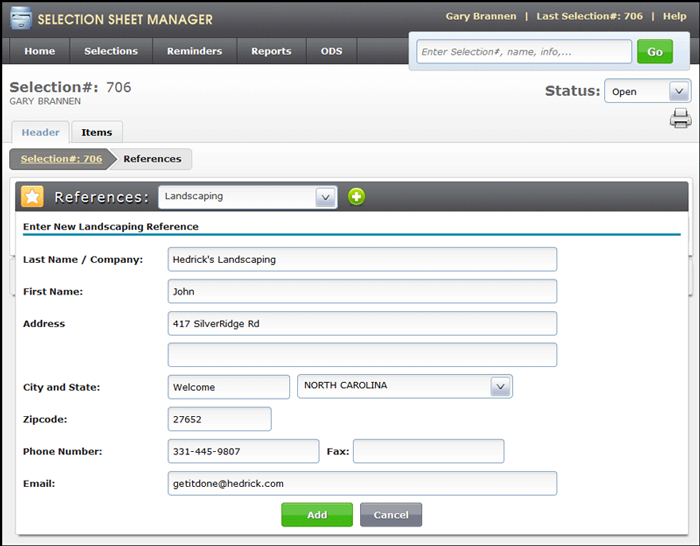
- Enter or edit the Reference information.
- Click Add to enter the new information onto the Selection Sheet.
Deleting a Reference
Deleting a record is a two step process.
- First you need to deactivate the reference. This keeps it from showing up for selection in future drop downs. This step is done within the GUI.
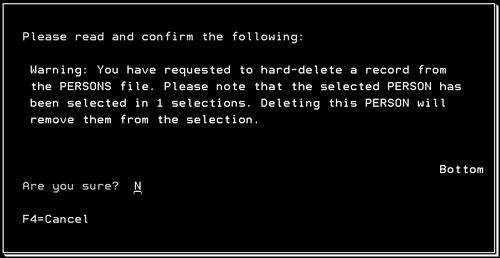
- Second is to delete the record, a warning is provided to indicate how many selection sheets curÂrently have this record attached to them. If any exist, when the record is deleted, all those referÂence fields would then be blank. This delete step is done from the green screen.
Step 1 - Deactivating the Reference
1. On the References Tab, click the Deactivate icon.
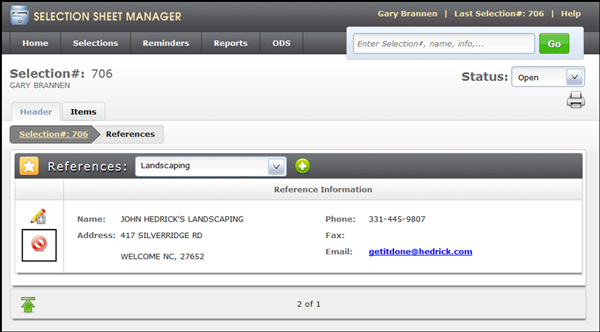
2. You are asked to confirm the deactivation. Keep in mind that if you deactivate the reference it will not available for selection in the drop downs.
3. Click Yes to deactivate the reference.
Step 2 - Deleting the Reference
- On the green screen, access the Selection Sheet Manager menu, and select option 12 - Work with References.
- A listing of all the available references appears.
- Enter a "W" in the Opt field of the Reference you want to work with and press Enter.
- Enter a "D" to delete the Reference. If the record is attached to any selection sheets you will receive the following message.
Selection Sheet Manager - Work with Detail Information (SSM 13)
Adding/Updating Entries
Use this option to build the Information portion of the Selection Sheet Manager web site. You can include additional information such as the type of construction (i.e. new or remodeling), how your consumers heard about your business, the development, plan ID, and lot number.
To view changes that are made in this option, you have to logout and then log back in.
When this option is selected, a screen similar to the following appears.
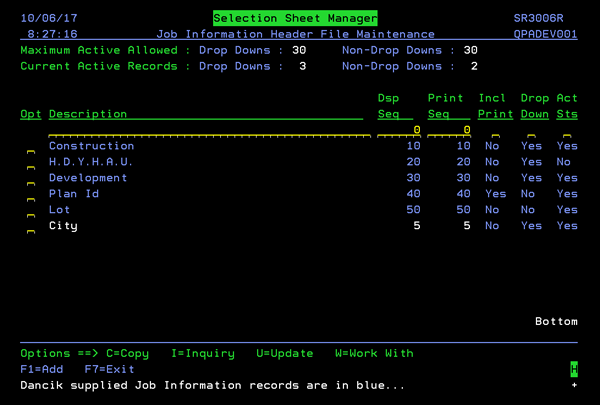
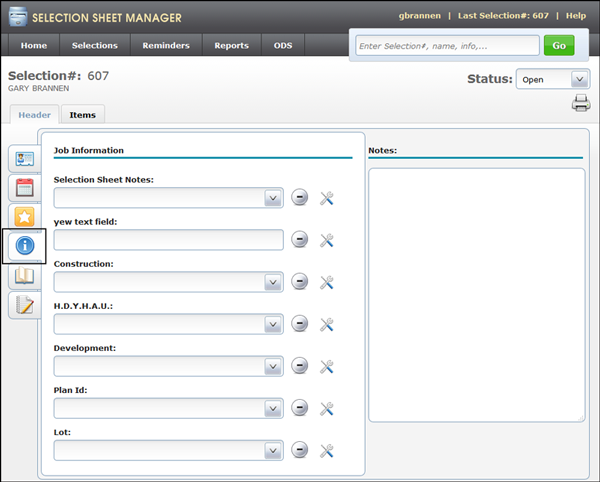
The Display Sequence controls the order that the information is displayed under the Information tab. A lower display sequence means that information is displayed toward the top of the listing. For example, using the sequences displayed above the information is grouped as follows under the Dates/Info tab.
The Print Sequence controls where the references appear on a printed document. References with lower numbers appear first and those with the same print sequence number are grouped together.
The Incl Print option provides control over what gets included on a printed selection sheet. This column, on the initial display, provides a quick glance into whether or not an entry is set to print on a selection sheet.
The Drop Down option signifies if the text box for an information grouping is text entry only or if a drop down menu is included.
The following information groupings are contained under Option 13 - Work with Detail Information:
- Construction - This selection lets you create entries related to construction types.
- H.D.Y.H.A.U. - stands for How Did You Hear About Us. Use this option to create, maintain, and track advertising and marketing avenues. This information can help you track which communication method is working the best for you.
- Development - This option lets you add and maintain housing development names. A possible benefit to this is the ability to spot trends in buying patterns.
- Plan Id - This option provides the means to add and maintain building plans.
- Lot - This option enables you to create and track lot numbers within a housing development.
These entries are displayed on the information section on the selection sheet header.
Adding/Updating Entries
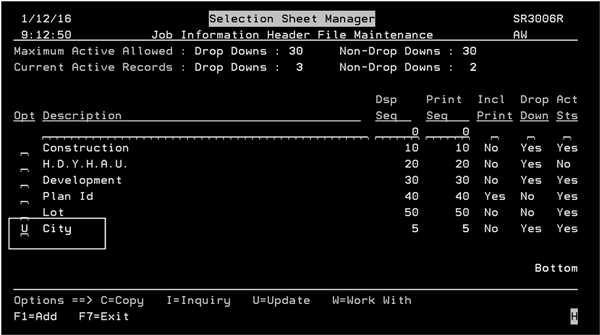
- To add a new Job Information Header Record, press F1 on the Job Information Header File Maintenance screen.
- Notice that the new entry doesn't have a Display Sequence or Print Sequence. The information in the Text Only and Act Sts columns is the system default. To update this record, enter a U in the Opt field.
- Press Enter to display the following screen.
- Press F6 to return to the initial screen.
- Next, we are going to add some cities within our new record, City. Enter a W in the Opt Column and press Enter.
- The Job Information Detail File Maintenance screen appears. Since this is a new entry, the screen is empty.
- Press F1 to add details. On the screen that appears, enter the detail information; in this case cities.
The Create New Job Information Header Record screen appears. Enter a description and press Enter then F6 to return back to the Job Information Header File Maintenance where your new entry is displayed.
User created entries are a different color than those supplied by Kerridge.
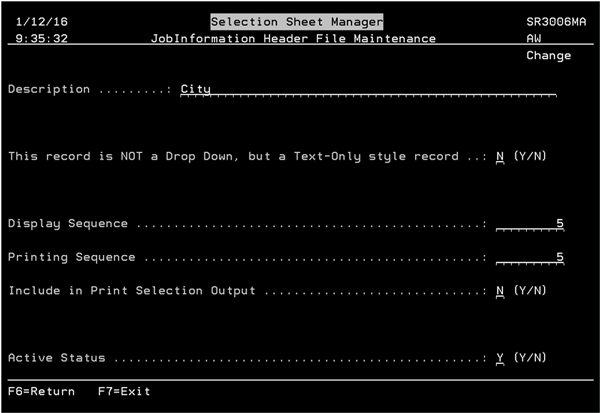
| Field | Description |
| This record is NOT a Drop Down, but a Text-Only style record |
If you want this field to have a drop down listing on Selection Sheet Manager, enter an N in the field Is this a Text-Only Style record. This provides your users with some choices. If you want your users to type in the information (no drop down listing) on Selection Sheet Manager, enter an Y in the field Is this a Text-Only Style record. |
| Display Sequence | The Display Sequence controls the order that the information is displayed under the Information tab. A lower display sequence means that information is displayed toward the top of the listing. |
| Printing Sequence | The Print Sequence controls where the references appear on a printed document. References with lower numbers appear first and those with the same print sequence number are grouped together. |
| Incl Print | This option provides control over what gets included on a printed selection sheet. |
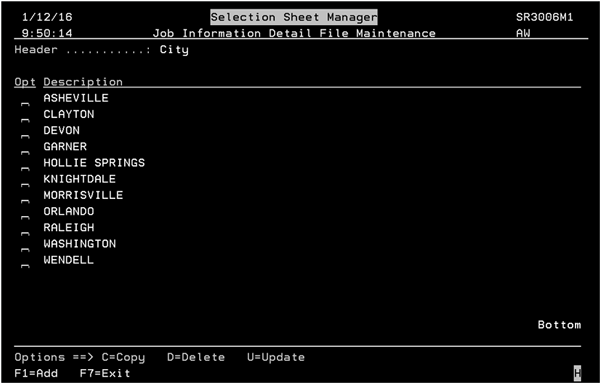
After adding all the detail information, press Enter and then F6 to return to the Job Information Header File Maintenance screen.
Now when someone uses Selection Sheet Manager and they want to enter city information, they can use the drop down menu.
Selection Sheet Manager - Work With Dates (SSM 14)
Use this option to add important dates, such as installation and due dates, and appointments to Selection Sheet Manager. Option 14 - Work with Dates controls the information displayed under the Dates portion when updating a Selection Sheet.
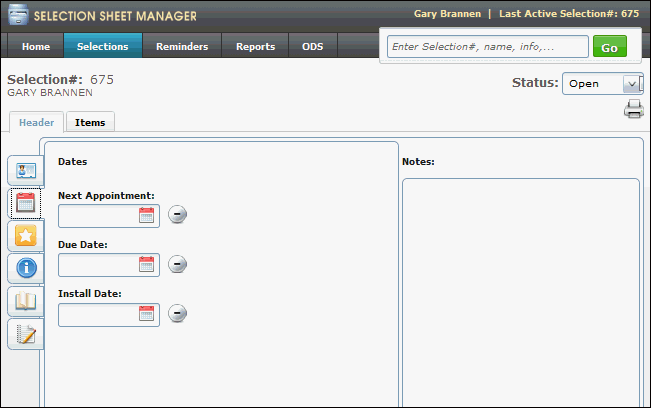
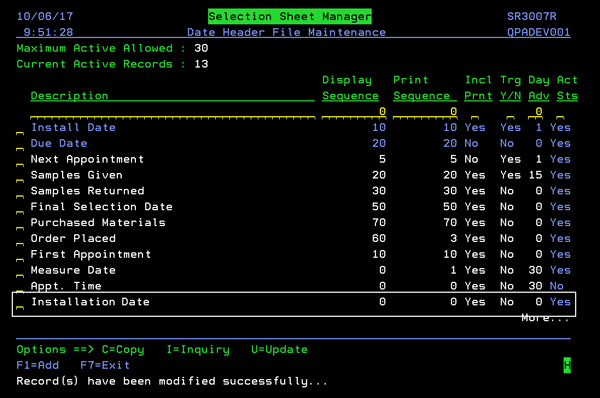
- When option 14 - Work with Dates is selected, a screen similar to the following appears.
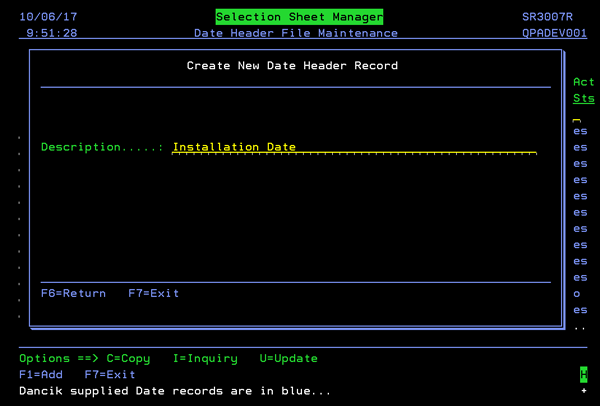
- Press F1 on the Date Header File Maintenance Screen. The screen that appears allows you to enter a description.
- Add a date description and press Enter and then F6 to return to the Date Header File Maintenance Screen. The entry is displayed.
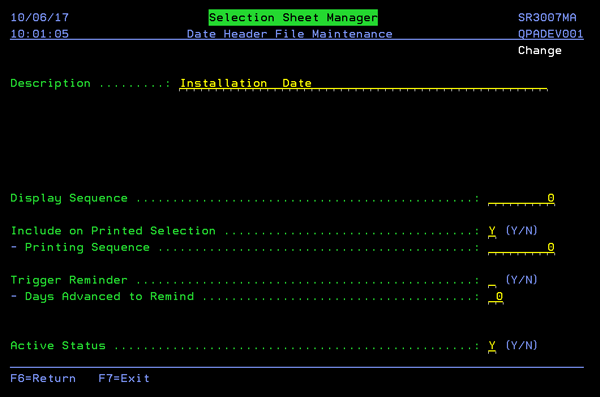
- Notice that even though the new date description is added it has not been configured. To configure the new entry, enter a U in its Opt column.
- Press Enter.
- Display Sequence - The Display Sequence controls the order that the date headings are displayed under the Date/Info tab. A lower display sequence means that information is displayed first.
- Printing Sequence - The Print Sequence controls where the dates appear on a printed document. Dates with lower numbers appear first and those with the same print sequence number are grouped together.
- Trigger Reminder - Enter a "Y" to automatically generate a reminder for this date type (i.e install date, next appointment). The default is "N".
- Days Advanced to Remind - Specifies the number of days, the default is 30 days, in advance from the current date to display the reminder in the Upcoming Reminders. If you enter 0 days, the reminder is added to the calendar on the exact date that is entered on the selection header screen.
- Reminders are displayed per user ID and not selection sheet number.
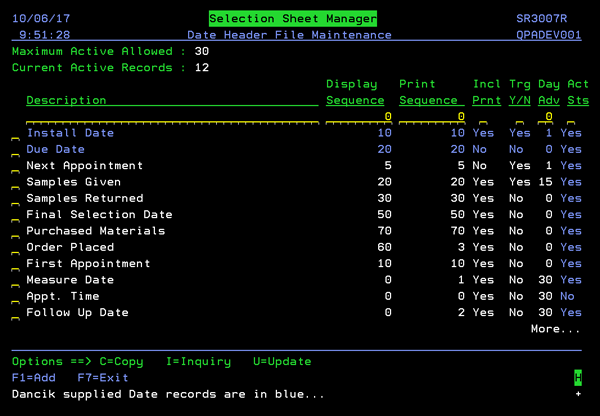
The next two fields can be used to trigger automatic reminders on the calendar. An example of how this functionality can be used is having a call back date automatically generated as a reminder.
Work with Status (SSM 15)
This option allows you to add additional status options to better capture the status of the selection sheet.
Prior to the introduction of this option in 2015, the order flow process in Selection Sheet Manager was limited to the following statuses: Open, Finalized, Closed, and Lost. This didn't allow enough flexibility for the categorization of selections.
The option adds the flexibility to create additional status values, with the statuses still linked to the existing background selection open and closed functionality. This provides greater flexibility in coding selections and more detailed reports.
- Access the Selection Sheet menu; menu option SSM.
- Select the option; SSM 15 - Work with Status. The existing statuses display.
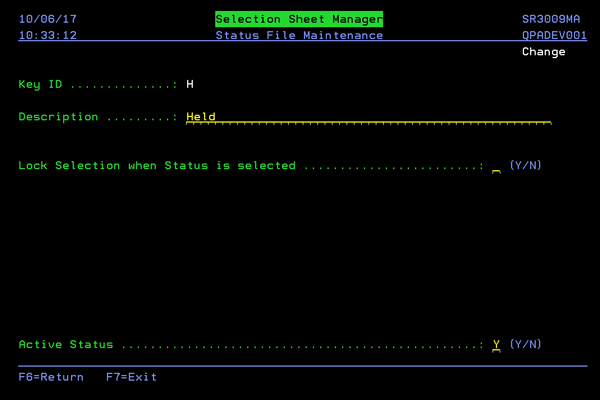
- Press F1 or "U"pdate an existing status code.
- If the Lock Selection when Status is selected setting is activated, any selection sheet assigned to this status cannot be edited or changed.
- Activating the Active Status setting ensures the status is inlcuded in the drop down menu when working with selection sheets in the web based application.
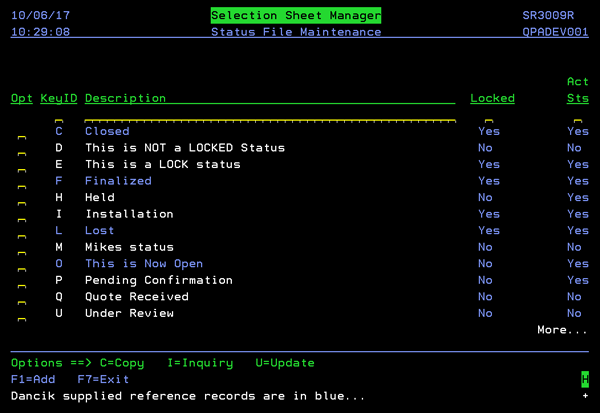
The system generated status codes, Closed, Finalized, Lost, and Open, cannot be changed or deleted.
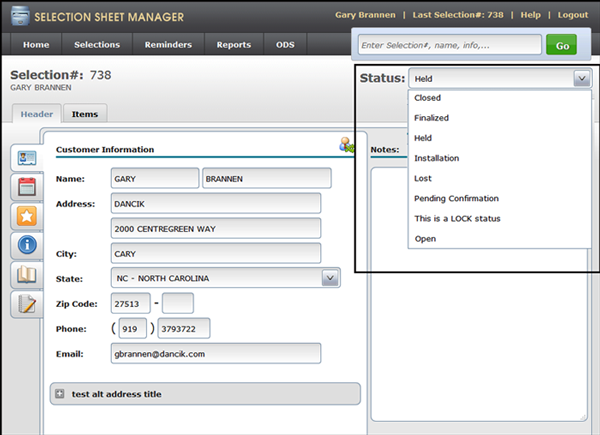
The Status Code drop down display has to be activated vi the Global (SSM1), Authority Class (SSM2), or User (SSM 3) setting Allow For Status Change at the End of Order Process.
If you deactivate an active status code, the system checks to see if any Selection Sheets are affected and if there are allows you to pick a substitute status code.
