Working with Credits
The issuing credits functionality, accessed from within the Order Management application of Navigator, creates credit memos based on information existing in the Invoice or Order files. The process automatically creates credit memos by copying all or selected lines from the order or invoice history files and substituting certain information, such as a negative sign in place of a positive sign, or a new price.
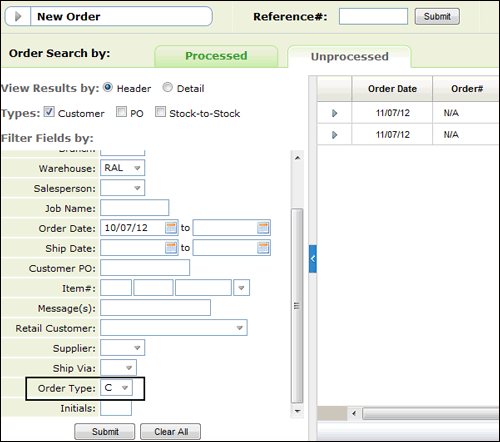
Using the existing Order Entry, where the user starts the order at the header with type C is considered the manual process. It will not copy the lines from the order or invoice, you will need to enter the data yourself to issue the credit.
Before we get started on how to issue credits in Navigator let's discuss a couple of things about this version of Issuing Credits:
- If you have invoicing roll over turned on, you might receive an error if you are working with an invoice number that is being re-used (rolled over).
- If you are working with a Retail Customer, use the option arrow to the left of an existing order to enter a credit. At the current time, entering a credit order via the order option drop down menu in the upper left hand corner of Order Management does not work for retail customers.
As with most Navigator functionality, access has to be granted via the Navigator (NAV) menu on the green screen. Permissions can be set at the global, authority class, or user level.
The hierarchy of these settings is (from highest to lowest)
- User (NAV 5)
- Authority Class (NAV 2)
- Global Settings (NAV 1)
Global Level (NAV 1)
Access the Navigator Global Setting (menu option NAV 1).
- Enter an "A" in the Opt field for Order Management.
- Press Enter to access the Work with Application Permissions screen.
- Enter a "Y" to grant access to the credits and adjustments functionality.

Authority Class Level (NAV 2)
Authority classes allow you to group users together, they can be created based on system access restrictions or on a user's functional areas such as Power Users or Admin. They allow you to customize the level of access a group of users has within Credits and Adjustments.
- Access the Navigator Authority Class Settings (menu option NAV 2).
- Enter a "W" in the appropriate authority class to work with web applications.
- Enter an "A" in the Opt field for Order Management.
- Enter a "Y" to grant access to the credits and adjustments functionality.
User Level (Control User File Maintenance - NAV 5)
- Access the Control User File Maintenance via menu option NAV 5.
- Enter a "W" for the user you want to grant the ability to enter credits and adjustments for.
- On the Web Access Settings screen that appears, enter an "A" in the Opt field for Order Management. You may need to scroll through the list of applications to get to Order Management.
- Enter a "Y" to grant access to the credits and adjustments functionality.
There are essentially two ways to enter credits and adjustments.
Starting a New Credit Order
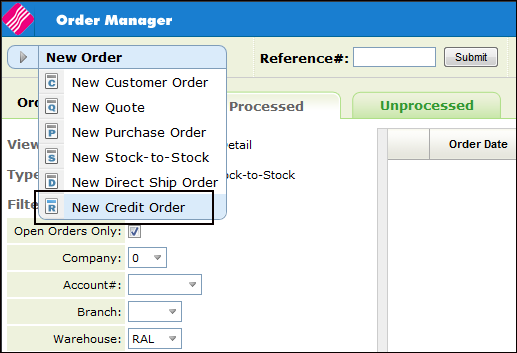
- Select New Credit Order from the Order Type drop down menu.
-
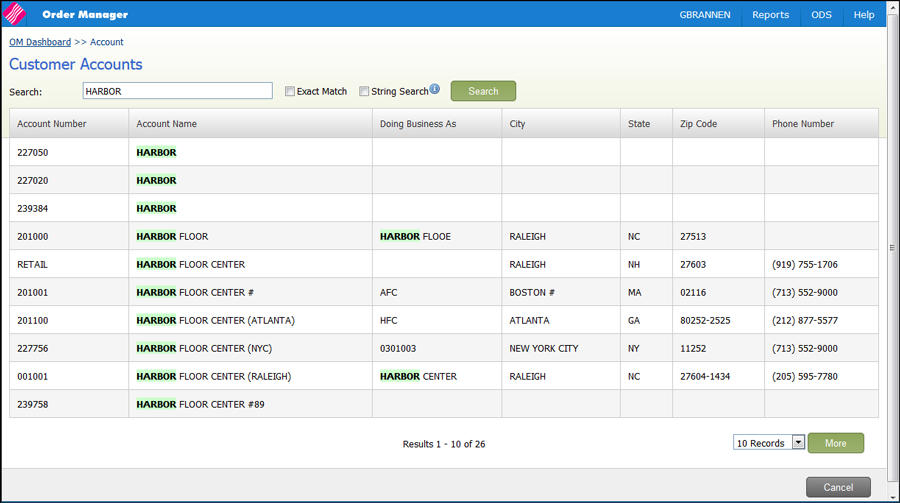
The Customer Accounts window appears. Enter your account search criteria.
-
If you enter an exact match on the account number, you are automatically directed to the Credit Type entry screen.
-
If the search criteria doesn't find an exact match, the complete search results are displayed.
-
-
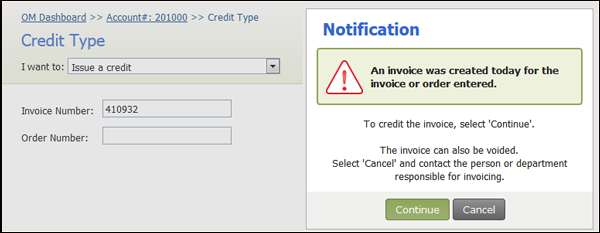
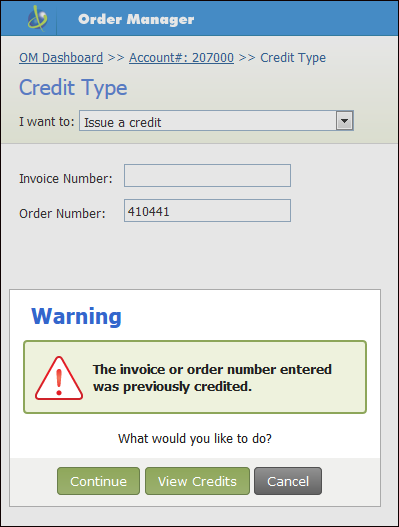
Click on an account to start the credit entry process with the Credit Type Window. Enter an invoice or order number. The system will verify if the account # on the invoice or order number matches with the account # selected. If the invoice/order # does not match the account# the following error message is issued.

Invoices created today can be entered, You do not need to wait for night jobs to process the invoices.
-
Click Continue to proceed to the Credit by Invoice and/or Order Number window.
-
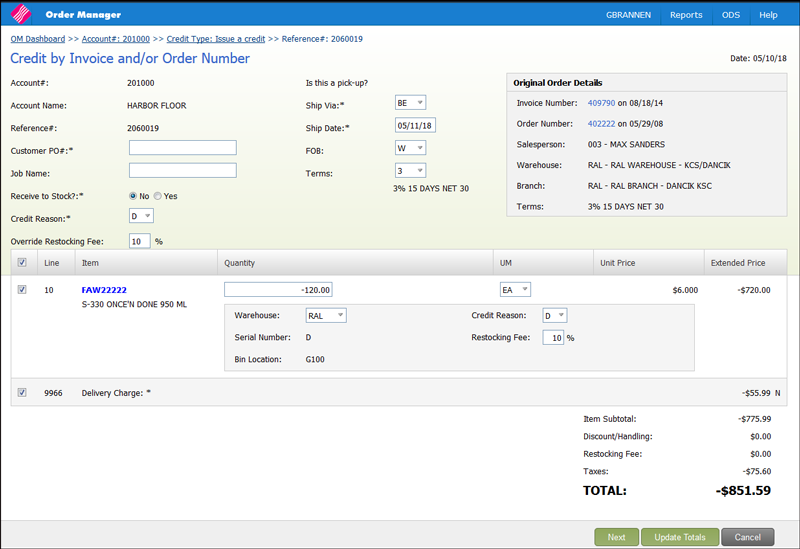
This order only has one line, but if there were multiple lines you could select to credit all of them or select them individually.
-
The Account, Account Name, Reference#, Unit Price, Extended Price, Serial Number, Bin Location, and Warehouse are imported in from the original order or invoice.
-
Enter a Customer PO# for this Credit Order. Since you are creating a new order, even though it is a credit, a new and unique PO is needed.
-
The Job Name can be made mandatory if the setting JobName Mandatory on O/E is activated in the user's Web Control Panel (NAV 5>Option Y>page 2 - Order Entry & Invoicing Options).
-
Use the Receive to Stock setting to direct the order entry and invoicing systems to add the credited material back into inventory. Enter "Y" if the inventory is to be returned into stock when the credit memo is invoiced and night jobs is run. Enter "N" if no stock is being returned into inventory, or if you are updating the inventory via another method.
-
The Ship Via and Ship Date are imported in from the account's Billto File.
-
The FOB code can be imported in the from the account's Billto File or the user's Web Control Panel (NAV 5>Option Y>page 1- General Default & Restriction Options).
- The Terms code is imported in from the order/invoice you have selected to credit.
- Select a Credit Code from the drop down list. This credit code is applied to all the selected lines.
-
If the user is assigned a restocking fee that default value displays in the Override Restocking Fee setting. Override the default restocking fee as needed.
-
The Credit Reason and Restocking Fee can also be changed at the line level.
-
Enter the necessary information and click Update Totals. The credit total gets updated.
-
The following information is imported in from original order or invoice; depending on which one is being credited:
- Quantity
- UM
- Unit Price
- Extended Price
- Serial Number
- Bin Location
- Warehouse
-
Changing the Quantity and/or UM updates the total credited back to the customer.
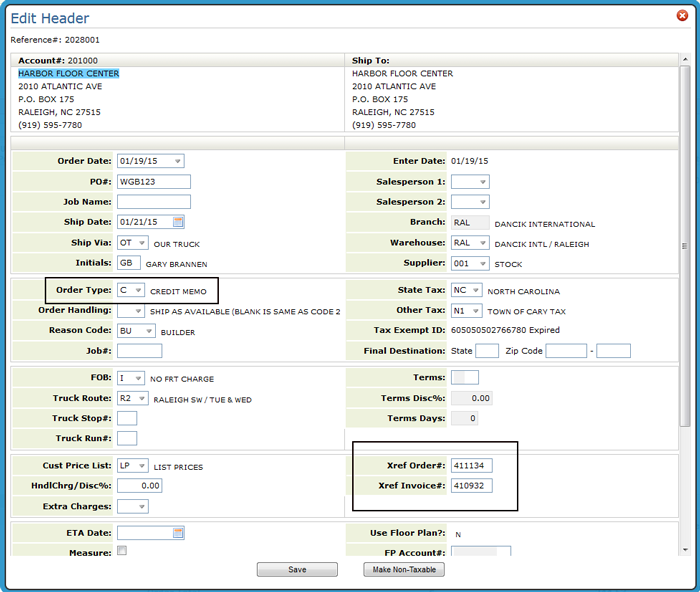
- Click Next to proceed to the Order Management system where you can process the credit order normally. The order gets assigned as a Credit type and the Xref Order# and Xref Invoice# fields are popuÂlated with the original order and invoice.
If the order line contains message lines that have pricing (i.e. freight cost or cut charges) the message line pricing can also be credited. Credited message lines are displayed on the Order's notepad.
Adjusting an Existing Order to Add Credits
There are a couple of ways to add credits to an order.
New Credit/Adjustment option
In this example, we are going to update an existing order that has multiple invoices. We are going to access it via the options arrow to the left of the order. Keep in mind that orders have to be invoiced before credits can be issued against them.
- Access the Navigator Order Management application and use the filters to search for your proÂcessed order.
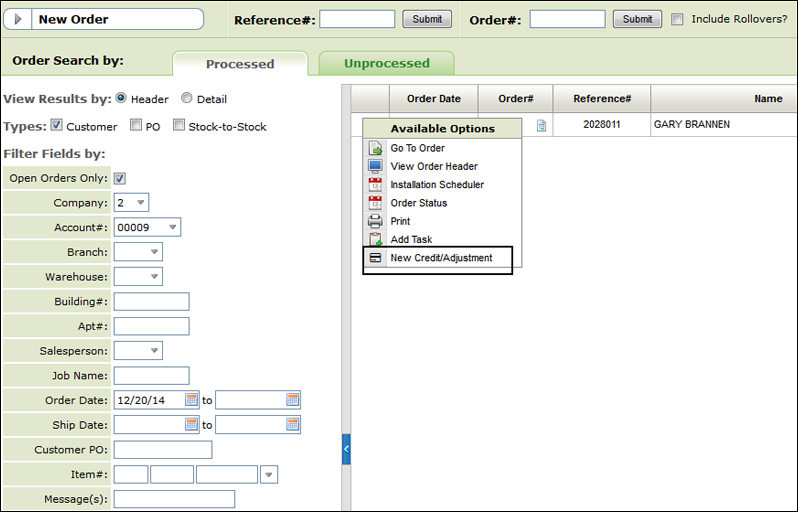
- Click on the options arrow to the left of the order and select New Credit/Adjustment.
-
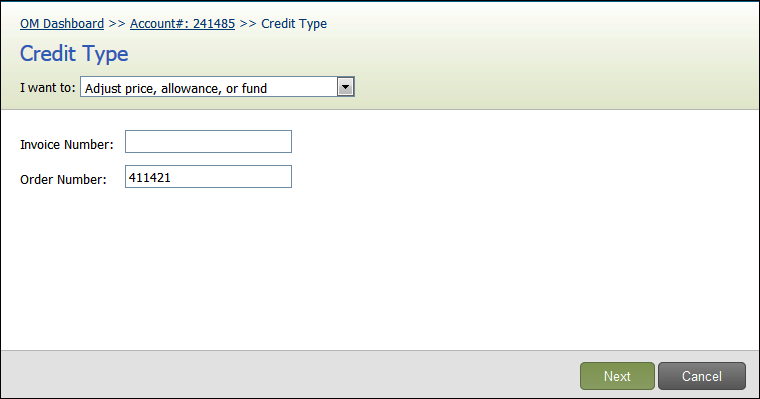
The Credit Type window appears with the selected order inserted.
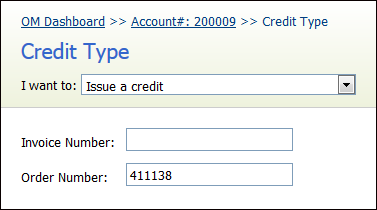
- If an order number is entered without an invoice number, the system will find all the associated invoices in the current invoice and not the rollover file for this order. It will display all the invoices and allow you to view and select which invoice to credit.
-
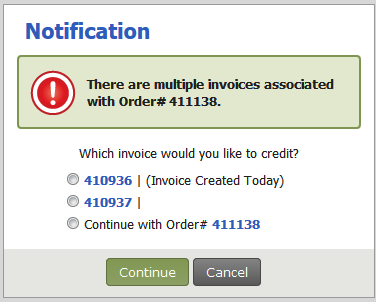
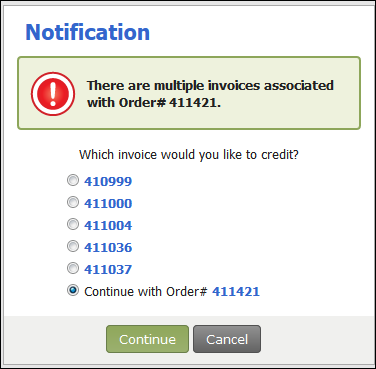
Click Next to begin the credit issuing process. If the order, has multiple invoices associated with it a dialog box appears that lets you select the invoice to credit.
-
Select an invoice to edit or continue working with the order. In this example, we are going to continue working with the order.
By default all the order lines are selected and credited.
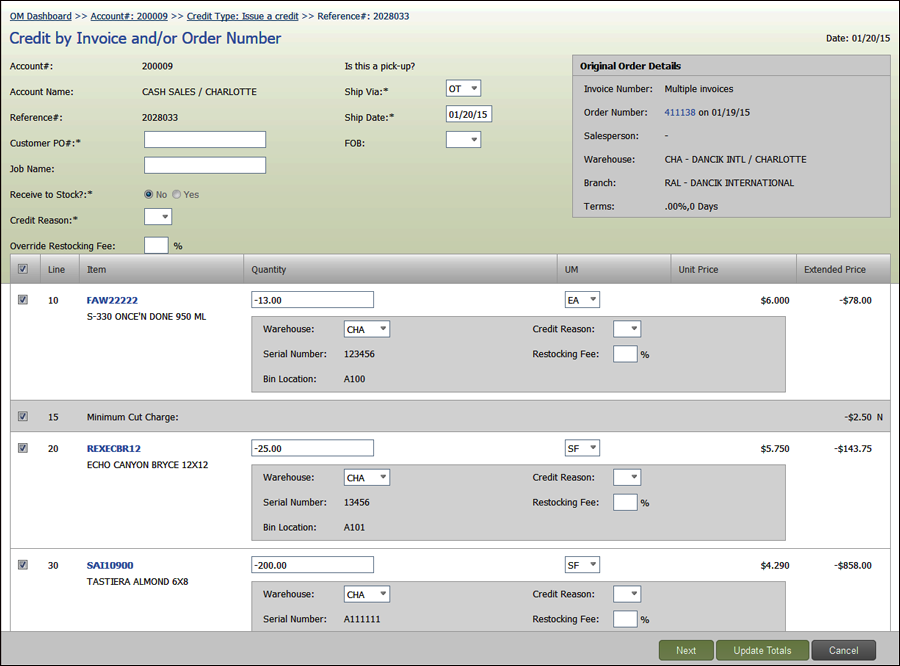
If the order line contains message lines that have pricing (i.e. freight cost or cut charges) the message line pricing can also be credited. Crediting message lines will also be noted in the order's notepad.
-
Make the necessary adjustments and click Update Totals to see how your changes affect the order.
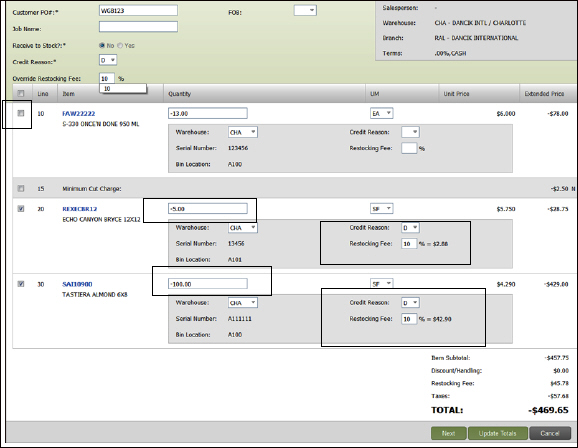
Required fields are noted with an *. The Job Name might or might not be required depending on the Users Control Panel settings.
-
In the example shown above, the first line and its associated cut charge was deselected. Lines 20 and 30 had a a portion of the initial inventory credited (due to damage). A restocking fee of 10% was also charged.
-
Click Next take you to order entry to complete the credit and review your changes.
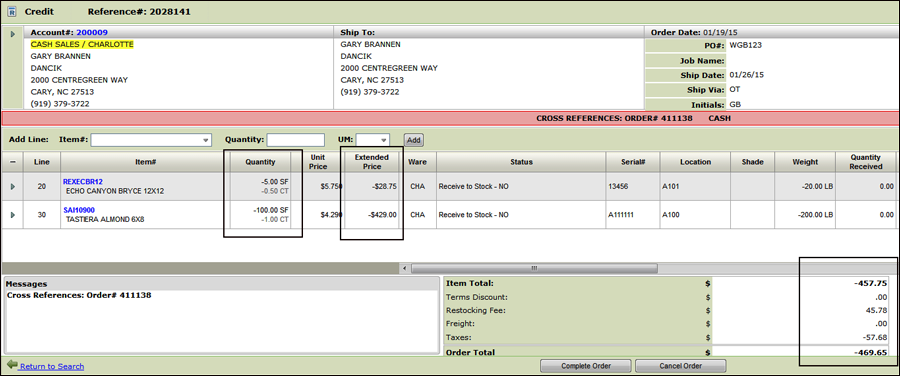
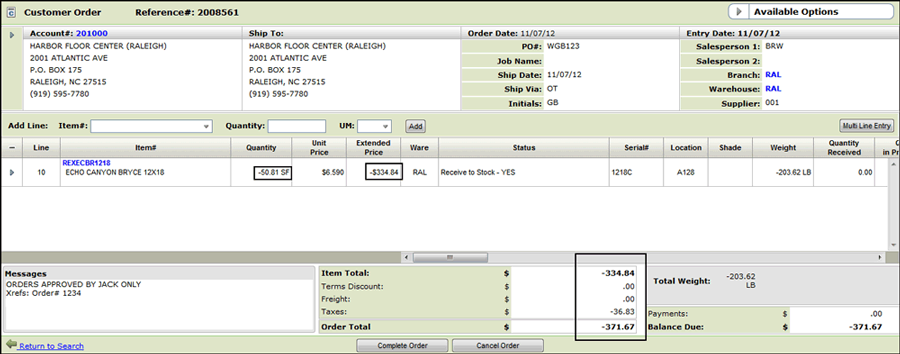
The negatives in the Quantity, Extended Price and Item Total columns indicate that inventory is being returned and a credit is being issued.
-
Click Complete Order to finalize and process the credit.
You could also select to credit the entire order instead of selecting an individual invoice since crediting by order retrieves all lines from the order. However, any charges added on the individual invoice will not be shown.
Entering the Quantity as a Negative
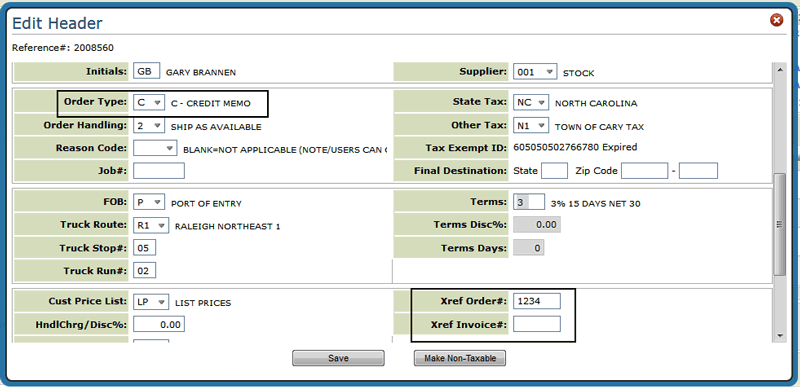
- On the Order Header, ensure the order is flagged as an Order Type "C" (credit memo).
- Cross reference either an order or invoice or both.
-
Enter the item, quantity (as a negative number), and the UM.

-
Click Add. The Add Line window appears.
-
Expand the top part of the window by clicking the expansion arrow in the middle of the screen.
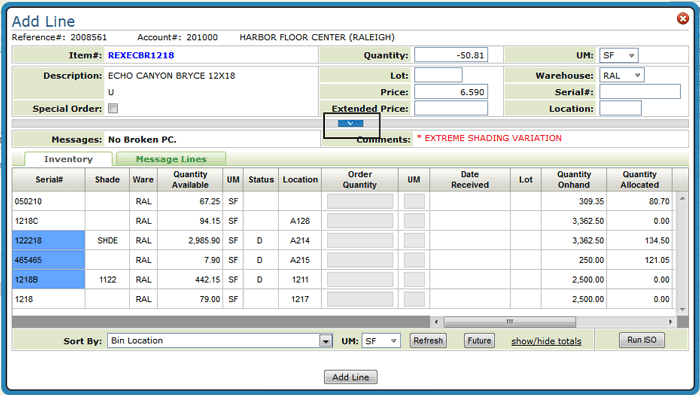
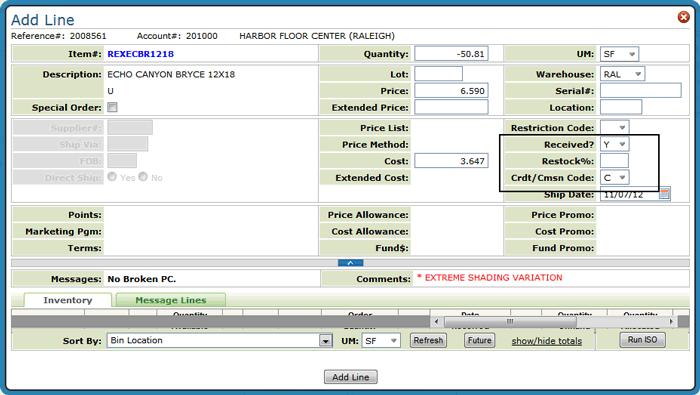
The settings circled below pertain to credits.
- Received - the codes that apply to credits are:
- Y - if you want the computer to add the quantity back into inventory.
- N if you do not want the computer to adjust inventory.
- Restock% - This setting indicates the restocking charge percentage. If you are entering a credit or return, enter a percentage from 00 through 99 to charge back the customer, if applicable. For example, if the extended price of the returned material is $100.00 and you enter 5 as the restocking charge, the credit memo is issued for $100.00 less $5.00. A default restocking charge percentage may be established in your Control Panel.
- Crdt/Cmsn Code - These codes represent the reason or category of the credit. These codes are defined on the system in the Classification Codes File. These codes can be separately analyzed on many reports and screens.
- Received - the codes that apply to credits are:
-
Collapse the top part of the screen by clicking on the same arrow.
-
Select a serial number to add the inventory to and then click Add Line.
-
Confirm your selections and then click Add Line again.
The credit line is added to the order. Notice that the quantity and prices are negative.
-
From this point, the order can be completed like a regular order.
The issue credits functionality can be used to adjust the price on a complete order or invoice or selected lines.
Associated Files
Promotional Price File
You can use the Promotional Pricing File to establish finely tuned promotional price or price allowances applicable to selected groups of products and for selected groups of customers.
The Allowance and Fund information shown when making Adjustments is imported in from the Promotional Price File.
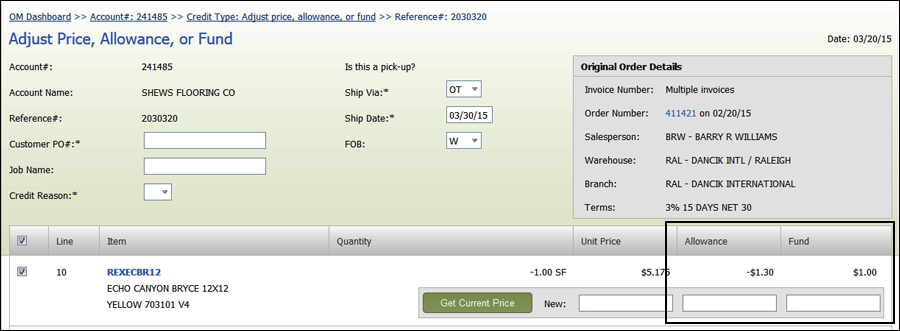
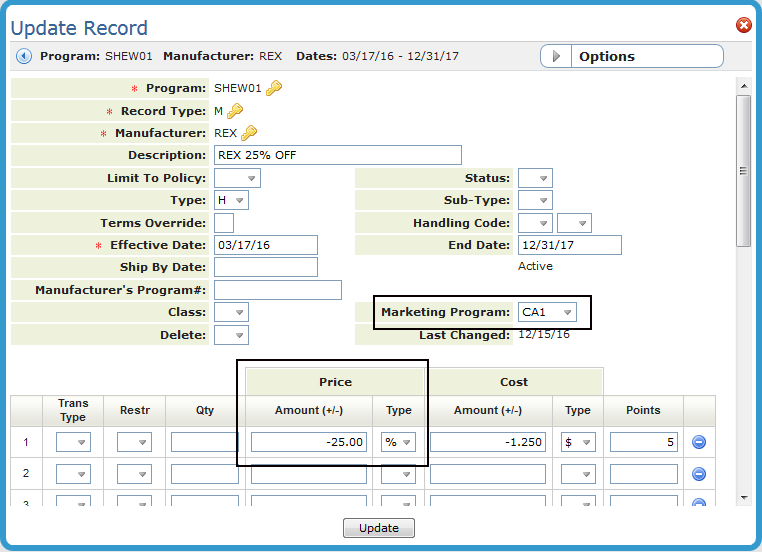
Let's take a look at a Promotional Price File and see how the entries made on it effect what shows up on the adjustment window.
- Promotional files can be set up for several types of records such as: items, price classes and manÂufacturers. The promotion shown below is set up for a manufacturer.
- Only the Price allowances are used when making adjustments.
- If a Marketing Program is entered, the Promotional record is considered a Fund and the information is only imported into the Fund category when making adjustments.
-
Items, manufacturers, price classes, etc. can be included in more than one promotion. If the proÂmotion is considered a Fund (a Marketing Program is entered), the promotional information is only imported in the Fund column on the Adjustments window. However, the parameter (item, manufacturer, price class, etc) might also be included in another promotion that has a Price Allowance and that information is imported into the Allowance column of the Adjustments window.
Making Adjustments
- Follow the normal process for entering a credit:
-
-
Use the New Order drop down menu to start a Credit Order.
-
-
Enter the customer account.
- On the Credit Type window:
- Select Adjust price, allowance, or fund from the I want to drop down menu.
- Enter an invoice, order number or both.
- Click Next. If the order has invoices associated with it you can select one of the invoices or continue adjusting the order; as we will do in this example.
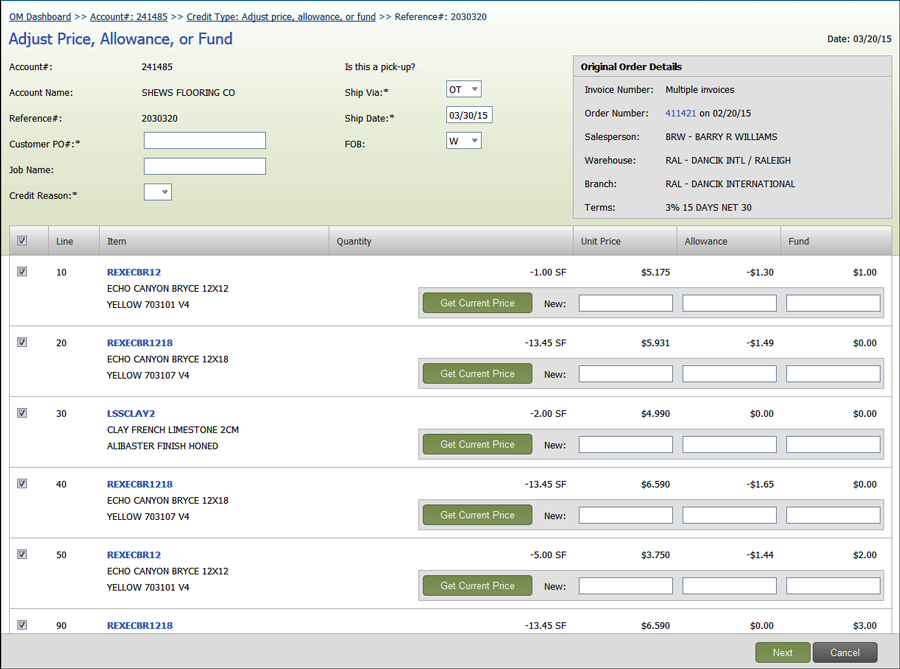
- Click Continue to display all the invoiced and closed lines on the order. The default is for all the lines to be selected.
-
The Account, Account Name, Reference#, Unit Price, Extended Price, Serial Number, Bin Location, and Warehouse are imported in from the original order or invoice.
-
A Reference# is automatically assigned to the adjustment order.
-
Enter a Customer PO# for this Credit Order. Since you are creating a new order, even though it is a credit, a new and unique PO is needed.
-
The Job Name can be made mandatory if the setting JobName Mandatory on O/E is activated in the user's Web Control Panel (NAV 5>Option Y>page 2 - Order Entry & Invoicing Options).
-
Select a Credit Reason from the drop down list. This credit code is applied to all the selected lines.
-
The Ship Via and Ship Date are imported in from the account's Billto File.
-
The FOB code can be imported in the from the account's Billto File or the user's Web Control Panel (NAV 5>Option Y>page 1- General Default & Restriction Options).
-
Select the lines you want to make adjustments on.
- The Get Current Price button retrieves the current prices for this customer and item from the Promotional File. If no promotional file exists for the account/item combination then no new pricing is returned.
- If a promotional file does exsits for the account/item combination, the original unit price, allowance and fund information is retrieved and displayed.
- Allowances are based on Price allowances made in the Promotional File.
- Funds are essentially a bank account for your customers where the bank is your company, and your customer's deposits can be in the form of dollars, points, or both. If a Promotional file is set up as a Fund the information is imported into the Fund column.
- If only the Unit Price is updated and the original line contained an Allowance and/or Fund, do not carry those values over from the original line.
- If only the Allowance is adjusted, carry over the Unit Price from the original line and popuÂlate it in the new adjustment line.
- If only a Fund is updated, carry over the Price and Allowance, if one exists, from the original line and populate it in the new adjustment line.
- If both an Allowance and Fund are entered, carry over the Price from the original line and populate it in the new adjustment line under Unit Price.
- If the original order or invoice line did not contain an Allowance and/or Fund and one is added here, the Promotional File (FIL 30) is not updated to reflect the addition.
- If the original order or invoice line contained an allowance and/or Fund and one is updated, then populate the original Allowance Promo or Fund Promo value on the new line.
-
After entering the adjustments, click Next. The new Credit order displays.
-
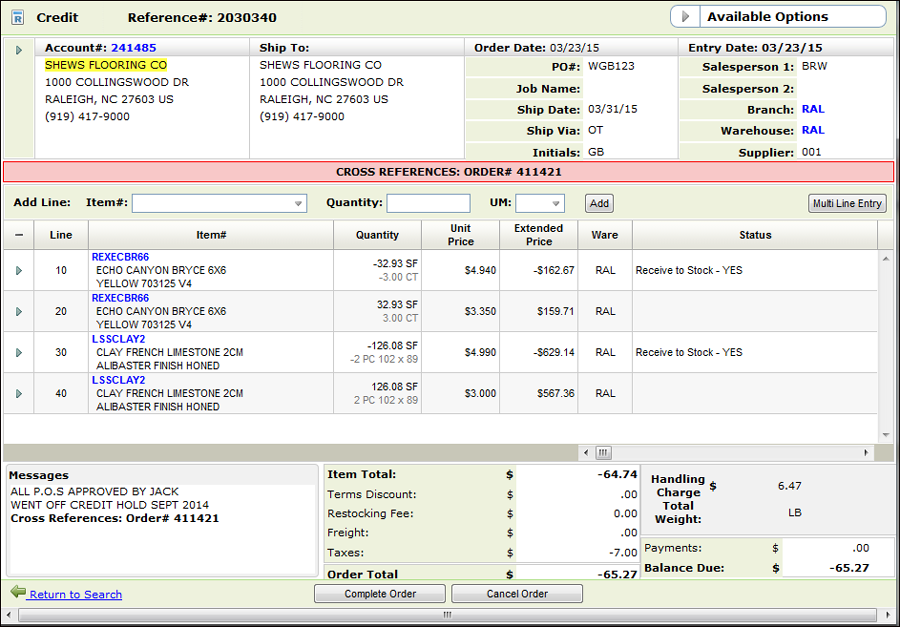
For each item adjustment, two lines are created on the Credit order.
-
The first line is a credit for the original quantity and the second line is a debit at the new adjusted price. The difference is calculated and refunded to the account.
- The original (first) line contains the following information:
- The original Quantity as a negative value
- The original Unit Price
- The original Price Allowance
- The original Fund
- The original Extend Price as a negative value
The adjustment (second) line contains the following:
- The original Quantity as a positive value
- The new Unit Price
- The Allowance value that was entered in the Adjustments by Invoice or Order screen
- The new Funds value
- Updated Extend Price value calculated using the updated price, allowance, and fund values entered in the Adjustments by Invoice or Order screen (use the existing OM Customer Order logic).
To view the Fund and Price Allowance information (and more), use the horizontal scroll bar, right above the payment information, to scroll to the right. -
The new credit order adheres to the normal order management process. Meaning it can be edited and processed like any other order.
-
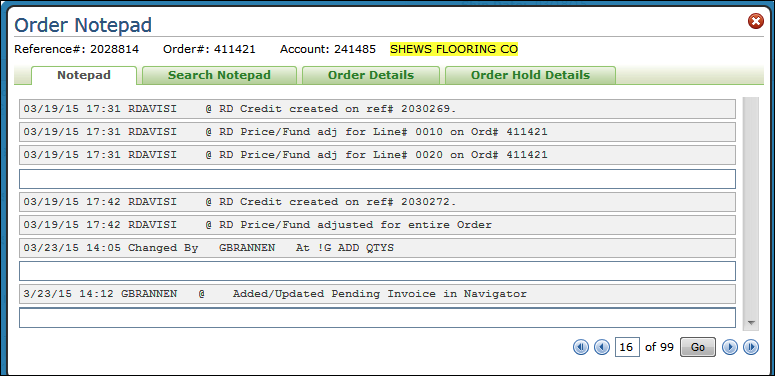
Any adjustments are noted in the Order Notepad which is accessed via the Available Options drop down menu in the upper right hand corner.
-
Click Complete Order to process the adjustment.
To get back to the original order, click its link under the Original Order Details window.
Rules for what gets updated
This functionality introduces the Receive Items to Stock button on a Credit Order that allows for the immediate return to stock of inventory. This option is available if "N" is selected for the Receive to Stock setting in the issue credits process.
Manually Returning Inventory to Stock
Set-up
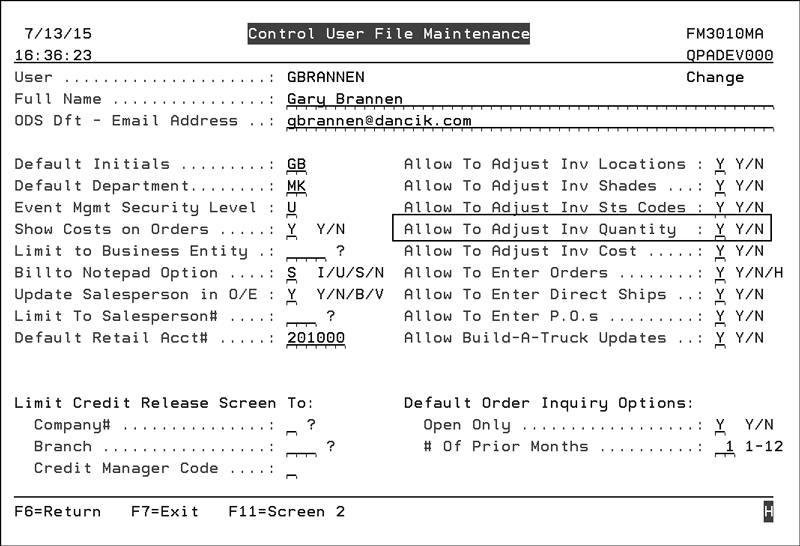
Navigator Control User File Maintenance - NAV 5
Navigator Control User File Maintenance - NAV 5
The setting Allow To Adjust Inv Quantity has to be activated.
Received flag must be "N"
The item on a credit order detail line must have the Received flag set to "N".
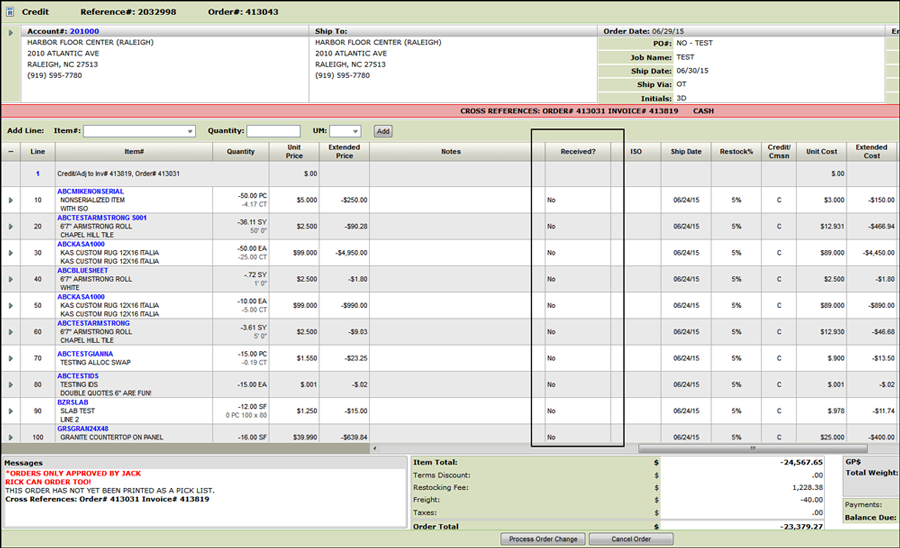
Order Type "C"redit
This functionality only works for orders flagged as credit orders; order type "C".
Serialized items only
Only items with a serial number can be returned to stock.
Manually Returning Inventory to Stock
- Access Navigator's Order Management application.
- Enter the credit order number or reference number.
-
Click Submit to access the order.
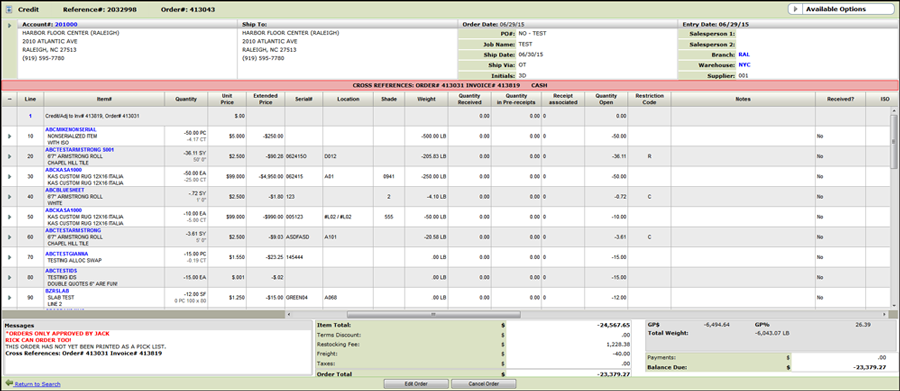 In the example, several of the items do not have serial numbers. These items will not display on the Receive Items to Stock window which is shown in step 5.
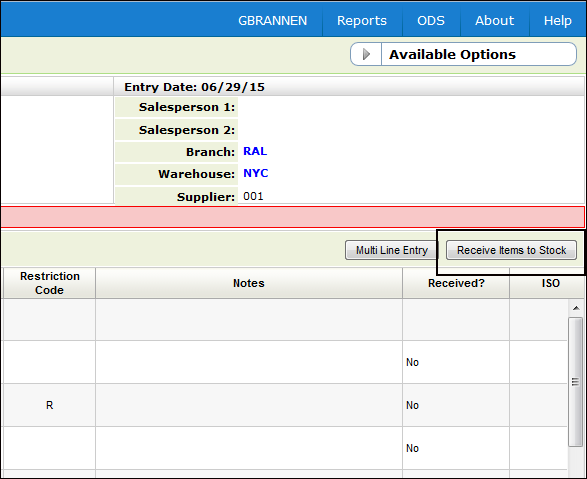
 - Click Edit Order. If the user has been given permission to adjust inventory to stock (refer to Set-up), the Receive Items to Stock button appears on the right-hand side of the window.
-
Click Receive Items to Stock to access the Select Items to Receive to Stock window.
-
On the Select Items to Receive to Stock window, select the items you want to return to stock.
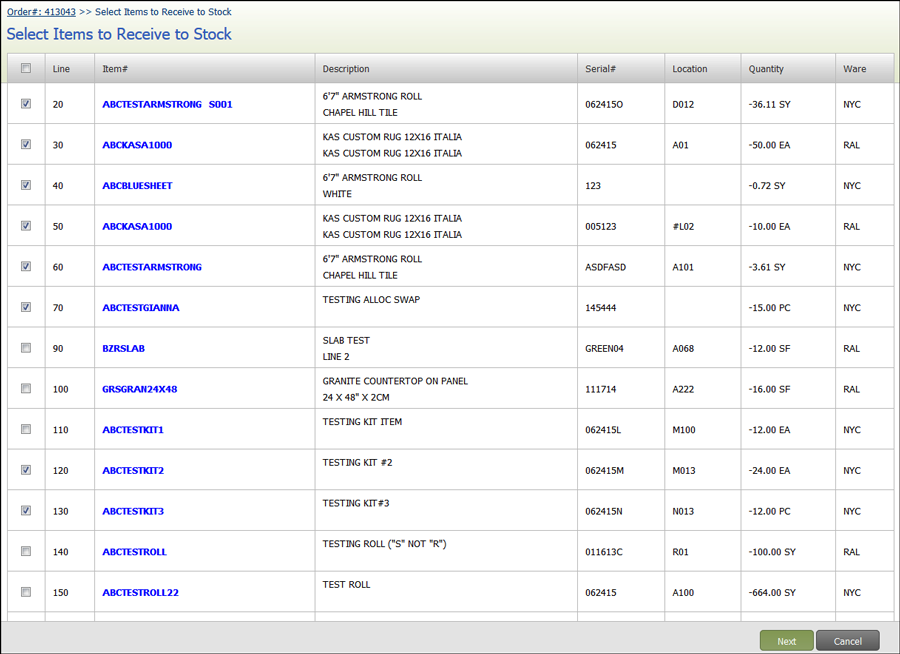
-
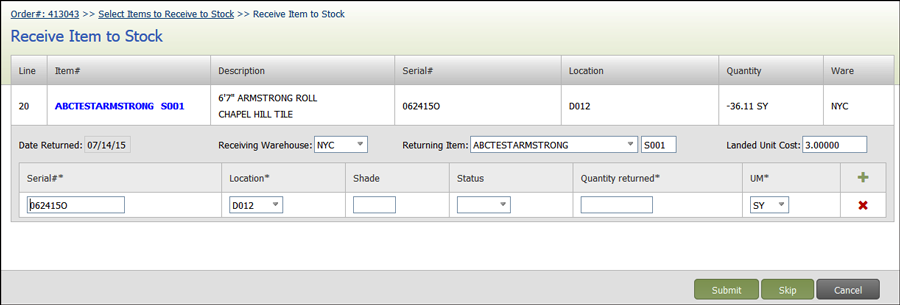
Click Next to access information about each of the selected items.
-
The existing item/order information is displayed. It can be changed as needed. The required fields are: Serial#, Location, Qty returned, and UM.
Field Description Order Line Data These are the details for the line that was selected in the Selected Items to Receipt to Stock screen. Date Returned The current days date. Receiving Warehouse The default is to populate this field with the warehouse from the order line. Use the drop down menu to select another available to the user performing the receipt. Returning Item The item and lot number from the order line are imported in. The Lot number setting, the input box to the right of the item box, is used with special order items.
If the returned item and the original item do not match, a warning message is displayed. The returned item can be different from the original item, but it must ne a valid item number.
Landed Unit Cost The Landed Cost consists of Unit Base Cost and Unit Freight cost.
The landed cost off the original order is loaded, but it can be changed as needed.
A user's ability to see cost information is based on the following settings on the Navigator Control User File Maintenance (NAV 5).
Show Costs on Orders
- If "N" the Landed Unit Cost field does not display.
- If "Y" then display and check the users access for adjusting cost.
Allow To Adjust Inv Cost
- if "N" the data cannot be edited.
- if "Y" the data can be edited.
Serial# The Serial Number from the order line. Location# The Bin location where you want to house the returned inventory. Shade The shade of the item being returned; if one exists. Status The status of the item being returned.
These status codes are created via the Order & Serial# Status Codes application (menu option SET 7 on the green screen).
Qty Returned Enter the quantity being returned to stock. UM The unit of measure is pulled in from the order line. You use the drop down menu to select another applicable UM for the item. -
Click one of the three buttons at the bottom of the window.
- Submit - Commits the transactions for the data entered and creates an adjustment record for the inventory.
- Skip - Skips the data entry for the current line and proceeds to the next selected line. If the current line was the only line selected then this button is not displayed. If the current line is the last line selected this button is displayed but it is disabled.
- Cancel - Displays a confirmation dialog that asks "Are you sure you want to cancel the Receive to Stock process?". If Yes is selected, the process stops and you are returned to the Credit Order window. If No is selected, you are returned to the Receive Item to Stock screen.
Any adjustments made prior to pressing the Cancel button are still created. -
Work through the selected items. After clicking Submit, if the adjustment was successful the following confirmation appears.

-
After receiving all the items, the program lets you know you have finished with the following confirmation window.

- Return to Receive Stock - Returns you to the Receipt to Stock window.
- Return to Order - Returns you to the customer order where the process was initiated.
-
To verify the inventory was properly returned, click Return to Order and then click one of the returned items. Select Inventory on the menu that appears.
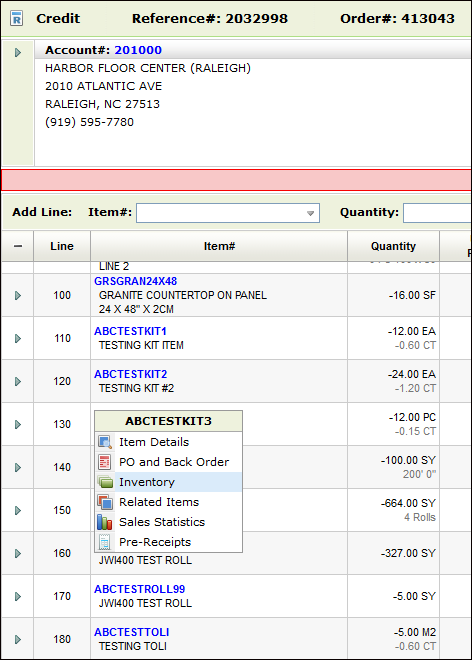

This displays the Inventory Inquiry window for the item with the returned item's inventory disÂplayed by serial number.
When entering a credit memo, before the detail line screens are displayed, the system checks all active files for potential credit (order type "C") duplicates. A potential duplicate credit is defined as any other credit memo cross referenced to the same original invoice or order number as the credit memo you are beginning to enter.
- When an order or invoice that was previously credited is entered, the following message displays.
-
Click Continue to proceed to the Credit by Invoice and/or Order Number window; where you can enter the credit.
-
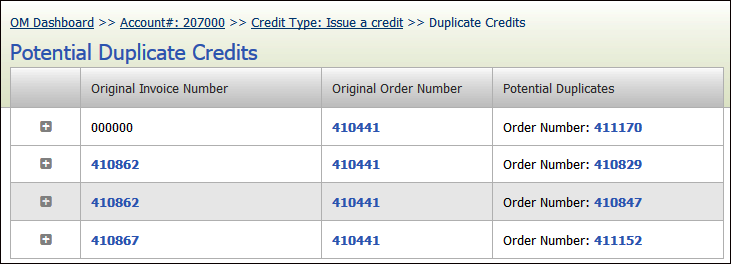
Click View Credits to view the potential duplicate credits.
-
From the Potential Duplicate Credits window you can do the following:
-
Expand the entry for a quick view at the credit details.

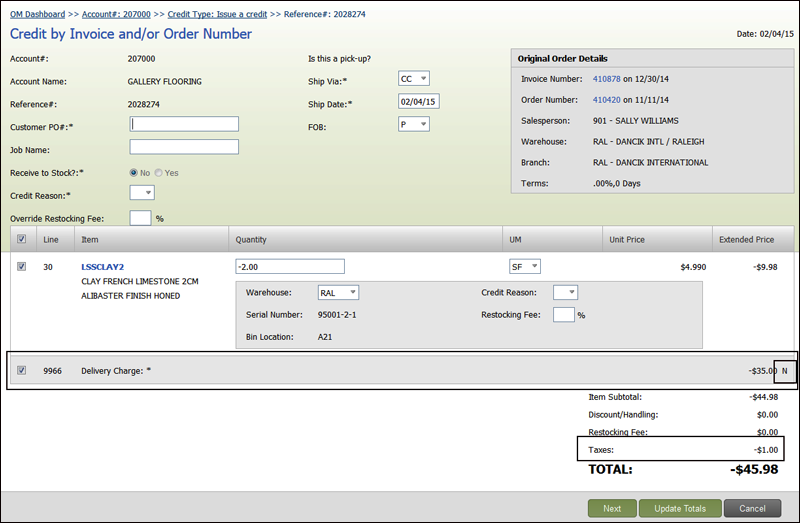
The "N" at the end of the Delivery Charge line (line 9966) denotes that the charge is non taxable and will not be calculated into the tax credited back to the customer.
- Access the Original Invoice Number by clicking its link.
-
Access the original order
-
Access the Potential Duplicate Credit Order by clicking its link under the Potential DupliÂcates column.
-
-
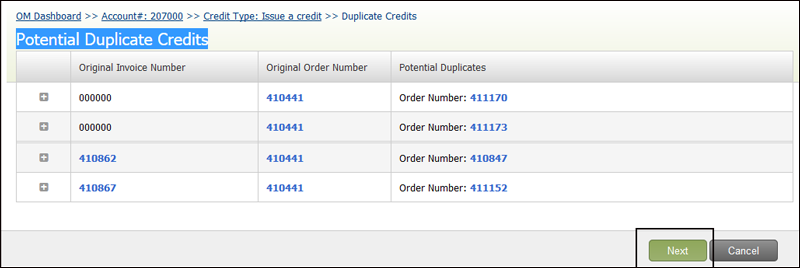
Back on the Potential Duplicate Credits window, click Next to proceed with the credit order.
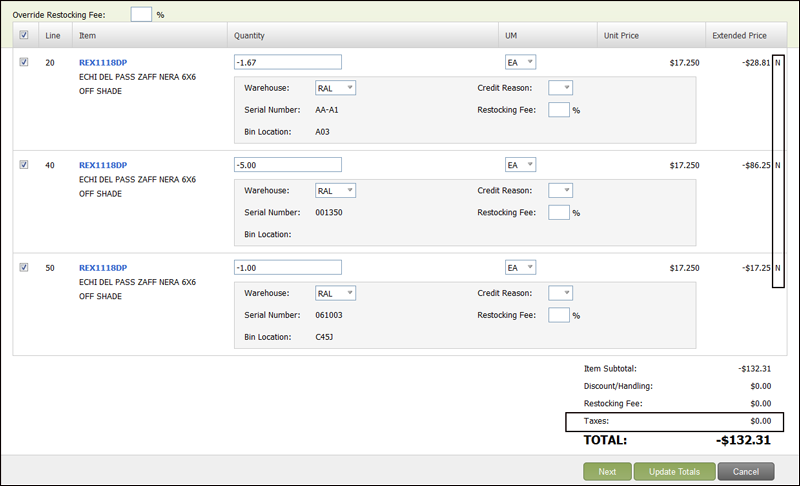
Items and/or message lines charges that were entered as non taxable in the original order are flagged with an "N" and are not included when calculating the tax amount on a credit.
In the credit order shown below, the Delivery Charge is being credited back to the customer but since it was entered as a Non Taxed charge on the original order it is not considered in tax calculation.
Order items can also be flagged as non taxed. In the example shown below, all the items were entered as non taxable. Therefore when the order was credited the tax calculation was not affected.
On the Order Search screen, filter the orders by entering a "C" as the Order Type.
