Entering Orders
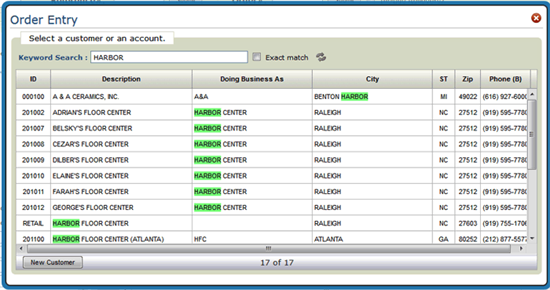
- After selecting New Customer Order from the New Order drop down menu in the upper left-hand corner, enter or search for a customer or account number.
- Account Number (from the Billto File) - If an exact account match is found an order is automatically started.
- Description (from the Billto File)
- Last/First name (for Retail accounts)
- DBA (from the Billto File)
- City (from the Billto or Retail File)
- State (from the Billto or Retail File)
- Phone numbers (numbers only; do not insert hyphens, spaces, or parenthesis)
-
Highlight and click on the desired customer. If the customer is not listed, the user has the ability to add a new retail customer. Clicking New Customer takes you to the File Management application of Navigator where you can add the new customer or update an existing one. If the new customer will be on payment terms, the customer should first be added under Billto File Management.
After selecting a customer, the Order Header window appears.
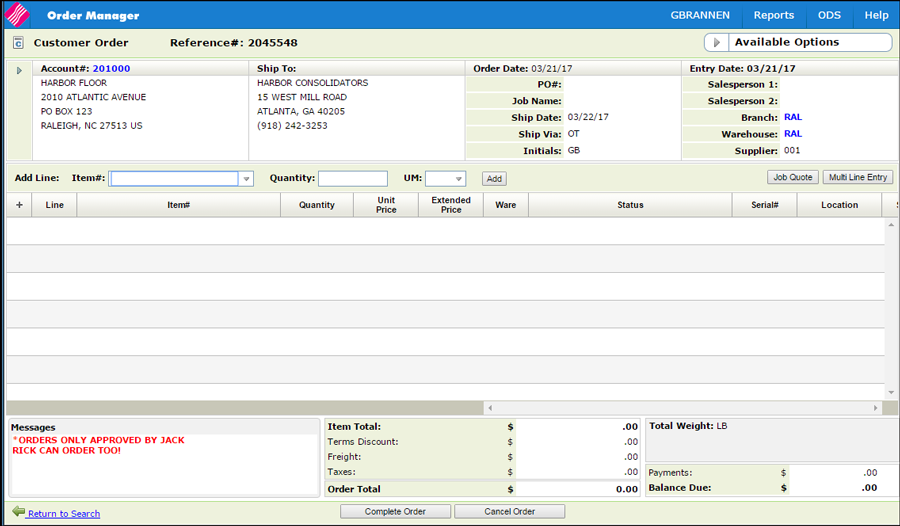 For a description of all the fields on the order header, refer to Order Header Field Descriptions.
An order reference number is assigned when an order is started. If a customer cancels during order entry, the reference number is deleted and is not used again.
- Click the drop down arrow to the left of the Account#, you can confirm/edit the order header, shipto information and add miscellaneous lines and changes applicable to the account.
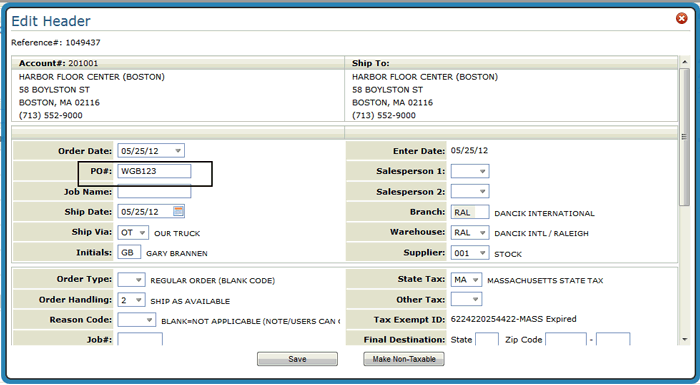
- The next step is to add a PO number. Click anywhere in the order header or click the drop down arrow to the left of the Account# and select Edit Header.
- Enter a PO# in the field provided.
-
Direct shipments can be identified in the Order Header by entering warehouse DIR as the warehouse.
-
The Make Non-Taxable button acts as a toggle switch between taxable and non-taxable. Tax information for taxable orders is inserted from the Billto or County Files. If an order is already taxable (contains tax codes on the Order Header Screen), then the button removes the tax codes and makes the order non-taxable. If the customer is tax exempt, the current tax ID will be displayed on the order header.
The screen also shows whether or not the tax exempt ID has expired. If it has, a new tax exempt ID should be entered using menu option SYS 605/606.
- Click Save to return to the order.
-
Enter an Item#, Quantity and UM, then click Add. If you are not limited to a default manufacturer, via the User Web Control Panel File Maintenance (SET 32 option "Y"), the three character manufacturer code has to be entered as part of the item number.
- If you do not know the item number, click the drop down arrow to the right of the field. This accesses an item keyword search.
- You can select to include discontinued items. Items are considered discontinued if they have a date entered in the Date Discontinued field in the Item File and/or have a DI as an item policy code. The key word search is controlled by the Options to Enable Item Keyword Search.
- The View Customer Items option allows a customer service rep to search through a customer's item numbers while also viewing your corresponding item numbers in Order Management. Customer item numbers have to be set-up in the Customer Preference File.
- Item attributes can be searched on. For more information on how to set this up, refer to Item Attributes and System Administration.
- The Pricing Account drop down, in the upper right corner, provides the ability to search and see pricing by account while viewing the item search results. A default account can be established via the Options for Navigator.
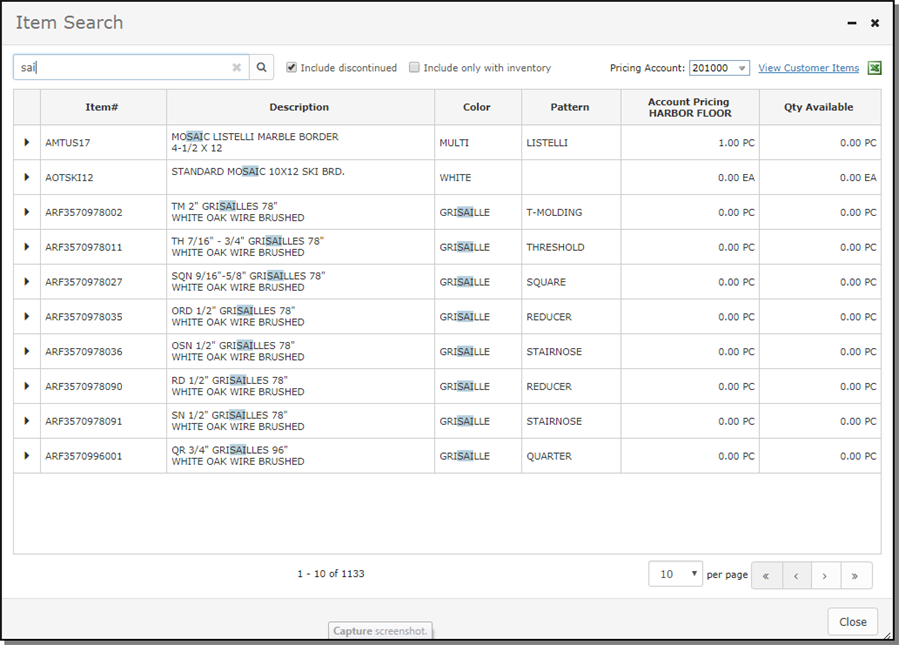
The setting Include Pricing In Search Results, in menu option NAV 5, has to be activated. Path: NAV 5> W=Webapps> F10 Navigator Defaults > Include pricing in search results _ Y/N. (Default N).
- Entering a negative number in the Quantity field signifies a credit. Credits require a Y or N in the Received field. To get to the Received field, click the expand arrow in the middle of the Add Line window. It is on the right-hand side of the window.
- If a "special" item is entered, the system recognizes it and automatically populates the fields and settings associated with special items. Items are designated as special items in the Item File via the Inventory (Y/N/S) setting.
- The Multi-Line Entry button enables you to enter multiple item numbers simultaneously. If you enter a bill-of-material or kit item, the Multi-Line Entry screen displays. This screen allows the user to view all of the components associated with a Bill-of-Material or kit item. The user then has the option of selecting those components (e.g. an item with a different shade or pattern) requested by the customer. ISO, which is mandatory for multi-line entry, runs and prompts the user to confirm the allocations or back ordered items. You can then accept or reject the ISO selections. If accepted, all line items are created at once. Multiple line item entry can be used when working from faxed or written order requests or any time a customer presents a list of items, rather than entering one item at a time.
- If you encounter the error message Item cannot be sold to this customer it means the item that you are trying to order has lock out pricing established in the Promotional Pricing File or on the Customer Price Exception screen within the Billto File. A user has the ability to override the price if their Navigator Control Panel setting (NAV 5 option Y) Allow A Price Override To Bypass Error Message On Locked Out Items is set to Y. If the user has the authority to override the price, they can bypass the error message by entering only the item number and clicking on the Add button. On the Add Line window that displays, the price of 99999.99 can be overridden.
- If you do not know the item number, click the drop down arrow to the right of the field. This accesses an item keyword search.
-
The system can automatically check for duplicate orders for an item during the order entry process. This check can alert you to possible situations where an item is already on an order, hold, or quote for a customer. This feature is active if the System-Wide Settings - Part 2 (Green Screen menu option SET 4) is activated.
From the Potential Duplicate Orders window you can perform the following by clicking on the arrow to the right of an order:
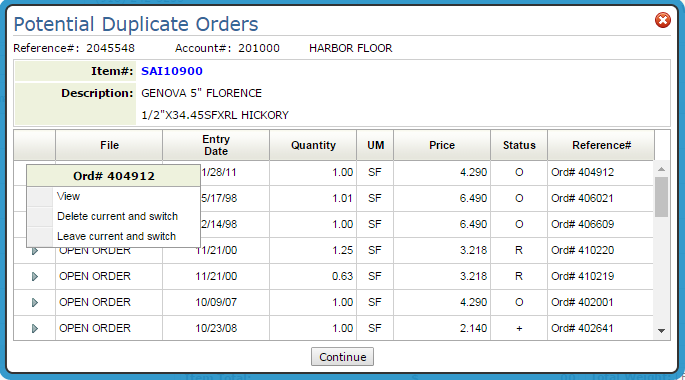
- View order
- Delete Current Order and Switch to Selected Order - The order you are currently working on will be deleted and the system switches you over to the selected order, hold, or quote.
- Leave Current Order and Switch to Selected Order - This option does not delete the order you are entering, but it does switch you over to the selected order, hold, or quote. The current order (the one you are leaving) is assigned a reference number and is saved as an unprocessed order. All the information you entered up to the point of leaving the order is saved.
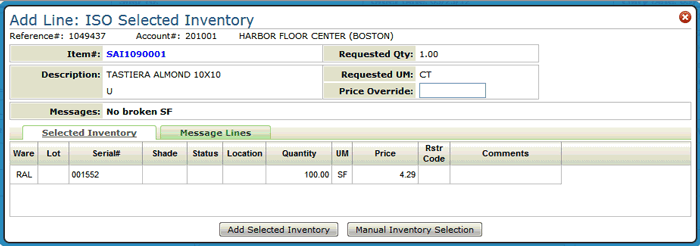
- If the Inventory Selection Optimizer (ISO) is activated (via the Auto-ISO Option on page two of the web access control panel (NAV 5, option "Y"), the system automatically selects inventory based on established ISO rules.
-
Click Add Selected Inventory.
If the icon
 appears in the Item# column heading, the account has been set up in the Customer Preference File to display order information using their own item numbers and descriptions. For more information click here.
 -
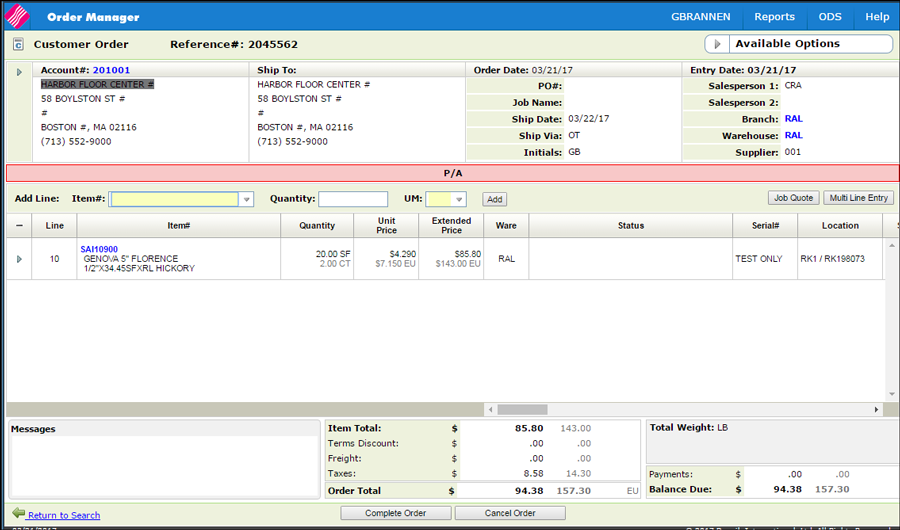
The arrow to the left of the item allows you to edit or cancel the line item. You can also add, update or inquire on any messages, add shipping charges for the line item, and access the price calculator.
Clicking on the hyphen - or addition + symbols allows the user to expand or collapse the display panel. The addition + symbol allows the user to view header and detail line messages associated with the order. The hyphen - symbol allows the user to view only detail lines associated with an order. -
Click on an item to access additional information such as any purchase and/or back orders that affect it, sales statistics for the item, and related items.
-
Notice that in the example screen shown earlier, the Unit Price and Extended Price are shown in two currencies; American dollars and European Euros. To display an order in a foreign currency, the following settings are required:
- Within the Customer Preference File (FIL 38), a currency code has to be entered in the Customer Currency Code For Invoices field.
- The Currency Code Exchange Rate (SET 11) - has to be set up for the enter the foreign currency code and the exchange rate.
-
The Messages displayed in the lower left-hand corner, are imported from the Billto File for the customer. Vital messages can be prefixed with a "*" in the Billto File. These messages are highlighted in red.
If cross referenced orders and/or invoice were entered on the Xref Ord#/Inv# fields of the order header, those order/invoice number appear in the Messages box.
-
When you are finished adding items to the order, click Complete Order at the bottom of the screen in the lower right-hand corner. Otherwise, clicking on Return to Order Search leaves the newly created order as unprocessed. The Cash Register screen only appears if the user's Navigator Control Panel (NAV 5) is set to display the cash register. Otherwise they will be presented with a list of available print options.
If the Navigator Print Options is activated, a PDF order acknowledgment is produced. This allows you to review the order to ensure the order is correct.The Cash Register screen supports secure cashier codes, gift cards, and other functions for recording and balancing cash.
-
Enter a valid cashier code and payment information. Cashier codes are created via the Cashier Code Maintenance - ACT 116 file.
If the setting Cash Register Screen is not activated in your User Web Control Panel (NAV 5, screen 2), the Cash Register screen does not display. Instead you will see the End-of-Options panel.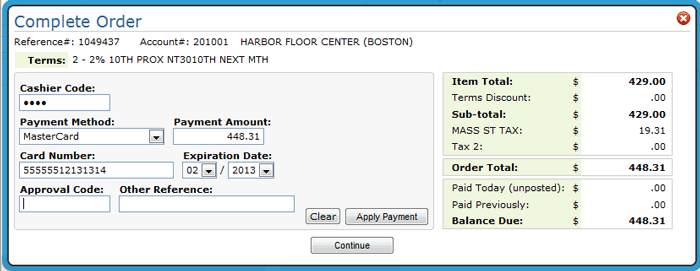 To mask the credit card number ensure the setting Verify credit card number for this payment method is activated. This setting can be found on the Payment Method Code Table Maintenance application.When credit card payments are processed on the Cash Register window, the option to print a receipt (
 ) also displays. For more information, refer to Printing receipt for CC payment
 -
Enter the necessary payment information and then click Apply Payment and then Continue.
Payment methods are user defined by your system administrator in the Payment Methods File. We recommend establishing codes such as CA = Cash, CH or CK = Check, and a code for each type of card. You can also set up special codes to represent Gift Card Purchases, Non Payment, etc.
-
After the payment is applied to the order, click Continue again to access the End-of-Order Options window.
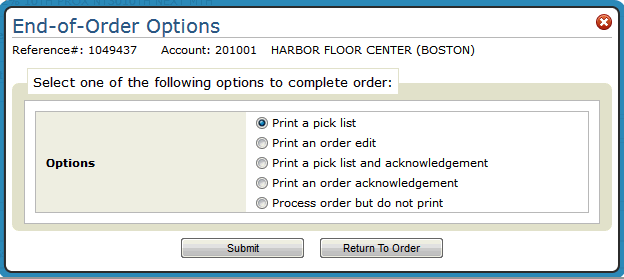
Some of the print options might not be available. For example, if the order is assigned an order handling code of 5 - Must Ship Complete and the order has back order lines on it, the Print a pick list and Print a pick list and acknowledgment options are not available. Order Handling codes are assigned on the Order Header.
For more information on the option to Send Purchase Orders and Direct Orders Directly to Supplier, click here. -
Select an option. The option Process order but do not print directs the system to process the order then send it to the open order file, but no pick list or acknowledgment is generated. Printing an order edit will leave the order as unprocessed.
Printers for pick lists are designated in the Warehouse File. Printers for the other documents (quotations, material selection forms and acknowledgments) are designated in the Web Control panel (NAV 5 option Y). For more information refer to Printing.
If a pick list is printed, the order notepad can be stamped with who printed the pick list. This functionality is activated via the option Update Notepad when Order is printed as a Pick list on the Notepad Format Options.
-
If your Control User File (menu option NAV 5 "U" option) is configured to send order acknowledgements via ODS, when either Print a pick list and acknowledgement or Print an order acknowledgment is selected you are presented with options for sending out the order acknowledgment.
Keywords can be automatically be inserted into an Order Acknowledgement via menu option ODS 5. For more information, refer to Keywords in the ODS Default for Order Acknowledgments.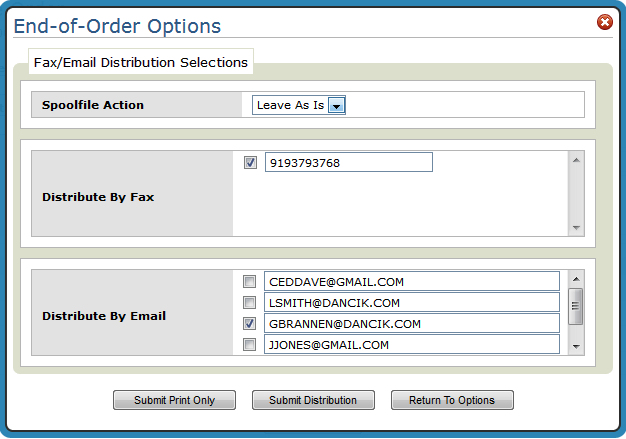
The fax number and email recipients are pulled from the Phone Number File (SYS 802).
-
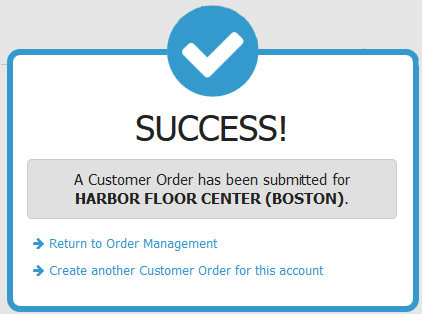
The final step in the order entry process allows you to start another order for the same account or you can return to the main Order Management window.
The Keyword Search searches through the following criteria for matches:
