Allocation Swapping
This functionality, added to Navigator in September 2019 via spec 5922, provides the ability to easily switch orders between a status of allocated (assigned to inventory) and unallocated (on back order).
Set-up
Control User File Maintenance (NAV 5)
Options for Allocation Swapping
Granting Access
Access has to be granted via the Order Management and/or Warehouse options on the Navigator menu.
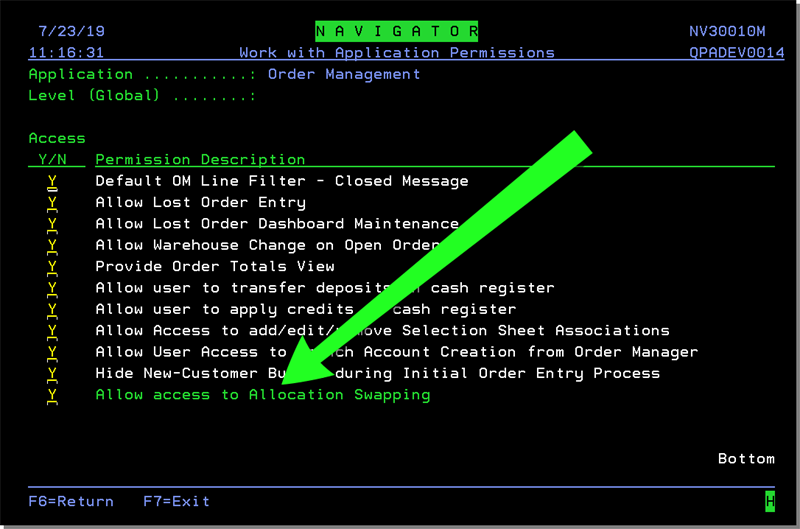
Paths:
NAV 1>A for Order Management and/or Warehouse
NAV 2>W for an Authority Class> A for Order Management and/or Warehouse
NAV 3>W for a User ID> A for Order Management and/or Warehouse
Control User File Maintenance (NAV 5)
The following settings on a user's Control User File Maintenance pertain to allocation swapping.
- Access Allocation Swapping by Item#, by Order/Line# or by Both
- Allocation Swapping Options to Disable for this User
To access these settings: NAV5, U, F11 to screen 2.
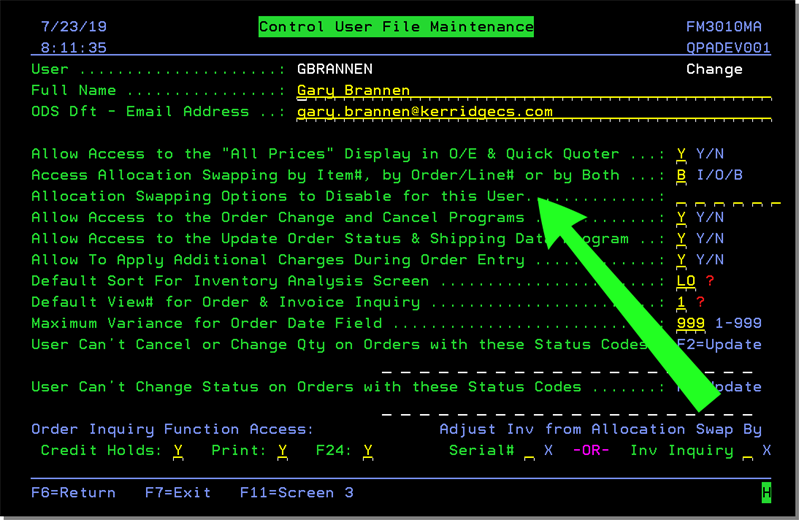
Access Allocation Swapping by Item#, by Order/Line# or by Both:
- I - Access by item number - The user can enter an item number and view all of the orders for that item number.
- O - Access by order and line number - The user can enter an order and line number and view only that line item. This is designed primarily for users who are only allowed to use the Reallocation option within Allocation Swapping.
- B - Access by either method - The user can enter an item number or enter an order or line number instead.
Allocation Swapping Options to Disable for this User:
- A - Allocate inventory to a back order.
- D - Deallocate inventory from an order, making it a back order.
- E - Exchange allocation status between two orders.
- S - Split a line into two lines whose total quantity equals the original line
- R - Reallocate inventory. Change the serial number or bin number allocated. This option allows you to disable all or certain Allocation Swapping options for a user. You can enter any of the above options to be disabled.
Options for Allocation Swapping
This System Wide Setting contains several options related to Allocation Swapping.
Accessing Allocation Swapping
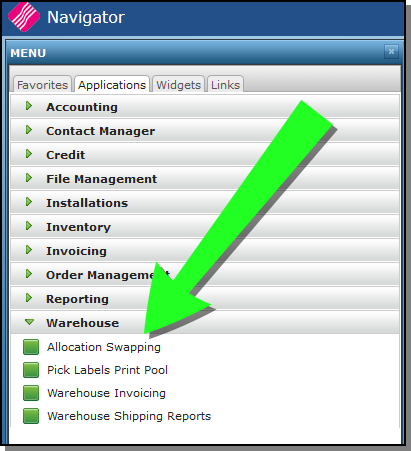
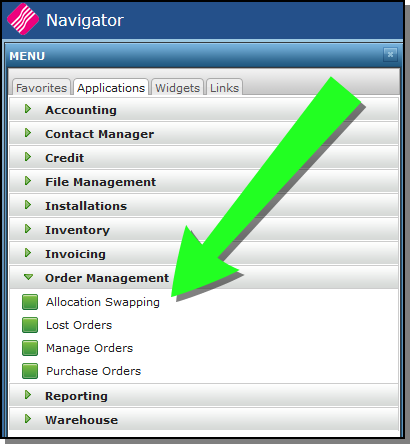
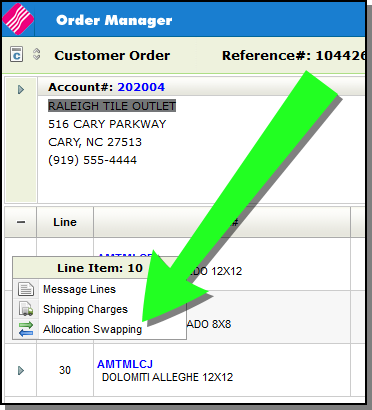
There are three ways to access Allocation Swapping
- From the Warehouse Application
- From the Order Management Application
- From a Processed Order Line
Allocation Swapping Dashboard
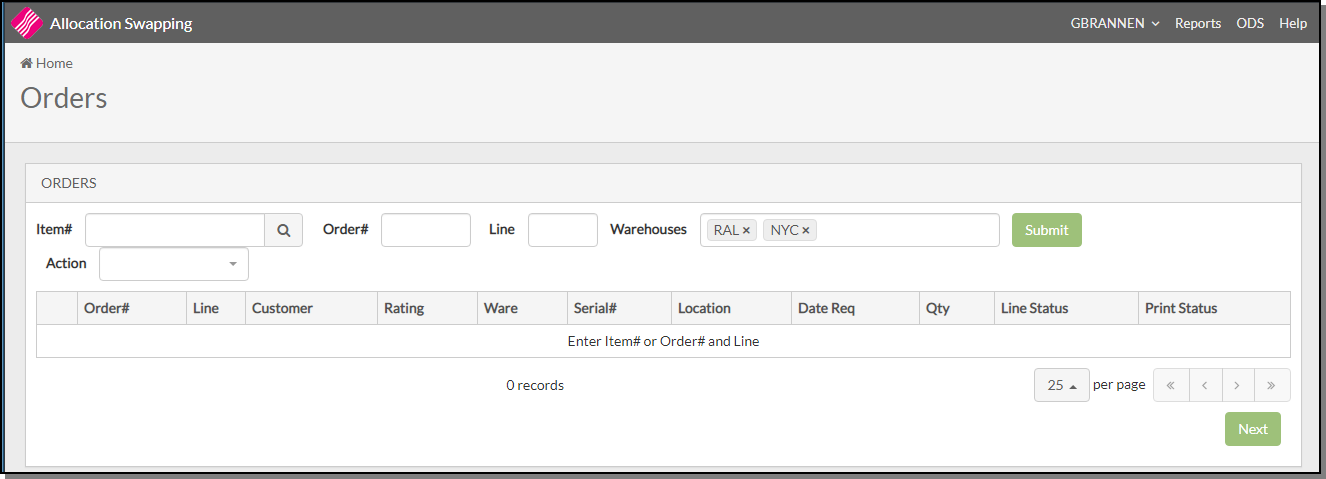
| Setting | Description |
| Item |
Enter an item number to view all the orders for that item number. If the allocation swapping option was selected from a processed order line then the item number is pre-populated with the item from the order line and the screen is filled with the orders. If the option was selection from the OM application or the Warehouse application then the screen is blank. If the user is only allowed to access allocation swapping by item, per the user settings, this field is required. |
| Order# and Line |
If a qualifying order and line number is entered the display is limited to that order. If the user is only allowed to perform allocation swapping by order/line per the user settings this field is required. |
| Warehouses |
The default warehouse, established via the Work Station Control Panel (SET 1), is automatically entered. If the default warehouse in SET 1 is set to *MX (the warehouse matrix), the system looks at the warehouse matrix and pulls up the data in accordance with the matrix file (SET 17). If the Work Station Control Panel (SET 1) being used has not been configured, the system does not know which warehouse data to show so it inserts ALL in the Warehouses field. |
| Action |
The following Actions are available:
|
Allocation
Select Allocate as the Action.
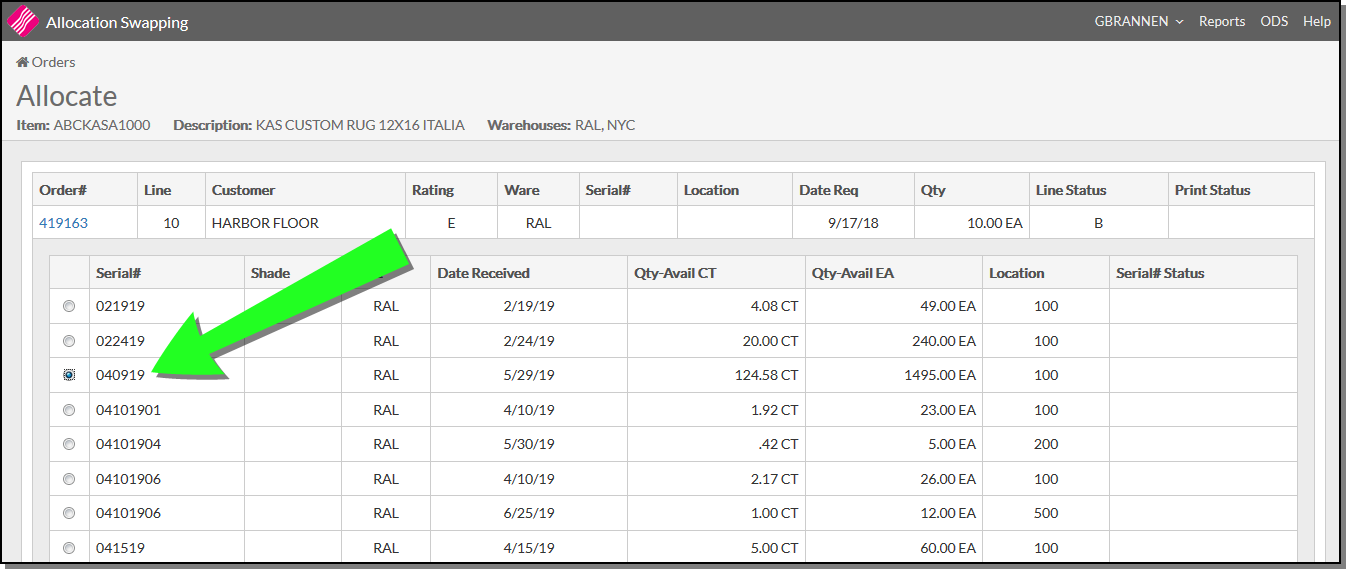
Select any single inventory record to allocate that inventory to the back order being updated. The backorder can only be filled by a single inventory record.
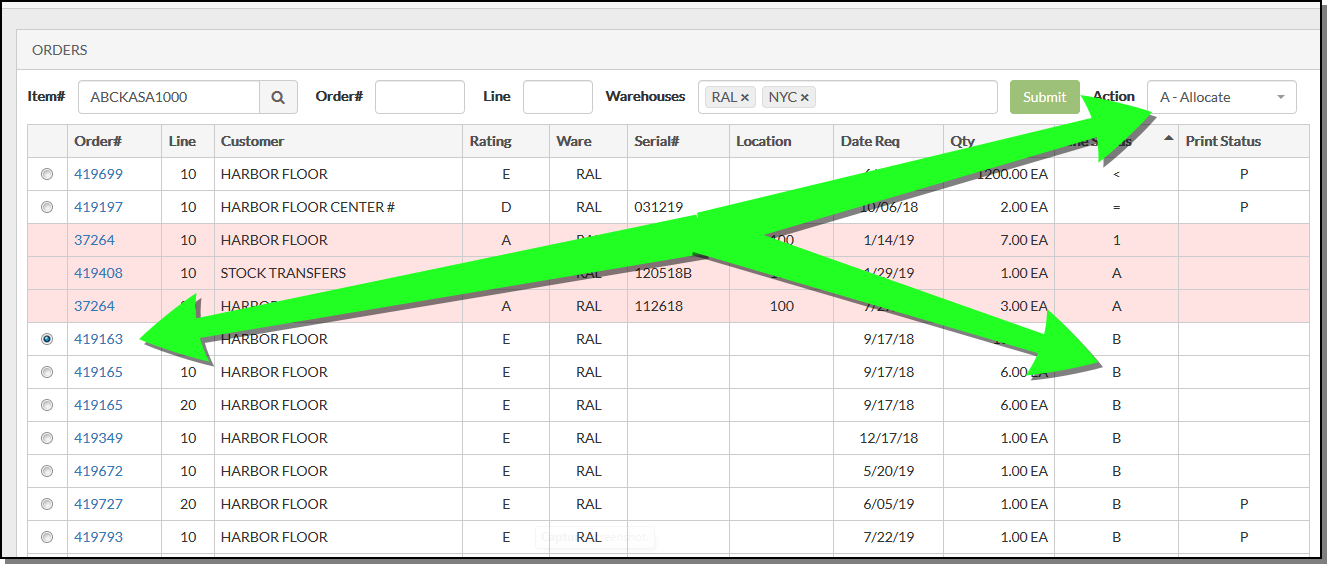
Click Next.
On the window that appears, select an order to grab inventory from.
The bottom of the window contains some additional information.

- Reason - A Reason is required. This comment will be written to the notepad of the order.
- Do you want to remove the remaining quantity of the allocated serial number? - Enter N (the default) to leave the remainder of the item inventory available. Enter a Y to remove all of the inventory of that inventory record from the system.
- Adjustment code to use - These codes are imported in from the System Cross Reference Table File Maintenance (SET 5) table - AdjustCodes.
- Eligible for Reallocation? - This option lets you determine reallocation status on an order by order basis. Reallocation combines a deallocate and an allocate in one step. A reallocation is done when you simply want to change the assigned serial number or bin location of an order/line. This option is displayed only if activated via the Options for Allocation Swapping.
Press Submit. The system alerts you that the Inventory was successfully allocated.

Click Ok to return to the Maim Allocation Swapping window.
If you search on the order, you can see that it's line status has been changed from B (backorder) to R (B/O received).

Deallocation
The Deallocation screen is displayed when a user chooses deallocation of an allocated order. Deallocating an order converts the order to a back order, and makes the inventory available.
Enter an item number and click Submit to display orders associated with the item.
Select Deallocate as the Action and pick an order.

Click Next to access the following window.
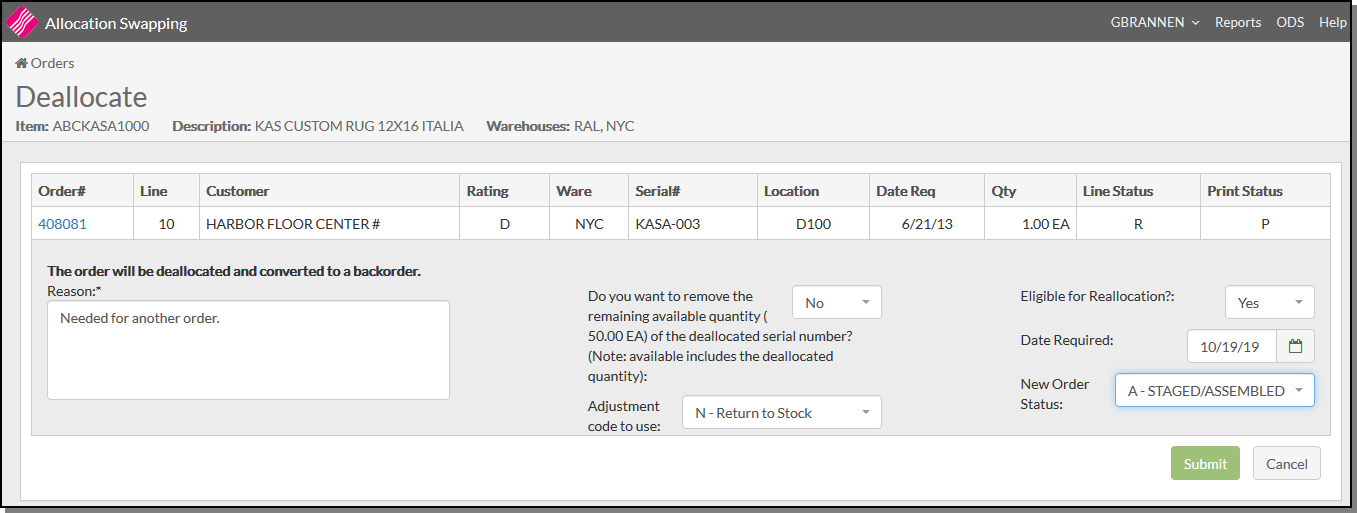
- Reason - A Reason is required. This comment will be written to the notepad of the order.
- Do you want to remove the remaining quantity of the allocated serial number? - Enter N (the default) to leave the remainder of the item inventory available. Enter a Y to remove all of the inventory of that inventory record from the system.
- Adjustment code to use - These codes are imported in from the System Cross Reference Table File Maintenance (SET 5) table - AdjustCodes.
- Eligible for Reallocation? - This option lets you determine reallocation status on an order by order basis. Reallocation combines a deallocate and an allocate in one step. A reallocation is done when you simply want to change the assigned serial number or bin location of an order/line. This option is displayed only if activated via the System Wide Setting (SET 4) - Options for Allocation Swapping.
- Date Required - The date entered will be the order header date required.
- New Order Status - Set the order line to this status code. These order line status codes are created via menu option SET 7 - Order & Serial# Status Codes on the green screen.
Click Submit.
- The order is converted to a back order.
- The inventory is made available for other orders.
- The order notepad is stamped with the date, time, and user that deallocated the order.
The following message appears to let you know the operation was performed.

Click Ok to return to the main Allocation Swapping Dashboard where you can see that the deallocated order has been placed in a backordered status.

Exchange
The Exchange action allows you to fill one or more back orders with the inventory deallocated from another order.
Enter an Item on the Allocation Swapping Dashboard and click Submit.
Select Exchange as the Action.
Select two orders for the exchange. One of the orders must be a backorder.
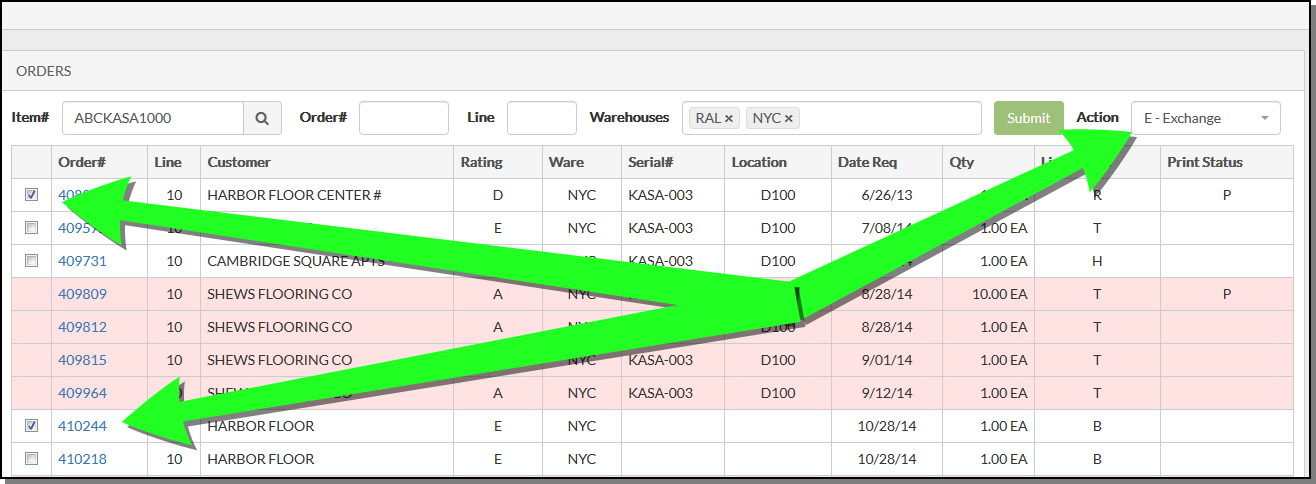
Click Next to perform the Exchange and display the following message.

Click Ok to return to the Allocation Swapping dashboard. Notice that the line statues of the two orders have been changed.
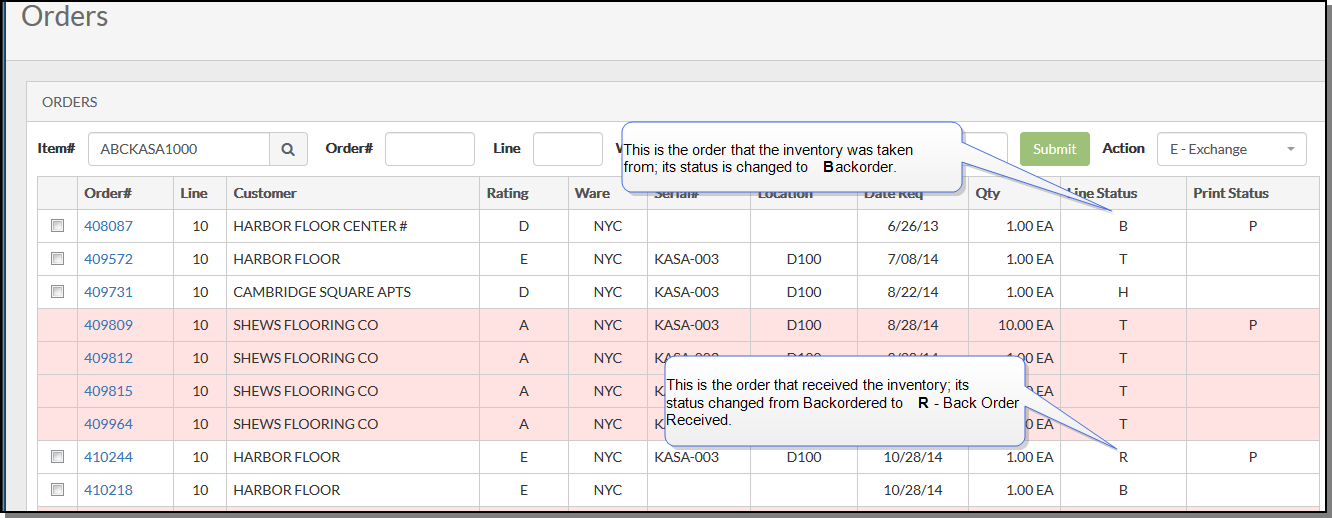
Split
The split line action allows you to split an order line into two order lines that represent the same total quantity.
The following are situations were an order line cannot be split:
- An item on the line has a no break (NB) item policy
- The order line has been invoiced
Enter an Item number and click Submit.
Select Split from the Action drop down menu.
Select an order to split.
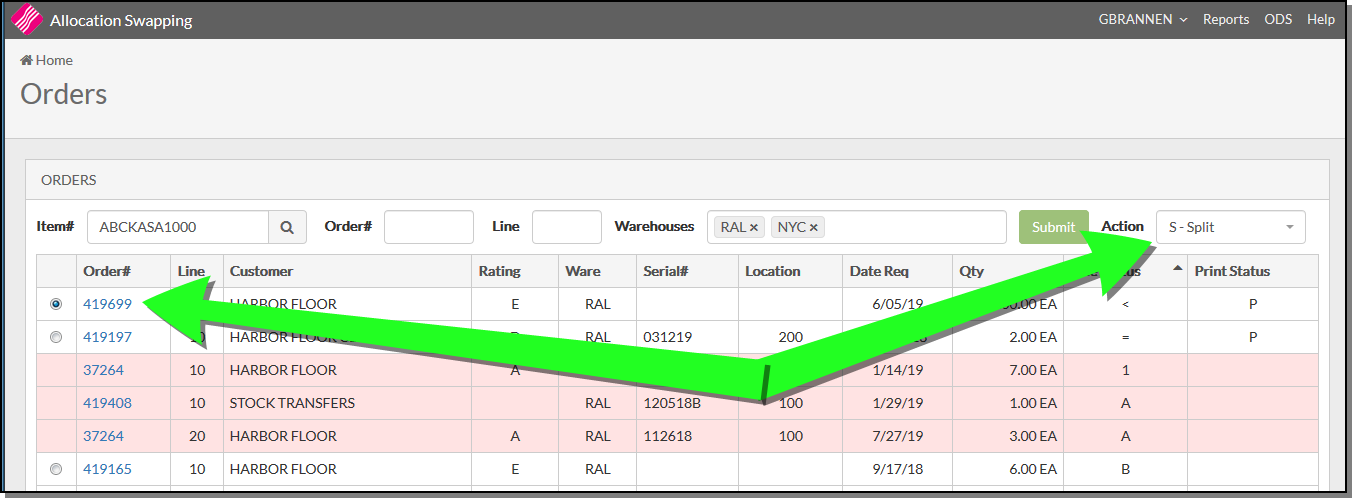
Click Next to enter details about the split.
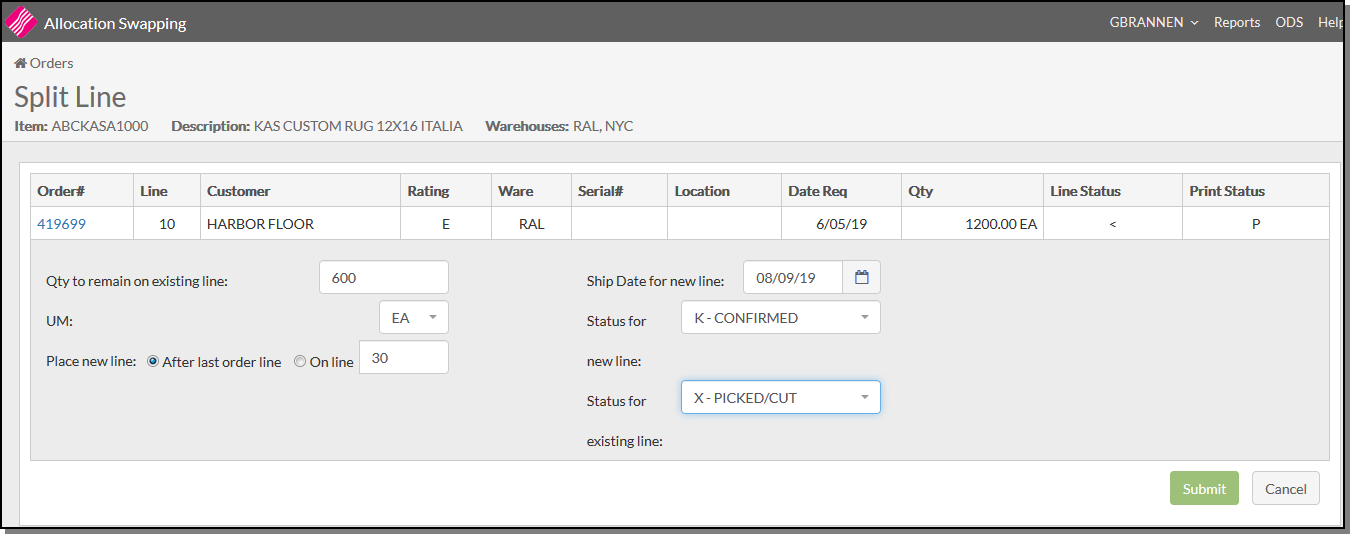
| Field | Description |
| Quantity to remain on existing line. | Enter the quantity remaining on this line number, after the line is split. The difference is put on the new line created when the line is split. |
| Unit of measure | Select the UM related to the quantity stated above. |
| Place new line |
Controls the line# of the new line.
|
| Ship Date for new line | Optionally enter a ship date for the new line. Leave this field blank for the ship date on the new line to remain the same as the existing line. |
| Status for new line | Optionally enter a status code for the new line. Leave this field blank for the status code on the new line to remain the same as the existing line. |
| Status for existing line. | Status codes allow you to identify the status of each line of each order as it moves throughout the system and your warehouses. |
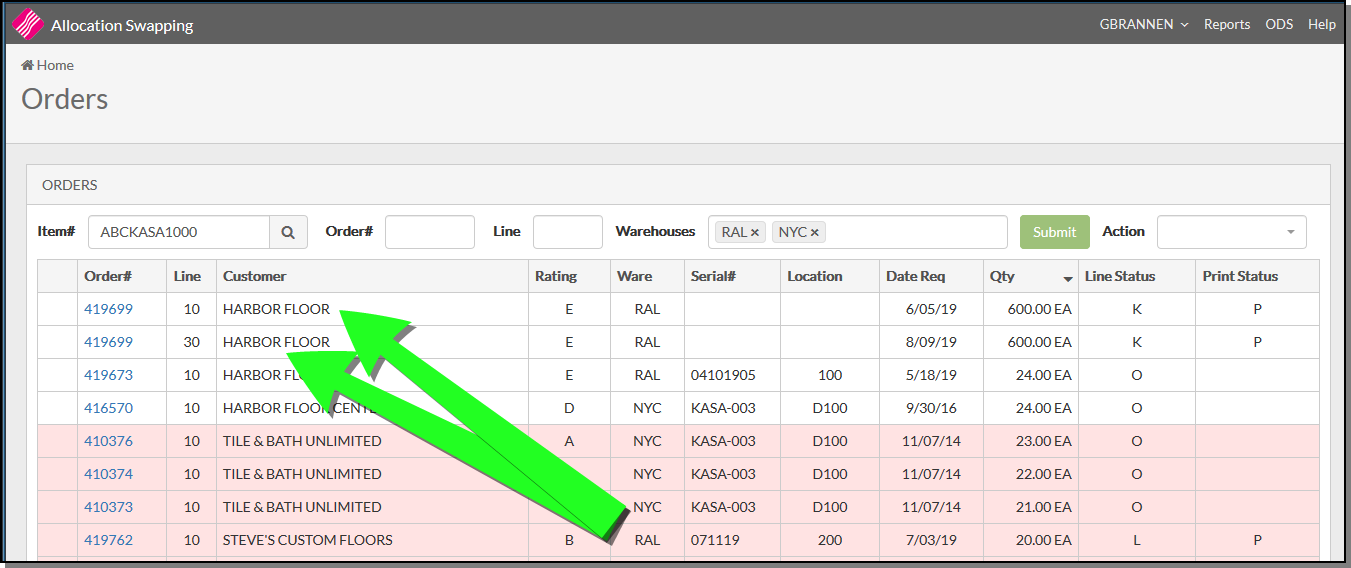
Going back to the Allocation Swapping Dashboard we can see the old line and the new line with their respective inventory amounts.
Reallocate
Advanced Logic for Reallocation of Rolls
Reallocation is meant to combine deallocation and allocation in one step. A reallocation is done when you simply want to change the assigned serial number or bin location of an order/line.
Enter an Item and click Submit.
Select the Reallocate action.
Select an order to reallocate inventory to and click Next.

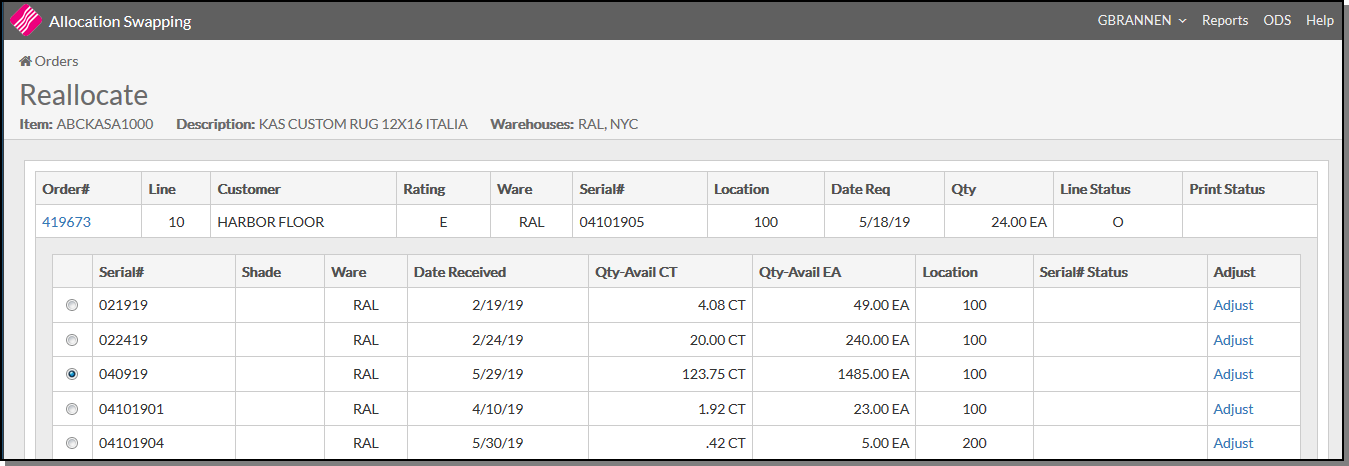
On the Reallocate window, choose the serial number that you want to reallocate to the order.
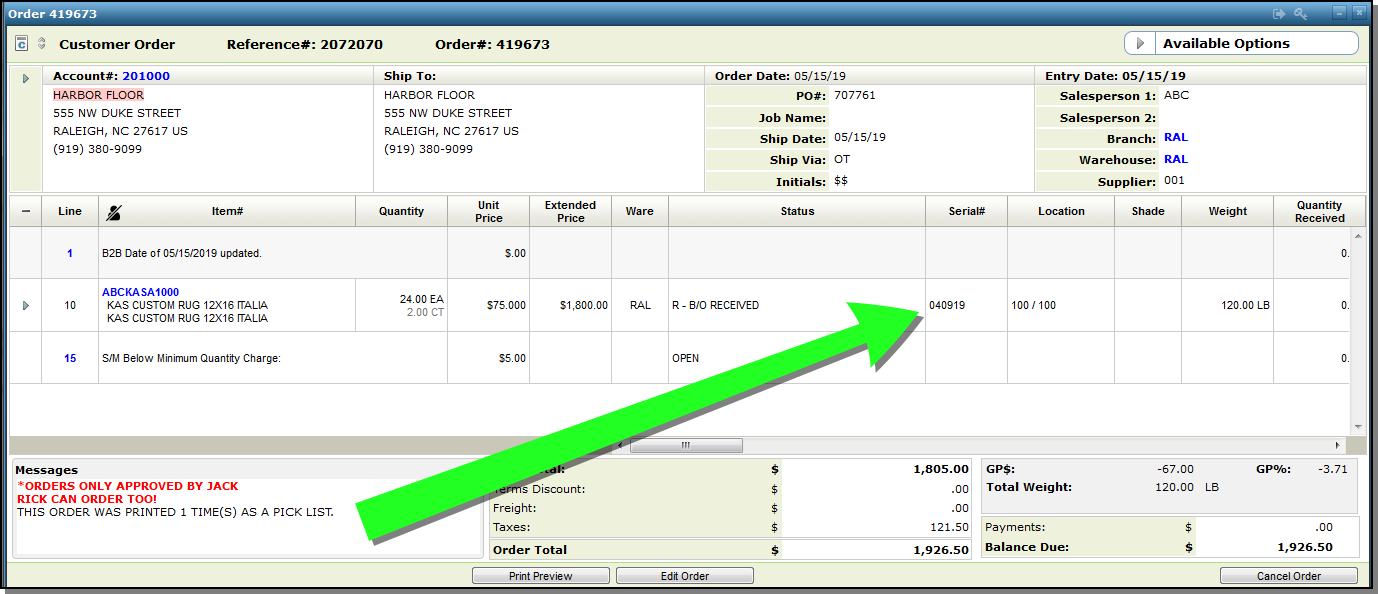
Looking at the details of the order, accessed by clicking the hyperlinked order number, we can see the selected serial number is added to the order.
Adjust
The Adjust link on the far right of the Reallocation window...
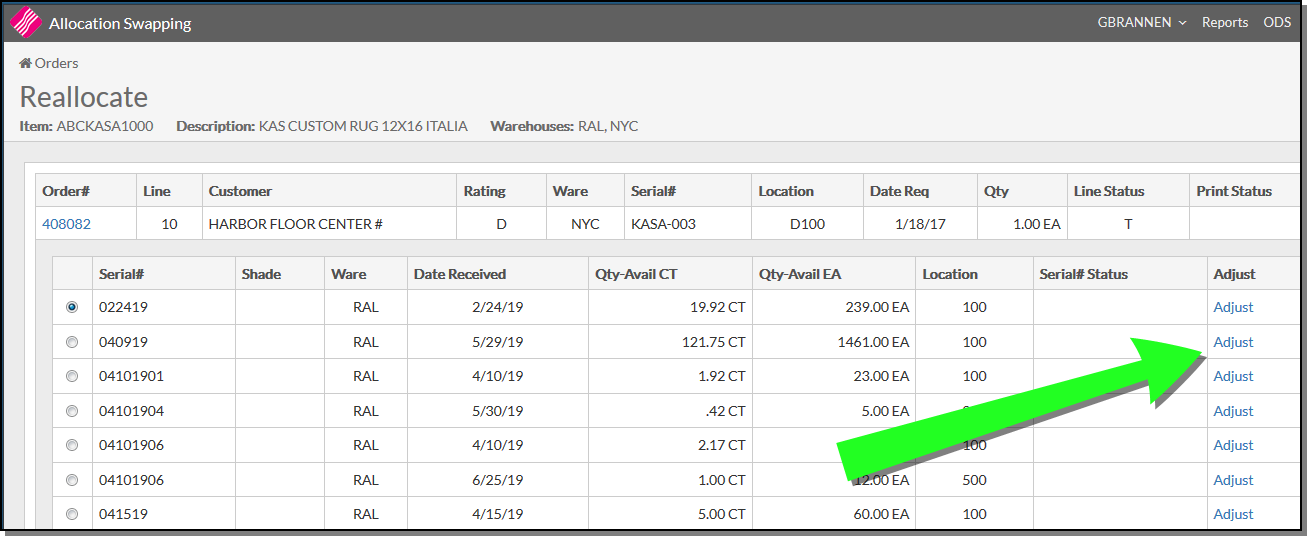
...opens an inventory adjustment dialog box.
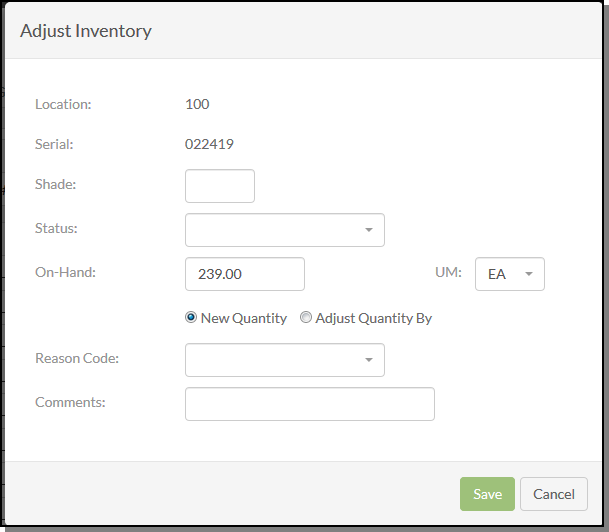
- Select New Quantity to replace the quantity with the value entered. Select Adjust Quantity By to add or subtract quantity on hand by the value entered. If the amount is to be subtracted from inventory, enter a minus sign before the quantity.
- If quantity does not need to be changed, but you want to let the system know that you performed a cycle count and the quantity in the system was correct, enter zero quantity, any valid U/M, and reason code C.
- If the quantity you need to enter is bigger than the field allows, you can split the balances into two or more serial number/bin locations.
- If the quantity is set or adjusted to zero, the item is removed from the Inventory Inquiry listing when you run an inventory inquiry for the item and serial number.
Advanced Logic for Reallocation of Rolls
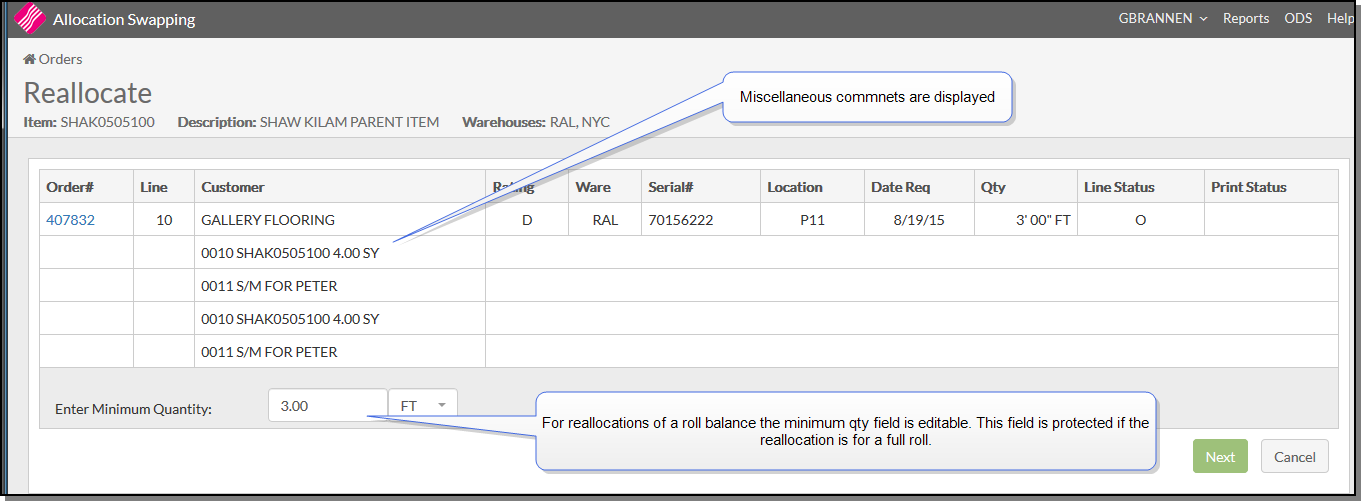
When reallocating a roll, the system evaluates the minimum and maximum fields to define what quantities should display. Also, the system evaluates the Open Rolls Allowed if UM=RL field in the Customer Preferences File to identify if open rolls that fall into the specified minimum or maximum quantities should display.
If a minimum is not found in the preferences file, the system defaults the minimum quantity amount as the quantity on the original order.
For reallocations of a roll balance the minimum qty field is editable. This field is protected if the reallocation is for a full roll.
Settings
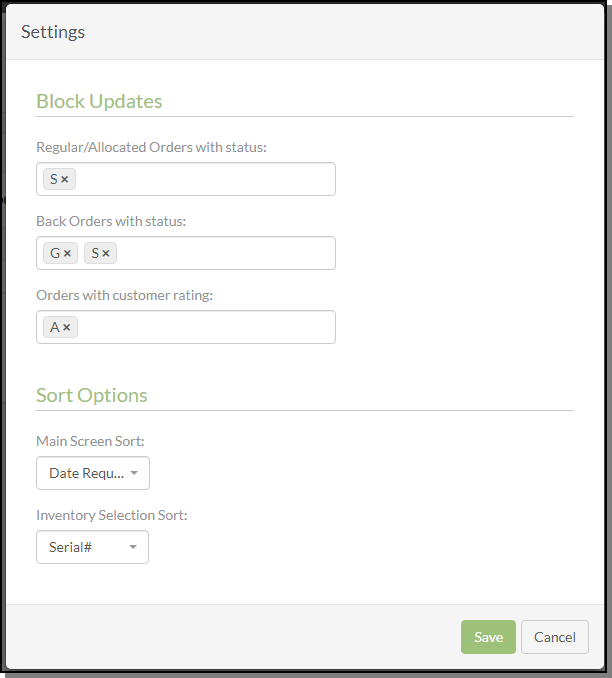
To establish allocation swapping defaults, click on the User Name and select Settings.
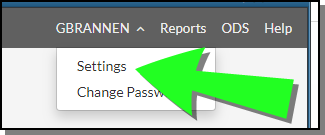
The Settings window establishes the default sort options and controls which orders can be updated based on status codes.
Block Updates
- Regular/Allocated Orders with status - Enter the status codes that you want to prevent from being deallocated. The recommended default entries are X,A,S,L,0,1,2,3,4,5,6,7,8 and 9 which represent orders already released for picking. It is very important that these defaults are set, in order to prevent the deallocation of orders that are already being picked or shipped.
- Back Orders with status - Enter the status codes of back orders that you want to prevent from being allocated, if any.
- Orders with customer rating - This setting allows you to restrict deallocating an order based on the customer's rating code. For example, if a T rating was entered in this field, customers with that rating cannot have their orders deallocated.
Sort Options
- Main Screen Sort - Enter the sort code to be used as the default on the main Allocation Swapping Screen.
Sort by order number.
Sort by customer name.
Sort by warehouse.
Sort by serial number.
Sort by location.
Sort by date required.
Sort by quantity ordered.
Sort by status code of order.
- Inventory Selection Sort - Enter the sort code to be used as the default on the Allocation Screen
Sort by serial number.
Sort by shade.
Sort by warehouse.
Sort by date of receipt.
Sort by quantity available.
Sort by location.
Sort by status code of inventory record.
