Update Shipping Data By Vessel Name - PUR 15
Use the Update Shipping Data by Vessel Name Program to make a mass update to dates and statuses of all purchase orders and related customer future orders on a vessel.
To assign vessel names, use the Additional Shipping Data Screen of the Update Order Status and Shipping Data Program. You can notate the vessel name on purchase orders and the customer future orders allocated against the material on that vessel.
If a vessel is changed or delayed, use the Update Shipping Data By Vessel Program to update files easily.
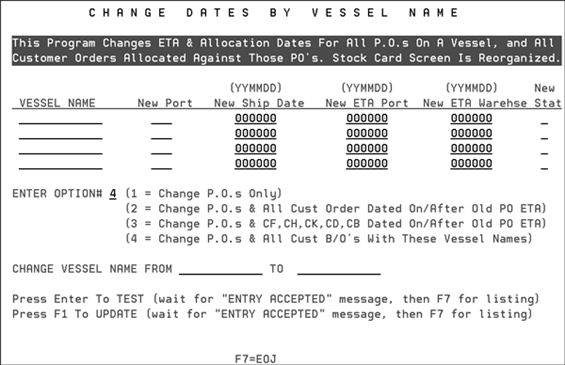
- Select option 15- Update Shipping Data By Vessel Name on the Purchasing Menu. The following screen appears.
- Enter the vessel name or control number and any of the following information that applies.
- New Port - If the vessel's unloading destination changes, enter the new port here.
- New Ship Date - If the vessel will not embark on the original ship date, you can input a new ship date here.
- New ETA Port - This is the date that the vessel is due to arrive in port.
- New ETS Warehouse - The date the material is due to arrive at the warehouse.
- New Stat - Enter a new status if required.
- Next, enter the option for what you want updated. Using this option you can update purchase orders only, or a variety of other purchasing related documents.
- If the vessel carrying your material changed, for example it had mechanical problems, you can change the vessel name for all the purchase orders on that vessel using the CHANGE VESSEL NAME FROM TO fields.
- Press Enter to let the system run a Test on the entered information.
- When the message ** ENTRY ACCEPTED ** TEST ONLY ** appears at the bottom of the screen, press F1. The message ** ENTRY ACCEPTED **FILES UPDATED** appears.

For a listing of status codes go to Option #7 - Order & Serial# Status Codes Table of the System Settings Menu. Then press F6 to display all the available codes.
These codes contained in option 3 identify that an order has been placed (note the C) and the current order status (the second letter) when viewing Inventory Inquiry. These codes are: CF- Future Order, CH - Order Hold, CK - Order Confirmed, CD - Order Delayed, CB - Order Backordered. A list of these statuses can be found by accessing Order Inquiry + F12 and then prompting on the status field.
Example
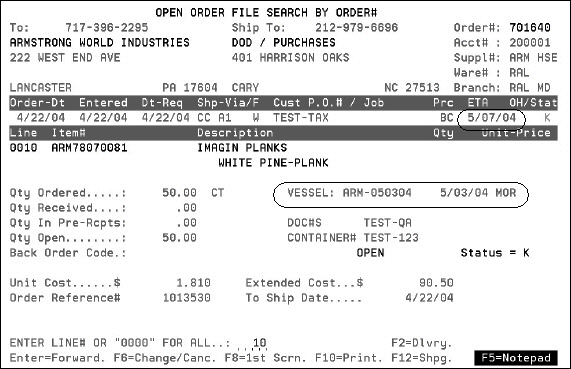
The following screen shows the result of an open order search. Note the vessel name, ETA and port information.

Open Order Searches are conducted using Option 10 on the Purchasing Menu. From this screen you can press F12 to access the Open Order File/Status Update screen. This screen lets you update individual purchase order shipping information (shipping date, ETA date, and status code). On the Open Order File/Status Update screen, you can press F2 to update a vessel name and other individual purchase order information.
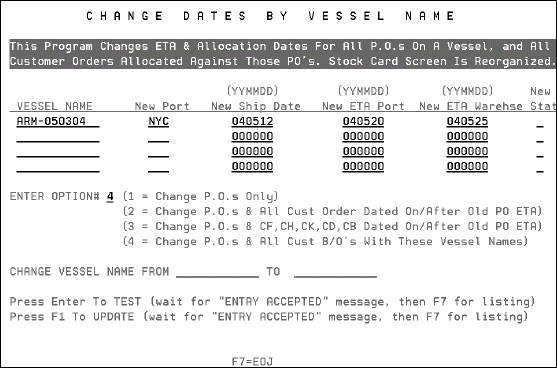
- To make a mass update of all your purchase orders contained on this vessel, go to option 15 - Update Shipping Data By Vessel Name on the Purchasing Menu.
- In the figure above, all purchase orders connected to vessel ARM-050304 have a new ship date of Feb. 02, 2005. The ship is scheduled to arrive at the new port of NYC on March 10, 2005 and will then be delivered to your warehouse on March 15, 2005.
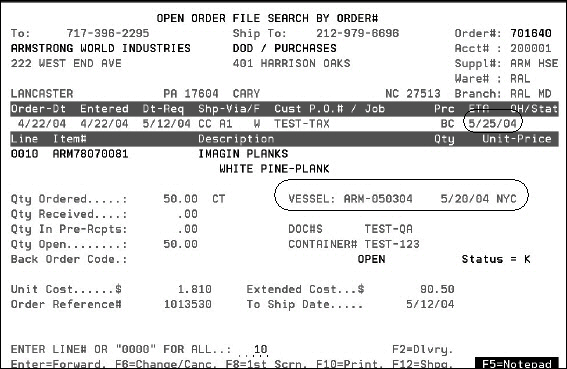
- Press Enter then F7 to make the changes. Go back into the Open Order Inquiry program to ensure the shipping information was changed.
For the purposes of this example, assume the vessel is delayed due to mechanical problems and because of the delay the port will change as well. You will want to add the extra time to your dates and make the change in ports as well. The following screen shows the date and port changes.

The System Wide Setting - Options for Special Orders contains two options that apply to the Update Shipping Data By Vessel Name program. If the setting Update Order Status of Linked Back Order when P.O. Status is Changed is set to Y, the Status on the corresponding Customer BO lines is also updated with the PO Line Status. If the setting Update Ship Date of Linked Back Order when P.O. ETA Date is Changed is set to Y,, update Ship Date on BO lines with PO ETA Date from lines on the PO.
The status of the order did not change so the New Stat field was left blank.

