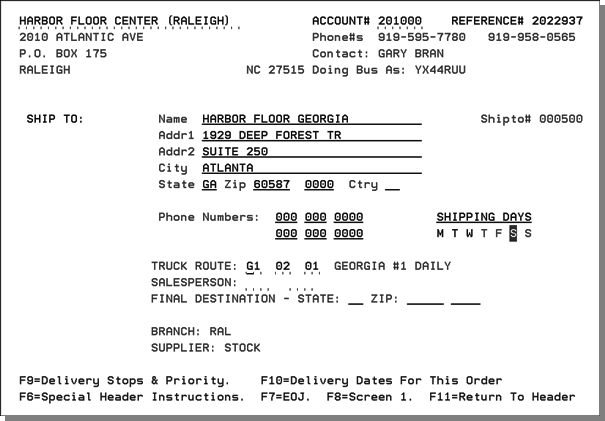
Shipto Screen

- Enter the name, street address, and zip code where the order will be shipped.
- Depending on if the parameter Auto-fill State & City from Tax By Zip Table if Zip Code Found is activated in the Options for Taxing Based Upon Shipto Address, when you enter a zip code the city and state are automatically inserted, if that zip code is found in the Tax By Zip Table.
- If the parameter Make Zip Code Mandatory is activated in the Options for Taxing Based Upon Shipto Address, then users are forced to enter a zip code when overriding shipto addresses.
- Use the fields Final Destination - State_ Zip_ to have the system calculate the tax based upon the "final destination" state and zip code rather than the zip code of the shipto address. This applies in situations where the shipto represents an intermediary point such as a fabricator, work room, or consolidation center. If the Tax by Zip Code Table is not activated, these entries are informational only.
- When these entries are made and Enter is pressed, the system pulls the established tax rates for the zip code from the Tax by Zip Codes table. The program uses the shipto zip code, unless the "final destination" zip code is also keyed.
- Check to ensure this is the correct address. If not, enter F11 to return to the Order Header Screen. Enter a Y in the Ship to Override field. This will bring up a blank Shipto screen.
- For one time retail customers, you can enter Retail Purchase or something similar on the Name line. It is not necessary to enter any more information.
- If this screen comes up blank, it is because a Y has been entered into the Shipto Override field on the Order Header screen.
- Default truck routes from the Billto File appear here if the ship via code that triggers the truck routes is entered on the Order Header Screen. Usually, ship via codes OT or DE are used for deliveries.
- Ensure the shipto address and the truck route information is correct or change as needed. Press Enter. The Order Detail Screen appears.
Whenever the Final Destination fields are used, they are stored with the order, and displayed on the order and invoice inquiry screens.
The zip code has to be established in the Tax by Zip Code Table.
Function Keys
The following table provides a guide to the function keys on this screen.
|
Function Key |
Description |
|
F6 |
Press F6 to display the Special Instructions Screen to enter special instructions or comments which should print prior to detail line items. Instructions that pertain to an entire order, such as project numbers and descriptions, contractor or architect names, or sidemarking instructions, should be entered now. |
|
F7 |
Ends job and returns to the menu. If an order was entered, this function key displays the Print Selection Screen. |
|
F8 |
Returns to the initial Order Entry screen. |
|
F9 |
F9 displays all stops on this route in the sequence that they are normally delivered. It also enables input and display of comments and priority stops assigned for that day's deliveries. Priority stops are deliveries made earlier than usual and/or out of normal sequence. The stops display lets you scroll up and down through the screens displaying the stops. Once you enter either priority stops or comments about a route for a given date, warehouse personnel can view or print this information using options 7 and 8 on the Delivery Systems Menu. |
|
F10 |
Displays delivery dates for the entire order, including the date required and the earliest date each line item can be shipped and then received at the customer's location. It also shows the approximate time of day the delivery is expected at customer's location if those delivery times have been entered in the Stops File. Items that will delay the delivery (that cannot make the date required) are displayed in pink. These items are usually items that need to be transferred from other warehouses. You may want to change the required date on the Header Screen to the date the order would be shipped complete, or you may move the late arrivals from this order to a separate order with a later date. For more information, refer to Shipto Screen. The Options for Delivery Arrival Dates allows the system to calculate arrival dates for routes that take more than one day to go from your warehouse to the customer, based on whether or not Saturday and/or Sundays are available for deliveries. This feature enables your Customer Service department to accurately predict arrival dates to your customers, based on the routing files and the ship dates of their orders. Scheduling information is setup via the Routing File (DEL 1). |
|
F11 |
Returns to the Header Screen |
Associated Files
- List/Delete Shipto Override Addresses - SYS 202
- Shipto File (FIL 15)
- Truck Route File (DEL 1)
-
Shipto Search (ORD 15)
