Order Entry
Getting Started
Customer orders can be entered through the Customer Service menu or through the Order Desk menu. Both menus are virtually the same, with the exception that the Order Desk menu is more restrictive.
- From the Customer Service Menu, select option 01- Enter Orders.
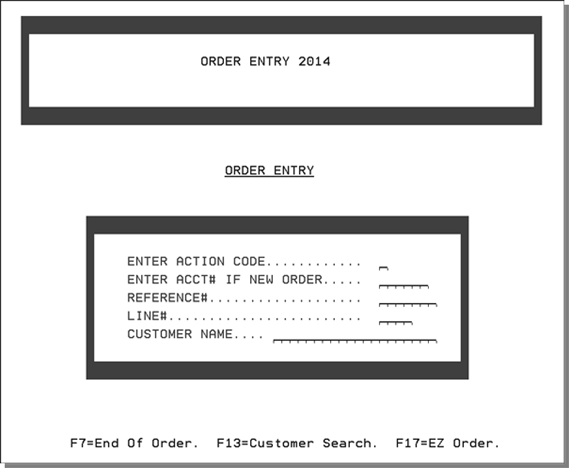
- Press Enter. The first screen of the Order Entry program appears.
- The following Action Codes are available.
- A - If you are entering a new order, type A to add lines and start the order. Type the customer's account number in the Enter Acct# field. Leave Reference # and Line # fields blank. This code displays an Order Header for the account designated. If you leave the Action Code field blank, the system assumes an A is entered.
- Q (quote) - Use to create a new order starting from the detail line item screen. If you start an order this way, the order can only be ended with F2 or F3, this prevents the processing of a quote into an order prematurely. When the quote is ready to be converted into an order, the Q can be removed and processed as an order.
- S - Use this code to perform a multi-line ISO stock check and then to optionally place an order. This code triggers the following sequence of events:
- Enter list of items to check. Check stock level by entering an I in the Opt field.
- ISO shows results for all items at once.
- User can accept or cancel.
- If user accepts, the user is asked to select a customer, and an order is created.
- U - Use this code to update an unprocessed order. When this code is entered, you must also enter the reference number of the order (and optionally the line number) you are updating.
- If you are correcting an order that has not been processed, leave the first two fields blank and enter the reference number and line number you wish to correct. Press Enter.
- If you are adding a line to an existing order that has not been processed, enter A in the first field, skip the account number field, and type the reference number. Next, enter the line number you want to add. Any unused line number is sufficient.
- For retail customers, you can enter the account number for designated for retail sales. There are several options for dealing with retail customers. The process is essentially the same as with traditional, but there are some variations that will be highlighted.
- The Customer Name field allows you to look through both the Billto File and the Retail Customer File simultaneously for entries. The search looks at each word within the customer's name and D.B.A. (Doing Business As) fields. For example, an entry of SMITH will find SMITH CONTRACTORS, CONTRACTORS OF SMITHVILLE, and JOE SMITH SUPPLIES.
- Press Enter. The Order Header Screen appears.

The F17-EZ Orderfunction allows an order to be entered in it entirety (including the main header information) on one screen.
If you do not know the account number, you can enter the customer's name or press F13 (Shift + F1) to search existing accounts. This will give you access to an initial and a detailed search screen. From the detailed screen you can choose to start a new order, add to an existing order or show all open orders for a customer.
If your system is set to display credit checks the next screen to appear will be the Credit Check Screen.
